2 Using the Event Browser to Display and Adjust Events
This chapter provides an overview of the Event Browser, which is a component of Oracle Communications Billing and Revenue Management (BRM) Customer Center. You use the Event Browser to display and adjust events, including making tax and accounts receivable adjustments.
For background information, see "About Accounts Receivable".
For information about calculating taxes, see "About Calculating Taxes" in BRM Calculating Taxes.
Working with the Event Browser
You use Event Browser to find events. When you find the event, you can perform the following tasks:
-
Review detailed information about customer accounts such as credits, debits, dialup sessions, and name changes.
See "Finding Events".
-
Summarize the impacts of events on the resource balances in an account. For example, you can see how login events during one month affected the balance of dollars and hours in a customer's account.
-
Cancel the effects of events on resource balances. For example, if a customer was charged the wrong amount, you can cancel the charge by adjusting the event that generated the charge.
See "Adjusting Events".
Note:
The Event Browser shows you all data in event objects. In addition, you can look at data stored in other objects associated with an event object, such as account objects, bill objects, and service objects.
Finding Events
To find events, you use an Event Browser search template to search for events with specific characteristics. You can make your search more specific by performing an advanced search that simultaneously uses more than one search template. For example, to find a check payment event for a specific account during a certain month, use the Check Payments template, the Account template, and the Between Dates template.
For more information, see Event Browser Help.
Tip:
To tailor your search for specific needs, you can create custom search templates. See "Creating Custom Search Templates for Event Browser" in BRM Developer's Guide.Reviewing Events
The data that you see in Event Browser depends on your access privileges and permission level. For example, without appropriate access privileges, you cannot access accounts in a certain brand or account group, and without the appropriate permission, you cannot see credit card numbers. For more information about access privileges and permissions, see Event Browser Help.
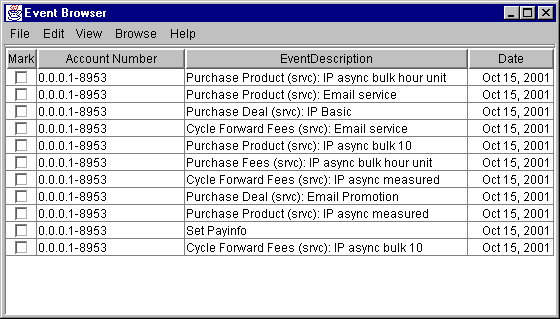
After you search for events, the Results table displays the information you requested.
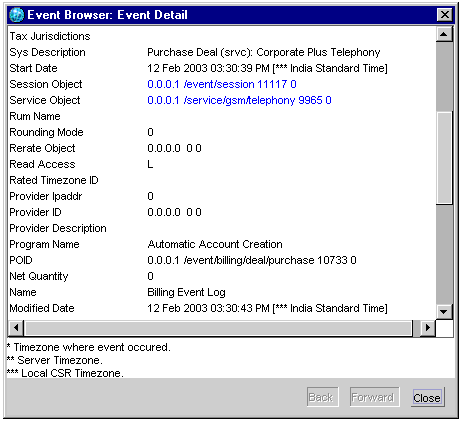
To see more information, you can display detailed data about an event or an object associated with an event. Detailed information appears in the Event Detail window.
Tip:
Use the Back and Forward buttons in the Event Detail window to browse between details of events and objects you want to review.About the Results Table
After you search for an event, your search results appear in the Results table as shown in Figure 2-1. The Results table shows all the events that match your search criteria. Each matching event is displayed in a row in the table. The columns show the information stored in the events. Depending on the template you used, different columns might appear.
Note:
Service passwords stored as plain text are displayed as asterisks (****) in the Event Browser.You can customize the results table to suit your needs. See "Creating Custom Search Templates for Event Browser" in BRM Developer's Guide.
Depending on how you define your search criteria, the Results table could display one event or many events. If no events match your search criteria, you will see a message and the Event Browser displays a blank table.
Events are sorted in the Results table by the column your company specified when defining the search template properties. You can sort the Event Description and Date columns; click the column head to sort in descending order, press SHIFT and click the column head to sort in ascending order.
For more information, see Event Browser Help.
Time Zone Indication in Event Browser
Customer Center can display the event time based on one of the following:
-
The time zone where the event occurred.
-
The time zone where the server was located.
-
The time zone where the CSR is located.
Table 2-1 lists how the Event Browser Event Detail panel indicates the time zone with one, two, or three asterisks (*):
Table 2-1 Time Zone Representation in Event Browser
| Number of Asterisks (*) | Represents the Time Zone... |
|---|---|
|
One (*) |
Where the event occurred. |
|
Two (**) |
Where the server is located. |
|
Three (***) |
Where the CSR is located. This is the default. |
For the time displayed in the Start Date, End Date, and Effective Date fields, Event Browser does the following:
-
Looks for the event time zone in the event TIMEZONE__ID field.
-
If there is no entry in the TIMEZONE__ID field, Event Browser gets the server time zone from the Infranet.properties file infranet.server.timezone entry.
-
If this entry is not configured, Event Browser uses the CSR time zone.
For all other fields that show the event time, Event Browser does the following:
-
Looks for the server time zone in the Infranet.properties file infranet.server.timezone entry.
-
If this entry is not configured, Event Browser uses the CSR time zone.
Figure 2-2 shows the Event Detail panel with the captions:
Setting the Time Zone Displayed in Event Browser
To set the time zone to be displayed in the Event Detail panel:
-
Open the Infranet.properties file in the BRM_Home/EventBrowser directory:
-
Edit the infranet.server.timezone entry:
infranet.server.timezone=timezonewhere timezone represents the three-letter time zone code such as PST.
-
Save and close the file.
Adjusting Events
You adjust events to cancel the effect of the events on resource balances and general ledger entries. An event adjustment does not cancel the event itself. For example, if you adjust an event generated when a password is changed, the event adjustment does not cancel the password change, only the cost of the change.
Note:
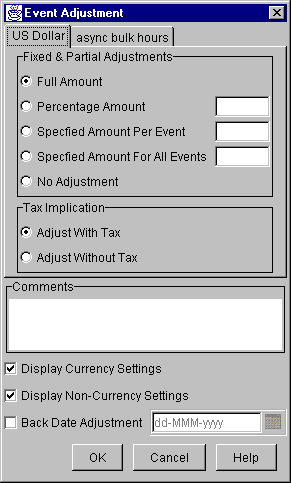
You can adjust events for more than one account at a time.Figure 2-3 shows the options you can choose when adjusting events:
If you do a partial event adjustment, you must also specify whether to adjust a percentage of each marked event, a specific amount for each event, or a single amount for the group of events being adjusted at the same time.
If you choose to adjust accounts receivable or events, you must also set the options in the Event Adjustment dialog box.
Note:
You won't be able to adjust an event unless you have the read/write or write-only permission level for the /accounttool/araccess permission. For more information about permissions, see Event Browser Help.Caution:
-
Adjusting an event affects the balance in the customer's account. You should adjust an event only in strict compliance with your company's guidelines.
-
Be sure to confirm the settings on every resource tab in the Event Adjustment dialog box before clicking OK. If you do not want the adjustment to affect a particular resource, be sure the No Adjustment button is selected on the tab for that resource.
By default, you can adjust the following events:
-
/event/billing/debit
-
/event/billing/product/fee/cycle/cycle_arrear
-
/event/session/dialup
-
/event/billing/product/fee/purchase
-
/event/billing/product/fee/cancel
-
/event/billing/product/fee/cycle/cycle_forward_monthly
-
/event/billing/product/fee/cycle/cycle_forward_bimonthly
-
/event/billing/product/fee/cycle/cycle_forward_quarterly
-
/event/billing/product/fee/cycle/cycle_forward_semiannual
-
/event/billing/product/fee/cycle/cycle_forward_annual
If you create custom events that you must adjust or if you must adjust additional events, you must add additional event types to this configuration object. See "Adding Fields to /config Objects" in BRM Developer's Guide.
Printing Events
You can print information in the event object, but you cannot print information stored in linked objects, such as the associated account or bill objects.
For information, see Event Browser Help.
Exporting an Event Description
You can save event descriptions by exporting them to a text file. You can export information in the event object, but you cannot export information stored in linked objects, for example, the associated account or bill objects.
For information, see Event Browser Help.
Customizing the Event Browser
You can customize the Event Browser by adding custom search templates and defining custom results tables. For more information, see "Creating Custom Search Templates for Event Browser" in BRM Developer's Guide.


