| Oracle® Fusion Middleware Application Adapter for PeopleSoft User's Guide for Oracle WebLogic Server 11g Release 1 (11.1.1) E17055-01 |
|
 Previous |
 Next |
| Oracle® Fusion Middleware Application Adapter for PeopleSoft User's Guide for Oracle WebLogic Server 11g Release 1 (11.1.1) E17055-01 |
|
 Previous |
 Next |
This appendix describes how to configure and test PeopleSoft Integration Broker (release 8.4) and PeopleSoft Application Messaging (release 8.1) using a PeopleSoft-supplied File Output interface. In PeopleSoft release 8.1, the messaging architecture is called Application Messaging and includes Application Messaging Gateway. In release 8.4, the messaging architecture is called Integration Broker, which includes Integration Gateway. When discussing release-generic issues, this section uses release 8.4 terminology. When discussing release-specific issues, it uses release-specific terminology.
|
Note: This section is not a substitute for PeopleSoft documentation. For more complete and up-to-date information on PeopleSoft Messaging and Integration Broker, see the PeopleSoft Online Library for your PeopleSoft system. |
PeopleSoft Integration Broker provides a mechanism for communicating with the outside world using XML files. Communication can take place between different PeopleSoft applications or between PeopleSoft and third-party systems. To subscribe to data, third-party applications can accept and process XML messages posted by PeopleSoft using the available PeopleSoft connectors or by adding a custom built connector to the Integration Gateway. This topic primarily covers publishing outbound asynchronous messages from a PeopleSoft system to a third-party application using the delivered File Output connector. For information on outbound synchronous messages, see "Using Outbound Synchronous Messages".To send a message, you must properly configure various internal structures and processes. The following descriptions are generally release-generic. Detailed differences between releases 8.1 and 8.4 are discussed in other topics.
Message
A Message is a container for the data that goes into the XML. It contains basic structural information, such as records and fields. The Message must be in an Active status to send the XML file
Message Channel
The Message Channel is a mechanism for structuring records into logical groupings. Each Message can belong to only one Message Channel. The Message Channel must be in an Active (Run) status for the Message to be delivered.In release 8.1, the Message Channel also provides preliminary routing instructions; you can specify which Message Nodes handle the message. Each Message Channel can route messages to multiple Message Nodes
Message Node
Message node functionality changed from 8.1 to 8.4:In release 8.1, the primary function of the Message Node is to specify which Gateway receives the messages.In release 8.4, much of the "intelligence" that was built into the Message Channel moved to the Message Node. This provides additional flexibility over release 8.1. You can specify which messages the Message Node can handle. In addition, the Gateway Connector is bound to the Message Node. Each Message Node can route messages to only one Connector.
Integration Gateway
The Integration Gateway is a program that runs on the PeopleSoft Web Server. It is the physical hub between PeopleSoft and the third-party system.
Target Connector/Handler
Connectors are Java programs that run under the control of the Integration Gateway and control the final output destination of the XML file. PeopleSoft release 8.4 comes with several connectors including HTTP, FTP, SMTP, JMS, POP3, and a Simple File connector that places the file in a directory on the Web Server. This section discusses the Simple File connector.
PeopleCode
PeopleCode is the programming tool provided with PeopleTools that enables you to create complex application functionality. A message can only be initiated using specific PeopleCode instructions. This code is typically triggered by an application event, such as creating a new database entry through an online panel or through a batch job.
Most of the examples in this section use the LOCATION_SYNC message, which is a PeopleSoft Enterprise Integration Point (EIP) and is supplied with most PeopleSoft applications. If LOCATION_SYNC is not part of your package, you may use any supplied message.
You can configure PeopleSoft 8.4 to send an asynchronous outbound message to the File Output connector.
To configure application messaging in PeopleSoft 8.4:
Ensure that the message is active and is routed to the proper Message Channel.
Configure the Message Channel.
Configure the IntegrationGateway.properties file to communicate with your PeopleSoft 8.4 application.
Configure the Integration Gateway and File Output connector.
Create and configure a new Gateway node.
These tasks are described in detail in the following procedures.
Ensuring the Message Is Active and Is Routed Correctly
To ensure that the message is active and is routed to the proper Message Channel:
Open Application Designer.
On the File menu, point to Open, click Message, and then open the LOCATION_SYNC message.
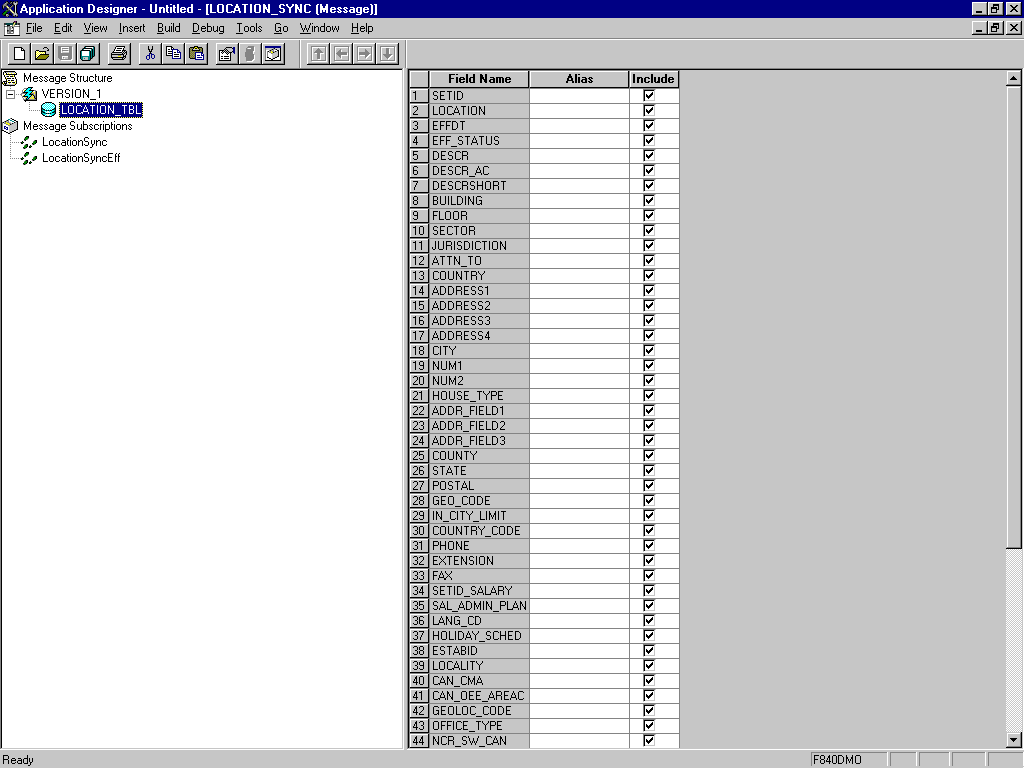
To view the fields that are included in the Message, highlight LOCATION_TBL.
Right-click LOCATION_TBL and select Properties.
The Message Properties dialog is displayed.
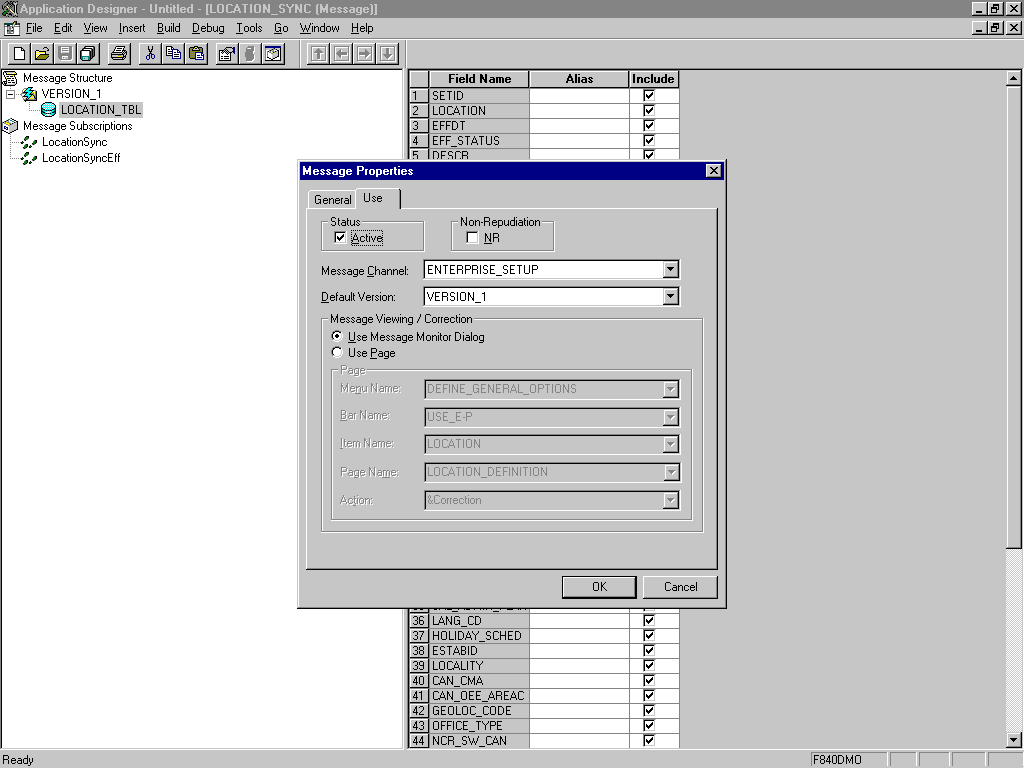
Select the Use tab.
Ensure the Active check box is selected.
The message is routed to the Message Channel, ENTERPRISE_SETUP, and the default message version is VERSION_1 (messages can have multiple versions).
Click OK and then save the message.
You have finished ensuring that the message is active and is routed correctly.
Configuring the IntegrationGateway.properties File
To configure the IntegrationGateway.properties file:
Open the IntegrationGateway.properties file using the editor of your choice.
Find the section of the file that specifies the JOLT connect string setting for the default application server. This is usually near line 75, and looks similar to the following:
## JOLT connect string setting for optional Default Application Server. Do NOT specify a NODENAME.
#
# Example:
#ig.isc.serverURL=//MYSERVER:9000
#ig.isc.userid=MYUSERID
#ig.isc.password=MYPASSWORD
#ig.isc.toolsRel=8.40
Uncomment (or copy and uncomment) the four lines that specify the connection.
Enter the appropriate information.
In the following example, the tools release is 8.40.09:
ig.isc.serverURL=//isdsrv14:9000
ig.isc.userid=VP1
ig.isc.password=VP1
ig.isc.toolsRel=8.40.09
The PeopleSoft tools release must be precise to the last decimal.
|
Note: With release 8.42, the password must be stored in an encrypted format. PeopleSoft provides a script calledPSCipher.bat (PSCipher.sh on UNIX) to accomplish encryption. Typically, this script is located in the path of the IntegrationGateway.properties file. Follow the instructions supplied by PeopleSoft to run this script. |
You have finished configuring the IntegrationGateway.properties file.
Configuring the Integration Gateway and the File Output Connector
To configure the Integration Gateway and the File Output Connector:
In a Web browser, open your PeopleSoft 8.4 application in 4-tier mode.
In the Menu pane, expand PeopleTools, Integration Broker, and then click Gateways.
Open the LOCAL Gateway ID and enter the following Gateway URL:
host name/PSIGW/PeopleSoftListeningConnector
Where host name is the name of your PeopleSoft Web Server.
Click Refresh.
A message appears stating the outcome of the refresh process.
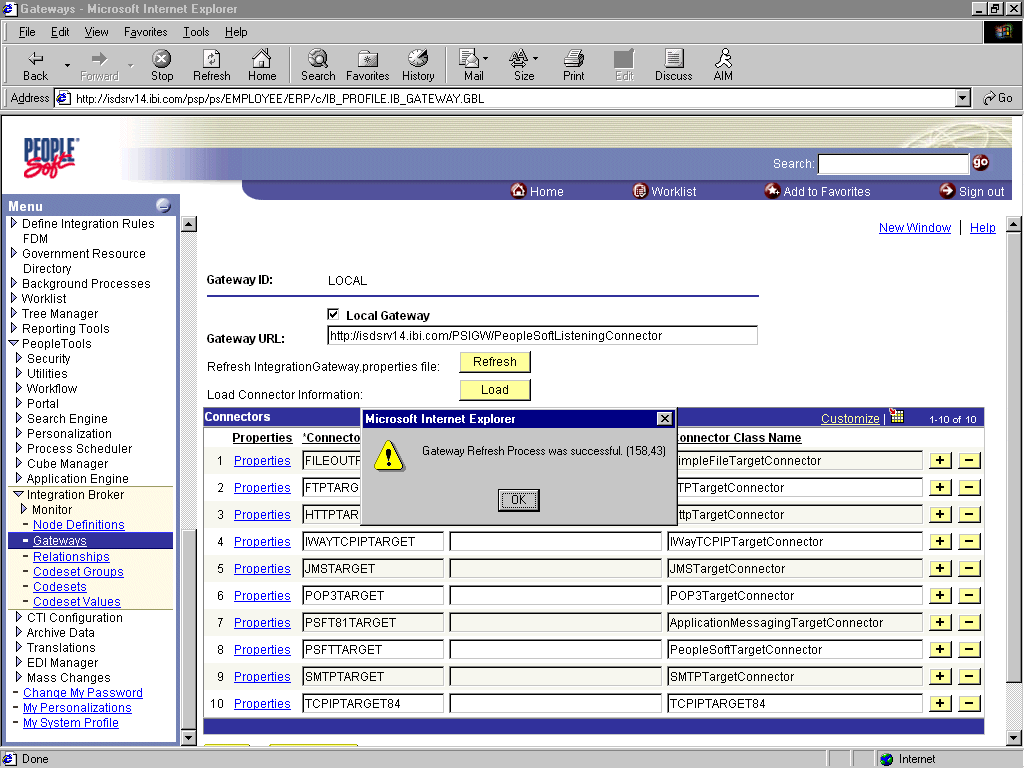
Click OK and scroll down to click Save.
You must click Save before continuing.
Click the Properties link for the FILEOUTPUT Connector ID.
The Properties window for the FILEOUTPUT Connector is displayed.
Accept or overwrite the default values.
In the following figure, the FilePath PROPERTY from the c:\temp default was changed to d:\ps\cache.
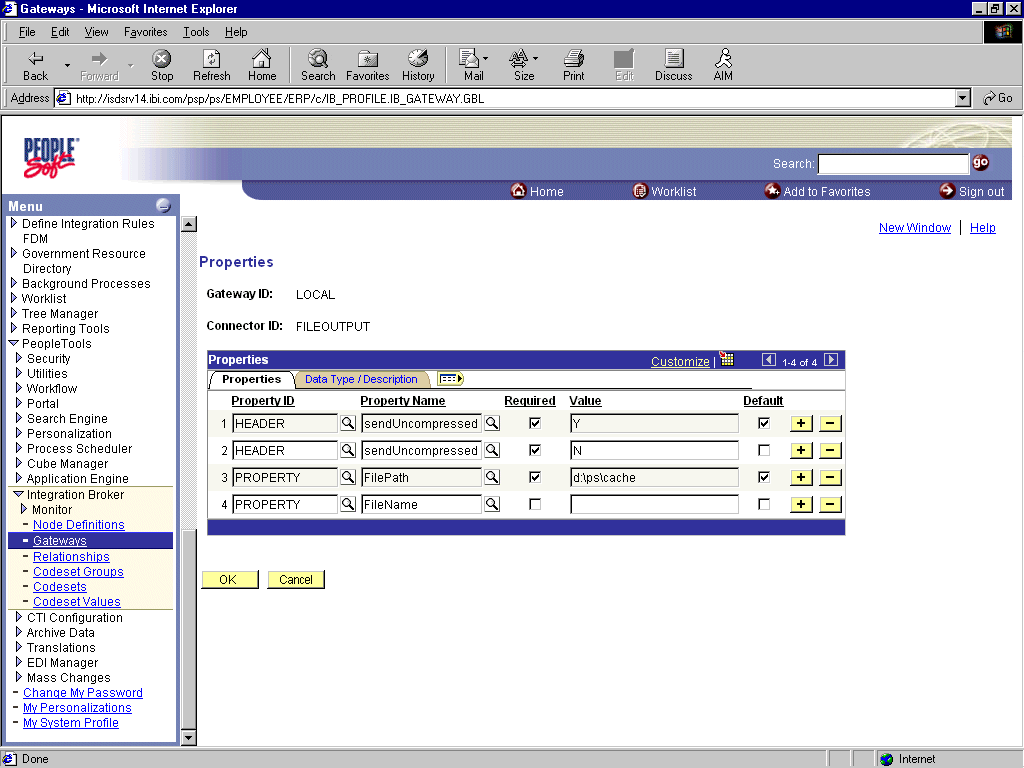
To return to the Gateway window, click OK.
Scroll down and click Save.
You have finished configuring the Integration Gateway and the File Output Connector.
Creating and Configuring a New Gateway Node
To create and configure a new Gateway Node:
In the Menu pane, expand PeopleTools, Integration Broker, and then, click Node Definitions.
Select the Add a New Value tab.
In the Node Name field, enter a node name.
It is recommended that you name your first (trial) message node EXTERNAL. After successfully configuring and sending messages using this node, you can create additional message nodes with names appropriate for your application.
Click Add.
The Node Info tab becomes available.
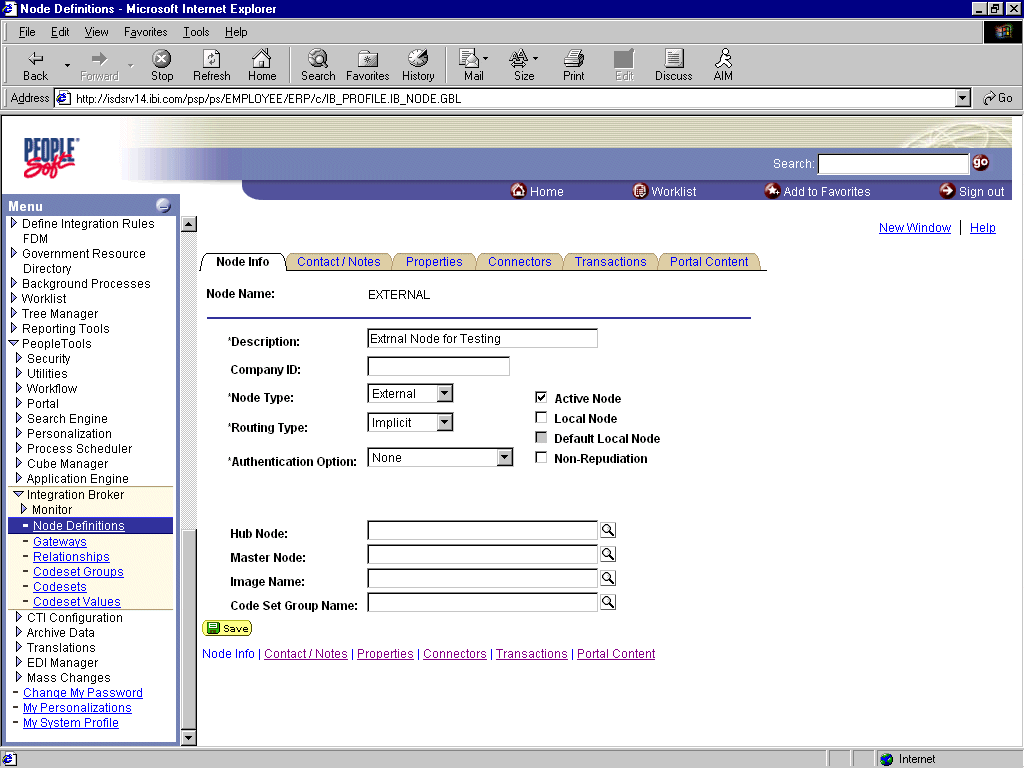
Perform the following steps:
In the Description field, enter an appropriate description.
From the Node Type list, select EXTERNAL.
From the Routing Type list, select Implicit.
Select the Connectors tab.
The Connectors tab becomes available.
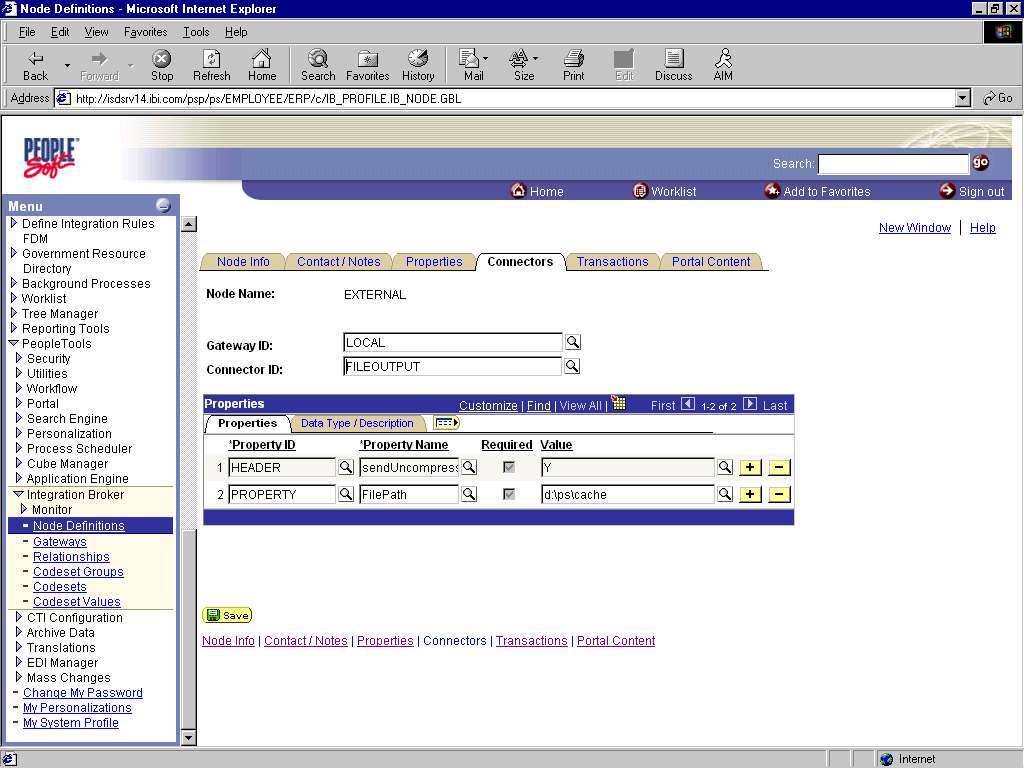
Perform the following steps:
Specify LOCAL for the Gateway ID.
Specify FILEOUTPUT for the Connector ID.
Accept or overwrite the default Gateway property values.
Click Save.
To specify the transactions to route messages to your node, select the Transactions tab and click Add Transaction.
The Node Transactions pane is displayed.
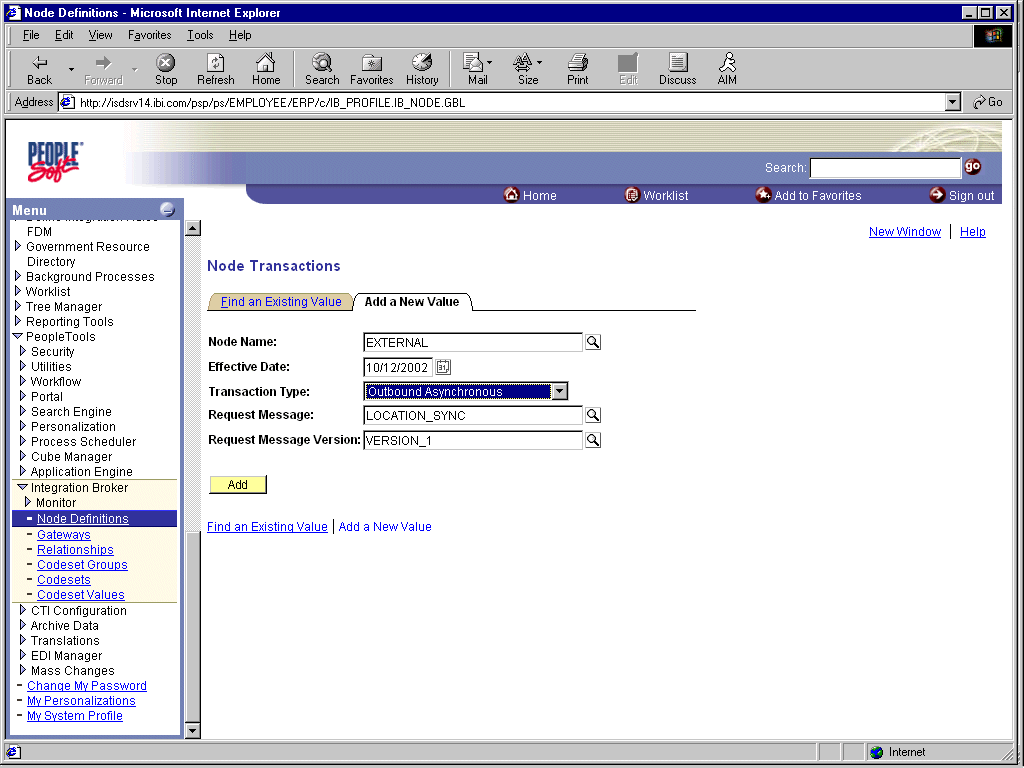
Perform the following steps:
From the Transaction Type list, select Outbound Asynchronous.
In the Request Message field, specify LOCATION_SYNC.
In the Request Message Version field, specify VERSION_1.
In the Request Message Version field, specify VERSION_1.
Click Add.
The Transaction Detail pane is displayed.
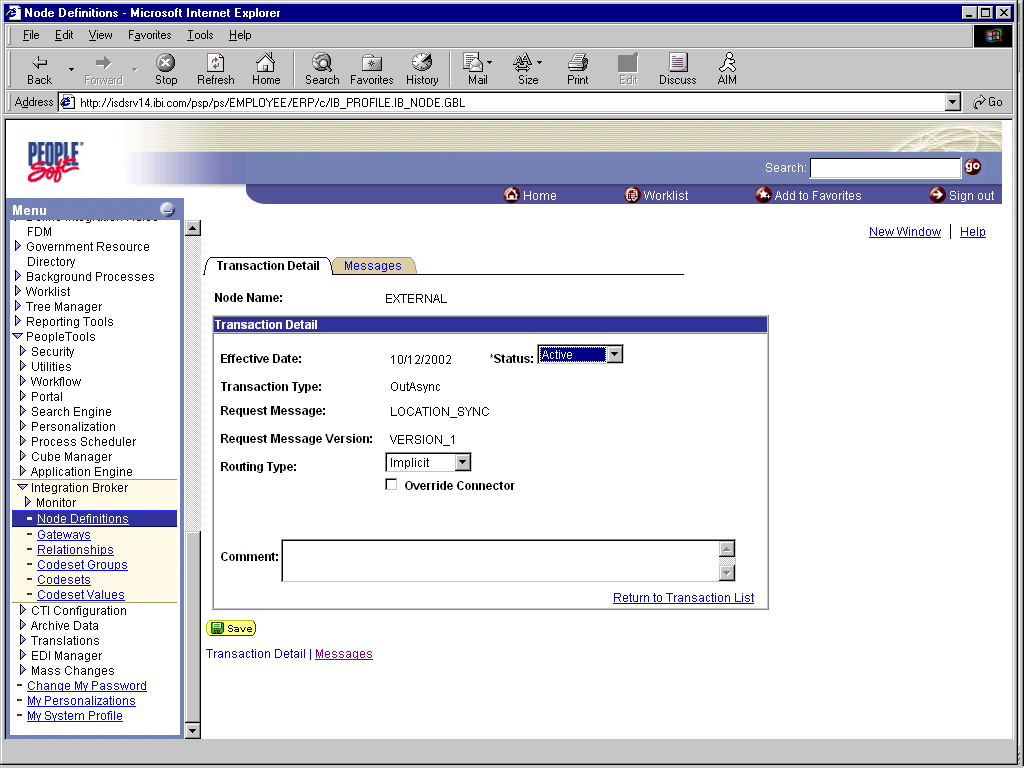
Perform the following steps:
Verify that the Routing Type is Implicit.
Click Save, then click the Return to Transaction List link.
To ensure that your data entry is not lost, click Save again.
You have finished creating and configuring the new Gateway Node.
See "Viewing the PeopleCode for a Message" for more information.
You can configure PeopleSoft 8.1 to send an asynchronous outbound message to the Simple File Handler.To configure application messaging in PeopleSoft 8.1:
Create and configure a new Message Node.
Ensure the message is active and is routed to the proper Message Channel.
Configure the Message Channel.
Configure the Simple File Handler in the Gateway.
These tasks are described in detail in the following procedures.
Creating and Configuring a New Message Node
To create and configure a new message node:
Select New from the File menu and click Message Node.
A Message Node window is displayed.
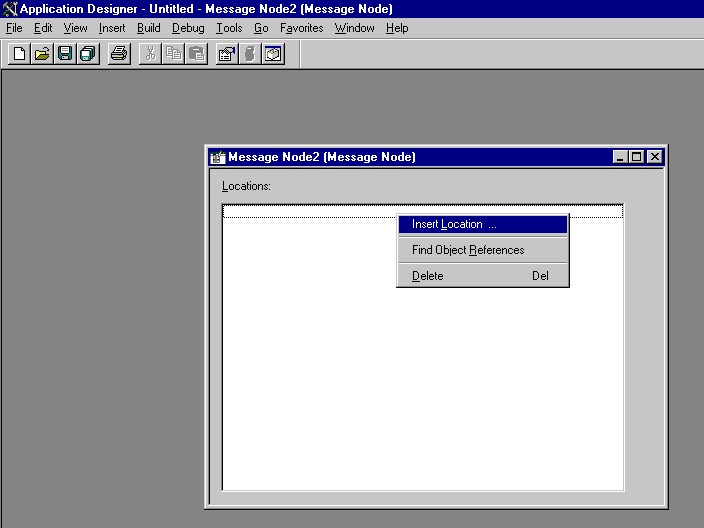
Right-click anywhere inside the white space and select Insert Location.
The Location URL box is displayed.
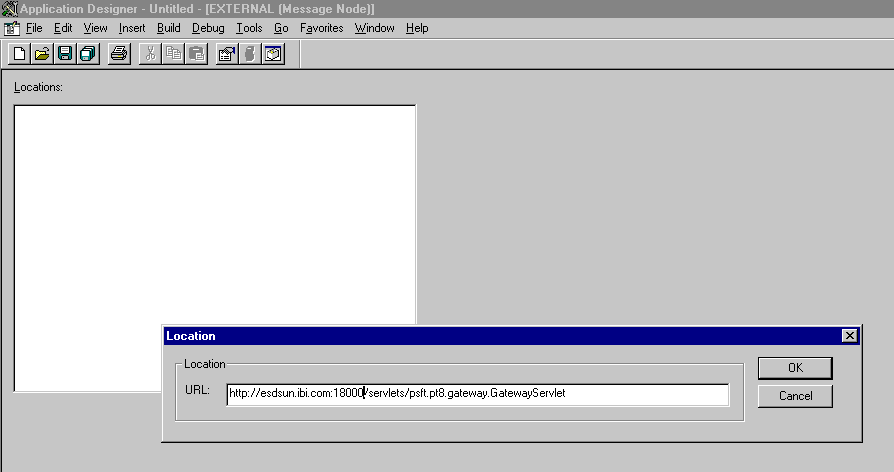
Enter the following URL for the PeopleSoft Application Gateway (handler directory):
host name:port/servlets/psft.pt8.gateway.GatewayServlet
Where host name is the host name of your PeopleSoft Web server and port is the socket on which the server is listening. The characters you enter after host name are case-sensitive.
Click OK.
Display the Message Node Properties dialog.
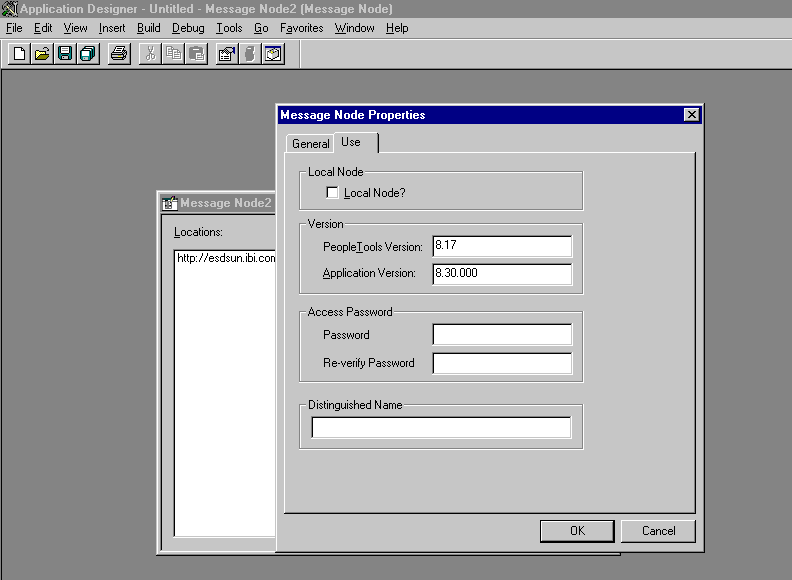
Perform the following steps:
Select the Use tab.
In the text boxes, enter the PeopleTools and Application Version numbers.
Click OK.
Display the Save As dialog.
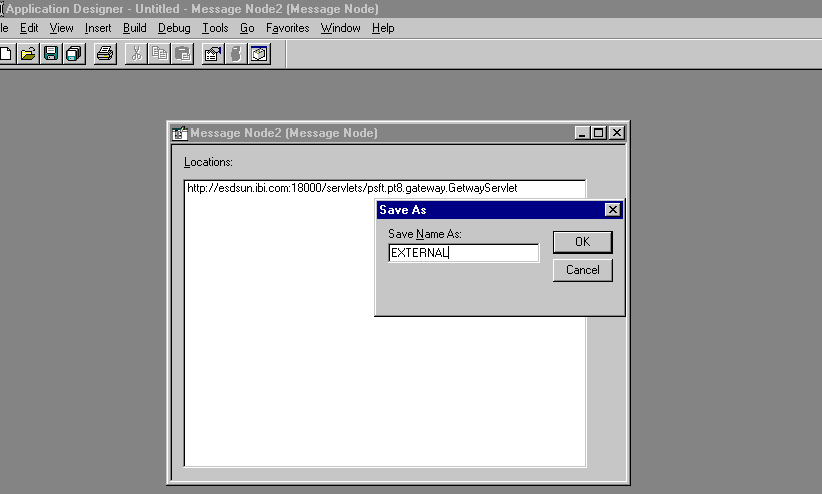
To save the Message Node, click OK.
It is recommended that you name your first (trial) message node EXTERNAL. After successfully configuring and sending messages using this node, you can create additional message nodes with names appropriate for your application.If you intend to migrate this message node to a different PeopleSoft environment (for example, from Test to QA), you can create a PeopleSoft project and insert the Message Node into the project.You have finished creating and configuring the message node.
Ensuring the Message Is Active and Is Routed Correctly
To ensure that the message is active and is routed to the proper message channel:
Open Application Designer.
On the File menu, point to Open, click Message, and open the LOCATION_SYNC message.
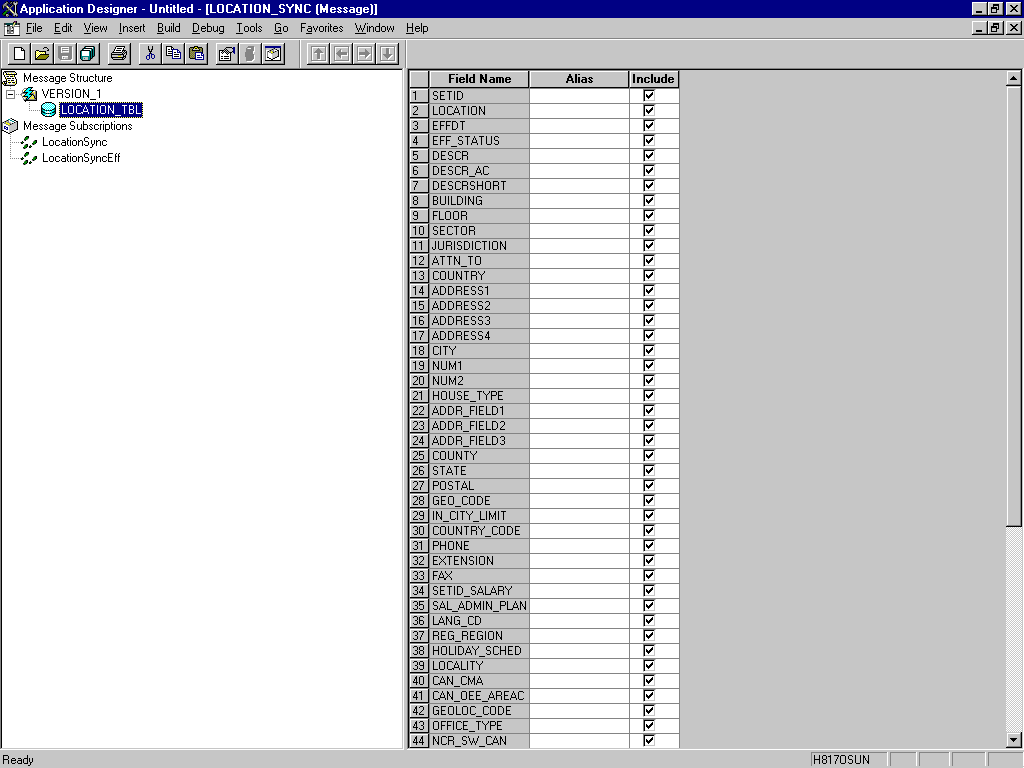
To view the fields that are included in the message, highlight LOCATION_TBL.
Right-click LOCATION_TBL and select Properties.
The Message Properties dialog is displayed.
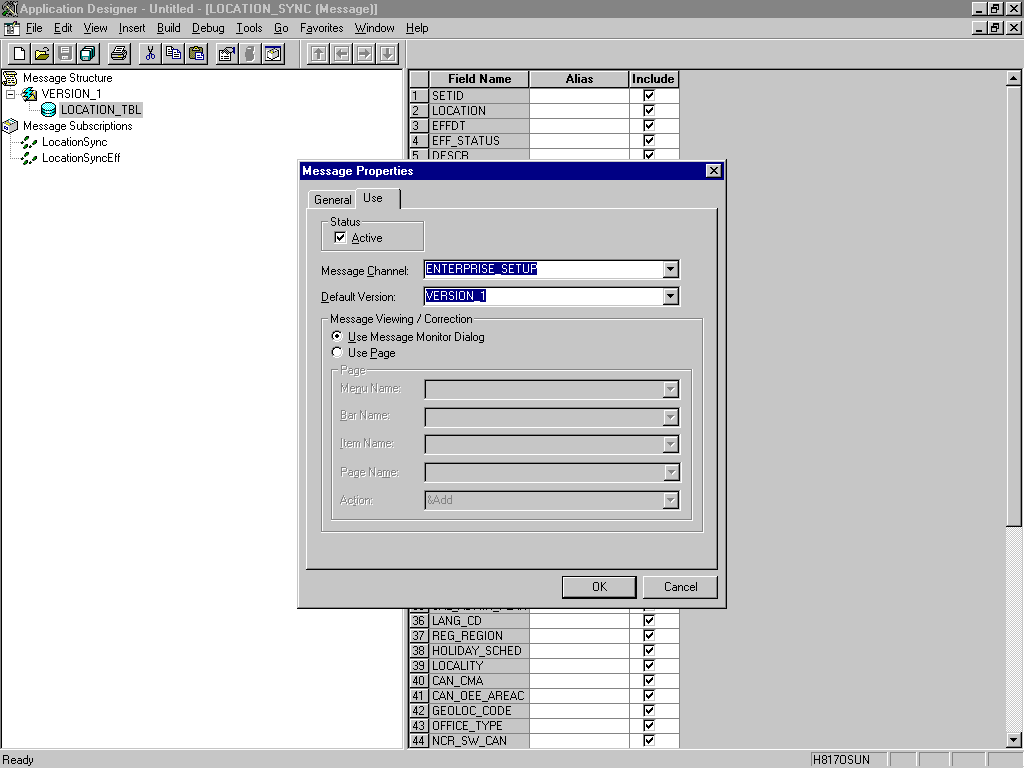
Perform the following steps:
Select the Use tab.
Ensure the Status check box is selected, which indicates that the message is active.
From the Message Channel list, select ENTERPRISE_SETUP.
From the Default Version list, select VERSION_1 (messages can have multiple versions).
Click OK.
Save the message.
Configuring the Message Channel
To configure the message channel:
From the File menu, choose Open and click Message Channel.
To open the ENTERPRISE_SETUP Message Channel, select ENTERPRISE_SETUP.
Right-click ENTERPRISE_SETUP and select Properties.
The Message Channel Properties dialog is displayed.
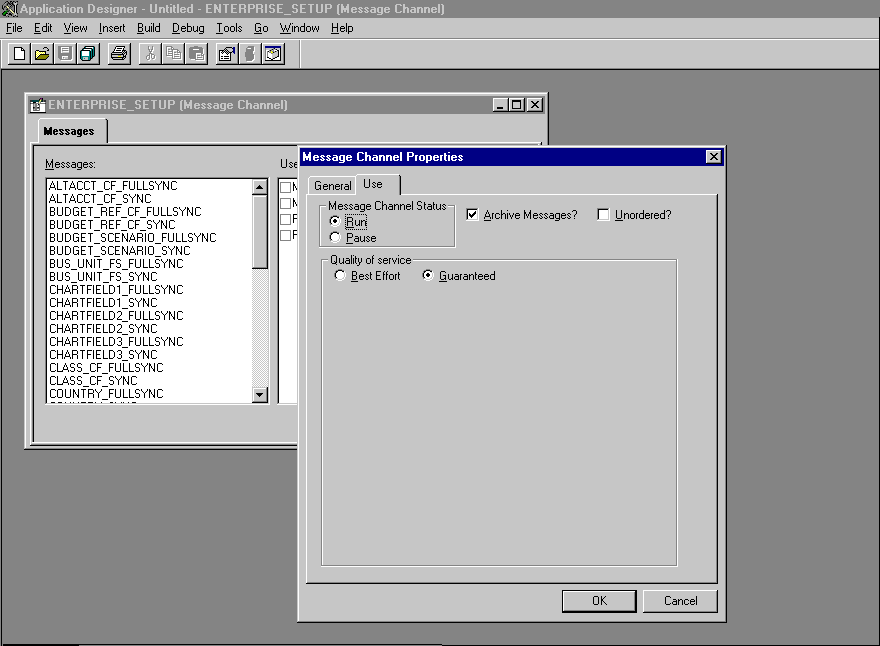
Perform the following steps:
Select the Use tab.
Ensure that the Message Channel status is set to Run.
Click OK.
From the left pane, select the Routing Rules tab.
The pane is blank.
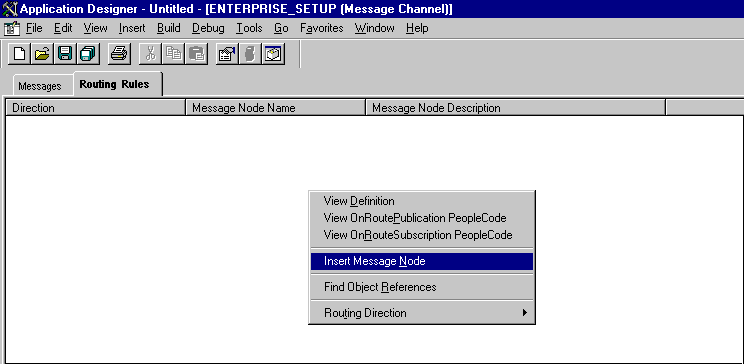
Right-click the pane and select Insert Message Node.
The Insert Message Node dialog is displayed.
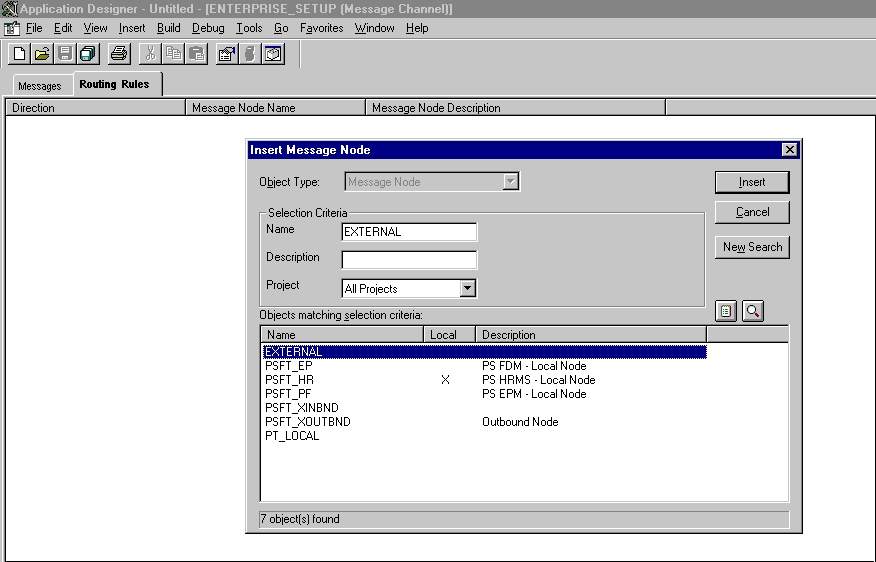
Perform the following steps:
Select the message node that you created in "Creating and Configuring a New Message Node", for example, EXTERNAL.
Click Insert.
Click Cancel.
Information appears on the Routing Rules tab.
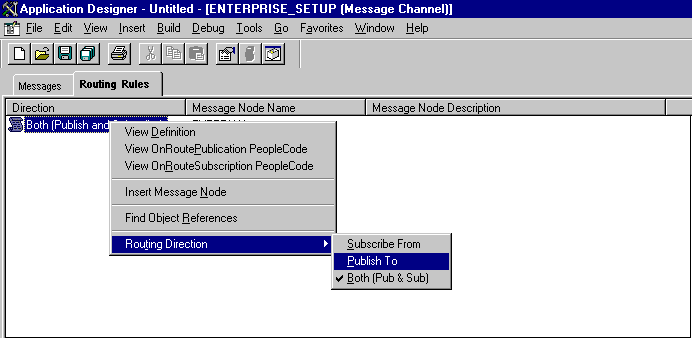
Perform the following steps:
Right-click the message node and point to Routing Direction.
From the Routing Direction menus, select Publish To.
Save the Message Channel, and if you require it, place it in your project.
Configuring the Simple File Handler in the Gateway
To configure the Simple File Handler in the Gateway:
In a Web browser, launch the PeopleSoft 8.1 configuration servlet interface (also known as the server gateway) by entering the following URL:
host name:port/servlets/gateway.administration
Where host name is the name of the application server that hosts PeopleSoft and port is the port number on which the application server is listening.
The Handler Directory window is displayed.
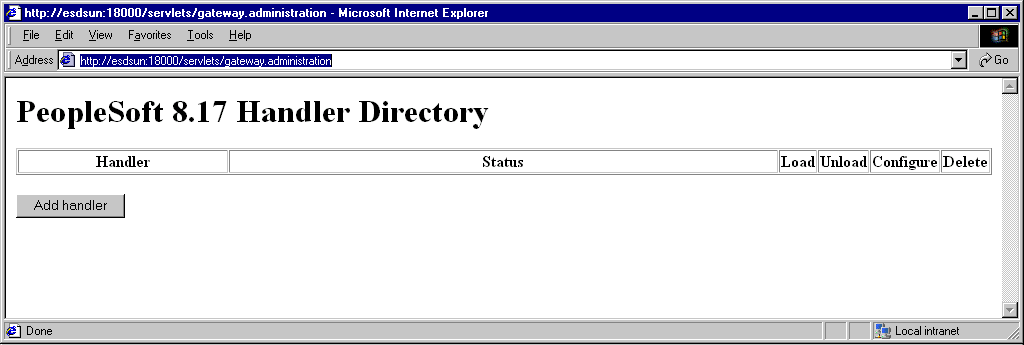
Click Add Handler.
The Add Handler window is displayed.
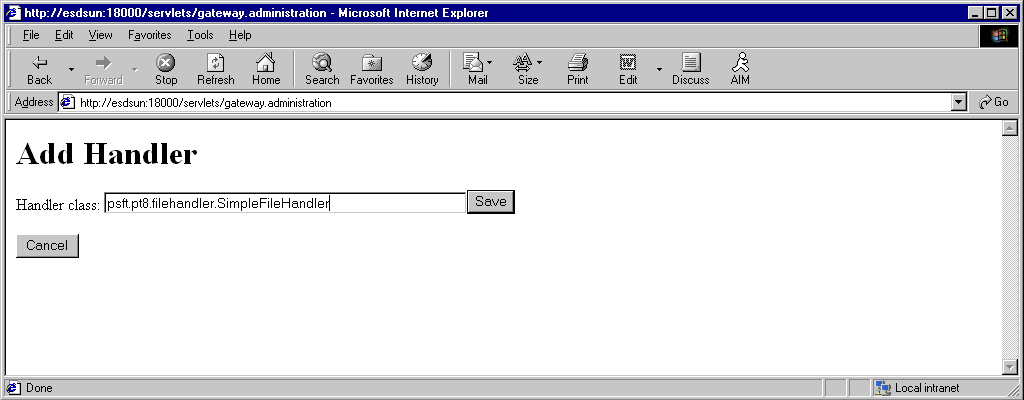
Enter the full name of the Simple File Handler class, psft.pt8.filehandler.SimpleFileHandler.
|
Note: The name is case-sensitive. |
Click Save.
The Handler Directory window is displayed.
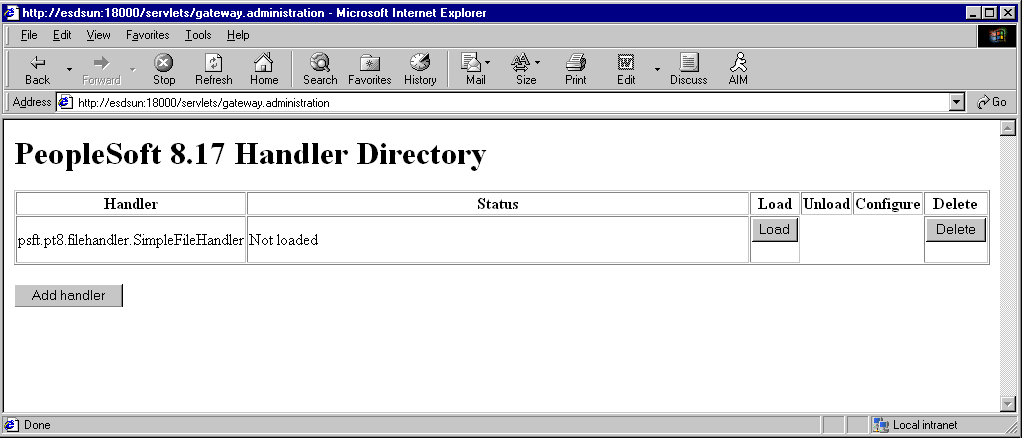
To load the handler, click Load.
After the handler loads, "Loaded successfully" appears in the Status column.
Click Configure.
The Simple File Handler Directory window is displayed.
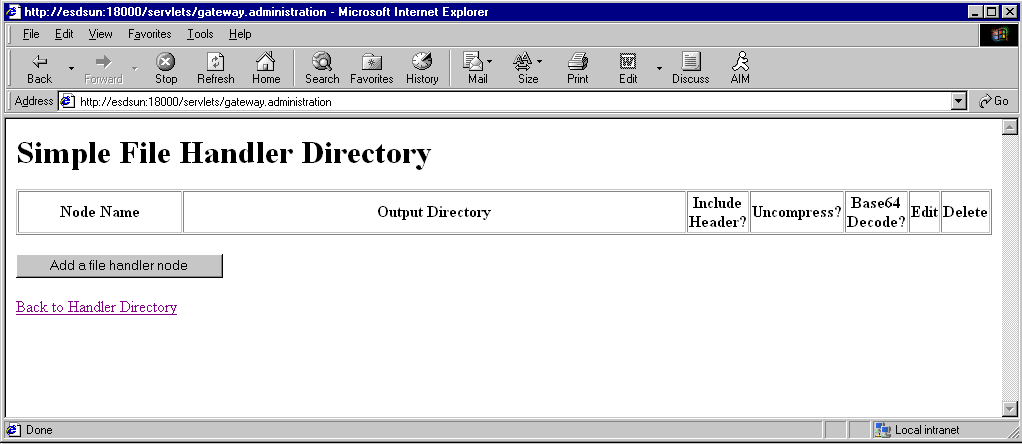
Click Add a file handler node.
The Add File Handler window is displayed.
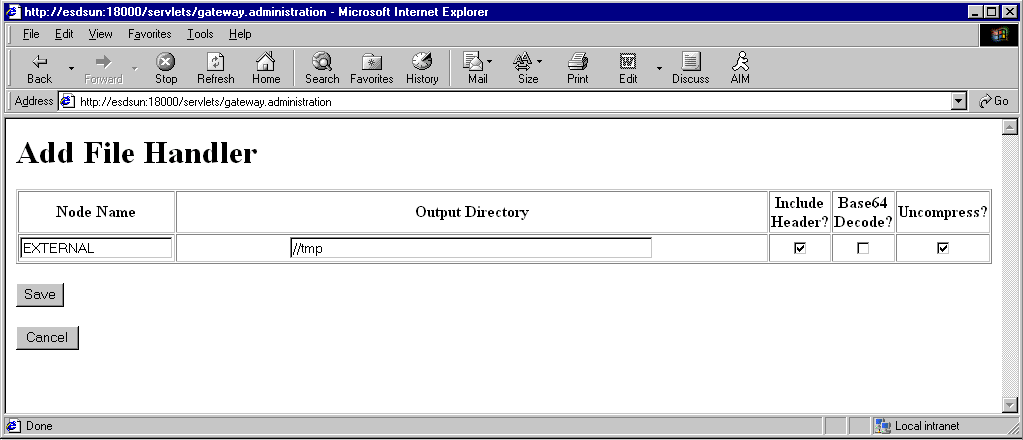
In the Node Name field, enter the name of the message node that you created in "Creating and Configuring a New Message Node", for example, EXTERNAL.
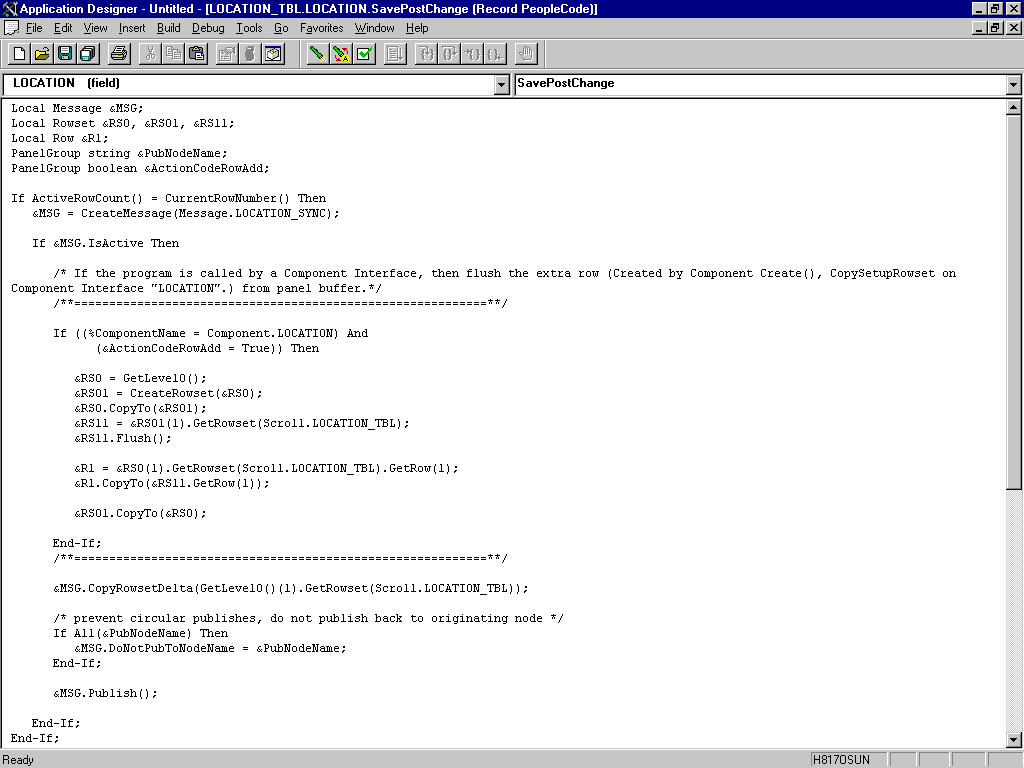
Messages are initiated by the PeopleCode that is attached to a record. Usually, this record is one of the records associated with the message itself.
Open Application Designer.
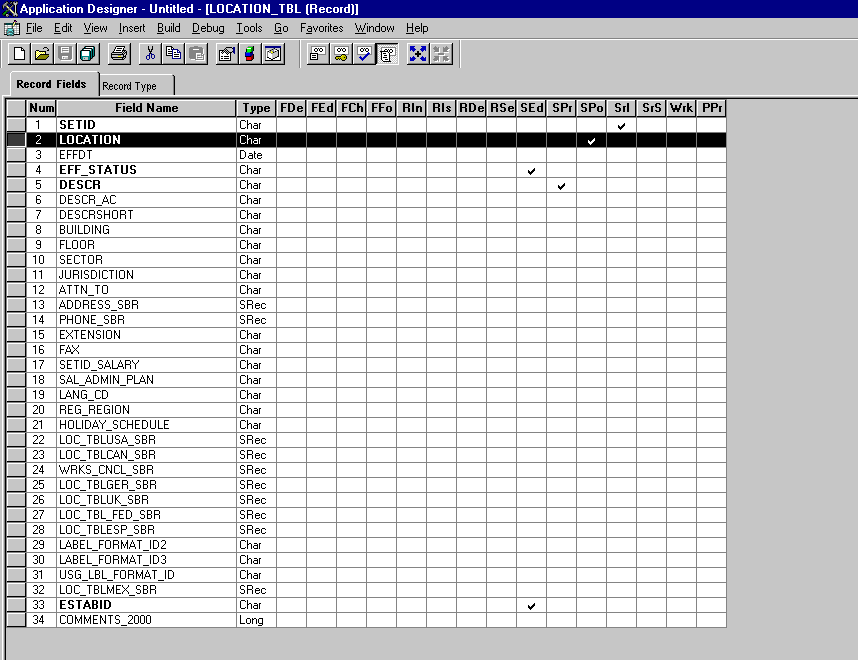
On the Record Fields tab, select the LOCATION_TBL record.
Select the PeopleCode display option.
Select the Save Post Change (SPo) box for the LOCATION field.
The following window displays the PeopleCode that initiates a LOCATION_SYNC message.
For more information about PeopleCode, consult your PeopleSoft Online Library.
You have finished viewing the PeopleCode for a message. You can now test Integration Broker (in PeopleSoft 8.4) or Application Messaging (in PeopleSoft 8.1).
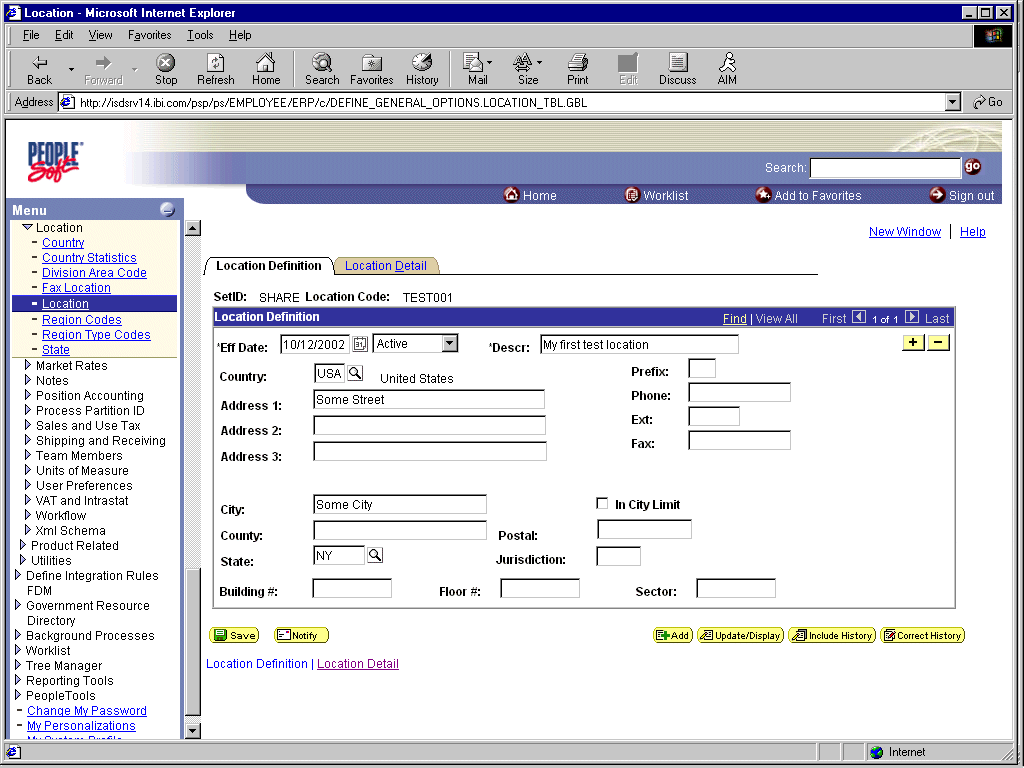
To test the Integration Broker by generating a message, you can navigate to the Location Transaction window and add, update, or delete a location entry in your application. Depending on your application, the way you navigate varies.
The following example illustrates a Financials 8.4 application where a new location with a SetID of SHARE and a Location Code of TEST001 was added.
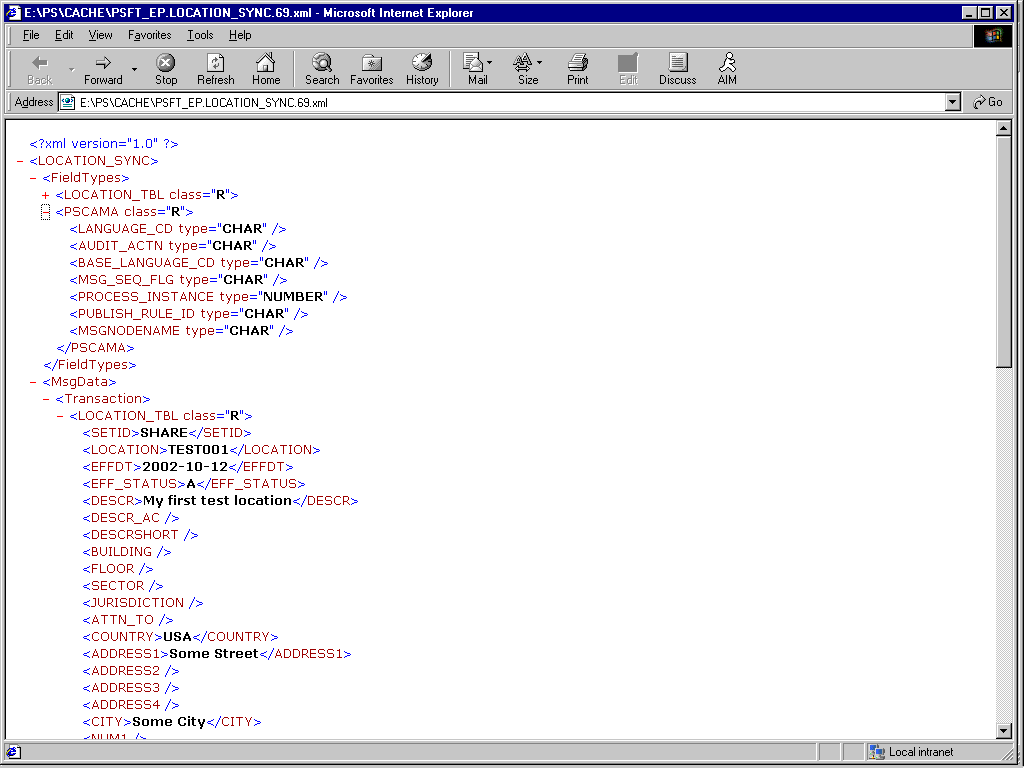
The following figure shows a portion of the XML output.
|
Note: The name of the file isPSFT_EP.LOCATION_SYNC.69.xml, which is the concatenation of PSFT_EP (the local Publishing Node), the name of the message, and the number of the Publication ID. |
If you cannot send a message successfully, PeopleSoft provides a set of tools for monitoring the progress of your messages. In release 8.1, you use a tool called the Application Messaging Monitor. In release 8.4, you use the Monitor Menu in the Integration Broker.
For a complete description on how to isolate and resolve problems with your messaging environment, consult your PeopleSoft Online Library. If you are still unable to send your XML file, the PeopleSoft Customer Connection can help solve your problem.
Starting with PeopleTools 8.4, you can send outbound synchronous messages. From a high-level point of view, the primary difference between outbound synchronous and asynchronous is that with outbound asynchronous, the transaction is completed whether the message is actually sent or received.
For synchronous outbound messages:
The transaction must wait for a response from the external system before continuing.
The transaction must process the response message.
The external system must ensure that the response message is correctly formatted.
Oracle Application Adapter for PeopleSoft can work with PeopleSoft outbound synchronous messages. Outbound synchronous messages involve additional configuration steps, both within PeopleSoft and in Oracle WebLogic Server. This topic briefly describes the configuration requirements within PeopleSoft.
|
Note: The instructions in this topic build upon the instructions for outbound asynchronous messages. It is strongly recommended that you familiarize yourself with outbound asynchronous messaging before attempting outbound synchronous. See "Configuring Integration Broker in PeopleSoft 8.4" for more information on outbound asynchronous messages.Ensure that both outbound and inbound messages are created and active. PeopleSoft provides template examples called IB_INST_VER_SYNC_MSG and IB_INST_VER_RESP_MSG. F. See "Ensuring the Message Is Active and Is Routed Correctly" for information on examining these messages. |
You can use an existing node, or you can create a new node to configure outbound synchronous messages. See "Creating and Configuring a New Gateway Node" for information on creating and configuring a node. In either case, you must set up your outbound synchronous transaction.
The following example uses a node and transaction delivered by PeopleSoft. However, this example is for illustrative purposes only and does not actually work as delivered without additional steps. As of Financials release 8.42, there are no preconfigured outbound synchronous transactions that you can use for testing purposes.
Configuring an Outbound Synchronous Message
To configure an outbound synchronous message:
Navigate to the Node Definitions page and open the PT_LOCAL node.
Click the Transactions tab.
The Transactions pane is displayed.
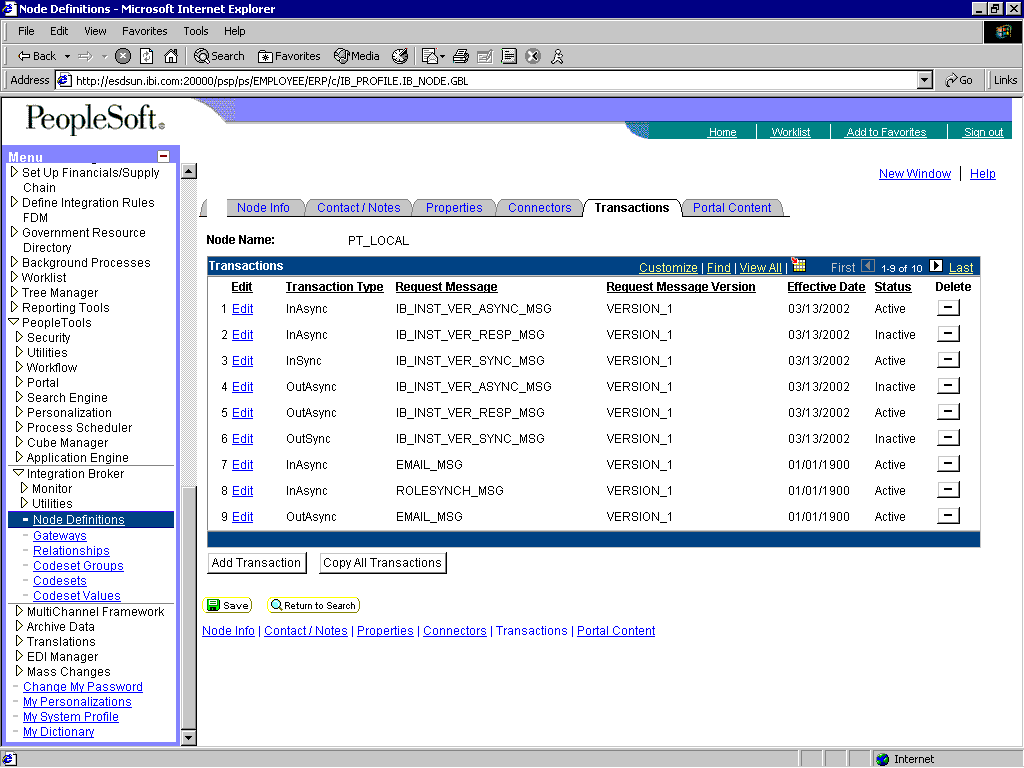
One outbound synchronous message, IB_INST_VER_SYNC_MSG, appears in the Transaction Type list.
Click the Edit link in the IB_INST_VER_SYNC_MSG row.
The following pane is displayed.
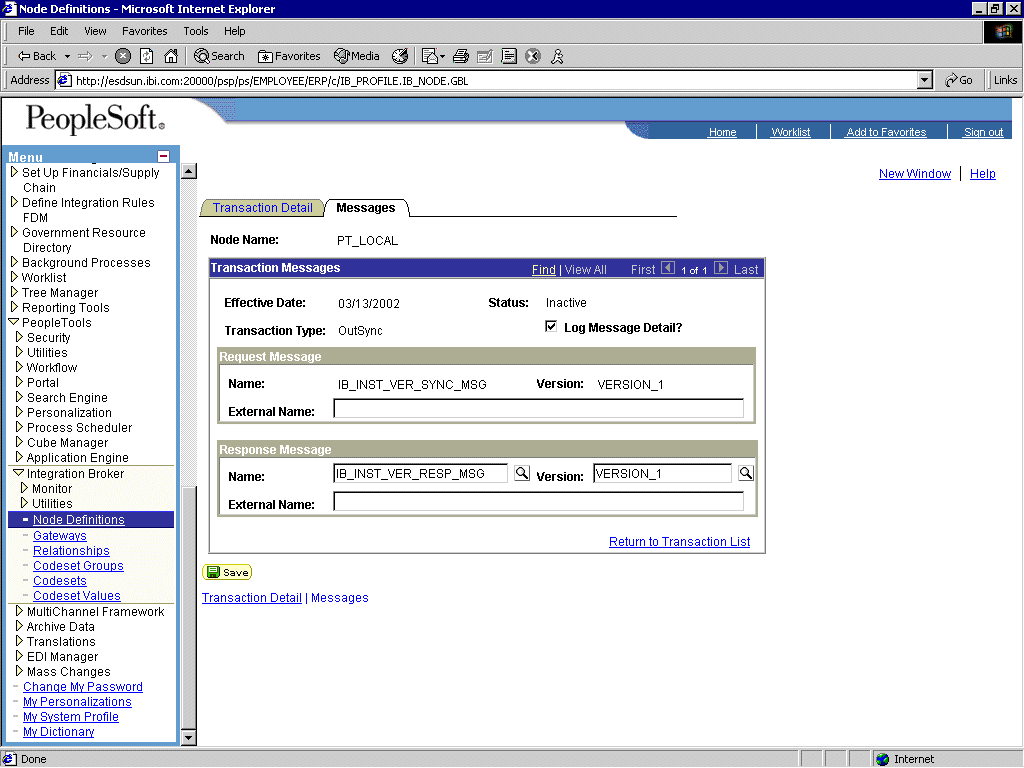
Click the Messages tab.
Both request and response messages appear. The target system must ensure that the response message follows the format of the request message. As the target system is your Oracle WebLogic Server, you must transform the XML that is sent and returned from your final destination.
|
Note: You must use the PeopleSoft-supplied HTTP target connector when you are working with synchronous outbound messages. You cannot use the TCPIP84TARGET connector for outbound synchronous messages. |
The sample PeopleCode in the following example is for a synchronous outbound message. It differs from asynchronous outbound in that it must handle a response message.
Viewing the PeopleCode for a Financials Synchronous Outbound Message
The following sample code is supplied with the Financials application and is associated with the two messages IB_INST_VER_SYNC_MSG and IB_INST_VER_RESP_MSG.
To view the code, perform the following steps:
From Application Designer, open the PSINST_VER record.
Select the PeopleCode display option.
Select the Field Change (FCh) box for the IB_SEND_SOS_BTN field.
The following window is displayed.
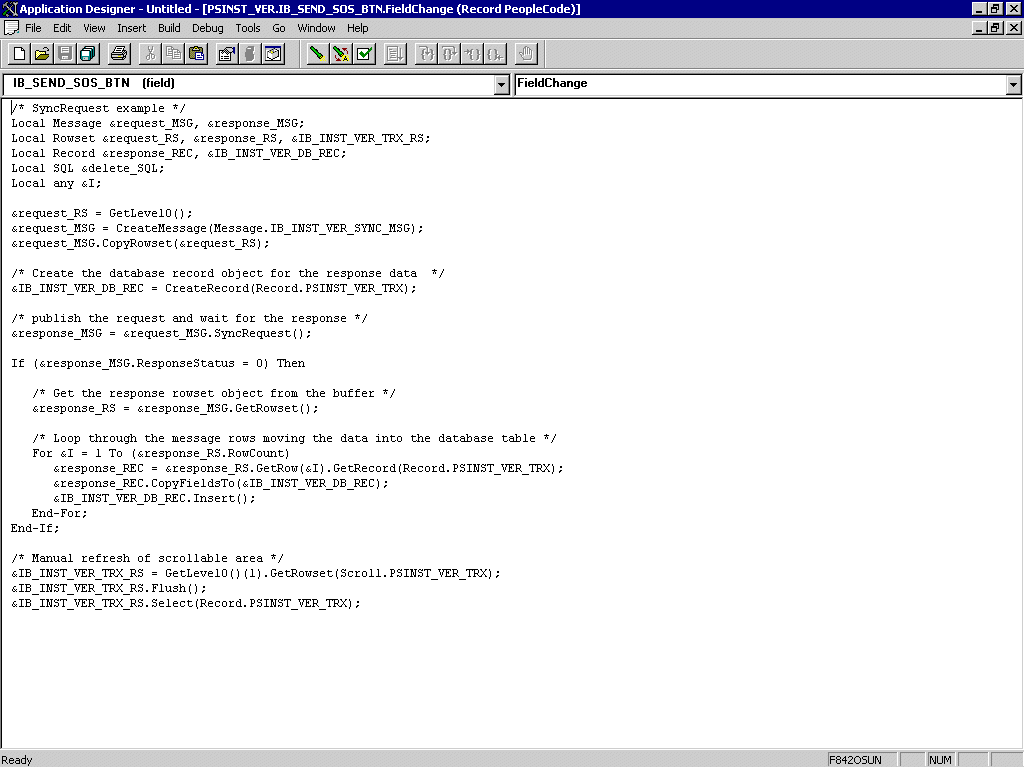
This section provides a tutorial that walks you through the PeopleSoft event generation process using PeopleTools version 8.48 and 8.49. The tutorial uses the PeopleTools version 8.48.02 and 8.90 Financial / SCM application. As a result, if you are using a different platform, then correlate the terms and commands specific to that operating system. For more information, refer to the appropriate user guide for each specific component.
This section describes how to configure PeopleSoft services.
Adding a Remote Node
To add a remote node:
Logon to PeopleSoft using the browser-based GUI (Pure Internet Architecture).
Select PeopleTools, Integration Broker, Integration Setup, followed by Nodes.
The Node Definitions tab is displayed.
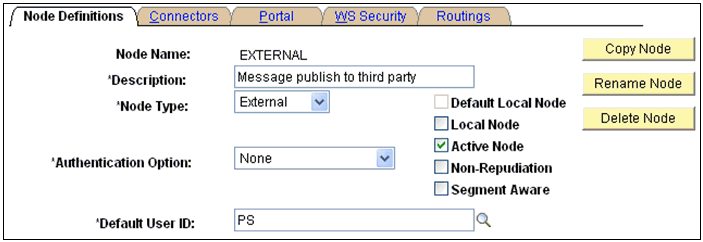
Perform the following steps:
In the Node Name field, type a name for the new node definition, for example, EXTERNAL.
In the Description field, type a brief description for the new node definition.
From the Node Type drop-down list, select External.
From the Authentication Option drop-down list, ensure that the default option, none, is selected.
In the Default User ID field, type the user ID that is being used by the PeopleSoft system, for example, PS.
Select the Active Node check box.
Click the Connectors tab.
The Connectors tab is displayed.
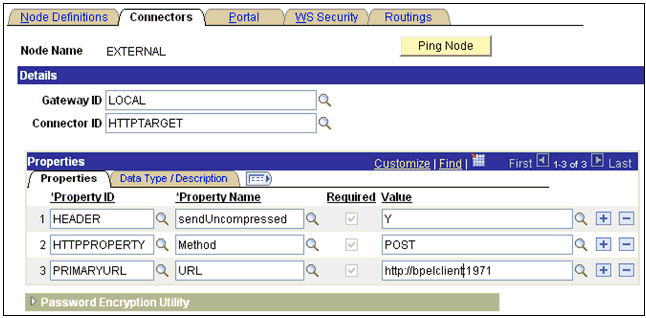
Perform the following steps:
In the Gateway ID field, type LOCAL.
In the Connector ID field, type HTTPTARGET.
For the PRIMARYURL value, enter the host and port number of the PeopleSoft adapter instance that is used to listen for events.
Leave the default values for the remaining properties.
Save your changes.
Selecting a Service
To select a service:
Select PeopleTools, Integration Broker, Integration Setup, followed by Services.
Search for the DEPT_SYNC service and select it.
The DEPT_SYNC Services pane is displayed.
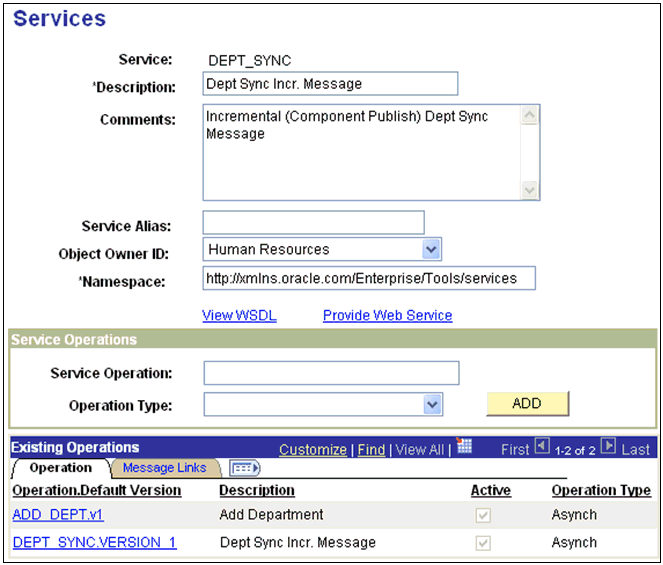
From the Existing Operations section on the lower-left, click the DEPT_SYNC.VERSION_1 service operation.
The Service Operation - General pane is displayed.

Click the Active check box.
Click the Routings tab to add a new routing.

In the Routing Name field, type a name for the new routing, for example, ADD_DEPT.
Click Add.
Click the Routing Definitions tab to add a new routing definition.
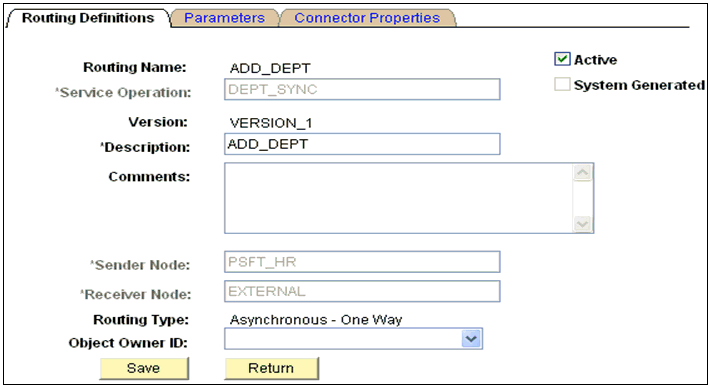
Perform the following steps:
In the Sender Node field, type PSFT_HR, which is the default PeopleSoft node that publishes the message.
In the Receiver Node field, type EXTERNAL, which is the new node that has been created to subscribe the message published by PeopleSoft.
Click the Connector Properties tab.
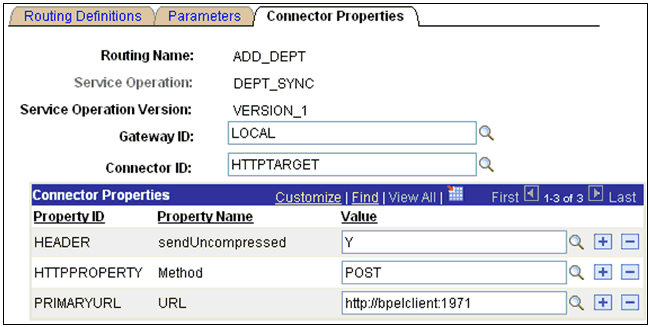
Perform the following steps:
In the Gateway ID field, type LOCAL.
In the Connector ID field, type HTTPTARGET.
For the PRIMARYURL value, enter the host and port number of the PeopleSoft adapter instance that is used to listen for events.
Click Save and then click Return.
You are returned to the Routing Definitions pane. Notice that the new routing definition (ADD_DEPT) is now added to the list.

Click Save to save the details of the Service Operation.
Click the Return to Service link to return to the Services pane.
Click Save on the Services pane.
Activating the Gateway
To activate the gateway:
Select PeopleTools, Integration Broker, Configuration, followed by Gateways.
Search for the Integration Gateway ID, for example, Local and select it.
The Gateways pane is displayed.

Click Ping Gateway.
A new browser window is displayed, which shows that the gateway is active.

Close the new browser window to return to the Gateways pane.
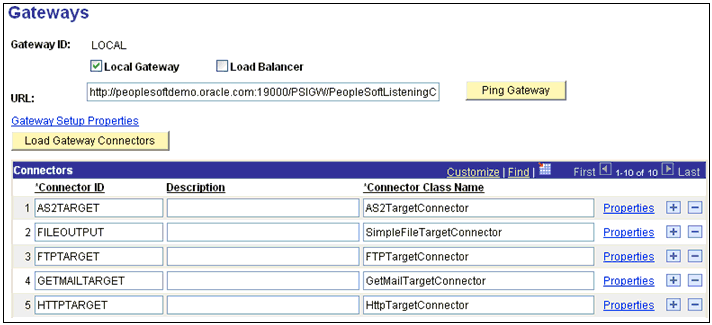
Ensure that HTTPTARGET is listed in the Connectors section. If it is not listed, click Load Gateway Connectors to refresh the available connectors.
Activating the Domain
To activate the domain:
Select PeopleTools, Integration Broker, Configuration, followed by Quick Configuration.
The Quick Configuration pane is displayed.
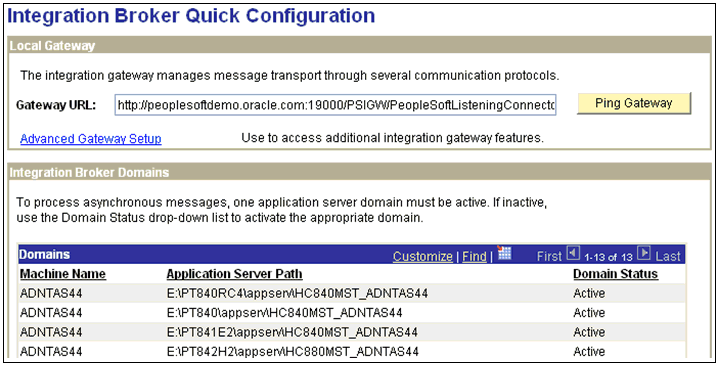
Ensure that the domain is active.
Activating the Service
To activate the service:
Select PeopleTools, Integration Broker, Integration Setup, followed by Services.
The Services pane is displayed.
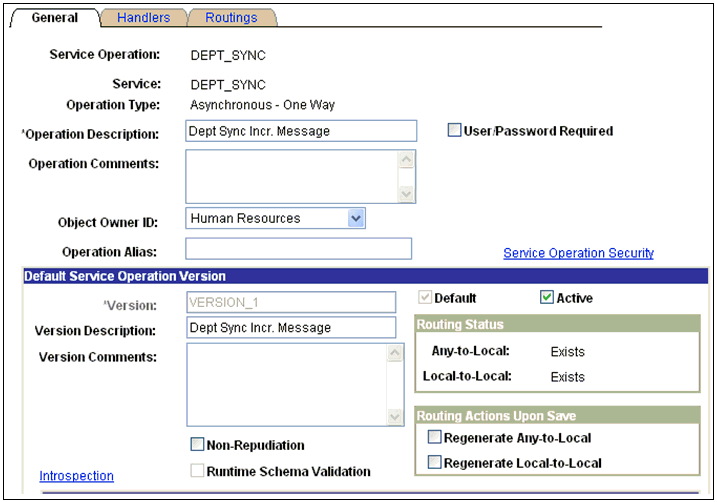
Ensure that the service is active.
Activating the Service Operation (Queue and Message Node)
To activate the service operation:
Select PeopleTools, Integration Broker, Configuration, Integration Setup, followed by Services.
The Services pane is displayed.

From the Existing Operations section on the lower-left, click the DEPT_SYNC.VERSION_1 service operation.
The Service Operation - General pane is displayed.

In the message information section on the bottom of the page, note the value in the Queue Name field of the service operation.

Click the View Queue link.
The Queue Definitions pane is displayed.
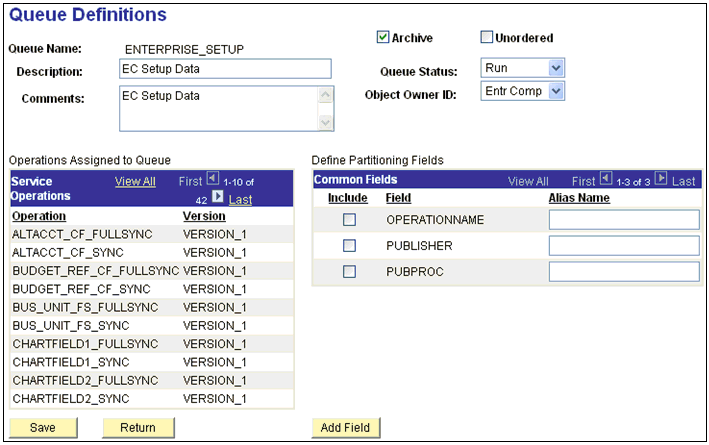
Ensure that the Queue Status drop-down list has Run selected.
Click Return to return to the Service operation pane.
Click the Routings tab.
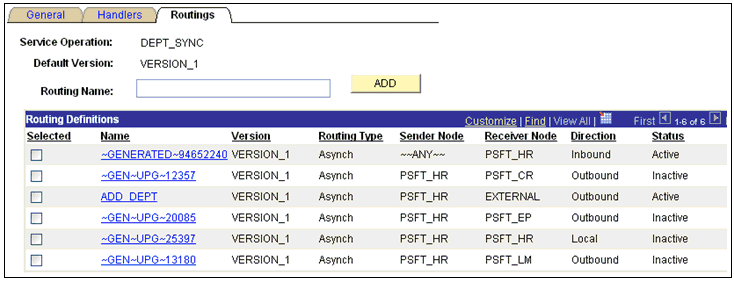
Ensure that the routings are active.
Click the Return to Service link on the bottom of the pane to return to the Services pane.
Click Return to Search to go to the Services search pane.
In the above steps, if the status has been activated in any of the panes for any of the components, then make sure to save the status at the appropriate pane and the respective components.
Select PeopleTools, Integration Broker, Configuration, Integration Setup, Services, followed by Nodes.
The Node Definitions pane is displayed.

Ensure that the status of the External node is active.
This completes the configuration on the PeopleSoft side.
This section describes how to trigger the event in PeopleSoft.
Triggering the Event
To trigger the event:
Logon to PeopleSoft using the browser-based GUI (Pure Internet Architecture).
Navigate to Main Menu, Set up HRMS, Foundation Tables, followed by Departments.
The Departments pane is displayed.
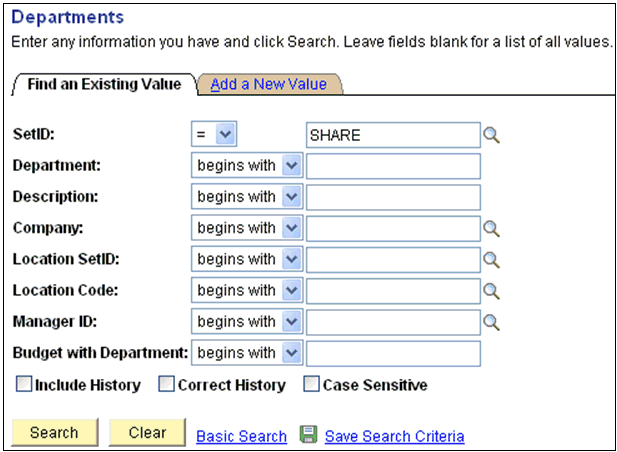
Click the Add a New Value tab.
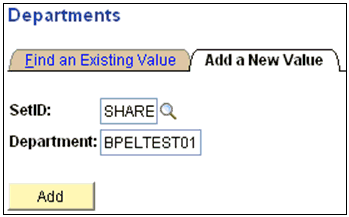
Enter the appropriate value in the SetID and Department fields
Click Add.
The Department Profile tab is displayed.
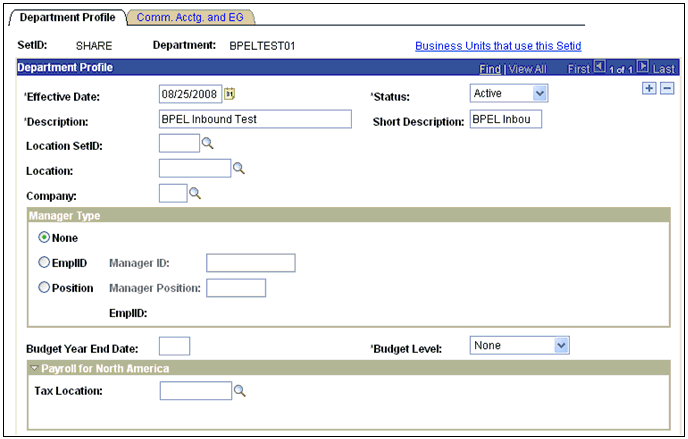
Provide the necessary information according to your requirements to create a new Department record.
Click Save at the bottom of the pane when you are finished.
This section describes how to verify the event results.
Verifying the Results
To verify the results:
Logon to PeopleSoft using the browser-based GUI (Pure Internet Architecture).
Navigate to Main Menu, PeopleTools, Integration Broker, Service Operation Monitor, followed by Asynchronous Services.
The Monitor Overview tab is displayed.
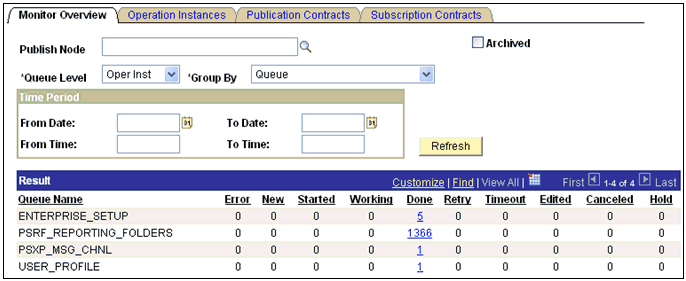
Here you can view the results of the events at the queue level.
Click the number link (5) queue (Enterprise_Setup) in the Result section.
The Operation Instances tab is displayed.
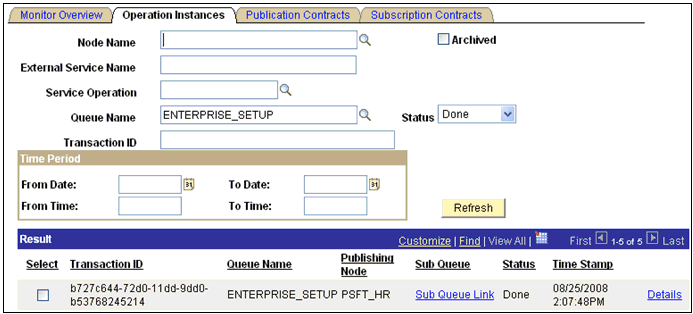
Notice that a new record for the event (department) is available.
Click the Details link on the lower-right.
A new browser window (Asynchronous Details) is displayed.
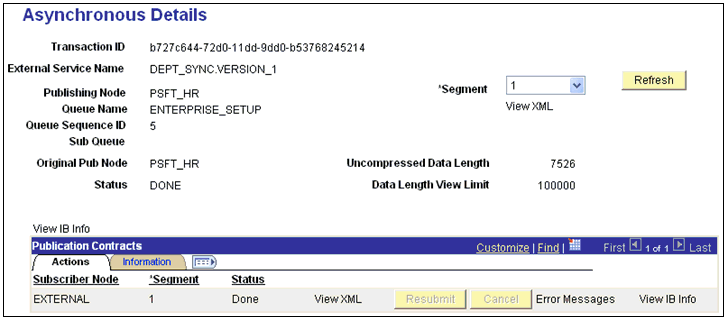
Notice that the status of the transaction is DONE for the Publishing and Subscriber nodes.