| Oracle® Fusion Middleware Installation Guide for Oracle WebCenter 11g Release 1 (11.1.1) E12001-02 |
|
 Previous |
 Next |
| Oracle® Fusion Middleware Installation Guide for Oracle WebCenter 11g Release 1 (11.1.1) E12001-02 |
|
 Previous |
 Next |
This appendix contains screenshots and descriptions for all of the Oracle WebCenter configuration screens:
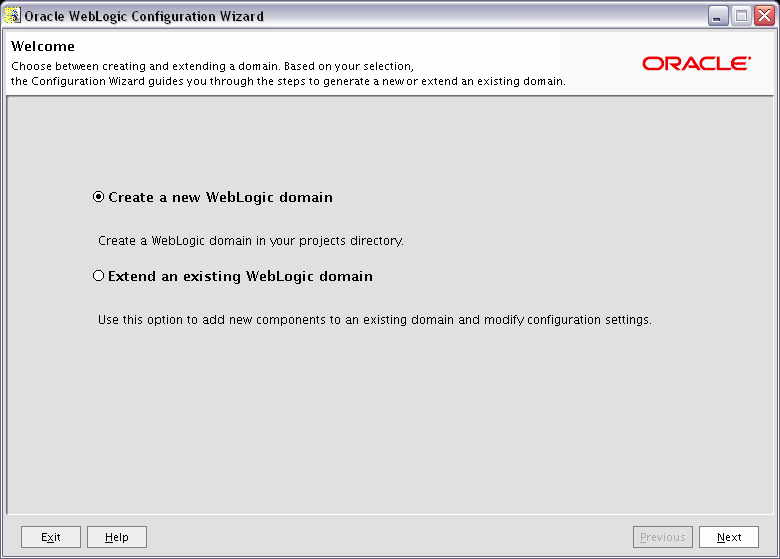
The Welcome screen is displayed each time you start the Configuration Wizard.
Select Create a new WebLogic domain to create a new WebLogic domain in your projects directory.
Select Extend an existing WebLogic domain if you want to add applications and services, or to override existing database access (JDBC) and messaging (JMS) settings.
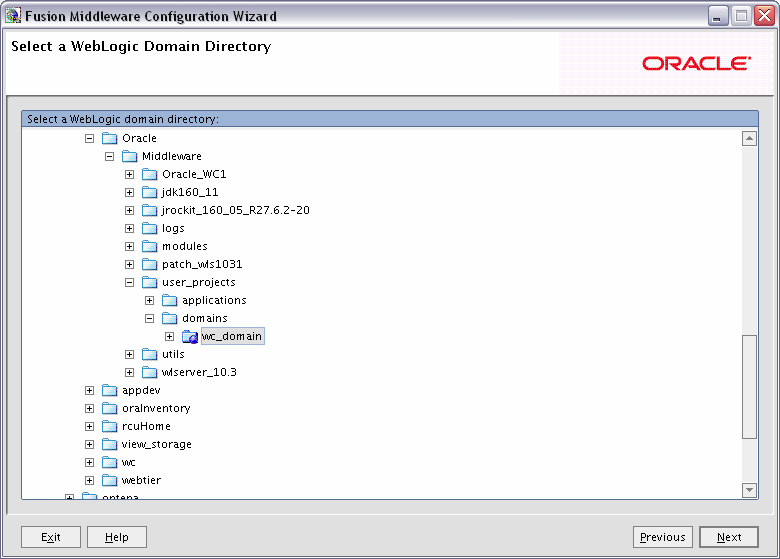
This screen only appears if selected Extend an existing WebLogic domain on the Welcome Screen.
Select the WebLogic directory containing the domain you are extending.
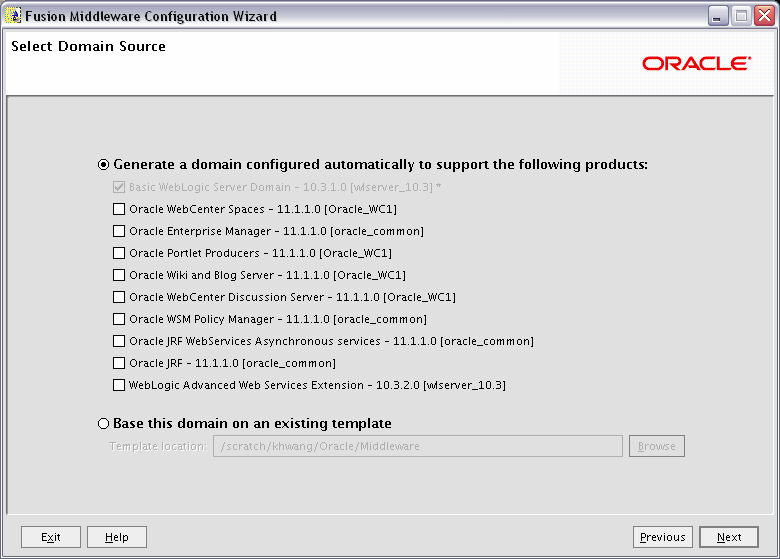
This screen only appears if selected Create a new WebLogic domain on the Welcome Screen.
Select the source from which you want to create your new domain.
Select Generate a domain configured automatically to support the following products to create your domain to support selected products. Then, select the products for which you want support.
Select Base this domain on an existing template to create your domain based on an existing domain template. Click Browse to navigate your directories to find an existing template.
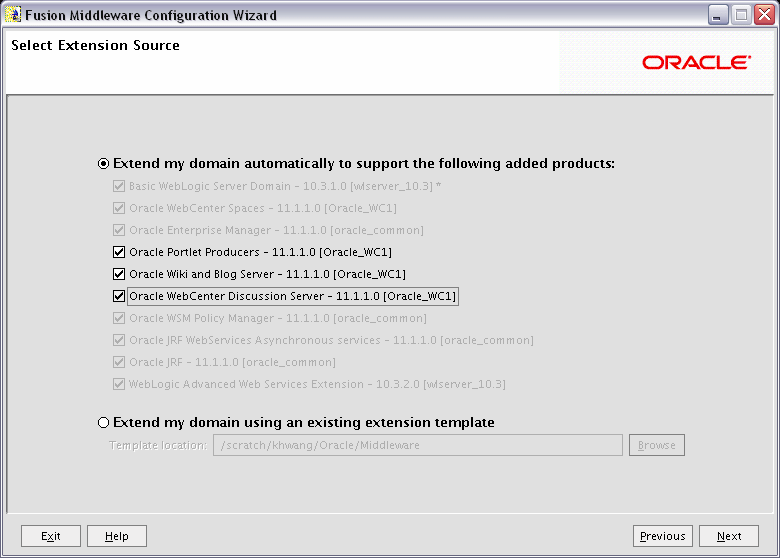
This screen only appears if selected Extend an existing WebLogic domain on the Welcome Screen.
Select the source from which you want to extend your domain.
Select Extend my domain automatically to support the following added products to extend your domain to support selected products. Then, select the products for which you want support.
Select Extend my domain using an existing extension template to extend your domain based on an existing extension template. Click Browse to navigate your directories to find an existing template.
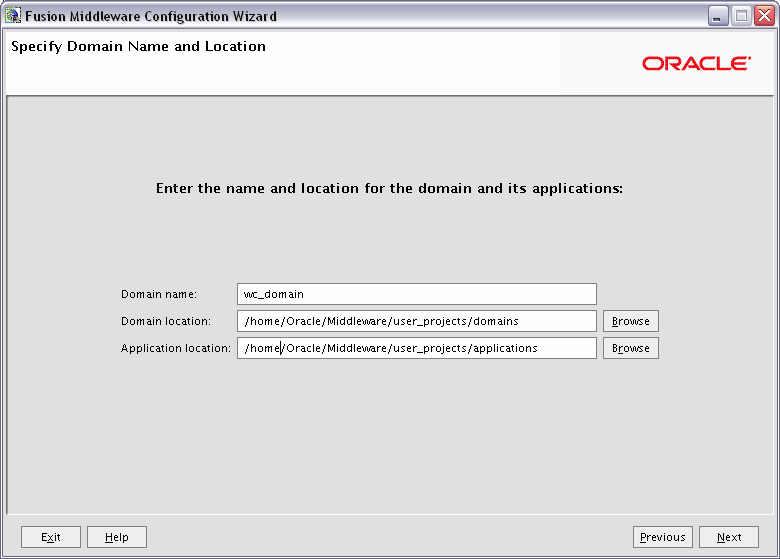
Specify the following information for the domain you are creating:
Domain name
The name of the domain you want to create. The default name is base_domain.
Domain Location
The absolute path to the directory where this domain should be created. The default location is MW_HOME/user_projects/domains (on UNIX operating systems) or MW_HOME\user_projects\domains (on Windows operating systems).
|
Note: On Windows machines, be sure to include the drive letter when you specify the domain location. |
Application Location
The absolute path to the directory where applications created in this domain should reside. The default location is MW_HOME/user_projects/applications (on UNIX operating systems) or MW_HOME\user_projects\applications (on Windows operating systems).
|
Note: On Windows machines, be sure to include the drive letter when you specify the application location. |
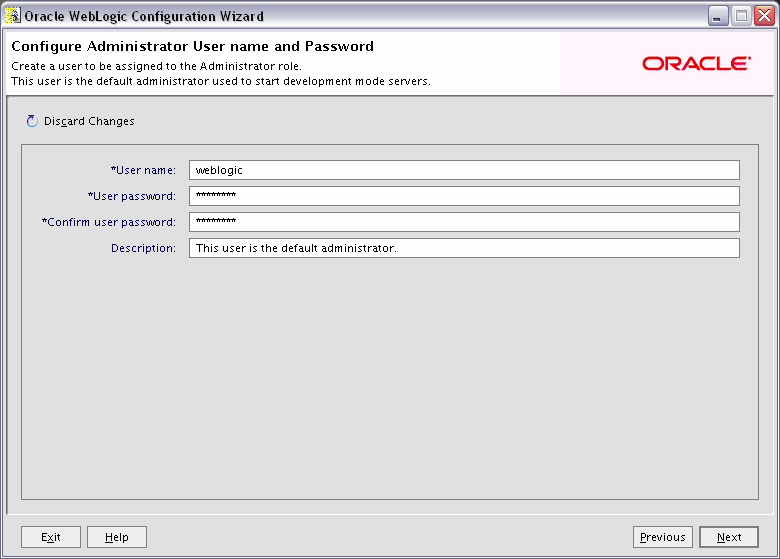
Create a user that will be assigned to the Administrator role. This user is the default administrator used to start development mode servers.
|
Note: The domain administrator you create for Oracle WebCenter is also the administrator for WebCenter Spaces, Oracle WebCenter Discussions, and Oracle WebCenter Wiki and Blogs Server. You can choose to grant domain administrative rights for these WebCenter components to a different user. For information about granting the administrator role to a nondefault user for:
|
User name
Specify the administrator name. The default name is weblogic.
User password
Specify the password for the administrator. The password must be at least eight characters long and contain at least one number.
Confirm user password
Re-enter the administrator password.
Description
Enter a description for the user. This field is optional.
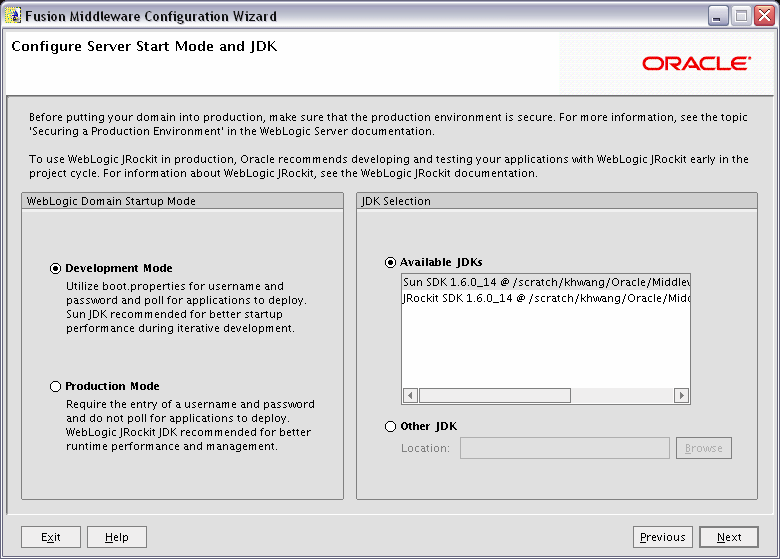
In the WebLogic Domain Startup Mode section, select one of the following startup modes:
Development mode should be used while you are developing your applications. Development mode uses a relaxed security configuration and enables you to auto-deploy applications. In this mode, boot.properties is used for username and passwords and polling is used for application deployment.
Production mode shouldbe used when your application is running in its final form. A production domain uses full security and may use clusters or other advanced features. In this mode, usernames and passwords are required and polling is not used for application deployment.
In the JDK Selection section, select the recommended JDK for your startup mode from the list of available JDKs, or select Other JDK and click Browse to find another JDK on your system. The recommended JDKs are described in the text for each mode in the WebLogic Domain Startup Mode section.
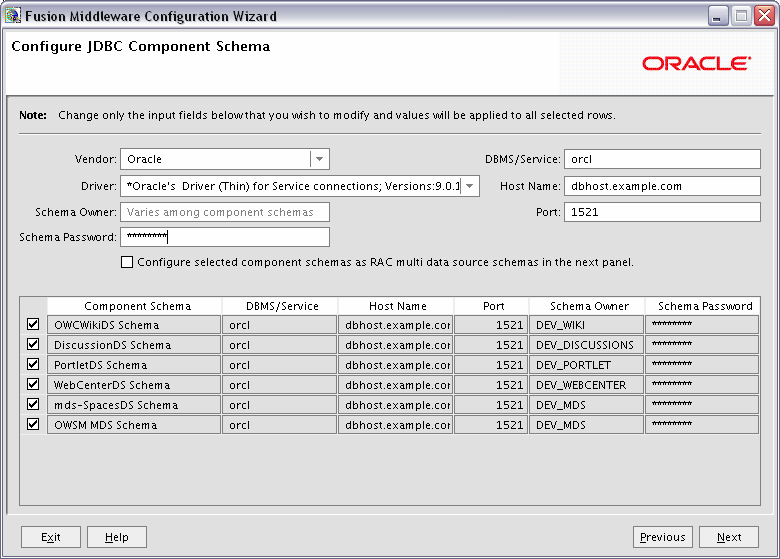
Configure the schema owner and password for each component schema listed on this screen. Changes to any of the fields on this screen are applied to all selected component schema in the table.
For example, if all of your schemas reside on the same database, select all of the schemas in the table, then specify the appropriate database values for the schemas (DBMS/Service, Host Name, and Port).
If, for example, you hare a different password for each schema, then you must select each schema individually and specify the password for the selected schema only.
Review the table on this screen and identify which fields you need to modify:
Vendor
Select the vendor for your database from the drop-down list.
Driver
Select the driver type from the drop-down list.
Schema Owner
Specify the schema owner for the schema. This schema owner was assigned when you created the schema using RCU.
Password
Specify the password for the schema. You specified this password when creating the schema using RCU.
DBMS/Service
Specify the service name for your database. This is the database on which the schema resides.
Host Name
Specify the name of the machine where your database is running.
Port
Specify the database listen port number.
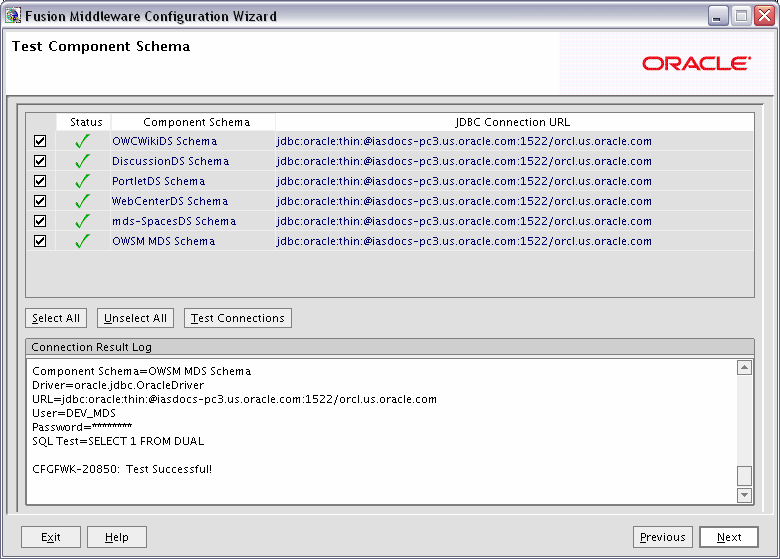
Verify that the connections to your data sources are successful.
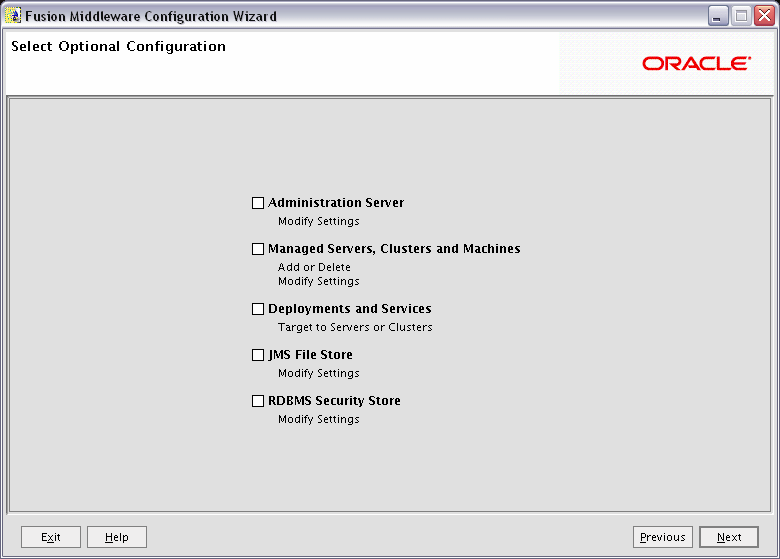
Select any category for which you want to perform custom or advanced configuration. Note that selection of any of these categories is optional, and your domain will be created or extended if you choose not to customize any of these categories.
Administration Server
Select this to edit your Administration Server settings. You will be able to:
Change the name of your Administration Server (default is AdminServer).
Specify custom port numbers.
Configure the Administration Server to accept SSL connections.
Managed Servers, Clusters and Machines
Select this to add or delete managed servers, clusters, and machines. You can also modify the settings of any existing server, cluster, or machine.
For more information about these concepts, refer to "Oracle Fusion Middleware Concepts for All Users" in Oracle Fusion Middleware Installation Planning Guide.
Deployments and Services
Select this to customize how deployments and services are targeted to machines and clusters.
Typically, these screens do not need to be modified unless specifically told to do so. For more information, refer to Oracle Fusion Middleware Enterprise Deployment Guide for Oracle WebCenter.
JMS File Store
Select this to customize your JMS file store settings.
RDBMS Security Store
Select this if you want to configure an external relational database management system (RDBMS) as a data store for various security providers.
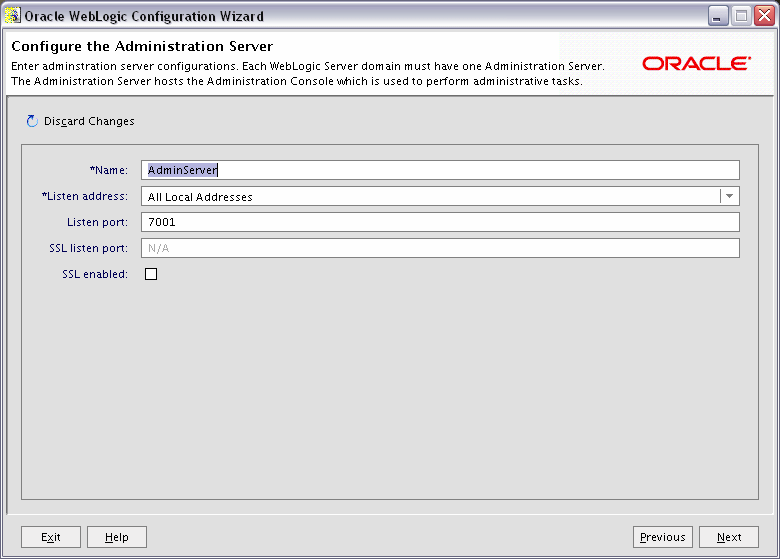
The Administration Server is the primary tool used to manage a WebLogic Server domain.
One WebLogic Server instance in each domain is configured as the Administration Server. If you have multiple WebLogic Server instances, then all the other instances are referred to as Managed Servers. In a domain with only one WebLogic Server instance, that instance functions both as Administration Server and Managed Server.
Name
Specify the name of your Administration Server. The default name is AdminServer.
Listen Address
Use the drop-down list to select an address or range of addresses that the Administration Server will listen to for events. The default selection is All Local Addresses.
Specify the listen port number. The default port number is 7001.
Select SSL enabled if you want your Administration Server to accept SSL connections. Be sure to specify the SSL Listen Port if you select the SSL enabled option.
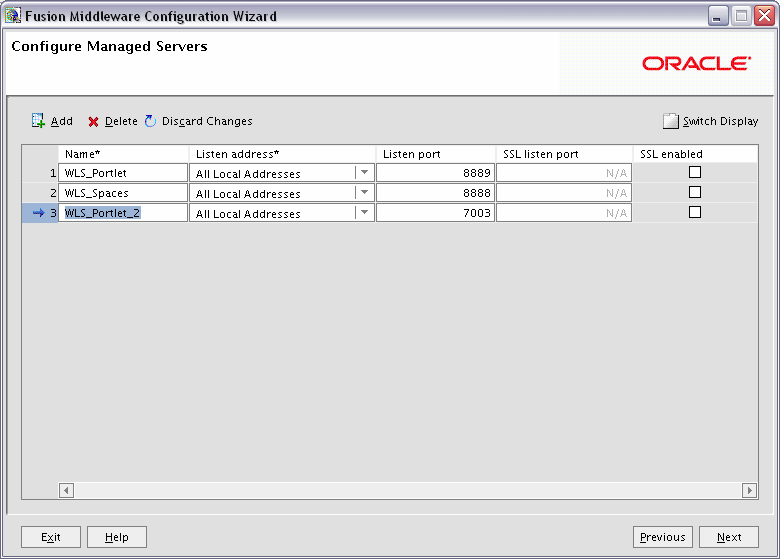
A managed server is an instance of WebLogic Server used to host enterprise applications. A typical production environment has at least one managed server, which is managed by the Administration Server.
Use this screen to add or delete managed servers; click Add to add a managed server. To delete a managed server, select the server name and click Delete.
|
Note: Deleting one of the default managed servers (WLS_Spaces, WLS_Portlet, or WLS_Services) is not recommended. |
For each managed server, specify:
Name
Name of the managed server. Each server within the domain must have a unique name. The server name is not used as part of the URL for applications that are deployed on the server. It is for your identification purposes only.
Listen Address
Enter an IP address or DNS name if you want to limit the number of valid addresses for a server instance. Otherwise, URLs to the server can specify any of the host computer's IP address, any DNS name that maps to one of the IP addresses, or the localhost string.
Listen Port
Enter the port number from which you want to access the server instance. If you run multiple server instances on a single computer, each server must use its own listen port.
SSL Listen Port
Enter the port number from which you want to access the server instance for SSL connections - this column is only active if the corresponding SSL enabled checkbox in the same row is selected.
Click Switch Display to see the managed server information in tabs rather than in a table.
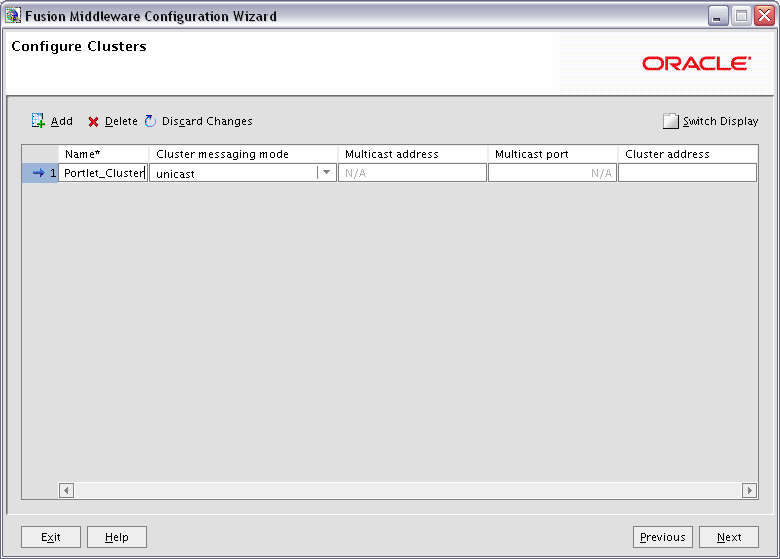
A cluster consists of multiple managed server instances working together to provide increased scalability and reliability.
Use this screen to add or delete clusters; click Add to add a cluster. To delete a cluster, select the cluster name and click Delete.
For each cluster, specify:
Name
Name of the cluster.
Cluster messaging mode
If you are creating a cluster within a new WebLogic Server environment, Oracle recommends that you use the Unicast messaging type.
If you are creating a cluster within an existing WebLogic Server environment or you need to ensure backward compatibility with older versions of WebLogic Server, you must use the Multicast messaging type. This enables multiple applications to subscribe to a given IP address and port number and listen for messages.
Select "multicast" or "unicast" from the drop-down list. If you select "multicast" you must also provide:
Multicast address
A multicast address is an IP address in the range from 224.0.0.0 to 239.255.255.255. The valid range is from 224.0.0.0 to 239.255.255.255. The default value used by WebLogic Server is 239.192.0.0. You should avoid using multicast addresses in the range x.0.0.1. This address must be unique to this cluster and should not be shared by other applications.
Multicast port
The multicast port is used by cluster members to communicate with each other. Valid values are between 1 and 65535.
Cluster address
Address of the cluster.
Click Switch Display to see the cluster information in tabs rather than in a table.
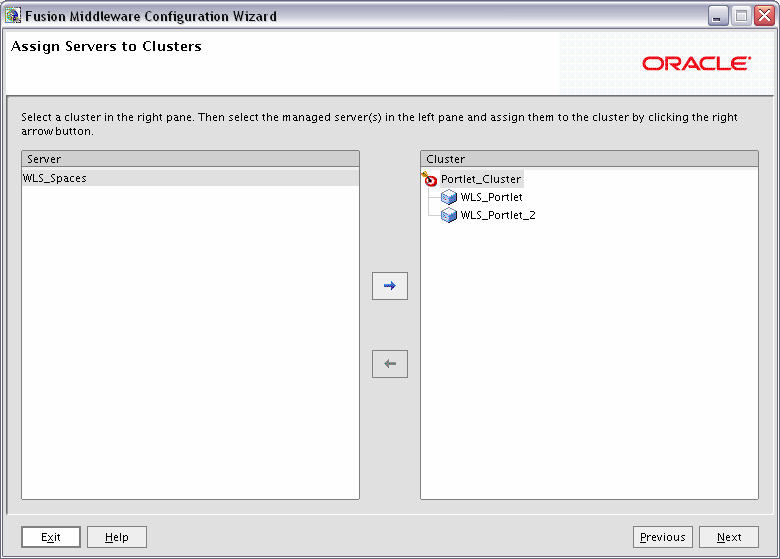
Use this screen to assign each managed server to a cluster in the domain.
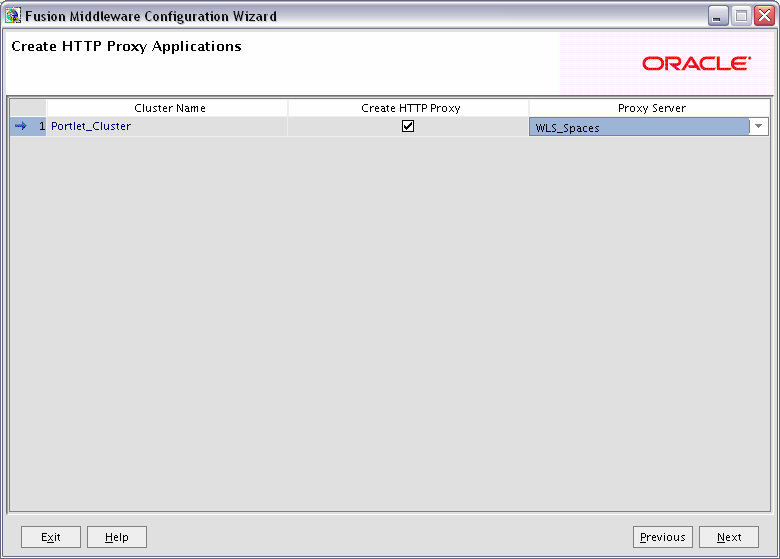
An HTTP proxy server proxies requests from a web server to WebLogic Server instances in a cluster, and provides load balancing and failover for the proxied HTTP requests.
If you want to proxy requests for a cluster, select Create HTTP Proxy next to the cluster name, then select a proxy server from the drop-down list in the "Proxy Server" field.
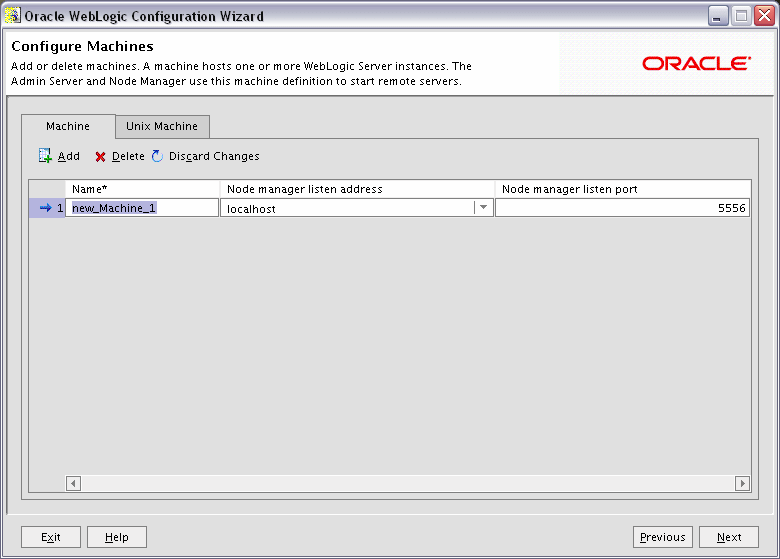
A machine is the logical representation of the computer that hosts one or more WebLogic Server instances. Each Managed Server must be assigned to a machine. The Administration Server and Node Manager are used to manage the machines defined on this screen.
If you are creating a new machine on a non-UNIX operating system, specify the following:
Name
Name of the machine. This name is used to identify the machine within the WebLogic Server domain; it does not have to correspond to the machine's network name.
Node manager listen address
Enter the DNS name or IP address on which the Node Manager listens.
Node manager listen port
Enter the port number on which the Node Manager listens for incoming requests.
For UNIX machine, click the "Unix Machine" tab and specify the following:
Name
Name of the machine. This name is used to identify the machine within the WebLogic Server domain; it does not have to correspond to the machine's network name.
Post bind GID enabled and Post bind GID
Select Post bind GID enabled to specify a non-privileged group account under which the server instance runs, then enter the group in the Post bind GID column. The default group is nobody, which is a standard UNIX group ID that provides the least possible privileges. In a production environment, Oracle recommends that you create a group account specifically for running instances of WebLogic Server.
Post bind UID enabled and Post bind UID
Select Post bind UID enabled to specify a non-privileged user account under which the server instance runs, then enter the user in the Post bind UID column. The default user is nobody, which is a standard UNIX account that provides the least possible privileges. In a production environment, Oracle recommends that you create a user account specifically for running instances of WebLogic Server.
Node manager listen address
Enter the DNS name or IP address on which the Node Manager listens.
Mode manager listen port
Enter the port number on which the Node Manager listens for incoming requests.
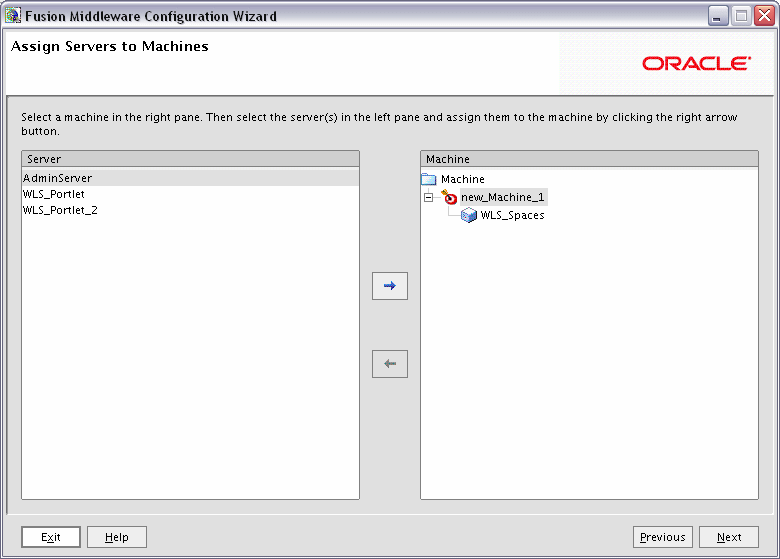
Use this screen to assign each WebLogic Server instance to the corresponding machine on which it runs.
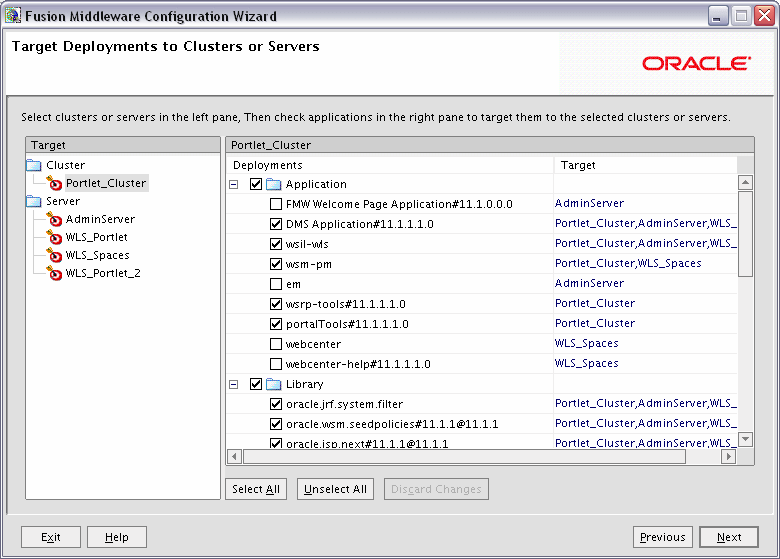
This screen enables you to target your deployments to servers or clusters. Doing so enables WebLogic Server to serve the deployment to clients.
The Configuration Wizard automatically takes care of all necessary deployment targeting. You should not have to change anything on this screen unless specifically directed to do so. For more information, refer to "Target Deployments to Clusters or Servers" in Oracle WebLogic Server Creating WebLogic Domains Using the Configuration Wizard.
In the left pane, select the server or cluster. Then, select the deployment in the right pane that you want to target to the selected server or cluster. The "Target" column in the right pane shows you the servers and clusters to which each deployment is targeted.
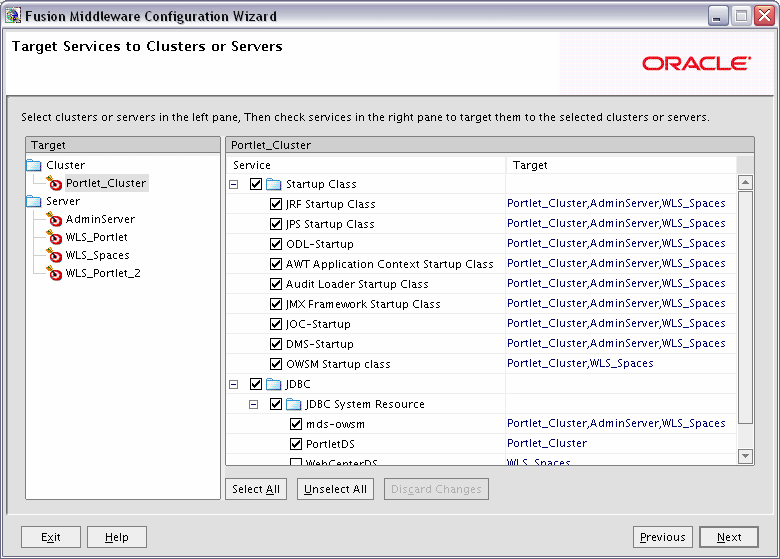
Use this screen to target your services (for example, JMS, JDBC, startup and shutdown classes) to servers or clusters. Doing so enables your applications to use these services.
The Configuration Wizard automatically takes care of all necessary services targeting. You should not have to change anything on this screen unless specifically directed to do so. For more information, refer to "Target Services to Clusters or Servers" in Oracle WebLogic Server Creating WebLogic Domains Using the Configuration Wizard.
In the left pane, select the server or cluster. Then, select the service in the right pane that you want to target to the selected server or cluster. The "Target" column in the right pane shows you the servers and clusters to which each service is targeted.
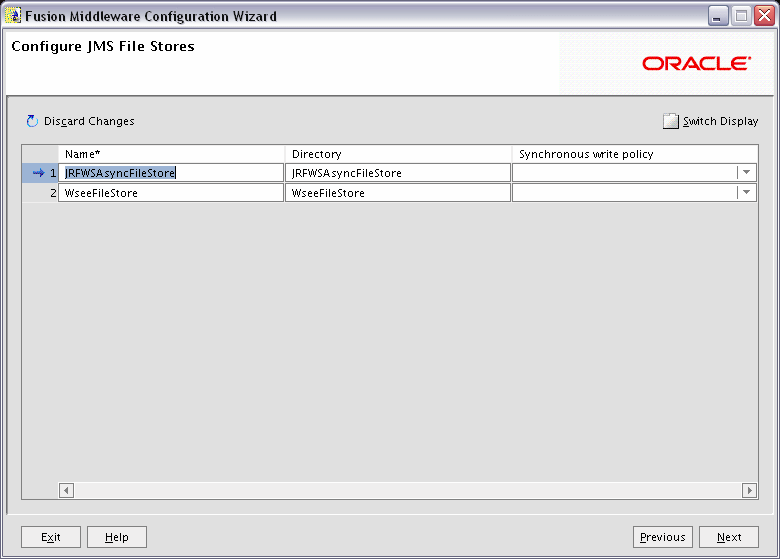
Edit the configuration information for the JMS file stores, which are used to store persistent messages and durable subscribers.
Name
Alphanumeric (no spaces) name of your JMS file store. Each JMS file store configuration in your WebLogic environment must have a unique name, regardless of the domain or cluster in which it resides.
Directory
Directory where the JMS file store is located.
Synchronous write policy
Use the drop-down list to select one of the following for each file store:
Cache-Flush
Transactions cannot complete until all of their writes have been flushed down to disk. This policy is reliable and scales well as the number of simultaneous users increases.
Direct-Write
File store writes are written directly to disk. This policy is supported on Solaris and Windows. If this policy is set on an unsupported platform, the file store automatically uses the Cache-Flush policy instead.
Disabled
Transactions are complete as soon as their writes are cached in memory, instead of waiting for the writes to successfully reach the disk. This policy is the fastest, but the least reliable (that is, transactionally safe). It can be much faster than the other policies, but power outages or operating system failures can cause lost or duplicate messages.
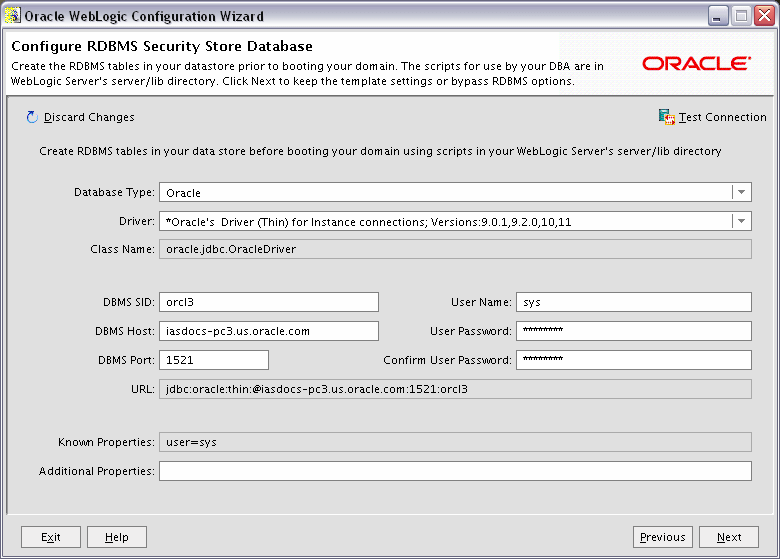
To make changes on this screen, select a database type from the drop-down list in the "Database Type" field. Then, select the appropriate driver in the "Driver" field.
Provide the following credentials for the selected database:
DBMS SID
The service ID of your database; this is usually the same as the global ID.
DBMS Host
The name of the machine on which the database is running.
DBMS Port
The listen port number of the database.
User Name
The user name to access the database.
User Password
The password for the database user.
Confirm User Password
Re-enter the password for the database user.
Click Test Connection to make sure that the connection to your database is valid.
Click Next to continue.
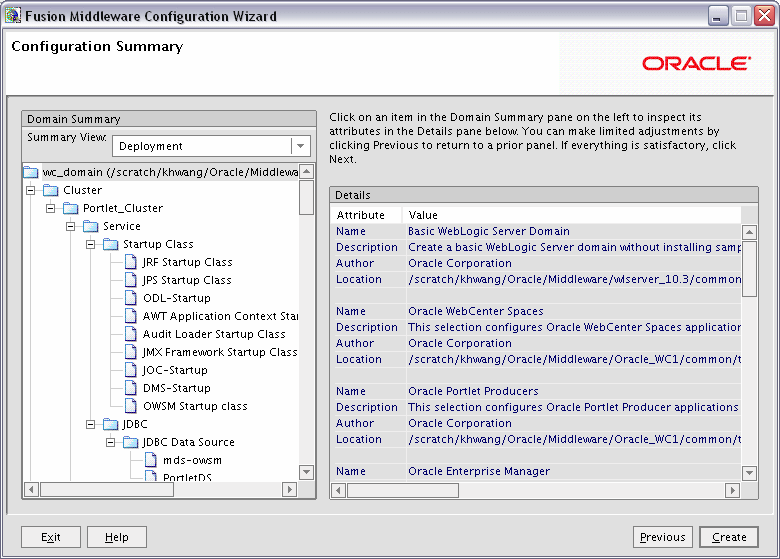
Verify the information on this screen. In the Summary View field, select a category from the drop-down list to view information about that category:
Deployment
Shows the deployments that will be configured in each cluster and server. You can click on the name of a deployment to view detailed information about the selected deployment.
Application
Shows the applications that will be configured in each cluster and server. You can click on the name of an application to view detailed information about the selected application.
Service
Shows the services that will be configured in each cluster and server. You can click on the name of a service to view detailed information about the selected service.
Cluster
Shows the clusters that will be configured in this domain and the servers that will be configured in each cluster. You can click on each server name to view information specific to that server.
Machine
Shows the machines that will be configured in this domain and the servers that will be configured in each machine. You can click on each server name to view information specific to that server.
Use the Previous button if you want to return to a previous screen to alter some portion of the configuration.
If everything is correct, click Create.
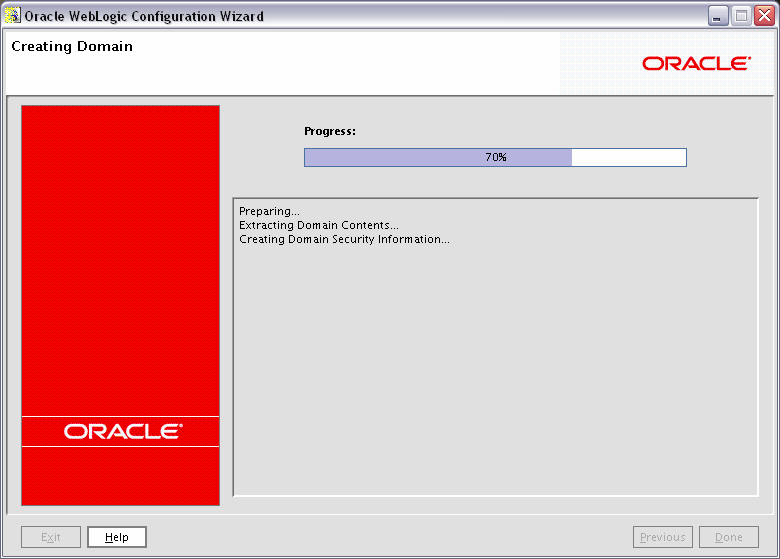
This screen shows the progress of the domain creation.
When it is finished, click Done to dismiss the window.
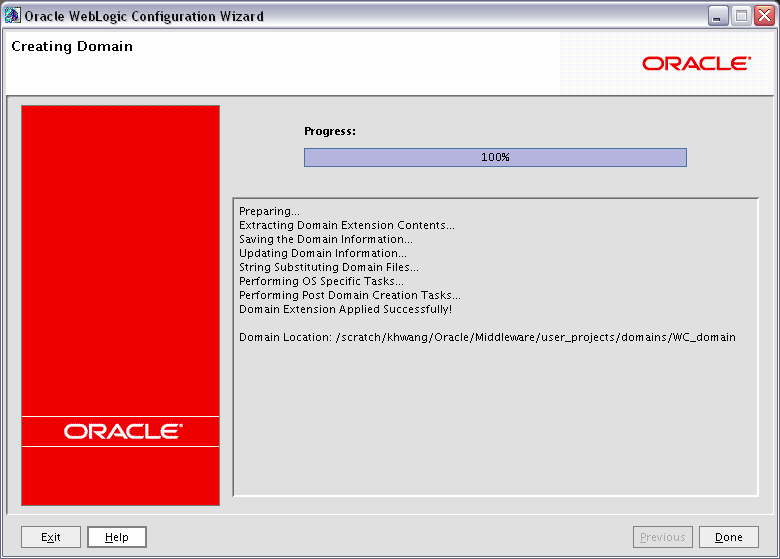
This screen shows the progress of the domain creation.
When it is finished, click Done to dismiss the window.