| Oracle® Fusion Middleware Developer's Guide for Oracle SOA Suite 11g Release 1 (11.1.1) E10224-03 |
|
 Previous |
 Next |
| Oracle® Fusion Middleware Developer's Guide for Oracle SOA Suite 11g Release 1 (11.1.1) E10224-03 |
|
 Previous |
 Next |
This chapter describes how to use domain value maps to map the vocabulary used by different domains.
This chapter includes the following sections:
Section 41.5, "Creating a Domain Value Map Use Case for Hierarchical Lookup"
Section 41.6, "Creating a Domain Value Map Use Case For Multiple Values"
Domain value maps operate on actual data values that transit through the infrastructure at runtime. They enable you to map from one vocabulary, used in a given domain, to another vocabulary used in a different domain. For example, one domain might represent a city with a long name (Boston) while another domain may represent a city with a short name (BO). In such cases, you can directly map the values by using domain value maps. A direct mapping of values between two or more domains is known as point-to-point mapping. Table 41-1 shows a point-to-point mapping for cities between two domains:
Table 41-1 Point-to-Point Mapping
| CityCode | CityName |
|---|---|
|
BELG_MN_STLouis |
BelgradeStLouis |
|
BELG_NC |
BelgradeNorthCarolina |
|
BO |
Boston |
|
NP |
Northport |
|
KN_USA |
KensingtonUSA |
|
KN_CAN |
KensingtonCanada |
Each domain value map typically holds a specific category of mappings among multiple applications. For example, one domain value map might hold mappings for city codes and another might hold mappings for state codes.
Domain value map values are static. You specify the domain value map values at design time using Oracle JDeveloper, and then at runtime, the domain value map columns are looked up for values.
|
Note: To dynamically integrate values between applications, you can use the Cross referencing feature of Oracle SOA Suite. For information about cross references, see Chapter 43, "Working with Cross References" |
The domain value map functionality consists of the following features:
Qualifiers qualify mappings. A mapping may not be valid unless qualified with additional information. For example, a domain value map containing city code to city name mapping may have multiple mappings from KN to Kensington because Kensington is a city in Canada and the USA. So, this mapping requires a qualifier (USA or Canada) to qualify when the mapping becomes valid, as shown in Table 41-2.
Table 41-2 Qualifier Support Example
| Country (Qualifier) | CityCode | CityName |
|---|---|---|
|
USA |
BO |
Boston |
|
USA |
BELG_NC |
Belgrade |
|
USA |
BELG_MN_Streams |
Belgrade |
|
USA |
NP |
Northport |
|
USA |
KN |
Kensington |
|
Canada |
KN |
Kensington |
You can also specify multiple qualifiers for a domain value map. For example, as shown in Table 41-3, BELG to Belgrade mapping can also be qualified with state name.
Table 41-3 Multiple Qualifier Support Example
| Country (Qualifier) | State (Qualifier) | CityCode | CityName |
|---|---|---|---|
|
USA |
Massachusetts |
BO |
Boston |
|
USA |
North Carolina |
BELG |
Belgrade |
|
USA |
Minnesota |
BELG |
Belgrade |
|
USA |
Alabama |
NP |
Northport |
|
USA |
Kansas |
KN |
Kensington |
|
Canada |
Prince Edward Island |
KN |
Kensington |
Qualifiers are used only to qualify the mappings. So, the qualifier values cannot be looked up.
A qualifier order is used to find the best match during lookup at runtime. The order of a qualifier varies from highest to lowest depending on the role of the qualifier in defining a more exact match. In Table 41-3, the state qualifier can have a higher order than the country qualifier, as a matching state indicates a more exact match.
Domain value maps support hierarchical lookup. If you specify a qualifier value during a lookup and no exact match is found, then the lookup mechanism tries to find a more generalized match by setting the higher order qualifiers to a"". It proceeds until a match is found, or until a match is not found with all qualifiers set to a"". Figure 41-1 describes hierarchical lookup performed for the following lookup on Table 41-3:
State=Arkansas, Country=Canada, CityCode=KN_USA
In this example, the State qualifier has a qualifier value of 1 and the Country qualifier has a qualifier value of 2.
As shown in Figure 41-1, the lookup mechanism sets the higher order qualifier STATE to the exact lookup value Arkansas and uses Canada|"" for the lower order qualifier Country.
When no match is found, the lookup mechanism sets the higher order qualifier, STATE to value "" and sets the next higher qualifier Country to an exact value Canada.
When no match is found, the lookup mechanism sets the value of the previous higher order qualifier Country to value "". One matching row is found where CityCode is KN_USA and Kensington is returned as value.
Table 41-4 provides a summary of these steps.
You can map one value to multiple values in a domain value map. For example, a domain value map for Payment Terms can contain mapping of payment terms to three values, such as discount percentage, discount period, and total payment period, as shown in Table 41-5.
You can create one or more domain value maps in a SOA Composite application of Oracle JDeveloper, and then at runtime, use it to look up for column values.
You can create a domain value map by using the Create Domain Value Map(DVM) File dialog in Oracle JDeveloper.
To create a domain value map:
In the Application Navigator, right-click the project in which you want to create a domain value map and select New.
The New Gallery dialog is displayed.
Expand the SOA Tier node, and then select the Transformations category.
In the Items list, select Domain Value Map(DVM) and click OK.
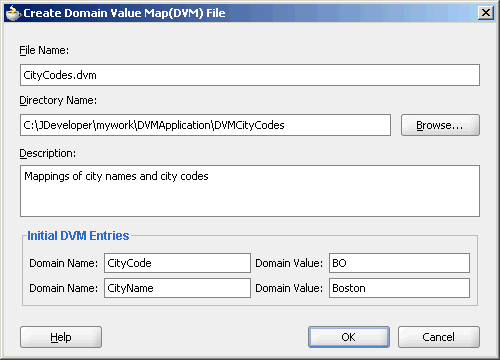
The Create Domain Value Map(DVM) File dialog is displayed.
In the File Name field, enter the name of the domain value map file. For example, specify CityCodes to identify a domain value map for city names and city codes.
In the Description field, enter a description for the domain value map. For example, Mappings of city names and city codes. This field is optional.
In the Domain Name field, enter a name for each domain. For example, you can enter CityCode in one Domain Name field and CityName in another. Each domain name must be unique in a domain value map.
|
Note: You can later add more domains to a domain value map by using the Domain Value Map Editor. |
In the Domain Value field, enter a value corresponding to each domain. For example, enter BO for CityCode domain and Boston for CityName domain as shown in Figure 41-2.
Figure 41-2 Populated Create Domain Value Map File Dialog
Click OK.
The Domain Value Map Editor is displayed, as shown in Figure 41-3.
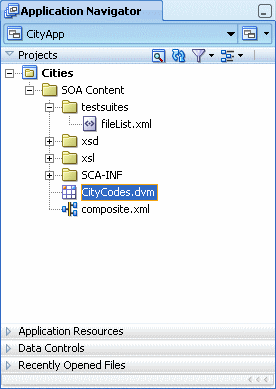
A file with extension .dvm gets created and appears in the Application Navigator, as shown in Figure 41-4.
Figure 41-4 A Domain Value Map File in Application Navigator
All .dvm files are based on the following schema definition (XSD) file:
<?xml version="1.0" encoding="UTF-8" ?>

<!-- Copyright (c) 2006, Oracle. All rights reserved.  -->

<xsd:schema xmlns:xsd="http://www.w3.org/2001/XMLSchema"

                  targetNamespace="http://xmlns.oracle.com/dvm"

                  xmlns:tns="http://xmlns.oracle.com/dvm"

                  elementFormDefault="qualified"

                  attributeFormDefault="unqualified">


<xsd:element name="dvm">

    <xsd:annotation>

      <xsd:documentation>The Top Level Element

      </xsd:documentation>

    </xsd:annotation>

    <xsd:complexType>

      <xsd:sequence>

        <xsd:element name="description" minOccurs="0" type="xsd:string">

          <xsd:annotation>

            <xsd:documentation>The DVM Description.  This is optional

            </xsd:documentation>

          </xsd:annotation>

        </xsd:element>

        <xsd:element name="columns">

          <xsd:annotation>

            <xsd:documentation>This element holds DVM's column List.

            </xsd:documentation>

          </xsd:annotation>

          <xsd:complexType>

            <xsd:sequence>

              <xsd:element name="column" minOccurs="2" maxOccurs="unbounded">

                <xsd:annotation>

                  <xsd:documentation>This represents a DVM Column

                  </xsd:documentation>

                </xsd:annotation>

                <xsd:complexType>

                  <xsd:attribute name="name" use="required" type="xsd:string"/>
                  <xsd:attribute name="qualifier" default="false" type="xsd:boolean"

 use="optional"/>

                  <xsd:attribute name="order" use="optional" type="xsd:positiveInteger"/>

                </xsd:complexType>

              </xsd:element>

            </xsd:sequence>

          </xsd:complexType>

        </xsd:element>

        <xsd:element name="rows" minOccurs="0">

          <xsd:annotation>

            <xsd:documentation>This represents all the DVM Rows.

            </xsd:documentation>

          </xsd:annotation>

          <xsd:complexType>

            <xsd:sequence>

              <xsd:element name="row" minOccurs="1" maxOccurs="unbounded">

                <xsd:annotation>

                  <xsd:documentation>

                    Each DVM row of values

                  </xsd:documentation>

                </xsd:annotation>

                <xsd:complexType>

                  <xsd:sequence>

                    <xsd:element name="cell" minOccurs="2" maxOccurs="unbounded"

                       type="xsd:string">

                      <xsd:annotation>
                        <xsd:documentation>This is the value for this row and for
 each column in the same order as defined in Columns.

                        </xsd:documentation>

                      </xsd:annotation>

                    </xsd:element>

                  </xsd:sequence>

                </xsd:complexType>

              </xsd:element>

            </xsd:sequence>

          </xsd:complexType>

        </xsd:element>

      </xsd:sequence>

      <xsd:attribute name="name" use="required" type="xsd:string"/>

    </xsd:complexType>

  </xsd:element>

  <xsd:annotation>
    <xsd:documentation>This Schema is used to validate the DVM Document got for
 creation and
 update of a DVM.

    </xsd:documentation>

  </xsd:annotation>

</xsd:schema>
After you have created a domain value map, you can edit it and make adjustments to the presentation of data in the Domain Value Map Editor.
A domain value map column defines the domain whose values you want to map with other domains.
To add a column to a domain value map:
Click Add.
Select Add Column.
The Create DVM Column dialog is displayed.
In the Name field, enter a column name.
In the Qualifier field, select True to set this column as a qualifier, else select False.
In the Qualifier Order field, enter a qualifier number. This field is enabled only if you have selected True in the Qualifier field.
Click OK.
After creating a domain value map, you can use the XPath functions of the domain value map to look up for appropriate values and populate the targets for the applications at runtime.
You can use the dvm:lookupValue and dvm:lookupValue1M XPath functions to look up a domain value map for a single value or multiple values at runtime.
The dvm:lookupValue function returns a string by looking up the value for the target column in a domain value map, where the source column contains the given source value.
Usage 1
dvm:lookupValue(dvmMetadataURI as string, SourceColumnName as string,

 SourceValue as string, TargetColumnName as string, DefaultValue as string) as

 string
Example:
dvm:lookupValue('cityMap.dvm','CityCodes','BO', 'CityNames','CouldNotBeFound')
Usage 2
dvm:lookupValue(dvmMetadataURI as string, SourceColumnName as string,

SourceValue as string, TargetColumnName as string, DefaultValue as string,

(QualifierSourceColumn as string, QualifierSourceValue as string)*) as string
Example:
dvm:lookupValue ('cityMap.dvm','CityCodes','BO','CityNames',

 'CouldNotBeFound', 'State', 'Massachusetts')
Arguments
dvmMetadataURI - The domain value map URI.
SourceColumnName - The source column name.
SourceValue - The source value (an XPath expression bound to the source document of the XSLT transformation).
TargetColumnName - The target column name.
DefaultValue - If the value is not found, then the default value is returned.
QualifierSourceColumn: The name of the qualifier column.
QualifierSourceValue: The value of the qualifier.
The dvm:lookupValue1M function returns an XML document fragment containing values for multiple target columns of a domain value map, where the value for source column is equal to the source value.
dvm:lookupValue1M(dvmMetadataURI as string, SourceColumnName as string,
 SourceValue as string,(TargetColumnName as string)?)as nodeset
Arguments
dvmMetadataURI - The domain value map URI.
SourceColumnName - The source column name.
SourceValue - The source value (an XPath expression bound to the source document of the XSLT transformation).
TargetColumnName - The name of the target columns. At least one column name should be specified. The question mark symbol (?) indicates that you can specify multiple target column names.
Example
dvm:lookupValue1M ('cityMap.dvm','CityCode','BO','CityName','CityNickName')
The result is:
<CityName>Boston</CityName>
<CityNickName>BeanTown</CityNickName>
The domain value map functions can be used for transformation with a BPEL service component or a Mediator service component. Transformations are done by using the XSLT Mapper window, which is displayed when you create an XSL file to transform the data from one XML schema to another.
For information about XSLT Mapper, see Chapter 35, "Creating Transformations with the XSLT Mapper".
To use the lookupValue1M Function in Transformation:
In the Application Navigator, double-click an XSL file to open the XSLT Mapper window.
In the XSLT Mapper window, expand the trees in the Source and Target panes.
In the Component Palette, click the down arrow and then select Advanced.
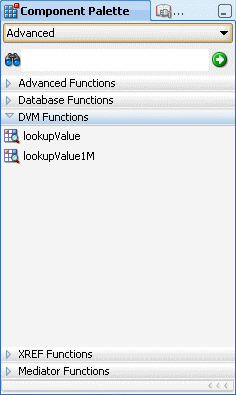
Select DVM Functions as shown in Figure 41-5.
Figure 41-5 Domain Value Map Functions in Component Palette
Drag and drop lookupValue1M onto the line that connects the source to the target.
A dvm:lookupValue1M icon appears on the connecting line.
Double-click the lookupValue1M icon.
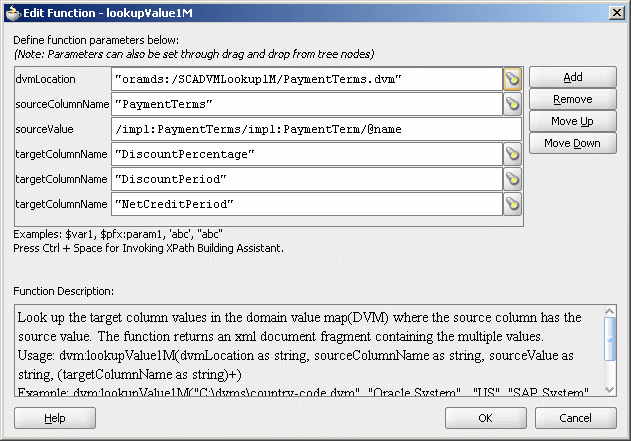
The Edit Function – lookupValue1M dialog is displayed, as shown in Figure 41-6.
Figure 41-6 Edit Function – lookupValue1M Dialog
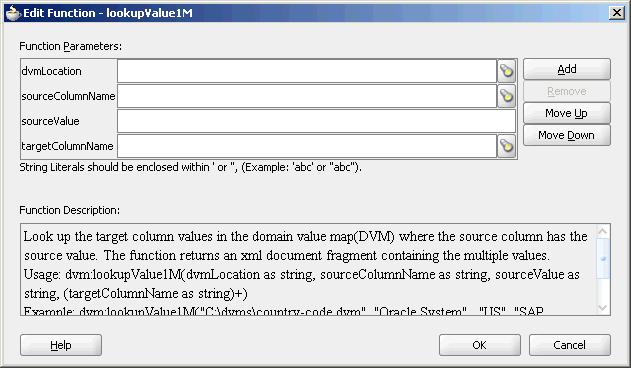
Specify values for the following fields in the Edit Function – lookupValue1M dialog:
In the dvmLocation field, enter the location URI of the domain value map file or click Browse to the right of the dvmLocation field to select a domain value map file. You can select an already deployed domain value map from MDS and also from the shared location in MDS. This can be done by selecting the Resource Palette.
In the sourceColumnName field, enter the name of the domain value map column that is associated with the source element value, or click Browse to select a column name from the columns defined for the domain value map you previously selected.
In the sourceValue field, enter a value or press Ctrl-Space to use XPath Building Assistant. Press the up and down arrow keys to locate an object in the list, and press Enter to select an item.
In the targetColumnName field, enter the name of the domain value map column that is associated with the target element value, or click Browse to select the name from the columns defined for the domain value map you previously selected.
Click Add to add another column as target column and then enter the name of the column.
A populated Edit Function - lookupValue1M dialog is shown in Figure 41-7.
Figure 41-7 Populated Edit Function – lookupValue1M Dialog
Click OK.
The XSLT Mapper window is displayed with the lookupValue1M function icon.
From the File menu, click Save All.
You can use the domain value map functions to create XPath expressions in the Expression Builder dialog. You can access the Expression builder dialog through the Filter Expressions or the Assign Values functionality of a Mediator service component.
For information about the Assign Values functionality, see Section 20.2.2.8, "Assigning Values".
To use the lookupValue function in the Expression Builder dialog:
In the Functions list, select DVM Functions.
Double-click the dvm:lookupValue function to add it to the expression field.
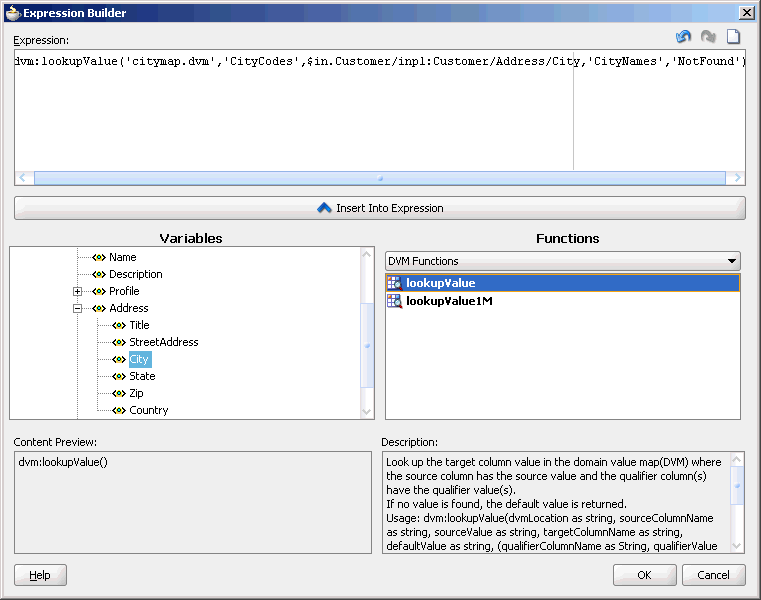
Specify the various arguments of the lookupValue function. For example:
dvm:lookupValue('citymap.dvm','CityCodes',$in.Customer/inp1:Customer/Address/Ci
ty,'CityNames','NotFound')
This expression, also shown in Figure 41-8, looks up a domain value map for the city name equivalent of a city code. The value of the city code depends on the value specified at runtime.
Figure 41-8 Domain Value Map Functions in the Expression Builder Dialog
This use case demonstrates the hierarchical lookup feature of domain value maps. The hierarchical lookup use case consists of the following steps:
Files are picked up from a directory by an adapter service named ReadOrders.
The ReadOrders adapter service sends the file data to the ProcessOrders Mediator.
The ProcessOrders Mediator then transforms the message to the structure required by the adapter reference. During transformation, Mediator looks up the UnitsOfMeasure domain value map for an equivalent value of the Common domain.
The ProcessOrders Mediator sends the message to an external reference WriteOrders.
The WriteOrders reference writes the message to a specified output directory.
For downloading the sample files mentioned in this section, visit the following URL:
http://www.oracle.com/technology/sample_code/products/mediator
This section provides the design-time tasks for creating, building, and deploying your SOA composite application. These tasks must be performed in the order in which they are presented.
Section 41.5.1.1, "Task 1: Creating an Oracle JDeveloper Application and Project"
Section 41.5.1.4, "Task 4: Creating ProcessOrders Mediator Component"
Section 41.5.1.5, "Task 5: Creating a File Adapter Reference"
Section 41.5.1.7, "Task 7: Configuring Oracle Application Server Connection"
Section 41.5.1.8, "Task 8: Deploying the Composite Application"
To create an application and a project for the use case:
In Oracle JDeveloper, click File and select New.
The New Gallery dialog appears.
In the New Gallery, expand the General node, and select the Applications category.
In the Items list, select SOA Application and click OK.
The Create SOA Application Wizard appears.
In the Application Name field, enter Hierarchical and then click Next.
The Name your SOA project screen appears.
In the Project Name field, enter HierarchicalValue and click Next.
The Configure SOA settings for the SOA project screen appears.
In the Composite Template list, select Empty Composite and then click Finish.
The Applications Navigator of Oracle JDeveloper is populated with the new application and the project, and the Design tab contains a blank palette.
From the File menu, click Save All.
After creating an application and a project for the use case, you must create a domain value map.
To create a domain value map:
In the Application Navigator, right-click the HierarchicalValue project and select New.
In the New Gallery dialog, expand the SOA Tier node, and then select the Transformations category.
In the Items list, select Domain Value Map(DVM) and click OK.
The Create Domain Value Map(DVM) File dialog is displayed.
In the File Name field, enter UnitsOfMeasure.dvm.
In the Domain Name fields, enter Siebel and Common.
In the Domain Value field corresponding to the Siebel domain, enter Ea.
In the Domain Value field corresponding to the Common domain, enter Each.
Click OK.
The Domain Value Map Editor is displayed.
Click Add and then select Add Column.
The Create DVM Column dialog is displayed.
In the Name field, enter TradingPartner.
In the Qualifier list, select true.
In the QualifierOrder field, enter 1 and click OK.
Repeat Step 9 through Step 12 to create another qualifier named StandardCode with qualifier order as 2.
Click Add and then select Add Row.
Repeat this step to add two more rows.
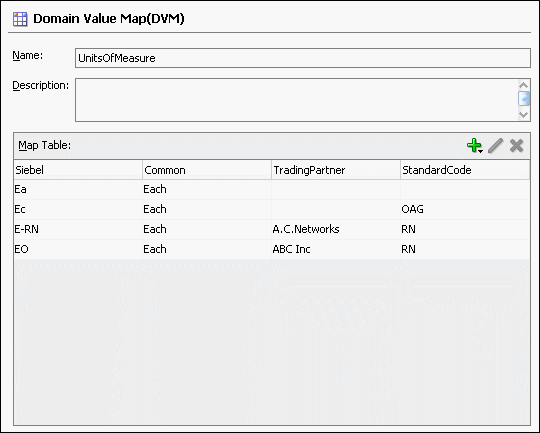
Enter the following information in the newly added rows of the domain value map table:
| Siebel | Common | TradingPartner | StandardCode |
|---|---|---|---|
| EC | Each | OAG | |
| E-RN | Each | A.C.Networks | RN |
| EO | Each | ABC Inc | RN |
The Domain Value Map Editor would appear as shown in Figure 41-9.
Figure 41-9 UnitsOfMeasure Domain Value Map
From the File menu, click Save All and close the Domain Value Map Editor.
After creating the domain value map, you must create a File adapter service, named ReadOrders to read the XML files from a directory.
|
Note: Oracle Mediator may process the same file twice when run against Oracle RAC planned outages. This is because a File adapter is a non-XA compliant adapter. So, when it participates in a global transaction, it may not follow the XA interface specification of processing each file only once. |
To create a File adapter service:
From the Components Palette, select SOA.
Select File Adapter and drag it to the Exposed Services design area.
If the Adapter Configuration Wizard Welcome page appears, click Next.
The Service Name page is displayed.
In the Service Name field, enter ReadOrders and then click Next.
The Operation page is displayed.
In the Operation Type field, select Read File and then click Next.
The File Directories page is displayed.
In the Directory for Incoming Files (physical path) field, enter the directory from which you want to read the files.
Click Next.
The File Filtering page is displayed.
In the Include Files with Name Pattern field, enter *.xml and then click Next.
The File Polling page is displayed.
Change the Polling Frequency field value to 10 seconds and then click Next.
The Messages page is displayed.
Click Search.
The Type Chooser dialog is displayed.
Click Import Schema File.
The Import Schema File dialog is displayed.
Click Search and select the Order.xsd file present in the Samples folder.
Click OK.
Expand the navigation tree to Type Explorer\Imported Schemas\Order.xsd.
Select listOfOrder and click OK.
Click Next.
The Finish page is displayed.
Click Finish.
From the File menu, click Save All.
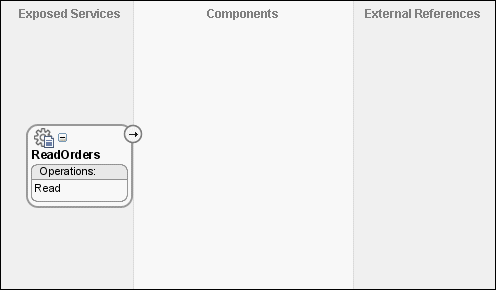
Figure 41-10 shows the ReadOrders service in SOA Composite Editor.
Figure 41-10 ReadOrders Service in the SOA Composite Editor
To create a Mediator named ProcessOrders:
Drag and drop a Mediator from Component Palette to the Components design area.
The Create Mediator dialog is displayed.
In the Name field, enter ProcessOrders.
In the Template list, select Define Interface Later.
Click OK.
A Mediator with name ProcessOrders is created.
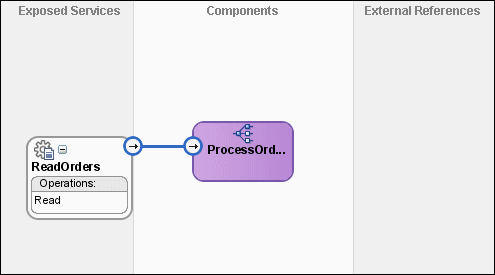
In the SOA Composite Editor, connect the ReadOrders service to the ProcessOrders Mediator, as shown in Figure 41-11.
This specifies the file adapter service to invoke the ProcessOrders Mediator while reading a file from the input directory.
Figure 41-11 ReadOrders Service Connected to the ProcessOrders Mediator
From the File menu, click Save All.
To create a file adapter reference:
From the Components Palette, select SOA.
Select File Adapter and drag it to the External References design area.
The Adapter Configuration wizard Welcome page is displayed.
Click Next.
The Service Name page is displayed.
In the Service Name field, enter WriteCommonOrder.
Click Next.
The Operation page is displayed.
In the Operation Type field, select Write File.
Click Next.
The File Configuration page is displayed.
In the Directory for Outgoing Files (physical path) field, enter the name of the directory where you want to write the files.
In the File Naming Convention field, enter common_order_%SEQ%.xml and click Next.
The Messages page is displayed.
Click Search.
The Type Chooser dialog is displayed.
Navigate to Type Explorer, Project Schema Files, Order.xsd and then select listOfOrder.
Click OK.
Click Next.
The Finish page is displayed.
Click Finish.
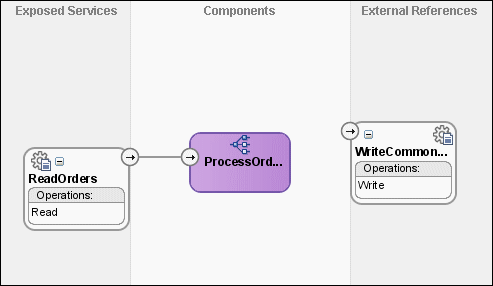
Figure 41-12 shows the WriteCommonOrder reference in SOA Composite Editor.
Figure 41-12 WriteCommonOrder Reference in SOA Composite Editor
From the File menu, click Save All.
You must specify the path that messages take from the ReadOrders adapter service to the external reference.
To specify routing rules
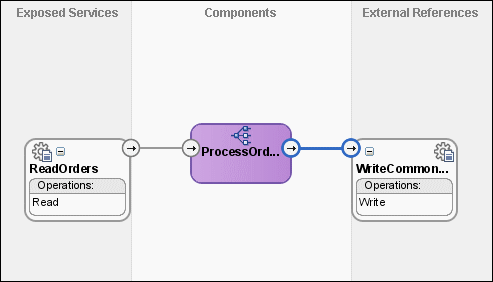
Connect the ProcessOrders Mediator to the WriteCommonOrder reference as shown in Figure 41-13.
Figure 41-13 ProcessOrders Mediator Connected to the WriteCommonOrder Reference
Double-click ProcessOrders Mediator.
Click the icon to the right of the Transform Using field.
The Request Transformation Map dialog is displayed.
Select Create New Mapper File and click OK.
A listOfOrder_To_listOfOrder.xsl tab is displayed.
Drag and drop the imp1:listOfOrder source element onto imp1:listOfOrder target element.
The Auto Map Preferences dialog is displayed.
From the During Auto Map options, deselect Match Elements Considering their Ancestor Names.
Click OK.
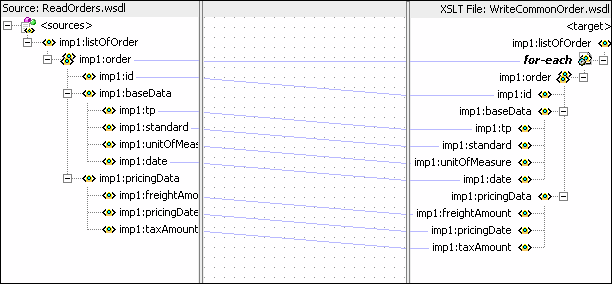
The listOfOrder_To_listOfOrder.xsl tab appears as shown in Figure 41-14.
Figure 41-14 imp1:listOfOrder To imp1:listOfOrder Transformation
In the Components Palette, select Advanced.
Click DVM Functions.
Drag and drop lookupValue on the line connecting the unitsOfMeasure elements, as shown in Figure 41-15.
Figure 41-15 Adding lookupValue Function to imp1:listOfOrder To imp1:listOfOrder.xsl
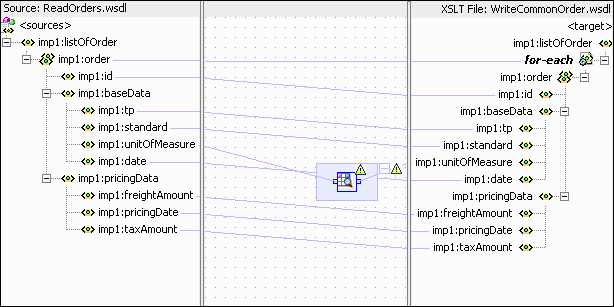
Double-click the lookupvalue icon.
The Edit Function-lookupValue dialog is displayed.
Click Search to the right of the dvmLocation field.
The SCA Resource Lookup dialog is displayed.
Select UnitsofMeasure.dvm and click OK.
Click Search to the right of the sourceColumnName field.
The Select DVM Column dialog is displayed.
Select Siebel and click OK.
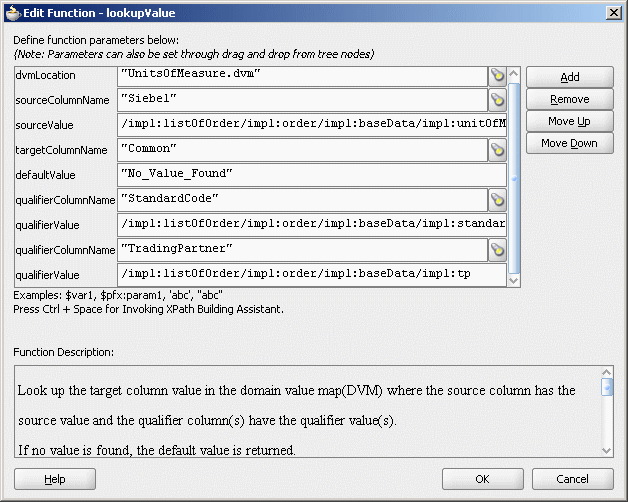
In the sourceValue column, enter
/imp1:listOfOrder/imp1:order/imp1:baseData/imp1:unitOfMeasure.
Click Search to the right of the targetColumnName field.
The Select DVM Column dialog is displayed.
Select Common and click OK.
In the defaultValue field, enter "No_Value_Found".
Click Add.
A qualifierColumnName row is added.
In the qualifierColumnName field, enter "StandardCode".
Click Add.
A qualifierValue row is added.
In the qualifierValue field, enter
/imp1:listOfOrder/imp1:order/imp1:baseData/imp1:standard.
Click Add to insert another qualifierColumnName row.
In the qualifierColumnName field, enter "TradingPartner".
Click Add to insert another qualifierValue row.
In the qualifierValue field, enter /imp1:listOfOrder/imp1:order/imp1:baseData/imp1:tp.
The Edit Function-lookupValue dialog would appear as shown in Figure 41-16.
Figure 41-16 Edit Function-lookupValue Function Dialog: Hierarchical Lookup Use Case
Click OK.
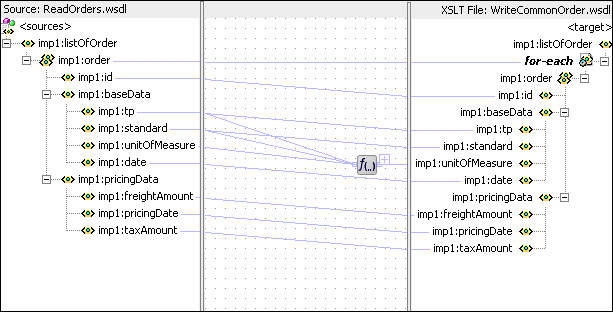
The transformation would appear as shown in Figure 41-17.
Figure 41-17 Complete imp1:listOfOrder To imp1:listOfOrder Transformation
From the File menu, click Save All and close the listOfOrder_To_listOfOrder.xsl tab.
An Oracle Application Server connection is required for deploying your SOA composite application. For information on creating an Oracle Application Server connection, refer to Oracle Fusion Middleware User's Guide for Technology Adapters.
Deploying the HierarchicalValue composite application to Oracle Application Server consists of the following steps:
Creating an Application Deployment Profile.
Deploying the Application to Oracle Application Server.
For detailed information about these steps, see Section 38.7.1, "Deploying a Single SOA Composite in Oracle JDeveloper".
After deploying the HierarchicalValue application, you can run it by copying the input XML file sampleorder.xml to the input folder. This file is available in the samples folder. On successful completion, a file with name common_order_1.xml is written to the specified output directory.
For monitoring the running instance, you can use Oracle Enterprise Manager Console at the following URL:
http://hostname:port/em
where hostname is the host on which you installed the Oracle SOA Suite infrastructure.
For detailed information about these steps, see Section 38.7.1, "Deploying a Single SOA Composite in Oracle JDeveloper".
This use case demonstrates the integration scenario using a DVM lookup between two endpoints to look up multiple values. For example, if the inbound is State, then the outbound are Shortname of State, Language, and Capital. The multivalue lookup use case consists of the following steps:
Files are picked up from a directory by an adapter service named readFile.
The readFile adapter service sends the file data to the LookupMultiplevaluesMediator Mediator.
The LookupMultiplevaluesMediator Mediator then transforms the message to the structure required by the adapter reference. During transformation, Mediator looks up the multivalue domain value map for an equivalent value of Longname and Shortname domains.
The LookupMultiplevaluesMediator Mediator sends the message to an external reference writeFile.
The writeFile reference writes the message to a specified output directory.
For downloading the sample files mentioned in this section, visit the following URL:
http://www.oracle.com/technology/sample_code/products/mediator
This section provides the design-time tasks for creating, building, and deploying your SOA composite application. These tasks should be performed in the order in which they are presented.
Section 41.6.1.1, "Task 1: Creating an Oracle JDeveloper Application and Project"
Section 41.6.1.4, "Task 4: Creating LookupMultiplevaluesMediator Mediator Component"
Section 41.6.1.5, "Task 5: Creating a File Adapter Reference"
Section 41.6.1.7, "Task 7: Configuring Oracle Application Server Connection"
Section 41.6.1.8, "Task 8: Deploying the Composite Application"
To create an application and a project for the use case:
In Oracle JDeveloper, click File and select New.
The New Gallery dialog appears.
In the New Gallery, expand the General node, and select the Applications category.
In the Items list, select SOA Application and click OK.
The Create SOA Application Wizard appears.
In the Application Name field, enter Multivalue and then click Next.
The Name your project screen appears.
In the Project Name field, enter Multivalue and click Next.
The Configure SOA settings screen appears.
In the Composite Template list, select Empty Composite and then click Finish.
The Applications Navigator of Oracle JDeveloper is populated with the new application and the project, and the Design tab contains a blank palette.
From the File menu, click Save All.
After creating an application and a project for the use case, you must create a domain value map.
To create a domain value map:
In the Application Navigator, right-click the Multivalue project and select New.
In the New Gallery dialog, expand the SOA Tier node, and then select the Transformations category.
In the Items list, select Domain Value Map(DVM) and click OK.
The Create Domain Value Map(DVM) File dialog is displayed.
In the File Name field, enter multivalue.dvm.
In the Domain Name fields, enter Longname, Shortname, Language, and Capital.
In the Domain Value field corresponding to the Longname domain, enter Karnataka.
In the Domain Value field corresponding to the Shortname domain, enter KA.
In the Domain Value field corresponding to the Language domain, enter Kannada.
In the Domain Value field corresponding to the Capital domain, enter Bangalore.
Click OK.
The Domain Value Map Editor is displayed.
Click Add and then select Add Row.
Repeat this step to add two more rows.
Enter the following information in the newly added rows of the domain value map table:
| Longname | Shortname | Language | Capital |
|---|---|---|---|
| Karnataka | KA | Kannada | Bangalore |
| Tamilnadu | TN | Tamil | Chennai |
| Andhrapradesh | AP | Telugu | Hyderbad |
| Kerala | KL | Malayalam | Trivandram |
The Domain Value Map Editor would appear as shown in Figure 41-18.
From the File menu, click Save All and close the Domain Value Map Editor.
After creating the domain value map, you must create a File adapter service, named readFile to read the XML files from a directory.
|
Note: Oracle Mediator may process the same file twice when run against Oracle RAC planned outages. This is because a File adapter is a non-XA compliant adapter. So, when it participates in a global transaction, it may not follow the XA interface specification of processing each file only once. |
To create a File adapter service:
From the Components Palette, select SOA.
Select File Adapter and drag it to the Exposed Services design area.
If the Adapter Configuration Wizard Welcome page appears, click Next.
The Service Name page is displayed.
In the Service Name field, enter readFile and then click Next.
The Adapter Interface page is displayed.
Click Define from operation and schema (specified later) and then click Next.
The Operation page is displayed.
In the Operation Type field, select Read File and then click Next.
The File Directories page is displayed.
In the Directory for Incoming Files (physical path) field, enter the directory from which you want to read the files.
Click Next.
The File Filtering page is displayed.
In the Include Files with Name Pattern field, enter *.xml and then click Next.
The File Polling page is displayed.
Change the Polling Frequency field value to 1 second and then click Next.
The Messages page is displayed.
Click Search.
The Type Chooser dialog is displayed.
Click Import Schema File.
The Import Schema File dialog is displayed.
Click Search and select the input.xsd file present in the Samples folder.
Click OK.
Expand the navigation tree to Type Explorer\Imported Schemas\input.xsd.
Select Root-Element and click OK.
Click Next.
The Finish page is displayed.
Click Finish.
From the File menu, click Save All.
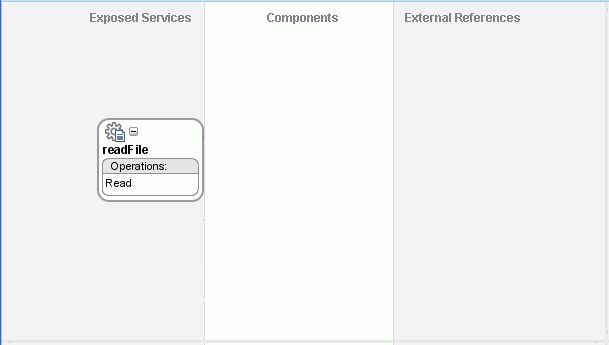
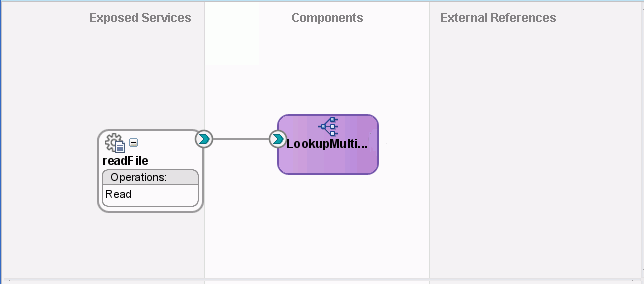
Figure 41-19 shows the readFile service in SOA Composite Editor.
Figure 41-19 readFile Service in the SOA Composite Editor
To create a Mediator named LookupMultiplevaluesMediator:
Drag and drop a Mediator from Component Palette to the Components design area.
The Create Mediator dialog is displayed.
In the Name field, enter LookupMultiplevaluesMediator.
In the Template list, select Define Interface Later.
Click OK.
A Mediator with name LookupMultiplevaluesMediator is created.
In the SOA Composite Editor, connect the readFile service to the LookupMultiplevaluesMediator Mediator, as shown in Figure 41-20.
This specifies the file adapter service to invoke the LookupMultiplevaluesMediator Mediator while reading a file from the input directory.
Figure 41-20 readFile Service Connected to the LookupMultiplevaluesMediator Mediator
From the File menu, click Save All.
To create a file adapter reference:
From the Components Palette, select SOA.
Select File Adapter and drag it to the External References design area.
The Adapter Configuration wizard Welcome page is displayed.
Click Next.
The Service Name page is displayed.
In the Service Name field, enter writeFile and then click Next.
The Adapter Interface page is displayed.
Click Define from operation and schema (specified later) and then click Next.
The Operation page is displayed.
Click Next.
The Operation page is displayed.
In the Operation Type field, select Write File.
Click Next.
The File Configuration page is displayed.
In the Directory for Outgoing Files (physical path) field, enter the name of the directory where you want to write the files.
In the File Naming Convention field, enter multivalue_%SEQ%.xml and click Next.
The Messages page is displayed.
Click Search.
The Type Chooser dialog is displayed.
Navigate to Type Explorer, Project Schema Files, output.xsd and then select Root-Element.
Click OK.
Click Next.
The Finish page is displayed.
Click Finish.
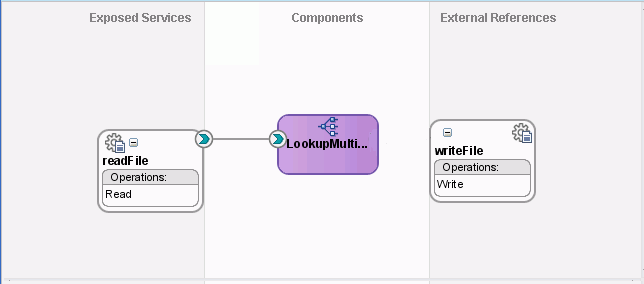
Figure 41-21 shows the writeFile reference in SOA Composite Editor.
Figure 41-21 writeFile Reference in SOA Composite Editor
From the File menu, click Save All.
You must specify the path that messages take from the readFile adapter service to the external reference.
To specify routing rules
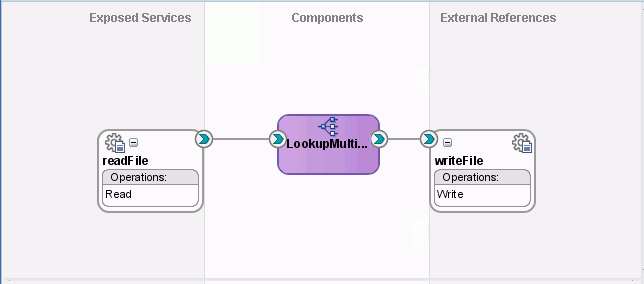
Connect the LookupMultiplevaluesMediator Mediator to the writeFile reference as shown in Figure 41-22.
Figure 41-22 LookupMultiplevaluesMediator Mediator Connected to the writeFile Reference
Double-click the LookupMultiplevaluesMediator Mediator.
Click the icon to the right of the Transform Using field.
The Request Transformation Map dialog is displayed.
Select Create New Mapper File and click OK.
A Input_To_Output_with_multiple_values_lookup.xsl tab is displayed.
Drag and drop the imp1:Root-Element source element to ns2:Root-Element target element.
The Auto Map Preferences dialog is displayed.
From the During Auto Map options, deselect Match Elements Considering their Ancestor Names.
Click OK.
The Input_To_Output_with_multiple_values_lookup.xsl tab appears as shown in Figure 41-23.
Figure 41-23 imp1:Root-Element To ns2:Root-Element Transformation

In the Components Palette, select Advanced.
Click DVM Functions.
Drag and drop lookupValue1M to the center swimlane, as shown in Figure 41-24.
Figure 41-24 Adding lookupValue Function to imp1:Root-Element to ns2:Root-Element

Double-click the lookupvalue1M icon.
The Edit Function-lookupValue1M dialog is displayed.
Click Search to the right of dvmLocation field.
The SCA Resource Lookup dialog is displayed.
Select multivalue.dvm and click OK.
Click Search to the right of sourceColumnName field.
The Select DVM Column dialog is displayed.
Select Longname and click OK.
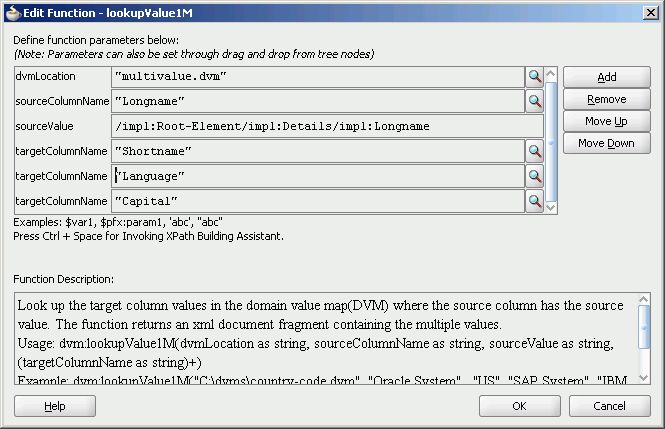
In the sourceValue column, enter /imp1:Root-Element/imp1:Details/imp1:Longname.
Click Search to the right of targetColumnName field.
The Select DVM Column dialog is displayed.
Select Shortname and click OK.
Click Add.
A targetColumnName row is added.
In the targetColumnName field, enter "Language".
Click Add to insert another targetColumnName row.
In the targetColumnName field, enter "Capital".
The Edit Function-lookupValue dialog would appear as shown in Figure 41-25.
Figure 41-25 Edit Function-lookupValue Function Dialog: Multiple Value Lookup Use Case
Click OK.
The Transformation would appear as shown in Figure 41-26.
Figure 41-26 Complete imp1:Root-Element To ns2:Root-Element Transformation

From the File menu, click Save All and close the Input_To_Output_with_multiple_values_lookup.xsl tab.
An Oracle Application Server connection is required for deploying your SOA composite application. For information on creating Oracle Application Server connection, refer to Oracle Fusion Middleware User's Guide for Technology Adapters.
Deploying the Multivalue composite application to Oracle Application Server consists of the following steps:
Creating an Application Deployment Profile.
Deploying the application to Oracle Application Server.
For detailed information about these steps, see Section 38.7.1, "Deploying a Single SOA Composite in Oracle JDeveloper".
After deploying the Multivalue application, you can run it by copying the input XML file sampleinput.xml to the input folder. This file is available in the samples folder. On successful completion, a file with name multivalue_1.xml is written to the specified output directory.
For monitoring the running instance, you can use Oracle Enterprise Manager Console at the following URL:
http://hostname:port/em
where hostname is the host on which you installed the Oracle SOA Suite infrastructure.
In Oracle Enterprise Manager Console, you can click the Multivalue to see the project dashboard.
To view the detailed execution trail, click the instance ID in the instance column. The Flow Trace page is displayed.