| Oracle® Fusion Middleware User's Guide for Technology Adapters 11g Release 1 (11.1.1) E10231-02 |
|
 Previous |
 Next |
| Oracle® Fusion Middleware User's Guide for Technology Adapters 11g Release 1 (11.1.1) E10231-02 |
|
 Previous |
 Next |
Oracle JCA Adapters are based on J2EE Connector Architecture (J2CA) 1.5 standards and deployed in the Oracle WebLogic Server. The life cycle of Oracle JCA Adapters depend on Oracle Fusion Middleware. These adapters integrate with Oracle Fusion Middleware through the JCA Binding Component.
This chapter includes the following sections:
Configuring Message Header Properties for Oracle JCA Adapters
Creating an Application Server Connection for Oracle JCA Adapters
Handling Deployment Plan When Working on a Remote Oracle SOA Server
Singleton (Active/Passive) Inbound Endpoint Lifecycle Support Within Adapters
Oracle BPEL Process Manager Correlation Support Within Adapters
Recommended Setting for Data Sources Used by Oracle JCA Adapters
Oracle Technology Adapters and Oracle Adapter for Oracle Applications are available as part of the Oracle Fusion Middleware install. These adapters support both Oracle WebLogic Server and middle tier deployments. For more information, see Section 2.3, "Oracle SOA Suite 11g (11.1.1.0.0)", in the Oracle Fusion Middleware Installation Planning Guide.
Legacy adapters and packaged-application adapters are available as part of the Oracle Fusion Middleware Adapters and Connectors CD. These adapters support middle tier deployment only. For more information, see Section 2.18, "Oracle Fusion Middleware Adapters and Connectors", in the Oracle Fusion Middleware Installation Planning Guide.
|
Note: Before installing any adapter, review Section 1.1, "System Requirements and Prerequisites", in the Oracle Fusion Middleware Installation Planning Guide, to familiarize yourself with system requirements and prerequisites including supported operating system and JDK versions. |
Oracle JCA Adapters are deployed as JCA 1.5 resource adapters. Therefore, to start or stop an adapter, every resource adapter must implement the start (BootstrapContext) and stop methods as part of the SPI interface. Oracle JCA Adapters are started when an SOA composite using them starts a JCA outbound interaction. Adapters can also be started when an SOA composite is itself loaded for inbound interactions or when adapters publish events to the Oracle BPEL process.
Once you have started an adapter, you can stop the adapter by shutting down the Oracle WebLogic Server or by stopping the J2EE application within Oracle Fusion Middleware. In this release, the JCA Binding Component acts as a part of the JCA 1.5 container.
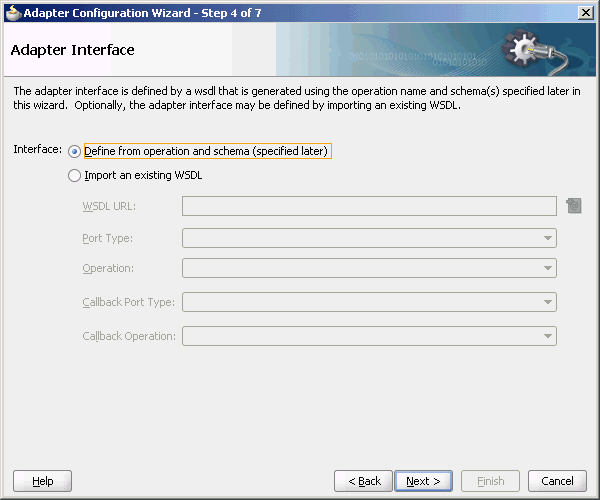
You can define an adapter interface in the Adapter Configuration Wizard Adapter Interface page, as shown in Figure 2-1, by using either of the following methods:
Using a WSDL that is generated using the operation name and schema that you specify in the Adapter Configuration Wizard in the pages that appear subsequent to the Adapter Configuration Wizard Adapter Interface page.
Importing an existing WSDL.
Figure 2-1 The Adapter Configuration Wizard Adapter Interface Page
This section describes how to define an adapter interface by importing an existing WSDL. You can use this feature to create an adapter service or reference by using existing WSDLs. The option to choose an existing WSDL is supported for the following adapters only:
Oracle File Adapter
Oracle FTP Adapter
Oracle Socket Adapter
Oracle AQ Adapter
Oracle JMS Adapter
Oracle MQ Series Adapter
If you select the option of defining the adapter interface by importing an existing WSDL, then some functionalities on subsequent wizard pages are disabled. For example, since the WSDL defines the operation name and the message schema, the subsequent operation name and schema element fields are automatically filled in and you cannot modify it, as shown in Figure 2-2. However, if you do not choose to use an existing WSDL, then the adapter wizards will behave exactly as before.
Figure 2-2 Operation Page for Oracle AQ Adapter with Fields Automatically Populated
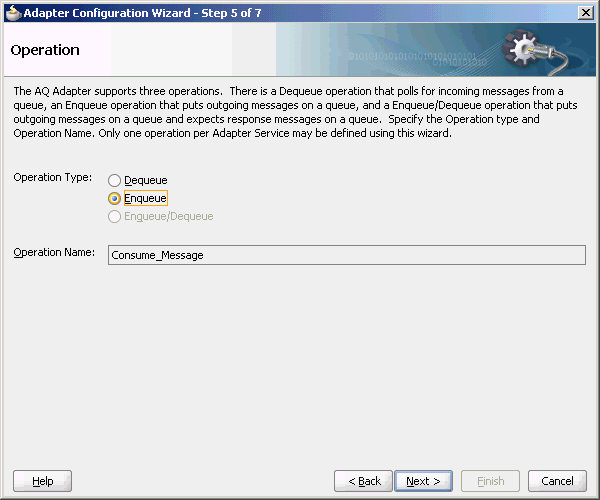
Note that the Adapter Configuration Wizard for Oracle MQ Series Adapter, Oracle JMS Adapter, and the Oracle AQ Adapter appears a bit different from the other adapters. It has the additional option to select a callback the port type and operation. Subsequent options in the Adapter Configuration Wizard are enabled or disabled depending on what port types and operations you select.
For example, while using the Adapter Configuration Wizard for defining Oracle MQ Series Adapter, if a callback is selected, then only the Send Message to MQ and Get Reply/Reports and the Get Message from MQ and Send Reply/Reports Asynchronous options are enabled. If a callback is not selected, then only the Put Message into MQ and Get Message from MQ options are enabled. If a WSDL operation that has a synchronous reply is selected, then only the Get Message from MQ and Send Reply/Reports Synchronous option is enabled.
Note that in all cases of using an existing WSDL, the options to use CICS or IMS schemas are disabled.
|
Note: The most common approach to importing an existing WSDL is to first create an Oracle BPEL process or a Mediator, and then define their WSDL files from schemas (or NXSD). After this is done, adapter services are created, and the WSDL file generated for the BPEL process or the Mediator component is imported as the existing WSDL file.However, you must keep in mind that this feature works only for those messages which use schema element. Simple and complex types are not supported. |
Oracle JCA Adapters expose the underlying back-end operation specific properties as message header elements and allow the manipulation of these elements within a business process.
You can add, delete, or revert Oracle JCA Adapters properties from the Fusion Middleware Control Console. However, depending on the type of property, you may need to redeploy your composite application in order to apply the property change.
Table 2-1 lists the types of message header properties you can configure and whether or not redeployment is required.
Table 2-1 Oracle JCA Adapters Property Types
| Property Type | Description | Restrictions |
|---|---|---|
|
Activation specification and interaction specification |
Activation specification properties operate as services and interaction specification properties operate as references in a SOA composite application. |
Do not add or remove these properties. You can only change their values. These properties require the adapter endpoint to be recycled. These types of properties are also dependent upon other properties. If you attempt to add one of these properties, you have no way of knowing which dependent properties must also be added. |
|
Endpoint |
These are tuning-related properties that are not exposed through the activation or interaction specification properties, such as specifying time outs, thresholds, maximum intervals, and so on. |
There are no restrictions on adding, removing, or changing endpoint properties. The adapter is notified when these properties are added, removed, or changed, but it does not require redeployment. Note that you cannot add or remove |
For more information, see Appendix A, "Oracle JCA Adapter Properties".
The record implementation for Oracle JCA Adapters is XMLRecord. All adapter interactions are started with XMLRecord. Each JCA record must be an implementation of oracle.tip.adapter.api.record.XMLRecord. Each instance of XMLRecord contains the RecordElement. RecordElements payload that contains data. In addition, each RecordElement contains one BLOB of data, which can either be a UTF-8-encoded XML string or a binary opaque byte stream.
XMLRecord consists of the following methods:
getPayloadRecordElement: Retrieves the payload RecordElement.
setPayloadRecordElement: Sets the payload record element of the XMLRecord.
Oracle JCA Adapters are deployed as JCA 1.5 resource adapters in an Oracle WebLogic Server container. Adapters are packaged as Resource Adapter Archive (RAR) files using the Java Archive (JAR) format. The physical deployment of adapters involves using the RAR file and registering the adapters as connectors with the underlying Oracle WebLogic Server or the middle tier platform. The RAR file contains the ra.xml file, which is the deployment descriptor XML file containing deployment-specific information about the resource adapter. In addition, the RAR file contains declarative information about the contract between Oracle WebLogic Server and the resource adapter.
In addition to the ra.xml file in the.rar file, adapters package the weblogic-ra.xml template file. The weblogic-ra.xml file is used to define resource adapter ConnectorFactory objects (logical deployment). The weblogic-ra.xml file is the Oracle WebLogic Server-specific deployment descriptor for a resource adapter. It contains deployment configurations for deploying resource adapters to Oracle WebLogic Server, which includes the back-end application connection information as specified in the deployment descriptor of the resource adapter, Java Naming and Directory Interface (JNDI) name to be used, connection pooling parameters, resource principal mapping mechanism, and configurations.
For more information, see:
Creating an Application Server Connection for Oracle JCA Adapters
Handling Deployment Plan When Working on a Remote Oracle SOA Server
Recommended Setting for Data Sources Used by Oracle JCA Adapters
Oracle Fusion Middleware Installation Guide for Oracle WebLogic Server.
You must establish connectivity between the design-time environment and the server you want to deploy it to. To establish such connectivity, you must create an application server connection.
The following are the steps to create an application server connection:
In the File menu, click New.
The New Gallery page is displayed, as shown in Figure 2-3.
In the All Technologies tab, under General categories, select Connections.
A list of the different connections that you can make is displayed in the Items pane on the right side of the New Gallery page.
Select Application Server Connection, and then click OK.
The Create Application Server Connection page is displayed, as shown in Figure 2-4.
Figure 2-4 The Create Application Server Connection Name & Type Page
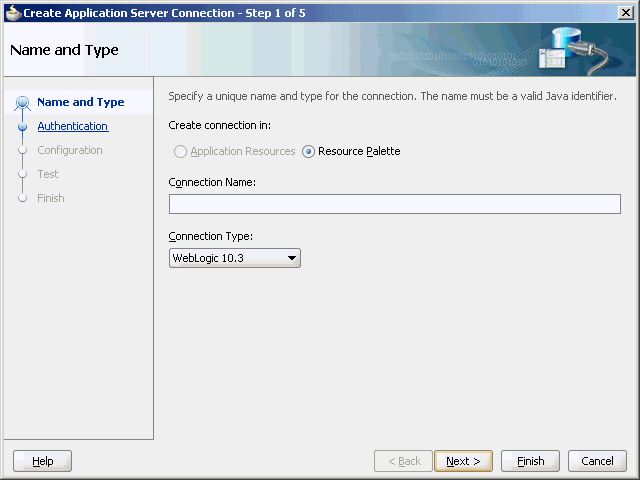
Enter a connection name in the Connection Name field. For example, AppsServerConnection1.
Select WebLogic 10.3. for Connection Type and click Next.
The Authentication page is displayed, as shown in Figure 2-5.
Figure 2-5 The Create Application Server Connection Authentication Page
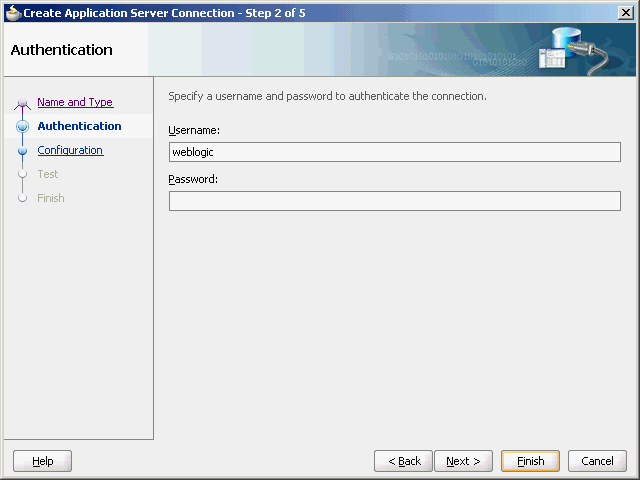
Enter the user name and password, and then click Next.
The Create Application Server Connection Configuration page is displayed, as shown in Figure 2-6.
Figure 2-6 The Create Application Server Connection Configuration Page
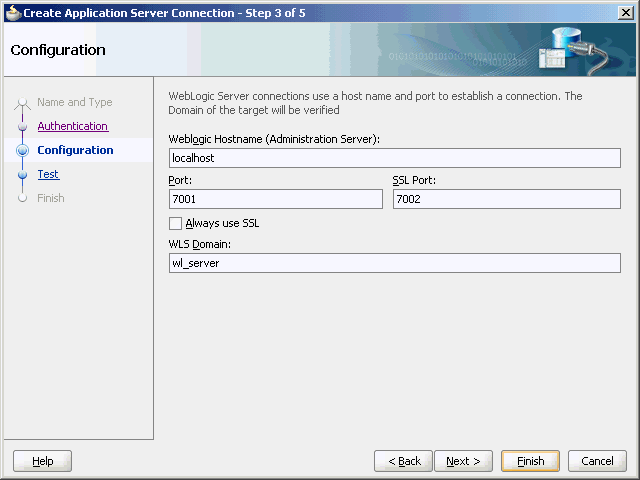
Enter the host name, the port details, and the domain server name in the Configuration page.
Click Next.
The Create Application Server Connection Test page is displayed, as shown in Figure 2-7.
Figure 2-7 The Create Application Server Connection Test Page
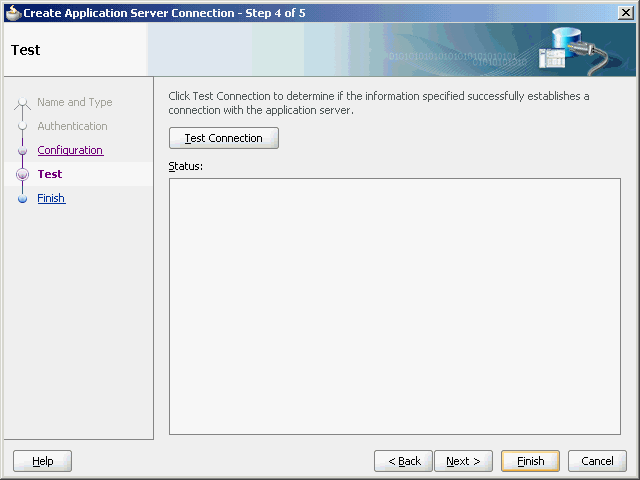
Click Test Connection. A success message is displayed in the Status pane.
Click Finish.
You have created a server connection.
You deploy an SOA composite application from JDeveloper.
JDeveloper requires the use of profiles for SOA projects and applications to be deployed. This section describes how to create and deploy profiles with JDeveloper.
This section describes how you deploy an application profile for the SOA project and the application.
To deploy the application, you must perform the following steps:
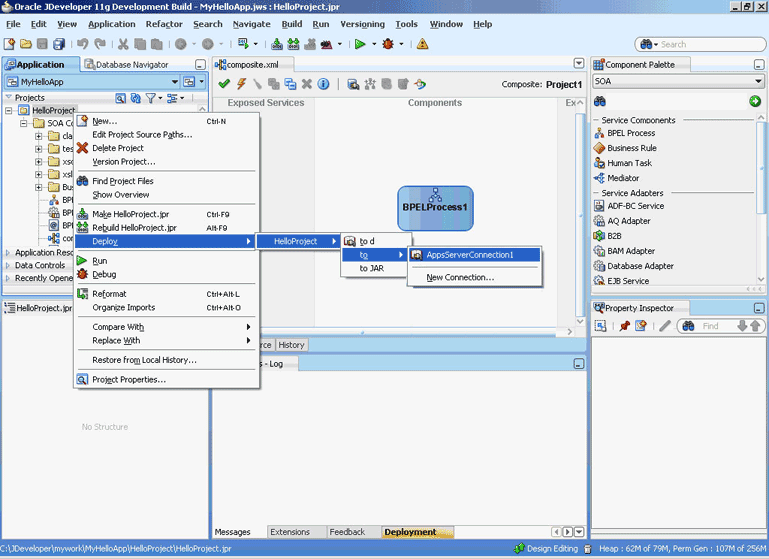
Right-click the project that you want to deploy, and select Deploy > project_name, to Application_Server_Connection_Name, as shown in Figure 2-8.
The SOA Deployment Configuration dialog is displayed.
Figure 2-8 Application Profile Deployment
Use the default settings, as shown in Figure 2-9.
Figure 2-9 The SOA Deployment Configuration Dialog
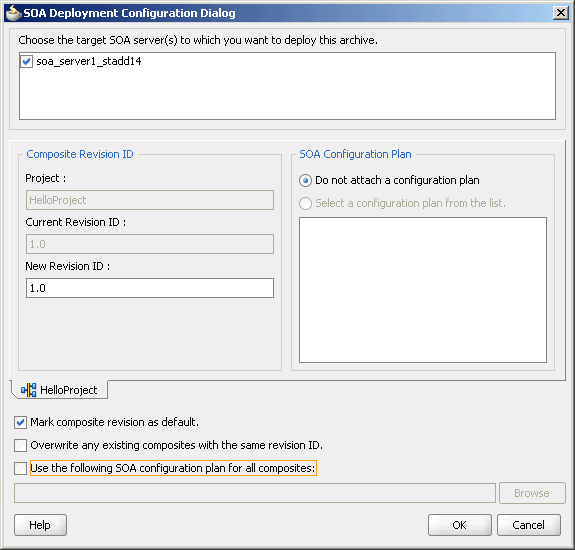
Click OK.
The Authorization request dialog is displayed.
Enter the user name and password, and then click OK.
The project is compiled and deployed to the Managed Server. You can view the deployment log clicking the Deployment tab in the design area.
If you want to redeploy the same version of a SOA composite application, you cannot change the composite name. You can deploy with the same revision number if you selected the Overwrite any existing composites with the same revision ID check box on the SOA Deployment Configuration dialog. However, if you do not do so, then the following error message is deployed in the deployment log:
pr 29, 2009 1:55:57 AM
oracle.integration.platform.blocks.deploy.servlet.CompositeDeployerMessages severeSendError
SEVERE: Sending back error message:
Error during composite deployment: oracle.fabric.common.FabricDeploymentException:
Composite with same revision ID already exists:
default/<application name>!<revision id>.
Please set the overwrite flag or use different revision ID.
Abort deployment...
This section describes how to manually deploy any adapter RAR file that does not have a jar file associated with it.
If you deploy any adapter RAR file that only contains META-INF/ra.xml and META-INF/weblogic-ra.xml and does not contain the jar file adapter required for creating JNDIs, then while deploying, you must change the deployment order to a higher value (say 500) so that the Oracle WebLogic Server can deploy this RAR file after the jar file of this adapter is loaded.
For example, to deploy the DBAdapter_NewJndis.rar file that contains only META-INF/ra.xml and META-INF /weblogic-ra.xml and does not contain the jar file adapter (DbAdapter.jar) required while instantiating the new JNDIs. In this case, after deploying the DBAdapter_NewJndis.rar file, you must change the deployment order to a higher value. This ensures that the Oracle WebLogic Server deploys the DBAdapter_NewJndi.rar file correctly even if you restart the Oracle WebLogic Server.
The following are the steps to manually deploy an adapter RAR file that does not have a jar file associated with it:
Navigate to the Oracle WebLogic Server Administration Console: http://servername:portnumber/console.
Use the required credentials to open the Home page of the Oracle WebLogic Server Administration Console.
The Home page of the Oracle WebLogic Server Administration Console is displayed.
Select Deployments in the Domain Structure pane.
The Oracle WebLogic Server Administration Console Summary of Deployments page is displayed.
Click Install.
The Install Application Assistant page is displayed.
Enter the path of the application directory or file in the Path field, and then click Next.
Select the servers to which you want to deploy this application, and then click Next.
The Optional Settings page is displayed.
Modify these settings or accept the defaults, and then click Next.
The Review your choices and click Finish page is displayed.
Click Finish to complete the deployment.
After you deploy the RAR file, under Summary of Deployments, click the name of the RAR file that you deployed.
The Settings page is displayed.
Change the value of Deployment Order field to a value that is higher than the default value. For example, 500.
This ensures that the newly deployed RAR file is always loaded after the supporting classes are loaded by the Oracle WebLogic Server.
If the Adminserver is running on computer A and the Oracle SOA server is running on computer B, then you must copy the deployment plan file to computer B before you activate changes made on the Oracle SOA server. If you try to activate changes without copying the deployment plan to the Oracle SOA Server computer, then a NullPointerException is thrown.
All the JCA files generated by the Adapter Configuration Wizard have a reference to the JNDI name. The reference is defined in the weblogic-ra.xml file, which is the adapter's deployment descriptor. The JNDI name is the key when you want to migrate from a development environment to a test environment to a production environment. You should update the weblogic-ra.xml file to have the same JNDI name in all three environments: development, testing, and production. You should specify values for deployment time properties, such as retry interval and retry count, and then redeploy to testing environment or production environment. The weblogic-ra.xml will identify the end point as a development EIS or testing EIS or production EIS. For example, consider that when running through the Database Adapter Service Wizard, you specify eis/DB/custStore as the JNDI name for the createCustomer service. After modeling the composite by using this adapter service, you should deploy it to the development, test, or production environments without making any changes. But before you do this, ensure that you have a corresponding JNDI entry for eis/DB/custStore in each of your various environments pointing to the right EIS instance.
This section describes how adapters ensure no message loss.
Transactional adapters allow the Enterprise Information System (EIS) to participate in one-phase or two-phase commits (local transactions or global/distributed transactions). These commits are controlled either by the adapter (inbound) or by the Oracle User Messaging Service (UMS) (outbound). Non-transactional adapters implement their own schemes to ensure delivery, without the use of transactional semantics.
This section describes:
For more information, see:
Section 5.9.1.2 "Oracle JCA Adapters Reliability and Transactional Behavior" in the Oracle Fusion Middleware High Availability Guide.
Local transaction allows the Oracle WebLogic Server to manage resources, which are local to the resource adapter. The adapter defines the type of transaction support by specifying the transaction-support element in the weblogic-ra.xml file. When an application component requests for an EIS connection, the Oracle WebLogic Server starts a local transaction based on the current transaction context. When the application component closes that connection, the Oracle WebLogic Server commits the local transaction. The Oracle WebLogic Server also cleans up the EIS connection once the transaction has completed.
In the case of local transactions, fault policies are executed if the JTA transaction is detected to still be active and if a policy has been bound to the partnerlink that has thrown the exception. The JTA check allows the BPEL engine to catch manipulation of the transaction by a third party before proceeding with work that may be dehydrated.
Adapters support global transactions in the JCA 1.5 XA contracts that leverage the underlying application server transaction manager. This includes Oracle Adapter for Oracle Applications, Database, Advanced Queuing, JMS and MQSeries. Non-transactional adapters include Oracle File Adapter and Oracle FTP Adapter.
In the case of a global transaction, you cannot do anything to stop a rollback. This fault type indicates that the JTA transaction must be retried (for example when a RAC node goes down, the transaction must be retried by restarting the transaction). In this case, fault policy gets executed. However, it is not advisable to use fault policy when XA behavior is desired, because fault policy runs in its own transaction and does not participate in the Global Transaction.
Specifically, the Fault Policy commits any existing JTA transaction before it starts executing a particular Reference (for example, in Oracle BPEL PM it is an Invoke activity). The prexisting JTA transaction is not suspended and then resumed.
For an asynchronous SCA service entry point, a transactional adapter initiates a global JTA transaction before sending an inbound message to a composite. When control returns to the adapter, it will commit the JTA transaction, thus executing the following set of actions as an atomic unit of work:
Commit the removal of the message from the inbound adapter endpoint (for example, table and queue).
Commit the execution of the composite instance.
If anything fails during this, then both the actions 1 and 2 will be rolled back.
For a synchronous process, the global transaction initiated by the adapter will span message delivery and composite execution.
For transactional adapters, outbound JCA interactions (the Invoke activities) are scoped with the global BPEL JTA (EJB) transaction. This means that all composite activities, including Oracle JCA adapter invocations will be part of a global transaction, and as such either all activities are committed or rolled back, if an error occurs.
For example, a BPEL process can insert data into several tables (on different databases) through different invoke activities (invoking the Database adapter). When the BPEL instance is about to finish, the JTA transaction is committed. Only at that point will the database insert operations be committed. If any errors occur during the BPEL instance execution, all activities (and thus database operations) will be rolled back to the last dehydration point.
The Oracle WebLogic Server migration is used on WebLogic platform so that if a managed server or machine fails, then it automatically restarts on the same or another machine and inbound adapters to a composite on the failed server will then resume functioning. Meanwhile, inbound adapters in other cluster members continue working servicing messages.
For more information, see:
Singleton (Active/Passive) Inbound Endpoint Lifecycle Support Within Adapters
File and FTP adapters: High Availability
Database adapter: High Availability
MQ adapter: High Availability
Section 5.9 "Oracle JCA Adapters and High Availability Concepts" in the Oracle Fusion Middleware High Availability Guide.
The JCA Binding Component supports active fail-over of inbound Adapter Services.
To enable this feature for a given inbound adapter endpoint, add the singleton JCA service binding property (composite.xml) and set it to a value of true as Example 2-1 shows. To disable this feature, set the singleton property to a value of false (or remove the property from the <binding.jca> element).
Example 2-1 singleton Property in composite.xml
<service name="JmsTopicSubscr" ui:wsdlLocation="JmsTopicSubscr.wsdl">
    <interface.wsdl interface="http://xmlns.oracle.com/...#wsdl.interface(Subscr_ptt)"/>
    <binding.jca config="JmsTopicSubscr_file.jca">
        <property name="singleton">true</property>
    </binding.jca>
</service>
In an Oracle WebLogic cluster, the multiple activations of the same (for example, JMS) adapter (inbound) endpoint (for a specific composite service) will be detected implicitly and automatically by all the instances of the adapter framework active in that cluster. Only one activation will be allowed to actually start the reading or publishing messages. The JCA Binding Component instances chooses one among them, randomly as to who should assume the Primary Activation responsibility. The other activations (instances) in the Oracle WebLogic cluster will initiate to a hot stand-by state, without actually invoking EndpointActivation on the JCA resource adapter.
If a primary activation at some point becomes unresponsive, is deactivated manually, or if it crashes or exits, then any one of the remaining JCA Binding Component members of the Oracle WebLogic cluster will immediately detect this, and reassign the primary activation responsibility to one of activation agents standing by.
For more information, see Composite Availability and Inbound Adapters.
When Native Correlation is used to correlate an inbound asynchronous message with a previous outbound message - by way of defining a callback interface (for a Reference) or by a mid process receive (in BPEL) - by default, the JCA framework always tries to post the message to the composite, whether the inbound message can be correlated or not.
For the Oracle AQ Adapter and Oracle JMS Adapter, if an external application copies the MessageId from the request (Invoke) message to the CorrelationId of the response (Receive) message, the adapter framework ensures that the BPEL correlation occurs.
However, when the CorrelationId of the Receive message does not match any earlier Invoke message, the message is mapped to a BPEL conversation that does not actually exist. In this case, although the message is actually persisted in the database, you may see the SEVERE log message that Example 2-2 shows:
Example 2-2 Log Error When CorrelationId of the Receive Does not Match any Earlier Invoke
SEVERE: JCABinding=>  aqadapter aqadapterAdapter Service aqadapter was unable to perform delivery of inbound message to the composite ... due to: Cannot simply post callback message to the composite as there is no service element associated with the callback. Recommendation: add/set the JCA reference/binding property 'rejectUncorrelatedMessages' to true ...
SEVERE: JCABinding=>  aqadapter Unable to create/save Composite Instance Fault due to: null
You can explicitly alter the adapter framework behavior so that it rejects nonmatching native correlation IDs by adding the rejectUncorrelatedMessages service binding property to the composite.xml file as Example 2-3 shows.
Example 2-3 Setting the rejectUncorrelatedMessages Property
<service name="FileIn" ui:wsdlLocation="FileIn.wsdl">
    <interface.wsdl interface="http://xmlns.oracle.com/...#wsdl.interface(Read_ptt)"/>
    <binding.jca config="FileIn_file.jca">
        <property name="rejectUncorrelatedMessages">true</property>
    </binding.jca>
</service>
When rejectUncorrelatedMessages is set to true, uncorrelatable Receive messages are rejected by the adapter framework, that is, pushed back to the publishing JCA resource adapter.
By default, this property is set to false.
To prevent the resource adapter from trying to resend the message indefinitely, you can declare a message rejection handler.
For more information, see:
Oracle JCA Adapters support large payload processing for both inbound and outbound processing. However, only the following adapters support the streaming feature explicitly:
Oracle File Adapter
For more information, see Oracle File Adapter Scalable DOM.
Oracle AQ Adapter
For more information, see Stream Payload Support.
Oracle JMS Adapter
For more information, see "Supports Streaming Large Payload".
Oracle Database Adapter
For more information, see Streaming Large Payload.
The other adapters do not have explicit support for both.
The batching and debatching functionality is supported only by Oracle JCA Adapter for Files and Oracle JCA Adapter for FTP, and Oracle JCA Adapter for Databases.
Oracle JCA Adapter for File and Oracle JCA Adapter for FTP consist of a Reader to debatch a single large file into several batches. You need to specify the batch size during the design-time configuration. In addition, the adapter includes a Writer to batch a set of messages into a single file. For more information, see File Debatching.
Oracle JCA Adapter for Databases consists of a Publish component to poll a set of tables to detect events. This component can raise events to the BPEL process one record at a time or multiple records at a time. For more information, see Polling Strategies.
The logical deployment of adapters refers to the creation of ConnectionFactory objects in the weblogic-ra.xml deployment descriptor file. To add the connection information and assign to a JNDI name, edit the corresponding weblogic-ra.xml file of the resource adapter by either using Oracle WebLogic Server Administration Console or WLST scripts. The weblogic-ra.xml file contains run-time connection parameters for an adapter.
For more information about creating a connection factory, see Oracle Fusion Middleware Installation Guide for Oracle WebLogic Server.
The following steps describe how to set up a Database connection factory in the Oracle WebLogic Server Administration Console.
This section includes the following topics:
To create a data source:
Navigate to http://servername:portnumber/console.
Use the required credentials to open the Home page of the Oracle WebLogic Server Administration Console.
The Home page of the Oracle WebLogic Server Administration Console is displayed.
Under Domain Structure, select Services, JBDC, and then click DataSources.
The Summary of JDBC Data Sources page is displayed.
Click New. The Create a New JDBC Data Source page is displayed.
Enter the following values for the properties to be used to identify your new JDBC data source:
Name: soademoDatabase
JNDI Name: jdbc/soademoDatabase
Database Type: Oracle
Retain the default value for Database driver.
Click Next. The Create a New JDBC Data Source Transaction Options page is displayed.
Click Next. The Create a New JDBC Data Source Connection Properties page is displayed.
Enter the connection properties in the Connection Properties page, and then click Next.
The Create a New JDBC Data Source Test Database Connection page is displayed.
Click Test Configuration to test the database availability and the connection properties you provided. A message stating that the connection test succeeded is displayed at the top of the Create a New JDBC Data Source Test Database Connection page.
Click Next. The Create a New JDBC Data Source Select Targets page is displayed.
Select a target, and then click Finish. You have created a data source.
The Summary of JDBC Data Sources page is displayed. This page summarizes the JDBC data source objects that have been created in this domain. The Data Source that you created is displayed in this list.
To create a connection pool:
Navigate to http://servername:portnumber/console.
Use the required credentials to open the Home page of the Oracle WebLogic Server Administration Console.
The Home page of the Oracle WebLogic Server Administration Console is displayed.
Under Domain Structure, click Deployments.
The Summary of Deployments page is displayed.
Click the Database adapter name from the Deployments list.
The Settings for DbAdapter page is displayed.
Click Configuration tab, and then click Outbound Connection Pools tab.
The Outbound Connection Pool Configuration Table is displayed.
Click New.
Select javax.resource.cci.ConnectionFactory, and then click Next.
The Create a New Outbound Connection page is displayed.
In the JNDI Name: field, enter eis/DB/soademoDatabase.
|
Note: The JNDI value that you enter in this step is not the same value that you entered in Step 5 in Creating a Data Source. The JNDI name specified in this step must match the value you enter in your database connection you create when building your application later. |
Click Finish.
The Settings for DbAdapter page displaying a table of Outbound Connection Pool groups and instances for this resource adapter is displayed.
The configuration changes that you made must be stored in a new deployment plan.
In the Path field, select or enter the path of a deployment plan file. The path must end with ".xml".
|
Note: If the Adminserver is running on computer A and the Oracle SOA server is running on computer B, then you must copy the deployment plan file to computer B before you activate changes made on the Oracle SOA server. If you try to activate changes without copying the deployment plan to the Oracle SOA Server computer, then aNullPointerException is thrown. |
In the Properties field, enter the value for xADataSourceName as jdbc/soademoDatabase
Click Save.
|
Note: Note that the properties do not get saved when you click Save as mentioned in this step. Instead, you have to press Enter in the keyboard to save the changes you made. |
Under Domain Structure, click Deployments.
The Summary of Deployments is displayed.
Do either of the following steps:
Select the DbAdapter check box, and then click Update.
The Update Application Assistant page is displayed.
Select Redeploy this application, and then click Finish.
The Summary of Deployments page stating that the deployment you selected is updated is displayed.
Under Domain Structure, click Deployments, DbAdapter, Configuration, and then Outbound Connection Pools.
Notice that the value of the xADataSource property that you entered in Step 11 is displayed in the Connection Factory Interface tab.
|
Note: If you are adding a new value for the outbound connection pool, then you do not have to re-start the Managed server or the Admin server. However, if you edit any property of an existing connection pool, then you must re-start the server. |
This section describes the recommended setting for non-XA and XA data sources used by Oracle JCA Adapters.
The following are the recommended settings for multi data sources:
test-frequency-seconds should be 5
algorithm-type should be Load-Balancing
data-source-list should point to a list of comma-separated child data sources. For example, ("JDBC Data Source-0,JDBC Data Source-1")
Note that if your endpoint property resides in a RAC database, then it is recommended that you use multi data sources.
Table 2-2 lists the recommended setting for XA and non-XA data sources used by Oracle JCA Adapters.
Table 2-2 Recommended Setting For XA and Non-XA Data Sources
| XA Data Sources | Non-XA Data Sources |
|---|---|
|
The driver used is |
The driver used is |
|
The JDBC URL should be in the following format: jdbc:oracle:thin:@(DESCRIPTION=(ADDRESS=(PROTOCOL=TCP)(HOST=host-vip)(PORT=1521))(CONNECT_DATA=(SERVICE_NAME=service_name)(INSTANCE_NAME=inst1))) |
Same as that of XA data source. |
|
You must set the following property <property> <name>oracle.net.CONNECT_TIMEOUT</name> <value>10000</value> </property> |
Same as that of XA data source. |
|
The value of |
Same as that of XA data source. |
|
The value of |
Same as that of XA data source. |
|
The value of |
Same as that of XA data source. |
|
The value of |
Same as that of XA data source. |
|
The value of |
Same as that of XA data source. |
|
The value of |
Same as that of XA data source. |
|
The value of |
The value for |
|
The value of |
NA |
|
The value of |
NA |
|
The value of |
NA |
|
Note: The settings mentioned in Table 2-2 are applicable to both types of database, single instance and RAC database. In case of a RAC database, these settings have to be used for constituent data sources for multi data sources created for endpoints. |
In addition to applying the settings mentioned in Table 2-2, you must perform the steps documented in "Using Oracle Thin/XA Driver" in the Oracle Fusion Middleware Programming JTA for Oracle WebLogic Server
These steps are required for data sources using XA driver. After performing the steps mentioned in the preceding link, you must run the following SQL statements to enable WLS JTA recovery to work:
grant select on sys.dba_pending_transactions to public
GRANT FORCE ANY TRANSACTION TO public
grant execute on sys.dbms_xa to public
The Oracle JCA Adapters provide error handling capabilities, as listed in the following sections.
This section includes the following topics:
The messages that error out before being posted to the service infrastructure are referred to as rejected messages. For example, Oracle File Adapter picks a file having data in CSV format and tries to translate it to the XML format (using NXSD). Now, if there is any error in the translation, then this message is rejected and will not be posted to the target composite. Primarily, adapters and binding components are the ones which generate rejected messages.
Errors or faults arising after the message is posted to Service Infrastructure layer are not rejected. These faulted messages are handled by the Service Infrastructure components and will not be considered as rejected messages.
Adapters and other binding components (for example, WS Binding Component) reject messages which error out at the binding level, that is, before entering the Service Infrastructure layer. All rejected messages are stored in the Database with payload.
This section includes the following topics:
For more information, see Oracle BPEL Process Manager Correlation Support Within Adapters.
In the 10.x release, rejection handlers were defined in the deployment descriptor (bpel.xml) of an Oracle BPEL process. However, in the 11g release, you must define rejection handlers by using fault policies.
Note that only one action handler can be specified for inbound rejection handlers.
You must create two files named fault-policies.xml and fault-bindings.xml, and copy them to the SOA project directory in JDeveloper, as described in the following steps:
You must define a fault policy for the rejected messages in the fault-policies.xml file, which is stored along with composite.xml in the JDeveloper project directory.
The following is an example of fault policy:
<?xml version="1.0" encoding="UTF-8"?>
  <faultPolicies>
    <faultPolicy version="2.0.1" id="RejectedMessages">
      <Conditions> <!-- All the fault conditions are defined here -->
        <faultName xmlns:rjm="http://schemas.oracle.com/sca/rejectedmessages" name="rjm:<SERVICE_NAME>"> <!-- local part of fault name should be the service name-->
          <condition>
           <action ref="writeToFile"/> <!-- action to be taken, refer to Actions section for the details of the action -->
          </condition>
        </faultName>
      </Conditions>
      <Actions> <!-- All the actions are defined here -->
          <Action id="writeToFile">
            <fileAction>
              <location>/tmp/rej_msgs</location>
              <fileName>emp_%ID%_%TIMESTAMP%.xml</fileName>
            </fileAction>
          </Action>
      </Actions>
    </faultPolicy>
  </faultPolicies>
You must associate the fault policy with a service endpoint of the composite in fault-bindings.xml, as shown in the following example:
<faultPolicyBindings version="2.0.1" xmlns="http://schemas.oracle.com/bpel/faultpolicy" xmlns:xsi="http://www.w3.org/2001/XMLSchema-instance">
    ...
    <service faultPolicy="RejectedMessages">
        <name>Read</name>
    </service>
    ...
</faultPolicyBindings>
Copy the fault-policies.xml and the fault-bindings.xml files to your SOA composite project directory.
Deploy the SOA composite project.
|
Note: If you do not configure rejection handlers as mentioned in Configuring Rejection Handlers, then a default file-based rejection handler will kick in and the rejected messages will be directed to<domain_home>/rejmsgs/<wls_server_name>/<composite_name>.
Also, note that you can configure rejected messages with a Mediator Component in the same fault policy as that of Oracle BPEL Process Manager (Oracle BPEL PM). |
The following are the rejected message handlers:
Available Action Handlers
The following are the system defined error handlers, which you can configure in fault policies:
Web Service Handler
Predefined WSDL interface has to be implemented by the target service.
SOAP bindings will be used for the Web service invocation.
Native payloads can be passed as WS-attachments, as shown in the following example:
<Action id="ora-ws">
  <invokeWS uri="WebServiceURI"/>
<!-- format - <Absolute wsdl path>|service name|port name -->
</Action>
WSDL Interface Details
This must have only one port type, only input operation, and a schema for input message, as shown in the following example:
<?xml version="1.0"?>
<schema xmlns="http://www.w3.org/2001/XMLSchema" targetNamespace="http://xmlns.oracle.com/pcbpel/errorHandling" xmlns:tns="http://xmlns.oracle.com/pcbpel/errorHandling" elementFormDefault="qualified">
  <element name="RejectedMessage" type="tns:RejectedMessageType">
  <complexType name="RejectedMessageType"/>
    <sequence>
      <element name="MessageHeader" type="string"/>
<!-- base64 encoded string -->
      <element name="MessagePayload" type="string"/>
<!-- base64 encoded string -->
      <element name="RejectionReason" type="string"/>
  </sequence>
    <attribute name="RejectionId" type="string"/>
  </complexType>
</schema>
Custom Java Handler
A predefined Java interface has to be implemented by the target class, as shown in the following example:
<Action id="ora-custom">
  <javaAction className="mypackage.myClass" defaultAction="ora-terminate">
    <returnValue value="SUCCESS" ref="ora-file"/>
    <returnValue value="FAILED" ref="ora-ws"/>
  </javaAction>
</Action>
Java Interface Details
The following code snippet is an example:
package oracle.integration.platform.faultpolicy;
public interface IFaultRecoveryJavaClass
{
    public void handleRetrySuccess( IFaultRecoveryContext ctx);
    public String handleFault( IFaultRecoveryContext ctx);}
Queue
The rejected message is enqueued to a queue as a JMS message with the appropriate context and payload, as shown in Example 1: Using a Standalone Database and Example 2: Using an RAC Database.
Example 1: Using a Standalone Database
<Action id="ora-queue">
  <enqueue uri="QueueURI"/> <!-- QueueURI format  - jdbc:oracle:thin:@<host>:<port>:<sid>#<un>/<pw>#queue -->
</Action>
Example 2: Using an RAC Database
<Action id="ora-queue">
  <enqueue uri="QueueURI"/> <!-- QueueURI format  - jdbc:oracle:thin:@(DESCRIPTION=(LOAD_BALANCE=on)(ADDRESS_LIST=(ADDRESS=(PROTOCOL=TCP)(HOST=<host1>)(PORT=<port1>))(ADDRESS=(PROTOCOL=TCP)(HOST=<host2>)(PORT=<port2>)))(CONNECT_DATA=(SERVICE_NAME=<service_name>)))#<un>/<pw>#queue -->
</Action>
File
The rejected message is stored in the file system with the proper context and payload, as shown in the following example. Payload file will be created at the configured location.
<Action id="ora-file">
  <fileAction>
    <location>FOLDER_LOCATION</location>
    <fileName>FILE_NAME</fileName>
<!-- FILE_NAME will support %ID%(rejected message instance id) or %TIMESTAMP% wildcards -->
  </fileAction>
</Action>
Only the File action handler creates a metadata file that contains all the properties of the rejected message. For example, for Oracle File Adapter, this metadata file would include information, such as the inbound direction, and filename. The location of metadata file is same as the payload file and the naming pattern is <FILE_NAME>_metadata.
|
Note: Rejected Messages cannot be submitted from the Fusion Middleware Control Console. |
Payload Persistence
For resubmitting rejected messages, payload persistence is imperative. Payloads are stored in the Database and a facility to view the payloads is available through the Fusion Middleware Control Console. Error handlers, invoked during automatic error handling will also get the payload during their invocation.
Error payload persistence in Database is available by default.
Rejected messages are stored in the rejected_message table. You can check for rejected messages by using either of the following steps:
Checking from the Database
You must connect to the database as soainfra schema, and run the following SQL command:
select * from rejected_message
Checking from the Fusion Middleware Control Console
You can view the rejected messages in the Recent Faults and Rejected Messages section of the Dashboard tab or in the Faults and Rejected Messages tab.
For more information about using the Fusion Middleware Control Console for checking for rejected messages, see:
Section 28.2, "Monitoring Recent Faults and Rejected Messages for an Inbound Adapter" in the Oracle Fusion Middleware Administrator's Guide for Oracle SOA Suite.
Section 28.3, "Monitoring Faults and Rejected Messages for an Inbound Adapter" in the Oracle Fusion Middleware Administrator's Guide for Oracle SOA Suite.
Oracle JCA Adapters and Oracle Adapter for Oracle Applications handle connection errors for the following interactions:
Oracle JCA Adapters and Oracle Adapter for Oracle Applications raise the oracle.tip.adapter.api.exception.PCRetriableResourceException exception for transient connection errors, which are recoverable connection errors. For example, a database listener may not have started and this might be giving connection errors.
There are two types of rejection handlers, the retryable exception and the non-retryable exception:
In the case of retryable exceptions, you must set the value of jca.retry.count to the number of times that you want the retry to be carried out. For example, if you set the value of jca.retry.count to 10, then the retry occurs 10 times. However, if you have not set any value for jca.retry.count, then the retry is carried out by the fault policy, if you have included it as part of the composite
The following code snippet is an example of setting values in the composite.xml file for retryable exceptions for outbound interactions:
<reference name="Outbound">
  <interface.wsdl interface="http://xmlns...#wsdl.interface(Outbound_PortType)"/>
  <binding.jca config="Outbound_jms.jca">
    <property name="jca.retry.count">5</property>
    <property name="jca.retry.interval">1</property>
    <property name="jca.retry.backoff">2</property>
    <property name="jca.retry.maxInterval">6</property>
    <property name="jca.retry.maxPeriod">30</property>
  </binding.jca>
</reference>
You can handle nonretryable exceptions for outbound interactions, by defining the maximum number of reconnection attempts that can be made through the fault-policy.xml file. In this file specify the parameters for reconnection attempts, as shown in the following example:
<faultName xmlns:bpelx="http://schemas.oracle.com/bpel/extension" name="bpelx:bindingFault">
            <condition>
                <action ref="ora-retry"/>
            </condition>
        </faultName>
      <Actions>
        <Action id="ora-retry">
            <retry>
                <retryCount>10</retryCount>
                <retryInterval>2</retryInterval>
                <exponentialBackoff>2</exponentialBackoff>
            </retry>
        </Action>
      </Actions>
A fault policy must be associated with a reference end point of the composite in fault-bindings.xml file, as shown in the following example:
<?xml version="1.0" encoding="UTF-8"?>
<faultPolicyBindings version="2.0.1" xmlns="http://schemas.oracle.com/bpel/faultpolicy" xmlns:xsi="http://www.w3.org/2001/XMLSchema-instance">
    <reference faultPolicy="ConnectionFaults">
      <name>writeMessageToQueue</name>
    </reference>
</faultPolicyBindings>
In this example, the reconnection parameter settings specify the JCA Binding Component run time to retry 10 times and the retry interval exponentially increases by multiples of 2 starting with 2 seconds.
|
Note: Fault policy does not work for the outbound adapters in XA mode. For example, if you want the Fault policy to retry when the outbound adapter fails, then it does not retry and any outbound adapter that has been successful before this failure occurred does not rollback. |
After the configured number of retries is reached, the Service Infrastructure Invocation exception is thrown. All time measurements are specified in seconds.
The propagation of the type of the Service Infrastructure Invocation exception is important in order to allow inbound adapters to respond to errors reported by outbound adapters. shows the fault propagation in the case of when an adapter calls Oracle BPEL Process Manager synchronously and then the Oracle BPEL Process Manager calls a down-stream adapter. In Figure 2-10, a Service Infrastructure Invocation exception propagates from the down-stream adapter, through Oracle BPEL Process Manager, and to the caller adapter.
All Oracle JCA Adapters (except for Oracle Socket Adapter) as well as legacy adapters support a pull model for connecting to the back-end application for receiving events.
The packaged-application adapters (except for Oracle Adapter for Oracle Applications), support a push model for receiving events from EISs (Enterprise Information System). Connection-related issues are considered recoverable and most inbound adapters keep retrying until the adapters are able to establish connection with the EIS. However, if the inbound adapter encounters an irrecoverable error, for example, then if the inbound adapter is unable to delete from the EIS after a message has been published, then it deactivates the endpoint to prevent poisoned messages.
The packaged-application adapters (besides Oracle EBS Adapter) also support a push model for receiving events from the back-end application. In this case, the concept of a connection does not apply. The inbound endpoints are usually an HTTP listener, TCP/IP listener, FTP listener, MQSeries listener and so on and their onMessage method is triggered whenever an event arrives.
There are two types of rejection handlers: the retryable exception and the non-retryable exception.
|
Note: These rejection handlers are applicable in synchronous processes only. They do not apply to asynchronous or one-way processes. |
The following properties are supported for retryable exceptions for inbound interactions:
jca.retry.count
Specifies the maximum number of retries before rejection.
jca.retry.interval
Specifies the time interval between retries (measured in seconds.)
jca.retry.backoff
Specifies the retry interval growth factor (positive integer.)
jca.retry.maxInterval
Specifies the maximum value of retry interval, that is, a cap if backoff > 1
The preceding list of properties are specified in the composite.xml file in JDeveloper, as shown in the following example:
 <service name="Inbound">
   <interface.wsdl interface="http://xmlns...#wsdl.interface(Inbound_PortType)"/>
   <binding.jca config="Inbound_db.jca">
         <property name="jca.retry.count">5</property>
         <property name="jca.retry.interval">1</property>
       <property name="jca.retry.backoff">2</property>
       <property name="jca.retry.maxInterval">6</property>
     </binding.jca>
</service>
In the case of retryable exceptions, you must set the value of jca.retry.count to the number of times that you want the retry to be carried out. For example, if you set the value of jca.retry.count to 10, then the retry occurs 10 times. However, if you have not set any value for jca.retry.count, then the retry is carried out indefinitely.
|
Note: Infinite retries by inbound adapters for errors results in creating multiple composite instances because for every retry a separate composite instance is created. |
This section describes how to handle message errors by means of a sample scenario.
Consider an example, where there are two composites, Composite 1 and Composite 2 each having an Oracle BPEL process and there is a mix of local as well as XA resources, as shown in Figure 2-11.
Figure 2-11 Sample Scenario: Handling Message Errors
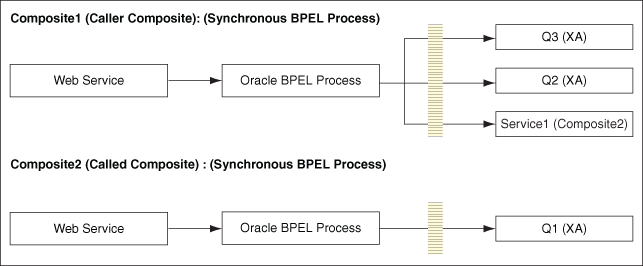
In a positive scenario, that is, when the message is successfully delivered to all the queues (Q1, Q2 and Q3) the transaction commits successfully.
If the message cannot be delivered to Q1 (or to any one of the queues) whereas the message is delivered to queues Q2 and Q3, then the transaction must roll back all the three messages because all are XA resources and there is an exception in one of its units. The rollback exception is thrown only for the second composite where Q1 failed, and the transactions commits Q2 and Q3 instead of rolling back the messages for all the three queues.
In order that the transaction rolls back all the queues even if only one fails, and the other two have messages successfully delivered to them, you must make the change in the composite.xml file of the called composite (Composite2) that Example 2-4 shows:
Example 2-4 Changes in composite.xml of Composite2
<component name="BPELProcess1">
  <implementation.bpel src="BPELProcess1.bpel"/>
  <property name="bpel.config.transaction">required</property>
</component>
Note that if you set property bpel.config.transaction to a value of required, then the Oracle BPEL engine effectively processes the synchronous request without creating a new transaction, rather, it uses the caller's transaction. Therefore, if at any point the transaction gets rolled back, nothing done in that transaction will commit.
You can run and test instances of deployed SOA composite applications from Oracle Enterprise Manager Grid Control Console. This enables you to:
Manage a composite application.
Initiate an instance of a composite.
Track an instance of a composite.
View detailed component instance audit trails.
For more information about testing applications, see Oracle Fusion Middleware Administrator's Guide for Oracle SOA Suite.
Set the trace level as follows:
Oracle JCA Adapters and Oracle Adapter for Oracle Applications: Set the log level to, for example, TRACE:32 in the logger oracle.soa.adapter.
For more information about setting trace levels for adapters, see Oracle Fusion Middleware Administrator's Guide.
Packaged-application adapters: For outbound interactions, set the Loglevel property for packaged-application adapters in the weblogic-ra.xml file.
Legacy adapters: The trace level for Oracle Connect, and the mainframe server can be set by using Oracle Studio.
The following are the steps to set the trace level by using the Fusion Middleware Control Console:
Navigate to http://servername:portnumber/em.
The Fusion Middleware Control Console home page is displayed.
Right-click soa-infra from the SOA Folder in the Navigator in the left pane.
A menu is displayed.
Select Logs, and the Log Configuration, as shown in Figure 2-12.
Figure 2-12 Navigating to the Log Configuration Page
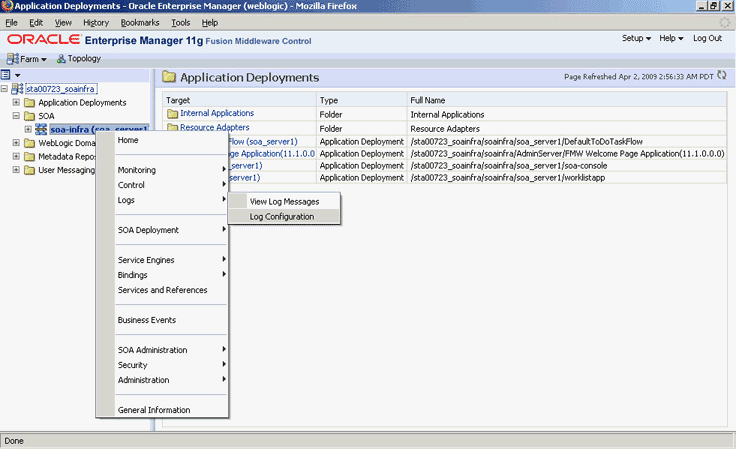
The Log Configuration page is displayed.
Locate oracle.soa.adapter in the Logger Name list, and change the log level in the Oracle Diagnostic Logging Level (Java Level) field. In this example, select Trace:32 (FINEST) from the list, as shown in Figure 2-13.
|
Note: To ensure that log levels persist across component restarts, select Loggers With Persistent Log Level State from the View list. By default, the log level is set for runtime loggers. Runtime loggers do not persist across component restarts. |
For more information, see Viewing Adapter Logs.
You can view the logs for Oracle JCA Adapters as follows:
Oracle JCA Adapters and Oracle Adapter for Oracle Applications: These adapters implement the LogManager interface of the JCA Binding Component, which redirects log files in the Oracle Diagnostic Logging (ODL) format. For both outbound and inbound interactions, the log files are redirected to the soa-diagnostic.log file.
The log files for Oracle SOA Suite that is deployed to the server-soa managed server are located in:
MW_HOME/user_projects/domains/domain_name/servers/server-soa/logs/soa-diagnostic.log
For more information about searching and viewing log files, see Oracle Fusion Middleware Administrator's Guide.
Packaged-application adapters: These adapters do not implement the LogManager interface because it is not part of the J2CA 1.5 standard. Therefore, for system components the log outputs are redirected to
ORACLE_INSTANCE\diagnostics\logs\component_type\component_name. For outbound interactions, the logs are directed to the same location. On the other hand, for inbound interactions, logs are redirected to soa-diagnostic.log.
Legacy adapters: In addition to the J2CA resource adapter, legacy adapters consists of Oracle Connect, which consists of native adapters for communicating with the mainframe application and data stores. Oracle Connect logs can be viewed using Oracle Studio, which is the mainframe adapter design-time tool and Oracle Connect management tool. Oracle Connect generates various types of logs, such as the daemon log, workspace log, and server process log.
For more information, see Setting the Trace Level of Oracle JCA Adapters.