| Oracle® Identity Manager Connector Guide for PeopleSoft Employee Reconciliation Release 9.1.1 E11205-11 |
|


 Previous |
 Next |
| Oracle® Identity Manager Connector Guide for PeopleSoft Employee Reconciliation Release 9.1.1 E11205-11 |
|
Previous |
Next |
After you deploy the connector, you must configure it to meet your requirements. This chapter discusses the following connector configuration procedures:
The following is a summary of the steps to use the connector for full reconciliation:
|
Note: It is assumed that you have performed all the procedures described in the preceding chapter.In Oracle Identity Manager release 11.1.1, a scheduled job is an instance of a scheduled task. In this guide, the term scheduled task used in the context of Oracle Identity Manager release 9.1.0.x is the same as the term scheduled job in the context of Oracle Identity Manager release 11.1.1. See Oracle Fusion Middleware System Administrator's Guide for Oracle Identity Manager for more information about scheduled tasks and scheduled jobs. |
Generate XML files for the PERSON_BASIC_FULLSYNC message for all persons. See Section 3.2.1.1, "Running the PERSON_BASIC_FULLSYNC Message" for more information.
Generate XML files for the WORKFORCE_FULLSYNC message for the same set of persons. See Section 3.2.1.2, "Running the WORKFORCE_FULLSYNC Message" for more information.
|
Note: The XML files that you generate in Steps 1 and 2 must reside in different directories. |
Copy these XML files to a directory on the Oracle Identity Manager host computer.
Configure the Peoplesoft HRMS Trusted Reconciliation scheduled task for the PERSON_BASIC_FULLSYNC message. The XML files are read by this scheduled task to generate reconciliation events. See Section 3.2.2.1, "Configuring the Scheduled Task for Person Data Reconciliation" for more information.
Configure the Peoplesoft HRMS Trusted Reconciliation scheduled task for the WORKFORCE_FULLSYNC message. The XML files are read by this scheduled task to generate reconciliation events. See Section 3.2.2.1, "Configuring the Scheduled Task for Person Data Reconciliation" for more information.
Change from full reconciliation to incremental reconciliation. See Section 3.3, "Performing Incremental Reconciliation" for instructions.
Full reconciliation involves reconciling all existing person records from the target system into Oracle Identity Manager. After you deploy the connector, you must first perform full reconciliation.
The following sections discuss the procedures involved in full reconciliation:
You must generate XML files for all existing persons in the target system.
|
Note: Before performing the procedure to generate XML files, you must ensure that you have configured the PERSON_BASIC_FULLSYNC and WORKFORCE_FULLSYNC messages. See Section 2.2.2, "Installation on the Target System" for more information. |
To generate XML files for full reconciliation perform the procedures described in the following section:
Running the Messages for Full Data Publish
This section describes the procedures for generating XML files.
|
Note: If you are using PeopleTools 8.50 and HCM 9.0, then before running Full Data Publish, you must apply the patch that addresses Bug 824529. This patch can be downloaded from Oracle Metalink. |
To run the PERSON_BASIC_FULLSYNC message:
In PeopleSoft Internet Architecture, expand Enterprise Components, Integration Definitions, Initiate Processes, and then click Full Data Publish.
Click the Add a New Value tab.
In the Run Control ID field, enter a value and then click ADD.
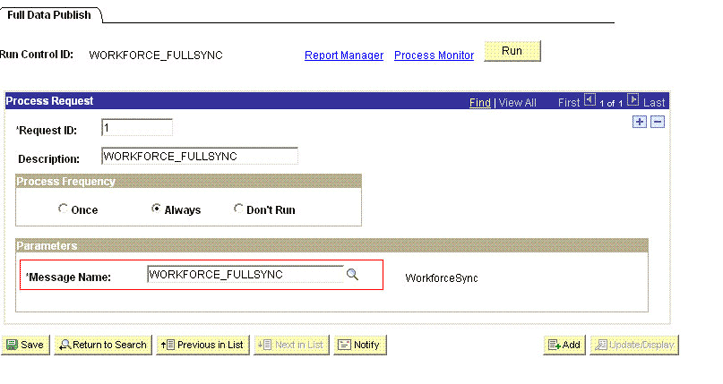
In the Process Request region, provide the following values:
Request ID: Enter a request ID.
Description: Enter a description for the process request.
Process Frequency: Select Always.
Message Name: Select PERSON_BASIC_FULLSYNC.
The following screenshot displays the preceding steps:

Click Save to save the configuration.
Click Run.
The Process Scheduler Request page appears.
From the Server Name list, select the appropriate server.
Select Full Table Data Publish process list, and click OK.
The following screenshot displays the process list:
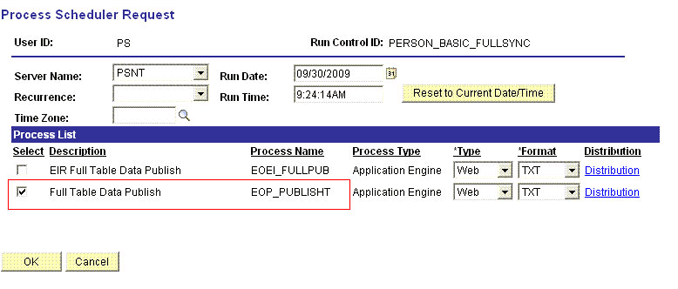
Click Process Monitor to verify the status of EOP_PUBLISHT Application Engine. The Run Status is Success if the transaction is successfully completed.
On successful completion of the transaction, XML files for the PERSON_BASIC_FULLSYNC message are generated at a location that you specified in the FilePath property while creating the OIM_FILE_NODE node for PeopleSoft Web Server. See "Configuring PeopleSoft Integration Broker" section for more information.
You must copy these XML files to a directory on the Oracle Identity Manager host computer.
|
Note: After you have performed this procedure, remove the permission list created in "Setting Up the Security for the PERSON_BASIC_FULLSYNC Service Operation" section. This is for security purposes. |
To run the WORKFORCE_FULLSYNC message:
In PeopleSoft Internet Architecture, expand Enterprise Components, Integration Definitions, Initiate Processes, and then click Full Data Publish.
Click the Add a New Value tab.
In the Run Control ID field, enter a value and then click ADD.
In the Process Request region, provide the following values:
Request ID: Enter a request ID.
Description: Enter a description for the process request.
Process Frequency: Select Always.
Message Name: Select WORKFORCE_FULLSYNC.
The following screenshot displays the preceding steps:
Click Save to save the configuration.
Click Run.
The Process Scheduler Request page appears.
From the Server Name list, select the appropriate server.
Select the Full Table Data Publish process list, and click OK.
The following screenshot displays the process list:
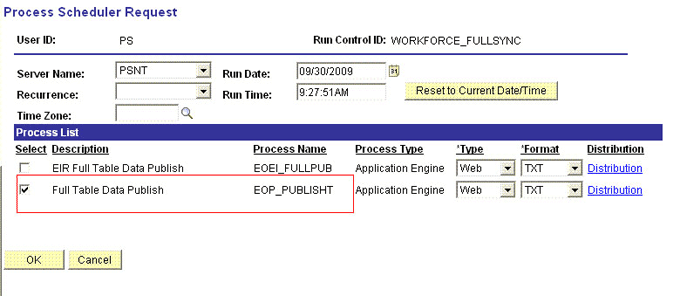
Click Process Monitor to verify the status of EOP_PUBLISHT Application Engine. The Run Status is Success if the transaction is successfully completed.
On successful completion of the transaction, XML files for the WORKFORCE_FULLSYNC message are generated at a location that you specified in the FilePath property while creating the OIM_FILE_NODE node for PeopleSoft Web Server. See "Configuring PeopleSoft Integration Broker" section for more information.
You must copy these XML files to a directory on the Oracle Identity Manager host computer.
|
Note: After you have performed this procedure, remove the permission list created in "Setting Up the Security for the WORKFORCE_FULLSYNC Service Operation" section. This is for security purposes. |
Section 3.2.2.1, "Configuring the Scheduled Task for Person Data Reconciliation" section describes the procedure to configure the scheduled task.
Section 3.2.2.2, "Running the PeopleSoft HRMS Manager Reconciliation Scheduled Task" describes the procedure to configure the scheduled task for reconciliation of Manager ID values.
When you run the Connector Installer, the PeopleSoft HRMS Trusted Reconciliation scheduled task is automatically created in Oracle Identity Manager.
To perform a full reconciliation run, you must configure the scheduled task to reconcile all person data into Oracle Identity Manager depending on the values that you specified in the scheduled task attributes. Table 3-1 describes the attributes of this scheduled task. See Section 3.6, "Configuring Scheduled Tasks" for instructions on running the scheduled task.
|
Note: Before you configure the scheduled task, you must ensure that the mapping for all Actions to be performed on the target system is defined in the Lookup.PSFT.HRMS.WorkForceSync.EmpStatus lookup definition. See Section 1.5.4.2.4, "Lookup.PSFT.HRMS.WorkForceSync.EmpStatus" for more information. |
The Peoplesoft HRMS Trusted Reconciliation scheduled task is used to transfer XML file data from the file to the parser. The parser then converts this data into reconciliation events.
Table 3-1 Attributes of the Peoplesoft HRMS Trusted Reconciliation Scheduled Task
| Attribute | Description |
|---|---|
|
Archive Mode |
Enter If |
|
Archive Path |
Enter the full path and name of the directory in which you want XML files used during full reconciliation to be archived. You must enter a value for the Archive Path attribute only if you specify Sample value: |
|
File Path |
Enter the path of the directory on the Oracle Identity Manager host computer into which you copy the file containing XML data. Sample value: |
|
IT Resource Name |
Enter the name of the IT resource that you create by performing the procedure described in Section 2.2.1.3, "Configuring the IT Resource." Default value: |
|
Message Implementation Class |
Enter the name of the Implementation class for the message handler required to process the message. For example, the implementation class for the following messages are provided by default: For the PERSON_BASIC_FULLSYNC message:
For the WORKFORCE_FULLSYNC message:
|
|
Message Name |
Use this attribute to specify the name of the delivered message used for full reconciliation. Sample value: |
|
Task Name |
This attribute holds the name of the scheduled task. Value: |
Manager ID values is not reconciled during full reconciliation run.
You must configure and run the PeopleSoft HRMS Manager Reconciliation scheduled task. Table 3-2 describes the attributes of this scheduled task.
Table 3-2 Attributes of the PeopleSoft HRMS Manager Reconciliation Scheduled Task
| Attribute | Description |
|---|---|
|
Employee ID UDF |
This attribute holds the metadata of the field of the person form with which EMPL ID from the target system is mapped. Sample value: |
|
Manager UDF |
This attribute holds the metadata of the Supervisor ID field of the person form. Sample value: |
|
Resource Object |
Enter the name of the resource object. Default value: |
|
Task Name |
This attribute holds the name of the scheduled task. Default value: |
|
Update Empty Manager Only |
Set this value to Default value: |
Before you run this scheduled task, you must specify a value for the Update Empty Manager Only attribute.
The attributes of the PeopleSoft HRMS Manager Reconciliation scheduled task are shown in the following screenshot:
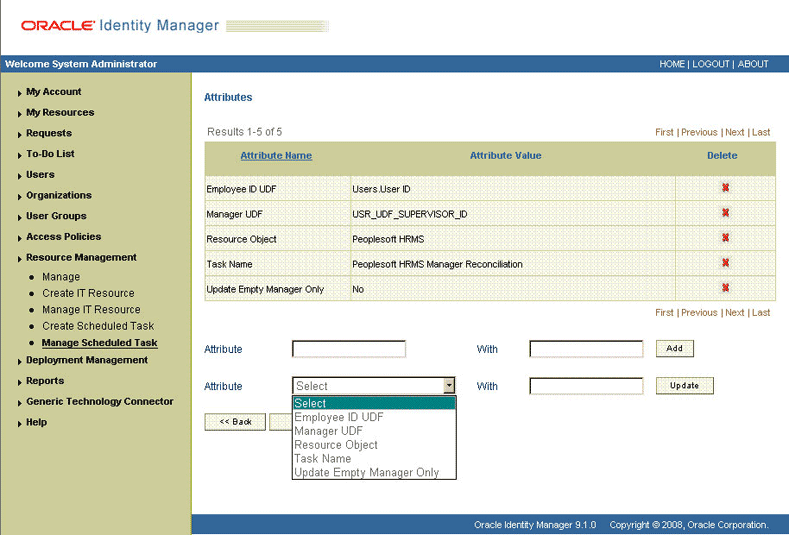
Enter yes if you want the scheduled task to populate Manager ID values in OIM User records that do not have this value. Existing Manager ID values in other OIM User records are not modified.
Enter no if you want the scheduled task to fetch and populate Manager ID values for all OIM User records, regardless of whether the Manager ID attribute in these records currently contains a value.
When it is run, this scheduled task performs the process described in Section 1.4.8, "Reconciliation of the Manager ID Attribute."
You do not require additional configuration for incremental reconciliation.
It is assumed that you have deployed the PeopleSoft listener as described in Section 2.2.1.4, "Deploying the PeopleSoft Listener."
|
Note: You must ensure that you have defined the mapping for all Actions to be performed on the target system in the Lookup.PSFT.HRMS.WorkForceSync.EmpStatus lookup definition. See Section 1.5.4.2.4, "Lookup.PSFT.HRMS.WorkForceSync.EmpStatus" for more information. |
By default, all target system records that are added or modified after the last reconciliation run are reconciled during the current incremental reconciliation run. For full reconciliation, all target system records are fetched into Oracle Identity Manager.
You configure segment filtering to specify the attributes whose values you want to fetch into Oracle Identity Manager. Similarly, you can configure limited reconciliation to specify the subset of target system records that must be fetched into Oracle Identity Manager.
You configure limited reconciliation by specifying a query condition as the value of the Custom Query attribute in the message-specific configuration lookup.
You must use the following format to specify a value for the Custom Query attribute:
RESOURCE_OBJECT_ATTRIBUTE_NAME=VALUE
For example, suppose you specify the following as the value of the Custom Query attribute:
Last Name=Doe
With this query condition, only records for persons whose last name is Doe are considered for reconciliation.
You can add multiple query conditions by using the ampersand (&) as the AND operator and the vertical bar (|) as the OR operator. For example, the following query condition is used to limit reconciliation to records of those persons whose first name is John and last name is Doe:
First Name=John & Last Name=Doe
You can limit reconciliation to the records of those persons whose first name is either John or their User ID is 219786 using the following query:
First Name=John | User ID=219786
To configure limited reconciliation:
Ensure that the OIM User attribute to use in the query exists in the Lookup.PSFT.HRMS.CustomQuery lookup definition. This lookup definition maps the resource object attributes with OIM User form fields.
|
See Also: Section 1.5.4.3.3, "Lookup.PSFT.HRMS.CustomQuery" for a listing of the default contents of this lookup definition |
You must add a new row in this lookup definition whenever you add a new UDF in the process form. See Section 4.6, "Setting Up the Lookup.PSFT.HRMS.CustomQuery Lookup Definition" for adding an entry in this lookup definition and Section 4.2, "Adding New Attributes for Incremental Reconciliation" for adding a UDF.
Create the query condition. Apply the following guidelines when you create the query condition:
Use only the equal sign (=), the ampersand (&), and the vertical bar (|) in the query condition. Do not include any other special characters in the query condition. Any other character that is included is treated as part of the value that you specify.
Add a space before and after the ampersand and vertical bar used in the query condition. For example:
First Name=John & Last Name=Doe
This is to help the system distinguish between ampersands and vertical bars used in the query and the same characters included as part of attribute values specified in the query condition.
You must not include unnecessary blank spaces between operators and values in the query condition.
A query condition with spaces separating values and operators would yield different results as compared to a query condition that does not contain spaces between values and operators. For example, the output of the following query conditions would be different:
First Name=John & Last Name=Doe
First Name= John & Last Name= Doe
In the second query condition, the reconciliation engine would look for first name and last name values that contain a space at the start.
Ensure that attribute names that you use in the query condition are in the same case (uppercase or lowercase) as the case of values in the Lookup.PSFT.HRMS.CustomQuery lookup definitions. For example, the following query condition would fail:
fiRst Name = John
Configure the message-specific configuration lookup with the query condition as the value of the Custom Query attribute. For example, to specify the query condition for the PERSON_BASIC_FULLSYNC message, search and open the Lookup.PSFT.Message.PersonBasicSync.Configuration lookup. Specify the query condition in the Decode column of the Custom Query attribute.
The messages are generated and sent to Oracle Identity Manager regardless of whether the WAR file is running or not. Reconciliation events are not created for the messages that are sent to Oracle Identity Manager while the WAR file is unavailable. To ensure that all the messages generated on the target system reach Oracle Identity Manager, perform the following procedure:
Manually Sending Messages
If Oracle Identity Manager is not running when a message is published, then the message is added to a queue. You can check the status of the message in the queue in the Message Instance tab. This tab lists all the published messages in queue. When you check the details of a specific message, the status is listed as Timeout or Error.
To publish a message in the queue to Oracle Identity Manager, resubmit the message when Oracle Identity Manager is running.
If the status of the message is New or Started and it does not change to Timeout or Done, then you must restart the PeopleSoft application server after you restart Oracle Identity Manager.
|
Note: PeopleSoft supports this functionality for a limited rights user created in Section 2.1.2.2.2, "Creating a Role for a Limited Rights User." But, you can specify persons who have rights to perform this task based on the security policy of your organization. |
To manually resend messages in Error or TimeOut status:
In PeopleSoft Internet Architecture, expand PeopleTools, Integration Broker, Service Operations Monitor, Monitoring, and then click Asynchronous Services.
From the Group By list, select Service Operation or Queue to view the number of messages in Error, TimeOut, Done, and so on.
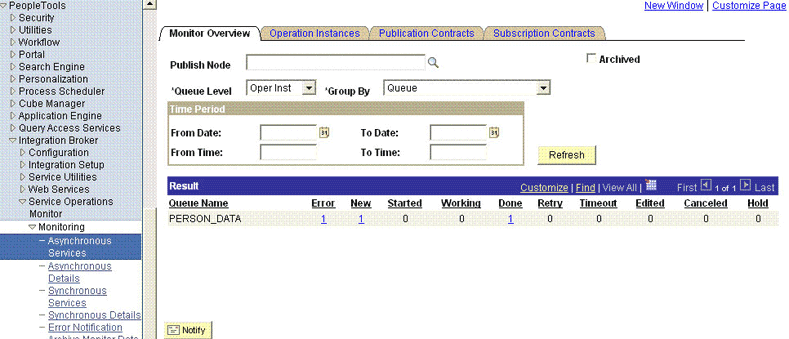
The number is in the form of a link, which when clicked displays the details of the message.
Click the link pertaining to the message to be resent, for example, the link under the Error or the TimeOut column.
You are taken to the Operation Instance tab.
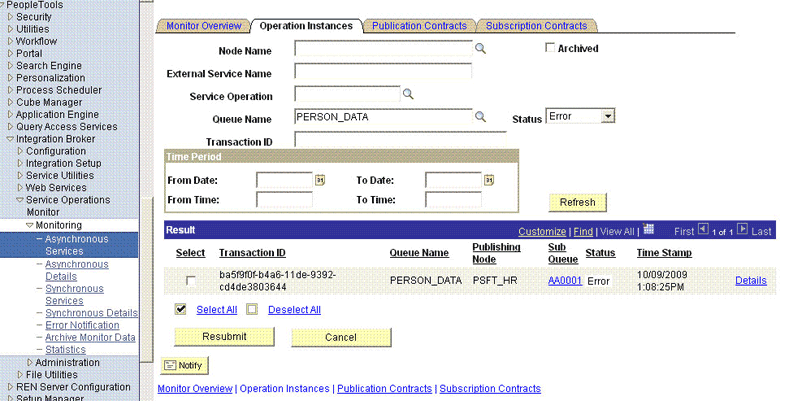
Click the Details link of the message to be resent. A new window appears.
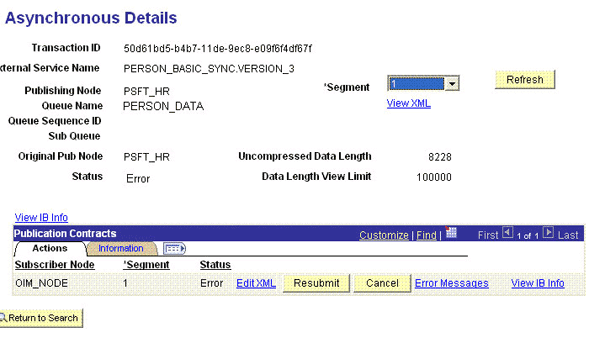
Click the Error Messages link to check the error description.
Click Resubmit after you have resolved the issue.
This section describes the procedure to configure scheduled tasks. You can apply this procedure to configure the scheduled tasks for reconciliation.
Table 3-3 lists the scheduled tasks that you must configure.
Table 3-3 Scheduled Tasks for Reconciliation
| Scheduled Task | Description |
|---|---|
|
PeopleSoft HRMS Trusted Reconciliation |
This scheduled task is used during full reconciliation. It parses the contents of the XML files and then creates reconciliation events for each record. See Section 3.2.2.1, "Configuring the Scheduled Task for Person Data Reconciliation" for information about this scheduled task. |
|
PeopleSoft HRMS Manager Reconciliation |
This scheduled task is used for reconciling Manager ID values during full reconciliation. See Section 3.2.2.2, "Running the PeopleSoft HRMS Manager Reconciliation Scheduled Task" for information about this scheduled task. |
To configure a scheduled task:
Log in to the Administrative and User Console.
Depending on the Oracle Identity Manager release you are using, perform one of the following steps:
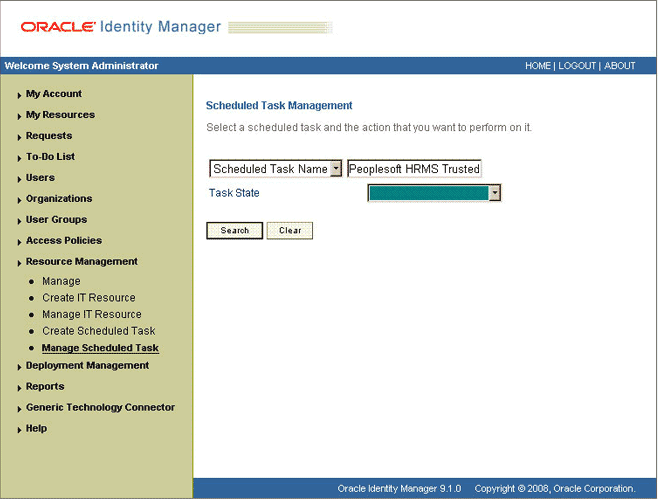
If you are using Oracle Identity Manager release 9.1.0.x, expand Resource Management, and then click Manage Scheduled Task.
If you are using Oracle Identity Manager release 11.1.1, then:
On the Welcome to Oracle Identity Manager Self Service page, click Advanced.
Click the System Management tab, and then click Scheduler.
On the left pane, click Advanced Search.
On the page that is displayed, you can use any combination of the search options provided to locate a scheduled task. Click Search after you specify the search criteria.
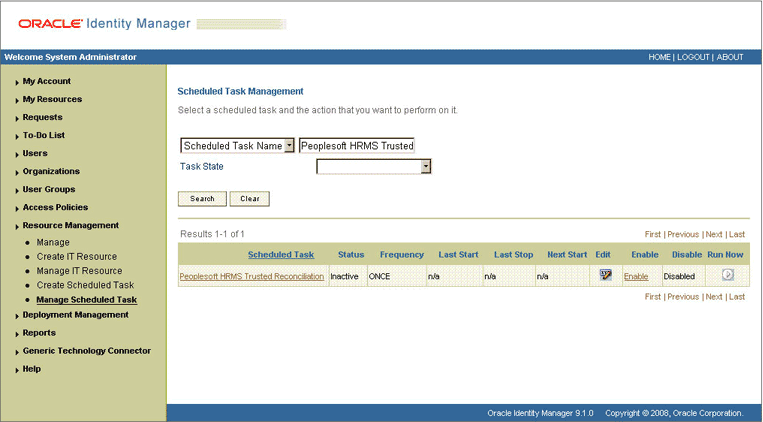
The following screenshot shows the Scheduled Task Management page for Oracle Identity Manager release 9.1.0.x:
The list of scheduled tasks that match your search criteria is displayed in the search results table.
Depending on the Oracle Identity Manager release you are using, perform one of the following steps:
If you are using Oracle Identity Manager release 9.1.0.x, then in the search results table, click the Edit icon in the Edit column for the scheduled task.
The following screenshot shows the Scheduled Task Management page:
If you are using Oracle Identity Manager release 11.1.1, then select the link for the scheduled task from the list of scheduled tasks displayed in the search results table.
Modify the details of the scheduled task. To do so:
If you are using Oracle Identity Manager release 9.1.0.x, then on the Edit Scheduled Task Details page, you can modify the following parameters:
- Status: Specify whether you want to leave the task in the enabled state. In the enabled state, the task is ready for use.
- Max Retries: Enter an integer value in this field. This number represents the number of times Oracle Identity Manager must attempt to complete the task before assigning the ERROR status to the task. The default value is 1.
- Next Start: Use the date editor to specify the date when you want the task to run. After you select a date value in the date editor, you can modify the time value that is automatically displayed in the Next Start field.
- Frequency: Specify the frequency at which you want the task to run.
If you are using Oracle Identity Manager release 11.1.1, then on the Job Details tab, you can modify the following parameters:
- Retries: Enter an integer value in this field. This number represents the number of times the scheduler tries to start the job before assigning the Stopped status to the job.
- Schedule Type: Depending on the frequency at which you want the job to run, select the appropriate schedule type.
|
Note: See Oracle Fusion Middleware System Administrator's Guide for Oracle Identity Manager for detailed information about schedule types. |
After modifying the values for the scheduled task details listed in the previous step, perform one of the following steps:
If you are using Oracle Identity Manager release 9.1.0.x, then click Continue.
If you are using Oracle Identity Manager release 11.1.1, then perform the next step.
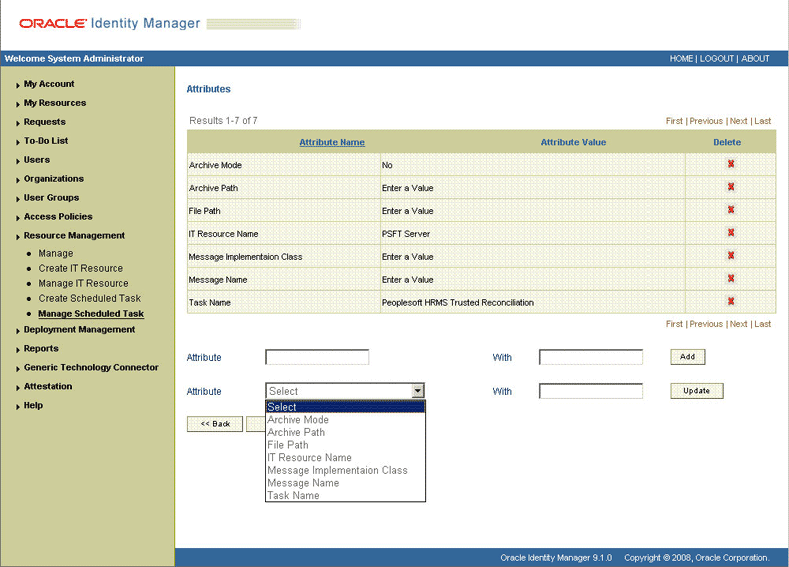
Specify values for the attributes of the scheduled task. To do so:
If you are using Oracle Identity Manager release 9.1.0.x, then select each attribute from the Attribute list, specify a value in the field provided, and then click Update. See Table 3-1 for more information about the attributes of the scheduled task.
The following screenshot shows the Attributes page. The attributes of the scheduled task that you select for modification are displayed on this page.
If you are using Oracle Identity Manager release 11.1.1, then on the Job Details tab, under the Parameters section, specify values for the attributes of the scheduled task. See Table 3-1 for more information about the attributes of the scheduled task.
|
Note:
|
After specifying the attributes, perform one of the following steps:
If you are using Oracle Identity Manager release 9.1.0.x, then click Save Changes to save the changes.
|
Note: The Stop Execution option is not available in the Administrative and User Console. If you want to stop a task, then click Stop Execution on the Task Scheduler form of the Design Console. |
If you are using Oracle Identity Manager release 11.1.1, then click Apply to save the changes.
|
Note: The Stop Execution option is available in the Administrative and User Console. You can use the Scheduler Status page to start, stop, or reinitialize the scheduler. |
|
 Copyright © 2011, Oracle and/or its affiliates. All rights reserved. Legal Notices |
|