| Oracle® Identity Manager Connector Guide for RSA Authentication Manager Release 9.1.0 E16663-02 |
|
 Previous |
 Next |
| Oracle® Identity Manager Connector Guide for RSA Authentication Manager Release 9.1.0 E16663-02 |
|
 Previous |
 Next |
To deploy the connector, perform the procedures described in the following sections:
This section is divided into the following topics:
Section 2.1.1, "Files and Directories That Comprise the Connector"
Section 2.1.2, "Determining the Release Number of the Connector"
Section 2.1.3, "Creating a Backup of the Existing Common.jar File"
Table 2-1 describes the files and directories on the installation media.
Table 2-1 Files and Directories On the Installation Media
| File in the Installation Media Directory | Description |
|---|---|
|
configuration/RSAAuthManager-CI.xml |
This XML file contains configuration information that is used during connector installation. |
|
Files in the DataSets directory |
These XML files specify the information to be submitted by the requester during a request-based provisioning operation. |
|
documentation/Javadocs |
This directory contains the Javadocs shipped with this connector. |
|
This JAR file contains the class files that are common to all connectors. During connector deployment, this file is copied into the following directory: OIM_HOME/xellerate/ScheduleTask |
|
|
lib/RSAAuthManagerCommon.jar |
This JAR file contains the class files that is specific to this connector. During connector deployment, this file is copied into the following directory: OIM_HOME/xellerate/JavaTasks |
|
lib/RSAAuthManager.jar |
This JAR file contains the class files that are used in connector operations. During connector deployment, this file is copied into the following directory: OIM_HOME/xellerate/JavaTasks |
|
Files in the resources directory |
Each of these resource bundles contains language-specific information that is used by the connector. During connector deployment, this file is copied into the following directory: OIM_HOME/xellerate/connectorResources Note: A resource bundle is a file containing localized versions of the text strings that are displayed on the Administrative and User Console. These text strings include GUI element labels and messages. |
|
xml/RSA-AuthManager-ConnectorConfig.xml |
This XML file contains definitions of the various connector objects. These objects are created in Oracle Identity Manager when you run the Connector Installer. |
|
Note: If you are using Oracle Identity Manager release 9.1.0.x, then the procedure described in this section is optional.If you are using Oracle Identity Manager release 11.1.1, then skip this section. |
You might have a deployment of an earlier release of the connector. While deploying the latest release, you might want to know the release number of the earlier release. To determine the release number of the connector that has already been deployed:
In a temporary directory, extract the contents of the connector JAR file that is in the OIM_HOME/xellerate/JavaTasks directory.
Open the Manifest.mf file in a text editor. The Manifest.mf file is one of the files bundled inside the connector JAR file.
In the Manifest.mf file, the release number of the connector is displayed as the value of the Version property.
The Common.jar file is in the deployment package of each release 9.1.x connector. With each new release, code corresponding to that particular release is added to the existing code in this file. For example, the Common.jar file shipped with Connector Y on 12-July contains:
Code specific to Connector Y
Code included in the Common.jar files shipped with all other release 9.1.x connectors that were released before 12-July
If you have already installed a release 9.1.x connector that was released after the current release of the RSA Authentication Manager connector, then back up the existing Common.jar file, install the RSA Authentication Manager connector, and then restore the Common.jar file. The steps to perform this procedure are as follows:
|
Caution: If you do not perform this procedure, then your release 9.1.x connectors might not work. |
Determine the release date of your existing release 9.1.x connector as follows:
Extract the contents of the following file in a temporary directory:
OIM_HOME/xellerate/JavaTask/Common.jar
|
Note: On Oracle Identity Manager release 11.1.1, use the Oracle Identity Manager Download JARs utility to download the Common.jar file from the database, and then extract the contents of this file into a temporary directory.See Oracle Fusion Middleware Developer's Guide for Oracle Identity Manager 11g Release 1 (11.1.1) for instructions about using the Download JARs utility. |
Open the Manifest.mf file in a text editor.
Note down the Build Date and Build Version values.
Determine the Build Date and Build Version values of the current release of the RSA Authentication Manager connector as follows:
On the installation media for the connector, extract the contents of the lib/Common.jar and then open the Manifest.mf file in a text editor.
Note down the Build Date and Build Version values.
If the Build Date and Build Version values for the RSA Authentication Manager connector are less than the Build Date and Build Version values for the connector that is installed, then:
If you are using Oracle Identity Manager release 9.1.0.x, then:
Copy the OIM_HOME/xellerate/JavaTasks/Common.jar to a temporary location.
After you perform the procedure described in Section 2.2, "Installation" overwrite the new Common.jar file in the OIM_HOME/xellerate/JavaTasks directory with the Common.jar file that you backed up in the preceding step.
If you are using Oracle Identity Manager release 11.1.1, then run the Oracle Identity Manager Upload JARs utility to post the Common.jar file to the Oracle Identity Manager database. This utility is copied into the following location when you install Oracle Identity Manager:
|
Note: Before you run this utility, verify that the WL_HOME environment variable is set to the directory in which Oracle WebLogic Server is installed. |
For Microsoft Windows:
OIM_HOME/server/bin/UploadJars.bat
For UNIX:
OIM_HOME/server/bin/UploadJars.sh
When you run the utility, you are prompted to enter the login credentials of the Oracle Identity Manager administrator, URL of the Oracle Identity Manager host computer, context factory value, type of JAR file being uploaded, and the location from which the JAR file is to be uploaded. Specify 1 as the value of the JAR type.
|
See Also: Oracle Fusion Middleware Developer's Guide for Oracle Identity Manager for detailed information about the Upload JARs utility |
|
Note: Perform the procedure described in this section only if your Oracle Identity Manager installation is running on IBM WebSphere Application Server. |
Some of the following files might be present in the WEBSPHERE_HOME/APPSERVER_HOME/lib directory:
com.bea.core.process_5.3.0.0.jar
wlfullclient.jar
wlcipher.jar
EccpressoAsn1.jar
EccpressoCore.jar
EccpressoJcae.jar
Stop the application server and then remove these files from the WEBSPHERE_HOME/APPSERVER_HOME/lib directory.
|
Note: If you run the Connector Installer while these files are present in the application server home directory, then you might encounter the following error:java.net.MalformedURLException: no protocol: ddm-map.dtd |
After you install the connector, you copy these JAR files back into the lib directory. The procedure is described later in this chapter.
|
Note:
|
To run the Connector Installer:
Copy the contents of the connector installation media directory into the following directory:
|
Note: In an Oracle Identity Manager cluster, copy this JAR file to each node of the cluster. |
For Oracle Identity Manager release 9.1.0.x: OIM_HOME/xellerate/ConnectorDefaultDirectory
For Oracle Identity Manager release 11.1.1: OIM_HOME/server/ConnectorDefaultDirectory
Log in to the Administrative and User Console by using the user account described in the "Creating the User Account for Installing Connectors" section of the following guide:
For Oracle Identity Manager release 9.1.0.x:
Oracle Identity Manager Administrative and User Console Guide
For Oracle Identity Manager release 11.1.1:
Oracle Fusion Middleware System Administrator's Guide for Oracle Identity Manager
Depending on the Oracle Identity Manager release you are using, perform one of the following steps:
For Oracle Identity Manager release 9.1.0.x:
Click Deployment Management, and then click Install Connector.
For Oracle Identity Manager release 11.1.1:
On the Welcome to Identity Manager Advanced Administration page, in the System Management region, click Install Connector.
From the Connector List list, select RSA Authentication Manager RELEASE_NUMBER. This list displays the names and release numbers of connectors whose installation files you copy into the default connector installation directory:
OIM_HOME/xellerate/ConnectorDefaultDirectory
If you have copied the installation files into a different directory, then:
In the Alternative Directory field, enter the full path and name of that directory.
To repopulate the list of connectors in the Connector List list, click Refresh.
From the Connector List list, select RSA Authentication Manager RELEASE_NUMBER.
Click Load.
To start the installation process, click Continue.
The following tasks are performed in sequence:
Configuration of connector libraries
Import of the connector Target Resource user configuration XML file (by using the Deployment Manager).
Compilation of adapters
On successful completion of a task, a check mark is displayed for the task. If a task fails, then an X mark and a message stating the reason for failure are displayed. Depending on the reason for failure, make the required correction and then perform one of the following steps:
Retry the installation by clicking Retry.
Cancel the installation and begin again from Step 1.
If all three tasks of the connector installation process are successful, then a message indicating successful installation is displayed. In addition, a list of the steps that you must perform after the installation is displayed. These steps are as follows:
Ensuring that the prerequisites for using the connector are addressed
|
Note: At this stage, run the Oracle Identiy Manager PurgeCache utility to load the server cache with content from the connector resource bundle in order to view the list of prerequisites. Refer to Section 2.3.2, "Clearing Content Related to Connector Resource Bundles from the Server Cache" for information about running the PurgeCache utility.There are no prerequisites for some predefined connectors. |
Configuring the IT resource for the connector
Record the name of the IT resource displayed on this page. The procedure to configure the IT resource is described later in this guide.
Configuring the scheduled tasks that are created when you installed the connector
|
Note: In Oracle Identity Manager release 11.1.1, a scheduled job is an instance of a scheduled task. In this guide, the term scheduled task used in the context of Oracle Identity Manager release 9.1.0.x is the same as the term scheduled job in the context of Oracle Identity Manager release 11.1.1.See Oracle Fusion Middleware System Administrator's Guide for Oracle Identity Manager for more information about scheduled tasks and scheduled jobs. |
Record the names of the scheduled tasks displayed on this page. The procedure to configure these scheduled tasks is described later in this guide.
When you run the Connector Installer, it copies the connector files and external code files to destination directories on the Oracle Identity Manager host computer. These files are listed in Table 2-1.
|
Note:
|
Installing the Connector in an Oracle Identity Manager Cluster
While installing Oracle Identity Manager in a cluster, you must copy all the JAR files and the contents of the connectorResources directory into the corresponding directories on each node of the cluster. See Table 2-1 for information about the files that you must copy and their destination locations on the Oracle Identity Manager host computer.
The following sections discuss postinstallation procedures:
Section 2.3.1, "Changing to the Required Input Locale on the Oracle Identity Manager Host Computer"
Section 2.3.2, "Clearing Content Related to Connector Resource Bundles from the Server Cache"
Section 2.3.5, "Addressing Prerequisites for Using the Java API of RSA Authentication Manager"
Section 2.3.6, "Copying Target System Files on Oracle Identity Manager"
Section 2.3.8, "Creating a Target System Account for Connector Operations"
Section 2.3.10, "Setting Up the Configuration Lookup Definition in Oracle Identity Manager"
Section 2.3.11, "Setting Up the Lookup.RSA.AuthManager.ExclusionList Lookup Definition"
Section 2.3.14, "Creating Authorization Policies for User Management"
|
Note: In an Oracle Identity Manager cluster, perform this procedure on each node of the cluster. Then, restart each node. |
Changing to the required input locale (language and country setting) involves installing the required fonts and setting the required input locale.
You may require the assistance of the system administrator to change to the required input locale.
|
Note: In an Oracle Identity Manager cluster, perform this procedure on each node of the cluster. Then, restart each node. |
When you deploy the connector, the resource bundles are copied from the resources directory on the installation media into the OIM_HOME/xellerate/connectorResources directory for Oracle Identity Manager release 9.1.0.x, and Oracle Identity Manager database for Oracle Identity Manager release 11.1.1. Whenever you add a new resource bundle to the connectorResources directory or make a change in an existing resource bundle, you must clear content related to connector resource bundles from the server cache.
To clear content related to connector resource bundles from the server cache:
In a command window, perform one of the following steps:
If you are using Oracle Identity Manager release 9.1.0.x, then switch to the OIM_HOME/xellerate/bin directory.
If you are using Oracle Identity Manager release 11.1.1, then switch to the OIM_HOME/server/bin directory.
|
Note: You must perform Step 1 before you perform Step 2. An exception is thrown if you run the command described in Step 2 as follows:For Oracle Identity Manager release 9.1.0.x: OIM_HOME/xellerate/bin/SCRIPT_FILE_NAME For Oracle Identity Manager release 11.1.1: OIM_HOME/server/bin/SCRIPT_FILE_NAME |
Enter one of the following commands:
|
Note: You can use the PurgeCache utility to purge the cache for any content category. RunPurgeCache.bat CATEGORY_NAME on Microsoft Windows or PurgeCache.sh CATEGORY_NAME on UNIX. The CATEGORY_NAME argument represents the name of the content category that must be purged.
For example, the following commands purge Metadata entries from the server cache:
|
For Oracle Identity Manager release 9.1.0.x:
On Microsoft Windows: PurgeCache.bat ConnectorResourceBundle
On UNIX: PurgeCache.sh ConnectorResourceBundle
|
Note: You can ignore the exception that is thrown when you perform Step 2. This exception is different from the one mentioned in Step 1. |
In this command, ConnectorResourceBundle is one of the content categories that you can delete from the server cache. See the following file for information about the other content categories:
OIM_HOME/xellerate/config/xlconfig.xml
For Oracle Identity Manager release 11.1.1:
On Microsoft Windows: PurgeCache.bat All
On UNIX: PurgeCache.sh All
When prompted, enter the user name and password of an account belonging to the SYSTEM ADMINISTRATORS group. In addition, you are prompted to enter the service URL in the following format:
t3://OIM_HOST_NAME:OIM_PORT_NUMBER
In this format:
Replace OIM_HOST_NAME with the host name or IP address of the Oracle Identity Manager host computer.
Replace OIM_PORT_NUMBER with the port on which Oracle Identity Manager is listening.
See Oracle Fusion Middleware System Administrator's Guide for Oracle Identity Manager for more information about the PurgeCache utility.
Depending on the Oracle Identity Manager release you are using, perform instructions in one of the following sections:
Section 2.3.3.1, "Enabling Logging on Oracle Identity Manager Release 9.1.0.x"
Section 2.3.3.2, "Enabling Logging on Oracle Identity Manager Release 11.1.1"
|
Note: In an Oracle Identity Manager cluster, perform this procedure on each node of the cluster. Then, restart each node. |
When you enable logging, Oracle Identity Manager automatically stores in a log file information about events that occur during the course of provisioning and reconciliation operations. To specify the type of event for which you want logging to take place, you can set the log level to one of the following:
ALL
This level enables logging for all events.
DEBUG
This level enables logging of information about fine-grained events that are useful for debugging.
INFO
This level enables logging of messages that highlight the progress of the application at a coarse-grained level.
WARN
This level enables logging of information about potentially harmful situations.
ERROR
This level enables logging of information about error events that might allow the application to continue running.
FATAL
This level enables logging of information about very severe error events that could cause the application to stop functioning.
OFF
This level disables logging for all events.
The file in which you set the log level and the log file path depend on the application server that you use:
IBM WebSphere Application Server
To enable logging:
Add the following lines in the OIM_HOME/xellerate/config/log.properties file:
log4j.logger.XELLERATE=log_level
log4j.logger.OIMCP.RSAM=log_level
In these lines, replace LOG_LEVEL with the log level that you want to set.
For example:
log4j.logger.XELLERATE=INFO
log4j.logger.OIMCP.RSAM=INFO
After you enable logging, log information is written to the following file:
WEBSPHERE_HOME/AppServer/logs/SERVER_NAME/startServer.log
JBoss Application Server
To enable logging:
In the JBOSS_HOME/server/default/conf/jboss-log4j.xml file, locate or add the following lines:
<category name="XELLERATE">
   <priority value="log_level"/>
</category>
<category name="OIMCP.RSAM">
   <priority value="log_level"/>
</category>
In the second XML code line of each set, replace LOG_LEVEL with the log level that you want to set. For example:
<category name="XELLERATE">
   <priority value="INFO"/>
</category>
<category name="OIMCP.RSAM">
   <priority value="INFO"/>
</category>
After you enable logging, log information is written to the following file:
JBOSS_HOME/server/default/log/server.log
Oracle Application Server
To enable logging:
Add the following lines in the OIM_HOME/xellerate/config/log.properties file:
log4j.logger.XELLERATE=log_level
log4j.logger.OIMCP.RSAM=log_level
In these lines, replace LOG_LEVEL with the log level that you want to set.
For example:
log4j.logger.XELLERATE=INFO
log4j.logger.OIMCP.RSAM=INFO
After you enable logging, log information is written to the following file:
ORACLE_HOME/opmn/logs/default_group~home~default_group~1.log
Oracle WebLogic Server
To enable logging:
Add the following lines in the OIM_HOME/xellerate/config/log.properties file:
log4j.logger.XELLERATE=LOG_LEVEL
log4j.logger.OIMCP.RSAM=LOG_LEVEL
In these lines, replace LOG_LEVEL with the log level that you want to set.
For example:
log4j.logger.XELLERATE=INFO
log4j.logger.OIMCP.RSAM=INFO
After you enable logging, log information is written to the following file:
WEBLOGIC_HOME/user_projects/domains/DOMAIN_NAME/SERVER_NAME/SERVER_NAME.log
|
Note: In an Oracle Identity Manager cluster, perform this procedure on each node of the cluster. Then, restart each node. |
Oracle Identity Manager release 11.1.1 uses Oracle Java Diagnostic Logging (OJDL) for logging. OJDL is based on java.util.logger. To specify the type of event for which you want logging to take place, you can set the log level to one of the following:
SEVERE.intValue()+100
This level enables logging of information about fatal errors.
SEVERE
This level enables logging of information about errors that might allow Oracle Identity Manager to continue running.
WARNING
This level enables logging of information about potentially harmful situations.
INFO
This level enables logging of messages that highlight the progress of the application.
CONFIG
This level enables logging of information about fine-grained events that are useful for debugging.
FINE, FINER, FINEST
These levels enable logging of information about fine-grained events, where FINEST logs information about all events.
These log levels are mapped to ODL message type and level combinations as shown in Table 2-2.
Table 2-2 Log Levels and ODL Message Type:Level Combinations
| Log Level | ODL Message Type:Level |
|---|---|
|
SEVERE.intValue()+100 |
INCIDENT_ERROR:1 |
|
SEVERE |
ERROR:1 |
|
WARNING |
WARNING:1 |
|
INFO |
NOTIFICATION:1 |
|
CONFIG |
NOTIFICATION:16 |
|
FINE |
TRACE:1 |
|
FINER |
TRACE:16 |
|
FINEST |
TRACE:32 |
The configuration file for OJDL is logging.xml, which is located at the following path:
DOMAIN_HOME/config/fmwconfig/servers/OIM_SERVER/logging.xml
Here, DOMAIN_HOME and OIM_SERVER are the domain name and server name specified during the installation of Oracle Identity Manager.
To enable logging in Oracle WebLogic Server:
Edit the logging.xml file as follows:
Add the following blocks in the file:
<log_handler name='rsam-handler' level='[LOG_LEVEL]' class='oracle.core.ojdl.logging.ODLHandlerFactory'>
<property name='logreader:' value='off'/>
     <property name='path' value='[FILE_NAME]'/>
     <property name='format' value='ODL-Text'/>
     <property name='useThreadName' value='true'/>
     <property name='locale' value='en'/>
     <property name='maxFileSize' value='5242880'/>
     <property name='maxLogSize' value='52428800'/>
     <property name='encoding' value='UTF-8'/>
   </log_handler>
<logger name="OIMCP.RSAM" level="[LOG_LEVEL]" useParentHandlers="false">
     <handler name="rsam-handler"/>
     <handler name="console-handler"/>
   </logger>
Replace both occurrences of [LOG_LEVEL] with the ODL message type and level combination that you require. Table 2-2 lists the supported message type and level combinations.
Similarly, replace [FILE_NAME] with the full path and name of the log file in which you want log messages to be recorded.
The following blocks show sample values for [LOG_LEVEL] and [FILE_NAME] :
<log_handler name='rsam-handler' level='NOTIFICATION:1' class='oracle.core.ojdl.logging.ODLHandlerFactory'>
<property name='logreader:' value='off'/>
     <property name='path' value='F:\MyMachine\middleware\user_projects\domains\base_domain1\servers\oim_server1\logs\oim_server1-diagnostic-1.log'/>
     <property name='format' value='ODL-Text'/>
     <property name='useThreadName' value='true'/>
     <property name='locale' value='en'/>
     <property name='maxFileSize' value='5242880'/>
     <property name='maxLogSize' value='52428800'/>
     <property name='encoding' value='UTF-8'/>
   </log_handler>

<logger name="OIMCP.RSAM" level="NOTIFICATION:1" useParentHandlers="false">
     <handler name="rsam-handler"/>
     <handler name="console-handler"/>
   </logger>
With these sample values, when you use Oracle Identity Manager, all messages generated for this connector that are of a log level equal to or higher than the NOTIFICATION:1 level are recorded in the specified file.
Save and close the file.
Set the following environment variable to redirect the server logs to a file:
For Microsoft Windows:
set WLS_REDIRECT_LOG=FILENAME
For UNIX:
export WLS_REDIRECT_LOG=FILENAME
Replace FILENAME with the location and name of the file to which you want to redirect the output.
Restart the application server.
|
Note: Perform the procedure described in this section only if your Oracle Identity Manager installation is running on Microsoft SQL Server. In a clustered environment, perform this procedure on each node of the cluster. Then, restart each node. |
In this connector, the child forms of a resource implement the dependent lookup feature of Oracle Identity Manager. Table 2-3 lists the child forms shipped with this connector.
Table 2-3 Child Forms
| Child Form | Description |
|---|---|
|
UD_AMROLE |
RSA Auth Manager Role Form |
|
UD_AMGROUP |
RSA Auth Manager Group Form |
By default, the queries for synchronization of lookup field values from the target system are based on Oracle Database SQL. If your Oracle Identity Manager installation is running on Microsoft SQL Server, then you must modify the lookup queries for synchronization of lookup definitions as follows:
To determine the field name of the ITResourceLookupField type from the parent form:
On the Design Console, expand Development Tools and double-click Form Designer.
Search for and open the UD_AMUSER form. This is the parent form.
On the Additional Columns tab for the Parent form, search for the row containing the ITResourceLookupField field type and note down the value in the Name column for the row.
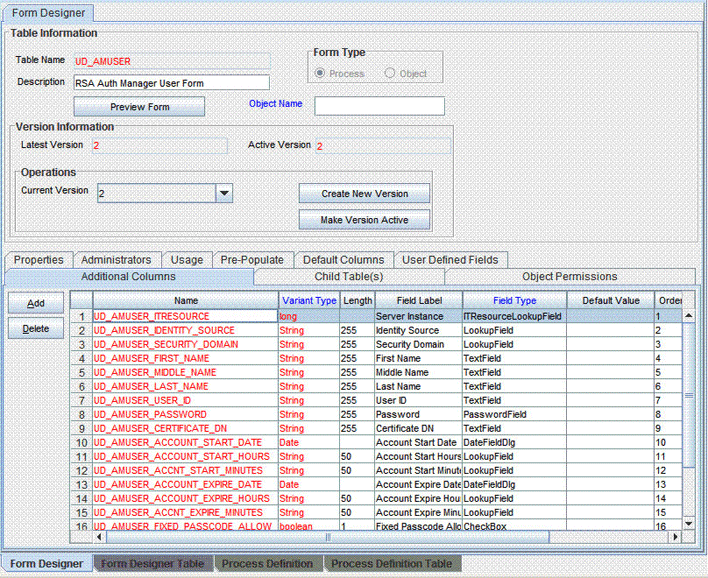
On the child forms, change the lookup field queries as follows:
Search for and open the UD_AMROLE child form.
Click Create New Version.
Enter a version for the form, click the Save icon, and then close the dialog box.
On the Additional Columns tab, search for the lookup containing the System Name field label. Note down the value in the Name column.
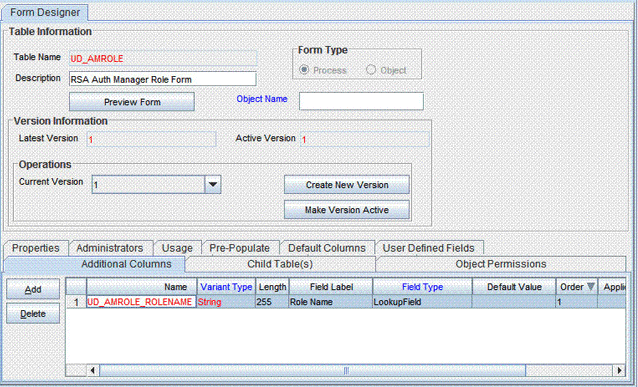
Open the Lookup Query property for the Role Name column.
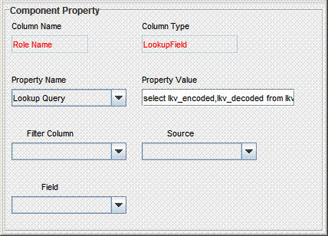
Delete the contents of the Property Value field.
Copy the following into the Property Value field:
select lkv_encoded,lkv_decoded from lkv lkv,lku lku where lkv.lku_key=lku.lku_key and lku_type_string_key='Lookup.RSA.AuthManager.AdminRole' and CHARINDEX('$Form data.UD_AMUSER_ITRESOURCE$' + '~' ,lkv_encoded)>0
Click the Save icon and then close the dialog box.
Click the Save icon to save the changes to the process form.
From the Current Version list, select the version that you modified.
Click Make Version Active.
Click the Save icon.
Perform the same procedure for the UD_AMGROUP form. For this form, copy the following Microsoft SQL Server query in the Property Value field:
select lkv_encoded,lkv_decoded from lkv lkv,lku lku where lkv.lku_key=lku.lku_key and lku_type_string_key='Lookup.RSA.AuthManager.Group' and CHARINDEX('$Form data.UD_AMUSER_ITRESOURCE$' + '~' ,lkv_encoded)>0
For each parent form, change the lookup field queries as follows:
Search for and open the UD_AMUSER form.
Click Create New Version.
Enter a version for the form, click the Save icon, and then close the dialog box.
On the Properties tab, double-click Lookup Query in the list of components.
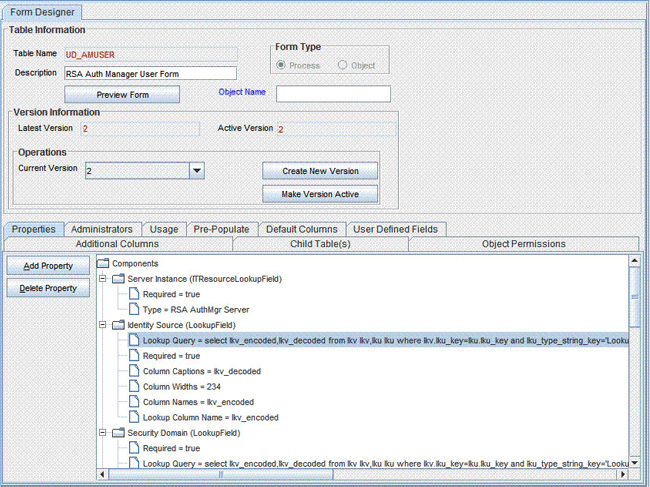
In the Edit Property dialog box, delete the contents of the Property Value field.
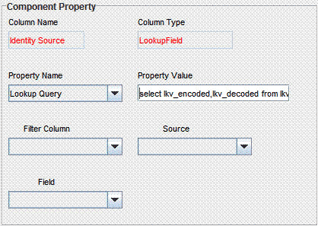
Copy the following query into the Property Value field:
select lkv_encoded,lkv_decoded from lkv lkv,lku lku where lkv.lku_key=lku.lku_key and lku_type_string_key='Lookup.RSA.AuthManager.IdentitySource' and CHARINDEX('$Form data.UD_AMUSER_ITRESOURCE$' + '~' ,lkv_encoded)>0
Repeat Step 3 for the following forms and lookup fields:
| Lookup Field and Form | Microsoft SQL Server Query |
|---|---|
| Security Domain field on UD_AMUSER | select lkv_encoded,lkv_decoded from lkv lkv,lku lku where lkv.lku_key=lku.lku_key and lku_type_string_key='Lookup.RSA.AuthManager.SecurityDomain' and CHARINDEX('$Form data.UD_AMUSER_ITRESOURCE$' + '~' ,lkv_encoded)>0 |
| Identity source field on UD_AMTOKEN | select lkv_encoded,lkv_decoded from lkv lkv,lku lku where lkv.lku_key=lku.lku_key and lku_type_string_key='Lookup.RSA.AuthManager.IdentitySource' and CHARINDEX('$Form data.UD_AMTOKEN_ITRESOURCE$' + '~' ,lkv_encoded)>0 |
Associate the revised child forms with the parent forms as follows:
On the Child Tables tab, change the child form version to the version created earlier for the child forms.
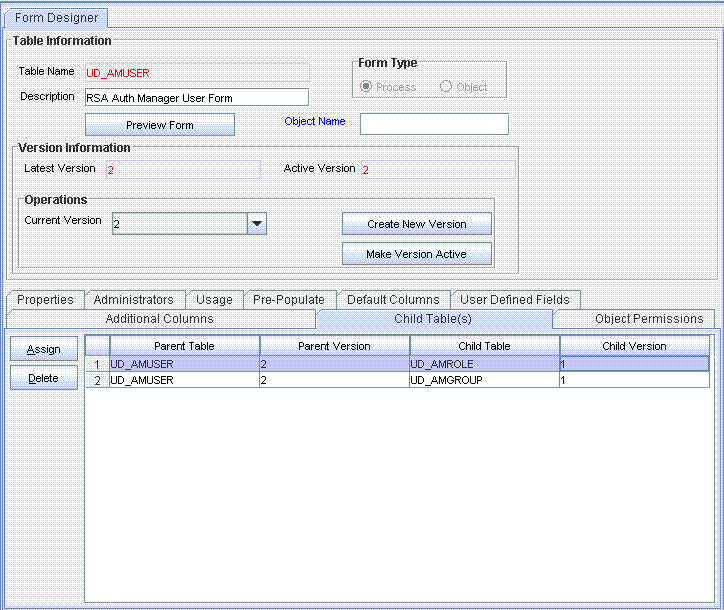
Click Make Version Active.
Click the Save icon.
To enable the connector to work with the Java API of the target system, perform the following procedures:
Section 2.3.5.1, "Exporting and Importing the Server Root Certificate"
Section 2.3.5.2, "Setting the Command Client User Name and Password"
To export and then import the server root certificate:
On the RSA Authentication Manager computer, export the root certificate as follows:
In a command window, change to the RSA_AM_HOME/appserver directory.
Enter the following command:
jdk/jre/bin/keytool -export -keystore RSA_AM_HOME/server/security/SERVER_NAME.jks -file am_root.cer -alias rsa_am_ca
In this command:
Replace RSA_AM_HOME with the full path of the directory in which RSA Authentication Manager is installed.
Replace SERVER_NAME with the host name of the computer on which RSA Authentication Manager is installed.
When prompted for the keystore password, press Enter without entering a password.
|
Note: Ignore the warning message. The server root certificate is exported at the path that you specify in the preceding step. |
Import the server root certificate as follows:
If you are using IBM Websphere Application Server, then perform the following procedure to import the certificate:
Locate the RSA Authentication Manger server root certificate file that you exported from RSA Authentication Manager, and copy it to the WEBSPHERE_HOME/profiles/SERVER_NAME/etc directory on the Oracle Identity Manager host computer.
Log in to the IBM WebSphere administrative console.
On the left pane, expand Security and select SSL certificate and key management.
Select Key stores and certificates, select NodeDefaultTrustStore, and then select Signer certificates.
Click Add.
The following page is displayed:
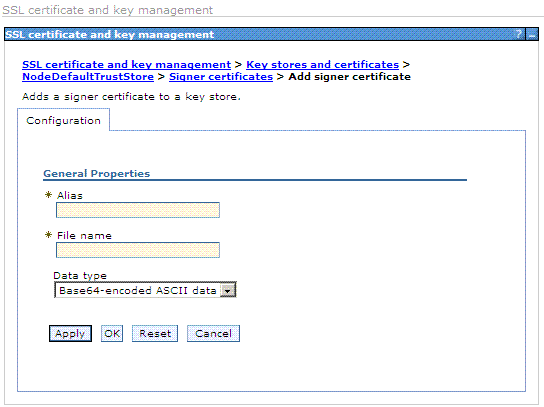
In the Alias field, enter rsa_am_ca.
In the File Name field, browse to the location where you exported the certificate.
For example: C:\IBM\WebSphere\AppServer\profiles\AppSrv02\etc\am_root.cer
Click OK.
The Signer certificates should now include the new certificate you added. A page with information similar to the following is displayed:
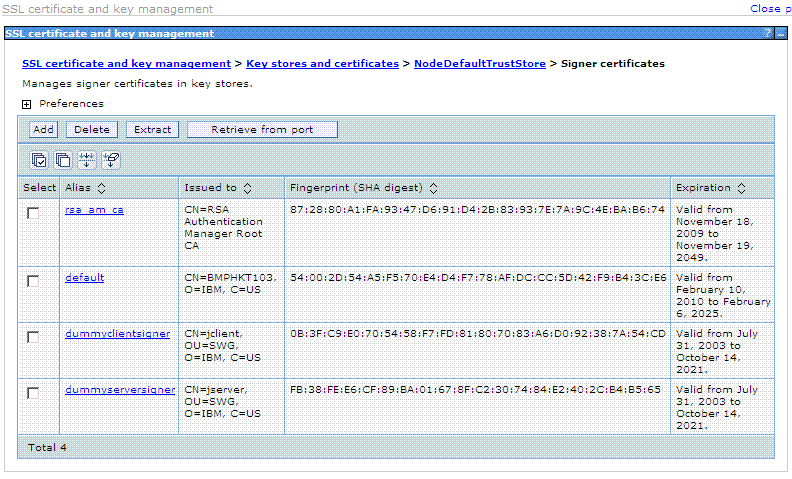
Select rsa_am_ca.
A page with information similar to the following is displayed:
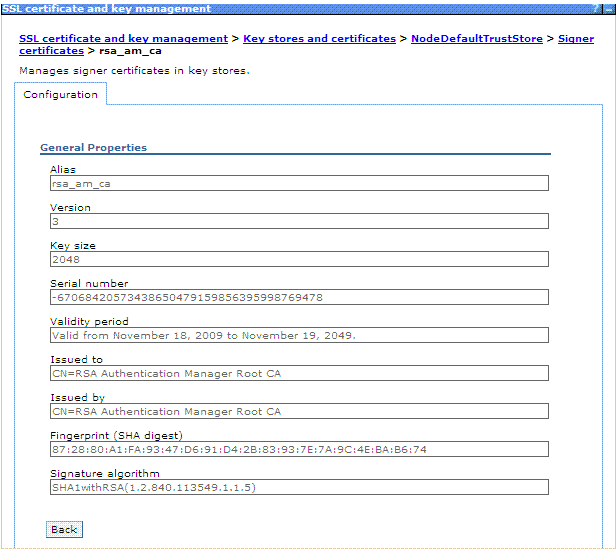
Click Save.
Restart the application server for the changes to take effect.
If you are using JBoss Application Server, then perform the procedure described in the "Importing the Server Root Certificate (Java)" section of the RSA Authentication Manager 7.1 Developer's Guide.
If you are using Oracle Weblogic Server, then:
Perform the procedure described in the "Importing the Server Root Certificate (Java)" section of the RSA Authentication Manager 7.1 Developer's Guide.
Import the server root certificate into the keystore of Oracle WebLogic by running the following command:
keytool -import -alias ALIAS -keystore WEBLOGIC_HOME/server/lib/DemoTrust.jks -file CERT_FILE_LOCATION -storepass PASSWORD
In the preceding command, replace:
ALIAS with an alias for the RSA root certificate.
CERT_FILE_LOCATION with the full path and name of the certificate file.
PASSWORD is the password of the certificate keystore.
The following is a sample command:
keytool -import -alias rsa001 -keystore D:\Oracle\Middleware\wlserver_10.3\server\lib\DemoTrust.jks -file D:\Oracle\cert46\am_root.cer -storepass DemoTrustKeyStorePassPhrase
Perform the procedure described in the "Setting the Command Client User Name and Password" section of the RSA Authentication Manager 7.1 Developer's Guide.
Copy the following files from the RSA Authentication Manager installation directory into the OIM_HOME/xellerate/ThirdParty directory if you are using Oracle Identity Manager release 9.1.0.x or the OIM_HOME/server/ThirdParty directory if you are using Oracle Identity Manager release 11.1.1.x:
|
Note: RSA_AM_HOME is the directory in which RSA Authentication Manager is installed. |
RSA_AM_HOME/appserver/license.bea
RSA_AM_HOME/appserver/modules/com.bea.core.process_5.3.0.0.jar
RSA_AM_HOME/appserver/weblogic/server/lib/wlfullclient.jar
RSA_AM_HOME/appserver/weblogic/server/lib/wlcipher.jar
RSA_AM_HOME/appserver/weblogic/server/lib/EccpressoAsn1.jar
RSA_AM_HOME/appserver/weblogic/server/lib/EccpressoCore.jar
RSA_AM_HOME/appserver/weblogic/server/lib/EccpressoJcae.jar
In addition, the following files are available in the SDK_HOME/lib/java directory on the RSA Authentication Manager host computer.
am-client.jar
axis-1.3.jar
commons-beanutils-1.7.0.jar
commons-discovery-0.2.jar
commons-lang-2.3.jar
ims-client.jar
ims-server-o.jar
iScreen-1-1-0rsa-2.jar
iScreen-ognl-1-1-0rsa-2.jar
ognl-2.6.7.jar
spring-2.0.7.jar
Depending on the application server that you use, copy the specified files from the RSA_AM_HOME/appserver and SDK_HOME/lib/java directories into the following directories:
For IBM Websphere Application Server
Copy the JAR files into the WEBSPHERE_HOME/APPSERVER_HOME/lib directory.
In addition, perform the following procedure:
In a text editor, open the WEBSPHERE_HOME/profiles/AppSrv02/bin/setupCmdLine.sh (or setupCmdLine.cmd) file.
In this file, search for the WAS_CLASSPATH variable.
To the current value of the WAS_CLASSPATH variable, add each of the JAR files that you copied earlier in this section.
For example:
WAS_CLASSPATH=%WAS_HOME%\properties;%WAS_HOME%\lib\startup.jar;%WAS_HOME%\lib\bootstrap.jar;%WAS_HOME%/lib/j2ee.jar;%WAS_HOME%/lib/lmproxy.jar;%WAS_HOME%/lib/urlprotocols.jar;%JAVA_HOME%\lib\tools.jar;%WAS_HOME%/lib/license.bea;%WAS_HOME%/lib/wlcipher.jar;%WAS_HOME%/lib/wlfullclient.jar;%WAS_HOME%/lib/com.bea.core.process_5.3.0.0.jar;%WAS_HOME%/lib/EccpressoAsn1.jar;%WAS_HOME%/lib/EccpressoCore.jar;%WAS_HOME%/lib/EccpressoJcae.jar;%WAS_HOME%/lib/am-client.jar;%WAS_HOME%/lib/ims-client.jar;%WAS_HOME%/lib/spring-2.0.7.jar;%WAS_HOME%/lib/iScreen-1-1-0rsa-2.jar;%WAS_HOME%/lib/iScreen-ognl-1-1-0rsa-2.jar;%WAS_HOME%/lib/ognl-2.6.7.jar;%WAS_HOME%/lib/ims-server-o.jar;%WAS_HOME%/lib/commons-lang-2.3.jar;%WAS_HOME%/lib/axis-1.3.jar;%WAS_HOME%/lib/commons-discovery-0.2.jar;%WAS_HOME%/lib/commons-beanutils-1.7.0.jar
Save and close the file.
Restart the server for the changes to take effect.
For JBoss Application Server
Copy the JAR files into the JBOSS_HOME/server/default/lib directory of the application server installation directory. Restart the server for the changes to take effect.
For Oracle Application Server
Copy the JAR files into the ORACLE_HOME/j2ee/home/lib directory.
In addition, perform the following procedure:
Copy the log4j-1.2.11rsa-3.jar and commons-logging-1.0.4.jar files from the SDK_HOME/lib/java directory into the ORACLE_HOME/j2ee/home/lib directory.
Extract the contents of the ORACLE_HOME/j2ee/home/oc4j.jar file into a temporary directory.
In a text editor, open the boot.xml file. This is one of the files in the oc4j.jar file.
Add the following lines under the <system-class-loader> element in the boot.xml file:
<code-source path="lib/am-client.jar"/>
<code-source path="lib/axis-1.3.jar"/>
<code-source path="lib/com.bea.core.process_5.3.0.0.jar"/>
<code-source path="lib/commons-beanutils-1.7.0.jar"/>
<code-source path="lib/commons-discovery-0.2.jar"/>
<code-source path="lib/commons-lang-2.3.jar"/>
<code-source path="lib/EccpressoAsn1.jar"/>
<code-source path="lib/EccpressoCore.jar"/>
<code-source path="lib/EccpressoJcae.jar"/>
<code-source path="lib/ims-client.jar"/>
<code-source path="lib/ims-server-o.jar"/>
<code-source path="lib/iScreen-1-1-0rsa-2.jar"/>
<code-source path="lib/iScreen-ognl-1-1-0rsa-2.jar"/>
<code-source path="lib/ognl-2.6.7.jar"/>
<code-source path="lib/spring-2.0.7.jar"/>
<code-source path="lib/wlcipher.jar"/>
<code-source path="lib/wlfullclient.jar"/>
<code-source path="lib/log4j-1.2.11rsa-3.jar"/>
<code-source path="lib/commons-logging-1.0.4.jar"/>
Re-create the oc4j.jar file and copy it into the ORACLE_HOME/j2ee/home directory.
Restart the server for the changes to take effect.
For Oracle WebLogic Server
Copy the JAR files into the WEBLOGIC_DOMAIN_HOME/lib directory. Restart the server for the changes to take effect.
MaxMessageSize is one of the JAVA_OPTIONS parameters. You must set this parameter to a value that is high enough to handle the maximum number of user and token records that you expect the connector to process during reconciliation.
In addition, if you are using JDK 1.6, then you must set the allowArraySyntax JAVA_OPTIONS parameter to true.
The procedure to configure JAVA_OPTIONS parameters depends on the application server that you are using:
Section 2.3.7.1, "Setting Values for JAVA_OPTIONS Parameters on IBM WebSphere Application Server"
Section 2.3.7.2, "Setting Values for JAVA_OPTIONS Parameters on JBoss Application Server"
Section 2.3.7.3, "Setting Values for JAVA_OPTIONS Parameters on Oracle Application Server"
Section 2.3.7.4, "Setting Values for JAVA_OPTIONS Parameters on Oracle WebLogic Server"
To configure the MaxMessageSize and allowArraySyntax JAVA_OPTIONS parameters on IBM WebSphere Application Server:
Log in to the administrative console.
Expand Servers, and click Application servers.
On the page that is displayed, click the name of the application server instance.
On the page that is displayed, expand Java and Process Management, click Process Definition, and then select Java Virtual Machine.
Add the following in the generic JVM arguments list:
-Dweblogic.MaxMessageSize= MAX_MESSAGE_SIZE
For example:
-Dweblogic.MaxMessageSize=40000000
If you are using the JDK 1.6, then you must also add the Dsun.lang.ClassLoader.allowArraySyntax parameter in the generic JVM arguments list:
-Dsun.lang.ClassLoader.allowArraySyntax=true
Click Save, and then restart the server for the changes to take effect.
To set values for the MaxMessageSize and allowArraySyntax JAVA_OPTIONS parameters on JBoss Application Server:
In a text editor, open the JBOSS_HOME/bin/run.sh (or run.bat) file.
In this file, search for the JAVA_OPTS variable.
The line containing this variable would be similar to the following:
rem JAVA_OPTS=%JAVA_OPTS% -Dsun.rmi.dgc.client.gcInterval=3600000 -Dsun.rmi.dgc.server.gcInterval=3600000
To this line, add the Dbea.home and Dweblogic parameters as shown here:
set JAVA_OPTS=%JAVA_OPTS% -Dsun.rmi.dgc.client.gcInterval=3600000 -Dsun.rmi.dgc.server.gcInterval=3600000 -Dbea.home=OIM_HOME/xellerate/ThirdParty -Dweblogic.MaxMessageSize=MAX_MESSAGE_SIZE
For example:
set JAVA_OPTS=%JAVA_OPTS% -Dsun.rmi.dgc.client.gcInterval=3600000 -Dsun.rmi.dgc.server.gcInterval=3600000 -Dbea.home=/oimserver/xellerate/ThirdParty -Dweblogic.MaxMessageSize=40000000
If you are using JDK 1.6, then you must also add the Dsun.lang.ClassLoader.allowArraySyntax parameter as follows:
set JAVA_OPTS=%JAVA_OPTS% -Dsun.rmi.dgc.client.gcInterval=3600000 -Dsun.rmi.dgc.server.gcInterval=3600000 -Dbea.home=OIM_HOME/xellerate/ThirdParty -Dweblogic.MaxMessageSize=MAX_MESSAGE_SIZE -Dsun.lang.ClassLoader.allowArraySyntax=true
For example:
set JAVA_OPTS=%JAVA_OPTS% -Dsun.rmi.dgc.client.gcInterval=3600000 -Dsun.rmi.dgc.server.gcInterval=3600000 -Dbea.home=/oimserver/xellerate/ThirdParty -Dweblogic.MaxMessageSize=40000000 -Dsun.lang.ClassLoader.allowArraySyntax=true
Save and close the file.
Restart the server for the changes to take effect.
To set values for the MaxMessageSize and allowArraySyntax JAVA_OPTIONS parameters on Oracle Application Server:
In a text editor, open the following file:
ORACLE_HOME/opmn/conf/opmn.xml file.
In the opmn.xml file, add the following in the <data id="java-options" value="-Xrs"> tag under the <category id="start-parameters"><ias-component id="default_group"> tag:
-Dweblogic.MaxMessageSize=MAX_MESSAGE_SIZE
For example:
<category id="start-parameters">
<data id="java-options" value="-Xrs -DXL.HomeDir=D:\OC4JOIM\Server\xellerate -Dlog4j.configuration=file:D:\OC4JOIM\Server\xellerate/config/log.properties -server -XX:MaxPermSize=128M -ms512M -mx1024M -XX:AppendRatio=3 -Djava.security.policy=$ORACLE_HOME/j2ee/home/config/java2.policy -Djava.awt.headless=true -Dhttp.webdir.enable=false -Doraesb.home=D:\product\10.1.3.1\OracleAS_3\integration\esb -Dhttp.proxySet=false -Doc4j.userThreads=true -Doracle.mdb.fastUndeploy=60 -Dorabpel.home=D:\product\10.1.3.1\OracleAS_3\bpel -Xbootclasspath^/p:D:\product\10.1.3.1\OracleAS_3\bpel/lib/orabpel-boot.jar  -Dhttp.proxySet=false -Dweblogic.MaxMessageSize=40000000"/>
</category>
If you are using JDK 1.6, then you must also add the Dsun.lang.ClassLoader.allowArraySyntax parameter in the opmn.xml file as follows:
-Dsun.lang.ClassLoader.allowArraySyntax=true
Save and close the file.
Restart the server for the changes to take effect.
To set values for the MaxMessageSize and allowArraySyntax JAVA_OPTIONS parameters on Oracle WebLogic Server:
In a text editor, open the following file:
WEBLOGIC_HOME/user_projects/domains/DOMAIN_NAME/bin/xlStartWLS.sh (or xlStartWLS.cmd)
Add the following to the JAVA_OPTIONS section of the xlStartWLS file:
-Dweblogic.MaxMessageSize=MAX_MESSAGE_SIZE
For example:
JAVA_OPTIONS="-DXL.HomeDir=$XLHOME -Djava.security.auth.login.config=$XLHOME/config/authwl.conf -Dlog4j.configuration=file:$XLHOME/config/log.properties -Djava.awt.headless=true -Doracle.jdbc.mapDateToTimestamp=false -Dweblogic.MaxMessageSize=40000000"
If you are using the JDK 1.6, then you must also add the Dsun.lang.ClassLoader.allowArraySyntax parameter as follows:
-Dsun.lang.ClassLoader.allowArraySyntax=true
For example:
JAVA_OPTIONS="-DXL.HomeDir=$XLHOME -Djava.security.auth.login.config=$XLHOME/config/authwl.conf -Dlog4j.configuration=file:$XLHOME/config/log.properties -Djava.awt.headless=true -Doracle.jdbc.mapDateToTimestamp=false -Dweblogic.MaxMessageSize=40000000" -Dsun.lang.ClassLoader.allowArraySyntax=true
Save and close the file.
Restart the server for the changes to take effect.
The connector uses a target system account to perform reconciliation and provisioning operations on the target system. To create this account:
Log in to the RSA Security Console.
Create a role having the permissions required for connector operations:
Expand the Administration list, select Administrative Roles, and then select Add New.
The following screenshot shows this page:
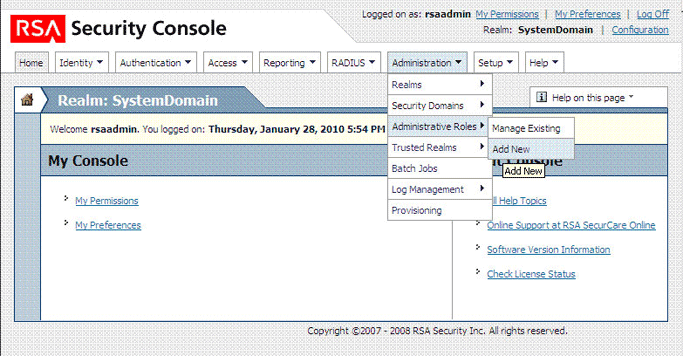
In the Administrative Role Name field, enter a name for the role.
Select the Permission Delegation check box.
In the Notes field, enter a description for the role.
In the Administrative Scope region:
Select the security domains that you want to include in the scope for connector operations.
Select the identity source that you want to include in the scope for connector operations.
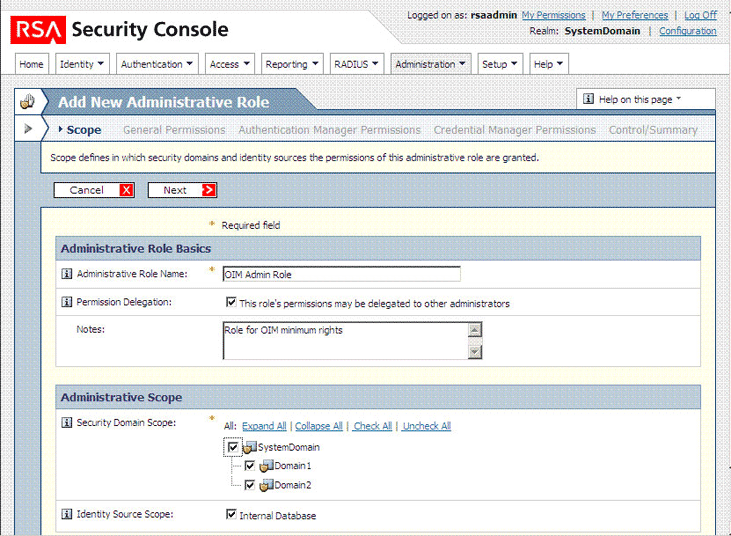
Click Next.
In the Realm Administrator region of the General Permissions page, select the View check box for the following permissions:
Identity Attribute Definitions
Password Policies
Lockout Policies
Self-Service Troubleshooting Policies
Authentication Grades
Console Display
SecurID Token Policies
Offline Authentication Policies
The following screenshot shows the first part of this page:
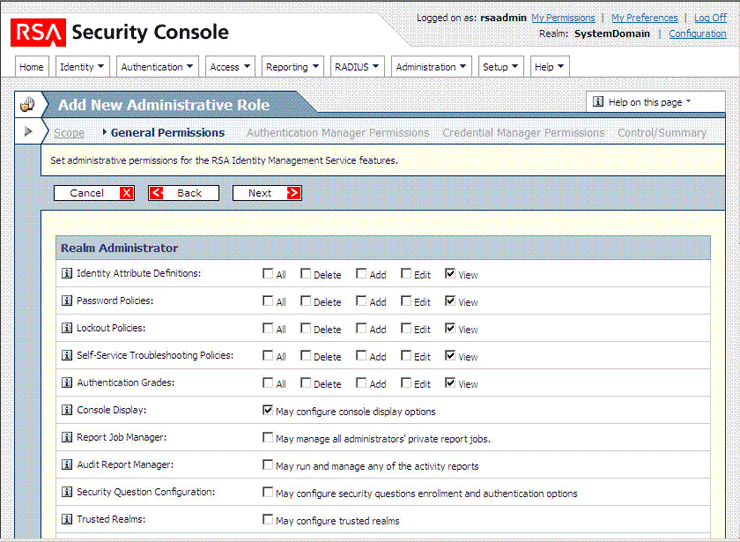
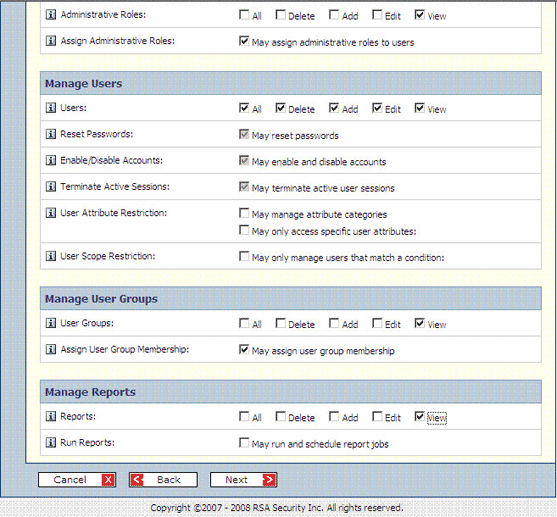
In the Manage Delegated Administration region, select the following permissions:
View check box for Security Domains
View check box for Administrative Roles
Assign Administrative Roles
In the Manage Users region, select the All, Delete, Add, Edit, and View check boxes.
In the Manage User Groups region, select the Assign User Group Membership check box.
In the Manage Reports region, select the View check box for the Reports permission.
The following screenshot shows the second part of this page:
Click Next.
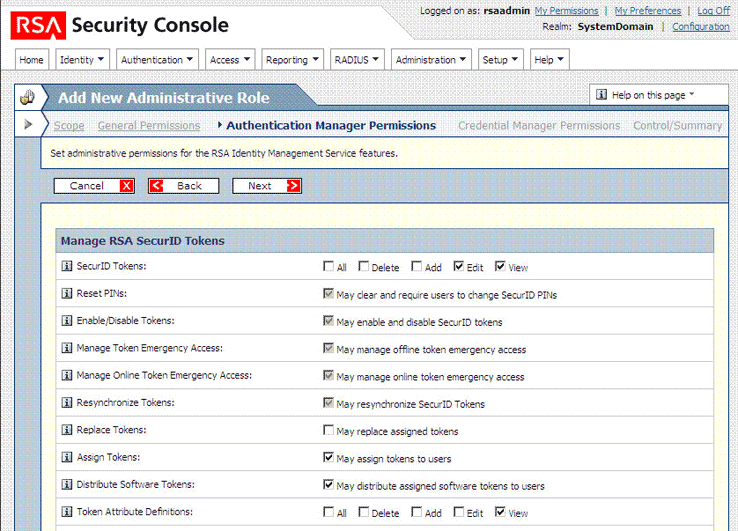
For the SecurID Tokens permission on the Manage RSA SecurID Tokens page, select the Edit and View check boxes.
Select the check boxes for the Assign Tokens and Distribute Software Tokens permissions.
Select the View check box for the Token Attribute Definitions permission.
The following screenshot shows the first part of this page:
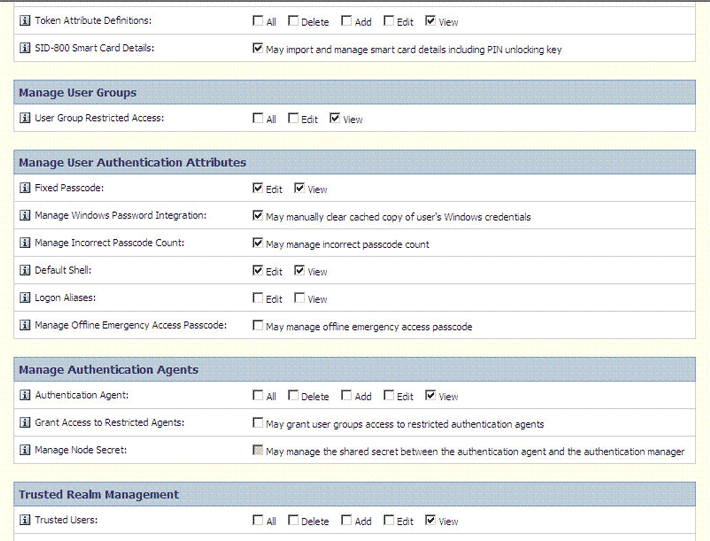
Select the SID-800 Smart Card Details check box.
In the Manage User Groups region, select the View check box for the User Group Restricted Access permission.
In the Manage User Authentication Attributes region, select the following check boxes:
Edit and View check boxes for the Fixed Passcode permission
Manage Windows Password Integration
Manage Incorrect Password Count
Edit and View check boxes for the Default Shell permission
In the Manage Authentication Agents region, select the View check box for the Authentication Agent permission.
In the Trusted Realm Management region, select the following check boxes
View check box for the Trusted Users permission
View check box for the Trusted User Groups permission
View check box for the Trusted User Group Restricted Access permission
The following screenshot shows the second part of this page:
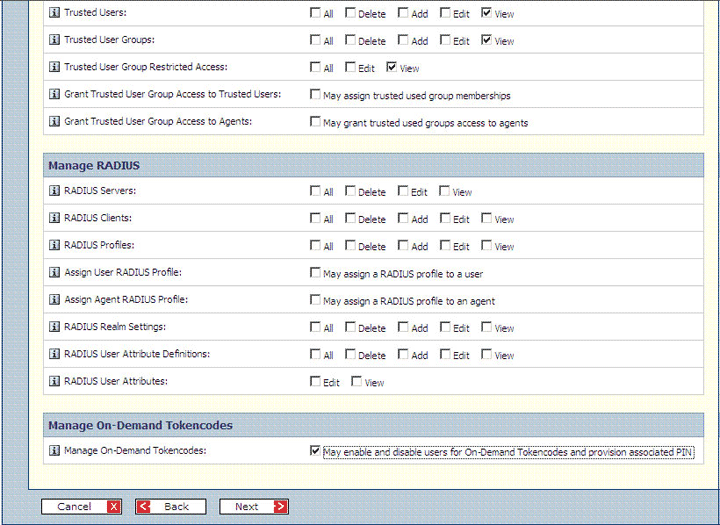
Select the check box in the Manage On-Demand Tokencodes region.
Click Next.
The following screenshot shows the third part of this page:
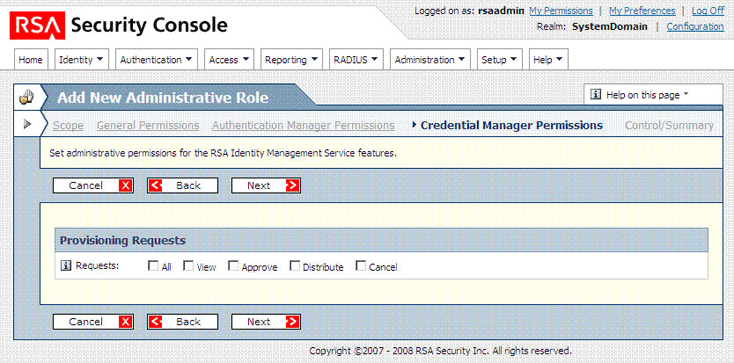
On the Credential Manager Permissions page, click Next.
The following screenshot shows this page:
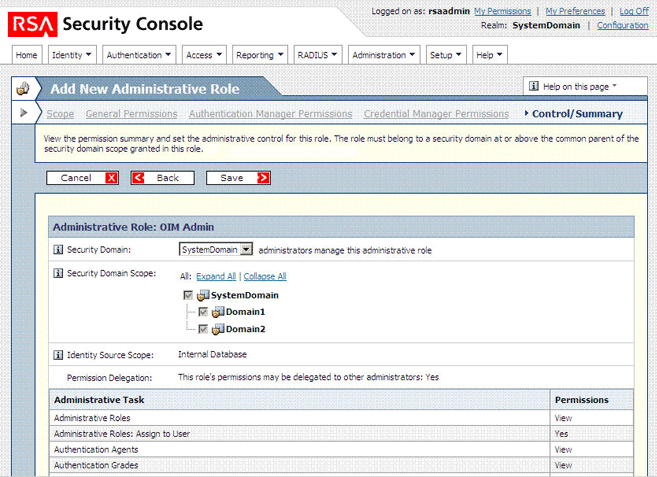
On the Control/Summary page, review the summary of permissions and then click Save.
The following screenshot shows the first part of this page:
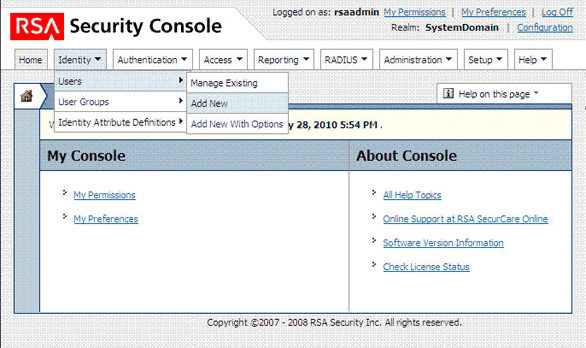
Create a user and assign the role to the user as follows:
Expand the Identity list, select Users, and then select Add New.
The following screenshot shows this page:
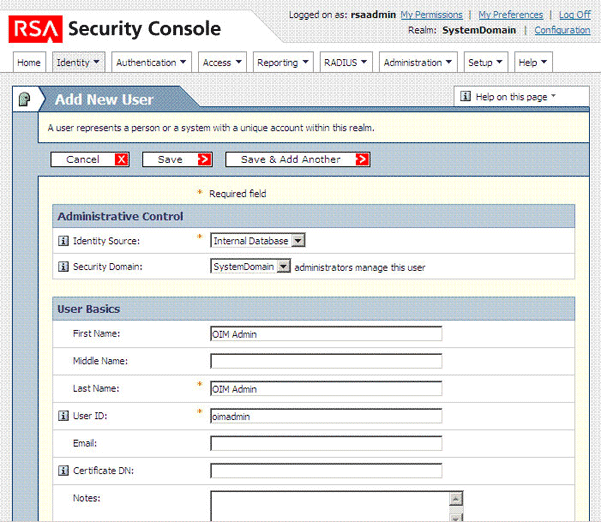
On the Add New User page, enter the required values and then click Save.
|
Note: The user ID and password that you enter on this page must be provided as the values of the Admin UserID and Admin Password IT resource parameters. Section 2.3.13, "Configuring Connection Parameters" describes these parameters. In the Account Information region, select the No expiration date check box. |
The following screenshot shows this page:
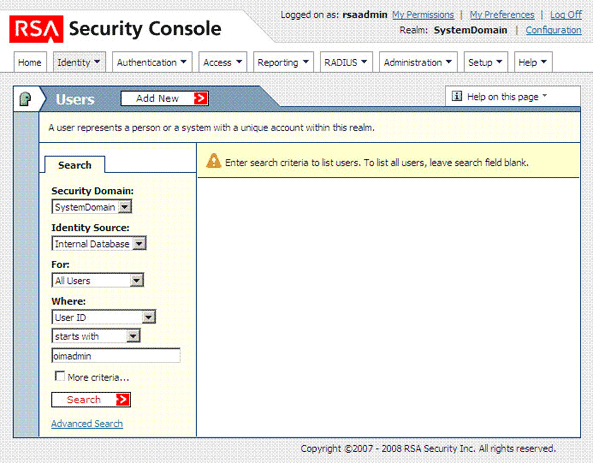
Use the Search feature to open the details of the newly created user.
The following screenshot shows this page:
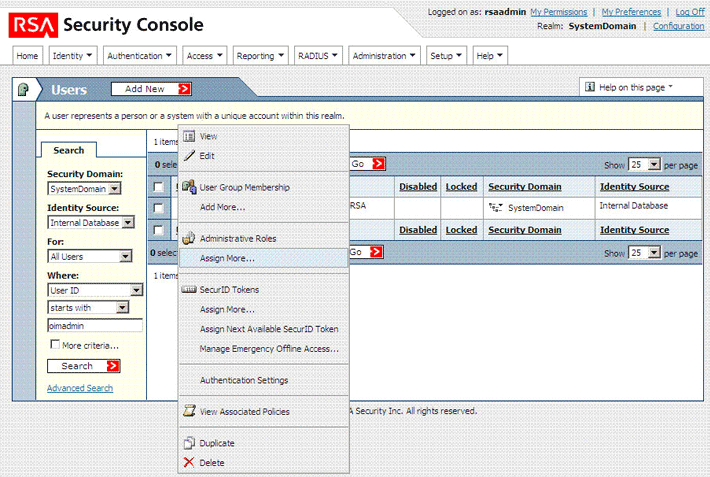
Click the arrow displayed next to the user name and then select Assign More.
The following screenshot shows this page:
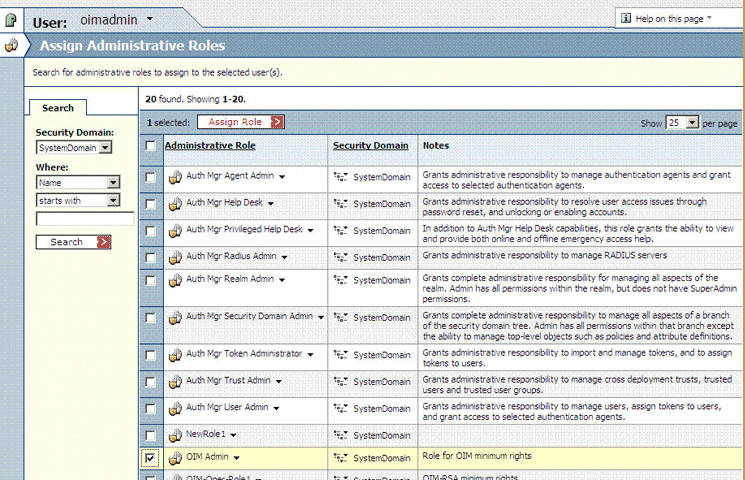
From the list of administrative roles, select the role that you create in Step 2 and then click Assign Role.
The following screenshot shows this page:
The connector uses the RemoteCommandTargetBean API of the target system to establish connections with the target system. The Lookup.RSA.AuthManager.ITResourceMapping lookup definition maps some of the IT resource parameters with parameters of this API. Table 2-4 shows the default entries in this lookup definition.
Table 2-4 Entries in the Lookup.RSA.AuthManager.ITResourceMapping Lookup Definition
| Code Key/IT Resource Parameter | Decode/API Parameter |
|---|---|
|
Command Client UserID |
SecurityPrincipal |
|
Command Client Password |
SecurityCredentials |
|
Provider URL |
ProviderURL |
|
JNDI Factory Class |
InitialContextFactory |
|
Note: See the Javadocs shipped with the target system for detailed information about connection properties used by the target system. |
To meet the requirements of your operating environment, you might need to add connection properties to this default set of properties. For example, if the target system is in a clustered environment and you want to access a specific server in the cluster, then you must also provide a value for the com.rsa.naming.pin.to.primary.server connection property.
To map a new connection property:
Add the connection property as a parameter in the RSA AuthMgr Server IT resource type definition as follows:
On the Design Console, expand Resource Management and then click IT Resources Type Definition.
Search for and open the RSA AuthMgr Server IT resource type.
Click Add.
A new row is displayed in the IT Resource Type Parameter table.
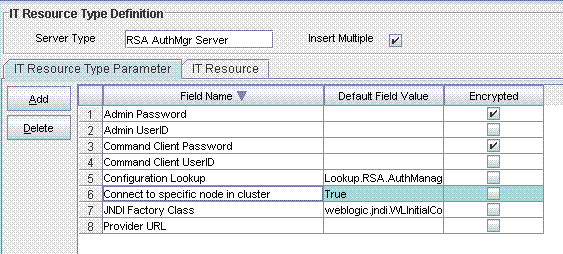
In the Field Name column, enter a name for the parameter.
Do not enter values in any other field.
Click the Save icon.
Specify a value for the new parameter in the IT resource. See Section 2.3.13, "Configuring Connection Parameters" for instructions.
In the Lookup.RSA.AuthManager.ITResourceMapping lookup definition, create a mapping between the connection property and the IT resource parameter as follows:
On the Design Console, expand Administration, and then double-click Lookup Definition.
Search for and open the Lookup.RSA.AuthManager.ITResourceMapping lookup definition.
Click Add.
In the Code Key column, enter the name of the IT resource parameter.
Sample value: Connect to specific node in cluster
In the Decode column, enter a value in the following format:
Property|PROPERTY_NAME
Sample value: Property|com.rsa.naming.pin.to.primary.server
Click the Save icon.
Table 2-5 describes the entries in the Lookup.RSA.AuthManager.Configuration lookup definition. You must set values for some of the entries.
|
Note: You must not change any of the Code Key values of this lookup definition. |
Table 2-5 Entries in the Lookup.RSA.AuthManager.Configuration Lookup Definition
| Code Key | Description |
|---|---|
|
This entry holds the name of the lookup definition that stores values used by the connector. The connector development team can use this lookup definition to make minor configuration changes in the connector. Default value: |
|
|
Date Mappings Lookup |
This entry holds the name of the lookup definition that stores entries used to format date values so that they are compatible with the date format used on the target system. This lookup definition is used during provisioning. |
|
Exclusion Users Lookup |
This entry holds the name of the lookup definition in which you enter user IDs of target system accounts for which you do not want to perform reconciliation and provisioning. See Section 2.3.11, "Setting Up the Lookup.RSA.AuthManager.ExclusionList Lookup Definition" for more information. |
|
Full Recon Filter |
This entry holds the name of the lookup definition that contains entries used by the connector during full reconciliation. |
|
IT Resource Mapping |
This entry holds the name of the lookup definition that maps some of the IT resource parameters with parameters of the RemoteCommandTargetBean API. |
|
Lookup Recon Mapping |
This entry holds the names of lookup definitions that are synchronized with the target system when you run the RSA Auth Manager Lookup Recon scheduled task. |
|
Target Date Format |
Enter the format in which date values are stored on the target system. During reconciliation, this date format is used to validate date values fetched from the target system. Default value: |
|
Target TimeZone |
Enter the time zone of the target system. For example, enter Default value: |
|
TKNFORMCOL TokenGUID |
If you create a copy of the token process form, then specify the column name for the Token GUID attribute on the new token process form. Default value: |
|
TKNFORMCOL TokenSerialNumber |
If you create a copy of the token process form, then specify the column name for the Token Serial Number attribute on the new token process form. Default value: |
|
TKNFORMCOL UserID |
If you create a copy of the token process form, then specify the column name for the User ID attribute on the new token process form. Default value: |
|
TKNROField TokenSerialNumber |
If you create a copy of the token resource object, then specify the name of the attribute (column) in the new token resource object that holds token serial numbers. Default value: |
|
TKNROFIELD IdentitySource |
If you create a copy of the token resource object, then specify the name of the attribute (column) in the new token resource object that holds the name of the user identity source. Default value: |
|
TKNROFIELD TokenGuid |
If you create a copy of the token resource object, then specify the name of the attribute (column) in the new token resource object that holds token GUIDs. Default value: |
|
TKNROField UserId |
If you create a copy of the token resource object, then specify the column name for the User ID attribute on the new token resource object. Default value: |
|
TKNROField User GUID |
If you create a copy of the token resource object, then specify the column name for the User GUID attribute on the new token resource object. Default value: |
|
Token Attribute Mapping Lookup |
This entry holds the name of the lookup definition that maps token process form fields with token attributes on the target system. |
|
Token Recon Attribute Mapping Lookup |
This entry holds the name of the lookup definition that maps user process form fields with token attributes on the target system. |
|
Token SerialNumber MaxLength |
Enter the maximum length of the token serial number allowed on your RSA Authentication Manager installation. Default value: |
|
Token Status Provisioned |
The value of this entry is used to specify the state of resources created through reconciliation. You can set either Default value: |
|
This entry holds the name of the lookup definition that is used to configure transformation of token attribute values fetched from the target system during token reconciliation. |
|
|
User Attribute Mapping Lookup |
This entry holds the name of the lookup definition that maps user process form fields with single-valued user attributes on the target system. |
|
User Child Attribute Mapping Lookup |
This entry holds the name of the lookup definition that maps user process form fields with multivalued user attributes on the target system. |
|
User Recon Attribute Mapping Lookup |
This entry holds the name of the lookup definition that maps user resource object fields and single-valued user attributes on the target system. |
|
User Recon Child Attribute Mapping Lookup |
This entry holds the name of the lookup definition that maps user resource object fields and multivalued user attributes on the target system. |
|
User Status Provisioned |
The value of this entry is used to specify the state of resources created through reconciliation. You can set either Default value: |
|
This entry holds the name of the lookup definition that configures transformation of user attribute values fetched from the target system during user reconciliation. |
|
|
Enter Default value: See Section 4.5, "Configuring Transformation of Data During Reconciliation" for more information. |
|
|
Enter Default value: See Section 4.5, "Configuring Transformation of Data During Reconciliation" for more information. |
|
|
Enter Default value: See Section 4.4, "Configuring Validation of Data During Reconciliation and Provisioning" for more information. |
|
|
Enter Default value: See Section 4.4, "Configuring Validation of Data During Reconciliation and Provisioning" for more information. |
|
|
Enter Default value: See Section 4.4, "Configuring Validation of Data During Reconciliation and Provisioning" for more information. |
|
|
User UDF USERGUID |
If you create a copy of the user process form, then specify the column name of the UDF for the User GUID attribute. Default value: |
|
USRFORMCOL ITResource |
If you create a copy of the user process form, then specify the column name for the IT Resource attribute on the new token process form. Default value: |
|
USRFORMCOL UserID |
If you create a copy of the user process form, then specify the column name for the User ID attribute on the new token process form. Default value: |
|
USRROField UserGUID |
If you create a copy of the user resource object, then specify the column name for the User GUID attribute in the new user resource object. Default value: |
|
USRROField Expire Time Hours |
If you create a copy of the user resource object, then specify the column name for the Expire Time Hours attribute in the new user resource object as the value of the USRROField Expire Time Hours entry. The Expire Time Hours attribute of Oracle Identity Manager is mapped to the target system attribute that holds the account expiry date and time. Default value: |
|
USRROField Expire Time Mins |
If you create a copy of the user resource object, then specify the column name for the Expire Time Mins attribute in the new user resource object as the value of the USRROField Expire Time Mins entry. The Expire Time Mins attribute of Oracle Identity Manager is mapped to the target system attribute that holds the account expiry date and time. Default value: |
|
USRFORMCOL UserGUID |
If you create a copy of the user process form, then specify the column name for the User GUID attribute on the new user process form. Default value: |
|
USRROField IdentitySource |
If you create a copy of the user resource object, then specify the column name for the Identity Source attribute in the new user resource object. Default value: |
|
USRROField Security Domain |
If you create a copy of the user resource object, then specify the column name for the Security Domain attribute in the new user resource object. Default value: |
|
USRROField Start Time Hours |
If you create a copy of the user resource object, then specify the column name for the Start Time attribute in the new user resource object as the value of the USRROField Start Time Hours entry. The Start Time attribute of Oracle Identity Manager is mapped to the target system attribute that holds the account start date and time. Default value: |
|
USRROField Start Time Mins |
If you create a copy of the user resource object, then specify the column name for the Start Time attribute in the new user resource object as the value of the USRROField Start Time Mins entry. The Start Time attribute of Oracle Identity Manager is mapped to the target system attribute that holds the account start date and time. Default value: |
|
USRROField UserID |
If you create a copy of the user resource object, then specify the column name for the User ID attribute in the new user resource object. Default value: |
|
This entry holds the name of the lookup definition that maps token process form fields with the Java validation classes that you create. Value: See Section 4.4, "Configuring Validation of Data During Reconciliation and Provisioning" for more information about this feature. |
|
|
This entry holds the name of the lookup definition that maps token resource object fields with the Java validation classes that you create. Value: See Section 4.4, "Configuring Validation of Data During Reconciliation and Provisioning" for more information about this feature. |
|
|
This entry holds the name of the lookup definition that maps user process form fields with the Java validation classes that you create. Value: See Section 4.4, "Configuring Validation of Data During Reconciliation and Provisioning" for more information about this feature. |
|
|
This entry holds the name of the lookup definition that maps user resource object fields with the Java validation classes that you create. Value: See Section 4.4, "Configuring Validation of Data During Reconciliation and Provisioning" for more information about this feature. |
In the Lookup.RSA.AuthManager.ExclusionList lookup definition, you can enter the user IDs of target system accounts for which you do not want to perform reconciliation and provisioning:
On the Design Console, expand Administration and then double-click Lookup Definition.
Search for and open the Lookup.RSA.AuthManager.ExclusionList lookup definition.
Click Add.
In the Code Key and Decode columns, enter the first user ID that you want to exclude. You must enter the same value in both columns.
|
Note: You must enter the user ID in the same case (uppercase and lowercase) in which it is stored on the target system. |
Repeat Steps 3 and 4 for all the user IDs that you want to exclude.
Click the Save icon.
After performing lookup field synchronization, to ensure that values retrieved from the lookup fields on the target system are displayed in the lookup fields in Oracle Identity Manager, you must perform the following procedure:
On the Design Console, expand Development Tools and double-click Form Designer.
Search for and open the UD_AMTOKEN form.
Click Create New Version, and then enter a version number for the new version.
Select the form which was created in the preceding step.
On the Properties tab, double-click the Lookup Query property.
In the Edit Property dialog box:
Click Make Version Active.
Click the Save icon.
The RSA Server Instance IT resource holds information used by the connector to establish a connection with the target system. This IT resource is automatically created when you run the Connector Installer. You must specify values for the IT resource parameters.
To specify values for the parameters of the IT resource:
Log in to the Administrative and User Console.
Depending on the Oracle Identity Manager release you are using, perform one of the following steps:
For Oracle Identity Manager release 9.1.0.x:
Expand Resource Management, and then click Manage IT Resource.
For Oracle Identity Manager release 11.1.1:
On the Welcome page, click Advanced in the upper-right corner of the page.
On the Welcome to Oracle Identity Manager Advanced Administration page, in the Configuration region, click Manage IT Resource.
In the IT Resource Name field on the Manage IT Resource page, enter RSA Server Instance and then click Search.
Click the edit icon for the IT resource.
From the list at the top of the page, select Details and Parameters.
Specify values for the parameters of the IT resource. Table 2-6 describes each parameter.
|
Note: Entries in this table are sorted in alphabetical order of parameter names. |
Table 2-6 Parameters of the IT Resource
| Parameter | Description |
|---|---|
|
Admin Password |
Enter the password of the target system user account that you create for connector operations See Section 2.3.8, "Creating a Target System Account for Connector Operations" for more information. |
|
Admin UserID |
Enter the user ID of the target system user account that you create for connector operations See Section 2.3.8, "Creating a Target System Account for Connector Operations" for more information. |
|
Command Client Password |
Enter the command client password. Setting the command client user name and password is one of the tasks in the procedure mentioned in Section 2.3.5, "Addressing Prerequisites for Using the Java API of RSA Authentication Manager." |
|
Command Client UserID |
Enter the command client user name. Setting the command client user name and password is one of the tasks in the procedure mentioned in Section 2.3.5, "Addressing Prerequisites for Using the Java API of RSA Authentication Manager." |
|
This parameter holds the name of the configuration lookup definition. Default value: |
|
|
JNDI Factory Class |
This parameter holds the name of the initial context factory class on the target system. Value: You must not change this value. |
|
Provider URL |
Note: If RSA Authentication Manager is installed in a clustered environment, then replace
Sample value: |
To save the values, click Update.
To create authorization policies for user management, perform the procedures described in the following sections:
|
Note: Perform the procedure described in the following sections only if you are using Oracle Identity Manager release 11.1.1. |
Section 2.3.14.1, "Creating an Authorization Policy for Provisioning"
Section 2.3.14.2, "Creating an Authorization Policy for Reconciliation"
Before you can start using the connector for provisioning operations, you must create an authorization policy as follows:
Log in to the Administrative and User Console.
On the Welcome to Identity Administration page, in the Authorization Policies page, click Create Authorization Policy.
On the Basic Policy Information page, enter values for the following fields:
Policy Name: Enter name of the authorization policy for provisioning.
Description: Enter a description of the authorization policy.
Entity Name: Select the User Management feature.
Click Next. The Permissions page is displayed.
In the Enable column, select the checkbox corresponding to the Modify User Profile permission.
Modify the attribute-level settings for the Modify User Profile permission as follows:
Click Edit Attributes.
In the Attribute Settings dialog box, from the User Attributes region, select User GUID, click Save, and then close the dialog box.
On the Permissions page, in the Enable column, select the checkbox corresponding to the View User Details permission.
Modify the attribute-level settings for the View User Details permission as follows:
Click Edit Attributes.
In the Attribute Settings dialog box, from the User Attributes region, select User GUID, click Save, and then close the dialog box.
Click Next. The Data Constraints page is displayed.
Ensure that All User is selected, and then click Next.
On the Policy Assignment page, under Assign by Rule, ensure that Management Chain of User is not selected to remove the assignment of the direct and indirect managers of the user to the authorization policy.
Assign the System Administrator role to the authorization policy as follows:
In the Assign by Role region, click Add.
In the Assign Roles dialog box, search for and select the System Administrator role, and then click Add. The System Administrator role is added to the table in the Policy Assignment page.
On the Policy Confirmation page, verify details of the policy, and then click Finish.
On the next page, a message confirming that the policy creation was successful is displayed.
Click Apply to save changes.
To successfully use the connector for reconciliation, create an authorization policy by performing the following instructions:
Log in to the Administrative and User Console.
On the Welcome to Identity Administration page, on the left pane, click the Authorization Policy tab.
On the left pane, in the Search field, enter the name of the policy (User Management All Users Policy) as the search criterion.
From the search results table, select User Management All Users Policy.
From the Actions menu, select Create Like.
On the right pane, in the Basic Policy Information page, edit the Policy Name and Description fields to specify a new value, and then click Next. For example, enter the following values:
Policy Name: User Management All Users Policy for RSA
Description: Allows users with the ALL USERS role to access all user-management actions and authorization policy for the an RSA Auth Manager user.
On the Permissions page, in the Enable column, select the checkbox corresponding to the Modify User Profile permission .
Modify the attribute-level settings for the Modify User Profile permission as follows:
Click Edit Attributes.
In the Attribute Settings dialog box, from the User Attributes region, select User GUID, click Save, and then close the dialog box.
On the Permissions page, in the Enable column, select the checkbox corresponding to the View User Details permission.
Modify the attribute-level settings for the View User Details permission as follows:
Click Edit Attributes.
In the Attribute Settings dialog box, from the User Attributes region, select User GUID, click Save, and then close the dialog box.
On the Permissions page, in the Enable column, select the checkbox corresponding to the Search User permission, and then click Next.
On the Data Constraints page, ensure that All User is selected, and then click Next.
On the Policy Assignment page, ensure that the ALL USERS role is displayed in the table, and then click Next.
On the Policy Confirmation page, verify details of the policy, and then click Finish.
On the next page that is displayed, click Apply to save changes.
|
Note: Perform the procedure described in this section only if you are using Oracle Identity Manager release 11.1.1 and you want to configure request-based provisioning. |
In request-based provisioning, an end user creates a request for a resource by using the Administrative and User Console. Administrators or other users can also create requests for a particular user. Requests for a particular resource on the resource can be viewed and approved by approvers designated in Oracle Identity Manager.
The following are features of request-based provisioning:
A user can be provisioned only one resource (account) on the target system.
|
Note: Direct provisioning allows the provisioning of multiple target system accounts on the target system. |
Direct provisioning cannot be used if you enable request-based provisioning.
To configure request-based provisioning, perform the following procedures:
A request dataset is an XML file that specifies the information to be submitted by the requester during a provisioning operation. Predefined request datasets are shipped with this connector. These request datasets specify information about the default set of attributes for which the requester must submit information during a request-based provisioning operation. The following are the predefined request datasets available in the dataset directory on the installation media:
ProvisionResourceRSA Auth Manager User.xml
ProvisionResourceRSA Auth Manager Token.xml
ModifyResourceRSA Auth Manager User.xml
ModifyResourceRSA Auth Manager Token.xml
Copy these files from the installation media to any directory on the Oracle Identity Manager host computer. It is recommended that you create a directory structure as follows:
/custom/connector/RESOURCE_NAME
For example:
E:\MyDatasets\custom\connector\RSA_Auth_Mgr
|
Note: Until you complete the procedure to configure request-based provisioning, ensure that there are no other files or directories inside the parent directory in which you create the directory structure. In the preceding example, ensure that there are no other files or directories inside the E:\MyDatasets directory. |
The directory structure to which you copy the dataset files is the MDS location into which these files are imported after you run the Oracle Identity Manager MDS Import utility. The procedure to import dataset files is described in the next section.
Depending on your requirement, you can modify the file names of the request datasets. In addition, you can modify the information in the request datasets. See Oracle Fusion Middleware Developer's Guide for Oracle Identity Manager for information on modifying request datasets.
All request datasets must be imported into the metadata store (MDS), which can be done by using the Oracle Identity Manager MDS Import utility.
To import a request dataset definition into MDS:
Ensure that you have set the environment for running the MDS Import utility. See Oracle Fusion Middleware Developer's Guide for Oracle Identity Manager for detailed information about setting up the environment for MDS utilities.
|
Note: While setting up the properties in the weblogic.properties file, ensure that the value of the metadata_from_loc property is the parent directory of the /custom/connector/RESOURCE_NAME directory. For example, while performing the procedure in Section 2.3.15.1, "Copying Predefined Request Datasets," if you copy the files to the E:\MyDatasets\custom\connector\RSA_Auth_Mgr directory, then set the value of the metada_from_loc property toE:\MyDatasets. |
In a command window, change to the OIM_HOME\server\bin directory.
Run one of the following commands:
On Microsoft Windows
weblogicImportMetadata.bat
On UNIX
weblogicImportMetadata.sh
When prompted, enter the following values:
Please enter your username [weblogic]
Enter the username used to log in to the WebLogic server
Sample value: WL_User
Please enter your password [weblogic]
Enter the password used to log in to the WebLogic server.
Please enter your server URL [t3://localhost:7001]
Enter the URL of the application server in the following format:
t3://HOST_NAME_IP_ADDRESS:PORT
In this format, replace:
HOST_NAME_IP_ADDRESS with the host name or IP address of the computer on which Oracle Identity Manager is installed.
PORT with the port on which Oracle Identity Manager is listening.
The request dataset is imported into MDS at the following location:
/custom/connector/RESOURCE_NAME
To enable the Auto Save Form feature:
Log in to the Design Console.
Expand Process Management, and then double-click Process Definition.
Search for and open the RSA Auth Manager User process definition.
Select the Auto Save Form check box.
Click the Save icon.
Repeat Steps 1 through 5 with the following difference:
While performing Step 3, search for and open the RSA Auth Manager Token process definition.
Run the PurgeCache utility to clear content belonging to the Metadata category from the server cache. See Section 2.3.2, "Clearing Content Related to Connector Resource Bundles from the Server Cache" for instructions.
The procedure to configure request-based provisioning ends with this step.