Release 3.1
Part Number E14597-03
Contents
Previous
Next
| Oracle Application Management Pack for Oracle E-Business Suite User's Guide Release 3.1 Part Number E14597-03 | Contents | Previous | Next |
Before you can manage an Oracle E-Business Suite system in Grid Control, you must discover (register) that system and its components with the agents. The Oracle Application Management Pack for Oracle E-Business Suite allows you to discover and register systems that have been deployed using a standard configuration. The process of registering an Oracle E-Business Suite system with Grid Control has been automated.
Only users with the OPERATOR or above privilege can submit an administration job, including a discovery job, on the Oracle E-Business Suite.
Note: The management pack does not support discovery of multiple Oracle E-Business Suite instances with the same name on different hosts on a given Oracle Management Server. Each Oracle E-Business Suite instance should have a unique Oracle System Identifier (SID).
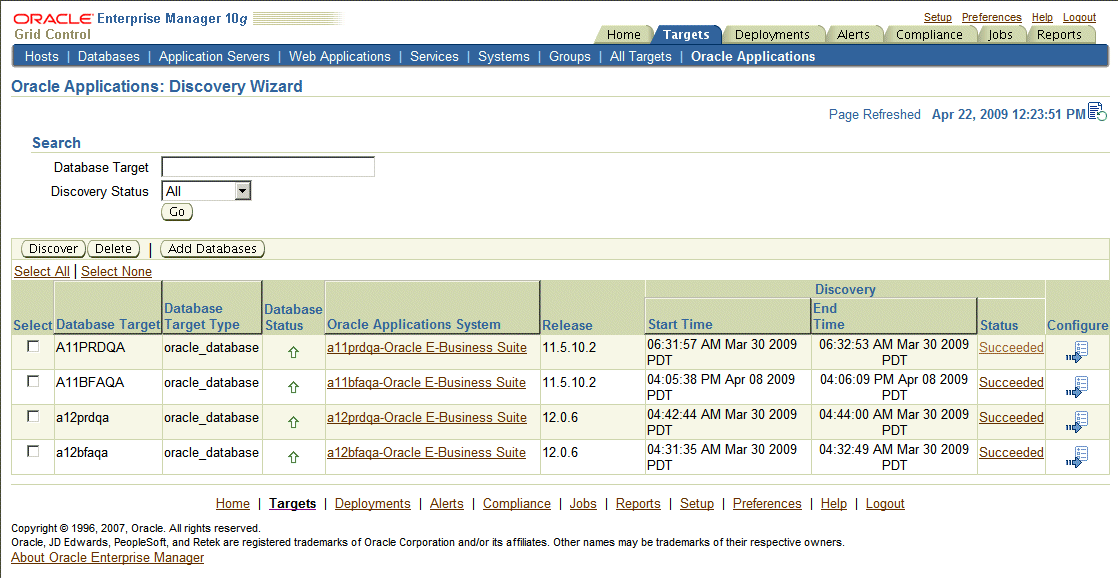
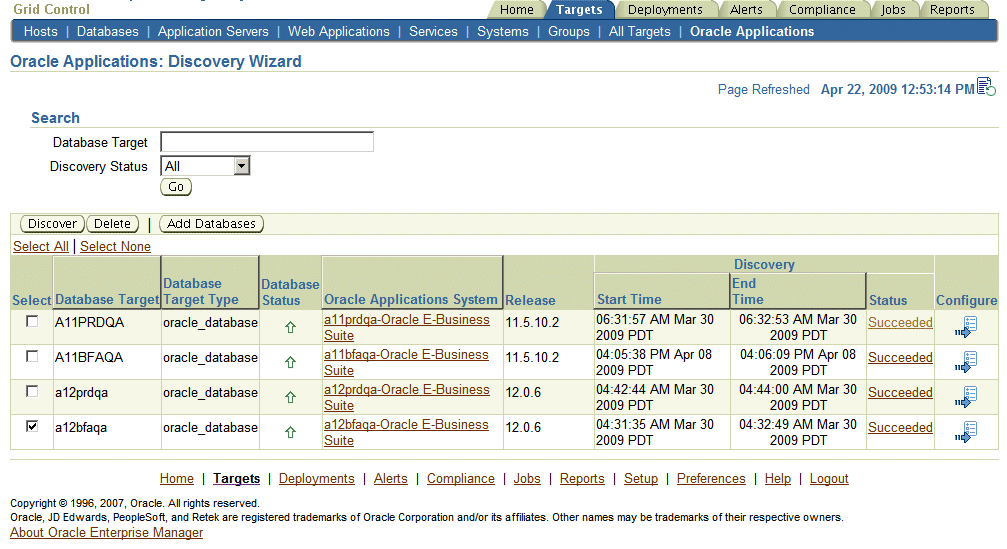
Discovery Wizard is a dashboard to track, plan, log and customize Oracle E-Business Suite discovery jobs.
The Discovery Wizard can be accessed by:
Click on the Discovery Wizard link under "Related Links" from the System Management Dashboard or Change Management Dashboard.
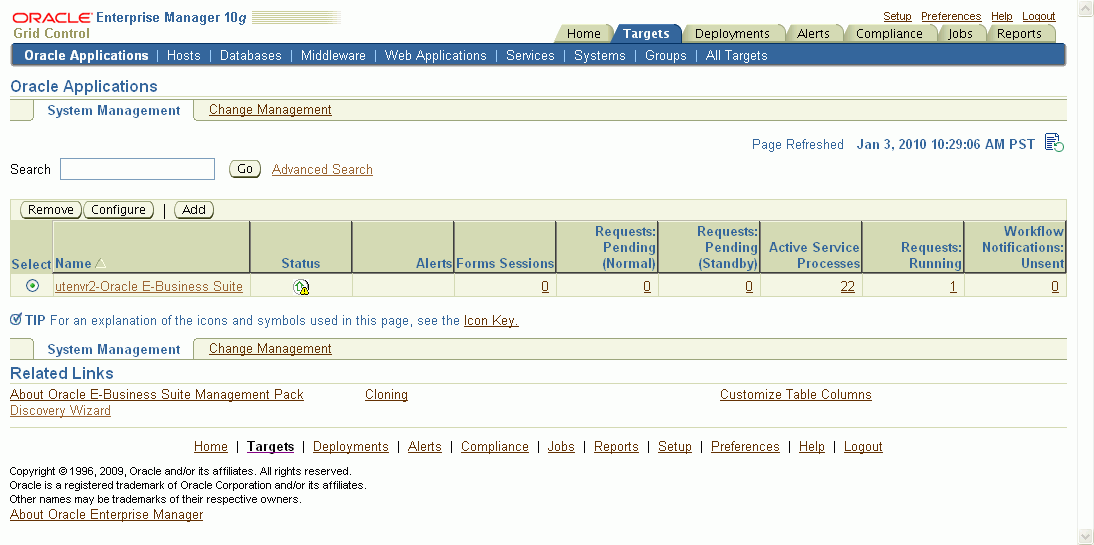
From the System Management dashboard, click the Add button to add a new Applications System and click Custom Discovery.
Before beginning the registration process of the Oracle E-Business Suite system, you must make sure the following steps have been performed:
An agent has been installed on the Oracle E-Business Suite system, on both the database tier and the application system tier.
The Oracle E-Business Suite database host system has been discovered by Grid Control. In case of a RAC System, Agent must be installed on all the nodes in the cluster
The Oracle E-Business Suite system database has been discovered by Grid Control.
Note: For an AutoConfig-enabled Release 11i instance, running AutoConfig on the database tier adds the following lines to sqlnet.ora automatically:
tcp.validnode_checking = yes
tcp.invited_nodes=(11i_HOST)
In this case, database discovery or application discovery via Oracle Enterprise Manager will fail because the Oracle E-Business Suite instance database tier listener will reject any connection requests other than from itself. To prevent this failure, add the Oracle Enterprise Manager Grid Control server to sqlnet_ifile.ora as listed below and bounce the database listener before discovery via Oracle Enterprise Manager.
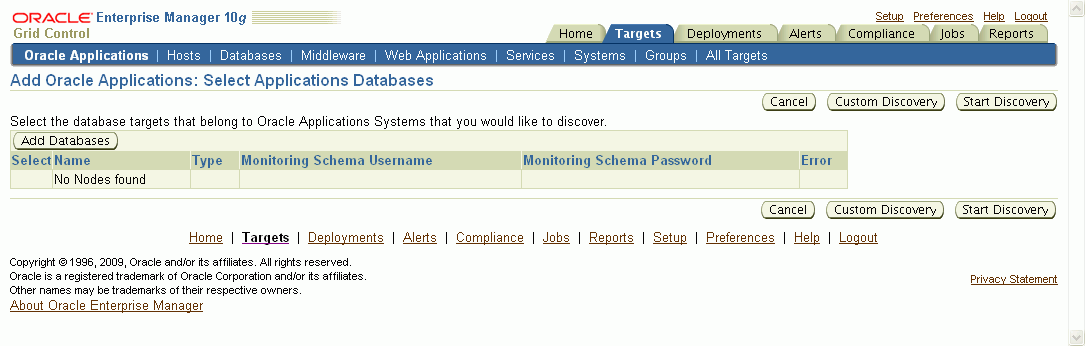
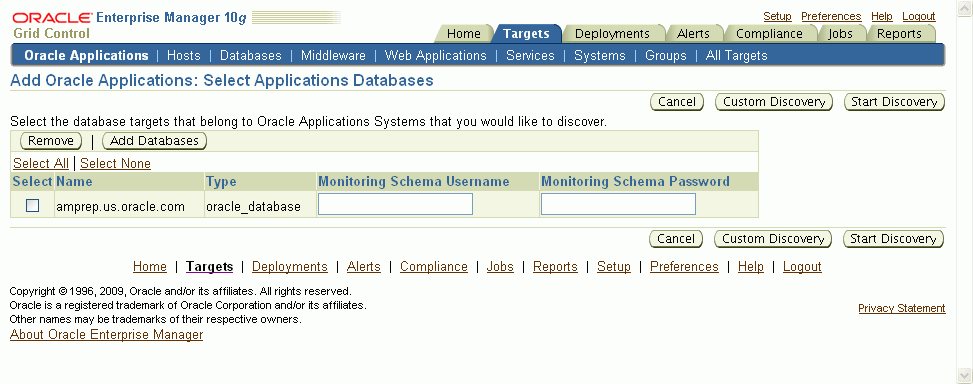
tcp.invited_nodes=(11i_HOST, EMGC_HOST) From the Discovery Wizard, you can add a database to the system using the Add Databases button.
Use the Add Databases button to select your database target.
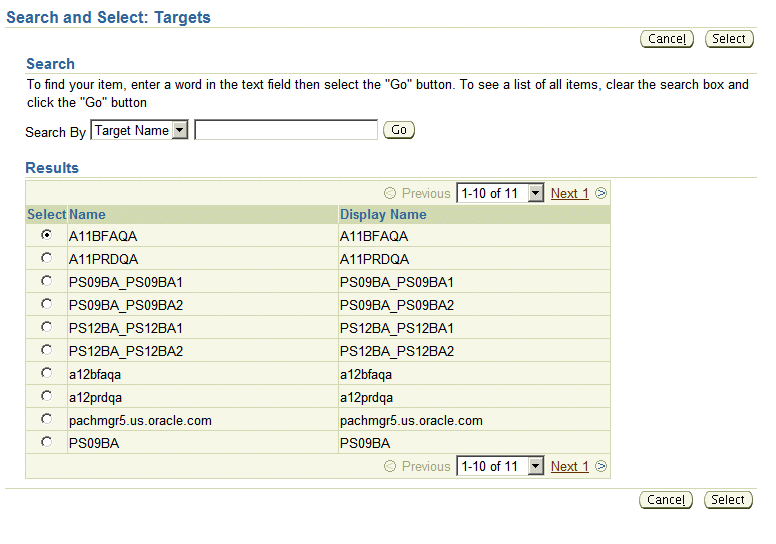
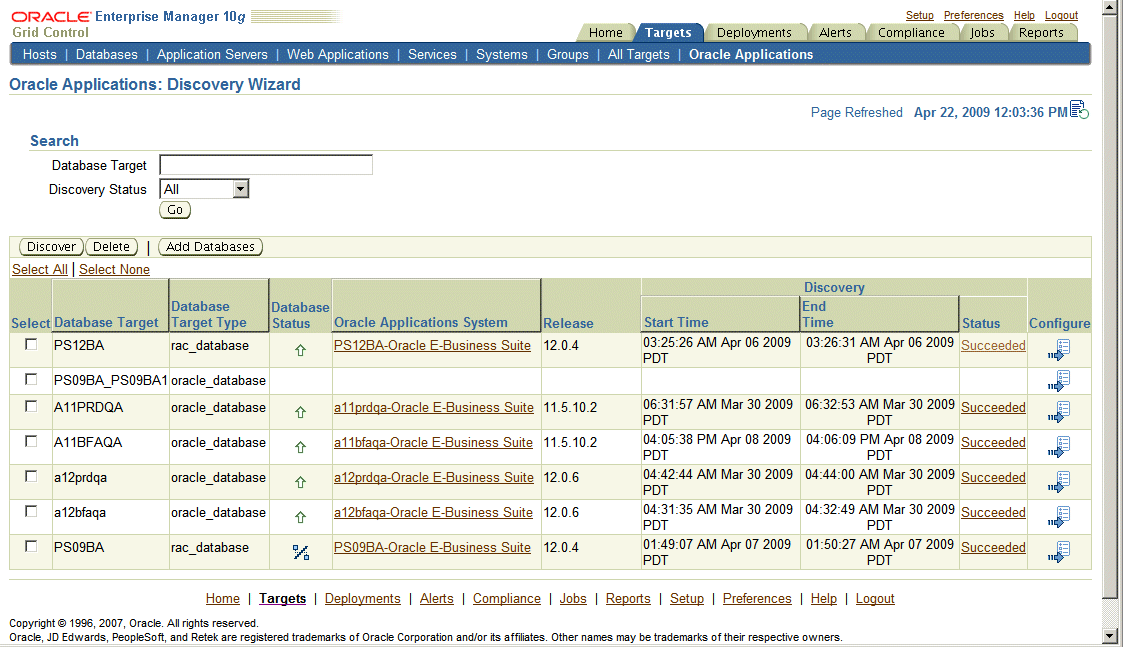
Once added, the database target appears in the table. Select the Application Database Targets you want to discover and click the Start Discovery button.
You can also start the registration process from the Oracle Applications subtab by clicking the Add button on the System Management dashboard.
You can then use the Add Database button to add an additional Oracle E-Business Suite database target to be discovered. In the case of an Oracle E-Business Suite instance deployed on a Real Application Clusters (RAC) database, select the Cluster Database Target for Discovery.
After choosing the relevant databases, enter the schema details and the application access details of the monitoring systems.
Note: If you had selected two or more database targets in the main Discovery Wizard page, you must enter credentials for all of them on this page, even if you do not select them all here.
For Monitoring Schema and Monitoring Schema Password, enter the schema username and password for the Oracle E-Business Suite database that can be used by the management pack for monitoring.
If you have applied the interoperability patches for Release 11i and/or Release 12, you can use the out-of-box em_monitor user with access to limited database objects required by the management pack. You can enable the em_monitor user as follows:
Apply the required patches to your Oracle E-Business Suite system.
Note: Please see My Oracle Support Knowledge Document 982302.1 for information on required patches.
Connect to the database through sqlplus as the SYSTEM user and issue command:
alter user em_monitor account unlock;Connect to the database through sqlplus as the em_monitor user and change the password:
sqlplus em_monitor/lizard; You can also use the APPS schema username and password as your monitoring schema credentials.
Additionally, if you wish to enable out-of-box example services you will also need to provide a Monitoring Applications Username and Password. Please refer to Chapter 6 on the steps required for creating a Monitoring Applications user. After following these steps enter the credentials of the Applications user into these fields. Click the Start Discovery button.
After the system starts a job to discover the Oracle E-Business Suite you can check its status on the main Discovery Wizard page.
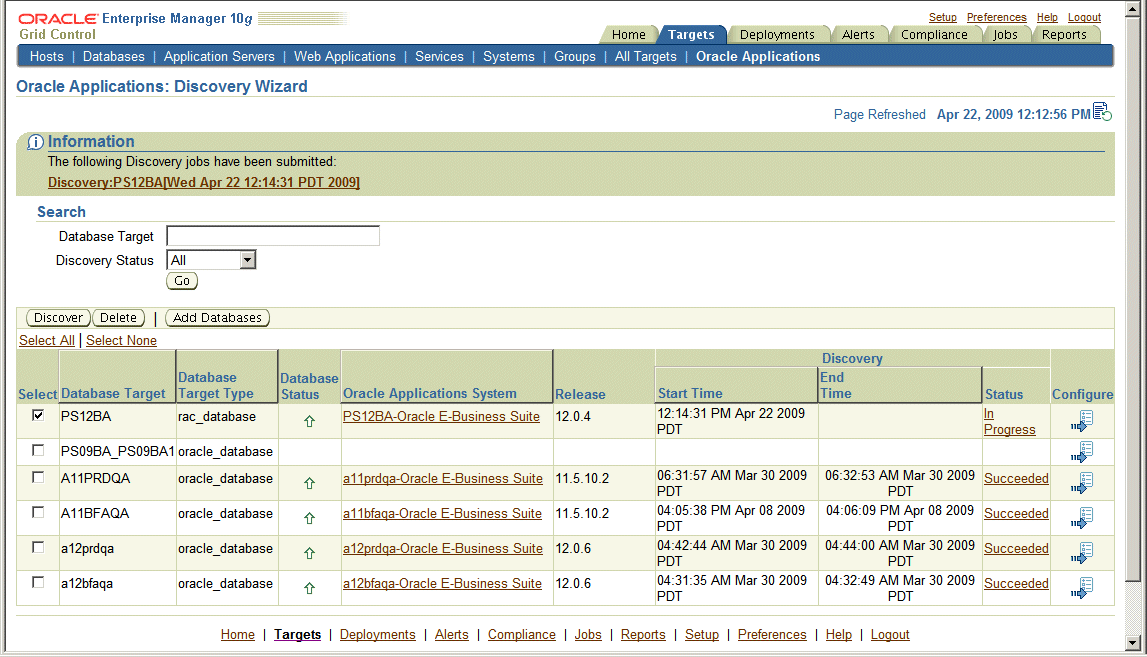
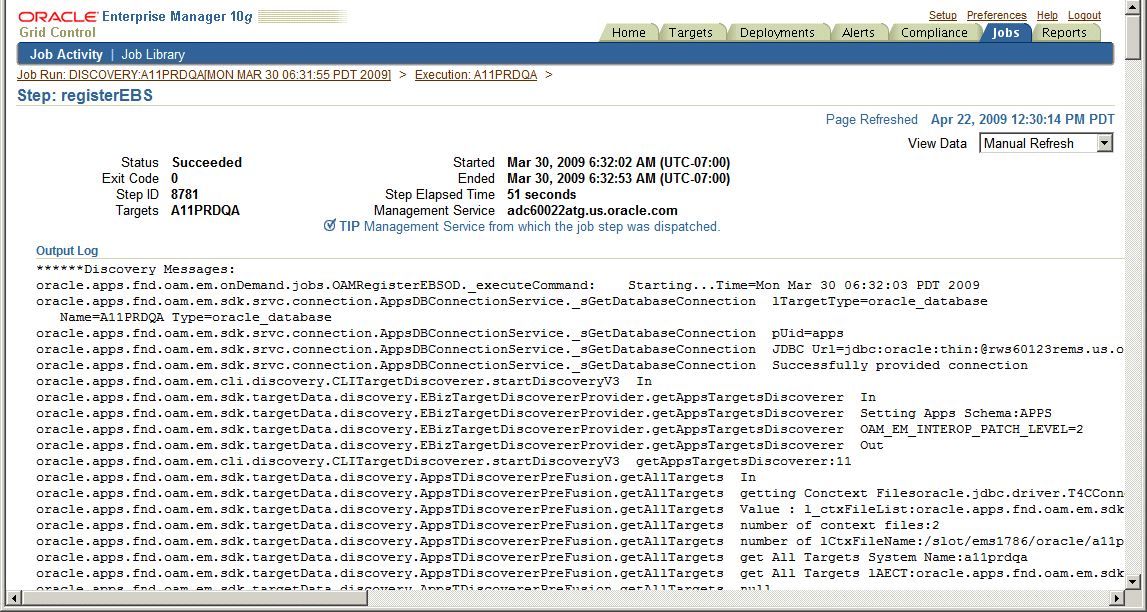
You can view details on the job on the Discovery Wizard main page by clicking the status link. After gathering the inputs from the user (to register Oracle Application Instance with Grid Control), the discovery job connects to the Oracle E-Business Suite database and retrieves the configuration information. Grid Control then registers the various target types for the Oracle E-Business Suite system and starts capturing the metrics.
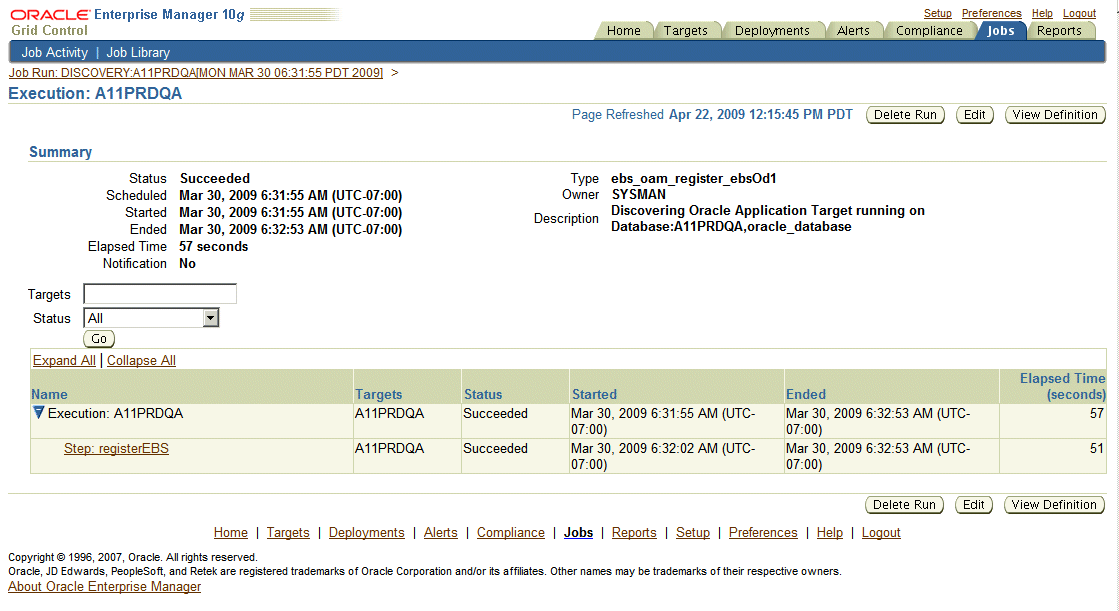
To learn more about a particular step in the discovery job's execution, click on the linked name of the step.
You also need to discover the database listener manually on the Oracle Enterprise Manager Grid Control console by clicking on Add Listener from the Enterprise Manager Grid Control Agent home page. For more information, see the Oracle Enterprise Manager online help.
Discovery Wizard allows you to customize the Oracle Applications registration process by enabling you to override many discovery options. To configure the discovery parameters for an Oracle E-Business Suite system, click on the icon in the Configure column of the database target for the Oracle E-Business Suite to configure the parameters.
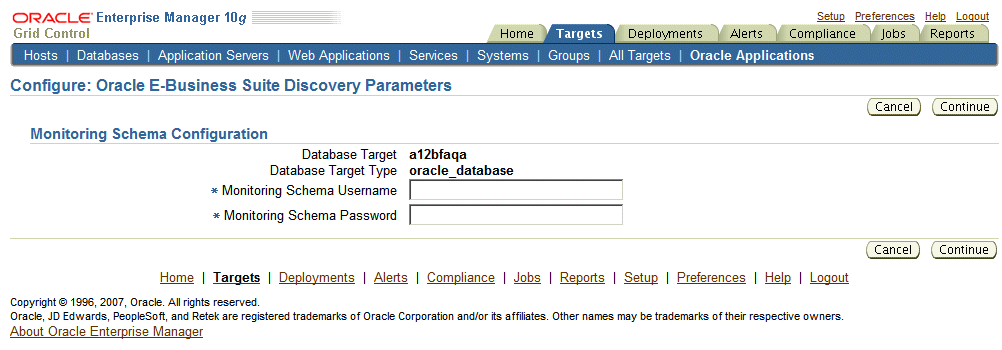
On the next page, enter application access details of the monitoring system. For Monitoring Schema Username and Monitoring Schema Password, enter the schema username and password for the Oracle E-Business Suite database that can be used by the management pack for monitoring. Click Continue.
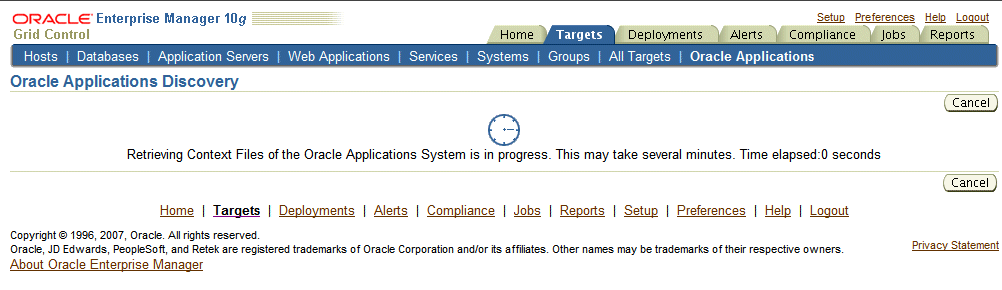
The system then retrieves context files of the Oracle E-Business Suite system.
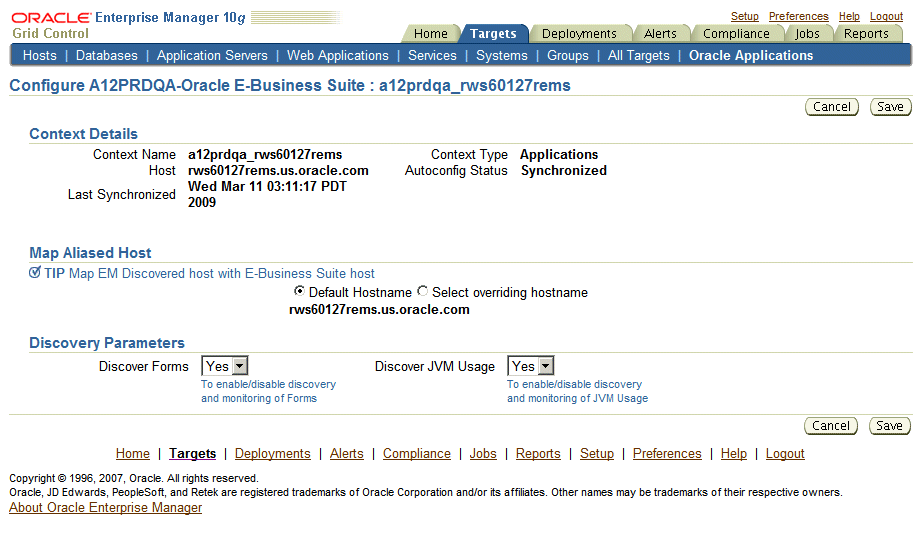
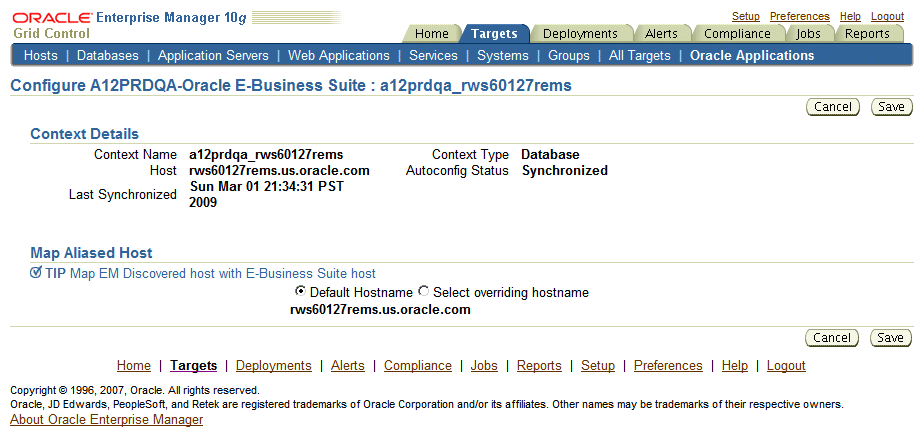
The Configure page allows you to update instance-level discovery parameters, as well as context-level parameters at the bottom of the page. To set context-level parameters, use the icon in the Configure column for the specified context.
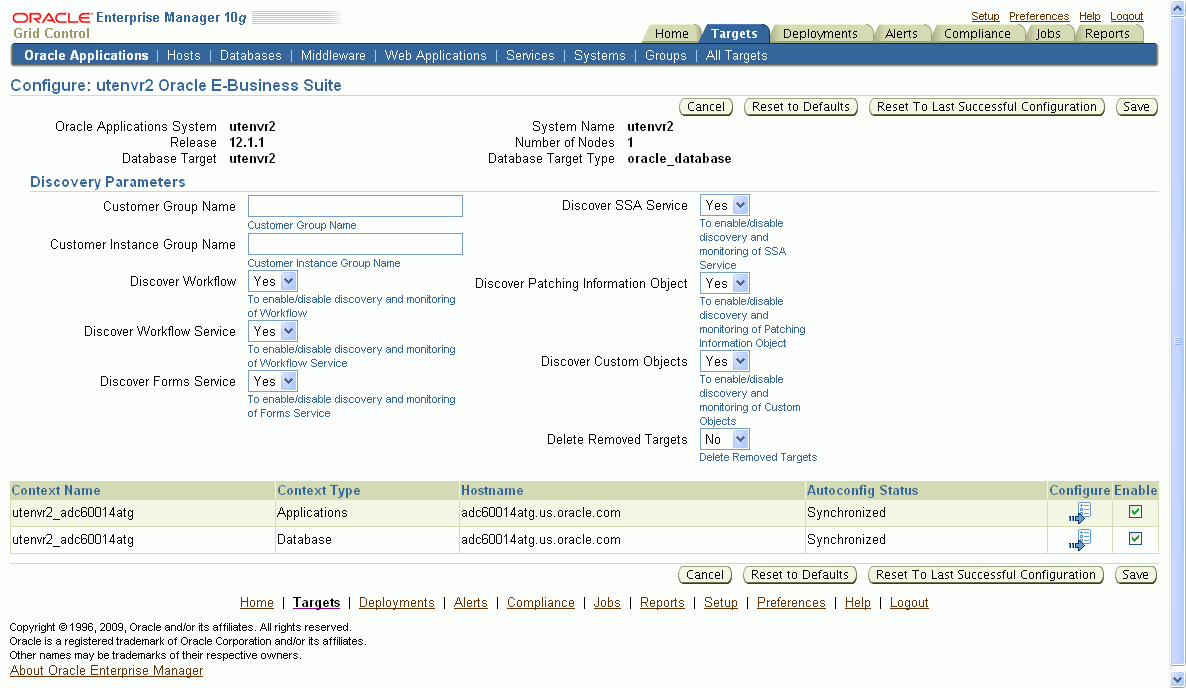
Configure Page for a Release 12 System
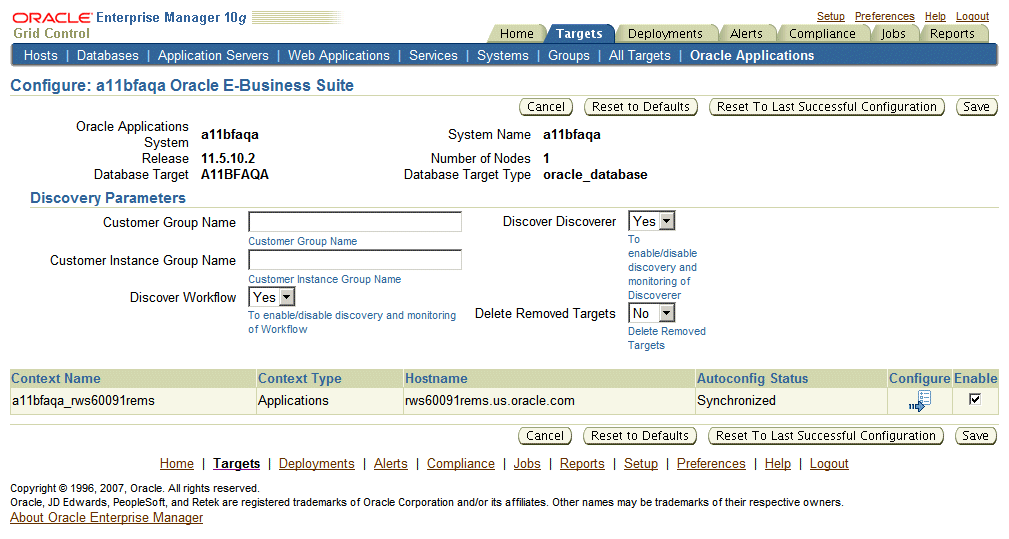
Configure Page for a Release 11i System
Context-level Information

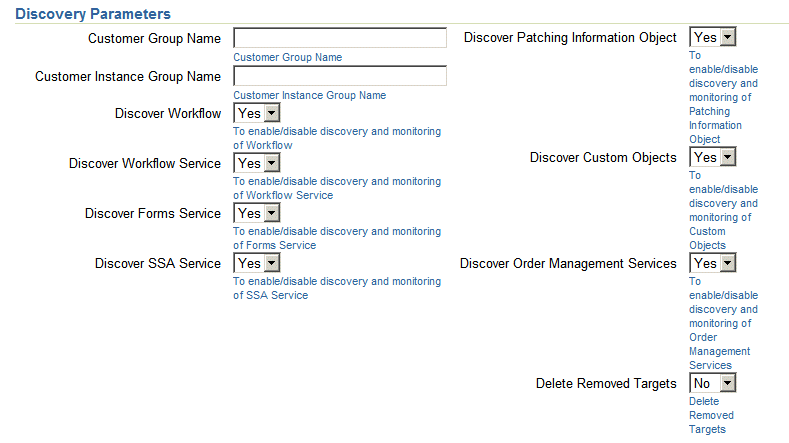
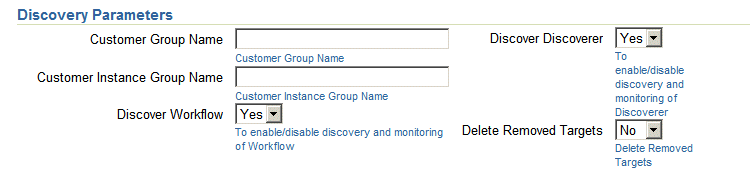
The following parameters of discovery can be customized.
| Parameter Name | Description | Default Value |
|---|---|---|
| Customer Instance Group Name | All targets discovered for this instance will be grouped under this group. This group will be added to Group: Customer Group Name. | No value. |
| Customer Group Name | If Customer Instance Group Name is provided all the targets discovered for this instance and the Customer Instance Group Name will be added to this group. | No value. |
| Discover Workflow | Disable/Enable Monitoring of the Oracle Workflow component. | Yes |
| Discover Workflow Service | Disable/Enable creation of the Oracle Workflow service. | Yes |
| Discover Forms Service | Disable/Enable creation of the Oracle Forms service. | Yes |
| Discover SSA Service | Disable/Enable creation of the Self-Service Applications (SSA) Service. | Yes |
| Discover Patching Information Object | Disable/Enable Discovery of the Patching Information Object. This target is essential for any Oracle E-Business Suite patching application and should be enabled if any patching applications are used with this Instance. | Yes |
| Discover Custom Objects | Disable/Enable Discovery of customs objects configuration. | Yes |
| Discover Order Management Services | Disable/Enable Monitoring of Order Management services (out-of-box services). | Yes |
| Delete Removed Targets | All targets which are dissociated from the Applications System will be deleted from the EM Repository if is this option is set to ‘Yes'. | No |
| Parameter Name | Description | Default Value |
|---|---|---|
| Customer Instance Group Name | All targets discovered for this instance will be grouped under this group. This group will be added to Group: Customer Group Name. | No value |
| Customer Group Name | If Customer Instance Group Name is provided all the targets discovered for this instance and the Customer Instance Group Name will be added to this group. | No value |
| Discover Workflow | Disable/Enable monitoring of the Oracle Workflow component. | Yes |
| Discover Discoverer | Disable/Enable monitoring of the Discoverer component. | Yes |
| Delete Removed Targets | All targets which are dissociated from the applications system will be deleted from EM Repository if is this option is set to ‘Yes'. | No |
All contexts (nodes) that belong to the Oracle E-Business Suite are shown in this table. You can click the Configure icon for each individual context to set context-level parameters.
Once you have entered parameter values, you can do the following:
Save - This option saves your changes to the EM Repository.
Reset to Last Successful Configuration - This option resets the values to those that were used during the last successful discovery.
Reset to Defaults - This option sets the parameters to the default values.
Cancel - This option cancels your changes.
Example of a Configure Context Page
Context details are retrieved from context files. There is a Database Context page applicable to both Release 11i and Release 12, and different Applications Context pages for Release 11i and Release 12.
The Mapped Alias Host configuration information can be used in case of host aliasing to select Host Target registered with Enterprise Manager for this context.
Database Context Page for Releases 11i and 12
Applications Context Page for Release 11i

Applications Context Page for Release 12
| Parameter Name | Description | Default Value |
|---|---|---|
| Discover Forms | Enable/Disable discovery of the Oracle Forms target for this context. | Yes |
| Discover JVM Usage | Enable/Disable discovery of the JVM Usage target. This option will not affect rediscovery of the applications system. | Yes |
Once you have entered parameter values, you can do one of the following:
Save - This option saves your changes to the EM Repository.
Cancel - This option cancels your changes.
For the customization to take effect you must rediscover the Oracle E-Business Suite. Rediscovery can be done by discovering the Oracle E-Business Suite instance again. Rediscovery will not affect the history of any of the already discovered targets.
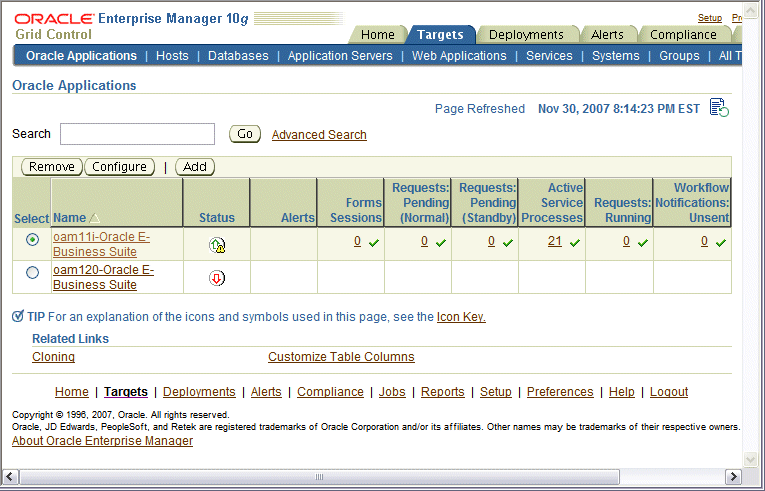
To edit the monitoring configuration of an Oracle E-Business Suite system, first select the desired system in the table, and then click Configure.
For more information on the Oracle Applications subtab, please see the section Using the Grid Control Pages to Manage the Oracle E-Business Suite. To access this subtab, you may need to set your Preferences in Grid Control (described in that section).
You can review and edit the monitoring schema information on this page.
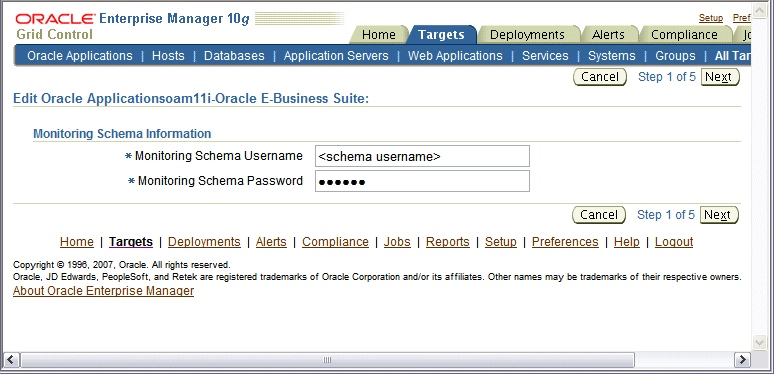
Monitoring Schema Username - This is the name of the Monitoring schema in your Oracle Applications database. Enterprise Manager will connect to this schema to collect certain system metrics.
Monitoring Schema Password - This is the password of the Monitoring schema in your Oracle Applications database.
After you have reviewed the required information, click Next to continue.
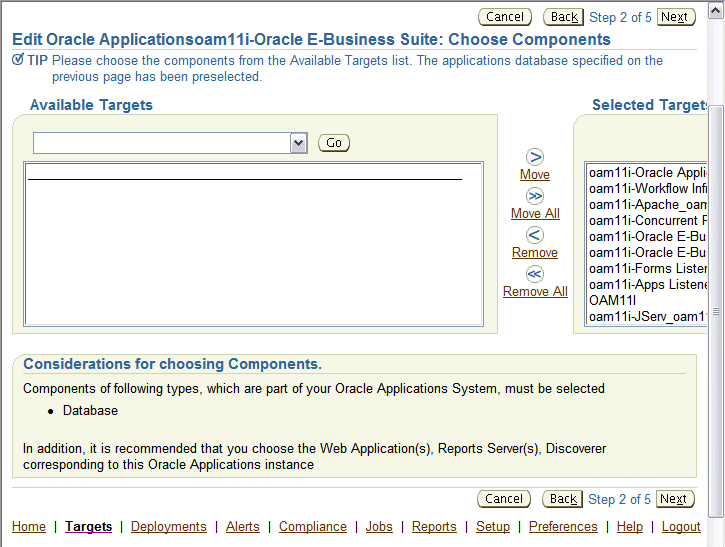
In this page, the registered Grid Control targets can be associated with the Oracle E-Business Suite system. These can include HTTP Servers, Oracle Forms listeners, databases, or any other targets registered in Grid Control. You will be able to monitor the status of these targets in the Oracle Applications pages, and you will later be given the option of defining the availability of the Oracle E-Business Suite system as a function of these targets.
Note: This page will attempt to automatically identify your Oracle E-Business Suite database and add it to the Selected Targets list. If the page cannot automatically match the database connection information that you provided to a registered target in Grid Control, then you will receive a warning, and you will need to add the correct database to the Selected Targets list manually.
To add a registered target to the Selected Targets list, choose the target type (for example, Database, Forms Listener for Oracle Applications Release 11i) and click Go. Select the appropriate target(s) from the Available Targets list, and click Move.
Once the Selected Targets List is complete, click Next to continue.
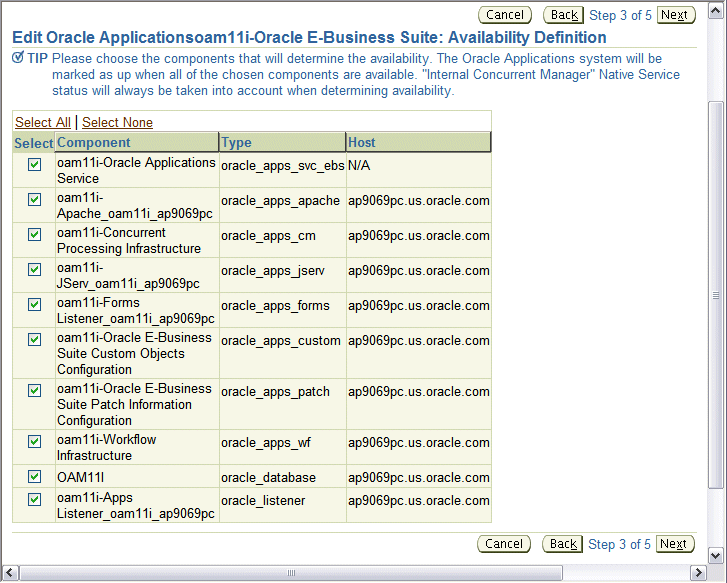
This page allows you to define the availability of your Oracle E-Business Suite system as a function of the availability of its member targets. Each selected target is included in the availability calculation for the Oracle E-Business Suite system. Any targets that are not selected are excluded from the availability calculation for the Oracle E-Business Suite system. The availability of the Oracle E-Business Suite system is calculated as described in the following table:
| Selected Targets’ Status | Oracle E-Business Suite System Status |
|---|---|
| All Up | Up |
| One or more Up | Partially Up |
| All Down | Down |
Once you have selected the appropriate targets, click Next to continue.

If you have associated multiple databases with the Oracle E-Business Suite system, then this page prompts you to specify the primary database and the primary Web application for your system.
The primary database is the database that contains the APPS schema for this Oracle E-Business Suite system. The database performance graphs shown in the Oracle E-Business Suite System Performance page are derived from this primary database.
Once you have selected the appropriate database and Web application, click Next to continue.
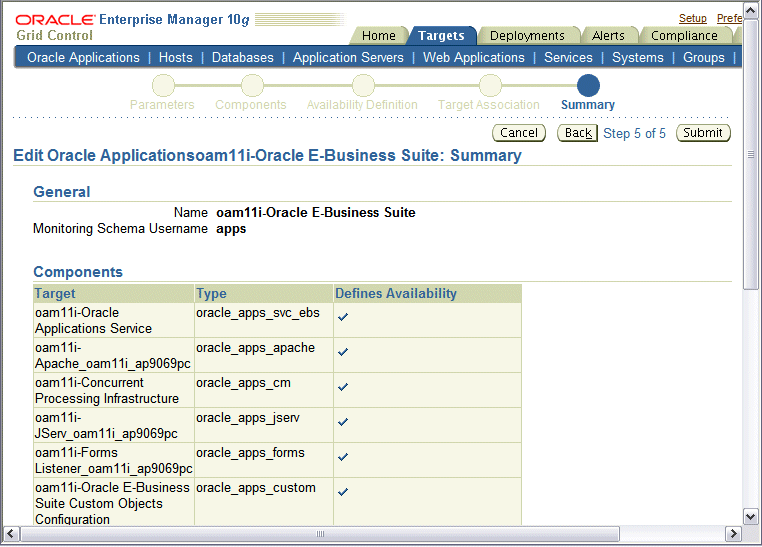
This page summarizes the configuration information for your Oracle E-Business Suite system. Click Next to complete configuring the Oracle Application system.
Note: To avoid possible errors when deleting composite targets, perform the following steps:
Before deleting an Oracle Applications target, shut down all the agents for the target.
Delete the Oracle Applications target.
Now start all the agents that were shut down earlier.
To configure Grid Control to monitor Oracle E-Business Suite middle tiers that are running in SSL, each Management Agent must be able to authenticate the middle tier's SSL certificate against its Certificate Authority (CA).
The HTTP Server that ships with Oracle E-Business Suite is already configured and verified to be running in SSL mode.
Basic knowledge of SSL certificates and their configuration.
In Microsoft Internet Explorer, connect to the HTTPS URL of the Web site you are attempting to monitor.
Double-click the lock icon at the bottom of the browser screen which indicates that you have connected to a secure Web site. The browser displays the Certificate dialog box, which describes the certificate used for this Web site. Other browsers offer a similar mechanism to view the certificate details of a Web site.
Click the Certificate Path tab and select the first entry in the list of certificates.
Click View Certificate to display a second Certificate dialog box.
Click the Details tab on the Certificate window.
Click Copy to File to display the Certificate Manager Export wizard.
In the Certificate Manager Export wizard, select Base64 encoded X.509 (.CER) as the format you want to export and save the certificate to a text file with an easily identifiable name, such as beacon_certificate.cer.
Open the certificate file using a text editor.
Each Management Agent that monitors an Oracle E-Business Suite middle-tier must have the CA certificate added to it as follows:
Locate the b64InternetCertificate.txt file in the following directory of Agent Home of the Beacon host: $AGENT_ORACLE_HOME/sysman/config (This file contains a list of Base64 Certificates).
Edit the b64InternetCertificate.txt file and add the contents of the certificate file you just exported to the end of the file, taking care to include all the Base64 text of the certificate including the BEGIN and END lines.
Repeat for each Management Agent.
Each Management Agent should be restarted:
> $AGENT_ORACLE_HOME/bin/emctl stop agent
> $AGENT_ORACLE_HOME/bin/emctl start agent
Grid Control may not immediately pick up the change. You may want to give it a few minutes for the agent to run a metrics collection and upload them to the Oracle Management Server (OMS). You can click on the Refresh icon in the upper right of the Oracle E-Business Suite home page (by the Page Refreshed time stamp) in the Grid Control console to get updated information.
Even though your Oracle Forms configuration may be running in SSL, Grid Control does not require any additional configuration to monitor Forms. The reason for this is that it uses a different method for determining the Forms Server status which does not require SSL communications with the server.
If you have implemented SSL or deactivated SSL after the initial discovery of that Oracle E-Business Suite instance in Grid Control, you will have to re-configure Grid Control to monitor the new URL with the new protocol. There are two ways to do this:
The Easy Way: If you don't care about the metrics data that has been collected for the instance, you can simply remove the instance from Grid Control and rediscover it.
The Hard Way: If metrics history is important, then each HTTP Server Target has to be re-configured to point to the new URL, port, and protocol.
Select the Release 11i instance in the Oracle Applications targets tab.
Under Applications Nodes Status, expand the Context link that corresponds with your SSL middle tier.
Select the Apache target (description: "HTTP Server for Oracle Applications 11i").
Under "Related Links", select "Monitoring Configuration".
Edit the Protocol and Port as appropriate.
Click OK.
Select the Release 12 instance in the Oracle Applications targets tab.
Under Applications Nodes Status, expand the Context link that corresponds with your SSL middle tier.
Select the target described as "Oracle Application Server".
Under "Related Links", select "Monitoring Configuration".
Edit the "URL to measure application response" as appropriate.
Click OK.
My Oracle Support (formerly OracleMetaLink) Knowledge Document 123718.1 - A Guide to Understanding and Implementing SSL with Oracle Applications Release 11i
My Oracle Support Knowledge Document 376700.1 - Enabling SSL in Oracle Applications Release 12
My Oracle Support Knowledge Document 391652.1 - Problem: Accessing Web application gives sun.security.validator.ValidatorException: No trusted certificate
Oracle Enterprise Manager Advanced Configuration 10g Release 4 (10.2.0.4.0), Section "Adding Trust Points to the Management Agent Configuration"
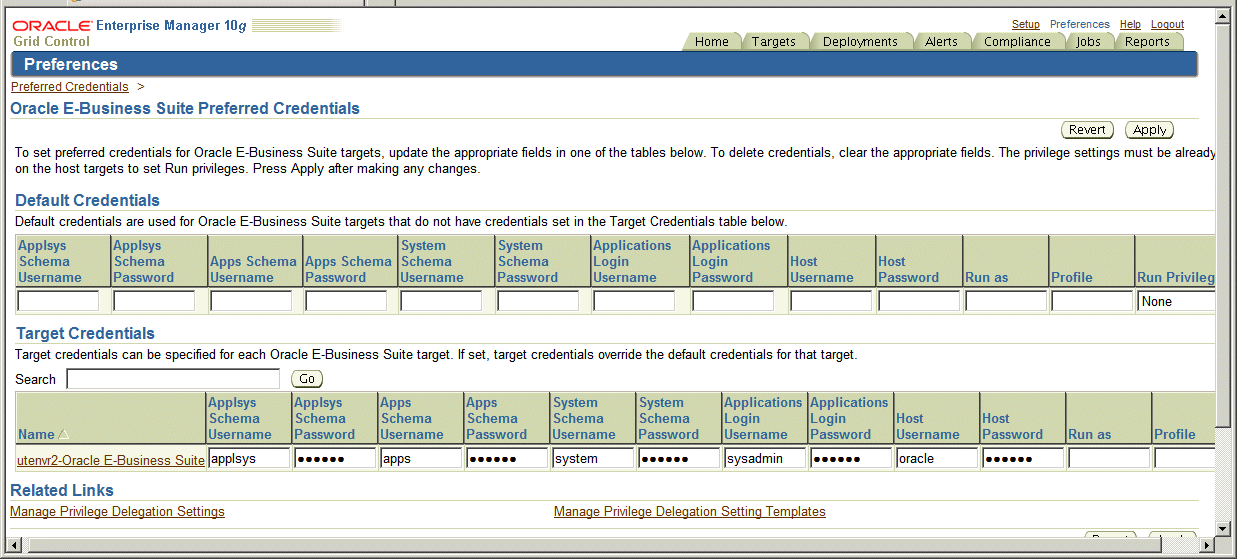
Oracle E-Business Suite administration uses preferred credentials for connecting to the System and executing various commands. Before managing an Oracle E-Business Suite instance from the Administration Dashboard, the Preferred Credentials must be set for the specific Oracle E-Business Suite target and Oracle E-Business Suite Infrastructure target of the specific node. Applications Schema Credentials need to be set for only those targets whose administration requires Applications Schema Credentials.
To set these credentials, navigate to Preferences (global link) > Preferred Credentials in Oracle Enterprise Manager.
Setting Credentials for the Oracle E-Business Suite Infrastructure Target

Setting Credentials for the Oracle E-Business Suite Target
![]()
Copyright © 2007, 2010, Oracle and/or its affiliates. All rights reserved.