| Oracle® Enterprise Manager Administrator's Guide for Software and Server Provisioning and Patching 11g Release 1 (11.1.0.1.0) E16599-05 |
|


 Previous |
 Next |
| Oracle® Enterprise Manager Administrator's Guide for Software and Server Provisioning and Patching 11g Release 1 (11.1.0.1.0) E16599-05 |
|
Previous |
Next |
This chapter assumes that you have applied the Cumulative Fixes for Oracle Enterprise Manager 11g Grid Control Fusion - May 2010 (interim patch number 9534192). For more details, refer to My Oracle Support note 427577.1. You must apply all the recommended patches listed in the Readme.txt shipped with this patch.
This chapter explains how you can automate common provisioning operations for Oracle Fusion Middleware 11g and Oracle WebLogic Domains.It covers the following:
This chapter helps you get started by providing an overview of the steps involved in provisioning WebLogic domains, Fusion Middleware homes or scaling up a WebLogic domain. Consider this section to be a documentation map to understand the sequence of actions you must perform to successfully provision or extend a WebLogic domain. Click the reference links provided against the steps to reach the relevant sections that provide more information.
Table 13-1 Getting Started with Provisioning and Scaling Up Fusion Middleware Domains
| Step | Description | Reference Links |
|---|---|---|
|
Step 1 |
Understanding the Deployment Procedure Understand the Deployment Procedures offered by Enterprise Manager Grid Control for provisioning WebLogic domains, Fusion Middleware homes, and scaling up / out WebLogic domains. Know how the Deployment Procedure functions, what use cases it covers, and so on. |
To learn about the Deployment Procedures, see Deployment Procedure. |
|
Step 2 |
Knowing About the Supported Releases Know what releases can be provisioned by the Deployment Procedure. |
To learn about the releases supported by the Deployment Procedure, see Supported Releases. |
|
Step 3 |
Selecting the Use Case This chapter covers the use cases for provisioning a WebLogic Domain, Fusion Middleware Home, and scaling a WebLogic Domain. Select the use case that best matches your requirement. |
|
|
Step 4 |
Meeting the Prerequisites Before you run any Deployment Procedure, you must meet the prerequisites, such as space requirements and user privileges. When you run the Deployment Procedure, these prerequisites are verified. |
|
|
Step 5 |
Running the Deployment Procedure Run the Deployment Procedure to successfully clone a WebLogic domain, Fusion Middleware Home, or scale up a WebLogic domain. |
|
Enterprise Manager Grid Control offers the following deployment procedures for provisioning WebLogic domains, Fusion Middleware homes, and scaling up WebLogic domains:
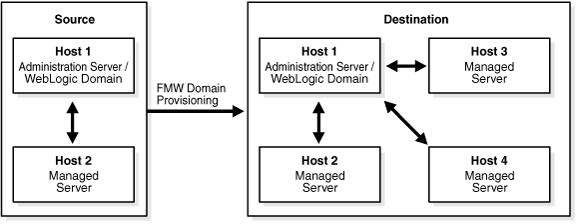
Fusion Middleware Domain Provisioning: Using this Deployment Procedure, you can automate the provisioning of WebLogic domains and Fusion Middleware homes using a live reference installation. Specifically, you can automate the provisioning of:
WebLogic Domains with a corresponding Oracle Fusion Middleware Home which includes WebLogic Servers and one or more Oracle Homes.
Oracle Fusion Middleware Homes.
|
Note: The Fusion Middleware Domain Provisioning deployment procedure does not support provisioning from a gold image. |
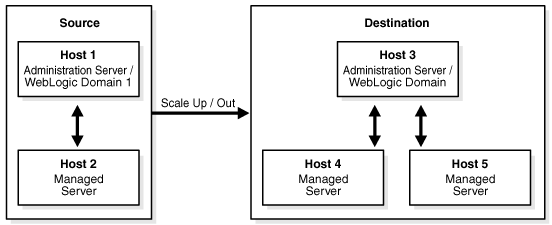
Fusion Middleware Domain Scale Up: Using this Deployment Procedure, you can expand or scale up a domain by increasing the capacity of the WebLogic server cluster. You can scale up a domain by:
Adding a new managed server to an existing cluster.
Provisioning a managed server.
|
Note: These deployment procedures start or create (using the FMW Provisioning Deployment Procedure) an Administration Server, Managed Servers, and Node Managers on destination hosts. With these deployment procedures, users can also perform generic domain configuration tasks on the destination domain.But, application specific or product specific artifacts present in the source domain will not be cloned on the destination domain. For example, in a SOA domain, these artifacts may include SOA Composites, Web Service Policies, and so on. You need to run the SOA Artifacts Provisioning Deployment Procedure to configure them. For more information, see Chapter 14, "Provisioning SOA Artifacts and Composites". |
This section lists the sequence of operations that are performed when you run the Fusion Middleware Provisioning Deployment Procedure in Enterprise Manager Grid Control.
Verify Source
Verify Destination
Prepare Source Binary Archive
Create Binary Clones on Destination
Create Source Domain Archive
Create Domain on Administration Server Host (Target)
Configure Domain
Create Domain Archive
Create Domain on Managed Server Hosts
Start Up Node Managers
Start Up Admin Server
Start Up Managed Servers
Validate Domain
Register Fusion Middleware homes and domains with OMS
You can scale up a WebLogic Domain by adding a new managed server to existing cluster or by provisioning a managed server to an existing host machine that is already running a managed server in the domain or cluster. You can scale out the domain by adding a managed server or cloning a managed server to a remote, new host machine that does not yet exist in the domain. This section lists the sequence of steps that are involved in scaling up / out a WebLogic Domain.
Verify Source
Verify Destination
Prepare Source Binary Archive
Create Binary Clones on Destinations
Clone / Add Managed Servers
Create Domain Archive
Create Domain on Managed Server Host
Start Up Node Managers
Start Up Managed Servers
Register Fusion Middleware homes and domains with OMS
Using these Deployment Procedures, you can provision and scale up Oracle Fusion Middleware Homes and WebLogic Domains using Oracle Fusion Middleware 11g Release 1 Patch Set 1 (11.1.1.2.0) which includes Oracle WebLogic Server Release 10.3.2.
|
Note: To view a list of supported releases, refer to Oracle Enterprise Manager Grid Control Certification Checker (ID 412431.1) note on My Oracle Support. |
This section lists some of the best practices to be followed while using Fusion Middleware Domain Provisioning and Domain Scale Up.
Configuration of the source domain should not be changed: While executing these deployment procedures, ensure that no administrative activities (such as configuration changes on the source domain and software patching) are actively performed on the source domain. If you change the configuration, the managed server may not respond to requests and the Administration Server will have an Unknown status.
Provisioning on the same machine: If you are using the Deployment Procedure to provision or scale up to the same machine as the source, ensure that the source working directory and the destination working directory are different. For example, if the working directory is /tmp/source for the source machine, it should be /tmp/dest on the destination directory.
Unique Farm Prefix: While using the Fusion Middleware Domain Provisioning Deployment Procedure, ensure that the farm prefix is unique. The farm prefix gets appended to the domain name to uniquely identify a given domain in Enterprise Manager Grid Control.
JDBC Configuration: While configuring the JDBC data sources, you need to provide appropriate passwords. If the passwords are not specified, the source passwords will be used.
Custom Java Applications and their Deployment Plan: These deployment procedures support custom java applications in staged mode. Externally staged applications need to be manually deployed. For instructions on manually deployment, see the WebLogic Administration Guide.
Multi NIC Machines: If the destination machine is a multi NIC system, enter a listen address that is accessible to both the Administration Server and Managed Server.
This section describes how to provision a WebLogic Domain or a Fusion Middleware Home from an existing installation. It contains the following:
Before running the Deployment Procedure, meet the following prerequisites:
The target machine should contain sufficient space. If the size of the Fusion Middleware Home on the source machine is 3 GB, you need approximately 3 GB in the working directory on the source and destination machines. Additionally, the destination machine should also have 3 GB of space for the Fusion Middleware Home. The working directory is cleaned up after deployment procedure has been successfully completed.
The Fusion Middleware Home directory you specify on the destination machine must be a new directory or an empty one.
The operating system user who runs the deployment procedure must belong to the same group and have the same permissions as the user who owns the Oracle Universal Installer Inventory. This will ensure that the group ownership on the Middleware Home directory on the destination machine will match the group ownership on the OUI inventory.
Ensure that the 11.1 Management Agent has been installed on the source (on which the Administration Server is running) and destination machines.
To provision a Fusion Middleware Domain, follow these steps:
In Grid Control, click the Deployments tab.
Click Deployment Procedures in the Deployment Procedure Manager section.
On the Deployment Procedure Manager page, in the Procedures subtab, from the table, select Fusion Middleware Provisioning. Then click Schedule Deployment.
Enterprise Manager Grid Control displays the Select Source page of the Oracle Fusion Middleware Deployment Procedure.
|
Note: You cannot customize the deployment procedure and include additional steps that require user input. |
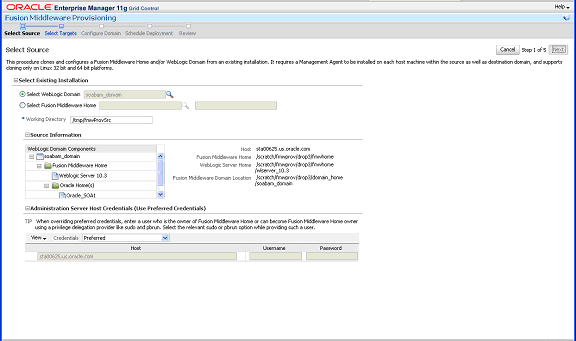
On the Select Source page, do the following:
In the Select Existing installation section, you can choose a WebLogic Domain or a Fusion Middleware Home. Select WebLogic Domain if you want to provision the domain and the software. Select Fusion Middleware Home if you want to provision the software only. The Fusion Middleware Home is provisioned first in a new environment. Domains are provisioned later and associated with the same software. Click the torch icon in the Select WebLogic Domain field and select a domain from the list. In the Source Information section, the WebLogic Domain Components including the Host, Fusion Middleware Home, WebLogic Server Home, and Fusion Middleware Domain Location are displayed.
|
Note: The deployment procedure may fail when the following situations occur:
|
If you select a Fusion Middleware Home, click the torch icon in the Select Fusion Middleware Home field and select a Fusion Middleware Home from the list. In the Source Information section, the Host, Fusion Middleware Home, and WebLogic Server Home are displayed.
In the Working Directory field, specify the directory on the Administration Server machine on which the provisioning related files are temporarily stored. If this directory is not present, it will be created. When the provisioning operation has been completed, the contents of this directory will be deleted.
In the Host Credentials section, select Preferred Credentials so that the preferred credentials stored in the Management Repository are used. The Preferred Credentials option will be available only if it has already been defined in Enterprise Manager Grid Control. For more information on setting up Preferred Credentials, see the Enterprise Manager Security chapter in the Enterprise Manager Administration Guide.
|
Note: You can optionally override these preferred credentials. For example, if you have added two source hosts where the users are A and B, then you can choose Override Credentials - Different for Each Host and specify different credentials for each of the hosts. Similarly, if the destination hosts have the same credentials, which may be different from the preferred credentials, then you can choose Override Credentials - Same for All Hosts. The credentials you specify here are used by the Deployment Procedure to run the provisioning operation. If this environment is secure and has locked accounts, then make sure that:
For more information, see Customizing Steps to Run as Another User |
Click Next.
Enterprise Manager Grid Control displays the Select Targets page.
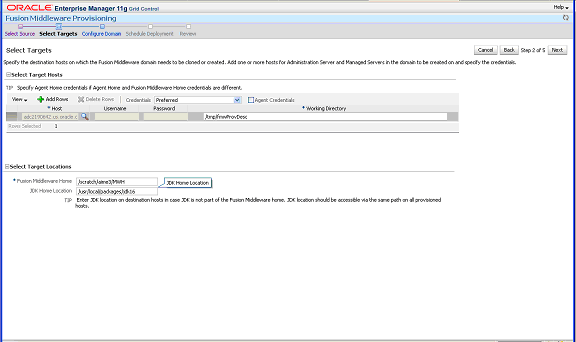
On the Select Targets page you can specify the target hosts on which the domain is to be created.
You can do the following:
Click on the torch icon in the Host column and select a host from the list.
If you choose to override the preferred credentials, specify the user name and password for the selected host.
In the Fusion Middleware Home field, enter the full path to the directory in which the Fusion Middleware Home is to be created.
If the JDK on the destination machine is in an external location, enter the full path to the location in the JDK Home Location field.
|
Note: If you are using the WebLogic Server generic installer, the external JDK location must be specified. If this location is not specified, the default JDK of the Management Agent will be used. |
Check the Agent Credentials checkbox to specify the agent credentials. This field is applicable if the user who installed the Management Agent is different from the user installing Oracle Fusion Middleware.
Click Next to proceed to the Configure Domain page.
On this page, you can enter the basic properties that are most likely to be reconfigured like domain name, administration server, clusters, machines, server, and JDBC Data Sources. For more information on configuring the domain, see the Creating WebLogic Domains Using the Configuration Wizard guide.
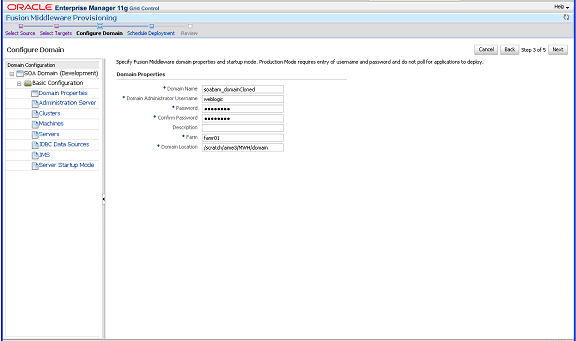
In the Domain Properties page, enter a unique name for the domain, the username for the Administration Server and the password. You also need to enter the name of the Farm and the Domain Location (path to the directory in which the domain is to be created). The Domain Location directory must be empty.
|
Tip: A farm is a collection of components managed by Enterprise Manager Grid Control. It can contain Oracle WebLogic Server domains, one Administration Server, one or more Managed Servers, and the Oracle Fusion Middleware components that are installed, configured, and running in the domain. For more information, see the Oracle Fusion Middleware Concepts Guide. |
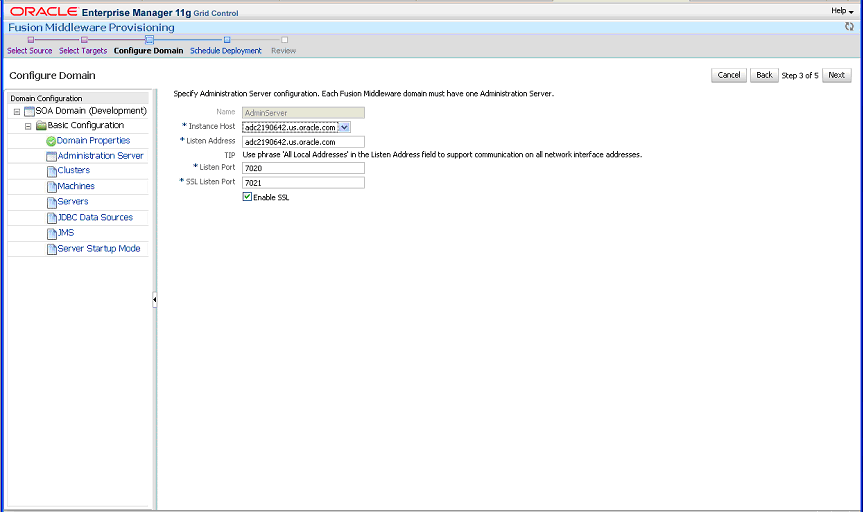
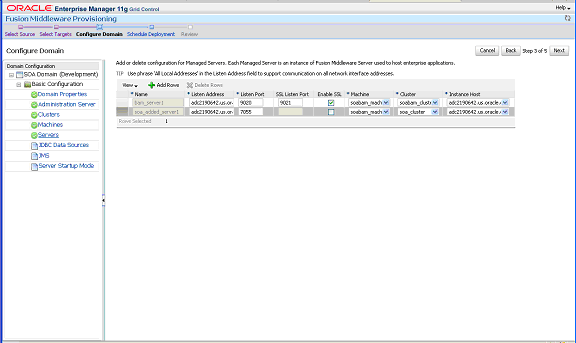
In the Administration Server page, enter the name of the Administration Server that will be used to manage the domain, listen address and port, and the name of the host on which the Administration Server is to be installed. If you checked the Enable SSL checkbox, enter the number of the SSL port for secure requests. You must ensure that the port numbers you specify for the Listen Port and SSL Listen Port are available.
|
Note: If you are using the SSL configuration, you must ensure that the security/identity stores are present in the file system under the same path as on the source and are configured with certificates generated for the destination hosts. |
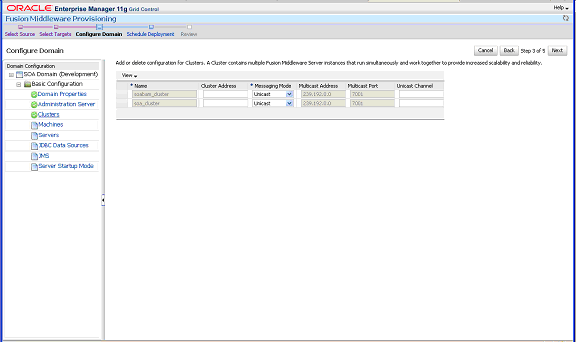
In the Clusters page, enter a name for the cluster, the cluster address that identifies the Managed Servers in the cluster, and the messaging mode (multicast or unicast). If you selected Multicast as the Messaging Mode, enter the multicast address and port.
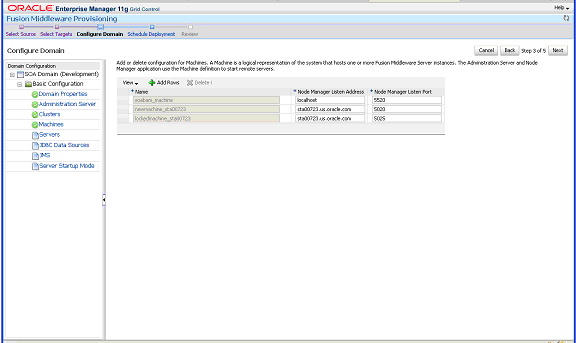
In the Machines page, enter the configuration information for the machines in the domain. You can add or delete configuration for the machines on this page.
In the Servers page, enter the configuration information for the managed server.
|
Tip: The port numbers you specify for the Listen Port and the SSL Listen Port on the Machines and Servers pages must be available on the target machine. |
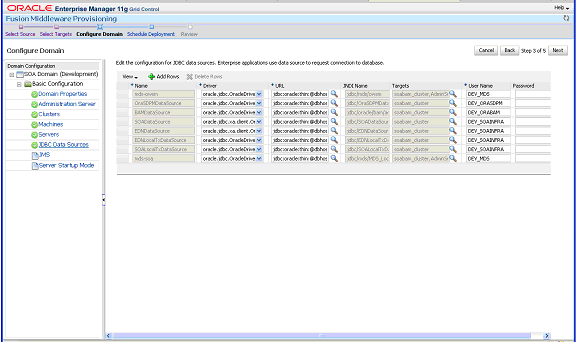
In the JDBC Data Sources page, enter the configuration information for the data source. In the Driver field, select the correct driver from the drop down list. Based on the driver you have selected, enter the URL in the correct format. Select the target from the drop down list and specify the database user name and password.
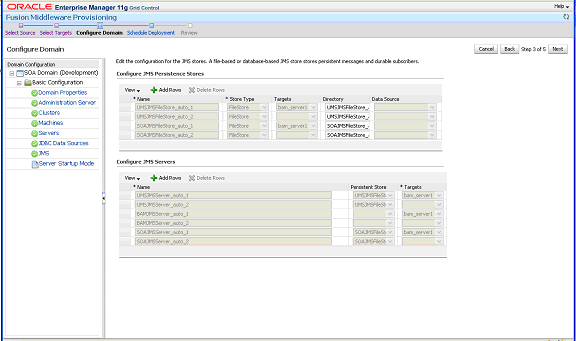
In the JMS page, you can add new JMS persistent stores and JMS servers.
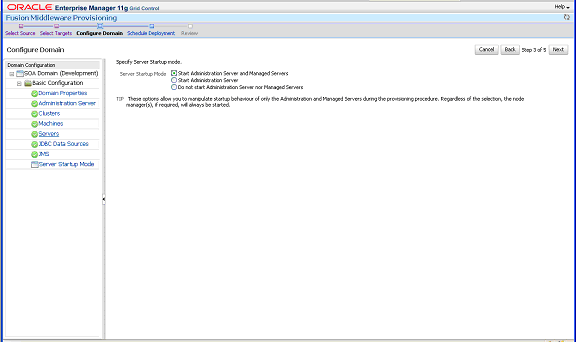
In the Server Startup Mode page, you can optionally start up the Managed Servers and the Admin Server. You can choose the following options:
- Start Administration and Managed Servers
- Start Administration Server
- Do not start Administration Server or Managed Server
On the Schedule Deployment page, you can schedule the provisioning of the domain by specifying the time zone, time at which the deployment process should be started and other details.
On the Review page, review the details you have provided for the Deployment Procedure. If you are satisfied with the details, then click Submit to run the Deployment Procedure according to the schedule set. If you want to modify the details, click the Edit link in the section to be modified or click Back repeatedly to reach the page where you want to make the changes.
After submitting the Deployment Procedure, you should see a link on top of the page. Click the link to view its progress. Alternatively, from the Deployments page, in the Deployment Procedure Manager section, click Procedure Completion Status to view the status of the Deployment Procedure.
After the Deployment Procedure has been successfully completed, the newly cloned domain will be added as a new target in Enterprise Manager Grid Control and can be monitored along with the other Fusion Middleware targets.
The Fusion Middleware Domain Scale Up Deployment Procedure allows you to increase the capacity of a domain so that the performance of the applications is improved. This section describes how to scale up a WebLogic Domain by adding a new managed server to an existing cluster or cloning a managed server to an existing host machine that is already running a managed server in the domain/cluster. Or you can scale out the domain by adding a managed server or cloning a managed server to a remote, new host machine that does not yet exist in the domain. It contains the following sections:
Before running the Deployment Procedure, meet the prerequisites listed in Prerequisites.
To scale up / scale out a WebLogic Domain, follow these steps:
In Grid Control, click the Deployments tab.
On the Deployments page, in the Deployment Procedure Manager section, click Deployment Procedures.
On the Deployment Procedure Manager page, in the Procedures subtab, from the table, select Fusion Middleware Domain Scale Up. Then click Schedule Deployment.
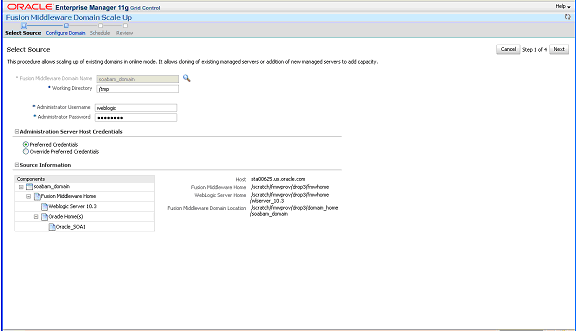
Enterprise Manager Grid Control displays the Select Source page of the Oracle Fusion Middleware Domain Scale Up Procedure.
On the Select Source page, you can do the following:
Click the torch icon in the Select Fusion Middleware Domain field and select a domain from the list. In the Source Information section, the details of the source domain including the Host, Fusion Middleware Home, WebLogic Server Home, and the Fusion Middleware Domain Location are displayed.
|
Note: While running the deployment procedure, ensure that the Administration Server and Managed Server are running. You must also select a WebLogic domain that is supported from the list. If you select an unsupported version, the deployment procedure will fail. |
In the Working Directory field, specify the directory on the Administration Server machine on which the domain scale up related files are temporarily stored. If this directory is not present, it will be created. When the scale up operation has been completed, the contents of this directory will be deleted.
In the Provisioning Mode section, enter the credentials for the Administration Server Console and the Administration Server Host. For the Administration Server Host, you can choose Preferred Credentials or choose Override Preferred Credentials and specify a user name and password for the host on which the server is running. The Preferred Credentials option will be available only if it has already been defined in Enterprise Manager Grid Control. For more information on setting up Preferred Credentials, see the Enterprise Manager Security chapter in the Enterprise Manager Administration Guide.
Click Next.
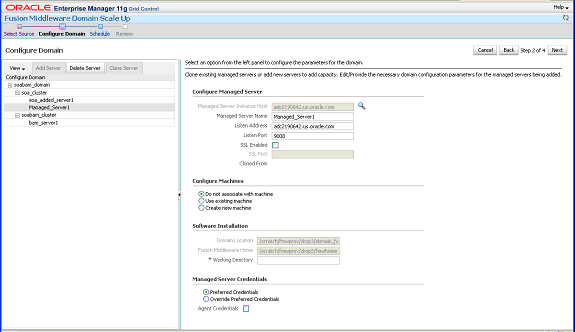
Enterprise Manager Grid Control displays the Configure Domain page.
On the Configure Domain page, you can add a new managed server, clone an existing one, or delete a managed server you have created. You can do the following:
Click the Add Server tab in the left panel. A new server is added to the list and you need to enter the configuration details on the right panel.
Select a server from the list and click the Clone Server tab in the left panel. A new server which is a copy of the one you selected will be created. You must configure the new server to proceed with the provisioning.
In the Configure Managed Server section, enter the name of the host on which the managed server is to be added, the name of the new server, listen address, port, and the SSL port if applicable. If you checked the Enable SSL checkbox, enter the number of the SSL port for secure requests.
|
Tip: The port numbers you specify for the Listen Port and the SSL Listen Port must be available on the target machine. |
In the Configure Machines section, you can configure the Machine and the Node Manager associated with the managed server instance.
|
Note: To perform administrative operations such as start and stop from the Enterprise Manager Grid Control, the Node Manager must be configured and running on the machine. |
In the Software Installation section, in the Working Directory field, enter the full path to the directory on which the files required for scale up will be staged.
In the Managed Server Credentials section, enter the user name and password for the host on which the managed server is to be created.
Check the Agent Credentials checkbox to specify the agent credentials. This field is applicable if the user who has installed the Management Agent is different from the user installing Oracle Fusion Middleware.
Click Next to proceed to the Schedule page.
On the Schedule Deployment page, you can schedule the domain scale up by specifying the time zone, time at which the deployment process should be started and other details.
On the Review page, review the details you have provided for the Deployment Procedure. If you are satisfied with the details, then click Submit to run the Deployment Procedure according to the schedule set. If you want to modify the details, click the Edit link in the section to be modified or click Back repeatedly to reach the page where you want to make the changes.
After submitting the Deployment Procedure, you should see a link on top of the page. Click the link to view its progress. Alternatively, from the Deployments page, in the Deployment Procedure Manager section, click Procedure Completion Status to view the status of the Deployment Procedure.
After the Deployment Procedure has been successfully completed, the newly added Managed Servers will be added to the domain and the domain will be refreshed in the Enterprise Manager Grid Control console.
|
 Copyright © 1996, 2012, Oracle and/or its affiliates. All rights reserved. Legal Notices |
|