3 Connecting to Oracle Database XE
This chapter is the first in a series of five chapters, each of which describes how to create parts of a Java application that accesses Oracle Database XE and displays, modifies, deletes, and updates data on it. To be able to access the database from a Java application, you must connect to the database using a java.sql.Connection object.
This chapter includes the following sections:
3.1 Connecting to Oracle Database XE from JDeveloper
You can set up and manage database connections in JDeveloper to enable your application to communicate with external data sources, including Oracle Database XE and offline database objects. This is done using the Database Navigator. The same navigator is also used to manage other connections your application needs, such as connections to application servers. The following subsections describe how you can use the Database Navigator to view the database and its objects and to create a connection to the database:
3.1.1 JDeveloper Database Navigator
The Database Navigator displays all currently defined connections. To view the Database Navigator, select the Database Navigator tab in the navigator panel on the top left-hand side of the JDeveloper display, if it is displayed, or use the View menu. For an illustration of the default layout of the JDeveloper IDE, see Figure 1-1.
You can use the Database Navigator to browse through the connections it displays. In particular, for a database schema, you can also view database objects, tables, views, and their contents.
Database connections are shown under the IDE Connections node. To view the objects in the database, expand the connection. Expanding a schema displays nodes for the object types in that schema. Expanding the node for an object type displays its individual objects. When you expand a table node, you can view the structure of the table and the data within the table.
3.1.2 Creating a Database Connection
You can connect to any database for which you have connection details. When you create a database connection, you must specify a user name and a password. By default, the connection enables you to browse only the schema of the user that you specify in the connection.
To create a connection, follow these steps:
-
Start JDeveloper.
-
From the View menu, go to Database and select Database Navigator. The Database Navigator is displayed, showing you a list of available connections.
-
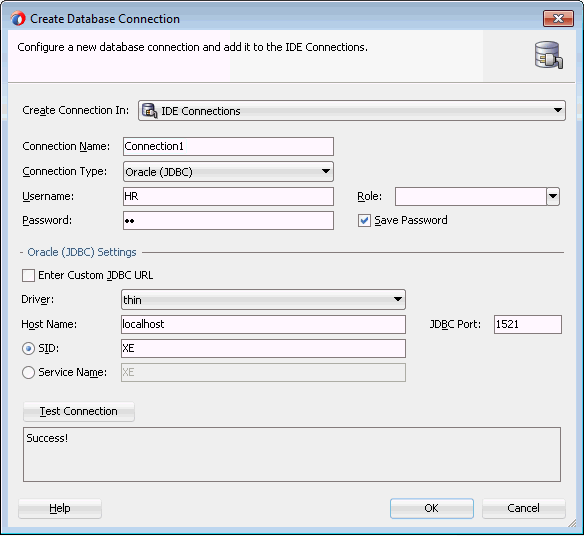
Right-click IDE Connection, and from the shortcut menu, select New Connection. The Create Database Connection screen is displayed.
-
On the Create Database Connection screen, do not change the default values for the connection name and type,
Connection1andOracle (JDBC). EnterHRin both the Username and Password fields. Do not enter a value for Role, and select Deploy Password. You must provide information about the computer where your database is located. Your database administrator should provide you with this information.Enter the following information:
-
Host Name:
Host name of the computer where Oracle Database XE is installedIf the database is on the same computer, then for the Host Name parameter, enter
localhost.
Click Test Connection. If the connection is successful, the word Success! is displayed in the Status field.
Figure 3–1 shows the Connection screen where you enter these details.
-
Click Finish to create the connection and close the screen.
Disconnecting and Reconnecting from Oracle Database XE in JDeveloper
To disconnect from the database in JDeveloper, in the Database Navigator, right-click the connection name and select Disconnect. The display in the Database Navigator now shows only the name of the connection, without the plus (+) symbol for expanding the node. To reconnect to the database, right-click the connection name and select Connect.
3.1.3 Browsing the Data Using the Database Navigator
After you have successfully established a connection to the database, you can browse its contents through the Database Navigator. The Database Navigator displays a navigable, hierarchical tree structure for the database, its objects, their instances, and the contents of each. To view the contents at each level of the hierarchy of the database connection that you created, do the following:
-
The IDE Connections node in the Database Navigator now shows a node with the name of your connection. Click the plus symbol (+) to the left of the connection name to expand the navigation tree. To display a list of the instances of an object type, for example Tables, expand the Table navigation tree.
-
The Structure window below the navigator shows the detailed structure of any object selected in the navigator. Select a table in the navigator (for example Employees) to see the columns of that table in the Structure window.
-
Figure 3-2 Viewing the Table Structure and Data
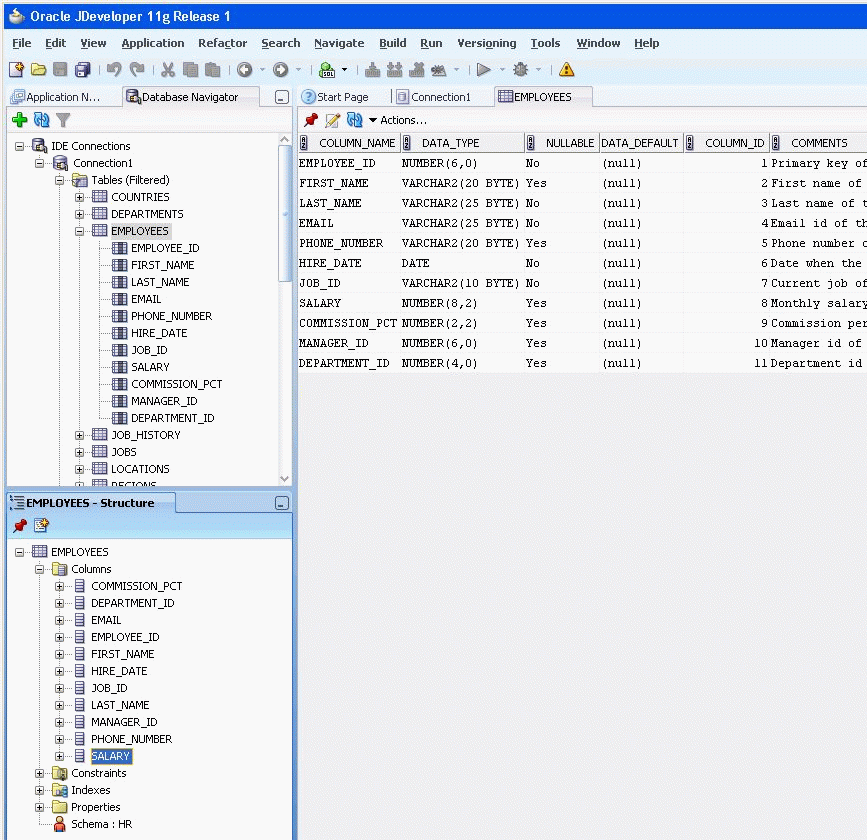
Description of "Figure 3-2 Viewing the Table Structure and Data"
-
If you double-click a table in the navigator, the structure of that table is displayed in the main editing area of the window. It includes details about all the columns, such as Name, Type, and Size, so you can browse the table definition.
To view the data from a table, select the Data tab below the table structure. You can now view and browse through the table data.
-
You can also edit the objects in the Database Navigator. To edit a table, right-click the table and select Edit from the shortcut menu. A dialog box enables you to make changes to the selected table.
3.2 Setting Up Applications and Projects in JDeveloper
In JDeveloper, you create your work in an application, within which you can organize your work into a number of projects. JDeveloper provides a number of application templates, to help you to create the project structure for standard types of application relatively quickly and easily. At the time you create your application in JDeveloper, you can choose the application template that matches the type of application you will be building.
The application template you select determines the initial project structure (the named project folders within the application) and the application technologies that will be included. You can then add any extra libraries or technologies you need for your particular application, and create additional projects if you need them.
3.2.1 Using the JDeveloper Application Navigator
The Application Navigator displays all your applications and projects. When you first start JDeveloper, the Application Navigator is displayed by default on the left side of the JDeveloper IDE.
To view the Application Navigator when it is not displayed, you can click the Applications tab in the navigator panel on the top left-hand side of the JDeveloper display, or select Application Navigator from the View menu.
The Application Navigator shows a logical grouping of the items in your projects. To see the structure of an individual item, you can select it and the structure is displayed in the Structure window.
From the Application Navigator, you can display items in an appropriate default editor. For example, if you double-click a Java file, the file opens in the Java Source Editor, and if you double-click a JavaServer Pages (JSP) file, it opens in the JSP/HTML Visual Editor.
3.2.2 Creating an Application and a Project
To get started with JDeveloper, you must create an application and at least one project in which to store your work, as follows:
-
In the Application Navigator, click New Application.
-
The Create Generic Application wizard is displayed. In the Name your application screen, enter
HRAppin the Application Name field, and from the Application Template list, select Generic Application. Click Next. -
On the Name your project screen, enter
Viewas the name of the project. Click Finish. -
The new
HRAppapplication is displayed in the Application Navigator. -
Save your application. To do this, from the File menu, select Save All.
3.2.3 Viewing the Javadoc and Source Code Available in the Project Scope
You can view the Javadoc or the code for any of the classes available in the project technology scope within JDeveloper. In addition, you can view the details of all the methods available for those classes.
For example, to see the code or Javadoc for the Connection class, do the following:
-
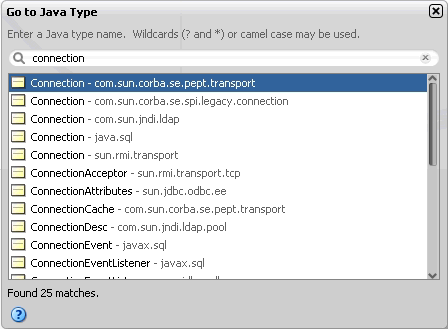
With your project selected in the Application Navigator, from the Navigate menu select Go to Java Type. You can also do this for a specific file in your project.
-
In the Go to Java Type dialog box, type the name of the Java class.
-
Enter the name of the class you want to view in the Name field, or click Browse to find the class. For the
Connectionclass, start to enterConnection, and from the displayed list select Connection (java.sql).Figure 3-3 Selecting the Class to View the Javadoc in JDeveloper
Description of "Figure 3-3 Selecting the Class to View the Javadoc in JDeveloper"
-
Click OK.
3.3 Connecting to Oracle Database XE from a Java Application
So far, you have seen how to connect to the database from JDeveloper. To initiate a connection from the Java application, you use the Connection object from the JDBC application programming interface (API).
This section describes connecting to the database from the Java application in the following subsections:
3.3.1 Overview of Connecting to Oracle Database XE
In Java, you use an instance of the DataSource object to get a connection to the database. The DataSource interface provides a complete replacement for the previous JDBC DriverManager class. Oracle implements the javax.sql.DataSource interface with the OracleDataSource class in the oracle.jdbc.pool package. The overloaded getConnection method returns a physical connection to the database.
You can either set properties using appropriate setxxx methods for the DataSource object or use the getConnection method that accepts these properties as input parameters.
Important DataSource Properties are listed in Table 3-1.
Table 3-1 Standard Data Source Properties
| Name | Type | Description |
|---|---|---|
|
|
Name of the particular database on the server. Also known as the service name (or SID) in Oracle terminology. For Oracle Database XE, this is |
|
|
|
Name of the underlying data source class. |
|
|
|
Description of the data source. |
|
|
|
Network protocol for communicating with the server. For Oracle, this applies only to the JDBC Oracle Call Interface (OCI) drivers and defaults to |
|
|
|
Password for the connecting user. |
|
|
|
Number of the port where the server listens for requests |
|
|
|
Name of the database server |
|
|
|
User name to be used for login |
|
|
|
Specifies the Oracle JDBC driver type. It can be either This is an Oracle-specific property. |
|
|
String |
Specifies the URL of the database connect string.You can use this property in place of the standard This is an Oracle-specific property. |
If you choose to set the url property of the DataSource object with all necessary parameters, then you can connect to the database without setting any other properties or specifying any additional parameters with the getDBConnection method. For more information about setting the database URL, refer to the Specifying Database URLs section.
Note:
The parameters specified through thegetConnection method override all property and url parameter settings previously specified in the application.3.3.2 Specifying Database URLs
This release of Oracle JVM supports Internet Protocol Version 6 (IPv6) addresses in the URL and system names of the Java code in the database, which resolve to IPv6 addresses.
Database URLs are strings that you specify for the value of the url property of the DataSource object. The complete URL syntax is the following:
jdbc:oracle:driver_type:[username/password]@database_specifier
The first part of the URL specifies which JDBC driver is to be used. The supported driver_type values for client-side applications are thin and oci. The brackets indicate that the user name and password pair is optional. The database_specifier value identifies the database to which the application is connected.
The following is the syntax for thin-style service names that are supported by the Thin driver:
jdbc:oracle:driver_type:[username/password]@//host_name:port_number:SID
For the sample application created in this guide, if you include the user name and password, and if the database is hosted locally, then the database connection URL is as shown in Example 3-1.
Example 3-1 Specifying the url Property for the DataSource Object
jdbc:oracle:thin:hr/hr@localhost:1521:XE
3.3.2.1 Using the Default Service Feature of the Oracle Database XE
If you have performed Oracle Database server installation in Typical mode, then the default service name used by the Oracle instance is ORCL, and the following Easy Connect syntax can be used to connect to that instance:
sqlplus /nolog
SQL> CONNECT username@"host/ORCL"
SQL> Enter password: password
The Easy Connect feature, which was introduced in Oracle Database 11g Release 1 (11.1), makes the following parts of the conventional JDBC connection URL syntax optional:
jdbc:oracle:driver_type:[username/password]@[//]host_name[:port][:XE]
In this URL:
-
// is optional.
-
:portis optional.Specify a port only if the default Oracle Net listener port (1521) is not used.
-
:XE(or the service name) is optional.The connection adapter for the Oracle Database connects to the default service on the host. On the host, this is set to
XEin thelistener.orafile.
See Also:
Oracle Database Net Services Administrator's Guide for more information about the Easy Connect featureExample 3-2 shows a basic configuration of the listener.ora file, where the default service is defined.
Example 3-2 Default Service Configuration in listener.ora
MYLISTENER = (ADDRESS_LIST=
 (ADDRESS=(PROTOCOL=tcp)(HOST=test555)(PORT=1521))
)
DEFAULT_SERVICE_MYLISTENER=dbjf.regress.rdbms.dev.testserver.com

SID_LIST_MYLISTENER = (SID_LIST=
(SID_DESC=(SID_NAME=dbjf)(GLOBAL_DBNAME=dbjf.regress.rdbms.dev.testserver.com)(ORACLE_HOME=/test/oracle))
)
After making changes to the listener.ora file, you must restart the listener with the following command:
> lsnrctl start mylistener
The following URLs should work with this configuration:
jdbc:oracle:thin:@//test555.testserver.com
jdbc:oracle:thin:@//test555.testserver.com:1521
jdbc:oracle:thin:@test555.testserver.com
jdbc:oracle:thin:@test555.testserver.com:1521
jdbc:oracle:thin:@(DESCRIPTION=(ADDRESS=(PROTOCOL=TCP)(HOST=test555.testserver.com)(PORT=1521)))
jdbc:oracle:thin:@(DESCRIPTION=(ADDRESS=(PROTOCOL=TCP)(HOST=test555.testserver.com)))
jdbc:oracle:thin:@(DESCRIPTION=(ADDRESS=(PROTOCOL=TCP)(HOST=test555.testserver.com)(PORT=1521))(CONNECT_DATA=(SERVICE_NAME=)))
Note:
Default service is a new feature in Oracle Database XE 11g Release 2. If you use any other version of the Oracle Database to connect to the database, then you must specify the SID and port number.3.3.3 Creating a Java Class in JDeveloper
The first step in building a Java application is to create a Java class. The following instructions describe how you create a class called DataHandler, which will contain the methods for querying the database and modifying the data in it.
-
In the Application Navigator, right-click the View project, and from the shortcut menu, select New.
-
In the New Gallery dialog box, select General in the Categories list. In the Items list, select Java Class, and click OK. The Create Java Class dialog box is displayed.
-
In the Create Java Class dialog box, enter
DataHandlerin the Name text box, andhrin the Package text box. Do not change the default values of the Optional Attributes, and click OK. The Create Java Class dialog box with the appropriate values specified is shown in Figure 3-4. -
The skeleton
DataHandlerclass is created and is displayed in the Java Source Editor. The package declaration, the class declaration, and the default constructor are created by default. Figure 3-5 shows the class displayed in the Java Source Editor, ready for you to add your Java code:


3.3.4 Java Libraries
Oracle JDeveloper comes with standard libraries to help Java application programming. These libraries include API support for Application Development Framework (ADF), Oracle libraries for JDBC, JSP, and so on.
To use JDBC in your project, you import the Oracle JDBC library into the project. Similarly, to use JSP technology, you import the JSP Runtime library.
3.3.4.1 Overview of the Oracle JDBC Library
Important packages of the Oracle JDBC library include the following:
-
oracle.jdbc: The interfaces of theoracle.jdbcpackage define the Oracle extensions to the interfaces in thejava.sqlpackage. These extensions provide access to Oracle SQL-format data and other Oracle-specific features, including Oracle performance enhancements. -
oracle.sql: Theoracle.sqlpackage supports direct access to data in SQL format. This package consists primarily of classes that provide Java mappings to SQL data types and their support classes. -
oracle.jdbc.pool: This package includes theOracleDataSourceclass that is used to get a connection to the database. The overloadedgetConnectionmethod returns a physical connection to the database.
3.3.5 Adding JDBC and JSP Libraries
To include libraries in your project, perform the following steps:
-
Double-click the View project in the Application Navigator to display the Project Properties dialog box.
-
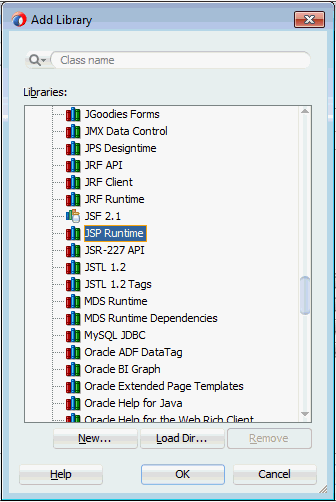
Click Libraries and Classpath, and then click Add Library.... The Add Library dialog box is displayed with a list of the available libraries for the Java2 Platform, Standard Edition (J2SE) version is displayed.
-
In the Add Library dialog box, scroll through the list of libraries in the Extension folder. Select JSP Runtime library and click OK to add it to the list of selected libraries for your project. Similarly, add the Oracle JDBC library. Figure 3-6 shows the Oracle JDBC library added to the
Viewproject. -
Click OK.
3.3.6 Importing JDBC Packages
To use JDBC in the Java application, import the following JDBC packages:
-
If the
DataHandler.javaclass is not already open in the Java Source Editor, in the Application Navigator, expand the View project, Application Sources, and your package (hr) and double-click DataHandler.java. -
At the end of the generated package declaration, on a new line, enter the
importstatements shown in Example 3-3.
3.3.7 Declaring Connection-Related Variables
Connection information is passed to the connection method by using the following connection variables: the connection URL, a user name, and the corresponding password.
Use the Java Source Editor of JDeveloper to edit the DataHandler.java class as follows:
-
After the
DataHandlerconstructor, on a new line, declare the three connection variables as follows:String jdbcUrl = null; String userid = null; String password = null;
These variables will be used in the application to contain values supplied by the user at login to authenticate the user and to create a connection to the database. The
jdbcUrlvariable is used to hold the URL of the database that you will connect to. Theuseridandpasswordvariables are used to authenticate the user and identify the schema to be used for the session.Note:
The login variables have been set to null to secure the application. At this point in the guide, application login functionality is yet to be built into the application. Therefore, to test the application until login functionality is built in, you can set values in the login variables as follows:Set the
jdbcUrlvariable to the connect string for your database.String jdbcUrl = "jdbc:oracle:thin:@localhost:1521:XE";
Set the variables
useridandpasswordtohras follows:String userid = "hr"; String password = "hr";
Make sure you reset these to
nullas soon as you finish testing.For more information about security features and practices, refer to Oracle Database Security Guide and the vendor-specific documentation for your development environment.
-
On a new line, declare a connection instance as follows:
Connection conn;
Your Java class should now contain the code in Example 3-4.
3.3.8 Creating the Connection Method
To connect to the database, you must create a method as follows:
-
Add the following method declaration after the connection declaration:
public void getDBConnection() throws SQLException
The Java Code Insight feature displays a message reminding you to import the
SQLExceptionerror handling package. Press the Alt+Enter keys to import it. Theimport java.sql.SQLExceptionstatement is added to the list of import packages. -
At the end of the same line, add an open brace (
{) and then press the Enter key. JDeveloper automatically creates the closing brace, and positions the cursor in a new empty line between the braces. -
On a new line, declare an
OracleDataSourceinstance as follows:OracleDataSource ds;
-
Enter the following to create a new
OracleDataSourceobject:ds = new OracleDataSource();
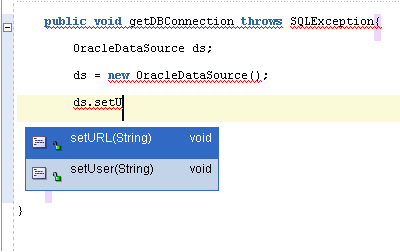
-
Start to enter the following to set the URL for the
DataSourceobject:ds.setURL(jdbcUrl);
Java Code Insight prompts you by providing you with a list of available
OracleDataSourcemethods. Scroll through the list to select thesetURL(String)method, and press the Enter key to select it into your code. In the parentheses for this function, enterjdbcUrlin place ofarg0.Figure 3-7 shows how the Java Code Insight feature in JDeveloper helps you with inserting code.
-
On the next line, enter the following:
conn = ds.getConnection(userid,password);
As usual, Java Code Insight will prompt you with a list of methods for
ds. This time, selectgetConnection(String,String). In the parentheses, enteruserid,password. End the line with a semicolon (;).Your code should look similar to the code in Example 3-5.
Example 3-5 Adding a Method to Connect to the Database
package hr; import java.sql.Connection; import java.sql.SQLException; import oracle.jdbc.pool.OracleDataSource; public class DataHandler { public DataHandler() { } String jdbcUrl = null; String userid = null; String password = null; Connection conn; public void getDBConnection() throws SQLException{ OracleDataSource ds; ds = new OracleDataSource(); ds.setURL(jdbcUrl); conn=ds.getConnection(userid,password); } } -
Compile your class to ensure that there are no syntax errors. To do this, right-click in the Java Source Editor, and select Make from the shortcut menu. A
Successful compilationmessage is displayed in the Log window below the Java Source Editor window.