30 Using Oracle BPM Worklist
This chapter describes how worklist users and administrators interact with Oracle BPM Worklist, and how to customize the worklist display to reflect local business needs, languages, and time zones.
This chapter includes the following sections:
See Chapter 31, "Building a Custom Worklist Client" for how to use the APIs exposed by the workflow service.
30.1 Introduction to Oracle BPM Worklist
Oracle BPM Worklist enables business users to access and act on tasks assigned to them. For example, from a worklist, a loan agent can review loan applications or a manager can approve employee vacation requests. These processes are defined in human tasks.
Oracle BPM Worklist provides different functionality based on the user profile. Standard user profiles include task assignee, supervisor, process owner, and administrator. For example, worklist users can update payloads, attach documents or comments, and route tasks to other users, in addition to completing tasks by providing conclusions such as approvals or rejections. Supervisors or group administrators can use the worklist to analyze tasks assigned to a group and route them appropriately.
Users can customize their task lists, as required, by adding worklist views, for example, selecting the columns to display, or displaying a subset of the tasks based on filter criteria.
Using Oracle BPM Worklist, task assignees can do the following:
-
Perform authorized actions on tasks in the worklist, acquire and check out shared tasks, define personal to-do tasks, and define subtasks.
-
Filter tasks in a worklist view based on various criteria.
-
Work with standard work queues, such as high priority tasks, tasks due soon, and so on. Work queues allow users to create a custom view to group a subset of tasks in the worklist, for example, high priority tasks, tasks due in 24 hours, expense approval tasks, and more.
-
Define custom work queues.
-
Gain proxy access to part of another user's worklist.
-
Define custom vacation rules and delegation rules.
-
Enable group owners to define task dispatching rules for shared tasks.
-
Collect a complete workflow history and audit trail.
-
Use digital signatures for tasks.
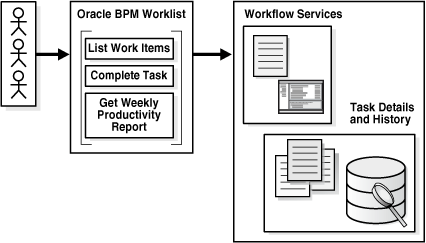
Figure 30-1 shows an illustration of Oracle BPM Worklist.
Figure 30-1 Oracle BPM Worklist—Access Tasks, Forms, Attachments, and Reports
Description of "Figure 30-1 Oracle BPM Worklist—Access Tasks, Forms, Attachments, and Reports"
The worklist is rendered in a browser by a task form that you create using ADF task flows in Oracle JDeveloper. See Chapter 29, "Designing Task Forms for Human Tasks" for more information.
Users can also act on tasks through portals such as Oracle WebCenter. Portals enable users to present information from multiple, unrelated data sources in a single organized view. This view, a portal page, can contain one or more components called portlets that can each collect content from different data sources.
You can build clients for workflow services using the APIs exposed by the workflow service. The APIs enable clients to communicate with the workflow service using local and remote EJBs, SOAP, and HTTP.
30.2 Logging In to Oracle BPM Worklist
Table 30-1 lists the different types of users recognized by Oracle BPM Worklist, based on the privileges assigned to the user.
Table 30-1 Worklist User Types
| Type of User | Access |
|---|---|
|
End user (user) |
Acts on tasks assigned to him or his group and has access to system and custom actions, routing rules, and custom views |
|
Supervisor (manager) |
Acts on the tasks, reports, and custom views of his reportees, in addition to his own end-user access |
|
Process owner |
Acts on tasks belonging to the process but assigned to other users, in addition to his own end-user access |
|
Group administrator |
Manages group rules and dynamic assignments, in addition to his own end-user access |
|
Workflow administrator |
Administers tasks that are in an errored state, for example, tasks that must be reassigned or suspended. The workflow administrator can also change application preferences and map attributes, and manage rules for any user or group, in addition to his own end-user access. |
Note:
Multiple authentication providers (for example, SSO and forms) are not supported.30.2.1 How To Log In to the Worklist
To log in, you must have installed Oracle SOA Suite and the SOA server must be running. See Oracle Fusion Middleware Installation Guide for Oracle SOA Suite and Oracle Business Process Management Suite for more information.
Use a supported web browser:
-
Microsoft Internet Explorer 7.x
-
Mozilla Firefox 2.x
-
Mozilla Firefox 3.x
-
Apple Safari
-
Go to
http://hostname:port_number/integration/worklistapp
-
hostnameis the name of the host computer on which Oracle SOA Suite is installed -
The
port_numberused at installation
-
-
Enter the user name and password.
You can use the preseeded user to log in as an administrator. If you have loaded the demo user community in the identity store, then you can use other users such as jstein or jcooper.
The user name and password must exist in the user community provided to JAZN. See Oracle Fusion Middleware Administrator's Guide for Oracle SOA Suite and Oracle BPM Suite for the organizational hierarchy of the demo user community used in examples throughout this chapter.
-
Click Login.
30.2.1.1 Enabling the weblogic User for Logging in to the Worklist
For the weblogic user in Oracle Internet Directory to log in to Oracle BPM Worklist, the Oracle Internet Directory Authenticator must have an Administrators group, and the weblogic user must be a member of that group.
-
Create a weblogic user in Oracle Internet Directory using the LDAP browser. The
users.ldiffile is imported to Oracle Internet Directory as follows:dn: cn=weblogic,cn=Users,dc=us,dc=oracle,dc=com objectclass: inetorgperson objectclass: organizationalPerson objectclass: person objectclass: orcluser objectclass: orcluserV2 objectclass: top sn: weblogic userpassword: welcome1 uid: weblogic
-
Create an Administrators group in Oracle Internet Directory and assign the
weblogicuser to it. Thegroups.ldiffile is imported to Oracle Internet Directory as follows:dn: cn=Administrators,cn=Groups,dc=us,dc=oracle,dc=com objectclass: groupOfUniqueNames objectclass: orclGroup objectclass: top owner: cn=orcladmin,cn=Users,dc=us,dc=oracle,dc=com uniquemember: cn=weblogic,cn=Users,dc=us,dc=oracle,dc=com
30.2.2 What Happens When You Log In to the Worklist
Identity service workflow APIs authenticate and authorize logins using a user name, password, and optionally a realm set, if multiple realms were defined for an organization. See Section 30.8.2, "How To Set the Worklist Display (Application Preferences)," for information on how administrators can set a preference to change the realm label displayed in the interface, or specify an alternative location for the source of the login page image.
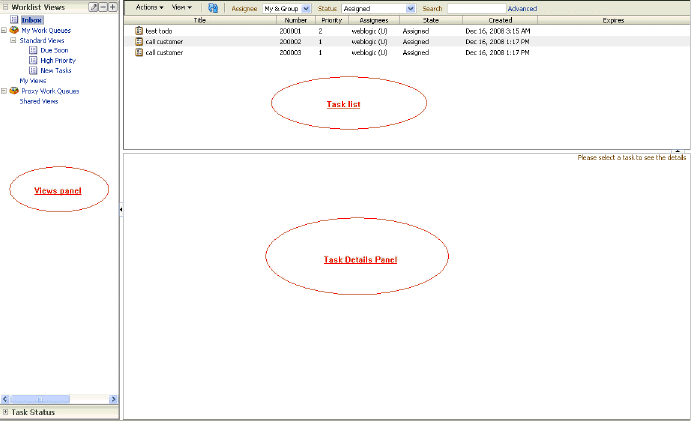
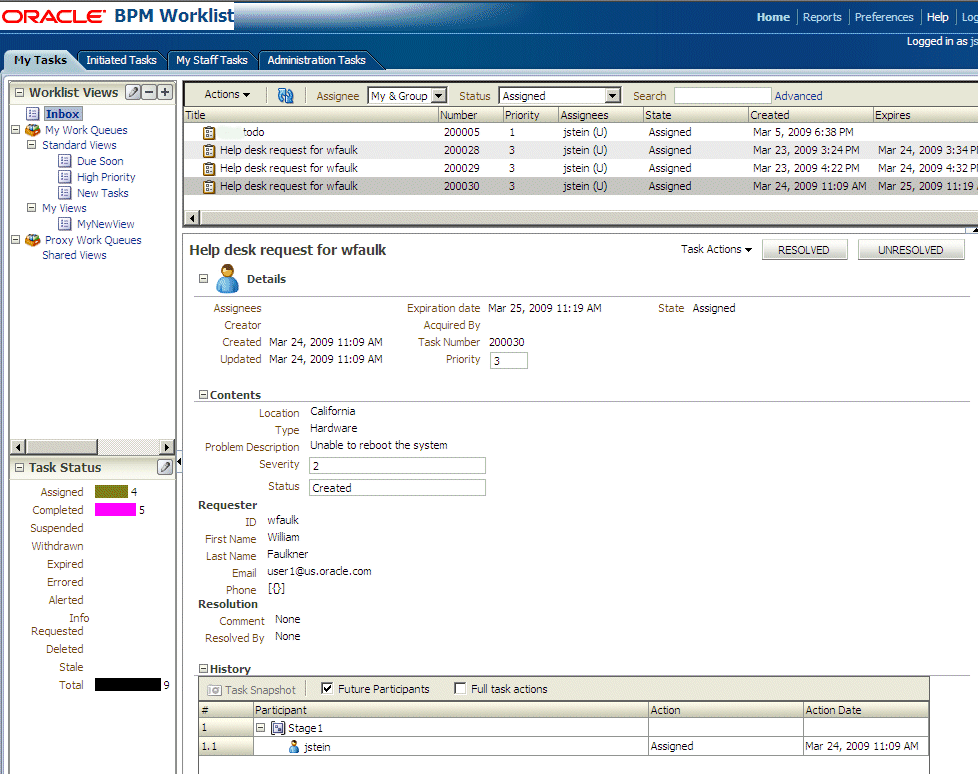
After a user logs in, the Home (task list) page displays tasks for the user based on the user's permissions and assigned groups and roles. The My Tasks tab and the Inbox are displayed by default. The actions allowed from the Actions list also depend on the logged-in user's privileges.
Figure 30-2 shows an example of the Home page.
Figure 30-2 Oracle BPM Worklist—The Home (Task List) Page
Description of "Figure 30-2 Oracle BPM Worklist—The Home (Task List) Page"
Table 30-2 describes the components of the Home (task list) page.
Table 30-2 Components of the Home (Task List) Page
| Component | Description |
|---|---|
|
Tabs |
The tabs displayed depend on the role granted to the logged-in user.
See the following for more information:
|
|
Worklist Views |
Inbox, My Work Queues, Proxy Work Queues—See Section 30.3.2, "How To Create and Customize Worklist Views," for more information. |
|
Task Status |
A bar chart shows the status of tasks in the current view. See Section 30.3.3, "How To Customize the Task Status Chart," for more information. |
|
Display Filters |
Specify search criteria from the View, Assignee or Status fields. The category filters that are available depend on which tab is selected.
Use Search to enter a keyword, or use Advanced Search. See Section 30.3.1, "How To Filter Tasks," for more information. |
|
Actions List |
Select a group action (Claim) or a custom action (for example, Approve or Reject) that was defined for the human task. Claim appears for tasks assigned to a group or multiple users; one user must claim the task before it can be worked. Other possible actions for a task, such as system actions, are displayed on the task details page for a specific task. You can also create ToDo tasks and subtasks here. Note:
|
|
Default Columns |
Title—The title specified when the human task was created. Tasks associated with a purged or archived process instance do not appear. Number—The task number generated when the BPEL process was created. Priority—The priority specified when the human task was created. The highest priority is 1; the lowest is 5. Assignees—The user or group or application roles. State—Select from Assigned, Completed, Errored, Expired, Information Requested, Stale, Suspended, or Withdrawn. Created—Date and time the human task was created Expires—Date and time the tasks expires, specified when the human task was created |
|
Task Details |
The lower section of the worklist displays the inline view of the task details page. Buttons indicate available actions. See Section 30.4, "Acting on Tasks: The Task Details Page," for more information. |
Figure 30-2 also shows the Administration, Reports, and Preferences links (upper-right corner). Table 30-3 summarizes the Home, Administration, Reports, and Preferences pages.
Table 30-3 Worklist Main Pages Summary
| Page | Description |
|---|---|
|
Home |
As described in Table 30-2, the logged-in user's list of tasks, details for a selected task, and all the functions needed to start acting on a task are provided. |
|
Administration |
The following administrative functions are available:
|
|
Reports |
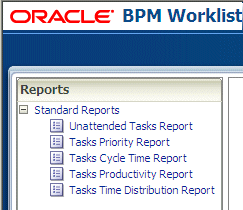
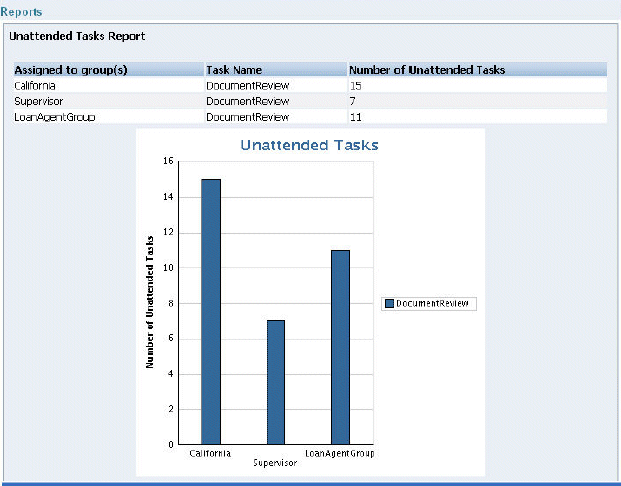
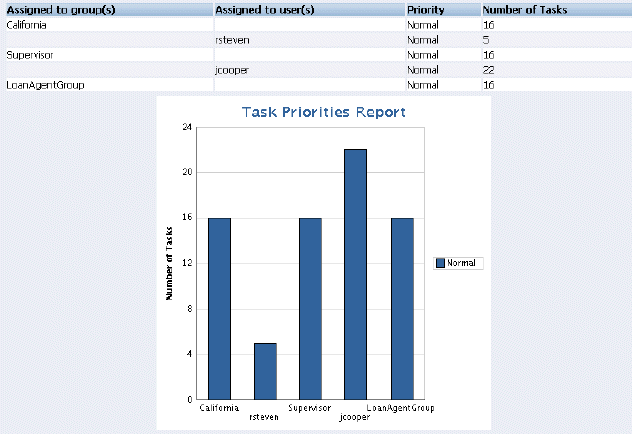
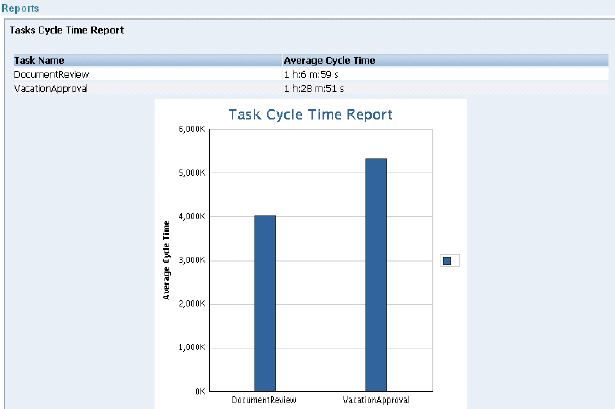
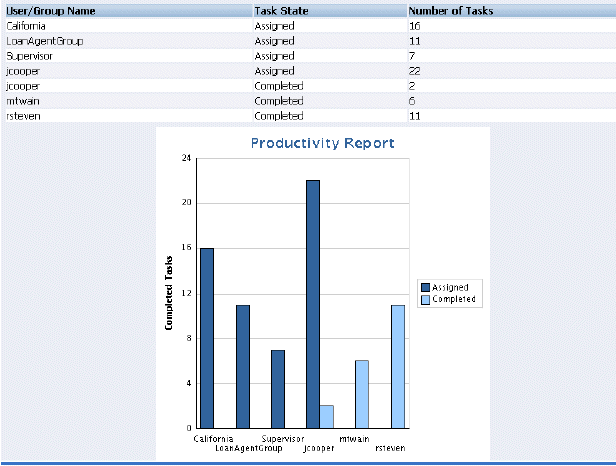
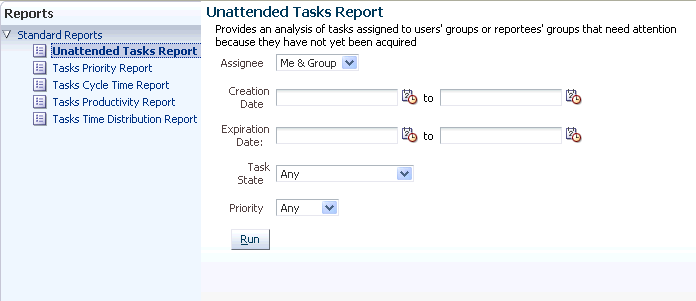
The following reports are available: Unattended Tasks Report, Tasks Priority Report, Tasks Cycle Time Report, Tasks Productivity Report, and Tasks Time Distribution Report. See Section 30.11.1, "How To Create Reports," for more information. |
|
Preferences |
Preference settings include:
|
30.2.3 What Happens When You Change a User's Privileges While They are Logged in to Oracle BPM Worklist
If you change a user's privileges in Oracle Enterprise Manager Fusion Middleware Control Console while the user is logged in to Oracle BPM Worklist, the changes take effect only after a subsequent login by the user. This is true for situations in which there are two active worklist sessions, one in which the user is logged in before the privileges are changed, and one in which the same user logs in after the privileges are changed. In the first case, the changes to the user's privileges do not take effect while the user is logged in. In the second case, when the user logs in to the second instance of the Worklist Application, the changes to the user's privileges do take effect.
30.3 Customizing the Task List Page
You can customize your task list in several ways, including adding worklist views, selecting which columns to display, and displaying a subset of the tasks based on filter criteria. Resize the task list display area to increase the number of tasks fetched.
Note:
When you deploy SOA composite applications with human tasks to partitions, the tasks created for these composites cannot be filtered using the partition as a parameter inside Oracle BPM Worklist. For example, you can select a task type corresponding to a particular partition (the same task type, but in different partitions), but filtering does not work with the advanced search, custom views, custom rules, and mapped attribute features. For example, assume VacationRequestApp is deployed to partition 1 and partition 2. When the advanced search is used to select tasks corresponding to composites deployed in partition 1, the result does not return the tasks.30.3.1 How To Filter Tasks
Figure 30-3 shows the filter fields.
Figure 30-3 Filters—Assignee, Status, Search, and Advanced Search

Description of "Figure 30-3 Filters—Assignee, Status, Search, and Advanced Search "
Filters are used to display a subset of tasks, based on the following filter criteria:
-
Assignee
From the My Tasks tab, select from the following:
-
My—Retrieves tasks directly assigned to the logged-in user
-
Group—Retrieves the following:
-
Tasks that are assigned to groups that the logged-in user belongs to
-
Tasks that are assigned to an application role that the logged-in user is assigned
-
Tasks that are assigned to multiple users, one of which is the logged-in user
-
-
My & Group—Retrieves all tasks assigned to the user, whether through direct assignment, or by way of a group, application role, or list of users
-
Previous—Retrieves tasks that the logged-in user has updated
-
Reviewer—Retrieves task for which the logged-in user is a reviewer
From the Initiated Tasks tab, select Creator.
From the My Staff Tasks tab, select Reportees.
From the Administration Tasks tab, select Admin.
-
-
Status—Select from the following: Any, Assigned, Completed, Suspended (can be resumed later), Withdrawn, Expired, Errored (while processing), Alerted, or Information Requested.
-
Search—Enter a keyword to search task titles, comments, identification keys, and the flex string fields of tasks that qualify for the specified filter criterion.
-
Advanced—Provides additional search filters.
Note:
If a task is assigned separately to multiple reportees, when a manager looks at the My Staff Tasks list, the manager sees as many copies of that task as the number of reportees that the task is assigned to.To filter tasks based on assignee or status:
-
Select options from the Assignee and Status lists.
The task list is automatically updated based on the filter selections.
To filter tasks based on keyword search:
-
Enter a keyword to search task titles, comments, identification keys, and the flex string fields of tasks that qualify for the specified filter criterion.
-
Press Enter or click Refresh.
To filter tasks based on an advanced search:
Mapped attribute labels can be used in an advanced search if you select task types for which mapped attribute mappings have been defined.
See Section 30.10.1, "How To Map Attributes," for more information.
-
Click Advanced.
-
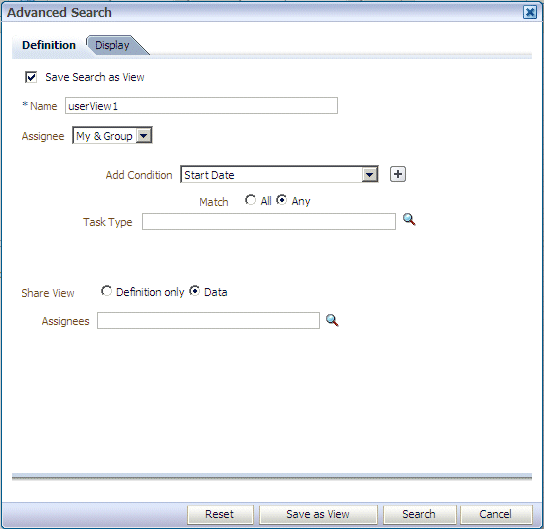
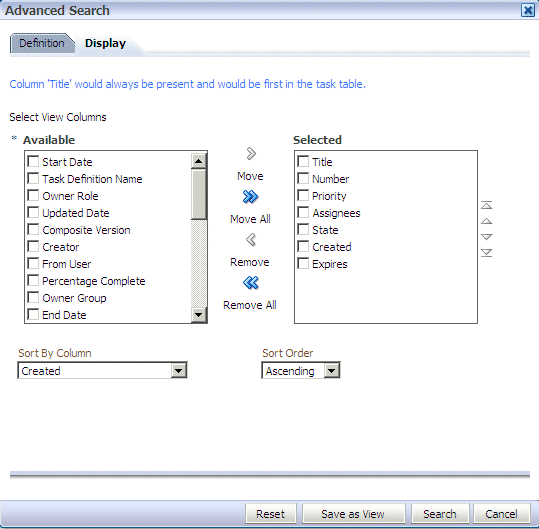
(Optional) Check Save As View, provide a view name, and use the Display tab to provide other information, as shown in Figure 30-4 and Figure 30-5.
Figure 30-4 Worklist Advanced Search—Definition Tab
Description of "Figure 30-4 Worklist Advanced Search—Definition Tab"
Figure 30-5 Worklist Advanced Search—Display Tab
Description of "Figure 30-5 Worklist Advanced Search—Display Tab"
Table 30-4 describes the advanced search view columns available in the Display tab.
Table 30-4 Advanced Search—View Columns
Column Description Start Date
The start date of the task (used with ToDo tasks).
Task Definition Name
The name of the task component that defines the task instance.
Owner Role
The application role (if any) that owns the task instance. Task owners can be application roles, users, or groups. If the owner of the task is an application role, this field is set.
Updated Date
The date the task instance was last updated.
Composite Version
The version of the composite that contains the task component that defines the task instance.
Creator
The name of the creator of the task.
From User
The from user for the task.
Percentage Complete
The percentage of the task completed (used with ToDo tasks).
Owner Group
The group (if any) that owns the task instance. Task owners can be application roles, users, or groups. If the owner of the task is a group, this field is set.
End Date
The end date of the task (used with ToDo tasks).
Composite
The name of the composite that contains the task component that defines the task instance.
Due Date
The due date of the task (used with ToDo tasks).
Composite Distinguished Name
The unique name for the particular deployment of the composite that contains the task component that defines the task instance.
Task Display URL
The URL to display the details for the task.
Updated By
The user who last updated the task.
Outcome
The outcome of the task, for example Approved or Rejected. This is only set on completed task instances.
Task Namespace
A namespace that uniquely defines all versions of the task component that defines this task instance. Different versions of the same task component can have the same namespace, but no two task components can have the same namespace.
Approvers
The approvers of the task.
Application Context
The application to which any application roles associated with the tasks (such as assignees, owners, and so on) belong.
Owner User
The user (if any) that owns the task instance. Task owners can be application roles, users, or groups. If the owner of the task is a user, this field is set.
Identifier
The (optional) custom unique identifier for the task. This is an additional unique identifier to the standard task number.
Category
The category of the task.
Acquired By
The name of the user who claimed the task in the case when the task is assigned to a group, application role, or to multiple users, and then claimed by the user.
Component
The name of the task component that defines the task instance.
Original Assignee User
The name of the user who delegated the task in the case when the user delegates a task to another user.
Assigned
The date that this task was assigned.
Domain
The domain to which the composite that contains the task component that defines the task instance belongs.
Title
The title of the task.
Number
An integer that uniquely identifies the task instance.
Priority
An integer that defines the priority of the task. A lower number indicates a higher priority—typically numbers 1 to 5 are used.
Assignees
The current task assignees (users, groups or application roles).
State
The state of the task instance.
Created
The date that the task instance was created.
Expires
The date on which the task instance expires.
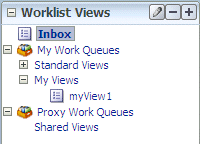
The saved view appears in the Inbox under My Views, as shown in Figure 30-6.
-
Select an assignee, as shown in Figure 30-7.
-
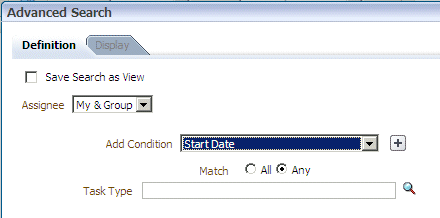
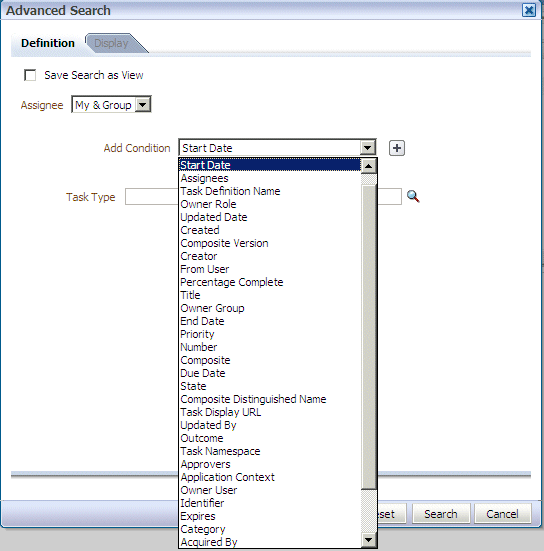
Add conditions (filters), as shown in Figure 30-8.
Figure 30-8 Adding Filters for an Advanced Search on Tasks
Description of "Figure 30-8 Adding Filters for an Advanced Search on Tasks"
Table 30-5 describes the available conditions.
Table 30-5 Advanced Search—Conditions
Condition Description Start Date
The start date of the task (used with ToDo tasks).
Assignees
The current task assignees (users, groups or application roles).
Task Definition Name
The name of the task component that defines the task instance.
Owner Role
The application role (if any) that owns the task instance. Task owners can be application roles, users, or groups. If the owner of the task is an application role, this field is set.
Updated Date
The date that the task instance was last updated.
Created
The date that the task instance was created.
Composite Version
The version of the composite that contains the task component that defines the task instance.
Creator
The name of the creator of the task.
From User
The from user for the task.
Percentage Complete
The percentage of the task completed (used with ToDo tasks).
Title
The title of the task.
Owner Group
The group (if any) that owns the task instance. Task owners can be application roles, users, or groups. If the owner of the task is a group, this field is set.
End Date
The end date of the task (used with ToDo tasks).
Priority
An integer that defines the priority of the task. A lower number indicates a higher priority—typically numbers 1 to 5 are used.
Number
An integer that uniquely identifies the task instance.
Composite
The name of the composite that contains the task component that defines the task instance.
Due Date
The due date of the task (used with ToDo tasks).
State
The state of the task instance.
Composite Distinguished Name
The unique name for the particular deployment of the composite that contains the task component that defines the task instance.
Task Display URL
The URL to display the details for the task.
Updated By
The user who last updated the task.
Outcome
The outcome of the task, for example Approved or Rejected. This is only set on completed task instances.
Task Namespace
The namespace of the task.
Approvers
The approvers of the task.
Application Context
The application to which any application roles associated with the tasks (such as assignees, owners, and so on) belong.
Owner User
The user (if any) that owns the task instance. Task owners can be application roles, users, or groups. If the owner of the task is a user, this field is set.
Identifier
The (optional) custom unique identifier for the task. This is an additional unique identifier to the standard task number.
Expires
The date on which the task instance expires.
Category
The category of the task.
Acquired By
The name of the user who claimed the task in the case when the task is assigned to a group, application role, or to multiple users, and then claimed by the user.
Component
The name of the task component that defines the task instance.
Original Assignee User
The name of the user who delegated the task in the case when the user delegates a task to another user.
Assigned
The date that this task was assigned.
Domain
The domain to which the composite that contains the task component that defines the task instance belongs.
-
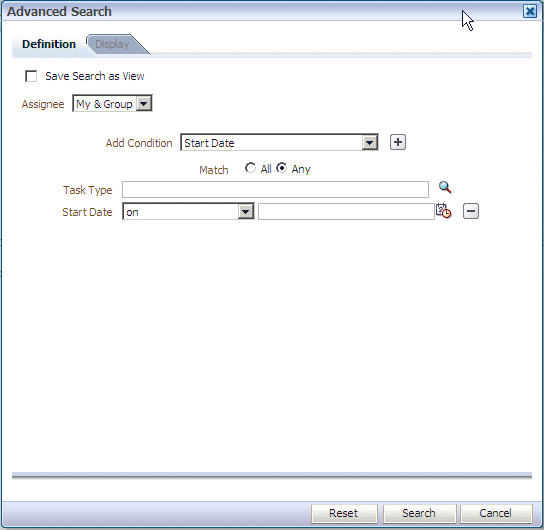
Add parameter values, shown in Figure 30-9.
-
Select Any or All for matching multiple filters.
-
(Optional) Search on a task type.
-
Click Search.
The task list page with the tasks filtered according to your criteria appears.
30.3.2 How To Create and Customize Worklist Views
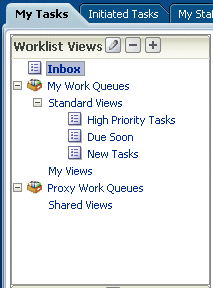
The Worklist Views area, shown in Figure 30-10, displays the following:
-
Inbox—Shows all tasks that result from any filters you may have used. The default shows all tasks.
-
My Work Queues—Shows standard views and views that you defined.
-
Proxy Work Queues—Shows shared views.
Use Worklist Views to create, share, and customize views.
-
In the Worklist Views section, click Add.
-
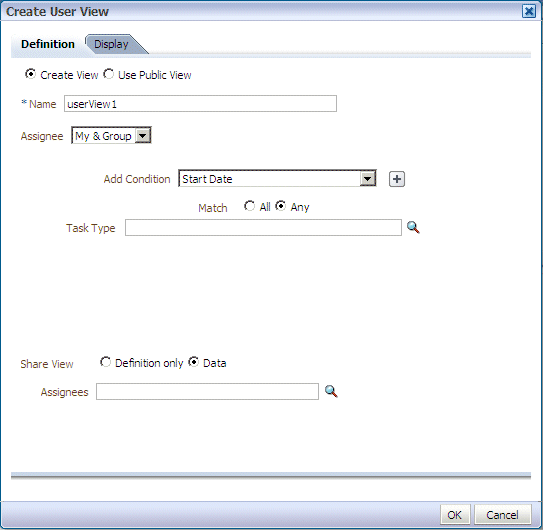
Use the Definition tab of the Create User View dialog, shown in Figure 30-11.
-
Create View or Use Public View—Create your own view or browse for a public view to copy.
-
Name—Specify a name for your view.
-
Add to Standard Views—This option applies to Administrators only. Administrators select this option to create the view as a standard view, which then appears in the Standard Views list for all worklist users.
-
Assignee—Select My, Group, My&Group, Previous, or Reviewer.
-
Add Condition—Select a filter from the list and click Add. For example, if you select startDate, and click Add, then a calendar and a list including on, equals, not equals, greater than, less than, and so on appears.
-
Task Type—Browse for a task type or leave the field blank for all types. Mapped attribute labels can be selected in the query and display columns dialogs if the selected task types have mapped attribute mappings defined.
-
Match—Select All or Any to match the conditions you added.
-
Share View—You can grant access to another user to either the definition of this view, in which case the view conditions are applied to the grantee's data, or to the data itself, in which case the grantee can see the grantor's worklist view, including the data. Sharing a view with another user is similar to delegating all tasks that correspond to that view to the other user; that is, the other user can act on your behalf. Shared views are displayed under Proxy Work Queues.
-
Assignees—Specify the users (grantees) who can share your view.
-
-
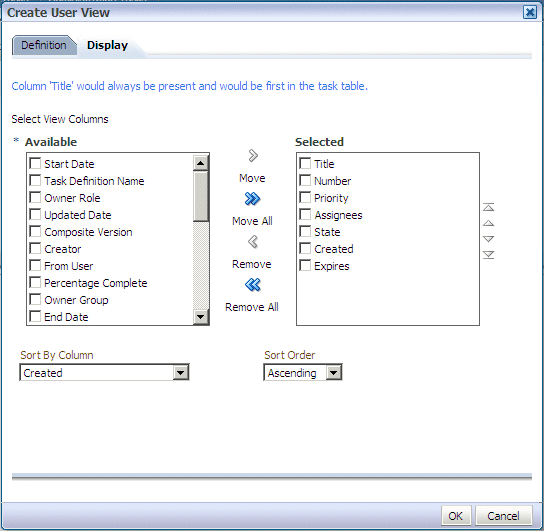
Use the Display tab of the Create User View dialog, shown in Figure 30-12, to customize the fields that appear in the view.
Figure 30-12 Displaying Fields in a Worklist View
Description of "Figure 30-12 Displaying Fields in a Worklist View"
-
Select View Columns—Specify which columns you want to display in your task list. They can be standard task attributes or mapped attributes that have been mapped for the specific task type. The default columns are the same as the columns in your inbox.
-
Sort by Column—Select a column to sort on.
-
Sort Order—Select ascending or descending order.
-
-
Click OK.
-
In the Worklist Views section, click the view name.
-
Click the Edit icon.
-
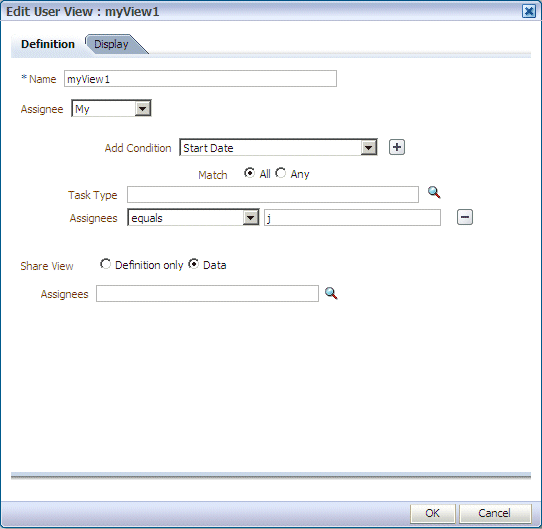
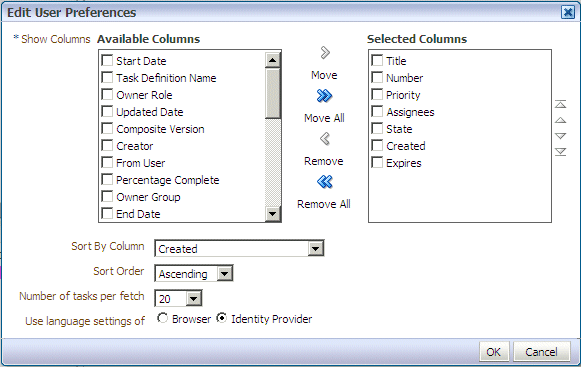
Use the Definition and Display tabs of the Edit User View dialog to customize the view, as shown in Figure 30-13 and Figure 30-14, and click OK.
Figure 30-14 Customizing Fields in a Worklist View
Description of "Figure 30-14 Customizing Fields in a Worklist View"
When you select and move items from the Available Columns list to the Selected Columns list (or vice-versa), the items remain checked. Therefore, if you select items to move back, the previously selected items are also moved. Be sure to uncheck items after moving them between the lists if you intend to move additional columns.
30.3.3 How To Customize the Task Status Chart
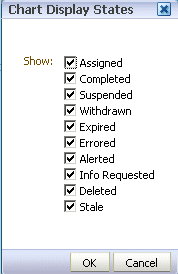
The bar chart shows tasks broken down by status, with a count of how many tasks in each status category. The chart applies to the filtered set of tasks within the current view.
To customize the task status chart:
-
Click the Edit icon.
-
Add or remove status states for display, as shown in Figure 30-15, and click OK.
Figure 30-15 Customizing the Task Status Chart
Description of "Figure 30-15 Customizing the Task Status Chart"
30.3.4 How To Create a ToDo Task
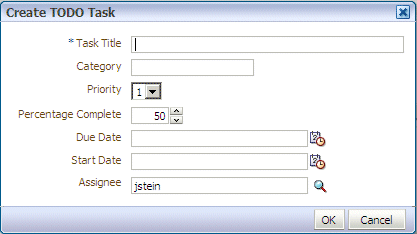
Use the Create ToDo Task dialog, shown in Figure 30-16, to create a top-level ToDo task for yourself or others. This task is not associated with a business task.
ToDo tasks appear in the assignee's Inbox.
You can create ToDo tasks that are children of other ToDo tasks or business tasks. A ToDo task can have only one level of child ToDo tasks. When all child ToDo tasks are 100% complete, the parent ToDo task is also marked as completed. If the parent ToDo task is completed, then child ToDo tasks are at 100% within the workflow system. If the parent is a business task, the child ToDo is not marked as completed. You must set the outcome and complete it. If you explicitly set a ToDo task to 100%, there is no aggregation on the parent task.
ToDo tasks can be reassigned, escalated, and so on, and deleted (logical delete) and purged (physical delete). Reassignment, escalation, and so on of the parent task does not affect the assignment of any child ToDo tasks. The completion percentage of a ToDo task can be reset to less than 100% after it is completed.
Assignment rules (such as vacation rules) are not applied to ToDo tasks. You cannot specify business rules for ToDo tasks.
-
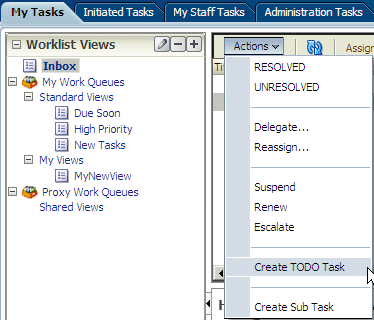
From the Actions list, select Create TODO Task, as shown in Figure 30-17.
-
Provide details in the Create ToDo Task dialog, shown in Figure 30-17, and click OK.
-
Task Title: Enter anything that is meaningful to you.
-
Category: Enter anything that is meaningful to you.
-
Priority: Select from 1 (highest) to 5 (lowest)
-
Percentage Complete: This attribute indicates how much of the task is completed. 100% sets the attribute as completed.
-
Due Date: The due date does not trigger an expiration. You can also see overdue tasks. The start date need not be the current date.
-
StartDate: The task start date.
-
Assignee: You can assign yourself or someone else.
-
30.3.5 How To Create a Subtask
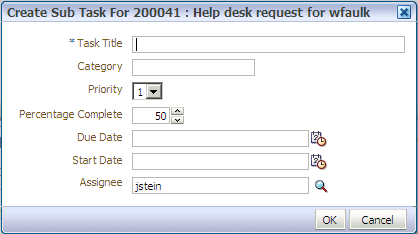
Use the Create Sub Task dialog, shown in Figure 30-18, to create a subtask, which is a ToDo task for a business task. You must select a business task before selecting the Create Sub Task option (shown in Figure 30-17).
Subtasks can break down a business task into measurable subtasks, and can be created for ToDo tasks also. Multiple levels of subtasks are not supported (that is, you cannot have subtasks inside of subtasks). If you create multiple levels of subtasks, and attempt to act on the main task (for example, to approve or reject), you receive an error.
30.4 Acting on Tasks: The Task Details Page
Task details can be viewed inline (see the lower section in Figure 30-2, "Oracle BPM Worklist—The Home (Task List) Page") or in a pop-up browser window. (Double-click the task.)
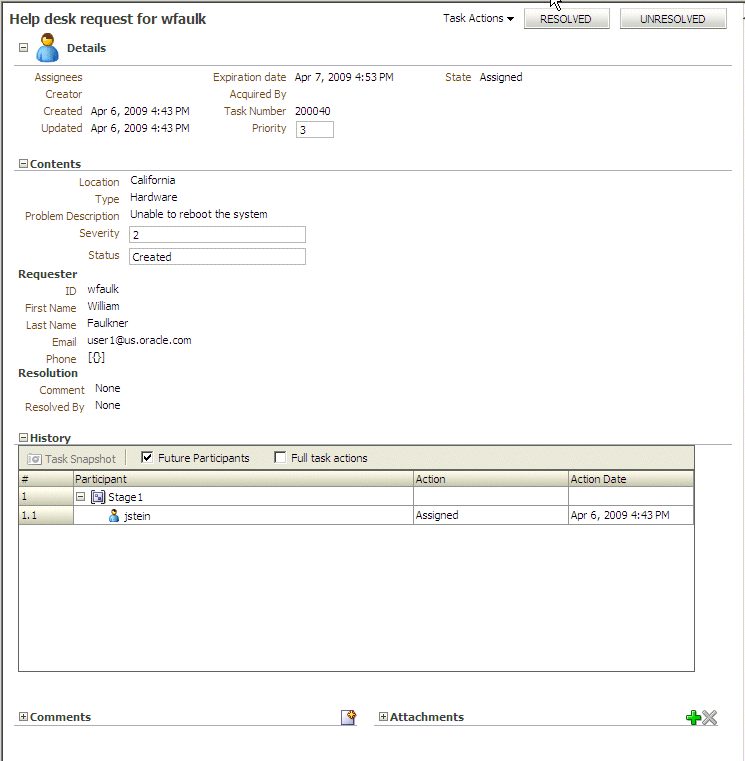
Figure 30-19 shows the task details page.
Any kind of change to the task details page, such as changing a priority or adding a comment or attachment, requires you to save the change before you go on to make any other changes.
The task details page has the following components:
-
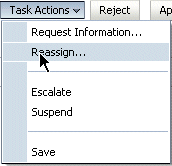
Task Actions—Lists the system actions that are possible for the task, such as Request Information, Reassign, Renew, Suspend, Escalate, and Save.
-
Action buttons—Displays buttons for custom actions that are defined in the human task, such as setting task outcomes (for example, Resolved and Unresolved for a help desk request or Approve and Reject for a loan request). For the task initiator, manager, or administrator, Withdraw may also appear.
-
Details—Displays task attributes, including the assignee, task creator, task number, state, priority, who acquired the task, and other mapped attributes. It also displays dates related to task creation, last update, and expiration date.
-
Contents—Displays the payload. The fields displayed are specific to how the human task was created.
-
Requester—Displays details (full name, contact information, and so on) about the task requester.
-
Resolution—Displays any comments or resolution status.
-
History—Displays the approval sequence and the update history for the task. See Section 30.4.2, "Task History," for more information.
Table 30-6 tells what the icons used in the Task Details History section signify.
Table 30-6 Icons for Task Action History
Icon Description 
Indicates an approver in an ad hoc routing scenario.

Indicates that the task has been approved.

Indicates that the participant is an FYI participant—that is, this participant just receives a notification task and the business process does not wait for the participant's response. Participant cannot directly impact the outcome of a task, but in some cases can provide comments or add attachments.

Indicates that a set of people must work in parallel. This pattern is commonly used for voting.

Indicates that the participant belongs to a management chain.

Indicates the simple case in which a participant maps to a user, group, or role.

Indicates that the task is untouched.
-
Comments—Displays comments entered by various users who have participated in the workflow. A newly added comment and the commenter's user name are appended to the existing comments. A trail of comments is maintained throughout the life cycle of the task. To add or delete a comment, you must have permission to update the task.
-
Attachments—Displays documents or reference URLs that are associated with a task. These are typically associated with the workflow as defined in the human task or attached and modified by any of the participants using the worklist. To add or delete an attachment, you must have permission to update the task. When adding file attachments, you can use an absolute path name or browse for a file.
Comments and attachments are shared between tasks and subtasks. Therefore, when you create a ToDo task and add comments and attachments, subtasks of this ToDo task include the same comments and attachments.
A user can view a task when associated with the task as the current assignee (directly or by group membership), the current assignee's manager, the creator, the owner, or a previous actor.
A user's profile determines his group memberships and roles. The roles determine a user's privileges. Apart from the privileges, the exact set of actions a user can perform is also determined by the state of the task, the custom actions, and restricted actions defined for the task flow at design time.
The following algorithm is used to determine the actions a user can perform on a task:
-
Get the list of actions a user can perform based on the privileges granted to him.
-
Get the list of actions that can be performed in the current state of the task.
-
Create a combined list of actions that appear on the preceding lists.
-
Remove any action on the combined list that is specified as a restricted action on the task.
The resulting list of actions is displayed in the task list page and the task details page for the user. When a user requests a specific action, such as claim, suspend, or reassign, the workflow service ensures that the requested action is contained in the list determined by the preceding algorithm.
Step 2 in the preceding algorithm deals with many cases. If a task is in a final, completed state (after all approvals in a sequential flow), an expired state, a withdrawn state, or an errored state, then no further update actions are permitted. In any of the these states, the task, task history, and subtasks (parent task in parallel flow) can be viewed. If a task is suspended, then it can only be resumed or withdrawn. A task that is assigned to a group must be claimed before any actions can be performed on it.
Note:
If you act on a task from the task details page, for example, if you approve a task, then any unchanged task details data is saved along with the saved changes to the task. However if you act on a task from the Actions menu, then unchanged task details are not saved.30.4.1 System Actions
The action bar displays system actions, which are available on all tasks based on the user's privileges. Table 30-7 lists system actions.
Table 30-7 System Task Actions
| Action | Description |
|---|---|
|
Claim |
If a task is assigned to a group or multiple users, then the task must be claimed first. Claim is the only action available in the Task Action list for group or multiuser assignments. After a task is claimed, all applicable actions are listed. |
|
Escalate |
If you are not able to complete a task, you can escalate it and add an optional comment in the Comments area. The task is reassigned to your manager (up one level in a hierarchy). |
|
Pushback |
Use this action to send a task down one level in the workflow to the previous assignee. The pushback action overrides all other actions. For example, if a task is pushed back and then reassigned, after the reassignee approves it, the task goes to the user who performed the pushback. This is the expected behavior. |
|
Reassign |
If you are a manager, you can delegate a task to reportees. |
|
Release |
If a task is assigned to a group or multiple users, it can be released if the user who claimed the task cannot complete the task. Any of the other assignees can claim and complete the task. |
|
Renew |
If a task is about to expire, you can renew it and add an optional comment in the Comments area. The task expiration date is extended one week. A renewal appears in the task history. The renewal duration for a task can be controlled by an optional parameter. The default value is |
|
Submit Information and Request Information |
Use these actions if another user requests that you supply more information or to request more information from the task creator or any of the previous assignees. If reapproval is not required, then the task is assigned to the next approver or the next step in the business process. |
|
Suspend and Resume |
If a task is not relevant, you can suspend it. These options are available only to users who have been granted the BPMWorkflowSuspend role. Other users can access the task by selecting Previous in the task filter or by looking up tasks in the Suspended status. A suspension is indefinite. It does not expire until Resume is used to resume working on the task. |
|
Withdraw |
If you are the creator of a task and do not want to continue with it, for example, you want to cancel a vacation request, you can withdraw it and add an optional comment in the Comments area. The business process determines what happens next. You can use the Withdraw action on the home page by using the Creator task filter. |
30.4.2 Task History
The task history maintains an audit trail of the actions performed by the participants in the workflow and a snapshot of the task payload and attachments at various points in the workflow. The short history for a task lists all versions created by the following tasks:
-
Initiate task
-
Re-initiate task
-
Update outcome of task
-
Completion of task
-
Error of task
-
Expiration of task
-
Withdrawal of task
-
Alerting of task to the error assignee
You can include the following actions in the short history list by modifying the shortHistoryActions element.
-
Acquire
-
Ad hoc route
-
Auto release of task
-
Delegate
-
Escalate
-
Information request on task
-
Information submit for task
-
Override routing slip
-
Update outcome and route
-
Push back
-
Reassign
-
Release
-
Renew
-
Resume
-
Skip current assignment
-
Suspend
-
Update
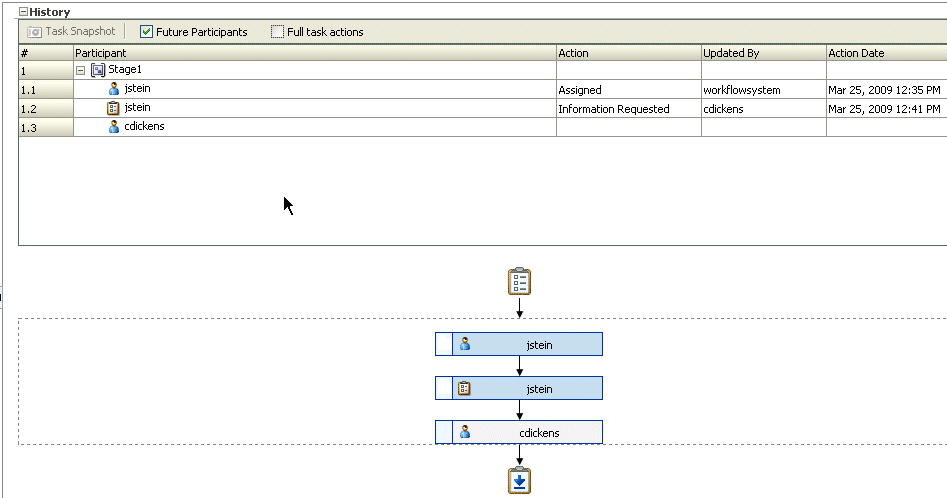
The history provides a graphical view of a task flow, as shown in Figure 30-20.
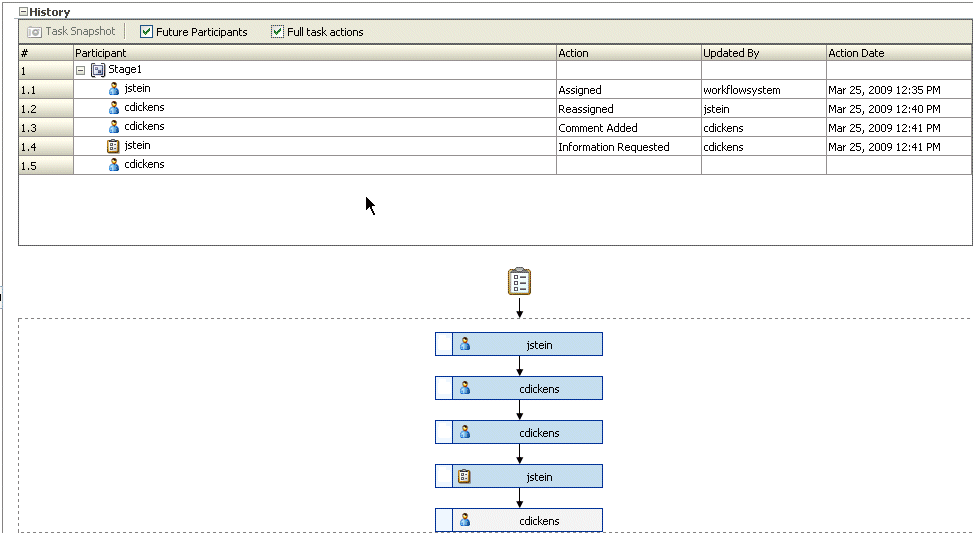
Check Full task actions to see all actions performed, including those that do not make changes to the task, such as adding comments, as shown in Figure 30-21.
Available ways to view the task history include:
-
Take a task snapshot
-
See future approvers
-
See complete task actions
30.4.3 How To Act on Tasks
If the human task was designed to permit ad hoc routing, or if no predetermined sequence of approvers was defined, then the task can be routed in an ad hoc fashion in the worklist. For such tasks, a Route button appears on the task details page. From the Route page, you can look up one or more users for routing. When you specify multiple assignees, you can select whether the list of assignees is for simple (group assignment to all users), sequential, or parallel assignment.
Parallel tasks are created when a parallel flow pattern is specified for scenarios such as voting. In this pattern, the parallel tasks have a common parent. The parent task is visible to a user only if the user is an assignee or an owner or creator of the task. The parallel tasks themselves (referred to as subtasks) are visible to whomever the task is assigned, just like any other task. It is possible to view the subtasks from a parent task. In such a scenario, the task details page of the parent task contains a View SubTasks button. The SubTasks page lists the corresponding parallel tasks. In a voting scenario, if any of the assignees updates the payload or comments or attachments, the changes are visible only to the assignee of that task.
A user who can view the parent task (such as the final reviewer of a parallel flow pattern), can drill down to the subtasks and view the updates made to the subtasks by the participants in the parallel flow. The parent task is a container for the subtasks while they are worked on by the assignees. The task owner must not act on or approve the parent task.
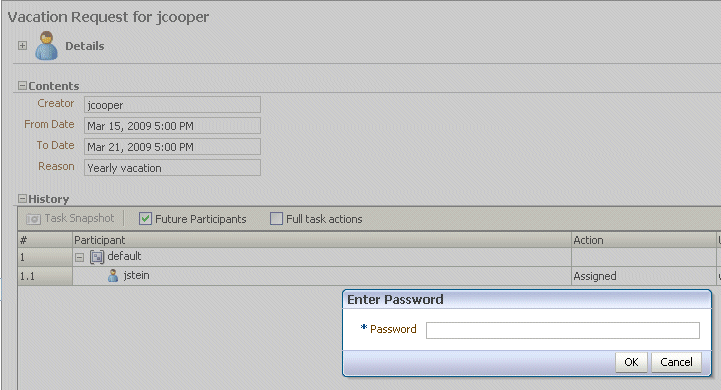
If a human task was set up to require a password, then when you act on it, you must provide the password, as shown in Figure 30-22.
Figure 30-22 Acting on a Task That Requires a Password
Description of "Figure 30-22 Acting on a Task That Requires a Password"
Note:
Any kind of change to the task details page, such as changing a priority or adding a comment, requires you to save the change. If you add an attachment to a task, it is automatically saved.To reassign or delegate a task:
-
From the Task Actions list, select Reassign, as shown in Figure 30-23.
-
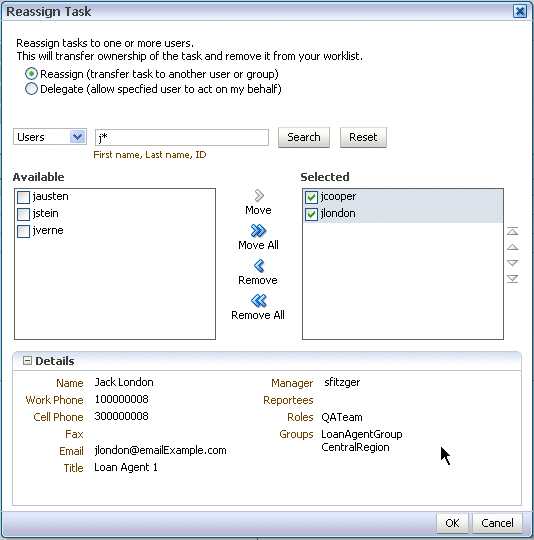
Select Reassign or Delegate.
Delegate differs from Reassign in that the privileges of the delegatee are based on the delegator's privileges. This function can be used by managers' assistants, for example.
-
Provide or browse for a user or group name, as shown in Figure 30-24.
A supervisor can always reassign tasks to any of his reportees.
-
Move names to the Selected area and click OK.
You can reassign to multiple users or groups. One of the assignees must claim the task, as shown in Figure 30-25.
-
From the Task Actions list, select Request Information, as shown in Figure 30-26.
-
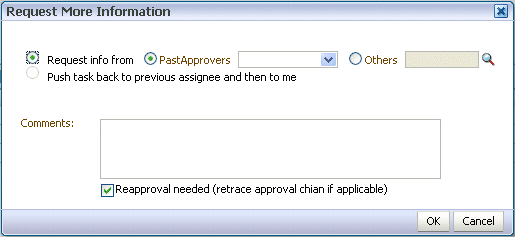
Request information from a past approver or search for a user name, or push the task back to the previous assignee, as shown in Figure 30-27.
Figure 30-27 Requesting Information from Past Approvers or Another User, or Pushing the Task Back
Description of "Figure 30-27 Requesting Information from Past Approvers or Another User, or Pushing the Task Back"
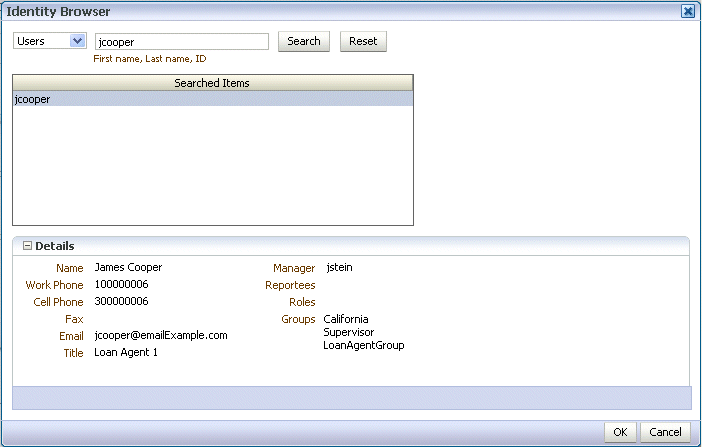
If you use the Search icon to find a user name, the Identity Browser appears, as shown in Figure 30-28.
Note:
If you are in a multi-tenancy environment, search for a user simply by the user identifier and not by the tenant identifier. For example, if the user identifier is jstein and the tenant identifier is company_name.jstein, you would search by using jstein. -
Click OK.
-
From the Task Actions list, select Adhoc Route, as shown in Figure 30-29.
-
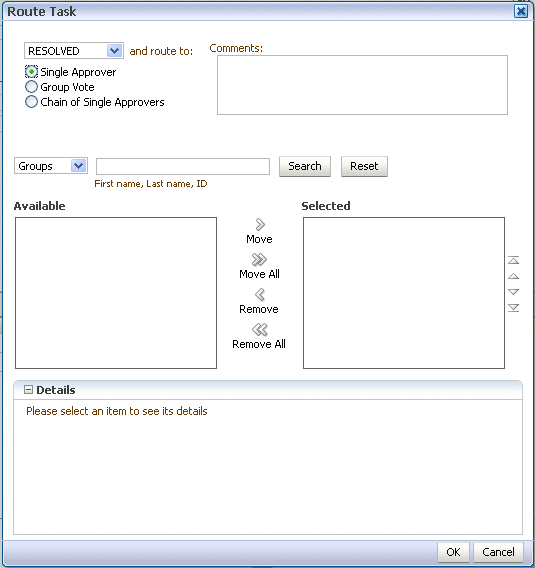
Select an action and a routing option, as shown in Figure 30-30.
-
Single Approver: Use this option for a single user to act on a task. If the task is assigned to a role or group with multiple users, then one member must claim the task and act on it.
-
Group Vote: Use this option when multiple users, working in parallel, must act, such as in a hiring situation when multiple users vote to hire or reject an applicant. You specify the voting percentage that is needed for the outcome to take effect, such as a majority vote or a unanimous vote, as shown in Figure 30-31.
Figure 30-31 Providing Consensus Information

Description of "Figure 30-31 Providing Consensus Information"
-
Chain of Single Approvers: Use this option for a sequential list of approvers. The list can comprise any users or groups. (Users are not required to be part of an organization hierarchy.)
-
-
Add optional comments for the next participant on the route.
-
Provide or search for user or group names; then move the names to the Selected area.
-
Click OK.
To add comments or attachments:
Notes:
-
Click Save before you browse for or upload attachments, to ensure that any previous changes to the task details page are saved.
-
When you remove a file or URL attachment, the task is not automatically updated. You must explicitly select Actions > Save. Otherwise, the attachment is not removed, even though it is displayed as removed. This is the expected behavior.
-
If you add a file attachment, you do not need to explicitly select Actions > Save.
-
If you add a URL attachment, you must explicitly select Actions > Save.
-
In the Comments or Attachments area, click Add.
Figure 30-32 Worklist Comments and Attachments

Description of "Figure 30-32 Worklist Comments and Attachments"
-
Enter comment text and click OK. Note that comments cannot be deleted once they are added.
The date and timestamp and your user name are included with the comment.
-
For attachments, provide a file or URL attachment, as shown in Figure 30-33, and click OK.
Figure 30-33 Adding a Worklist Attachment

Description of "Figure 30-33 Adding a Worklist Attachment"
If you attach a URL file in Oracle BPM Worklist (for example,
http://www.oracle.com/technology/products/oem/management_partners/snmpwp6.gif), it is not sent as an e-mail attachment. Instead, it appears as a hyperlink in the task details of the e-mail notification. However, if a desktop file is attached, it can be seen as a separate attachment in the task notification.Note:
Attachment file names that use a multibyte character set (MBCS) are not supported.Attachments of up to 1998K can be uploaded. You can modify this setting by setting the context parameter in
web.xmlas follows:<context-param> <param-name>org.apache.myfaces.trinidad.UPLOAD_MAX_DISK_SPACE</param-name> <param-value>1998</param-value> </context-param>
For more information about file uploading, see the Oracle Fusion Middleware Web User Interface Developer's Guide for Oracle Application.
-
From the Task Actions list, click Save.
30.4.4 How To Act on Tasks That Require a Digital Signature
The worklist supports the signature policy created in the human task:
-
No signature required — Participants can send and act on tasks without providing a signature.
-
Password required — Participants must specify their login passwords.
-
Digital certificate (signature) required —Participants must possess a digital certificate before being able to send and act on tasks. A digital certificate contains the digital signature of the certificate-issuing authority so that anyone can verify that the certificate is real. A digital certificate establishes the participant's credentials. It is issued by a certification authority (CA). It contains your name, a serial number, expiration dates, a copy of the certificate holder's public key (used for encrypting messages and digital signatures), and the digital signature of the certificate-issuing authority so that a recipient can verify that the certificate is real.
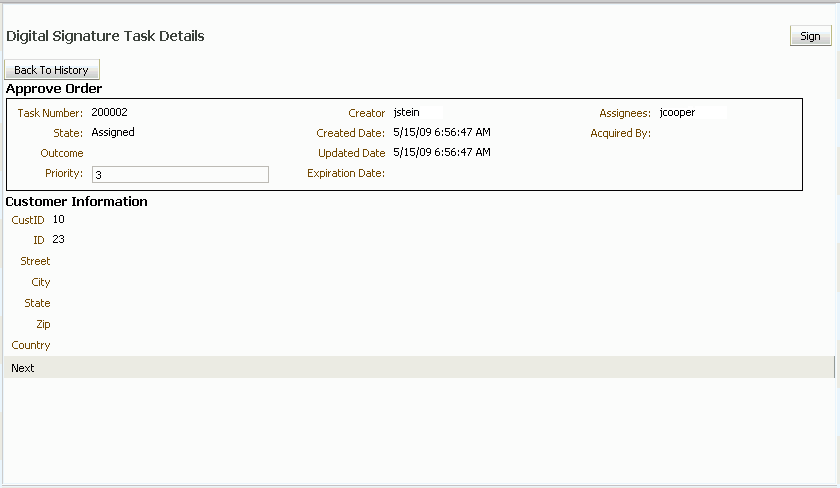
When you act on a task that has a signature policy, the Sign button appears, as shown in Figure 30-34.
Figure 30-34 Digital Signature Task Details
Description of "Figure 30-34 Digital Signature Task Details"
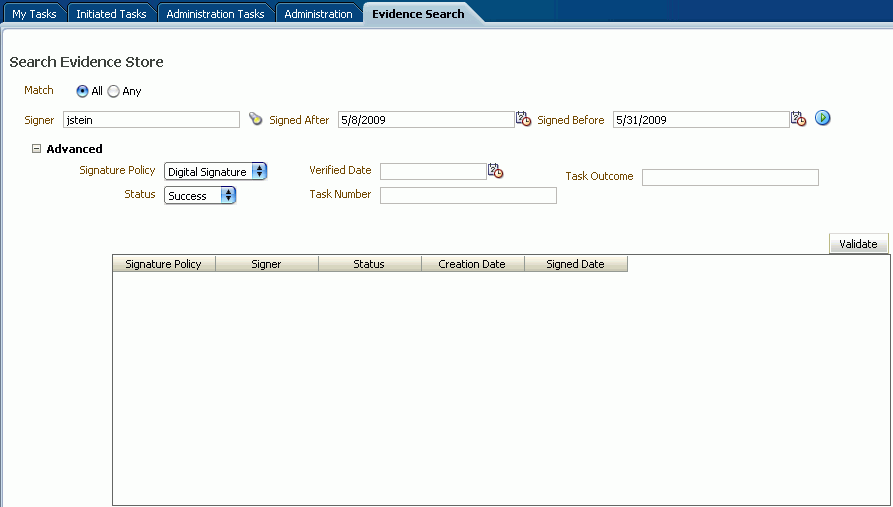
The evidence store service is used for digital signature storage and nonrepudiation of digitally signed human tasks. You can search the evidence store, as shown in Figure 30-35.
See Section 32.1.10, "Evidence Store Service and Digital Signatures" for more information.
To provide a digital signature:
-
In the upper right corner of Oracle BPM Worklist, click Preferences.
-
In the navigation bar on the left, click Certificates.
-
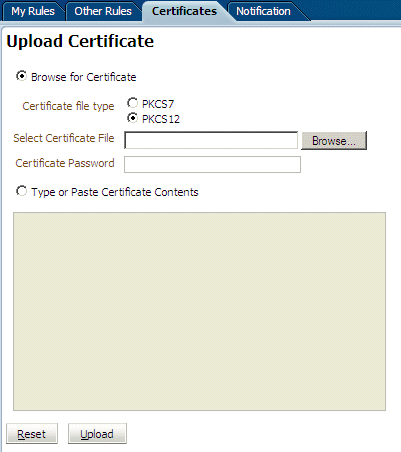
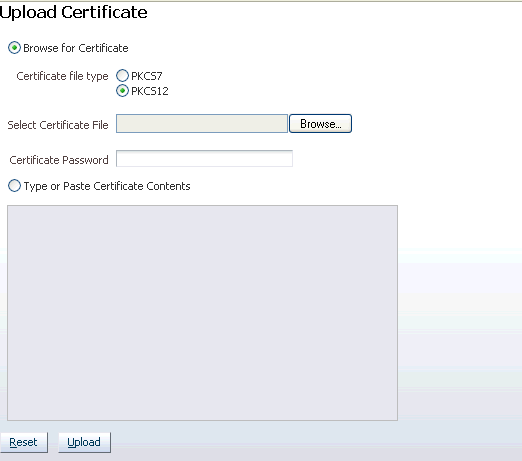
Upload the certificate to use to sign your decision, as shown in Figure 30-36.
When signing a task outcome using your certificate, you must upload the entire chain of certificates through Oracle BPM Worklist as a
.P7B(PKCS7 format) file, not just the one certificate issued to you by the certificate issuer. The entire chain can be exported through Internet Explorer. Mozilla Firefox does not let you export the chain as a.P7Bfile. Therefore, you can perform the following steps:-
Export the chain from Mozilla Firefox as a .P12 file (PKCS12 format that also contains your private key).
-
Import the
.P12file in Internet Explorer. -
Export it again from Internet Explorer as a
.P7Bfile. -
Upload it through Oracle BPM Worklist.
Note the following important points when providing your certificate to the system. Otherwise, you cannot use your certificate to sign your decisions on tasks.
-
The PKCS7 file format is a binary certificate format. Select this option if you have a standalone certificate file stored on your disk.
-
The PKCS12 file format is a keystore format. Select this option if you have your certificate stored inside a keystore.
-
If you want to copy and paste the contents of the certificate, select Type or Paste Certificate Contents and paste the BASE64-encoded text into the field. Do not paste a certificate in any other format into this field. Likewise, if you choose to upload a certificate, do not try to upload a BASE64-encoded certificate. Only PKCS12 and PKCS7 formatted files are supported for uploads.
-
-
Return to the task list by clicking the Home link in the upper-right corner of Oracle BPM Worklist.
-
Click a task to approve or reject.
The task details are displayed.
-
Click either Approve or Reject.
Details about the digital signature are displayed.
-
For a task that has a signature policy, click Sign.
The Text Signing Report dialog appears.
-
Select the certificate from the dropdown list to use to sign your decision.
-
Enter the master password of the web browser that you are using.
-
Click OK.
The web browser signs the string displayed in the upper half of the Text Signing Request with the certificate you selected and invokes the action (approval or rejection) that you selected. The task status is appropriately updated in the human workflow service.
For more information about how certificates are uploaded and used, see Section 32.1.10, "Evidence Store Service and Digital Signatures."
30.5 Approving Tasks
Table 30-8 describes the type of actions that can be performed on tasks by the various task approvers.
Table 30-8 Task Actions and Approvers
| Task Action | Admin | Owner (+ Owner Group) | Assignee (+ Assignee Manager + Assignee Group + Proxy Assignee) | Creator | Reviewer | Approver |
|---|---|---|---|---|---|---|
|
Acquire (Claim) |
No |
Yes |
Yes |
No |
No |
No |
|
Custom |
No |
YesFoot 1 |
YesFootref 1 |
No |
No |
No |
|
Delegate |
No |
No |
Yes |
No |
No |
No |
|
Delete |
YesFoot 2 |
YesFootref 2 |
YesFootref 2 |
YesFootref 2 |
No |
No |
|
Error |
No |
No |
YesFoot 3 |
No |
No |
No |
|
Escalate |
YesFoot 4 |
YesFootref 4 |
Yes |
No |
No |
No |
|
Info Request |
No |
No |
Yes |
No |
No |
No |
|
Info Submit |
No |
No |
Yes |
No |
No |
No |
|
Override Routing Slip |
Yes |
Yes |
No |
No |
No |
No |
|
Push Back |
No |
No |
Yes |
No |
No |
No |
|
Purge |
YesFootref 2 |
Yes |
No |
Yes |
No |
No |
|
Reassign |
YesFoot 5 |
YesFootref 5 |
Yes (No for proxy assignee) |
No |
No |
No |
|
Release |
Yes |
Yes |
Yes |
No |
No |
No |
|
Renew |
No |
Yes |
Yes |
No |
No |
No |
|
Resume |
Yes |
Yes |
Yes |
No |
No |
No |
|
Route |
No |
Yes |
Yes |
No |
No |
No |
|
Skip Current Assignment |
Yes |
Yes |
No |
No |
No |
No |
|
Suspend |
Yes |
Yes |
Yes |
No |
No |
No |
|
Update |
No |
Yes |
Yes |
Yes |
No |
No |
|
Update Attachment |
Yes |
Yes |
Yes |
Yes |
Yes |
No |
|
Update Comment |
Yes |
Yes |
Yes |
Yes |
Yes |
No |
|
View Process History |
Yes |
Yes |
Yes |
Yes |
No |
No |
|
View Sub Tasks |
Yes |
Yes |
Yes |
No |
No |
No |
|
View Task History |
Yes |
Yes |
Yes |
Yes |
Yes |
Yes |
|
Withdraw |
Yes |
Yes |
No |
Yes |
No |
No |
Footnote 1 Not valid for ToDo tasks
Footnote 2 Valid only for ToDo tasks
Footnote 3 Applicable for tasks in alerted states
Footnote 4 Without claim and escalate to current assignee's manager
Footnote 5 Without claim
30.6 Setting a Vacation Period
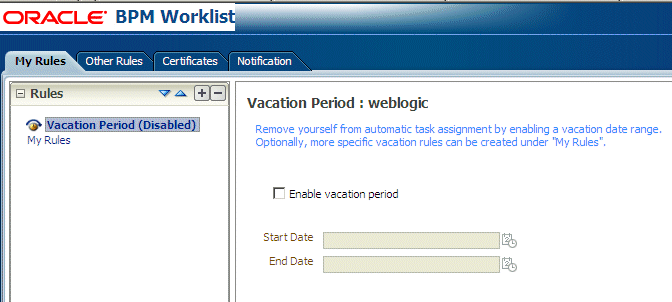
You can set a vacation period so that you are removed from automatic task assignment during the dates you specify, as shown in Figure 30-37.
Vacation rules are not executed for ToDo tasks. See Section 30.7, "Setting Rules," for how to set a vacation rule that is synchronized with the vacation period.
-
Click the Preferences link.
The My Rules tab is displayed.
-
Click Enable vacation period.
-
Provide start and end dates.
-
Click Save.
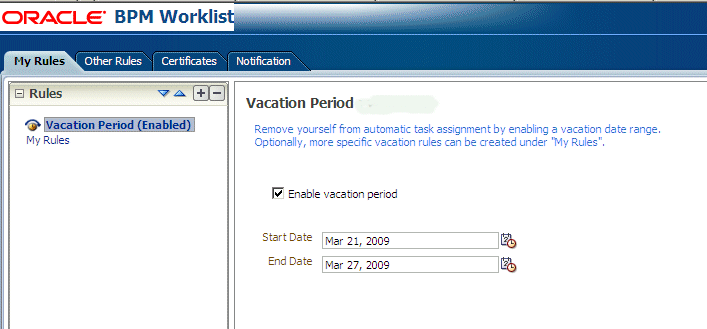
The vacation period is enabled, as shown in Figure 30-38.
30.7 Setting Rules
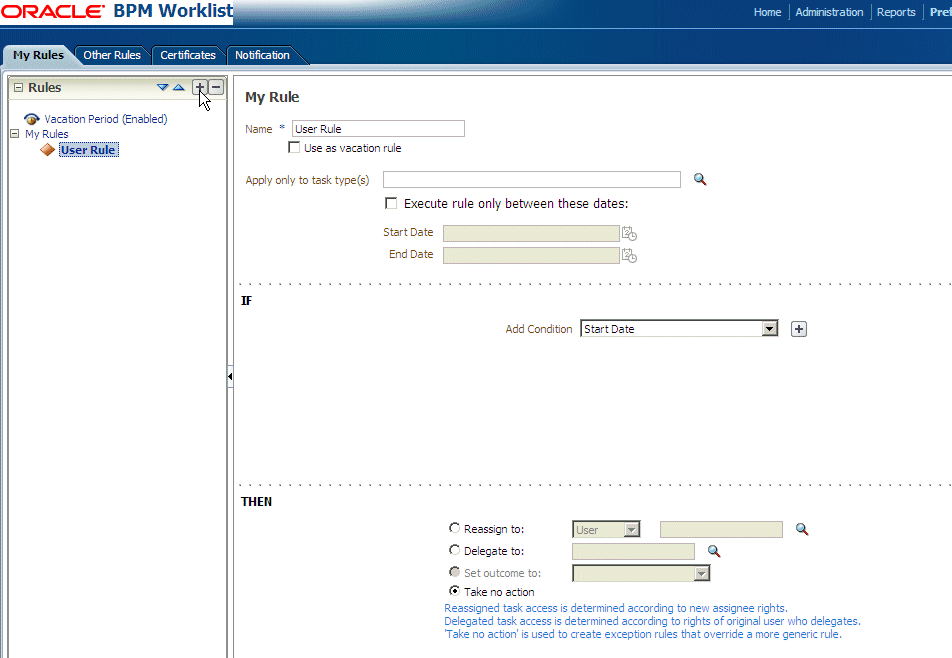
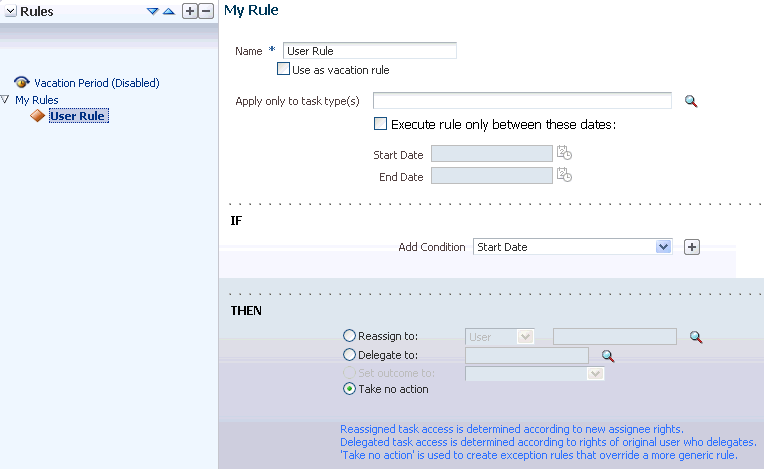
Rules act on tasks, either a specific task type or all the tasks assigned to a user or group. Figure 30-39 shows where you set rules, including vacation rules (different from the vacation period settings described in Section 30.6, "Setting a Vacation Period").
A rule cannot always apply in all circumstances in which it is used. For example, if a rule applies to multiple task types, it may not be possible to set the outcome for all tasks, since different tasks can have different outcomes.
Rules are executed in the order in which they are listed. Rules can be reordered by using the up and down buttons in the header, as shown in Figure 30-39.
If a rule meets its filter conditions, then it is executed and no other rules are evaluated. For your rule to execute, you must be the only user assigned to that task. If the task is assigned to multiple users (including you), the rule does not execute.
You cannot specify business rules for ToDo tasks
30.7.1 How To Create User Rules
Specify the following when creating a user rule:
-
Rule name
-
If the rule is a vacation rule. See Section 30.6, "Setting a Vacation Period," for how to set the vacation period that is synchronized with the vacation rule.
-
Which task or task type the rule applies to—If unspecified, then the rule applies to all tasks. If a task type is specified, then any attributes mapped for that task type can be used in the rule condition.
-
When the rule applies
-
Conditions on the rule—These are filters that further define the rule, such as specifying that a rule acts on priority 1 tasks only, or that a rule acts on tasks created by a specific user. The conditions can be based on standard task attributes and any mapped attributes that have been mapped for the specific tasks. See Section 30.10.1, "How To Map Attributes," for more information.
User rules do the following actions:
-
Reassign to—You can reassign tasks to subordinates or groups you manage.
-
Delegate to—You can delegate to any user or group. Any access rights or privileges for completing the task are determined according to the original user who delegated the task. (Any subsequent delegations or re-assignments do not change this from the original delegating user.)
-
Set outcome to—You can specify an automatic outcome if the workflow task was designed for those outcomes, for example, accepting or rejecting the task. The rule must be for a specific task type. If a rule is for all task types, then this option is not displayed.
-
Take no action—Use this action to prevent other more general rules from applying. For example, to reassign all your tasks to another user while you are on vacation, except for loan requests, for which you want no action taken, then create two rules. The first rule specifies that no action is taken for loan requests; the second rule specifies that all tasks are reassigned to another user. The first rule prevents reassignment for loan requests.
-
Click the Preferences link
The My Rules tab is displayed.
-
In the Rules area, click My Rules and click Add.
-
In the My Rule area, do the following and click Save:
-
Provide a name for the rule.
-
Select Use as a vacation rule if you are creating a vacation rule. The start and end dates of the rule are automatically synchronized with the vacation period.
-
Browse for task types to which the rule applies.
-
Select Execute rule only between these dates and provide rule execution dates.
-
In the IF area, add rule conditions.
-
In the THEN area, select actions to be taken: Reassign to, Delegate to, Set outcome to, or Take no action), as shown in Figure 30-39.
The new rule appears under the My Rules node.
-
30.7.2 How To Create Group Rules
Creating a group rule is similar to creating a user rule, with the addition of a list of the groups that you (as the logged-in user) manage. Examples of group rules include:
-
Assigning tasks from a particular customer to a member of the group
-
Ensuring an even distribution of task assignments to members of a group by using round-robin assignment
-
Ensuring that high-priority tasks are routed to the least busy member of a group
Group rules do the following actions:
-
Assign to member via—You can specify a criterion to determine which member of the group gets the assignment. This dynamic assignment criterion can include round-robin assignment, assignment to the least busy group member, or assignment to the most productive group member. You can also add your custom functions for allocating tasks to users in a group.
-
Assign to—As with user rules, you can assign tasks to subordinates or groups you directly manage.
-
Take no action—As with user rules, you can create a rule with a condition that prevents a more generic rule from being executed.
-
Click the Preferences link
-
Click the Other Rules tab.
-
Select Group from the list.
-
Enter a group name and click the Search icon, or enter a group name.
The Identity Browser opens for you to find and select a group.
-
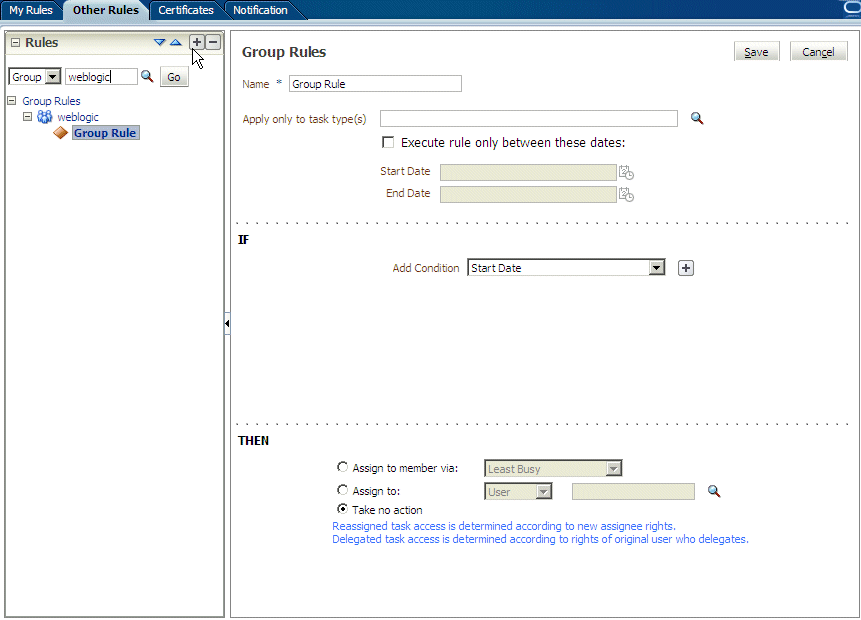
Select the group name under the Group Rules node and click Add, as shown in Figure 30-40.
-
Provide group rule information and click Save.
-
Provide a name for the rule.
-
Browse for task types to which the rule applies.
-
Provide rule execution dates.
-
In the IF area, add rule conditions.
-
In the THEN area, select the actions to be taken (or none) (Assign to member via, Assign to, or Take no action), as shown in Figure 30-40.
The new rule appears under the Group Rules node.
-
30.7.3 Assignment Rules for Tasks with Multiple Assignees
If a task has multiple assignees, then assignment rules are not evaluated for the task, and the task is not automatically routed. This is because each of the task's assignees can define assignment rules, which can potentially provide conflicting actions to take on the task. Only tasks that are assigned exclusively to a single user are routed by the assignment rules.
For example, consider the following sequence:
-
A rule is created for user cdickens to reassign all assigned requests to user jstein.
-
User jcooper reassigns the allocated tasks to cdickens and cdoyle.
-
Cdickens claims the task, and the task appears in their inbox.
The task is not automatically reassigned to jstein. The task is routed to jstein, following the assignment rule set for cdickens, if user jcooper explicitly re-assigns the task only to cdickens instead of reassigning the task to multiple users (cdickens and cdoyle).
30.8 Using the Worklist Administration Functions
Administrators are users who have been granted the BPMWorkflowAdmin role. Administration functions include the following:
-
Managing other users' or groups' rules
-
Setting the worklist display (application preferences)
-
Mapping attributes
An administrator can view and update all tasks assigned to all users. An administrator's Assignee filter displays Admin when the Admin tab is selected.
30.8.1 How To Manage Other Users' or Groups' Rules (as an Administrator)
This function is useful for fixing a problem with a rule. Also, for a user who no longer works for the company, administrators can set up a rule for that user so that all tasks assigned to the user are automatically assigned to another user or group.
To create a rule for another user or group:
-
From the task list page, click the Rules link.
-
Click the Other Rules tab.
-
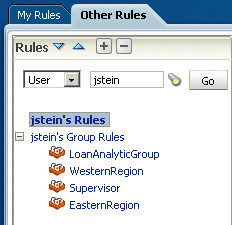
Search for the user or group for whom rules are to be created, as shown in Figure 30-41.
Figure 30-41 Creating Rules for Another User or Group
Description of "Figure 30-41 Creating Rules for Another User or Group"
-
Click a user rules node, or click a group name (for a group rule).
-
Click the Add icon to create a rule.
-
Provide rule information, as shown in Figure 30-42, and click Save.
Figure 30-42 Defining Rules for Another User or Group
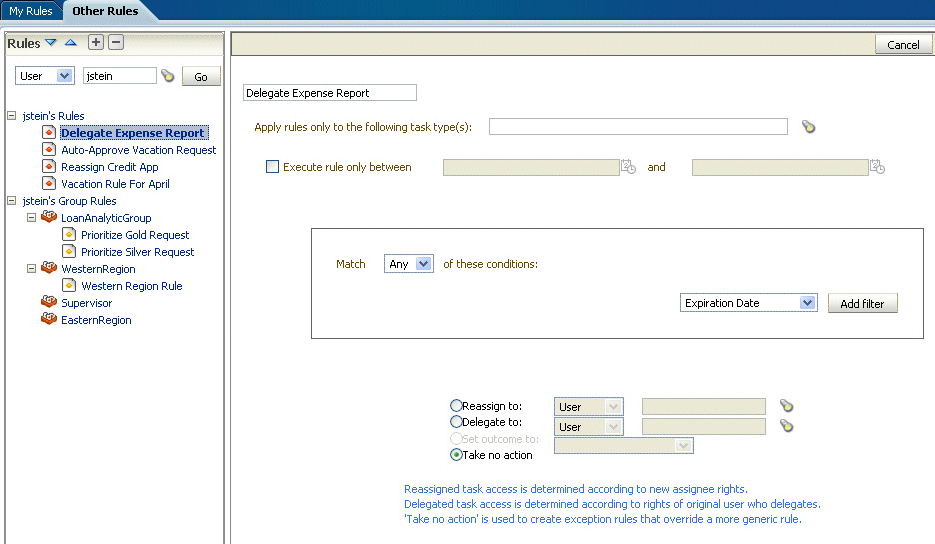
Description of "Figure 30-42 Defining Rules for Another User or Group"
30.8.2 How To Set the Worklist Display (Application Preferences)
Application preferences customize the appearance of the worklist. Administrators can specify the following:
-
Login page realm label—If the identity service is configured with multiple realms, then the Oracle BPM Worklist login page displays a list of realm names.
LABEL_LOGIN_REALMspecifies the resource bundle key used to look up the label to display these realms. The term realm can be changed to fit the user community—terms such as country, company, division, or department may be more appropriate. Administrators can customize the resource bundle, specify a resource key for this string, and then set this parameter to point to the resource key. -
Global branding icon—This is the image displayed in the top left corner of every page of the worklist. (The Oracle logo is the default.) Administrators can provide a
.gif,.png, or.jpgfile for the logo. This file must be in thepublic_htmldirectory. -
Resource bundle—An application resource bundle provides the strings displayed in the worklist. By default, this is the class at:
oracle.bpel.worklistapp.resource.WorklistResourceBundle
Administrators can change the strings shown in the application by copying
WorkflowResourceBundleand creating their own. This parameter allows administrators to specify the class path to this custom resource bundle.Administrators must extend
WorklistResourceBundle.javaby adding their resource strings. Administrators can change the strings shown in the application by copyingWorkflowResourceBundleand creating their own. This parameter allows administrators to specify the class path to this custom resource bundle. Then administrators create a JAR file from the compiled resource bundle and copy it underSOA_Oracle_Home\j2ee\home\applications\worklist\worklist\WEB-INF\lib
-
Use language settings of—Select the browser or the identity provider.
The Identity Provider that stores information on worklist users can store the user's locale, which can determine the worklist display language. Alternatively, the user's browser can supply the locale information. This parameter determines which is used as the source for determining the worklist application display language.
To specify application preferences:
-
Click the Administration tab.
-
Click Application Preferences.
-
Browse for the locations of the application preferences (login page realm label, branding icon, or resource bundle), as shown in Figure 30-43.
-
Select which language settings you want to use—from the browser or the identity provider.
-
Click Save.
30.9 Specifying Notification Settings
You can configure the notification settings to control how, when, and where you receive messages in cases when you have access to multiple communication channels (delivery types). Specifically, you can define messaging filters (delivery preferences) that specify the channel to which a message should be delivered, and under what circumstances.
For example, you might want to create filters for messages received from customers with different Service Level Agreements (SLA), specifying to be notified through business phone and SMS channels for customers with a premium SLA and by EMAIL for customers with a nonpremium SLA.
30.9.1 Messaging Filter Rules
A messaging filter rule consists of rule conditions and rule actions. A rule condition consists of a rule attribute, an operator, and an associated value. A rule action is the action to be taken if the specified conditions in a rule are true.
30.9.1.1 Data Types
Table 30-9 lists data types supported by messaging filters. Each attribute has an associated data type, and each data type has a set of predefined comparison operators.
Table 30-9 Data Types Supported by Messaging Filters
| Data Type | Comparison Operators |
|---|---|
|
Date |
isEqual, isNotEqual, isGreaterThan, isGreaterThanOrEqual, isLessThan, isLessThanOrEqual, Between, isWeekday, isWeekend |
|
Time |
isEqual, isNotEqual, Between |
|
Number |
isEqual, isNotEqual, Between, isGreaterThan, isGreaterThanOrEqual, isLessThan, isLessThanOrEqual |
|
String |
isEqual, isNotEqual, Contains, NotContains |
Note:
The String data type does not support regular expressions.30.9.1.2 Attributes
Table 30-10 lists the predefined attributes for messaging filters.
Table 30-10 Predefined Attributes for Messaging Filters
| Attribute | Data Type |
|---|---|
|
Total Cost |
Number |
|
From |
String |
|
Expense Type |
String |
|
To |
String |
|
Application Type |
String |
|
Duration |
Number |
|
Application |
String |
|
Process Type |
String |
|
Status |
String |
|
Subject |
String |
|
Customer Type |
String |
|
Time |
Time |
|
Group Name |
String |
|
Processing Time |
Number |
|
Date |
Date |
|
Due Date |
Date |
|
User |
String |
|
Source |
String |
|
Amount |
Number |
|
Role |
String |
|
Priority |
String |
|
Customer Name |
String |
|
Expiration Date |
Date |
|
Order Type |
String |
|
Organization |
String |
|
Classification |
String |
|
Service Request Type |
String |
30.9.2 Rule Actions
For a given rule, a messaging filter can define the following actions:
-
Send No Messages: Do not send a message to any channel.
-
Send Messages to All Selected Channels: Send a message to all specified channels in the address list.
-
Send to the First Available Channel: Send a message serially to channels in the address list until one successful message is sent. This entails performing a send to the next channel when the current channel returns a failure status. This filter action is not supported for messages sent from the human workflow layer.
30.9.3 Managing Messaging Channels
In Oracle BPM Worklist, messaging channels represent both physical channels, such as business mobile phones, and also email client applications running on desktops. Specifically, Oracle BPM Worklist supports the following messaging channels:
-
EMAIL
-
IM
-
MOBILE
-
SMS
-
VOICE
-
WORKLIST
Note the following about message channels:
-
Addresses for messaging channels are fetched from the configured identity store.
-
SMS and MOBILE notifications are sent to the mobile phone number.
-
VOICE notifications are sent to the business phone number.
-
No special notification is sent when the messaging channel preference is WORKLIST. Instead, log in to Oracle BPM Worklist to view tasks.
-
EMAIL is the default messaging channel preference when a preferred channel has not been selected.
You can use the Messaging Channels tab to view, create, edit, and delete messaging channels.
30.9.3.1 Viewing Your Messaging Channels
You can display your existing messaging channels.
-
Click the Preferences link.
-
Click the Notification tab.
-
Click the Messaging Channels tab.
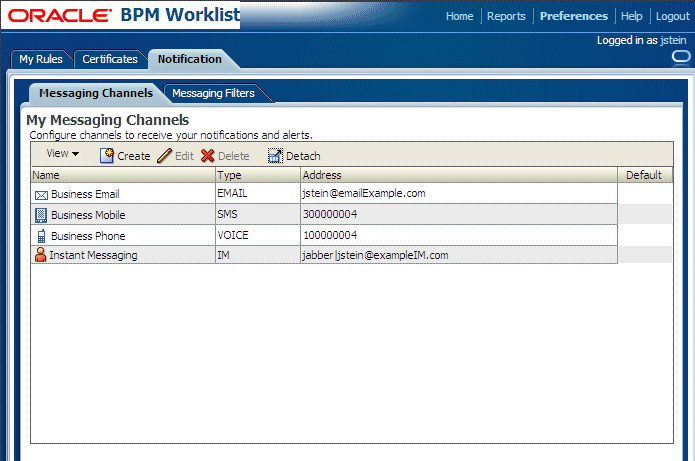
The My Messaging Channels list appears (Figure 30-44) and displays the following information:
-
Name: The name of the messaging channel.
-
Type: The type of messaging channel, such as EMAIL or SMS.
-
Address: The address for the channel, such as a phone number or email address.
-
Default: Specifies whether this channel is the default messaging channel.
-
-
Click View > Columns and select the columns to display or hide.
You can also click View > Reorder Columns to display a dialog to reorder the displayed columns.
Messaging channel names and addresses are retrieved from the underlying identity store, such as Oracle Internet Directory.
30.9.3.2 Creating, Editing, and Deleting a Messaging Channel
Oracle BPM Worklist uses an underlying identity store, such as Oracle Internet Directory, to manage messaging channels and addresses. Therefore, you cannot directly create, modify, or delete messaging channels using Oracle BPM Worklist.
To perform these actions, contact the system administrator responsible for managing your organization's identity store.
30.9.4 Managing Messaging Filters
You can use the Messaging Filters tab to define filters that specify the types of notifications you want to receive along with the channels through which to receive these notifications. You can do this through a combination of comparison operators (such as is equal to, is not equal to), attributes that describe the notification type, content, or source, and notification actions, which send the notifications to the first available messaging channels, all messaging channels, or to no channels (effectively blocking the notification).
For example, you can create a messaging filter called Messages from Lise, that retrieves all messages addressed to you from your boss, Lise. Notifications that match all of the filter conditions might first be directed to your business mobile phone, for instance, and then to your business email if the first messaging channel is unavailable.
30.9.4.1 Viewing Messaging Filters
You can display your existing messaging filters.
To view your messaging filters:
-
Click the Notification tab.
-
Click the Messaging Filters tab.
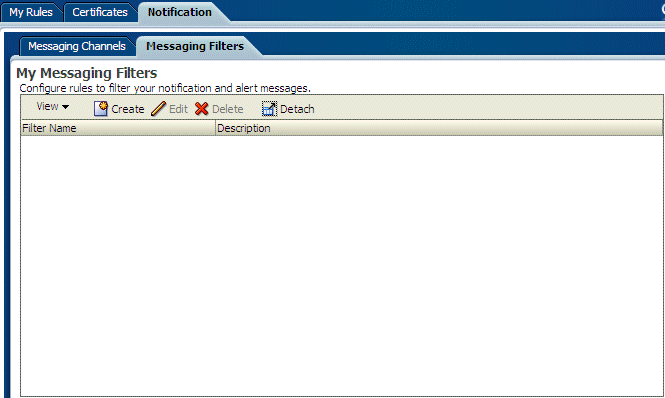
The My Messaging Filters list appears (Figure 30-45) and displays the following information:
-
Filter Name: The name of the messaging filter
-
Description: An optional description of the messaging filter
-
-
Click View > Columns and select the columns to display or hide.
You can also click View > Reorder Columns to display a dialog to reorder the displayed columns.
30.9.4.2 Creating Messaging Filters
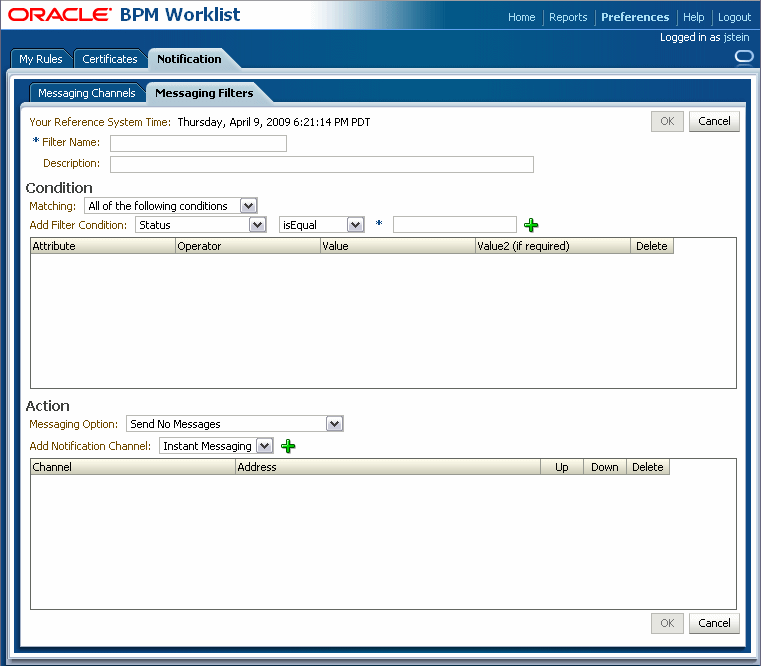
-
Click Create.
The Messaging Filters page appears, as shown in Figure 30-46.
-
Specify the following information:
-
Filter Name: The name of the messaging filter.
-
Description: An optional description for the messaging filter.
-
-
Define the filter conditions using the lists and fields in the Condition section, as follows:
-
Select whether notifications must meet all of the conditions or any of the conditions by selecting either the All of the following conditions or the Any of the following conditions options.
-
Select the attribute from the list.
-
Select the operator, such as isEqual, from the list.
-
Type the value of the condition in the text box.
-
Click Add to add the condition to the list.
-
Repeat these steps to add more filter conditions. To remove a filter condition, click Delete.
-
-
Select from the following messaging options in the Action section:
-
Send No Messages: Do not send a message to any channel.
-
Send Messages to All Selected Channels: Send a message to all specified channels in the address list.
-
Send to the First Available Channel: Send a message serially to channels in the address list until one successful message is sent. This entails performing a send to the next channel when the current channel returns a failure status.
-
-
To set the delivery channel, select a channel from the Add Notification Channel list and click Add. To remove a channel, click Delete.
-
Use the up and down arrows to prioritize channels. If available, the top-most channel receives messages meeting the filter criteria if you select Send to the First Available Channel.
-
Click OK.
The messaging filter appears on the My Messaging Filters page. The My Messaging Filters page enables you to edit or delete the channel. Click Cancel to dismiss the dialog without creating the filter.
30.9.4.3 Editing a Messaging Filter
To edit a messaging filter:
-
Select the filter on the My Messaging Filters page.
-
Click Edit.
-
Click OK to update the messaging filter. Click Cancel to dismiss the dialog without modifying the filter.
30.10 Using Mapped Attributes (Flex Fields)
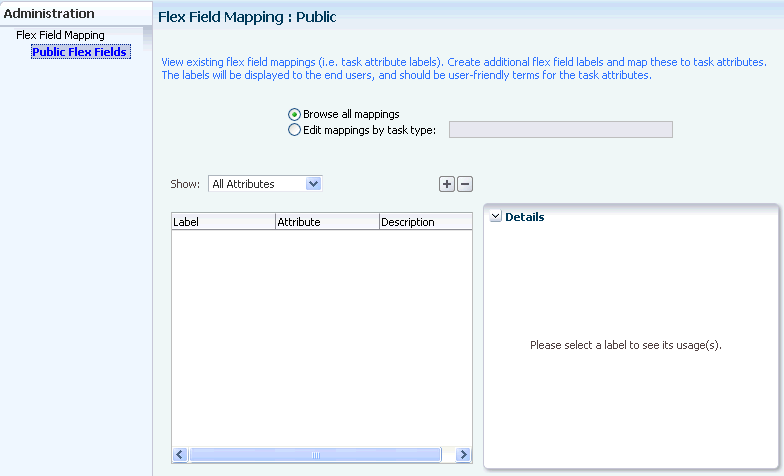
Human workflow mapped attributes (formerly referred to as flex fields) store and query use case-specific custom attributes. These custom attributes typically come from the task payload values. Storing custom attributes in mapped attributes provides the following benefits:
-
They can be displayed as a column in the task listing
-
They can filter tasks in custom views and advanced searches
-
They can be used for a keyword-based search
For example the Requester, PurchaseOrderID, and Amount fields in a purchase order request payload of a task can be stored in the mapped attributes. An approver logging into Oracle BPM Worklist can see these fields as column values in the task list and decide which task to access. The user can define views that filter tasks based on the mapped attributes. For example, a user can create views for purchase order approvals based on different amount ranges. If the user must also retrieve tasks at some point related to a specific requester or a purchase order ID, they can specify this in the keyword field and perform a search to retrieve the relevant tasks.
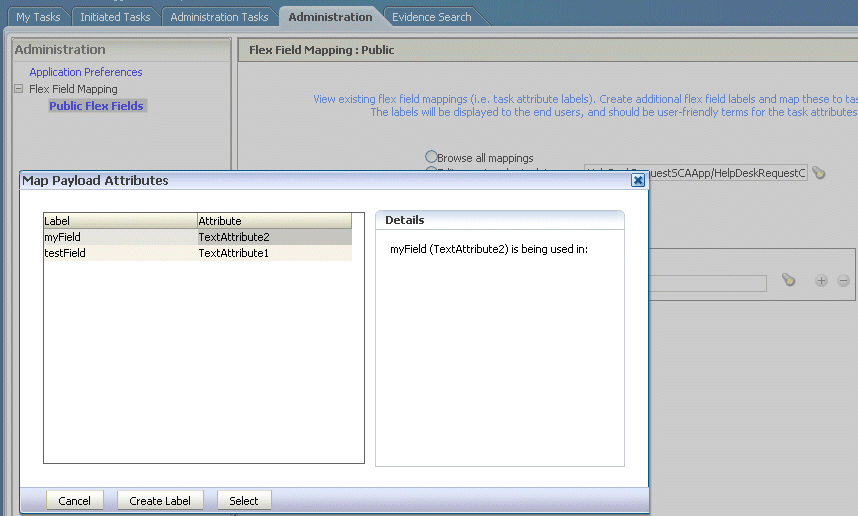
For the mapped attributes to be populated, an administrator must create mapped attribute mappings, as follows:
-
Specify a label for the mapped attribute to be populated.
-
Map the payload attribute containing the data to the label.
These mappings are valid for a certain task type. Therefore, each task type can have different mapped attribute mappings. After the mapping is complete and any new task is initiated, the value of the payload is promoted to the mapped attribute. Tasks initiated before the mapping do not contain the value in the mapped attribute. Only top-level simple type attributes in the payload can be promoted to a mapped attribute. Complex attributes or simple types nested inside a complex attribute cannot be promoted. It is important to define the payload for a task in the Human Task Editor, keeping in mind which attributes from the payload may must promoted to a mapped attribute. All text and number mapped attributes are automatically included in the keyword-based search.
Essentially, the Human Task Editor is used only when defining the payload for a task. All other operations are performed at runtime.
Directory naming is not available concomitant with the flex file naming convention.
Note:
-
Mapped attributes must be defined before instances of the business process are generated. Only instances generated after mapped attributes are created reflect the correct mapped attributes. Older instances of the business process do not reflect subsequent mapped attribute changes.
-
When you add a new locale, the mapped attribute labels are not automatically translated until you have flushed the cache. You may flush the cache either by restarting the server, or by changing a value in the workflow configuration settings—for example, by changing the
workflowCustomClasspathURLproperty in the workflow configuration to some new value, then changing it back again.
30.10.1 How To Map Attributes
An administrator, or users with special privileges, can use attribute mapping, shown in Figure 30-47, to promote data from the payload to inline mapped attributes. By promoting data to mapped attributes, the data becomes searchable and can be displayed as columns on the task list page.
Administrators can map public mapped attributes. Users who have been granted the workflow.mapping.publicFlexField privilege can map public mapped attributes, and see a Public Flex Fields node on the Administration tab.
To create a mapped attribute mapping, an administrator first defines a semantic label, which provides a more meaningful display name for the mapped attribute. Click Add to use the Create Label dialog, as shown in Figure 30-48.
As Figure 30-48 shows, labelName is mapped to the task attribute TextAttribute3. The payload attribute is also mapped to the label. In this example, the Text attribute type is associated with labelName. The result is that the value of the Text attribute is stored in the TextAttribute3 column, and labelName is the column label displayed in the user's task list. Labels can be reused for different task types. You can delete a label only if it is not used in any mappings.
A mapped payload attribute can also be displayed as a column in a custom view, and used as a filter condition in both custom views and workflow rules. The display name of the payload attribute is the attribute label that is selected when doing the mapping.
Note the following restrictions:
-
Only simple type payload attributes can be mapped.
-
A mapped attribute (and thus a label) can be used only once per task type.
-
Data type conversion is not supported for the
numberordatedata types. For example, you may not map a payload attribute of typestringto a label of typenumber.
-
Click Browse all mappings.
-
Select a row in the label table to display all the payload attributes mapped to a particular label.
To edit mappings by task type:
-
Click Edit mappings by task type, optionally provide a task type, and click Search.
-
Select a task type and click OK.
-
With the task type displayed in the Edit mappings by task type field, click Go.
All current mappings for the task type are displayed, as shown in Figure 30-51.
-
Select a mapping label and click Select.
Figure 30-52 shows a completed mapping.
Figure 30-52 Mapped Attribute Mapping Created

Description of "Figure 30-52 Mapped Attribute Mapping Created"
See Section 32.1.9.1, "Internationalization of Attribute Labels" for more information.
30.10.2 Custom Mapped Attributes
The following mapped attributes are included in the WorkflowTask.xsd file and are available for your use without restrictions.
Table 30-11 Custom Mapped Attributes
| Attribute | Datatype |
|---|---|
|
customerAttributeString1 |
String |
|
customerAttributeString2 |
String |
|
customerAttributeNumber1 |
Double |
|
customerAttributeNumber2 |
Double |
|
customerAttributeDate1 |
Date |
|
customerAttributeDate2 |
Date |
Use the following Java Architecture for XML Binding (JAXB) methods to set and get these attributes:
task.getCustomerAttributes.getCustomerAttributeString1()
task.getCustomerAttributes.setCustomerAttributeString1("String")
task.getCustomerAttributes.getCustomerAttributeNumber1()
task.getCustomerAttributes.setCustomerAttributeNumber2(9)
task.getCustomerAttributes.setCustomerAttributeDate1()
task.getCustomerAttributes.setCustomerAttributeDate2()
These fields are persisted in the database as customerAttributeString1, customerAttributeString2, customerAttributeNumber1, customerAttributeNumber2, customerAttributeDate1, customerAttributeDate2.
30.11 Creating Worklist Reports
Table 30-12 lists the worklist reports available for task analysis.
Table 30-12 Worklist Report Types
| Report Name | Description | Input Parameters |
|---|---|---|
|
Unattended Tasks |
Provides an analysis of tasks assigned to users' groups or reportees' groups that have not yet been acquired (the "unattended" tasks). |
|
|
Tasks Priority |
Provides an analysis of the number of tasks assigned to a user, reportees, or their groups, broken down by priority. |
|
|
Tasks Cycle Time |
Provides an analysis of the time taken to complete tasks from assignment to completion based on users' groups or reportees' groups. |
|
|
Tasks Productivity |
Provides an analysis of assigned tasks and completed tasks in a given time period for a user, reportees, or their groups. |
|
|
Tasks Time Distribution |
Provides the time an assignee takes to perform a task. |
|
30.11.1 How To Create Reports
Reports are available from the Reports link. Report results cannot be saved.
-
Click the Reports link.
-
Click the type of report you want to create.
Figure 30-53 shows the report types available.
-
Provide inputs to define the search parameters of the report.
Figure 30-54 shows an example of the Unattended Tasks Report input page. The other reports are similar. See Table 30-12 for information about input parameters for all the report types.
Figure 30-54 Unattended Tasks Report—Input Page for Task Analysis
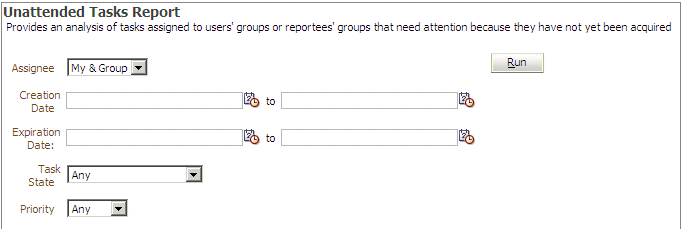
Description of "Figure 30-54 Unattended Tasks Report—Input Page for Task Analysis"
-
Click Run.
30.11.2 What Happens When You Create Reports
As shown in Figure 30-55, report results (for all report types) are displayed in both a table format and a bar chart format. The input parameters used to run the report are displayed under Report Inputs, in the lower-left corner (may require scrolling to view).
Figure 30-55 Report Display—Table Format, Bar Chart Format, and Report Inputs
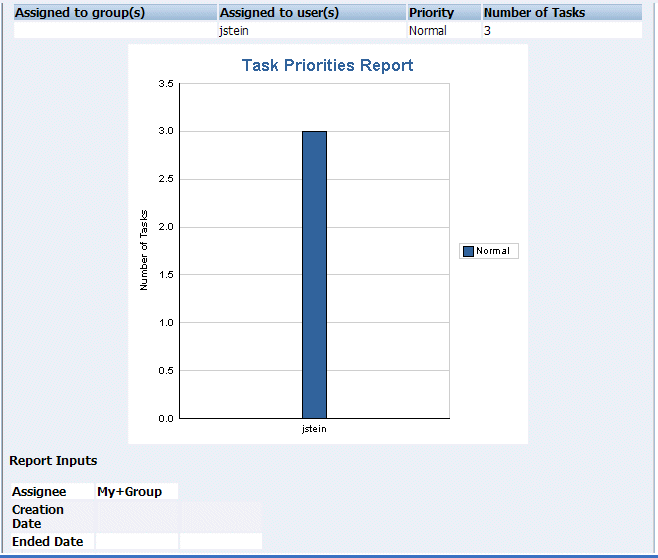
Description of "Figure 30-55 Report Display—Table Format, Bar Chart Format, and Report Inputs"
30.11.2.1 Unattended Tasks Report
Figure 30-56 shows an example of an Unattended Tasks report.
The report shows that the California group has 15 unattended tasks, the Supervisor group has 7 unattended tasks, and the LoanAgentGroup has 11 unattended tasks. The unattended (unclaimed) tasks in this report are all DocumentReview tasks. If multiple types of unattended task exists when a report is run, all task types are included in the report, and the various task types are differentiated by color.
30.11.2.2 Tasks Priority Report
Figure 30-57 shows an example of a Tasks Priority report.
The report shows that the California group, the Supervisor group, and the LoanAgentGroup each have 16 tasks of normal priority. The users rsteven and jcooper have 5 and 22 tasks, respectively, all normal priority. Priorities (highest, high, normal, low, lowest) are distinguished by different colors in the bar chart.
30.11.2.3 Tasks Cycle Time Report
Figure 30-58 shows an example of a Tasks Cycle Time Report.
The report shows that it takes 1 hour and 6 minutes on average to complete DocumentReview tasks, and 1 hour and 28 minutes on average to complete VacationApproval tasks. The bar chart shows the average cycle time in milliseconds.
30.11.2.4 Tasks Productivity Report
Figure 30-59 shows an example of a Tasks Productivity Report.
The report shows the number of tasks assigned to the California, LoanAgentGroup, and Supervisor groups. For individual users, the report shows that jcooper has 22 assigned tasks. In addition to his assigned tasks, jcooper has completed 2 tasks. The report shows that mtwain and rsteven have completed 6 and 11 tasks respectively. In the bar chart, the two task states—assigned and completed—are differentiated by color.
Note:
The Me and Group and Reportees options have been removed from the Productivity Report.30.12 Accessing Oracle BPM Worklist in Local Languages and Time Zones
A user's preferred worklist language is configured from either the identity store or the browser.
A user's preferred time zone is configured from the identity store.
If no preference information is available, then the user's preferred language and time zone are determined by the system defaults. System defaults are based on the server settings for language and time zone.
If the custom resource bundle class in the browser locale is not available and the custom resource bundle class in default server locale is available, then the language is derived from the custom resource bundle class in default server locale.If the custom resource bundle class in default server locale is also not available, then the language is derived from the custom base class.
If no user language preferences are set, or if they are set to a language not supported by Oracle BPM Worklist, then the Worklist Application defaults to English.
For more information, see the following sections for instructions on how to select Browser or Identity Provider in the worklist interface:
-
Section 30.8.2, "How To Set the Worklist Display (Application Preferences)" for how to select Browser or Identity Provider from the Application Preferences page
-
Section 30.3, "Customizing the Task List Page" and Figure 30-14, "Customizing Fields in a Worklist View"
30.12.1 Strings in Oracle BPM Worklist
Most strings in the worklist come from the Worklist Application bundle. By default, this is the class
oracle.bpel.services.workflow.resource.WorkflowResourceBundle
However, this can be changed to a custom resource bundle by setting the appropriate application preference (see Section 30.8.2, "How To Set the Worklist Display (Application Preferences)") or by providing an updated version of the default bundle class. See the Workflow Customizations sample for details.
For task attribute names, mapped attribute labels, and dynamic assignment function names, the strings come from configuring the resource property file WorkflowLabels.properties. This file exists in the wfresource subdirectory of the services config directory. See Chapter 32, "Introduction to Human Workflow Services" for information on adding entries to this file for dynamic assignment functions and attribute labels.
For custom actions and task titles, the display names come from the message bundle specified in the task configuration file. If no message bundle is specified, then the values specified at design time are used. See Chapter 32, "Introduction to Human Workflow Services" for information on how to specify message bundles so that custom actions and task titles are displayed in the preferred language.
30.12.2 How to Change the Preferred Language if the Identity Store is LDAP-Based
If an LDAP-based provider such as Oracle Internet Directory is used, then language settings are changed in the Oracle Internet Directory community. Connect to the embedded LDAP server, where you can change language settings in the Oracle Internet Directory community.
-
Start an LDAP browser (for example, openLdap browser, ldapbrowser, jXplorer, and so on). See the documentation for your browser for instructions.
-
Connect to the LDAP server by providing the hostname, port number on which the server is running, and the administration user credentials with which to log in.
-
For Embedded LDAP:
-
The default managed server port number is
7001. -
The administration credential username is
cn=admin. -
The administration password credential is accessible from the Oracle WebLogic Server Administration Console by selecting Security > Embedded LDAP for your domain.
For instructions on changing the default password credential, see Chapter 9, "Managing the Embedded LDAP Server" of Oracle Fusion Middleware Securing Oracle WebLogic Server.
-
-
For OIDm:
-
The default port number is
3060. -
The administration username is
cn=orcladmin. -
The administration password is the password for the LDAP server.
-
-
-
To change a user's preferred language, navigate to the user entry, and add/set the preferredLanguage attribute. See Table 30-13, "Languages Supported in Oracle BPM Worklist" for a list of supported languages. To change the time zone setting, add/set the orclTimeZone attribute. The format of the time zone string is Continent/Region. You can find the time zone values in the
$JAVA_HOME/jre/lib/zidirectory. The directories specify the continent names, for example, Africa, Asia, America, and so on, while the files within the directories specify the regions. Note that some regions include subregions, for example America/Indiana/Indianapolis.When a user logs in, the worklist pages are rendered in the user's preferred language and time zone.
30.12.3 How to Change the Language in Which Tasks Are Displayed
For better performance, only the English language is listed for the LocaleList property in the System MBean Browser in Oracle Enterprise Manager Fusion Middleware Control Console. If you want to display the task title, category, and subcategory in other languages or add other languages, you must change the required language locale in the System MBean Browser.
Note:
If you add another language, then any previously written tasks continue to appear only in the languages that were previously specified. For example, if the previously specified language was English, and you then added another language, then any tasks written before you added the new language appear in English only. Tasks created after you added the other language appear in either English or the added language, depending on the language specified in theLocaleList property of your System MBean Browser.-
In Oracle Enterprise Manager Fusion Middleware Control Console, right-click
soa-infrain the navigator, select Administration, then select System MBean Browser. -
Expand the following in sequence: Application Defined MBeans; then
oracle.as.soainfra.config; then Server: server_name; then WorkflowConfig. -
Click human-workflow.
To change the language:
-
In the Name column, click
LocaleList. -
In the Value field, click the value.
-
In the Name column, click Language.
-
In the Value field, change
ento the language value that you want to use. -
Click Apply.
To add additional languages:
-
Click the Operations tab.
-
In the Name column, click
createLocale. -
In the Value field, enter a value. For better performance, ensure that you include only the languages that you need for task title, category, and subcategory.
-
Click Invoke.
-
30.12.4 How To Change the Language Preferences from a JAZN XML File
In the JAZN XML file, change the portion in bold to set the user's preferred language.
<preferredLanguage>en-US</preferredLanguage>
Oracle BPM Worklist supports the languages shown in Table 30-13.
30.12.5 What You May Need to Know About Runtime Languages Not Displaying in the Worklist
Oracle BPM Worklist supports nine administration languages. However, the user's notification preference interface, as a standalone application, supports 21 runtime languages. If a user's preferred language is set to a language that is not supported by the worklist, but which is supported by the user's notification preference interface, then the worklist displays the language set by the server (or English if the server language is also not supported by the worklist), while the embedded user's notification preference interface displays in the user's preferred language. In this case, two languages are seen when you navigate to the Preferences settings in the Notification tab in the worklist.
For example, assume that the language of the SOA server is French and that someone tries to access the worklist in a browser with the language set to Arabic. The worklist interface displays the server language, French, while the embedded user's notification preference interface displays in Arabic when navigating to the Preferences > Notification tab.
30.12.6 What You May Need to Know About Inconsistent Display Languages in Worklist and Embedded User's Notification Preference Interface
Oracle BPM Worklist can be configured to set the language from the browser or from the identity store. There are two levels to this setting, the application level and the user level. If the user preference is set, it takes precedence in determining the worklist display language. However, the embedded user's notification preference interface always respects the application preference. Therefore, if the user's preference indicates that the language from the browser is to be used, while the application preference is set to use the language from the identity store, or vice versa, you may see different display languages in the worklist and in the user's notification preference interface.
30.12.7 How To Change the Time Zone Used in the Worklist
The following is based on extracting a user's time zone from a JAZN XML file.
Change the string in bold to set the user's preferred time zone.
<timeZone>America/Los_Angeles</timeZone>
The format of the time zone string is Continent/Region. You can find the time zone values in the $JAVA_HOME/jre/lib/zi directory. The directories specify the continent names, for example Africa, Asia, America, and so on, while the files within the directories specify the regions. Note that some regions include sub-regions, for example America/Indiana/Indianapolis.
30.13 Creating Reusable Worklist Regions
Some features available in worklist are exposed as standalone reusable components that can be embedded in any application. Moreover, these standalone task flows provide many customizations through parameters that enable user to build and customize a worklist application to meet requirements. All of the task flows are bundled in an ADF library that can be included in the embedding application.
30.13.1 How to Create an Application With an Embedded Reusable Worklist Region
The usage of each reusable worklist region is the same with a few exceptions. The following procedure provides the detailed steps to create an application and embed the Task List task flow in the application. Where applicable, notes on how to use other types of reusable worklist regions are provided.
To create an application with an embedded reusable worklist region:
-
Create new Fusion Web Application in Oracle JDeveloper. In this example, the name of the application is TaskListTaskFlowSample. Figure 30-60 provides details.
Figure 30-60 Creation of Application with an Embedded Reusable Worklist Region
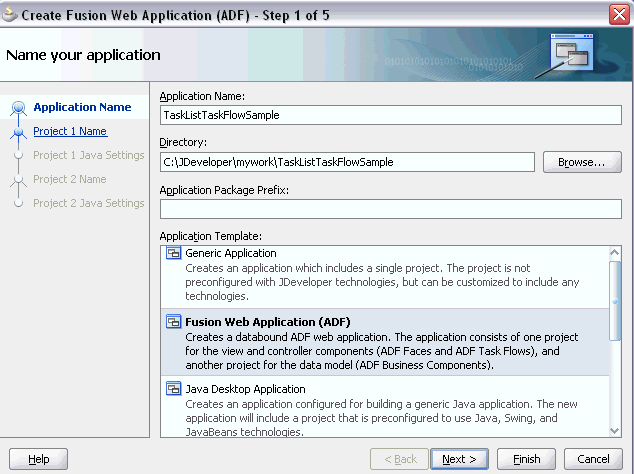
Description of "Figure 30-60 Creation of Application with an Embedded Reusable Worklist Region"
-
Open the View Controller Project Properties, Libraries and Classpath section, and click Add Library to add the following libraries in the class path:
-
BPM Worklist Components Add this library to add the task flow JAR
adflibTaskListTaskFlow.jarandadflibWorklistComponents.jar, which are required in the project's class path. -
BPM Services
-
WSRP Container
Figure 30-61 provides details.
Figure 30-61 Libraries and Classpath Section
Description of "Figure 30-61 Libraries and Classpath Section"
-
-
If your application runs on non-SOA server, you must perform two additional steps.
-
Install the
oracle.soa.workflowshared library.Note that if your server has
oracle.soa.workflow.wcalready installed you do not need to installoracle.soa.workflow. -
Configure a foreign JNDI on the server.
Note that if you run the Task List task flow in federated mode, you do not need to do this step. See the section "federatedMode" for information about how to use the task flow in federated mode.
-
-
Select the View Controller project and choose File > New > Current Project Technologies > Web Tier > JSF Page to create a jspx file (for example,
testSample.jspx).Be sure to select Create as XML document (*.jspx) in the Create JSF Page dialog.
-
Choose
adflibTaskListTaskFlow.jarfrom the component palette. It contains the list of all the Task Flows and Regions. Figure 30-62 provides details. -
Drag and drop one of the task flow Regions to the jspx page, and select Region in the Create menu (for example, taskList-task-flow-definition for Task List Task Flow).
See the following sections for details about the task flow definitions:
-
Section 30.13.4, "What You May Need to Know About Task List Task Flow"
-
Section 30.13.5, "What You May Need to Know About Certificates Task Flow"
-
Section 30.13.6, "What You May Need to Know About the Reports Task Flow"
-
Section 30.13.7, "What You May Need to Know About Application Preferences Task Flow"
-
Section 30.13.8, "What You May Need to Know About Mapped Attributes Task Flow"
-
Section 30.13.9, "What You May Need to Know About Rules Task Flow"
-
-
If you chose flex-fields-task-flow-definition, rules-task-flow-definition, tasklist-reports-task-flow-definition, or taskList-task-flow-definition, pass the task flow parameters in the Edit Task Flow Binding dialog that appears.
-
A new entry is added to the
pagenamePagedef.xmlfile.For example, adding the taskList-task-flow-definition results in the following new entry:
<taskFlow id="taskListtaskflowdefinition1" taskFlowId="/WEB-INF/taskList-task-flow-definition.xml#taskList-task- flow-definition" xmlns="http://xmlns.oracle.com/adf/controller/binding"> <parameters> <parameter id="federatedMode" value="true" xmlns="http://xmlns.oracle.com/adfm/uimodel"/> <parameter id="showServerColumn" value="true" xmlns="http://xmlns.oracle.com/adfm/uimodel"/> </parameters> </taskFlow> -
Add the shared libraries in the
weblogic-application.xmlfile. If you haveoracle.soa.workflow.wcinstalled on your server, add that library.<library-ref> <library-name>oracle.soa.workflow</library-name> </library-ref> -
Before deploying the application, see Section 30.13.2, "How to Set Up the Deployment Profile."
30.13.2 How to Set Up the Deployment Profile
Before deploying the application, you must edit the deployment profile.
To edit the deployment profile
-
Select the View Controller project and choose File > New > General > Deployment Profiles, select WAR File, and click OK.
-
Select WEB-INF/lib > Filters, and check
adflibTaskListTaskFlow.jar,adflibWorklistComponents.jarandwsrp-container.jar.
30.13.3 How to Prepare Federated Mode Task Flows For Deployment
If you are using the task flow in federated mode, you must pass the list of federated servers to the task flow. See "federatedMode" for details.
If the task flow is used in the federated mode, then enable global trust between the federated servers. This is done so that the already authenticated user token is passed to all the federated servers passed.
Do the below steps for all the federated servers and restart all the servers. It is very important that you restart all the servers.
-
Login to the Oracle Weblogic Server console.
-
Select the domain name soainfra under Domain Structures. The domain name may be different if a SOA server is not used.
-
Select the Security tab.
-
Select the Advanced link (near the bottom Save button).
-
Enter a password in the Credential field. (The same password must be given for all the federated servers).
-
Click Save.
-
Restart the server.
30.13.4 What You May Need to Know About Task List Task Flow
The Task List task flow takes in the parameters to control the display behavior of the embedded region. Figure 30-63 provides details.
Some of the parameters are listed below. For the full list of parameters, see Section 34.4, "Passing Worklist Portlet Parameters."
Only if passed as true, the task list would be shown in the federated mode. To run the task flow in federated mode, the list of federated servers must be passed to the task flow. You can pass the federated servers list to the task flow in one of the following two ways.
One method is to provide the client configuration file wf_client_config.xml in the class path (APP-INF\classes\wf_client_config.xml at the EAR level, or the WEB-INF\classes of the web application). The client configuration file contains all federated server details. See more information about this parameter in detail in Section 34.4, "Passing Worklist Portlet Parameters."
Another method is to construct a JAXB object, which contains the federated servers list. This JAXB object can be passed to the task flow through the federatedServers parameter. See "federatedServers" for information about constructing the JAXB object.
If both the client configuration file (wf_client_config.xml) and the JAXB object were provided to the task flow, the JAXB object takes the precedence.
This parameter is a JAXB object that contains the list of servers if the task flow is run in federated mode. This parameter takes precedence over the client configuration file (wf_client_config.xml) if it were also provided. See the code example in Example 30-1 for details about to constructing the JAXB object (WorkflowServicesClientConfigurationType).
Make sure that you set one of the servers as default, as shown in Example 30-1. Only one server is required to be designated as the default. Also, verify that the server you designate as the default is excluded from the federated servers list. The relevant code for doing this is in bold in the example.
The default server is used when you have many servers defined in wf_client_config.xml or in the JAXB object, but the workflow client is desired for a single server. There are a few legacy APIs that do not take a server name as a parameter. To support such legacy APIs, your must define a single server as the default server, otherwise any legacy APIs that do not take a server name do not work.
import oracle.bpel.services.workflow.client.config.IdentityPropagationType;
import oracle.bpel.services.workflow.client.config.PolicyReferenceType;
import oracle.bpel.services.workflow.client.config.PolicyReferencesType;
import oracle.bpel.services.workflow.client.config.RemoteClientType;
import oracle.bpel.services.workflow.client.config.ServerType;
import oracle.bpel.services.workflow.client.config.SoapClientType;
import oracle.bpel.services.workflow.client.config.WorkflowServicesClientConfigurationType;

WorkflowServicesClientConfigurationType wscct =
   new WorkflowServicesClientConfigurationType();

List<ServerType> servers = wscct.getServer();

/**** Setting default server in the list ****/

ServerType defalutServer = new ServerType();
servers.add(defalutServer);

defalutServer.setDefault(true);
defalutServer.setExcludeFromFederatedList(true);
defalutServer.setName("default");

RemoteClientType rct = new RemoteClientType();
rct.setServerURL("t3://myhost.us.oracle.com:7001");
rct.setInitialContextFactory("weblogic.jndi.WLInitialContextFactory");
rct.setParticipateInClientTransaction(false);
defalutServer.setRemoteClient(rct);

SoapClientType sct = new SoapClientType();
PolicyReferencesType prts = new PolicyReferencesType();

PolicyReferenceType prt = new PolicyReferenceType();
prt.setEnabled(true);
prt.setCategory("security");
prt.setUri("oracle/wss10_saml_token_client_policy");
prts.getPolicyReference().add(prt);

IdentityPropagationType ipt = new IdentityPropagationType();
ipt.setMode("dynamic");
ipt.setType("saml");
ipt.setPolicyReferences(prts);

sct.setRootEndPointURL("http://myhost.us.oracle.com:7001");
sct.setIdentityPropagation(ipt);

defalutServer.setSoapClient(sct);

/****** Setting Federated Server 1 to the list ****/

ServerType server1 = new ServerType();
servers.add(server1);
server1.setName("Human Resource");

RemoteClientType rct1 = new RemoteClientType();
rct1.setServerURL("t3://stadl28.us.oracle.com:7001");
rct1.setInitialContextFactory("weblogic.jndi.WLInitialContextFactory");
rct1.setParticipateInClientTransaction(false);
server1.setRemoteClient(rct1);

SoapClientType sct1 = new SoapClientType();
PolicyReferencesType prts1 = new PolicyReferencesType();

PolicyReferenceType prt1 = new PolicyReferenceType();
prt1.setEnabled(true);
prt1.setCategory("security");
prt1.setUri("oracle/wss10_saml_token_client_policy");
prts1.getPolicyReference().add(prt1);
IdentityPropagationType ipt1 = new IdentityPropagationType();
ipt1.setMode("dynamic");
ipt1.setType("saml");
ipt1.setPolicyReferences(prts1);

sct1.setRootEndPointURL("http://stadl28.us.oracle.com:7001");
sct1.setIdentityPropagation(ipt1);

server1.setSoapClient(sct1);

/****** Setting Federated Server 2 to the list ****/

ServerType server2 = new ServerType();
servers.add(server2);
server2.setName("Financials");

RemoteClientType rct2 = new RemoteClientType();
rct2.setServerURL("t3://myhost.us.oracle.com:7001");
rct2.setInitialContextFactory("weblogic.jndi.WLInitialContextFactory");
rct2.setParticipateInClientTransaction(false);
server2.setRemoteClient(rct2);

SoapClientType sct2 = new SoapClientType();
PolicyReferencesType prts2 = new PolicyReferencesType();

PolicyReferenceType prt2 = new PolicyReferenceType();
prt2.setEnabled(true);
prt2.setCategory("security");
prt2.setUri("oracle/wss10_saml_token_client_policy");
prts2.getPolicyReference().add(prt2);

IdentityPropagationType ipt2 = new IdentityPropagationType();
ipt2.setMode("dynamic");
ipt2.setType("saml");
ipt2.setPolicyReferences(prts2);

sct2.setRootEndPointURL("http://myhost.us.oracle.com:7001");
sct2.setIdentityPropagation(ipt2);

server2.setSoapClient(sct2);
If the task flow is run in federated mode, the server column in the task list is not shown by default. The server column is shown if this parameter is passed as true, otherwise it is not.
This is a workflow context token string. It is used to create workflow context inside the task flow. If the application is SSO-enabled, or it is secured using ADF security, this parameter is not required, otherwise this is a required parameter. You can get the workflow context ID as shown in Example 30-2.
30.13.5 What You May Need to Know About Certificates Task Flow
The user can upload the certificate to use to sign a decision, as shown in the following graphic. When signing a task outcome using your certificate, you must upload the entire chain of certificates through Oracle BPM Worklist as a .P7B (PKCS7 format) file, not only the one certificate issued to you by the certificate issuer.
A digital certificate contains the digital signature of the certificate-issuing authority, so that anyone can verify that the certificate is real. A digital certificate establishes the participant's credentials. It is issued by a certification authority (CA). It contains your name, a serial number, expiration dates, a copy of the certificate holder's public key (used for encrypting messages and digital signatures), and the digital signature of the certificate-issuing authority, so that a recipient can verify that the certificate is real.
Certificates task flow does not have any parameters. Figure 30-64 provides details.
30.13.6 What You May Need to Know About the Reports Task Flow
Figure 30-65 shows the unattended tasks report.
The following worklist reports are available for task analysis.
Unattended Tasks provides an analysis of tasks assigned to users' groups or reportees' groups that have not yet been acquired (the "unattended" tasks).
-
Assignee -This option (required) selects tasks assigned to the user's group (My Group), tasks assigned to the reportee's groups (Reportees), tasks where the user is a creator (Creator), or tasks where the user is an owner (Owner).
-
Creation Date - An optional date range
-
Expiration Date - An optional date range
-
Task State - The state (optional) can by Any, Assigned, Expired, or Information Requested.
-
Priority - The priority (optional) can be Any, Highest, High, Normal, Low, or Lowest.
Tasks Priority provides an analysis of the number of tasks assigned to a user, reportees, or their groups, broken down by priority.
-
Assignee - Depending on the assignee that you select, this required option includes tasks assigned to the logged-in user (My), tasks assigned to the user and groups that the user belongs to (My & Group), or tasks assigned to groups to which the user's reportees belong (Reportees).
-
Creation Date - An optional date range
-
Ended Date - An optional date range for the end dates of the tasks to be included in the report.
-
Priority - The priority (optional) can be Any, Highest, High, Normal, Low, or Lowest.
Tasks Cycle Time provides an analysis of the time taken to complete tasks from assignment to completion based on users' groups or reportees' groups.
-
Assignee - Depending on the assignee that you select, this required option includes your tasks (My) or tasks assigned to groups to which your reportees belong (Reportees).
-
Creation Date - An optional date range
-
Ended Date - An optional date range for the end dates of the tasks to be included in the report.
-
Priority - The priority (optional) can be Any, Highest, High, Normal, Low, or Lowest.
Tasks Productivity provides an analysis of assigned tasks and completed tasks in a given time period for a user, reportees, or their groups.
-
Assignee - Depending on the assignee that the user selects, this required option includes the user's tasks (My & Group) or tasks assigned to groups to which the user's reportees belong (Reportees).
-
Creation Date (range) - An optional creation date range. The default is one week.
-
Task Type - Use the Search (flashlight) icon to select from a list of task titles. All versions of a task are listed on the Select Workflow Task Type page (optional).
Tasks Time Distribution provides the time an assignee takes to perform a task.
-
Assignee - Depending on the assignee that the user selects, this required option includes the user's tasks (My & Group) or tasks assigned to groups to which the user's reportees belong (Reportees).
-
From...to (date range) - An optional creation date range. The default is one week.
-
Task Type - Use the Search (flashlight) icon to select from a list of task titles. All versions of a task are listed on the Select Workflow Task Type page (optional).
30.13.7 What You May Need to Know About Application Preferences Task Flow
Application preferences customize the appearance of the worklist. Administrators can specify the following:
-
Login page realm label-If the identity service is configured with multiple realms, then the Oracle BPM Worklist login page displays a list of realm names.
LABEL_LOGIN_REALMspecifies the resource bundle key used to look up the label to display these realms. The term realm can be changed to fit the user community. Terms such as country, company, division, or department may be more appropriate. Administrators can customize the resource bundle, specify a resource key for this string, and then set this parameter to point to the resource key. -
Global branding icon-This is the image displayed in the top left corner of every page of the worklist. (The Oracle logo is the default.) Administrators can provide a .gif, .png, or .jpg file for the logo. This file must be in the
public_htmldirectory. -
Resource bundle-An application resource bundle provides the strings displayed in the worklist. By default, this is the class at
oracle.bpel.worklistapp.resource.WorklistResourceBundle. Figure 30-66 provides details.
30.13.8 What You May Need to Know About Mapped Attributes Task Flow
Human workflow mapped attributes store and query use case-specific custom attributes. These custom attributes typically come from the task payload values. Storing custom attributes in mapped attributes provides the following benefits:
-
They can be displayed as a column in the task listing.
-
They can filter tasks in custom views and advanced searches.
-
They can be used for a keyword-based search.
For example the Requester, PurchaseOrderID, and Amount fields in a purchase order request payload of a task can be stored in the mapped attributes. An approver logging into Oracle BPM Worklist can see these fields as column values in the task list and decide which task to access. The user can define views that filter tasks based on the mapped attributes.
For example, a user can create views for purchase order approvals based on different amount ranges. If the user must also retrieve tasks at some point related to a specific requester or a purchase order ID, they can specify this in the keyword field and perform a search to retrieve the relevant tasks. Figure 30-67 provides details.
30.13.9 What You May Need to Know About Rules Task Flow
Rules act on tasks, either a specific task type, or all the tasks assigned to a user or group. The graphic below shows where you set rules, including vacation rules.
A rule cannot always apply in all circumstances in which it is used. For example, if a rule applies to multiple task types, it may not be possible to set the outcome for all tasks, since different tasks can have different outcomes.
Rules are executed in the order in which they are listed. Rules can be reordered by using the up and down buttons in the header. If a rule meets its filter conditions, then it is executed and no other rules are evaluated. For your rule to execute, you must be the only user assigned to that task. If the task is assigned to multiple users (including you), the rule does not execute.
The showOtherUsersRules parameter takes a boolean value. When it is passed as True other users' rules are displayed, and when it is passed as False other users' rules are not shown. In addition, this user has to have required permission to view other user rules. Figure 30-68 and Figure 30-69 provide details.
