19 User Messaging Preferences
This chapter describes the User Messaging Preferences that are packaged with Oracle User Messaging Service. It describes how to work with messaging channels and to create contact rules using messaging filters.
Note:
To learn about the architecture and components of Oracle User Messaging Service, see Oracle Fusion Middleware Getting Started with Oracle SOA Suite.This chapter contains the following sections:
19.1 Introduction
User Messaging Preferences allows a user who has access to multiple channels (delivery types) to control how, when, and where they receive messages. Users define filters, or delivery preferences, that specify which channel a message must be delivered to, and under what circumstances. Information about a user's devices and filters are stored in any database supported for use with Oracle Fusion Middleware.
For an application developer, User Messaging Preferences provide increased flexibility. Rather than an application needing business logic to decide whether to send an email or SMS message, the application can just send to the user, and the message gets delivered according to the user's preferences.
Since preferences are stored in a database, this information is shared across all instances of User Messaging Preferences in a domain.
The oracle.sdp.messaging.userprefs package contains the User Messaging Preferences API classes. For more information, refer to the Oracle Fusion Middleware User Messaging Service API Reference.
19.1.1 Terminology
User Messaging Preferences defines the following terminology:
-
Channel: a physical channel, such as a phone, or PDA.
-
Channel address: one of the addresses that a channel can communicate with.
-
Filters: a set of notification delivery preferences.
-
System term: a pre-defined business term that cannot be extended by the administrator.
-
Business term: a rule term defined and managed by the system administrator through Enterprise Manager. Business terms can be added, defined, or deleted.
-
Rule term: a system term or a business term.
-
Operators: comparison operators equals, does not equal, contains, or does not contain.
-
Facts: data passed in from the message to be evaluated, such as time sent, or sender.
-
Rules Engine: the User Messaging Preferences component that processes and evaluates filters.
-
Channel: the transport type, for example, e-mail, voice, or SMS.
-
Comparison: a rule term and the associated comparison operator.
-
Action: the action to be taken if the specified conditions in a rule are true, such as Broadcast to All, Failover, or Do not Send to Any Channel.
19.1.2 Configuration of Notification Delivery Preferences
User Messaging Preferences allows configuration of notification delivery preferences based on the following:
-
a set of well-defined rule terms (system terms or business terms)
-
a set of channel and the corresponding addresses supported by Oracle User Messaging Service
-
a set of User Messaging Preferences filters that are transparently handled by a rules engine
One use case for notification delivery preference is for bugs entered into a bug tracking system. For example, user Alex wants to be notified through SMS and EMAIL channels for bugs filed against his product with priority = 1 by a customer type = Premium. For all other bugs with priority > 1, he only wants to be notified by EMAIL. Alex's preferences can be stated as follows:
Example 19-1 Notification Delivery Preferences
Rule (1): if (Customer Type = Premium) AND (priority = 1) then notify [Alex] using
 SMS and EMAIL.

Rule (2): if (Customer Type = Premium) AND (priority > 1) then notify [Alex] using
EMAIL.
A runtime service, the Oracle Rules Engine, evaluates the filters to process the notification delivery of user requests.
19.1.3 Delivery Preference Rules
A delivery preference rule consists of rule comparisons and rule actions. A rule comparison consists of a rule term (a system term or a business term) and the associated comparison operators. A rule action is the action to be taken if the specified conditions in a rule are true.
19.1.3.1 Data Types
Table 19-2 lists data types supported by User Messaging Preferences. Each system term and business term must have an associated data type, and each data type has a set of pre-defined comparison operators. Administrators cannot extend these operators.
Table 19-1 Data Types Supported by User Messaging Preferences
| Data Type | Comparison Operators | Supported Values |
|---|---|---|
|
Date |
<, >, between, <=, >= |
Date is accepted as a "java.util.Date" object or "String" representing the number of milliseconds since the standard base time known as "the epoch", namely January 1, 1970, 00:00:00 GMT (in essence, the value from java.util.Date.getTime() or java.util.Calendar.getTime()). |
|
Time |
==, !=, between |
A 4-digit integer to represent time of the day in HHMM format. First 2-digit is the hour in 24-hour format. Last 2-digit is minutes. |
|
Number (Decimal) |
<, >, between, <=, >= |
A java.lang.Double object or a String representing a floating decimal point number with double precision. |
|
String |
==, !=, contains, not contains |
Any arbitrary string. |
Note:
The String data type does not support regular expressions.The Time data type is only available to System Terms.
19.1.3.2 System Terms
Table 19-2 lists system terms, which are pre-defined business terms. Administrators cannot extend the system terms.
Table 19-2 System Terms Supported by User Messaging Preferences
| System Term | Data Type | Supported Values |
|---|---|---|
|
Date |
Date |
Date is accepted as a "java.util.Date" object or "String" representing the number of milliseconds since the standard base time known as "the epoch", namely January 1, 1970, 00:00:00 GMT (in essence, the value from java.util.Date.getTime() or java.util.Calendar.getTime()). |
|
Time |
Time |
A 4-digit integer to represent time of the day in HHMM format. First 2-digit is the hour in 24-hour format. Last 2-digit is minutes. |
19.1.3.3 Business Terms
Business terms are rule terms defined and managed by the system administrator through Oracle Application Server 11g Enterprise Manager. For more information on adding, defining, and deleting business terms, refer to Oracle Fusion Middleware Administrator's Guide for Oracle SOA Suite. A business term consists of a key, a data type, an optional description, and an optional List of Values (LOV).
Table 19-3 lists the pre-defined business terms supported by User Messaging Preferences.
Table 19-3 Pre-defined Business Terms for User Messaging Preferences
| Business Term | Data Type |
|---|---|
|
Organization |
String |
|
Time |
Number (Decimal) |
|
Priority |
String |
|
Application |
String |
|
Application Type |
String |
|
Expiration Date |
Date |
|
From |
String |
|
To |
String |
|
Customer Name |
String |
|
Customer Type |
String |
|
Status |
String |
|
Amount |
Number (Decimal) |
|
Due Date |
Date |
|
Process Type |
String |
|
Expense Type |
String |
|
Total Cost |
Number (Decimal) |
|
Processing Time |
Number (Decimal) |
|
Order Type |
String |
|
Service Request Type |
String |
|
Group Name |
String |
|
Source |
String |
|
Classification |
String |
|
Duration |
Number (Decimal) |
|
User |
String |
|
Role |
String |
19.1.4 Rule Actions
For a given rule, a User Messaging Preferences user can define one of the following actions:
-
Broadcast to All: send a broadcast message to all channels in the broadcast address list.
-
Failover: Send a message serially to channels in the address list until one successful message is sent. This means performing a send to the next channel when the current channel returns a failure status. User Messaging Preferences does not allow a user to specify a channel-specific status code or expiration time.
-
Do not send to Any Channel: Do not send a message to any channel.
Tip:
User Messaging Preferences does not provide a filter action that instructs "do not send to a specified channel." A best practice is to specify only positive actions, and not negative actions in rules. -
Default address: if no action is defined, a message is sent to a default address, as defined in the Messaging Channels page in Enterprise Manager.
19.2 How to Manage Messaging Channels
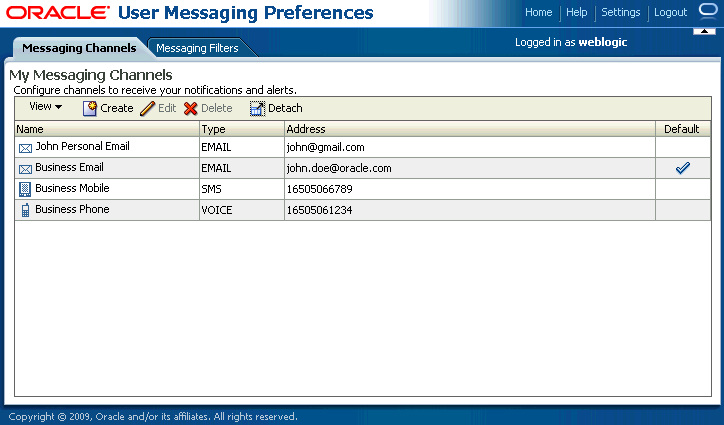
Any channel that a user creates is associated with that user's system ID. In Oracle User Messaging Service, channels represent both physical channels, such as mobile phones, and also e-mail client applications running on desktops, and are configurable on the The Messaging Channels tab (Figure 19-1).
The Messaging Channels tab enables users to perform the following tasks:
19.2.1 Creating a Channel
To create a channel:
-
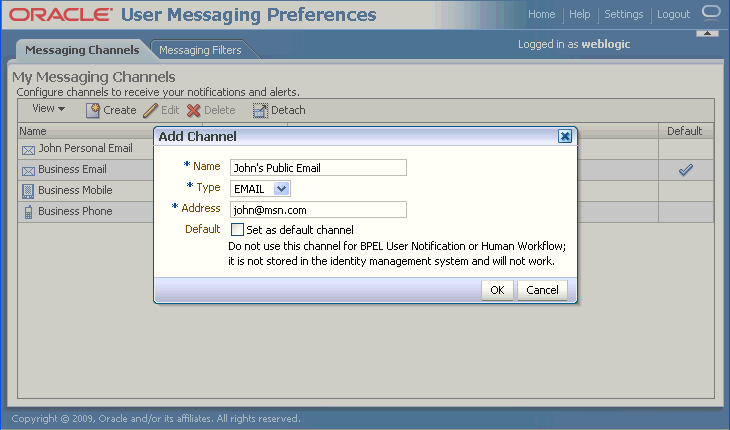
Click Create (Figure 19-2).
-
Enter a name for the channel in the Name field (Figure 19-3).
-
Select the channel's transport type from the Type drop-down menu.
-
Enter the number or address appropriate to the transport type you selected.
-
Select the Default checkbox to set the channel as the default channel.
-
Click OK to create the channel. The channel appears on the Channels page. The Channels page enables you to edit or delete the channel.
19.2.2 Editing a Channel
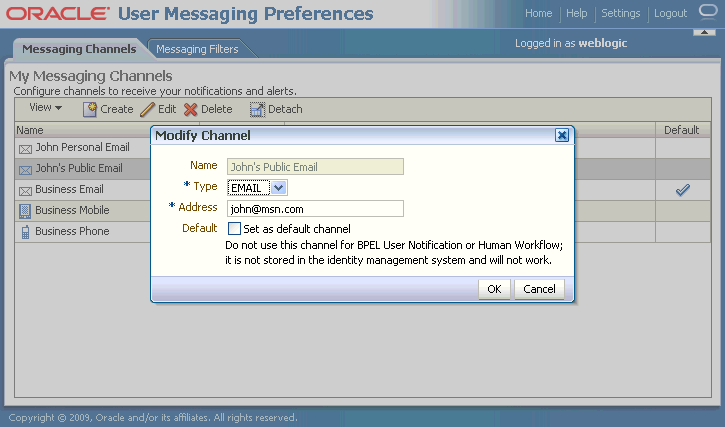
To edit a channel, select it and click Edit (Figure 19-4). The editing page appears for the channel, which enables you to add or change the channel properties described in Section 19.2.1, "Creating a Channel".
Certain channels are based on information retrieved from your user profile in the identity store, and this address cannot be modified by User Messaging Preferences (Figure 19-5). The only operation that can be performed on such as channel is to make it the default.
Figure 19-5 Edit a Identity Store-Backed Channel
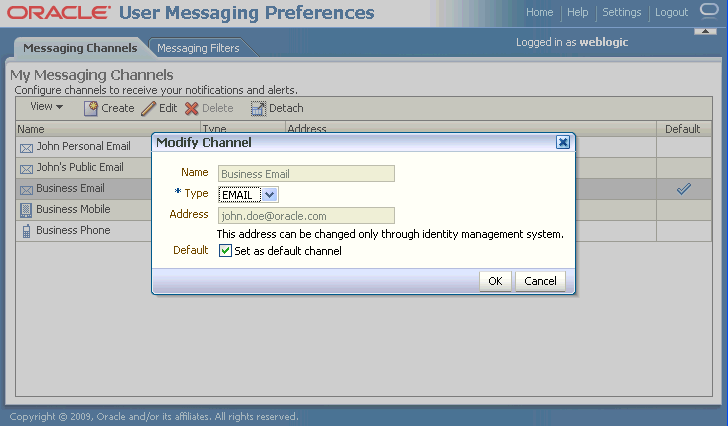
Description of "Figure 19-5 Edit a Identity Store-Backed Channel"
19.2.4 Setting a Default Channel
E-Mail is the default for receiving notifications. To set another channel as the default, select it, click Edit, and then click "Set as default channel." A check mark (Figure 19-7) appears next to the selected channel, designating it as the default means of receiving notifications.
19.3 Creating Contact Rules using Filters
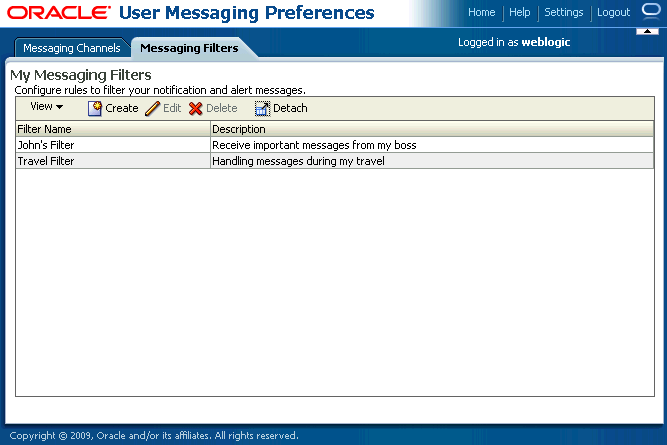
The Messaging Filters tab (Figure 19-8) enables users to build filters that specify not only the type of notifications they wish to receive, but also the channel through which to receive these notifications through a combination of comparison operators (such as is equal to, is not equal to), business terms that describe the notification type, content or source, and finally, the notification actions, which send the notifications to all channels, block channels from receiving notifications, or send notifications to the first available channel.
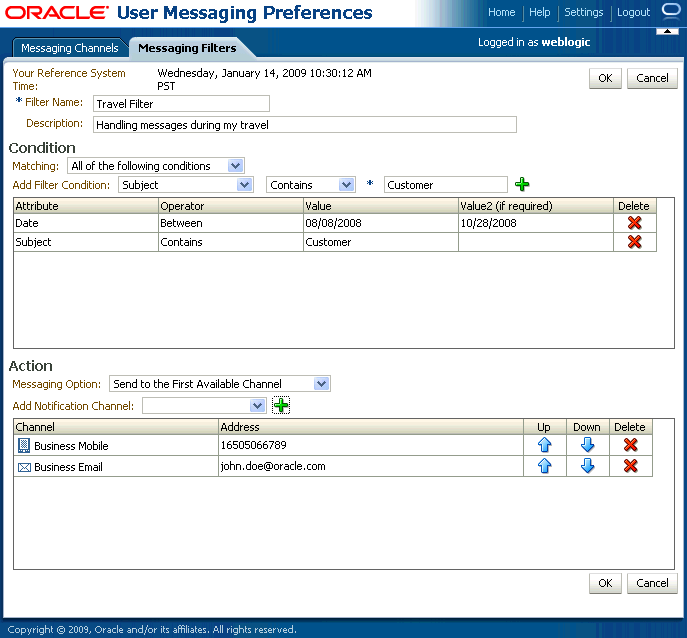
Figure 19-9 illustrates the creation of a filter called "Travel Filter", by a user named "weblogic", for handling notifications regarding Customers during his travel. Notifications that match all of the filter conditions are first directed to his "Business Mobile" channel. If this channel becomes unavailable, Oracle User Messaging Service transmits the notifications as e-mails since the next available channel selected is "Business Email".
19.3.1 Creating Filters
To create a filter:
-
Click Create (Figure 19-2). The Create Filter page appears (Figure 19-9).
-
Enter a name for the filter in the Filter Name field.
-
If needed, enter a description of the filter in the Description field.
-
Define the filter conditions using the lists and fields of the Condition section as follows:
-
Select whether notifications must meet all of the conditions or any of the conditions by selecting either the All of the following conditions or the Any of the following conditions options.
-
Select the notification's attributes. These attributes, or business components, include
-
Organization
-
Time
-
Priority
-
Application
-
Application Type
-
Expiration Date
-
From
-
To
-
Customer Name
-
Customer Type
-
Status
-
Amount
-
Due Date
-
Process Type
-
Expense Type
-
Total Cost
-
Processing Time
-
Order Type
-
Service Request Type
-
Group Name
-
Source
-
Classification
-
Duration
-
User
-
Role
-
-
Combine the selected condition type with one of the following comparison operators:
-
Is Equal To
-
Is Not Equal To
-
Contains
-
Does Not Contain
If you select the Date attribute, select one of the following comparison operators and then select the appropriate dates from the calendar application.
-
Is Equal
-
Is Not Equal
-
Is Greater Than
-
Is Greater Than or Equal
-
Is Less Than
-
Is Less Than or Equal
-
Between
-
Is Weekday
-
Is Weekend
-
Add appropriate values describing the attributes or operators.
-
Click Add (Figure 19-6) to add the attribute and the comparison operators to the table.
-
Repeat these steps to add more filter conditions. To delete a filter condition, click Delete (Figure 19-6).
-
Select one of the following delivery rules:
-
Send Messages to all Selected Channels -- Select this option to send messages to every listed channel.
-
Send to the First Available Channel (Failover in the order) -- Select this option to send messages matching the filter criteria to a preferred channel (set using the up and down arrows) or to the next available channel.
-
Send No Messages -- Select this option to block the receipt of any messages that meet the filter conditions.
-
-
To set the delivery channels, select a channel from the Add Notification Channel list and then click Add (Figure 19-2). To delete a channel, click Delete (Figure 19-6).
-
If needed, use the up and down arrows to prioritize channels. If available, the top-most channel receives messages meeting the filter criteria if you select Send to the First Available Channel.
-
Click OK to create the filter. Clicking Cancel discards the filter.
19.3.2 Editing a Filter
To edit a filter, first select it and then click Edit (Figure 19-9). The editing page appears for the filter, which enables you to add or change the filter properties described in Section 19.3.1, "Creating Filters".
19.4 Configuring Settings
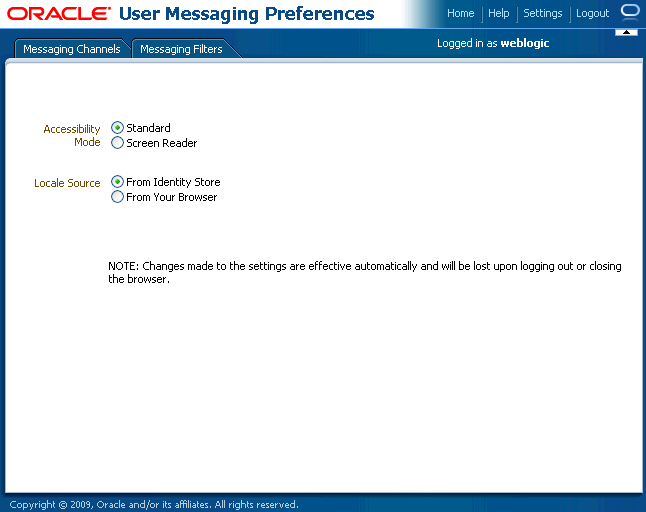
The Settings tab (Figure 19-10), accessed from the upper right area, enables users to set the following parameters:
-
Accessibility Mode: select "Standard" or "Screen Reader."
-
Locale Source: select "From Identity Store" or "From Your Browser."
