3 Who's Your Buddy?
This chapter describes how you can get the most out of using Presence. You set your Presence to let the world know something about you, such as your location, availability, or any other information, and you view your Contacts' Presence to learn the same types of information about them. Topics include:
Presence
Presence means being able to see your Contacts' availability, and to display your availability.
A Contact is any person about whose presence you are interested. One person can simultaneously be available on multiple SIP services. For example, you can be logged on with the same account both with Oracle Communicator on your home PC and on your personal laptop at the same time.
The main presence indicator is a presence icon (their appearances vary according to theme):
-
Available on at least one SIP service
-
Busy, and does not want to be disturbed
-
Away
You can toggle among these presence indicators by clicking on the Presence icon.
Set Presence
In addition to the graphical presence indicators, you can type in a Presence Note, which is shown next to your name in the Contact List. This can be used to convey more information that you want to share. To add information to your Presence Note, click in the Presence field and type in your note. Then press Enter, or just click outside the text field. Your new Presence note appears.
You can also add Smileys to your Presence Note. To do so, click on the smiley face next to the Presence Note field, and select your favorite Smiley.
Figure 3-2 Adding a Smiley to your Presence
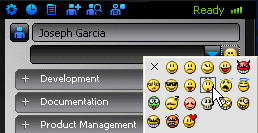
Description of "Figure 3-2 Adding a Smiley to your Presence"
Toggling between presence statuses (icons) does not change the presence text; these two pieces of information are independent.
Save Presence
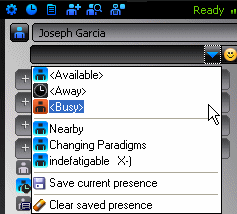
You can store a presence status/presence text combination for later use. To do this, click the down-pointing arrow on the drop-down in the My presence text area and select Save current presence. You can recall the saved state(s) by selecting one from the drop-down area.
The drop-down area also stores each of the three presence statuses (available, busy and away) along with empty text (into which you can enter your own text). Selecting one of these (indicated by the angle brackets in the drop-down selection list) will set your presence status to the indicated status and will clear your presence text.
A user cannot set his/her presence status to unavailable; rather, this is the presence status others see when you are offline. You can set a persistent note (in Preferences > Presence) that will also be displayed to users when you are offline.
A user who is otherwise available may also become idle if away from his/her computer for a customizable period of time. You can set whether to go idle and how long the computer is idle before going into that state (in Preferences > Presence).
All available SIP services are shown under each Contact's presence icon. If a person is logged in to at least one SIP service, there will be a small plus (+) icon in front of their presence icon. If you click on the plus (+) icon, you will be shown the list of SIP services on which the Contact is logged.
Presence Policy
You can decide who is allowed to see your presence information and who is not. People who are interested in your presence status are called presence watchers or just watchers. Whenever someone subscribes to your presence, he or she becomes a watcher. Just subscribing is not enough, though; in order to actually get your presence information, a watcher must be approved by you.
People who are accepted watchers are allowed to see your current presence, and will receive updates when it changes. People who are not accepted will not be allowed to see your presence or get any updates.
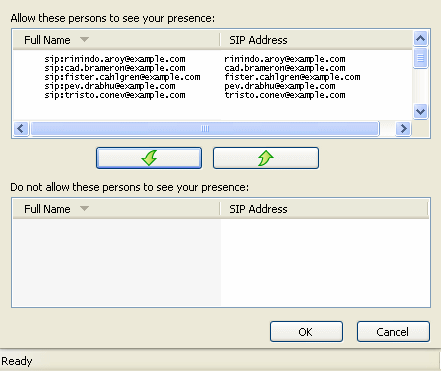
The first time you can decide if someone is allowed to see your presence is when they have added you to their Contact List. You will then see the New Subscribers dialog. However, you can change your mind at any time and change who is allowed to see your presence. To see and change the presence policy list, click Preferences under the Settings menu and then click the Security tab. Click the Presence Policy button and the Presence Policy dialog appears.
Presence Policy Dialog
The Contacts in the upper area are accepted as watchers, the people listed in the lower area are not, and may not even ask you to allow them to see your presence again. You can move people between the different states by selecting them and clicking the arrow buttons. When you click OK your presence policy will be saved.
New Subscribers
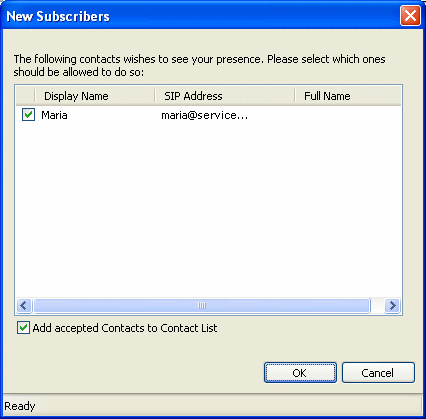
You will receive a notification if someone adds you to their Contact List. You must then decide whether or not to grant permission to see your presence information. The New Subscriber dialog appears.
New Subscriber Dialog
The New Subscriber dialog will also be displayed when you start the application if one or more Contacts have added you to their Contact List while you have been disconnected.
If you do not want a Contact to see your presence, uncheck the checkbox to the left of the name of this Contact. This Contact will not be notified that you rejected the request, but will only see you as a grey ghost figure, a Contact with no information, in his or her Contact List. All checked Contacts will see your presence. You can change who can or cannot see your presence using presence policy settings.
At the bottom of the dialog there is an Add Accepted Contact to Contact List checkbox. If this checkbox is checked, the Contacts will be added to your Contact List. If you do not want to add these Contacts, just uncheck the Add Accepted Contact to Contact List checkbox. Click OK to apply your choices.
If you add a new Contact to your Contact List and the Contact is not already in you Contact List, the Contact Properties dialog with information about the Contact will appear.
Contacts
Contacts are people using Oracle Communicator. You can share information about yourself with them, and communicate with them.
Manage Contacts
Not all Contacts are equal. There are some that you may want to allow to view your Presence, and there are others whom you do not. The choice is yours; you control access.
About the Contact List
The Contact List (also called the Buddy List) shows all of your Contacts, Contact Groups, and their presence statuses. Names displayed in the Contact List can be changed in the properties for each Contact. When one of your contacts come online or goes offline, their name is highlighted for a few seconds.
Main Screen
Depending on the theme you are displaying, your Contact List will look different, and behave slightly differently.
For example, in the Slate theme, clicking on a Contact's name will display:
-
a drop-down with buttons for actions such as Instant Messaging (depending on the capabilities of that Contact)
-
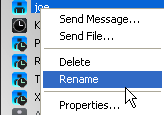
a menu button that enables you to message this contact. Additionally, you can delete the Contact, rename it, or open the Properties dialog for this Contact.
In the Communicator theme, clicking on a Contact's name displays the SIP Services that Contact is using. When you right-click on the Contact's name, a drop-down list is displayed from which you can message this contact. Additionally, you can delete the Contact, rename it, or open the Properties dialog for this Contact.
Your administrator may have configured the Contact List's information to be stored on a server. If that is the case, the same Contact List will be downloaded even if you install Oracle Communicator on different machines. If it has not been configured in that way, the you must create a new Contact List wherever you install Oracle Communicator.
Create Contacts
To create a new Contact in your Contact List:
-
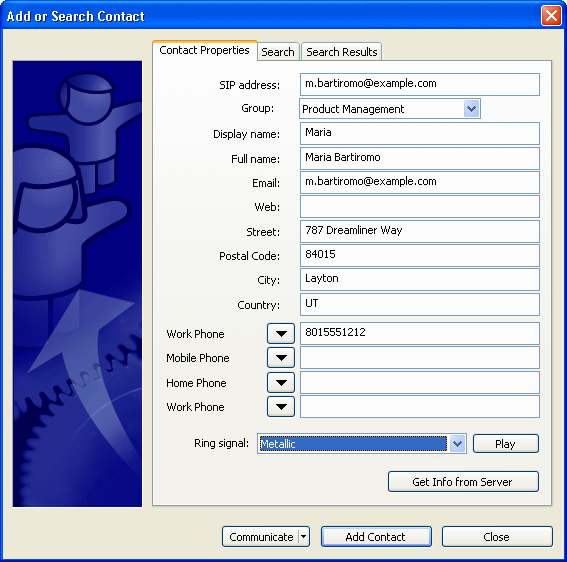
Select Add Contact... in the Edit Contact List menu or in the Context menu that appears when you right-click in an empty area of the Contact List. The Add or Search Contact dialog appears. You can either manually enter the data for the Contact, or search for a Contact on your network.
Note:
When using the Oracle Communicator theme, you can add a new Contact to an existing group at the time you create the Contact. Select the Group to which you want to add the new Contact from the drop-down list. -
Enter a SIP address, a Display name or a Full Name for the Contact. If you enter a SIP address you can click the Get Info from Server button to get more Contact Information from the server (this feature only works if your administrator has set it up for you). Otherwise, enter Contact Information manually in the text boxes.
Note:
All data you have entered manually will be overwritten with the information returned from the server when using the Get Info from Server function.If you enter a Display name for a Contact, that is what will be displayed in the Contact List and in the messages and calls received from this Contact. If no display name is given, the Full name is displayed instead. If neither Display name nor Full name is given, the SIP address is displayed. You must enter a SIP address to be able to see presence and send instant messages to this Contact. If you wish, you can enter a postal address and telephone numbers that are associated with the contact. To enter a telephone number, select one of either Work Phone, Home Phone or Mobile Phone and enter the number in the adjacent field.
-
Click the Add Contact button and the new Contact will appear in your Contact List and the Add or Search Contact dialog will close.
Note:
When you have added a Contact with a SIP address, this Contact will receive a message requesting permission to subscribe to his or her presence. The Contact may approve/reject in the New Subscriber dialog.
You can also add the Contact you are communicating with from the File menu in the Communication dialog.
SIP Services
In the Communicator theme, if a Contact is online, you can expand the branch they are on by pressing the plus sign (+) next to their name to see the SIP service or services they are on.
Devices
If a Contact is online on any SIP service, a SIP service presence symbol will appear under her or his name for each SIP service they are running. Presence status is shown next to each SIP service.
In the Slate theme, a blue symbol that toggles between a plus sign (+) and a minus sign (-) to the left of the expanded Contact enables you to display or hide SIP information for that Contact.
Note that this might be a SIP service with no presence. In that case, the Contact's presence will be offline but showing the registered SIP service with this symbol.
This will only be the case for a PC SIP service. If the Contact logs off a particular SIP service, the SIP service presence symbol under that Contact is removed.
Edit Contacts
To change the information about a Contact in your Contact List:
-
Right-click the Contact you want to edit and select Properties… from the Context menu.
-
The Contact Properties dialog appears in which you can change the information for the selected Contact. Enter the data in the text boxes. If the Contact has a SIP address, you can click the Get Info from Server button to get more contact information from the server.
Note:
All data you have entered manually will be overwritten with the information returned from the server when using the Get Info from Server button. -
Click OK when you are done editing the Contact Properties.
Search for Contacts
You can search for Contacts instead of creating them manually. Then you can add them to your Contact List, or communicate with them.
In the following example, a user is searching for Contacts in their organization's LDAP server. In order for such a search to work at your organization, an Administrator must have set up the LDAP server beforehand.
-
Select Search from the Add Contact menu. The Add or Search Contact dialog appears, showing the page for searching for Contacts.
-
Select the criteria you want to search by in the Search for Contacts by drop-down menu. Then enter your search text in the Containing text text box. If you check the Exact match only checkbox, the search will only return contacts with information matching the exact text you have specified. Otherwise, the search will return any Contact with information containing the text you have specified. Finally, select on which server you want to search in the Use Server drop-down menu.
-
Click the Search button to display the search results, which will be displayed on the next page of the dialog. If you hover over the returned Contacts you can see more information about them. You can sort the results by clicking on the column headings.
-
Select the Contacts you want to add to your Contact List. To select several Contacts at the same time, use the Shift or the Ctrl key at the same time as you select them.
-
To add the Contacts without viewing or editing the Contact information, click Add Contacts. The Contacts are added immediately.
-
To view or edit the information of a selected Contact before you add it, select the Contact and then click the View Properties button. The Contact's information is shown. Edit the information by entering or modifying data in the text boxes. When you are done editing, click the Add Contact button. The Contact is added to the Contact List.
Note:
When you have added a Contact with a SIP address, this Contact will receive a message saying that you want to subscribe to their presence. The Contact can then approve/reject your request the New Subscriber dialog.
-
-
Click Close to close the dialog.
Note:
Contacts who are already in your Contact List are not added. From the Contact List you can edit your Contacts.
Delete Contacts
Select the Contact you want to delete. Then right-click and choose Delete from the Context menu. When you delete a Contact, Oracle Communicator prompts you if you are sure that you want to delete the Contact. A check box (checked by default) indicates that you want to block the deleted contact from watching your presence.
Deleting a contact does not remove that Contact from the watcher list; the Contact will still be able to see your presence (if you do not want them to see your presence, you must make a change in the presence policy dialog.).
By pressing the Shift or the Ctrl key when selecting Contacts, you can select several Contacts to delete simultaneously. You can also delete a Group that contains Contacts.
Create Groups
Groups are collections of Contacts. You may for instance want to keep certain contacts in a group (Workmates, for example) for ease of viewing. To create a Group:
-
Depending on your theme, click an icon, or right-click in the Contact List area and select Create Group. A new Group is created in your Contact List.
-
Edit the name of the group.
-
To move Contacts to the Group, use drag-and-drop; click the Contact, drag it to the group and drop it. A plus (+) sign appears to the left of the group, click it to expand the group and show the included Contacts.
Edit Groups
You can change the name of a group and also move the Contacts out of a group or to another group. To move a Contact, simply drag and drop the Contact over the group title to which you want to move it.
To rename a Group:
-
Right-click the group and select Rename.
-
Enter the new name in the text area and press Enter, or click anywhere outside the text box.
Delete Groups
-
Right-click the group you want to delete and select Delete. A warning appears asking if you want to delete.
-
Click OK to proceed with the deletion. The group and the Contacts in the group are deleted from your Contact List.
To delete a group but keep one or more of the Contacts in the group, move the Contacts out of the group first. Then delete the group. You can also just delete the Contacts.
