9 Implementing Business Services with Application Modules
This chapter describes how to create application modules to encapsulate a data model using view objects. This chapter also describes how to combine business service methods with that data model to implement a complete business service.
This chapter includes the following sections:
-
Section 9.3, "Configuring Your Application Module Database Connection"
-
Section 9.5, "Creating an Application Module Diagram for Your Business Service"
-
Section 9.7, "Customizing an Application Module with Service Methods"
-
Section 9.8, "Customizing Application Module Message Strings"
-
Section 9.9, "Publishing Custom Service Methods to UI Clients"
-
Section 9.10, "Working Programmatically with an Application Module's Client Interface"
9.1 Introduction to Application Modules
An application module is an ADF Business Components component that encapsulates the business service methods and UI-aware data model for a logical unit of work related to an end-user task.
In the early phases of application development, architects and designers often use UML use case techniques to create a high-level description of the application's planned end-user functionalities. Each high-level, end-user use case identified during the design phase typically depends on:
-
The domain business objects involved. To answer the question, "What core business data is relevant to the use case?"
-
The user-oriented view of business data required. To answer the questions, "What subset of columns, what filtered set of rows, sorted in what way, grouped in what way, is needed to support the use case?"
The identified domain objects involved in each use case help you identify the required entity objects from your business domain layer. The user-oriented view of the required business data helps to define the right SQL queries captured as view objects and to retrieve the data in the exact way needed by the end user. For best performance, this includes retrieving the minimum required details necessary to support the use case. In addition to leveraging view object queries to shape the data, you've learned how to use view links to set up natural master-detail hierarchies in your data model to match exactly the kind of end-user experience you want to offer the user to accomplish the use case.
The application module is the "work unit" container that includes instances of the reusable view objects required for the use case in question, related through metadata to the underlying entity objects in your reusable business domain layer whose information the use case is presenting or modifying.
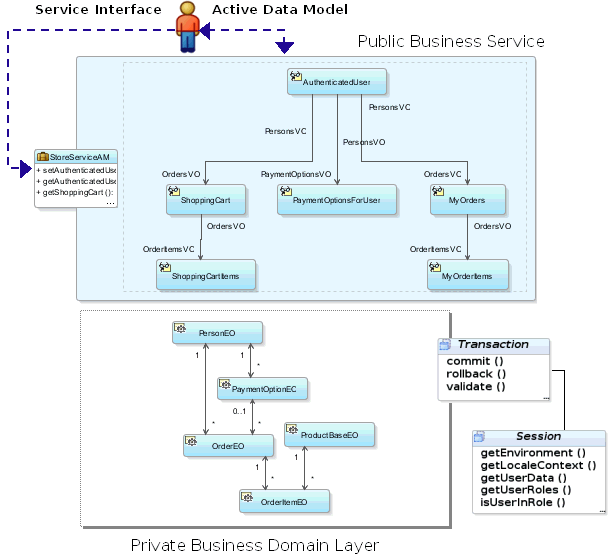
This chapter illustrates the following concepts illustrated in Figure 9-1, and more:
-
You use instances of view objects in an application module to define its data model.
-
You write service methods to encapsulate task-level business logic.
-
You expose selected methods on the client interface for UI clients to call.
-
You expose selected methods on the service interface for programmatic use in application integration scenarios.
-
You use application modules from a pool during a logical transaction that can span multiple web pages.
-
Your application module works with a
Transactionobject that acquires a database connection and coordinates saving or rolling back changes made to entity objects. -
The related
Sessionobject provides runtime information about the current application user.
9.2 Creating and Modifying an Application Module
In a large application, you typically create one application module to support each coarse-grained end-user task. In a smaller-sized application, you may decide that creating a single application module is adequate to handle the needs of the complete set of application functionality. Section 9.4, "Defining Nested Application Modules" provides additional guidance on this subject.
9.2.1 How to Create an Application Module
Any view object you create is a reusable component that can be used in the context of one or more application modules to perform the query it encapsulates in the context of that application module's transaction. The set of view objects used by an application module defines its data model, in other words, the set of data that a client can display and manipulate through a user interface.
To create an application module, use the Create Application Module wizard, which is available in the New Gallery.
Create the desired view objects as described in Section 5.2.1, "How to Create an Entity-Based View Object," and Section 5.2.3, "How to Create an Expert Mode, Read-Only View Object."
To create an application module:
-
In the Application Navigator, right-click the project in which you want to create the application module and choose New.
-
In the New Gallery, expand Business Tier, select ADF Business Components and then Application Module, and click OK.
-
In the Create Application Module wizard, on the Name page, provide a package name and an application module name. Click Next.
Note:
In Fusion web applications, the reserved wordsdata,bindings,security, andadfContextmust not be used to name your application module. Also, avoid using the "_" (underscore) at the beginning of the name. For more information, see Section 9.2.5, "How to Edit an Existing Application Module." -
On the Data Model page, include instances of the view objects you have previously defined and edit the view object instance names to be exactly what you want clients to see. Then click Next.
-
On the Java page, you can optionally generate the Java files that allow you to programmatically customize the behavior of the application module or to expose methods on the application module's client interface that can be called by clients. To generate an XML-only application module component, leave the fields unselected and click Finish.
Initially, you may want to generate only the application module XML definition component. After you complete the wizard, you can subsequently use the overview editor to generate the application module class files when you require programmatic access. For details about the programmatic use of the application module, see Section 9.7, "Customizing an Application Module with Service Methods."
For more step by step details, see Section 9.2.3.2, "Adding Master-Detail View Object Instances to an Application Module."
9.2.2 What Happens When You Create an Application Module
When you create an application module, JDeveloper creates the XML component definition file that represents its declarative settings and saves it in the directory that corresponds to the name of its package. For example, given an application module named StoreServiceAM in the storefront.model package, the XML file created will be ./storefront/model/StoreServiceAM.xml under the project's source path. This XML file contains the information needed at runtime to re-create the view object instances in the application module's data model.
If you are curious to view its contents, you can see the XML file for the application module by double-clicking the StoreServiceAM node in the Application Navigator to open the overview editor. In the editor window, click the Source tab to view the XML so that you can inspect it. The Structure window shows the structure of the XML file.
When you create business components, JDeveloper automatically creates a data control that contains all the functionality of the application module. Data controls are an ADF Model abstraction layer that provides supplemental metadata to describe the application module's operations and data collections (row sets of view object instances), including information about the attributes, methods, and types involved. Developers can then use the representation of the data control displayed in JDeveloper's Data Controls panel to create UI components that are automatically bound to the application module. At runtime, the ADF Model layer reads the metadata describing the data controls and bindings from appropriate XML files and implements the two-way connection between the user interface and the business service.
For example, the StoreServiceAMDataControl application module implements the business service layer of the StoreFront module application. Its data model contains numerous view object instances, including several master-detail hierarchies. The view layer of the Fusion Order Demo application consists of JSF pages whose UI components are bound to data from the view object instances in the StoreServiceAMDataControl's data model, and to built-in operations and service methods on its client interface. For details about how the Data Controls panel exposes the application module to UI developers, see Section 12.2, "Exposing Application Modules with ADF Data Controls."
9.2.3 How to Add a View Object to an Application Module
You can add a view object to an application module as you are creating the application module with the Create Application Module wizard, or you can add it later.
For information about using the Create Application Module wizard, see Section 9.2.1, "How to Create an Application Module."
9.2.3.1 Adding a View Object Instance to an Existing Application Module
You can add a view object to an application module that you have already created. To add a view object to an existing application module, and optionally, customize the view object instance, use the Data Model Components page of the overview editor for the application module.
Create the desired view objects as described in Section 5.2.1, "How to Create an Entity-Based View Object," and Section 5.2.3, "How to Create an Expert Mode, Read-Only View Object."
To add a view object instance to an existing application module:
-
In the Application Navigator, double-click the application module.
-
In the overview editor, click the Data Model navigation tab.
-
On the Data Model Components page, expand the View Object Instances section and, in the Available View Objects list, select the view instance you want to add.
The New View Instance field below the list shows the name that will be used to identify the next instance of that view object that you add to the data model.
-
To change the name before adding it, enter a different name in the New View Instance field.
-
With the desired view object selected, shuttle the view object to the Data Model list.
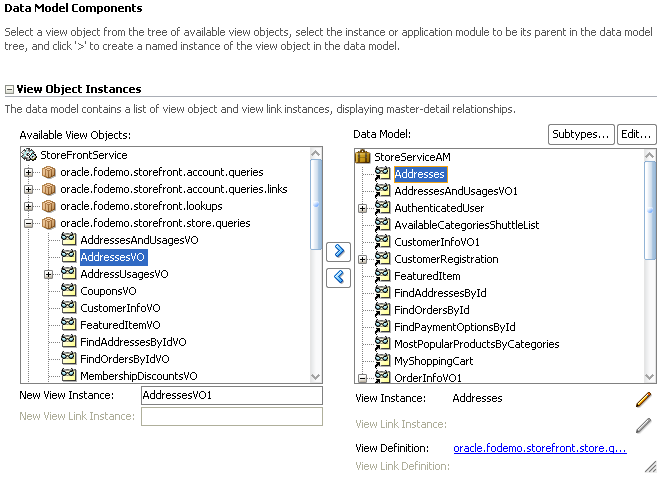
Figure 9-2 shows the view object
AddressVOhas been renamed toAddressbefore it was shuttled to the Data Model list.
9.2.3.2 Adding Master-Detail View Object Instances to an Application Module
You can use the data model that the application module overview editor displays to create a hierarchy of view instances, based on existing view links that your project defines. If you have defined view links that establish more than one level of master-detail hierarchy, then you can proceed to create as many levels of master-detail view instances as your application supports.
Create hierarchical relationships between view objects as described in Section 5.6, "Working with Multiple Tables in a Master-Detail Hierarchy."
To add master-detail view object instances to a data model:
-
In the Application Navigator, double-click the application module.
-
In the overview editor, click the Data Model navigation tab.
-
On the Data Model Components page, expand the View Object Instances section and, in the Data Model list, select the instance of the view object that you want to be the actively coordinating master.
The master view object will appear with a plus sign in the list indicating the available view links for this view object. The view link must exist to define a master-detail hierarchy.
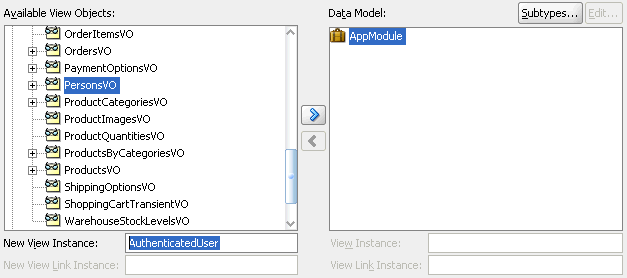
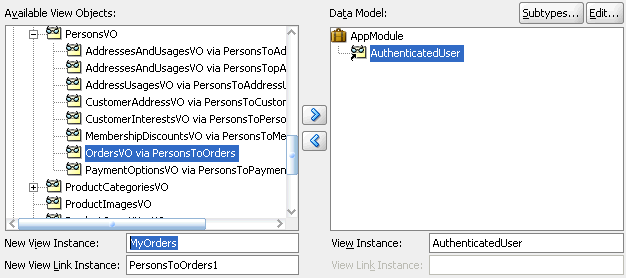
Figure 9-3 shows
PersonsVOselected and renamedAuthenticatedUserin the New View Instance field. -
Shuttle the selected master view object to the Data Model list.
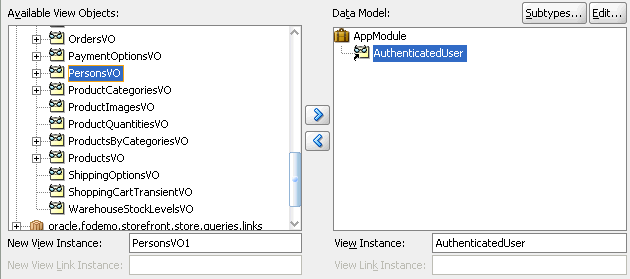
Figure 9-4 shows the newly created master view instance
AuthenticatedUserin the Data Model list. -
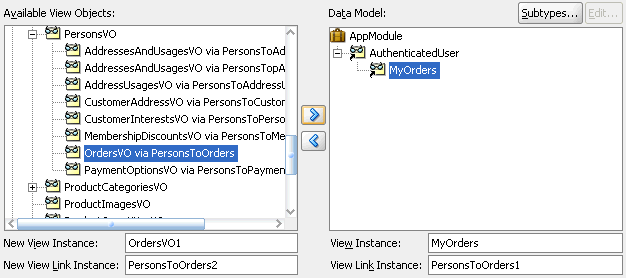
In the Data Model list, leave the newly created master view instance selected so that it appears highlighted. This will be the target of the detail view instance you will add. Then locate and select the detail view object beneath the master view object in the Available View Objects list.
Figure 9-5 shows the detail
OrdersVOindented beneath masterPersonsVOwith the nameOrdersVO via PersonsToOrders. The name identifies the view linkPersonsToOrders, which defines the master-detail hierarchy betweenPersonsVOandOrdersVO. Notice also that theOrdersVOwill have the view instance nameMyOrderswhen added to the data model. -
To add the detail instance to the previously added master instance, shuttle the detail view object to the Data Model list below the selected master view instance.
Figure 9-6 shows the newly created detail view instance
MyOrdersas a detail of theAuthenticatedUserin the data model. -
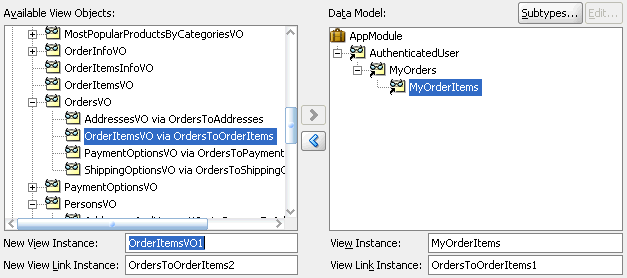
To add another level of hierarchy, repeat Step 3 through Step 6, but select the newly added detail in the Data Model list, then shuttle over the new detail, which itself has a master-detail relationship with the previously added detail instance.
Figure 9-7 shows the Data Model list with instance
AuthenticatedUser(renamed fromPersonsVO) as the master ofMyOrders(renamed fromOrdersVO via PersonsToOrders), which is, in turn, a master forMyOrderItems(renamed fromOrderItemsVO via OrdersToOrderItems).
9.2.3.3 Customizing a View Object Instance that You Add to an Application Module
You can optionally customize the view object instance by using the Data Model Components page of the overview editor for the application module. For example, you might want to apply a filter to set the controlling attribute for a master-detail view object relationship.
To customize a view object instance that you add to an existing application module:
-
In the Application Navigator, double-click the application module.
-
In the overview editor, click the Data Model navigation tab.
-
On the Data Model Components page, expand the View Object Instances section and, in the Data Model list, select the view object instance you want to customize and click the Edit button.
-
In the Edit View Instance dialog, perform any of the following steps, and then click OK.
-
In the View Criteria group box, select one or more view criteria that you want to apply to the view object instance. The view criteria will be appended as a
WHEREclause to the instance query. For details about defining view criteria, see Section 5.11, "Working with Named View Criteria." -
In the Bind Parameters Values group box, enter any values that you wish the instance to use when applying the defined view criteria. For more information about defining bind variables, see Section 5.10, "Working with Bind Variables."
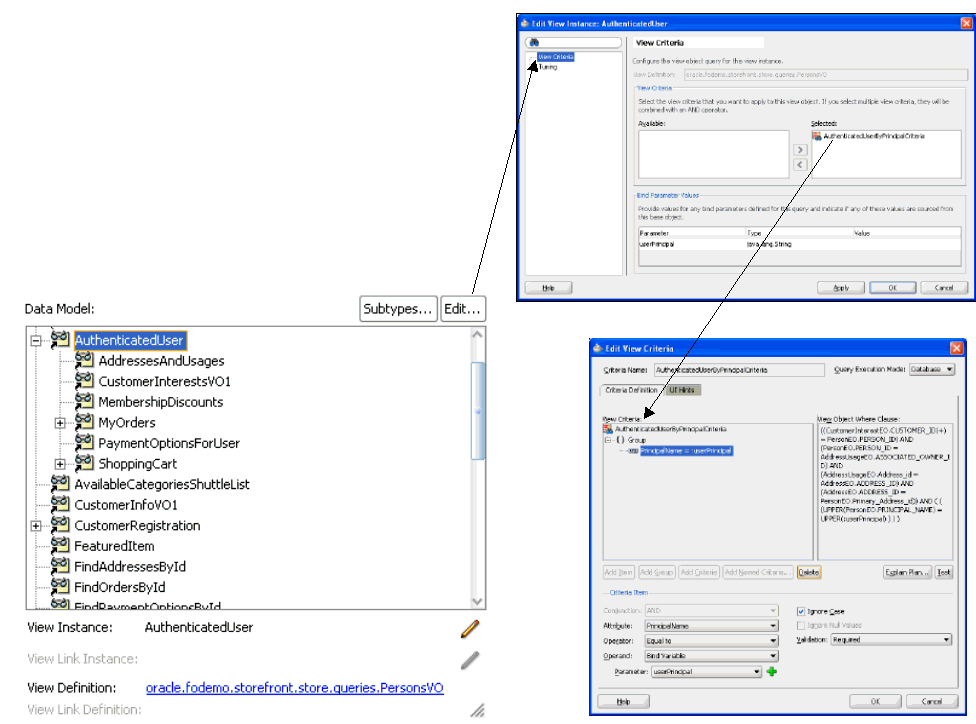
Figure 9-8 shows the Edit View Instance dialog opened for the
AuthenticatedUserview usage with theAuthenticatedUserByPrincipalCriteriaselected. No default value is supplied for the bind variableuserPrincipalsince the value will be provided at runtime through the evaluation of a Groovy expression that obtains the current user from the ADF security context. The data model for the project defines a master-detail relationship with thePrincipalNameattribute as the controlling attribute forAuthenticatedUserview usage. The controlling attribute, when set by the view criteria filter, provides a way to retrieve only the view rows for the current user. -
9.2.4 What Happens When You Add a View Object to an Application Module
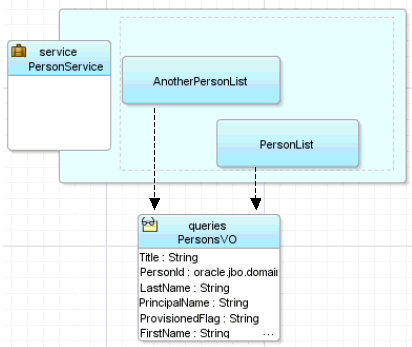
While adding a view object to an application module, you use instances of a view object component to define its data model. Figure 9-9 shows a JDeveloper business components diagram of a PersonService application module.
The sample application module contains two instances of the Persons view object component, with member names of PersonList and AnotherPersonList to distinguish them. At runtime, both instances share the same PersonsVO view object component definition—ensure that they have the same attribute structure and view object behavior—however, each might be used independently to retrieve data about different users. For example, some of the runtime properties, like an additional filtering WHERE clause or the value of a bind variable, might be different on the two distinct instances.
Example 9-1 shows how the PersonService application module defines its member view object instances in its XML component definition file.
Example 9-1 Member View Object Instances Defined in XML
<AppModule Name="PersonService">
   <ViewUsage
      Name="PersonList"
      ViewObjectName="oracle.fodemo.storefront.store.queries.PersonsVO"/>
   <ViewUsage
      Name="AnotherPersonList"
      ViewObjectName="oracle.fodemo.storefront.store.queries.PersonsVO"/>
</AppModule>
9.2.5 How to Edit an Existing Application Module
After you've created a new application module, you can edit any of its settings by using the Edit Application Module dialog. To launch the editor, choose Open from the context menu in the Application Navigator, or double-click the application module. By visiting the different pages of the editor, you can adjust the data model to determine whether or not to reference nested application modules, specify Java generation settings, client interface methods, remote deployment options, runtime instantiation behavior, and custom properties.
If you edit the name of your application module, choose a name that is not among the reserved words that Oracle Application Development Framework (Oracle ADF) defines. In particular, reserved words are not valid for a data control usage name which JDeveloper automatically assigns based on your application module's name. In Fusion web applications, these reserved words consist of data, bindings, security, and adfContext. For example, you should not name an application module data. If JDeveloper creates a data control usage with an ID that collides with a reserved word, your application may not reliably access your data control objects at runtime and may fail with a runtime ClassCastException.
Do not name the application module with an initial underscore (_) character to prevent a potential name collision with a wider list of reserved words that begin with the underscore.
Application module names that incorporate a reserved word into their name (or that change the case of the reserved word) will not conflict. For example, Product_Data, Product_data, or just Data are all valid application module names since the whole name does not match the reserved word data.
9.2.6 How to Change the Data Control Name Before You Begin Building Pages
By default, an application module will appear in the Data Controls panel as a data control named AppModuleNameDataControl. The user interface designer uses the Data Controls panel to bind data from the application module to the application's web pages. For example, if the application module is named StoreServiceAM, the Data Controls panel will display the data control with the name StoreServiceAMDataControl. You can change the default data control name to make it shorter or to supply a more preferable name.
When the user interface designer works with the data control, they will see the data control name for your application module in the DataBindings.cpx file in the user interface project and in each data binding page definition XML file. In addition, you might refer to the data control name in code when needing to work programmatically with the application module service interface. For this reason, if you plan to change the name of your application module, do this change before you begin building your view layer.
For complete information about the application module data control, see Chapter 12, "Using ADF Model in a Fusion Web Application."
Note:
If you decide to change the application module's data control name after you have already referenced it in one or more pages, you will need to open the page definition files andDataBindings.cpx file where it is referenced and update the old name to the new name manually.To change the application module data control name:
-
In the Application Navigator, double-click the application module.
-
Open the Property Inspector and expand the Other section.
-
Enter your preferred data control name in the Data Control Name field.
9.2.7 What You May Need to Know About Application Module Granularity
A common question related to application modules is, "How big should my application module be?" In other words, "Should I build one big application module to contain the entire data model for my enterprise application, or many smaller application modules?" The answer depends on your situation.
In general, application modules should be as big as necessary to support the specific use case you have in mind for them to accomplish. They can be assembled from finer-grained application module components using a nesting feature, as described in Section 9.4, "Defining Nested Application Modules." Since a complex business application is not really a single use case, a complex business application implemented using Oracle ADF will typically not be just a single application module.
In actual practice, you may choose any granularity you wish. For example, in a small application with one main use case and a "backend" supporting use case, you could create two application modules. However, for the sake of simplicity you can combine both use cases, rather than create a second application module that contains just a couple of view objects.
9.2.8 What You May Need to Know About View Object Components and View Object Instances
While designing an application module, you use instances of a view object component to define its data model. Just as the user interface may contain two instances of a Button component with member names of myButton and anotherButton to distinguish them, your application module contains two instances of the Persons view object component, with member names of PersonList and AnotherPersonList to distinguish them.
9.3 Configuring Your Application Module Database Connection
You configure your application module to use a database connection by identifying either a Java Database Connectivity (JDBC) URL or a JDBC data source name in the Connection Type section of the Edit Business Components Configuration dialog. A data source is a vendor-independent encapsulation of a database server connection.
You can use either the JDBC URL and the JDBC data source connection type to run the application module in any context where Java can run. Your application is not restricted to running inside a Java Enterprise Edition (Java EE) application server. For example, although the Business Component Browser is a standalone Java tool and does not run within the context of a Java EE application server, you can use either connection type to test your business components in the Business Component Browser.
The JDBC data source offers advantages that the JDBC URL connection type does not. When you define a connection type based on a data source, you reconfigure the data source without changing the deployed application. The data source is also centrally defined at the application server level, whereas JDBC URL connections are not. Although the default connection type for the application module is the JDBC URL, the Edit Business Components Configuration dialog lets you select among the existing application resources connections that appears in the Database Navigator.
9.3.1 How to Use a JDBC URL Connection Type
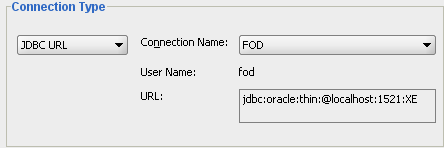
The default YourAppModuleNameLocal configuration uses a JDBC URL connection. It is based on the named connection definition set on the Business Components page of the Project Properties dialog for the project containing your application module. Figure 9-10 shows what this section would look like in a configuration using a JDBC URL connection.
Note:
If you are using a non-Oracle JDBC driver, make sure that you set the appropriate properties for the driver on the Properties page of the Edit Business Components Configuration dialog to avoid runtime exceptions.For example, if you are using a Sybase JDBC driver, you must set the jbo.sql92.LockTrailer property (which is set to FOR UPDATE by default) to a value appropriate for the Sybase database. Not setting this property would generate a SybSQLException runtime exception.
Note:
See Section 41.1.1.2, "Database Connection Pools," and Section 41.2.9, "What You May Need to Know About Database Connection Pool Parameters" for more information on how database connection pools are used and how you can tune them.9.3.2 How to Use a JDBC Data Source Connection Type
The other type of connection you can use is a JDBC data source. You define a JDBC data source as part of your application server configuration information, and then the application module looks up the resource at runtime using a logical name. Figure 9-11 shows what this section would look like in a configuration using a JDBC data source connection
Figure 9-11 JDBC DataSource Connection Type Setting in Edit Business Components Configuration Dialog

Example 9-2 shows the <resource-ref> tags in the web.xml file of a Fusion web application. These define two logical data sources named jdbc/FODemoDS and jdbc/FODemoCoreDS. The Edit Business Components Configuration dialog references this logical connection name after the prefix java:comp/env in the JDBC Datasource Name field. For example, the JDBC data source connection name for the same Fusion web application would display the value java:comp/env/jdbc/FODemoDS that you can select. Therefore the JDBC Datasource Name field is prepopulated with the JNDI name for all available application resources connection names.
Example 9-2 Logical Data Source Resource Names Defined in web.xml
  <!-- In web.xml -->
  <resource-ref>
    <res-ref-name>jdbc/FODemoDS</res-ref-name>
    <res-type>javax.sql.DataSource</res-type>
    <res-auth>Container</res-auth>
  </resource-ref>
  <resource-ref>
    <res-ref-name>jdbc/FODemoCoreDS</res-ref-name>
    <res-type>javax.sql.DataSource</res-type>
    <res-auth>Container</res-auth>
  </resource-ref>
You can directly edit the JDBC Datasource Name field when you want to specify a connection name for a global data source that is required to run the application on a target standalone application server. When you deploy to Oracle WebLogic Server, by default, the application-specific data source is not packaged with the application and Oracle WebLogic Server is configured to find a global data source named jdbc/applicationConnectNameDS using the look up java:comp/env/jdbc/applicationConnectNameDS. Therefore, by following this naming convention, you enable a single data source connection name to work correctly when running the application in JDeveloper using an application-specific data source or when running on the deployed standalone server using a global data source.
Note:
When configuring the ADF application module to access a highly available database system, such as redundant databases or Oracle Real Application Clusters (Oracle RAC) as the backend, the data source must be container-defined. In this scenario, the application module will use a multi data source; however, from the standpoint of the application module configuration, the naming convention for the multi data source is the same as it is for an non-multi data source. This ensures that the correct data source will be used at runtime. For details about configuring multi data sources for high availability applications, see the Oracle Fusion Middleware High Availability Guide.9.3.3 What Happens When You Create an Application Module Database Connection
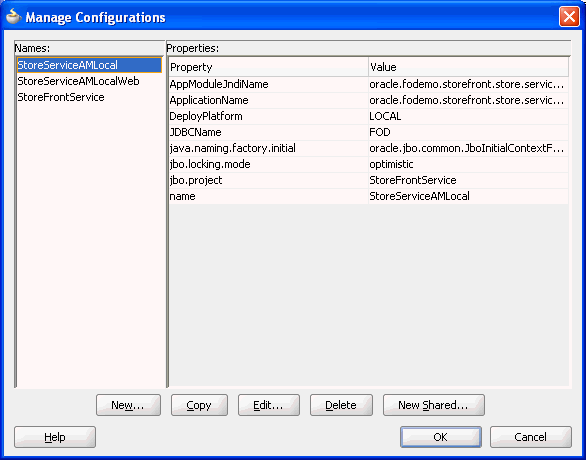
When you select the database connection in the Edit Business Components Configuration dialog, JDeveloper updates the application module configuration file, bc4j.xcfg in the ./common subdirectory relative to the application module's XML component definition. The file defines configurations for all of the application modules in a single Java package. For example, if you look at the bc4j.xcfg file in the ./classes/oracle/fodemo/storefront/store/service/common directory of the Fusion Order Demo application's StoreFront project, you will see the three named configurations for its StoreServiceAM application module.
The configurations defined by the bc4j.xcfg file allow the Fusion web application to interact with specific, deployed application modules. In addition to the database connection details for the application module, the bc4j.xcf file contains metadata information about application module names and it contains the runtime parameters that are configured for the application module.
Example 9-3 displays a sample bc4j.xcfg file from the Fusion Order Demo application. The configurations StoreServiceAMLocal and StoreServiceAMLocalWeb both reference a JDBC connection (named FOD) in the JDBCName attribute. The JDBC connection string for the JDBC connection is defined in the Connections folder of the Application Navigator and saved in the application's connection.xml file. The configuration StoreFrontService references a data source that will eventually be defined on the target application server. The JDBCDataSource attribute in the StoreFrontService configuration specifies the JNDI name for the application resources connection name in the form of java:comp/env/jdbc/applicationConnectNameDS, where applicationConnectName is the name of the application resources database connection defined in JDeveloper (in this case, FOD). This JNDI naming convention (with the application-specific name space java:comp/env/jdbc/ and DS appended to the application resources database connection name ) ensures that a deployed Fusion web application will run on Oracle WebLogic Server using the application's global data source and no changes will be required. The global data source is typically defined by the application server administrator using the Oracle WebLogic Server Administration Console.
Example 9-3 Application Module Database Configurations in the bc4j.xcfg File
<BC4JConfig version="11.1" xmlns="http://xmlns.oracle.com/bc4j/configuration">
   <AppModuleConfigBag ApplicationName="oracle.fodemo.storefront.store.service.StoreServiceAM">
      <AppModuleConfig
             DeployPlatform="LOCAL"
             JDBCName="FOD"
             jbo.project="StoreFrontService"
             name="StoreServiceAMLocal"
             ApplicationName="oracle.fodemo.storefront.store.service.StoreServiceAM">
         ...
      </AppModuleConfig>
      <AppModuleConfig
               DeployPlatform="LOCAL"
               JDBCName="FOD"
               jbo.project="StoreFrontService"
               name="StoreServiceAMLocalWeb"
               ApplicationName="oracle.fodemo.storefront.store.service.StoreServiceAM">
         ...
      </AppModuleConfig>
      <AppModuleConfig
               name="StoreFrontService"
               ApplicationName="oracle.fodemo.storefront.store.service.StoreServiceAM"
               jbo.project="StoreFrontService"
         ...
         <Custom JDBCDataSource="java:comp/env/jdbc/FODDS"/>
      </AppModuleConfig>
   </AppModuleConfigBag>
</BC4JConfig>
9.3.4 How to Change Your Application Module's Runtime Configuration
In addition to creating the application module XML component definition, JDeveloper also adds a default configuration named appModuleNameLocal to the bc4j.xcfg file in the subdirectory named common, relative to the directory containing the application module XML component definition file. The bc4j.xcfg file does not appear in the Application Navigator. To view the default settings or to change the application module's runtime configuration settings, you can use the Manage Configurations dialog shown in Figure 9-12.
To manage your application module's configuration:
-
To display the Edit Business Components Configuration dialog, do one of the following:
-
In the Application Navigator, right-click the application module and choose Configurations. In the Manage Configurations dialog, select the default configuration named
appModuleNameLocaland click Edit. -
In the overview editor for the application module, click the Configurations navigation tab and double-click the default configuration named
appModuleNameLocalin the displayed list.
-
-
In the Edit Business Components Configuration dialog, edit the desired runtime properties and click OK to save the changes for your configuration.
9.3.5 How to Change the Database Connection for Your Project
When you are developing applications, you may have a number of different users or schemas that you want to switch between. You can do this by changing the connection properties of the project that contains the business components. The selection you make will automatically update the connection name for each configuration that your project's bc4j.xcfg file defines.
To change the connection used by your application module's configuration:
-
In the Application Navigator, right-click the project that contains the application module and choose Project Properties.
-
In the Project Properties dialog, select Business Components to display the Business Components page, which shows details of the current database connection.
-
Click Edit, and in the Edit Database Connection dialog, make the appropriate changes.
-
Click OK.
9.4 Defining Nested Application Modules
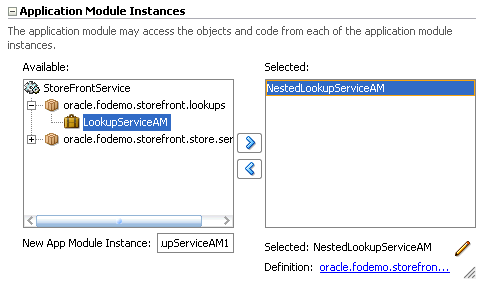
Application modules support the ability to create software components that mimic the modularity of your use cases, for which your higher-level functions might reuse a "subfunction" that is common to several business work flows. You can implement this modularity by defining composite application modules that you assemble using instances of other application modules. This task is referred to as application module nesting. That is, an application module can contain (logically) one or more other application modules, as well as view objects. The outermost containing application module is referred to as the root application module.
Declarative support for defining nested application modules is available through the overview editor for the application module, as shown in Figure 9-14. The API for application modules also supports nesting of application modules at runtime.
When you nest an instance of one application module inside another, you aggregate not only the view objects in its data model, but also any custom service methods it defines. This feature of "nesting," or reusing, an instance of one application module inside of another is one of the most powerful design aspects of the ADF Business Components layer of Oracle ADF for implementing larger-scale, real-world application systems.
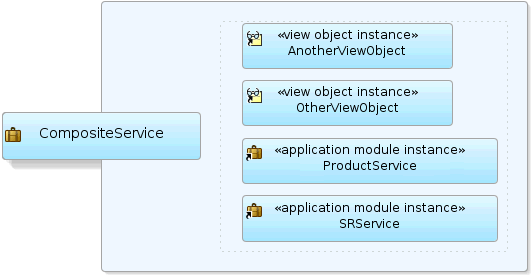
Using the basic logic that an application module represents an end-user use case or work flow, you can build application modules that cater to the data required by some shared, modular use case, and then reuse those application modules inside of other more complicated application modules that are designed to support a more complex use case. For example, imagine that after creating the application modules StoreServiceAM and ProductService, you later need to build an application that uses both of these services as an integral part of a new CompositeService application module. Figure 9-13 illustrates what this CompositeService would look like in a JDeveloper business components diagram. Notice that an application module like CompositeService can contain a combination of view object instances and application module instances.
9.4.1 How to Define a Nested Application Module
To specify a composite root application module that nests an instance of an existing application module, use the overview editor for the application module. All of the nested component instances (contained by the application module instance) share the same transaction and entity object caches as the root application module that reuses an instance of them.
Tip:
If you leverage nested application modules in your application, be sure to read Section 12.2.1.4, "How Nested Application Modules Appear in the Data Controls Panel" to avoid common pitfalls when performing data binding involving them.Create the desired application modules as described in Section 9.2.1, "How to Create an Application Module."
To define a nested application module:
-
In the Application Navigator, double-click the root application module.
-
In overview editor, click the Data Model navigation tab.
-
In the Data Model Components page, expand the Application Module Instances section and, in the Available list, select the application module that you want to add to the data model.
The New App Module Instance field below the list shows the name that will be used to identify the nested application module that you add to the data model.
-
To change the name before adding it, type a different name in the New App Module Instance field.
-
With the desired application module selected, shuttle the application module to the Selected list.
Figure 9-14 shows the application module
LookupServiceAMhas been renamed toNestedLookupServiceAMbefore it was shuttled to the Selected list.
9.4.2 What You May Need to Know About Root Application Modules Versus Nested Application Module Usages
At runtime, your application works with a main — or what's known as a root — application module. Any application module can be used as a root application module; however, in practice the application modules that are used as root application modules are the ones that map to more complex end-user use cases, assuming you're not just building a straightforward CRUD application. When a root application module contains other nested application modules, they all participate in the root application module's transaction and share the same database connection and a single set of entity caches. This sharing is handled for you automatically by the root application module and its Transaction object.
Additionally, when you construct an application using an ADF bounded task flow, to declaratively manage the transactional boundaries, Oracle ADF will automatically nest application modules used by the task flow at runtime. For details about bounded task flows and transactions, see Section 18.3, "Managing Transactions."
9.5 Creating an Application Module Diagram for Your Business Service
As you develop the business service's data model, it is often convenient to be able to visualize it using a UML model. JDeveloper supports easily creating a diagram for your application module that other developers can use for reference.
You can perform a number of tasks directly on the diagram, such as editing the application module, controlling display options, filtering methods names, showing related objects and files, publishing the application, and launching the Business Component Browser.
9.5.1 How to Create an Application Module Diagram
To create an application module diagram, use the Create Business Components Diagram dialog, which is available in the New Gallery.
To create a diagram of your application module:
-
In the Application Navigator, right-click the project in which you want to create the diagram and choose New.
-
In the New Gallery, expand Business Tier, select ADF Business Components and then Business Components Diagram, and click OK.
-
In the Create Business Components dialog, enter a diagram name and a package name in which the diagram will be created.
-
Click OK to create the empty diagram and open the diagrammer.
-
To add your existing application module to the open diagram, select the desired application module in the Application Navigator and drop it onto the diagram surface.
-
Use the Property Inspector to:
-
Hide the package name
-
Change the font
-
Turn off the grid and page breaks
-
Turn off the display of the end names on the view link connectors ("
Master"/"Detail")
-
After completing these steps, the diagram looks similar to the diagram shown in Figure 9-15.
9.5.2 What Happens When You Create an Application Module Diagram
When you create a business components diagram, JDeveloper creates a .adfbc_diagram file to represents the diagram in a subdirectory of the project's model path that matches the package name in which the diagram resides.
By default, the Application Navigator unifies the display of the project content's paths so that ADF components and Java files in the source path appear in the same package tree as the UML model artifacts in the project model path. You can use the Navigator Display Options > Show Directories toolbar option in the Application Navigator to switch between the unified directory view and a more distinct directory path view of the project content.
9.5.3 How to Use the Diagram to Edit the Application Module
The UML diagram of business components is not just a static picture that reflects the point in time when you dropped the application module onto the diagram. Rather, it is a UML-based rendering of the current component definitions, so it will always reflect the current state of affairs. The UML diagram is both a visualization aid and a visual navigation and editing tool.
You can bring up the overview editor for any application module in a diagram by choosing Properties from the context menu (or by double-clicking the application module).
You can also perform some application module editing tasks directly on the diagram, tasks such as renaming view object instances, dropping view object definitions from the Application Navigator onto the data model to create a new view object instance, and removing view object instances by pressing the Delete key.
Note:
Deleting components from the diagram only removes their visual representation on the diagram surface. The components and classes remain on the file system and in the Application Navigator.9.5.4 How to Control Diagram Display Options
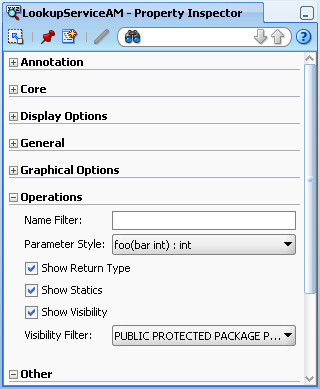
After you display the application module in the diagram, you can use the Property Inspector to control its display options.
In the Display Options category, toggle properties like the following:
-
Show Methods — to display service methods
-
Show Package — to display the package name
-
Show Stereotype — to display the type of object (for example "
<<application module>>")
Note:
The term operation is a more generic, UML name for methods.In the Operations category, consider changing the following properties depending on the amount of detail you want to provide in the diagram:
-
Parameter Style
-
Show Return Type
-
Show Visibility (public, private, etc.)
By default, all operations of the application module are fully displayed, as shown by the Property Inspector settings in Figure 9-16.
On the context menu of the diagram, you can also select to View As:
-
Compact — to show only the icon and the name
-
Symbolic — to show service operations
-
Expanded — to show operations and data model (default)
9.5.5 How to Filtering Method Names Displayed in the Diagram
Initially, if you show the operations for the application module, the diagram displays all the methods. Any method it recognizes as an overridden framework method displays in the <<Framework>> operations category. The rest display in the <<Business>> methods category.
The Name Filter property in the Operations category of the Property Inspector is a regular expression that you can use to filter out methods you don't want to display on the diagram. For example, by setting the Name Filter property to:
findLoggedInUser.*|retrieveOrder.*|get.*
you can filter out all of the following application module methods:
-
findLoggedInUserByEmail -
retrieveOrderById -
All the generated view object getter methods
9.5.6 How to Show Related Objects and Implementation Files in the Diagram
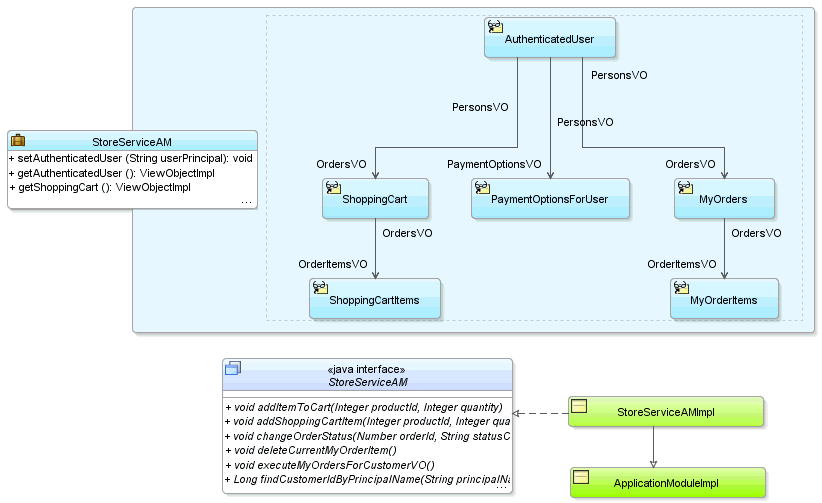
After selecting the application module on the diagram — or any set of individual view object instances in its data model — you can choose Show > Related Elements from the context menu to display related component definitions on the diagram. In a similar fashion, choosing Show > Implementation Files will include the files that implement the application module on the diagram. You can repeat these options on the additional diagram elements that appear until the diagram includes the level of detail you want to convey.
Figure 9-17 illustrates how the diagram displays the implementation files for an application module. You will see the related elements for the application module's implementation class (StoreServiceAMImpl). The diagram also draws an additional dependency line between the application module and the implementation class. If you have cast the application module instance to a specific custom interface, the diagram will also show that.
9.5.7 How to Publish the Application Module Diagram
To publish the diagram to PNG, JPG, SVG, or compressed SVG format, choose Publish Diagram from the context menu on the diagram surface.
9.6 Supporting Multipage Units of Work
While interacting with your Fusion web application, end users might:
-
Visit the same pages multiple times, expecting fast response times
-
Perform a logical unit of work that requires visiting many different pages to complete
-
Need to perform a partial "rollback" of a pending set of changes they've made but haven't saved yet.
-
Unwittingly be the victim of an application server failure in a server farm before saving pending changes
The application module pooling and state management features simplify implementing scalable, well-performing applications to address these requirements.
Note:
ADF bounded task flows can represent a transactional unit of work. You can specify options on the task flow to determine how to handle the transaction. For details about the declarative capabilities of ADF bounded task flows, see Section 18.3, "Managing Transactions."9.6.1 How to Simulate State Management in the Business Component Browser
To simulate what the state management functionality does, you can launch two instances of Business Component Browser on an application module in the Application Navigator.
To simulate transaction state passivation using the Business Component Browser:
-
Run the Business Component Browser and double-click a view object instance to query its data.
-
Make a note of the current values of a several attributes for a few rows.
-
Update those rows to have a different value those attributes, but do not commit the changes.
-
Choose File > Save Transaction State from the Business Component Browser main menu.
A Passivated Transaction State dialog appears, indicating a numerical transaction ID number. Make a note of this number.
-
Exit out of the Business Component Browser completely.
-
Restart the Business Component Browser and double-click the same view object instance to query its data.
-
Notice that the data is not changed. The queried data from the data reflects the current state of the database without your changes.
-
Choose File > Restore Transaction State from the Business Component Browser main menu, and enter the transaction ID you noted in Step 4.
At this point, you'll see that your pending changes are reflected again in the rows you modified. If you commit the transaction now, your changes are permanently saved to the database.
9.6.2 What Happens When the Application Uses Application Module Pooling and State Management
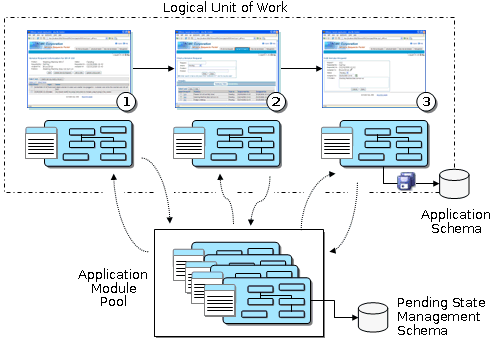
Applications you build that leverage an application module as their business service take advantage of an automatic application module pooling feature. This facility manages a configurable set of application module instances that grows and shrinks as the end-user load on your application changes during the day. Due to the natural "think time" inherent in the end user's interaction with your application user interface, the number of application module instances in the pool can be smaller than the overall number of active users using the system.
As shown in Figure 9-18, as a given end user visits multiple pages in your application to accomplish a logical task, with each page request an application module instance in the pool is acquired automatically from the pool for the lifetime of that one request. At the end of the request, the instance is automatically returned to the pool for use by another user session. In order to protect the end user's work against application server failure, the application module supports the ability to freeze the set of pending changes in its entity caches to a persistent store by saving an XML snapshot describing the change set. For scalability reasons, this state snapshot is typically saved in a state management schema that is a different database schema than the one containing the application data.
The pooling algorithm affords a tunable optimization whereby a certain number of application module instances will attempt to stay "sticky" to the last user session that returned them to the pool. The optimization is not a guarantee, but when a user can benefit from the optimization, they continue to work with the same application module instance from the pool as long as system load allows. When load is too high, the pooling algorithm uses any available instance in the pool to service the user's request and the frozen snapshot of their logical unit of work is reconstituted from the persistent store to allow the new instance of the application module to continue where the last one left off. The end user continues to work in this way until they commit or roll back their changes.
Using these facilities, the application module delivers the productivity of a stateful development paradigm that can easily handle multipage work flows, in an architecture that delivers the runtime performance near that of a completely stateless application. You will learn more about these application module features in Chapter 40, "Application State Management" and about how to tune them in Chapter 41, "Tuning Application Module Pools and Connection Pools."
Note:
This application module pooling and state management is also available for thin-client, desktop-fidelity Swing applications and web-style user interfaces.9.7 Customizing an Application Module with Service Methods
An application module can expose its data model of view objects to clients without requiring any custom Java code. This allows client code to use the ApplicationModule, ViewObject, RowSet, and Row interfaces in the oracle.jbo package to work directly with any view object in the data model. However, just because you can programmatically manipulate view objects any way you want to in client code doesn't mean that doing so is always a best practice.
Whenever the programmatic code that manipulates view objects is a logical aspect of implementing your complete business service functionality, you should encapsulate the details by writing a custom method in your application module's Java class. This includes code that:
-
Configures view object properties to query the correct data to display
-
Iterates over view object rows to return an aggregate calculation
-
Performs any kind of multistep procedural logic with one or more view objects
By centralizing these implementation details in your application module, you gain the following benefits:
-
You make the intent of your code more clear to clients.
-
You allow multiple client pages to easily call the same code if needed.
-
You simplify regression-testing of your complete business service functionality.
-
You keep the option open to improve your implementation without affecting clients.
-
You enable declarative invocation of logical business functionality in your pages.
9.7.1 How to Generate a Custom Class for an Application Module
To add a custom service method to your application module, you must first enable a custom Java class for it. If you have configured your IDE-level Business Components Java generation preferences to automatically generate an application module class, a custom class will be present. If you're not sure whether your application module has a custom Java class, open the overview editor for the application module node in the Application Navigator. The Java Classes page of the editor displays the complete list of classes generated for the application module in the project. If the file exists because someone created it already, then the Java Classes page will display a linked file name identified as the Application Module Class. To open an existing file in the source editor, click the corresponding file name link.
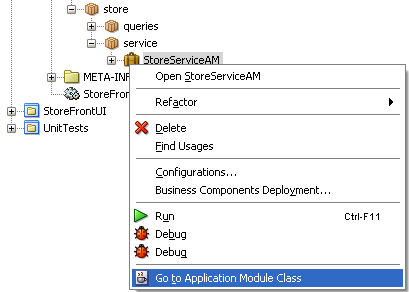
You can also check the application module node's context menu for the Go to Application Module Class option, as shown in Figure 9-19. When this option is present in the menu, you can use it to quickly navigate to your application module's custom class. If you don't see the option in the menu, then your application module is currently an XML-only component.
If no Java class exists in your project, you can generate one using the Java Classes page of the overview editor for the application module.
Create the desired application module as described in Section 9.2.1, "How to Create an Application Module."
To generate a Java file for your application module class:
-
In the Application Navigator, double-click the application module.
-
In the overview editor, click the Java navigation tab and click the Edit java options button.
-
In the Select Java Options dialog, select Generate Application Module Class.
-
Click OK.
The new
.javafile will appear in the Java Classes page.
9.7.2 What Happens When You Generate a Custom Class for an Application Module
When you generate a custom class for an application module, JDeveloper creates the file in the same directory as the component's XML component definition file. The default name for its custom Java file will be AppModuleNameImpl.java.
The Java generation option choices you made for the application module persist on the Java Classes page on subsequent visits to the overview editor for the application module. Just as with the XML definition file, JDeveloper keeps the generated code in your custom Java classes up to date with any changes you make in the editor. If later you decide you do not require a custom Java file, from the Java Classes page open the Select Java Options dialog and deselect Generate Application Module Class to remove the custom Java file from the project.
9.7.3 What You May Need to Know About Default Code Generation
By default, the application module Java class will look similar to what you see in Example 9-4 when you've first enabled it. Of interest, it contains:
-
Getter methods for each view object instance in the data model
-
A
main()method allowing you to debug the application module using the Business Component Browser
Example 9-4 Default Application Module Generated Code
package devguide.model;
import devguide.model.common.StoreServiceAM;
import oracle.jbo.server.ApplicationModuleImpl;
import oracle.jbo.server.ViewLinkImpl;
import oracle.jbo.server.ViewObjectImpl;
// ---------------------------------------------------------------------
// ---    File generated by Oracle ADF Business Components Design Time.
// ---    Custom code may be added to this class.
// ---    Warning: Do not modify method signatures of generated methods.
// ---------------------------------------------------------------------
public class StoreServiceAMImpl extends ApplicationModuleImpl {
  /** This is the default constructor (do not remove) */
  public StoreServiceImpl() { }

  /** Container's getter for YourViewObjectInstance1 */
  public ViewObjectImpl getYourViewObjectInstance1() {
    return (ViewObjectImpl)findViewObject("YourViewObjectInstance1");
  }

  // ... Additional ViewObjectImpl getters for each view object instance

  // ... ViewLink getters for view link instances here
}
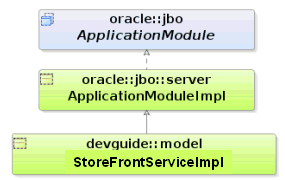
As shown in Figure 9-20, your application module class extends the base ADF ApplicationModuleImpl class to inherit all the default behavior before adding your custom code.
9.7.4 How to Add a Custom Service Method to an Application Module
To add a custom service method to an application module, simply navigate to the application module's custom class and enter the Java code for a new method into the application module's Java implementation class. Use the following guidelines to decide on the appropriate visibility for the method:
-
If you will use the method only inside this component's implementation as a helper method, make the method
private. -
If you want to allow eventual subclasses of your application module to be able to invoke or override the method, make it
protected. -
If you need clients to be able to invoke it, it must be
public.
Note:
TheStoreServiceAM application module examples in this chapter use the strongly typed, custom entity object classes that you saw illustrated in the StoreServiceAMImpl2.java example at the end of Chapter 4, "Creating a Business Domain Layer Using Entity Objects."Example 9-5 shows a private retrieveOrderById() helper method in the StoreServiceAMImpl.java class for the StoreServiceAM application module. It uses the static getDefinition() method of the OrdersEOImpl entity object class to access its related entity definition, it uses the createPrimaryKey() method on the entity object class to create an appropriate Key object to look up the order, and then it uses the findByPrimaryKey() method on the entity definition to find the entity row in the entity cache. It returns an instance of the strongly typed OrdersEOImpl class, the custom Java class for the OrderEO entity object.
Example 9-5 Private Helper Method in Custom Application Module Class
// In devguide.model.StoreServiceAMImpl class
/*
 * Helper method to return a Order by Id
 */
private OrdersEOImpl retrieveOrderById(long orderId) {
  EntityDefImpl orderDef = OrdersEOImpl.getDefinitionObject();
  Key orderKey =
    OrdersEOImpl.createPrimaryKey(new DBSequence(orderId));
  return (OrdersEOImpl)orderDef.findByPrimaryKey(getDBTransaction(),
                                                        orderKey);
}
Example 9-6 shows a public createProduct() method that allows the caller to pass in a name and description of a product to be created. It uses the getDefinition() method of the ProductImpl entity object class to access its related entity definition, and it uses the createInstance2() method to create a new ProductImpl entity row, whose Name and Description attributes it populates with the parameter values passed in before committing the transaction.
Example 9-6 Public Method in Custom Application Module Class
/*
 * Create a new Product and Return its new id
 */
public long createProduct(String name, String description) {
  EntityDefImpl productDef = ProductImpl.getDefinitionObject();
  ProductImpl newProduct =
    (ProductImpl)productDef.createInstance2(getDBTransaction(),null);
  newProduct.setName(name);
  newProduct.setDescription(description);
  try {
    getDBTransaction().commit();
  }
  catch (JboException ex) {
    getDBTransaction().rollback();
    throw ex;
  }
  DBSequence newIdAssigned = newProduct.getProdId();
  return newIdAssigned.getSequenceNumber().longValue();
}
9.7.5 How to Test the Custom Application Module Using a Static Main Method
When you are ready to test the methods of your custom application module, you can use JDeveloper to generate JUnit test cases. With JUnit, you can use any of the programmatic APIs available in the oracle.jbo package to work with the application module and invoke the custom methods. For details about using JUnit with ADF Business Components, see Section 31.10, "Regression Testing with JUnit."
As an alternative to JUnit test cases, a common technique to test your custom application module methods is to write a simple test case. For example, you could build the testing code into an object and include that code in the static main() method. Example 9-7 shows a sample main() method you could add to your custom application module class to test the sample methods you will write. You'll make use of a Configuration object (see Section 6.4.2, "How to Create a Command-Line Java Test Client") to instantiate and work with the application module for testing.
Note:
The fact that thisConfiguration object resides in the oracle.jbo.client package suggests that it is used for accessing an application module as an application client. Because a main() method is a kind of programmatic, command-line client, so this is an acceptable practice. Furthermore, even though you typically would not cast the return value of createRootApplicationModule() directly to an application module's implementation class, it is legal to do so in this one situation since despite being a client to the application module, the main() method's code resides right inside the application module implementation class itself.A glance through the code in Example 9-7 shows that it exercises the four methods created in the previous examples to:
-
Retrieve the total for order 1011.
-
Retrieve the name of the customer for order 1011.
-
Set the status of order 1011 to the value "CANCEL".
-
Create a new product supplying a null product name.
-
Create a new product with a product name and display its newly assigned product ID.
Example 9-7 Sample Main Method to Test a Custom Application Module from the Inside
// Main method in StoreServiceAMImpl.java
  public static void main(String[] args) {
    String        amDef = "devguide.model.StoreFrontService";
    String        config = "StoreServiceLocal";
    /*
     * This is the correct way to use application custom methods
     * from the client, by using the application module's automatically-
     * maintained custom service interface.
     */
    // 1. Acquire instance of application module, cast to client interface
    ApplicationModule am =
                          Configuration.createRootApplicationModule(amDef,config);
/*
* NOTE: This cast to use the StoreFrontServiceImpl class is OK since this
*       code is inside a business tier *Impl.java file and not in a
*       client class that is accessing the business tier from "outside".
*/
    StoreFrontServiceImpl service = (StoreFrontServiceImpl)am;
    String total = service.findOrderTotal(1011);
    System.out.println("Total for Order # 1011 = " + total);
    String customerName = service.findOrderCustomer(1011);
    System.out.println("Customer for Order # 1011 = " + customerName);
    try {
       service.updateOrderStatus(1011,"CANCEL");
    }
    catch (JboException ex) {
       System.out.println("ERROR: "+ex.getMessage());
    }
    long id = 0;
    try {
       id = service.createProduct(null, "NEW", "CLASS1");
    }
    catch (JboException ex) {
       System.out.println("ERROR: "+ex.getMessage());
    }
    id = service.createProduct("Canon PowerShot G9", "NEW", "CLASS1");
    System.out.println("New product created successfully with id = "+id);
    Configuration.releaseRootApplicationModule(am,true);
  }
Running the custom application module class calls the main() method in Example 9-7, and shows the following output:
Total for Order # 1011 = 99.99
Customer for Order # 1011 = John Chen
ERROR: JBO-27014: Attribute ProductName in ProductsBaseEO is required.
New product created successfully with id = 133
Notice that the first attempt to call createProduct() with a null for the product name raises an exception due to the built-in mandatory validation on the Name attribute of the Product entity object.
Note:
For an explanation of how you can use the client application to invoke the custom service methods that you create in your custom application module, see Section 9.9, "Publishing Custom Service Methods to UI Clients."9.7.6 What You May Need to Know About Programmatic Row Set Iteration
Any time your application logic accesses a row set to perform programmatic iteration, you should use a secondary row set iterator when working with view object instances in an application module's data model, or view link accessor row sets of these view object instances, since they may be bound to user interface components. To create a secondary iterator, use the createRowSetIterator() method on the row set you are working with. When you are done using it, call the closeRowSetIterator() method on the row set to remove the secondary iterator from memory. Example 9-8 shows a typical application module custom method that correctly uses a secondary row set iterator for programmatic iteration, because the EmpView1 view object instance in its data model may be bound to a user interface (either now or at a later time).
Example 9-8 Using a Secondary Row Set Iterator in an Application Module Custom Method
// Custom method in an application module implementation class
public void doSomeCustomProcessing() {
    ViewObject vo = getEmpView1();
    // create secondary row set iterator with system-assigned name
    RowSetIterator iter = vo.createRowSetIterator(null);
    while (iter.hasNext()) {
        Row r = iter.next();
        // Do something with the current row.
    }
    // close secondary row set iterator
    iter.closeRowSetIterator();
}
Note:
The same recommendation holds for custom code in a view object's implementation class that iterates its own default row set using that row set's default row set iterator.There are two important reasons to follow this recommendation. Failing to do so can lead to confusion for the end user when the current row unexpectedly changes or it can introduce subtle business logic errors because the first or last row, or both rows get skipped.
-
Confusing the end user by changing the current row unexpectedly
The iterator bindings determine what row the end-user sees as the current row in the row set. If your own programmatic logic iterates through the row set using the same default row set iterator that the iterator binding uses, you may inadvertently change the current row the user has selected, leaving the user confused.
-
Introducing subtle business logic errors by inadvertently skipping the first or last row
Iterator bindings force their row set iterator to be on a valid row to guarantee that UI components display data when the row set is not empty. This has the side-effect of preventing your custom logic from navigating to the slot either before the first row or to the slot after the last row (when it is using the same row set iterator as an iterator binding). In concrete terms, this means that a typical
while (rowset.hasNext())iteration loop will either be skipped or start by processing the second row instead of the first as shown in Example 9-9.
Example 9-9 Consequences of Using the Default Row Set Iterator
// Reset the default row set iterator to the slot before the first row
rowset.reset();
// If an iterator binding is bound to the same default row set iterator,
// then it has already forced it to navigate to the first row here instead
// of being on the slot before the first row.
//
// If the row set has only one row, the following will then return false
while (rowset.hasNext()) {
  // If the row set has more than one row, the first time through the loop
  // this call to next() will return the second row rather than the first
  // row as expected.
  Row curRow = rowset.next();
  // Do something with current row
}
9.8 Customizing Application Module Message Strings
The ADF application module does not have a resource bundle of its own and there is no design time in JDeveloper to associate one with the application module. However, if you do want to register a .properties file that contains your custom message strings, you can set a resource bundle definition in the definition class file that you generate for the application module.
9.8.1 How to Add a Resource Bundle to an Application Module
To generate the custom definition class file for the application module, use the Select Java Options dialog, which you open for the application module on the Java Classes page of the application module overview editor. You can use this file to override the built-in framework method finishedLoading().
-
Create the desired application module, as described in Section 9.2.1, "How to Create an Application Module."
-
Create the
.propertiesfile and add the message key and message, as described in .Section 4.7, "Working with Resource Bundles."The
.propertiesfile you create can reference attribute properties by their fully-qualified package name and custom method exception messages. For example, you might define message keys and strings as follows:test.Order.Orderno_LABEL=Order Number INVALID=You have called the method foo in an invalid way.
-
If your resource bundle defines a message for a method exception message, the custom method should appear in the application module client interface, as described in Section 9.9.1, "How to Publish a Custom Method on the Application Module's Client Interface."
For example, if you defined a message for the method
foo()that to replace the exception messageINVALID, your interface might define this method to invoke the message from the resource bundle as:public void foo() { ResourceBundleDef r = getResourceBundleDef(); throw new JboException(r,"INVALID",null); }
To generate the definition class and override the finishedLoading method:
-
In the Application Navigator, double-click the application module.
-
In the overview editor, click the Java navigation tab.
-
On the Java Classes page, click the Edit java options button.
-
In the Select Java Options dialog, select Generate Application Module Definition Class and click OK.
-
In the overview editor, on the Java Classes page, click the linked file name of the application module definition class that you want to customize. JDeveloper opens the class file in the source editor.
-
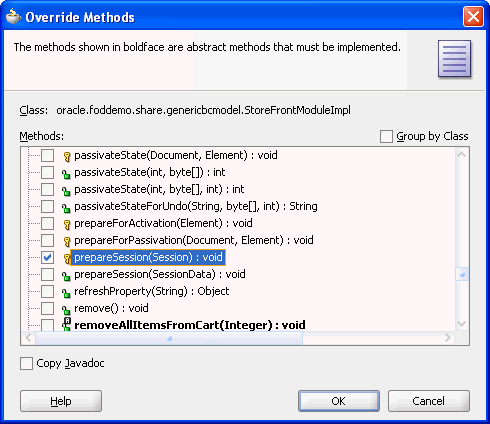
From the JDeveloper toolbar, choose Source > Override Methods.
If the Source menu is not displayed in the JDeveloper toolbar, be sure the definition class file is open and the source editor is visible.
-
In the Override Methods dialog, scroll the list to locate the finishedLoading() methods, select it, and click OK.
-
In the source editor for the definition class file, add the code to invoke your message bundle .properties file.
For example, if your file is
MyAMBundlein thetestpackage, your code would look like:@Override protected void finishedLoading() { super.finishedLoading(); PropertiesBundleDef pbd = new PropertiesBundleDef(this); pbd.setPropertiesFile("test.MyAMBundle"); setResourceBundleDef(pbd); }In this example, the
finishedLoading()method creates a message bundle definition and then sets the custom message bundle on the definition. -
Save the file.
9.8.2 What Happens When You Add a Resource Bundle to an Application Module
When you generate a custom definition class for an application module, JDeveloper creates the file in the same directory as the component's XML component definition file. The default name for its custom Java file will be AppModuleNameDefImpl.java.
Because you override the built-in finishedLoading() method in the definition class file, after the application is loaded at runtime, the framework will invoke the method and automatically load the named .properties file.
9.9 Publishing Custom Service Methods to UI Clients
When you add a public custom method to your application module class, if you want your application's UI to be able to invoke it, you need to include the method on the application module's UI client interface.
9.9.1 How to Publish a Custom Method on the Application Module's Client Interface
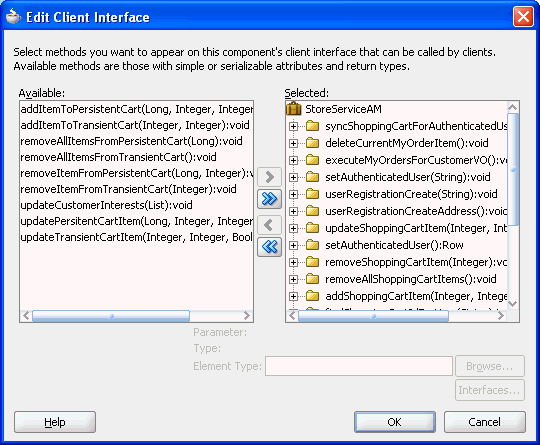
To include a public method from your application module's custom Java class on the client interface, use the Java Classes page of the overview editor for the application module, and then click the Edit icon in the Client Interface section of the page to display the Edit Client Interface dialog. Select one or more desired methods from the Available list and click the Add button to shuttle them into the Selected list. Then click OK to close the editor. Figure 9-21 shows multiple public methods added to the client interface.
9.9.2 What Happens When You Publish Custom Service Methods
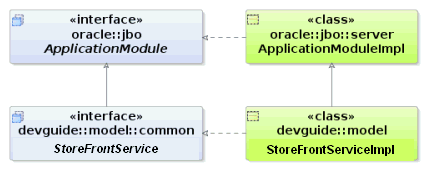
When you publish custom service methods on the client interface, as shown in Figure 9-22, JDeveloper creates a Java interface with the same name as the application module in the common subpackage of the package in which your application module resides. For an application module named StoreServiceAM in the fodemo.model package, this interface will be named StoreServiceAM and reside in the fodemo.model.common package. The interface extends the base ApplicationModule interface in the oracle.jbo package, reflecting that a client can access all of the base functionality that your application module inherits from the ApplicationModuleImpl class.
As shown in Example 9-10, the StoreServiceAM interface includes the method signatures of all of the methods you've selected to be on the client interface of your application module.
Example 9-10 Custom Client Interface Based on Methods Selected in the Client Interface Panel
package fodemo.model.common;
import oracle.jbo.ApplicationModule;
// ---------------------------------------------------------------------
// ---    File generated by Oracle ADF Business Components Design Time.
// ---------------------------------------------------------------------
public interface StoreServiceAM extends ApplicationModule {
  void deleteCurrentMyOrderItem();
  void executeMyOrdersForCustomerVO();
  void userRegistrationCreate(String userType);
  void updateUserInterests(List pCategoryIds);
  void userRegistrationCreateAddress();
}
Each time you add or remove methods in the Client Interface section, the corresponding client interface file is updated automatically. JDeveloper also generates a companion client proxy class that is used when you deploy your application module for access by a remote client. For the StoreServiceAM application module in this example, the client proxy file is called StoreServiceAMClient and it is created in the devguide.model.client subpackage.
Note:
After adding new custom methods to the client interface, if your new custom methods do not appear to be available when you use JDeveloper's code insight context-sensitive statement completion, try recompiling the generated client interface. To do this, select the application module in the Application Navigator, select the source file for the interface of the same name in the Structure window, and choose Rebuild from the context menu. Consider this tip for new custom methods added to view objects and view rows as well.9.9.3 How to Generate Client Interfaces for View Objects and View Rows
In addition to generating a client interface for your application module, it is also possible to generate strongly typed client interfaces for working with the other key client objects that you can customize. For example, you can open Java page in the overview editor for a view object, you can then expand the Client Interface section and the Client Row Interface section and add custom methods to the view object client interface and the view row client interface, respectively.
If for the Products view object in the devguide.model.queries package you were to enable the generation of a custom view object Java class and add one or more custom methods to the view object client interface, JDeveloper would generate the ProductsImpl class and Products interface, as shown in Figure 9-23. As with the application module custom interface, notice that it gets generated in the common subpackage.
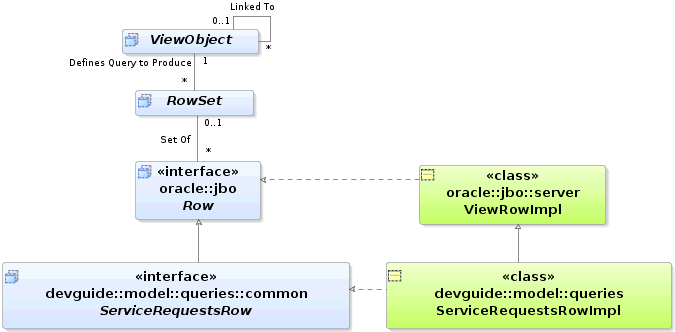
Likewise, if for the same view object you were to enable the generation of a custom view row Java class and add one or more custom methods to the view row client interface, JDeveloper would generate the ProductsRowImpl class and ProductsRow interface, as shown in Figure 9-24.
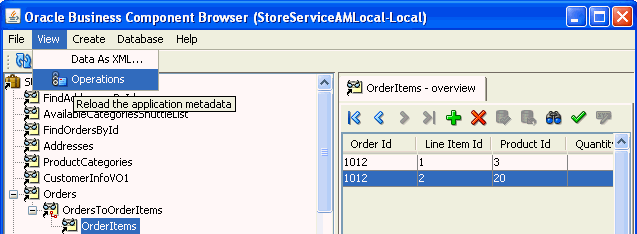
9.9.4 How to Test Custom Service Methods Using the Business Component Browser
You can test the methods of your custom application module in the Business Component Browser after you have published them on the client interface, as described in Section 9.9, "Publishing Custom Service Methods to UI Clients."
To test the service methods that you have published:
-
In the Application Navigator, expand the project containing the desired application module and view objects.
-
Right-click the application module and choose Run.
Alternatively, choose Debug when you want to run the application in the Business Component Browser with debugging enabled. JDeveloper opens the debugger process panel in the Log window and the various debugger windows. When debugging using the Business Component Browser, you can use these windows to view status message and exceptions, step in and out of source code, and manage breakpoints.
For information about receiving diagnostic messages specific to ADF Business Component debugging, see Section 6.3.8, "How to Enable ADF Business Components Debug Diagnostics."
-
To open the method testing panel for a method defined by a client interface, do one of the following:
-
In the data model tree, select the application module node and from the main menu choose View - Operations when you want to execute a method you published for the application module client interface. You can also double-click the application module node to display the method testing panel.
-
In the data model tree, select the desired view object node and from the main menu choose View - Operations when you want to execute a method you published on the client interface for a view object. You can also right-click the view object node and choose Operations.
-
-
To open the method testing panel for a method defined by a client row interface for a view object row, expand the data model tree, right-click the desired view object node and choose Show Table. Then in the overview panel for the view instance, select the desired row, and from the main menu, choose View - Operations.
Do not select a master view instance in the data model tree since view row operations are not permitted on master view objects. Always select a detail view instance or a view instance that is not specified in a master-detail hierarchy, as shown in Figure 9-25.
Tip:
In the case of a detail view instance, you can open the master view instance to navigate to the detail with the desired row. The Business Component Browser automatically synchronizes the data displayed in the open overview panel with the master view instance that you navigate to. -
In the method panel, select the desired service method from the dropdown list, enter values to pass as method parameters, and click Execute.
Notice that the method testing panel displays the parameter names to help you identify where to enter the values to pass. This is particularly useful when the method signature defines multiple parameters of the same data type.
You can view the return value (if any) and test result. The result displayed in the Business Component Browser will indicate whether or not the method executed successfully.
9.9.5 What You May Need to Know About Method Signatures on the Client Interface
You can include any custom method in the client interface that obeys these implementation rules:
-
If the method has a non-
voidreturn type, the type must be serializable. -
If the method accepts any parameters, all their types must be serializable.
-
If the method signature includes a throws clause, the exception must be an instance of
JboExceptionin theoracle.jbopackage.
In other words, all the types in its method signature must implement the java.io.Serializable interface, and any checked exceptions must be JboException or its subclass. Your method can throw any unchecked exception — java.lang.RuntimeException or a subclass of it — without disqualifying the method from appearing on the application module's client interface.
Note that method signatures of type java.util.List are allowed as long as the implementing class for the interface is serializable. For example, java.util.ArrayList and java.util.LinkedList are both serializable implementing classes. The same requirement applies to element types within the collection. The ADF Business Components runtime will produce an error if you instantiate a class that implements the interface yet does not implement the java.io.Serializable interface.
Note:
If the method you've added to the application module class doesn't appear in the Available list, first verify that it doesn't violate any of the method implementation rules. If it seems like it should be a legal method, try recompiling the application module class before visiting the overview editor for the application module again.9.9.6 What You May Need to Know About Passing Information from the Data Model
The private implementation of an application module custom method can easily refer to any view object instance in the data model using the generated accessor methods. By calling the getCurrentRow() method on any view object, it can access the same current row for any view object that the client user interface sees as the current row. As a result, while writing application module business service methods, you may not need to pass in parameters from the client. This is true if you would be passing in values only from the current rows of other view object instances in the same application module's data model.
For example, the custom application module method in Example 9-11 accepts no parameters. Internally, the createOrderItem() method calls getGlobals().getCurrentRow() to access the current row of the Globals view object instance. Then it uses the strongly typed accessor methods on the row to access the values of the Description and LineItemId attributes to set them as the values of corresponding attributes in a newly created OrderItem entity object row.
Example 9-11 Using View Object Accessor Methods to Access a Current Row
// In StoreServiceAMImpl.java, createOrderItem() method
GlobalsRowImpl globalsRow = (GlobalsRowImpl)getGlobals().getCurrentRow();
newReq.setDescription(globalsRow.getDescription());
newReq.setLineItemId(globalsRow.getLineItemId());
9.10 Working Programmatically with an Application Module's Client Interface
After publishing methods on your application module's client interface, you can invoke those methods from a client.
9.10.1 How to Work Programmatically with an Application Module's Client Interface
To work programmatically with an application module's client interface, do the following:
-
Cast
ApplicationModuleto the more specific client interface. -
Call any method on the interface.
Note:
For simplicity, this section focuses on working only with the custom application module interface; however, the same downcasting approach works on the client to use aViewObject interface as a view object interface like Orders or a Row interface as a custom view row interface like OrdersRow.Example 9-12 illustrates a TestClientCustomInterface class that puts these two steps into practice. You could also use the main() method of this class to test application module methods, as described in Section 9.7.5, "How to Test the Custom Application Module Using a Static Main Method." Here you use it to call all of the same methods from the client using the StoreFrontService client interface.
Note:
If you work with your application module using the defaultApplicationModule interface in the oracle.jbo package, you won't have access to your custom methods. Make sure to cast the application module instance to your more specific custom interface like the StoreFrontService interface in this example.The basic logic of Example 9-12 follows these steps:
-
Retrieve the total for order 1011.
-
Retrieve the name of the customer for order 1011.
-
Set the status of order 1011 to the value "CANCEL".
-
Create a new product supplying a null product name.
-
Create a new product with a product name and display its newly assigned product ID.
Example 9-12 Using the Custom Interface of an Application Module from the Client
package devguide.examples.appmodules;

import devguide.examples.appmodules.common.StoreFrontService;
import devguide.examples.entities.PersonsEOImpl;
import devguide.examples.entities.ProductsBaseEOImpl;

import oracle.jbo.ApplicationModule;
import oracle.jbo.JboException;
import oracle.jbo.Key;
import oracle.jbo.client.Configuration;
import oracle.jbo.domain.DBSequence;
import oracle.jbo.domain.Number;
import oracle.jbo.server.ApplicationModuleImpl;
import oracle.jbo.server.EntityDefImpl;

public class TestClientCustomInterface {
  public static void main(String[] args) {
    String        amDef = "devguide.model.StoreFrontService";
    String        config = "StoreFrontServiceLocal";
    /*
     * This is the correct way to use application custom methods
     * from the client, by using the application module's automatically-
     * maintained custom service interface.
     */
    //  Acquire instance of application module, cast to client interface
StoreFrontService service =
     (StoreFrontService)Configuration.createRootApplicationModule(amDef,config);
    String total = service.findOrderTotal(1011);
    System.out.println("Status of Order # 1011 = " + total);
    String customerName = service.findOrderCustomer(1011);
    System.out.println("Customer for Order # 1011 = " + customerName);
    try {
       service.updateOrderStatus(1011,"CANCEL");
    }
    catch (JboException ex) {
       System.out.println("ERROR: "+ex.getMessage());
    }
    long id = 0;
    try {
       id = service.createProduct(null, "NEW", "CLASS1");
    }
    catch (JboException ex) {
       System.out.println("ERROR: "+ex.getMessage());
    }
    id = service.createProduct("Canon PowerShot G9", "NEW", "CLASS1");
    System.out.println("New product created successfully with id = "+id);
    Configuration.releaseRootApplicationModule(am,true);
  }
}
Running the test client in Example 9-12 calls the custom methods of the client interface, and shows the following output:
Total for Order # 1011 = 99.99
Customer for Order # 1011 = John Chen
ERROR: JBO-27014: Attribute ProductName in ProductsBaseEO is required.
New product created successfully with id = 133
Notice that the first attempt to call createProduct() with a null for the product name raises an exception due to the built-in mandatory validation on the Name attribute of the Product entity object
9.10.2 What Happens When You Work with an Application Module's Client Interface
If the client layer accessing your application module will be located in the same tier of the Java EE architecture, the application module will be deployed in what is known as local mode. In local mode, the client interface is implemented directly by your custom application module Java class. Typically, you access an application module in local mode when you need to:
-
Access the application module in the web tier of a JavaServer Faces application
-
Access the application module in the web tier of a JSP/Struts application
-
Access the application module in the client tier (two-tier client-server style) for a Swing application
In contrast, when the client layer accessing your application module is located in a different tier of the Java EE architecture, the application module will be deployed in what is known as remote mode. In remote mode, the generated client proxy class implements your application module client interface on the client side, and the class handles all of the communications details of working with the remotely deployed application module service. You typically access the application module in remote mode only when a thin-client Swing application needs to access the application module on a remote application server.
A unique feature of ADF Business Components is that by adhering to the interface-only approach for working with client service methods, you can be sure your client code works unchanged regardless of your chosen deployment mode. Even if you plan to work only in local mode, the Java EE development community favors the interface-based approach to working with services. Using application modules, it's extremely easy to follow this approach in your applications.
Note:
Whether you plan to deploy your application modules in local mode or remote mode, as described in Section 9.9.5, "What You May Need to Know About Method Signatures on the Client Interface," the JDeveloper design time ensures that your custom interface methods will use serializable types. This allows you to switch at any time between local mode or remote mode, or to support both at the same time, with no code changes.9.10.3 How to Access an Application Module Client Interface in a Fusion Web Application
The Configuration class in the oracle.jbo.client package makes it very easy to get an instance of an application module for testing. This eases writing test client programs like the test client program described in Section 31.10, "Regression Testing with JUnit" as part of the JUnit regression testing fixture.
Because it is easy, it is tempting for developers to use the class createRootApplicationModule() and releaseApplicationModule() methods anywhere to access an application module. However, for Fusion web applications you should resist this temptation because there is an even easier way.
When working with Fusion web applications using the ADF Model layer for data binding, JDeveloper configures a servlet filter in your user interface project called the ADFBindingFilter. It orchestrates the automatic acquisition and release of an appropriate application module instance based on declarative binding metadata, and ensures that the service is available to be looked up as a data control using a known action binding or iterator binding, specified by any page definition file in the user interface project. You may eventually want to read about the ADF binding container, data controls, page definition files, and bindings, as described in Chapter 12, "Using ADF Model in a Fusion Web Application." For now, it is enough to realize that you can access the application module's client interface from this DCBindingContainer by naming an ADF action binding or an ADF iterator binding. You can reference the binding context and call methods on the custom client interface in a JSF managed bean, as shown in Example 9-13 for an action binding and Example 9-14 for an iterator binding.
To access the custom interface of your application module using an action binding, follow these basic steps (as illustrated in Example 9-13):
-
Access the ADF binding container.
-
Find a named action binding. (Use the name of any available action binding in the page definition files of the user interface project.)
-
Get the data control by name from the action binding.
-
Access the application module data provider from the data control.
-
Cast the application module to its client interface.
-
Call any method on the client interface.
Example 9-13 Accessing the Application Module Client Interface in a JSF Backing Bean Using a Named Action Binding
package demo.view;
import oracle.fodemo.storefront.store.service.common.StoreServiceAM;
import oracle.adf.model.binding.DCBindingContainer;
import oracle.adf.model.binding.DCDataControl;
import oracle.jbo.ApplicationModule;
import oracle.jbo.uicli.binding.JUCtrlActionBinding;
public class YourBackingBean {
  public String commandButton_action() {
    // Example using an action binding to get the data control
    public String commandButton_action() {
    // 1. Access the binding container
    DCBindingContainer bc = (DCBindingContainer)getBindings();
    // 2. Find a named action binding
    JUCtrlActionBinding action =
                    (JUCtrlActionBinding)bc.findCtrlBinding("SomeActionBinding");
    // 3. Get the data control from the iterator binding (or method binding)
    DCDataControl dc  = action.getDataControl();
    // 4. Access the data control's application module data provider
    ApplicationModule am = (ApplicationModule)dc.getDataProvider();
    // 5. Cast the AM to call methods on the custom client interface
    StoreServiceAM service = (StoreServiceAM)am;
    // 6. Call a method on the client interface
    service.doSomethingInteresting();
    return "SomeNavigationRule";
  }
}
To access the custom interface of your application module using an iterator binding, follow these basic steps (as illustrated in Example 9-14):
-
Access the ADF binding container.
-
Find a named iterator binding. (Use the name of any iterator binding in the page definition files of the user interface project.)
-
Get the data control by name from the iterator binding.
-
Access the application module data provider from the data control.
-
Cast the application module to its client interface.
-
Call any method on the client interface.
Example 9-14 Accessing the Application Module Client Interface in a JSF Backing Bean Using a Named Iterator Binding
package demo.view;
import oracle.fodemo.storefront.store.service.common.StoreServiceAM;
import oracle.adf.model.binding.DCBindingContainer;
import oracle.adf.model.binding.DCDataControl;
import oracle.adf.model.binding.DCIteratorBinding;
import oracle.jbo.ApplicationModule;
public class YourBackingBean {
  public String commandButton_action() {
    // Example using an iterator binding to get the data control
    public String commandButton_action() {
    // 1. Access the binding container
    DCBindingContainer bc = (DCBindingContainer)getBindings();
    // 2. Find a named iterator binding
    DCIteratorBinding iter = bc.findIteratorBinding("SomeIteratorBinding");
    // 3. Get the data control from the iterator binding
    DCDataControl dc  = iter.getDataControl();
    // 4. Access the data control's application module data provider
    ApplicationModule am = (ApplicationModule)dc.getDataProvider();
    // 5. Cast the AM to call methods on the custom client interface
    StoreServiceAM service = (StoreServiceAM)am;
    // 6. Call a method on the client interface
    service.doSomethingInteresting();
    return "SomeNavigationRule";
  }
}
These backing bean examples depend on the helper method shown in Example 9-15.
Example 9-15 Helper Method for Backing Bean Class
public BindingContainer getBindings() {
        if (this.bindings == null) {
            FacesContext fc = FacesContext.getCurrentInstance();
            this.bindings =
                (BindingContainer)fc.getApplication().evaluateExpressionGet(fc,
                            "#{bindings}", BindingContainer.class);
        }
        return this.bindings;
    }
If you create the backing bean class by overriding a button that is declaratively bound to an ADF action, then JDeveloper will automatically generate this method in your class. Otherwise, you will need to add the helper method to your class yourself.
9.11 Overriding Built-in Framework Methods
The ApplicationModuleImpl base class provides a number of built-in methods that implement its functionality. While Appendix E, "Most Commonly Used ADF Business Components Methods" provides a quick reference to the most common code that you will typically write, use, and override in your custom application module classes, this section focuses on helping you understand the basic steps to override one of these built-in framework methods to augment the default behavior.
9.11.1 How to Override a Built-in Framework Method
To override a built-in framework method for an application module, use the Override Methods dialog, which you select for the application module Java class from the main menu.
Create the desired application module as described in Section 9.2.1, "How to Create an Application Module."
To override an application module framework method:
-
In the Application Navigator, double-click the application module.
-
In the overview editor, click the Java navigation tab.
-
On the Java Classes page, click the linked file name of the application module Java class that you want to customize.
JDeveloper opens the class file in the source editor.
-
From the main menu, choose Source > Override Methods.
If the Source menu is not displayed, be sure that the desired Java class file is open and that the source editor is visible.
-
In the Override Methods dialog, scroll the list to locate the desired methods or type the first few letters of the method name to perform an incremental search.
-
Select one or more methods.
The Override Methods dialog allows you to select any number of methods to override simultaneously.
For example, if you wanted to override the application module's
prepareSession()method to augment the default functionality when a new user session begins working with an application module service component for the first time, you would select the checkbox next to theprepareSession(Session)method, as shown in Figure 9-26. -
Click OK.
9.11.2 What Happens When You Override a Built-in Framework Method
When you dismiss the Override Methods dialog, you return to the source editor with the cursor focus on the overridden method, as shown in Figure 9-27. Notice that the method appears with a single line that calls super.prepareSession(). This is the syntax in Java for invoking the default behavior that the base class would have normally performed for this method. By adding code before or after this line in the custom application module class, you can augment the default behavior before or after the default functionality.
Also notice that when you override a method using the Override Methods dialog, the source editor inserts the JDK @Override annotation just before the overridden method. This causes the compiler to generate a compile-time error if the method in the application module class does not match the signature of any method in the superclass.
Be careful when you add method names to your class to override a method in the superclass; you must have the signature exactly the same as the base class method you want to override. Be sure to add the @Override annotation just before the method. This way, if your method does not match the signature of any method in the superclass, the compiler will generate a compile-time error. Also, when you write code for a method instead of calling the superclass implementation, you should have a thorough understanding of what built-in code you are suppressing or replacing.
9.11.3 How to Override prepareSession() to Set Up an Application Module for a New User Session
Since the prepareSession() method is invoked by the application module when it is used for the first time by a new user session, it's a useful method to override in your custom application module class to perform setup tasks that are specific to each new user that uses your application module. Example 9-16 illustrates an overridden prepareSession() method in the oracle.fodemo.storefront.adfextensions.FODApplicationModuleImpl class that invokes a setCurrentUserLanguage() helper method to initialize the language used by the application.
Example 9-16 Initializing the Language to Use for Current User Session
public class FODApplicationModuleImpl extends ApplicationModuleImpl {

public static String preferredLanguage;
public static boolean isWebUser=false;
private String[] supportedLanguages = {"EN","JA","EL","FR","DE"};

    /**
     * @param session
     */
    @Override
    protected void prepareSession(Session session) {
        super.prepareSession(session);
        setCurrentUserLanguage();
    }

    private void setCurrentUserLanguage() {
        DBTransactionImpl dbti = (DBTransactionImpl)getDBTransaction();
        CallableStatement statement =
            dbti.createCallableStatement(("BEGIN " +
                                      "user_context_pkg.set_app_user_lang(?); " +
                                      "END;"), 0);
        try {
            statement.setString(1, getApplicationLanguage());
            statement.execute();
        } catch (SQLException sqlerr) {
            throw new JboException(sqlerr);
        } finally {
            try {
                if (statement != null) {
                    statement.close();
                }
            } catch (SQLException closeerr) {
                throw new JboException(closeerr);
            }
        }
    }

    /**
     * @return
     */
    public String getApplicationLanguage(){
        String appLanguage = "EN";
        if (isWebUser){
        for (int index=0; index<supportedLanguages.length; index++){
            if (preferredLanguage.equals(supportedLanguages[index])){
                appLanguage = preferredLanguage;
            break;
            }
        }
        } else{
            appLanguage = getAMLanguage();
        }
            return appLanguage;
    }

    /**
     * @return
     */
    public String getAMLanguage(){
        PropertyMetadata langProperty =
                          PropertyMetadata.findProperty("jbo.default.language");
        String amLanguage = langProperty.getProperty();
        return amLanguage.toUpperCase();
    }
}
