3 Configuration Wizard Screens
This chapter contains screen descriptions for all of the Oracle Fusion Middleware Configuration Wizard for WebSphere.
These screens contain the following standard buttons:
-
Exit: Exit the wizard without saving configuration changes.
-
Help: Display help for the current page. You can then navigate to other help topics if necessary.
-
Previous: Return to the previous screen.
-
Next: Continue to the next screen.
Some screens may also contain the following function buttons:
-
Discard Changes: Discard any changes you made on the current screen.
-
Delete: Delete the selected item or items.
-
Switch Display: Toggle between a table format (one row for each item) and a tabbed format (one tab for each item).
3.1 Welcome

Description of the illustration welcome.gif
Click Browse to navigate to the home directory for the IBM WebSphere installation for which you want to configure a new cell, update an existing cell, or federate a machine. After navigating to the directory, click Open.
Click Next to Continue.
3.2 Select Configuration Option
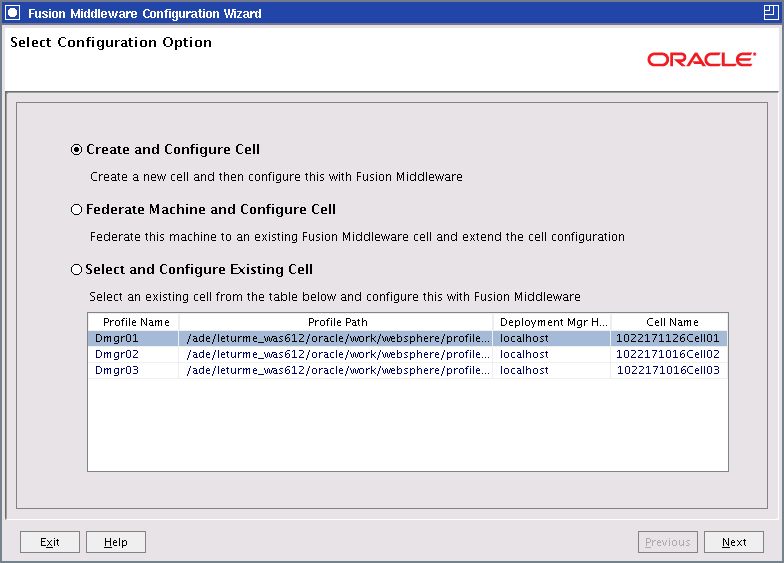
Description of the illustration selectconfigoption.gif
Select one of the following options. The options that you see depend on your current configuration.
-
Create and Configure Cell: Select this option to create a new cell. The Specify Cell, Profile and Node Name Information screen appears next.
-
Federate Machine and Configure Cell: (IBM WebSphere ND only) Select this option to add the current node to an existing cell. The Specify Profile and Node Name Information screen appears next. In this case, you must run the Configuration Wizard on the node that you want to federate to the cell.
Note:
This option is not displayed for IBM WebSphere AS environments, as it does not apply to single-server installations. -
Select and Configure Existing Cell: This option is available only if you have already created a cell. To change the configuration of an existing cell, select this option. From the list, click on the cell that you want to configure (the selected cell will be highlighted). The Loading Cell Information screen appears next. See Section 3.6, "Cell Progress," for information about this screen.
3.3 Specify Cell, Profile and Node Name Information
This screen differs depending on whether you are running the Configuration Wizard in an IBM WebSphere ND environment or an IBM WebSphere AS environment.
In an IBM WebSphere AS environment:
-
There is no Deployment Manager profile or Deployment Manager node. Therefore, the Deployment Manager Profile Name and Deployment Manager Node Name fields are not available on this screen.
-
The Application Server Name field is available, allowing you to assign a name to the Application Server.
The following image shows the IBM WebSphere ND version of this screen.
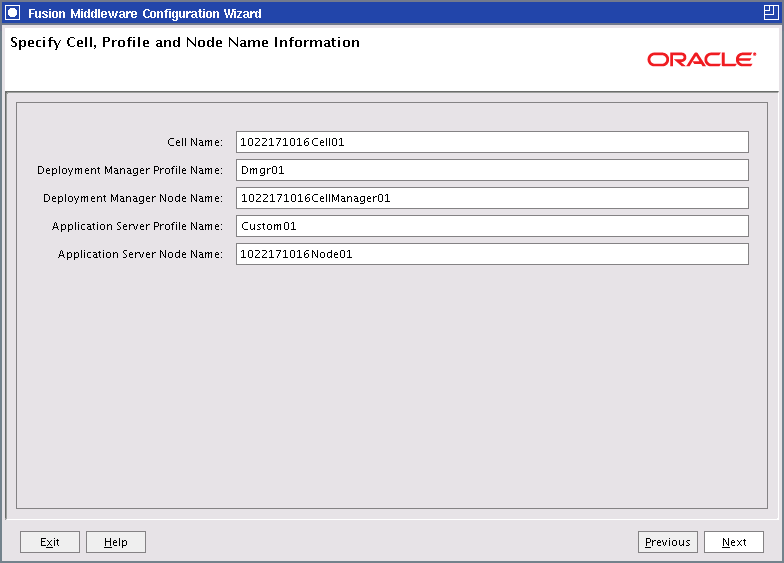
Description of the illustration specifycell.gif
Enter the appropriate values in the following fields. Each field is required. Use only alphanumeric characters in each field.
-
Cell Name: Enter a unique name for the new cell. This is the name of the directory in which the cell is created, under the following two directories:
-
IBM WebSphere ND only:
WAS_HOME/profiles/DepMgrProfile/config/cells, whereWAS_HOMEis the IBM WebSphere ND installation directory andDepMgrProfileis the name of the Deployment Manager profile. -
Both IBM WebSphere AS and IBM WebSphere ND:
WAS_HOME/profiles/AppSrvrProfile/config/cells, whereWAS_HOMEis the IBM WebSphere installation directory andAppSrvrProfileis the name of the Application Server profile.
The default name is machine_nameCelln, where machine_name is the name of the current machine, and n is the next two-digit number in the sequence on that machine. For example, if the machine name is machine1 and Cell01 already exists, the default cell name is machine1Cell02.
-
-
Deployment Manager Profile Name: (IBM WebSphere ND only) Enter a unique Deployment Manager profile name for this cell. This is the name of the directory in which the Deployment Manager profile is created, under
WAS_HOME/profiles.The default name is Dmgrn, where n is the next two-digit number in the sequence. For example, if Deployment Manager profile Dmgr01 already exists, the default for this field is Dmgr02.
-
Deployment Manager Node Name: (IBM WebSphere ND only) Enter a unique Deployment Manager node name for this cell.
The default name is machine_nameCellManagern, where machine_name is the name of the current machine, and n is the next two-digit number in the sequence. For example, if the machine name is machine1 and CellManager01 already exists, the default node name is machine1CellManager02.
-
Application Server Profile Name: Enter a unique Application Server profile name for this cell. The is the name of the directory in which the Application Server profile is created, under
WAS_HOME/profiles.-
IBM WebSphere ND: The default name is Customn, where n is the next two-digit number in the sequence. For example, if Application Server profile Custom01 already exists, the default for this field is Custom02.
-
IBM WebSphere AS: The default name is AppSrv01.
-
-
Application Server Node Name: Enter a unique Application Server node name for this cell.
The default name is machine_nameNoden, where machine_name is the name of the current machine, and n is the next two-digit number in the sequence on the machine. For example, if the machine name is machine1 and Node01 already exists, the default node name is machine1Node02.
-
Application Server Name: (IBM WebSphere AS only) If you have already created the Application Server, enter the name of the Application Server to use for this cell. The Configuration Wizard will designate this server internally as the Administration Server for this cell.
If you have not already created the Application Server, the server name defaults to OracleAdminServer. The Configuration Wizard will create the Application Server using this name, and designate it internally as the Administration Server for this cell.
When you are done filling in each field, click Next.
3.4 Specify Administrator Information
In an IBM WebSphere ND environment, you specify the Administrator user name and password on the Specify Deployment Manager Information screen (shown here).
In an IBM WebSphere AS environment, you specify the Administrator user name and password on the Specify Admin User Information screen.
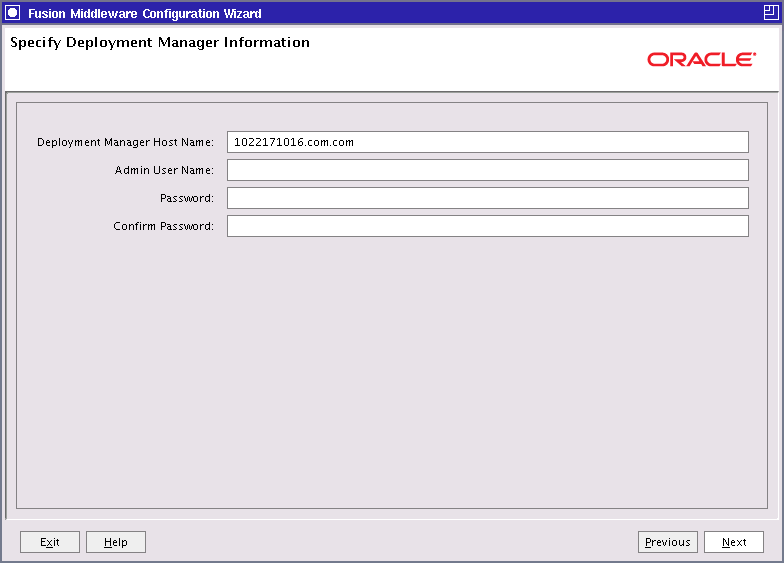
Description of the illustration specifydpminfo.gif
Use this screen to specify the host name, SOAP port (federation process only), administrator user name and password for the Deployment Manager. All fields are required.
-
Deployment Manager Host Name: (IBM WebSphere ND only) When you are creating a new cell, this field defaults to the host name of the current machine.
When you are federating a machine, enter the host name of the Deployment Manager that will manage the remote node.
-
Host Name: (IBM WebSphere AS only) This field defaults to the host name of the current machine.
-
SOAP Port: (IBM WebSphere ND only) This field is displayed only when you are federating a machine. Enter the SOAP port to use for connecting to the Deployment Manager node. This is the SOAP port of the Deployment Manager to which you want to federate this machine. The default is typically 8880. If you do not know the SOAP port for the Deployment Manager, open the following file on the Deployment Manager host:
WAS_HOME/profiles/DepMgr_name/logs/AboutThisProfile.txtReplace
WAS_HOMEwith the IBM WebSphere home directory and replaceDepMgr_namewith the name of the appropriate Deployment Manager profile on the specified host. -
Admin User Name: When creating a new cell, enter the administrator user name that you want to use to start or stop the Deployment Manager (IBM WebSphere ND) or start or stop the Administration Server (IBM WebSphere AS).
(IBM WebSphere ND only) When you are federating a machine, enter the administrator user name that was configured for the Deployment Manager on the specified host.
-
Password: When you are creating a new cell, enter the administrator password that you want to use for the cell.
(IBM WebSphere ND only) When you are federating a machine, enter the administrator password that was configured for the Deployment Manager on the specified host.
-
Confirm Password: This field is displayed only when you are creating a new cell. Reenter the administrator password to confirm it. This entry must exactly match the entry in the Password field.
Note:
The Administrator user name and password that you enter here are used to connect to the Deployment Manager, and to stop the Deployment Manager, Node Managers, Administration Server, or Application Servers.
When you are done filling in each field, click Next to continue.
3.5 Specify Profile and Node Name Information
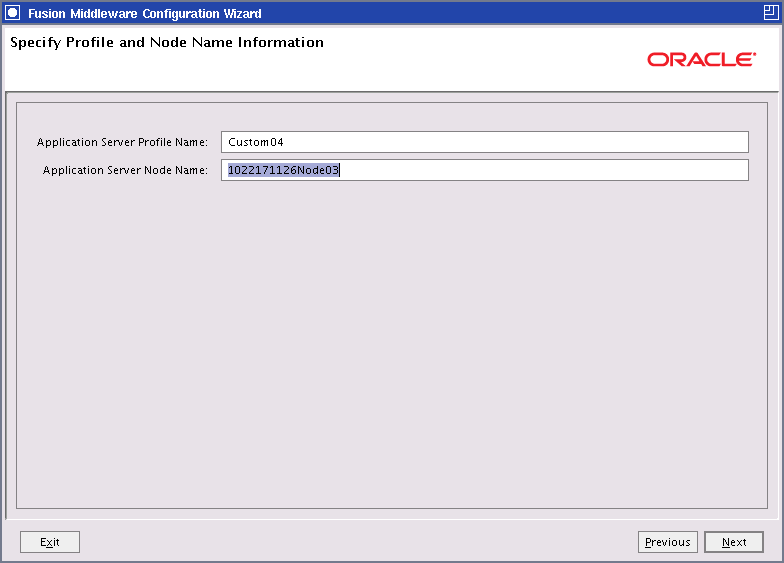
Description of the illustration specifyprofile.gif
Use this screen to specify the Application Server Profile name and Node Name for an IBM Websphere AS installation. Both fields are required.
-
Application Server Profile Name: Enter a unique Application Server profile name for this node. This is the name of the directory in which the Application Server profile is created, under
WAS_HOME/profileson the machine that is hosting the profile.The default name is Customn, where n is the next two-digit number in the sequence for the current cell. For example, if Application Server profile Custom01 already exists in the cell, the default for this field is Custom02.
If you change the default profile name, ensure that it is unique within the cell.
-
Application Server Node Name: Enter the node name to use for this Application Server.
The default name is machine_nameNoden, where machine_name is the name of the current machine, and n is the next two-digit number in the sequence on the current machine. For example, if the machine name is machine2 and Node01 already exists on the machine, the default node name is machine2Node02.
If you change the default node name, ensure that it is unique within the cell.
When you are done filling in each field, click Next to continue.
3.6 Cell Progress
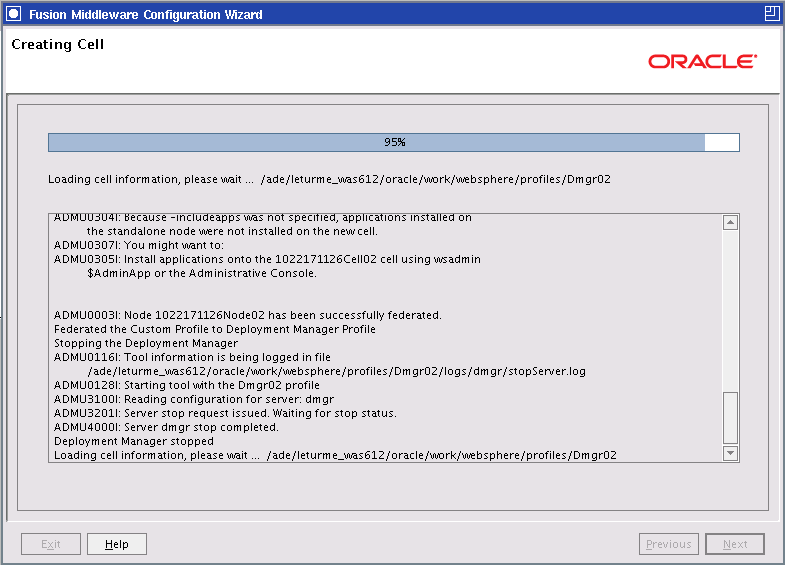
Description of the illustration creatingcell.gif
This screen displays the status of the cell creation, cell loading, or federating machine process. This example shows the Creating Cell screen. The screen title differs depending on your current task:
-
When you are creating a new cell, the screen title is Creating Cell.
-
When you are updating an existing cell, the screen title is Loading Cell Information.
-
When you are federating a remote machine to a cell, the screen title is Federating Machine.
When the progress bar reaches 100% and the message "Cell information read successfully, please click Next" is displayed in the lower window, click Next to continue.
3.7 Add Products to Cell
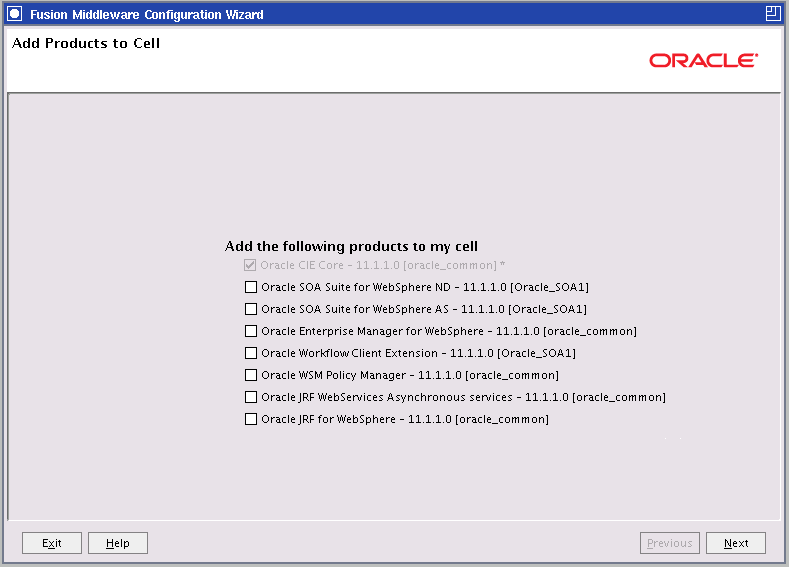
Description of the illustration addproducts.gif
Select the products that you want to include in this cell. By default, the Oracle CIE Core option is selected and cannot be deselected. This option adds the required CIE Online Custom Service to the cell and targets it to OracleAdminServer.
If you are editing an existing cell or federating a machine to a cell, products that have already been included in the cell are already selected and cannot be deselected.
Select the check boxes that correspond to the other products that you want to include in the cell. If you select a product that is dependent on resources provided by another product or products in the list, those products are also selected automatically. Similarly, if you deselect the check box for a product on which another product is dependent, the check box for the dependent product is also deselected.
The list of products (configuration templates) differs based on the Oracle Fusion Middleware product installation that you are configuring.
For more information about Oracle Fusion Middleware product templates, see "Oracle Fusion Middleware Product Templates" in the Oracle Fusion Middleware Domain Template Reference. Note that only some of the Oracle Fusion Middleware product templates are supported in an IBM WebSphere installation.
If you are adding products to an existing cell, all products that were previously added to the cell are already selected and cannot be deselected.
After selecting all products to include in the cell, click Next to continue.
Note:
When you click Next, if any of the selected products require resources provided by another product that is not selected, a warning dialog box is displayed. Return to the Add Products to Cell screen to select the dependency product before proceeding.3.8 Configure the Application Server
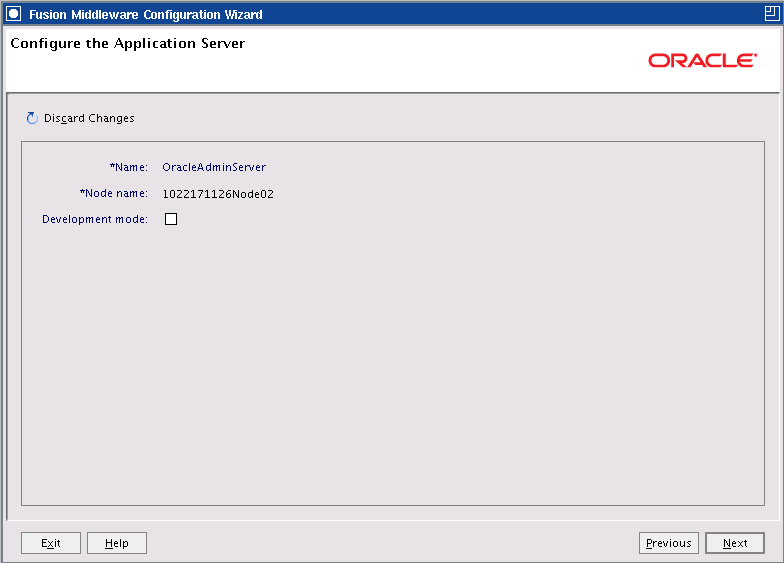
Description of the illustration configappsrvras.gif
This screen appears only for IBM WebSphere AS. Specify the following Application Server settings:
-
Name: The name of the Application Server. It defaults to OracleAdminServer or to the Application Server name that you specified on the Specify Cell, Profile and Node Name Information screen. You cannot change the name.
-
Node name: The name of the Application Server node.
-
Development mode: Select this check box to run the Application Server in development mode. Leave this check box empty to run the Application Server in production mode. For information about the differences between development mode and production mode, see the IBM WebSphere documentation.
When you are done, click Next to continue.
3.9 Configure JDBC Data Sources
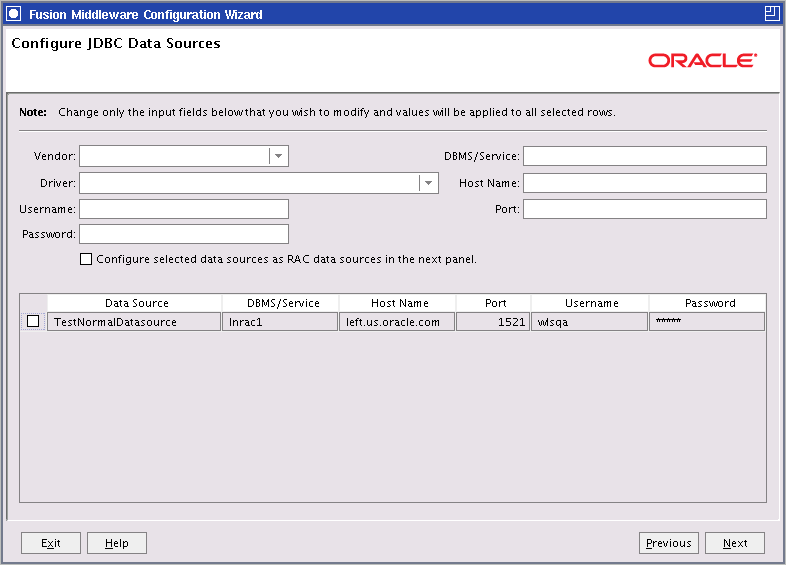
Description of the illustration configjdbcds.gif
A JDBC data source contains a pool of database connections that are created when the data source instance is created, when it is deployed or targeted, or at server startup. Applications look up a data source on the JNDI tree, and then request a connection. When the applications no longer need the connections, they return the connections to the connection pool in the data source.
Use this screen to configure the JDBC data sources defined in your cell.
The JDBC data sources associated with the products for which you are creating the cell are listed in the lower half of the screen.
Note:
To configure one or more of the data sources as Oracle RAC multi data sources, select the check box adjacent to the name of the data source, and select the Configure selected data sources as RAC multi data sources in the next panel check box; then click the Next button.Select the data sources for which you want to specify settings by selecting the check box adjacent to each data source name.
Notes:
When you select multiple data sources, the textVaries among data sources might be displayed in certain fields, indicating that the current values of those fields are different across the selected data sources. If you change the values in such fields, the new values are applied uniformly across the selected data sources.
The default values of data source parameters such as vendor, driver, host name, and port number depend on the values that are specified in the application templates.
After selecting the data sources, configure the following fields. The settings apply to all selected data sources:
-
Vendor: Select the database vendor.
-
Driver: Select the JDBC driver to use to connect to the database. The list includes common JDBC drivers for the selected database vendor.
-
Username: Enter the user name for connecting to the database.
-
Password: Enter the password for the specified user name.
-
DBMS/Service: Enter a DBMS SID or service name. The value that you enter depends on the driver that you selected.
-
If the name of the Oracle driver that you selected contains the words "for Instance connections," you must enter the SID.
-
If the name of the Oracle driver contains the words "for Service connections," you must enter the service name.
-
For information about configuring a DataDirect driver, see the DataDirect documentation.
-
-
Host Name: Enter the name of the server hosting the database.
-
Port: Enter the port number to be used to connect to the server.
For the selected data sources, the values that you specify are displayed in the appropriate columns in the data source list.
When you are finished configuring the JDBC data sources, click Next to continue.
3.10 Configure RAC Data Sources
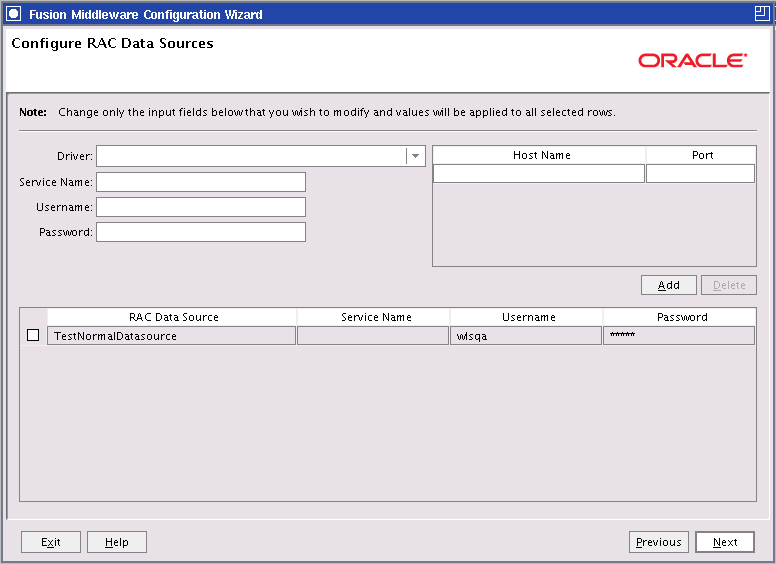
Description of the illustration configracmds.gif
Use this screen to configure the data sources that you chose to configure as Oracle RAC data sources.
The data sources that you opted to configure as Oracle RAC data sources on the Configure JDBC Data Sources screen are listed in the lower half of the screen.
Select the data sources for which you want to specify settings by selecting the check box adjacent to each data source name.
Note:
When you select multiple data sources, the textVaries among data sources might be displayed in certain fields, indicating that the current values of those fields are different across the selected data sources. If you change the values in such fields, the new values are applied uniformly across the selected data sources.After selecting the data sources, configure the following fields. The settings apply to all selected data sources:
-
Driver: Select the JDBC driver to use to connect to the database.
-
Service Name: Enter an Oracle RAC database service name.
-
Username: Enter the user name for connecting to the database.
-
Password: Enter the password for the specified user name.
-
Host Name: Enter the name of the server hosting the Oracle RAC database instances.
-
Port: Enter the port numbers to be used to connect to the server that hosts the database.
To add a new database instance, click Add, and then specify the host name, instance name and port number.
When you are finished configuring your Oracle RAC multi data sources, click Next.
3.11 Test JDBC Data Sources
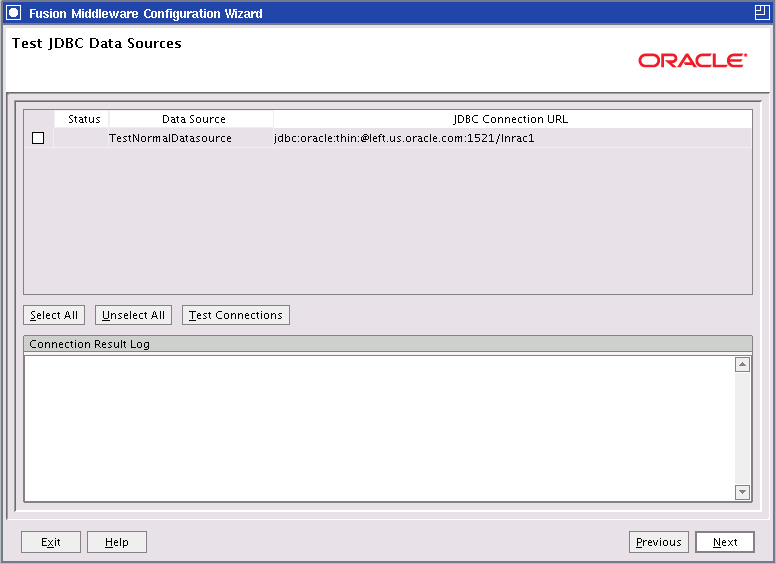
Description of the illustration testjdbcds.gif
Use this screen to test the data source connections that you configured on the Configure JDBC Data Sources and Configure RAC Data Sources screens.
Notes:
To test the database connections, the database to which you are connecting must be running.If you do not want to test the connections at this time, do not select any data sources. Click Next to continue, then click OK on the warning dialog box that appears.
Select the check box for each data source you want to test, and then click Test Connections.
The wizard tests the configuration for each selected data source by attempting to connect to a URL that is constructed by using the driver, host, port, and other information that you specified while configuring the data source.
The result of the test is indicated in the Status column. Details are displayed in the Connection Result Log section.
When the tests complete successfully, click Next to continue.
3.12 Configure JDBC Component Schema
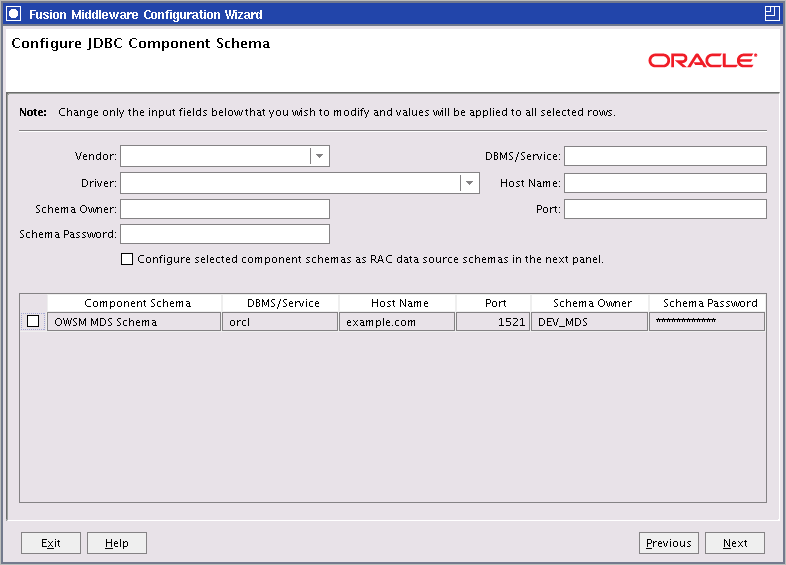
Description of the illustration configjdbcschema.gif
For some Oracle Fusion Middleware components (for example, Oracle SOA Suite and Oracle Web Services), JDBC data sources might be defined as part of the component's database schema. The schema is loaded (during installation) by using the Oracle Fusion Middleware Repository Creation Utility (RCU).
Note:
For a complete list of the schemas that are available for various products for supported database types, see "Required Schemas and Dependencies" in Oracle Fusion Middleware Repository Creation Utility User's Guide.When you create a cell for such components by using the Configuration Wizard, you can configure the JDBC component schema settings, such as database driver, schema owner, password, and so on.
The JDBC component schemas associated with the products for which you are creating the cell (for example, Oracle SOA Suite) are listed in the lower half of the screen.
Note:
To configure one or more of the schemas as Oracle RAC multi data sources, select the check boxes adjacent to the schema names, and select the Configure selected component schemas as RAC multi data source schemas in the next panel check box. Click Next when you are done.Select the schemas for which you want to specify data source settings by selecting the check box adjacent to each schema name.
Note:
When you select multiple component schemas, the textVaries among component schemas might be displayed in certain fields, indicating that the current values of those fields are different across the selected component schemas. If you change the values in such fields, the new values are applied uniformly across the selected component schemas.
The default values of component schema parameters such as vendor, driver, host name, and port number depend on the values that are specified in the application templates.
After selecting the schemas, configure the following fields. The settings apply to all selected schemas:
-
Vendor: Select the database vendor.
-
Driver: Select the JDBC driver to use to connect to the database. The list includes common JDBC drivers for the selected database vendor.
-
Schema Owner: Enter the user name for connecting to the database.
-
Schema Password: Enter the password for the specified schema owner.
-
DBMS/Service: Enter a database DBMS name, or service name if you selected a service type driver.
-
Host Name: Enter the name of the server hosting the database.
-
Port: Enter the port number to be used to connect to the server that hosts the database.
For the selected schemas, the values that you specify are displayed in the appropriate columns in the schema list.
When you finish configuring the component schemas, click Next to continue.
3.13 Configure RAC Data Source Component Schema
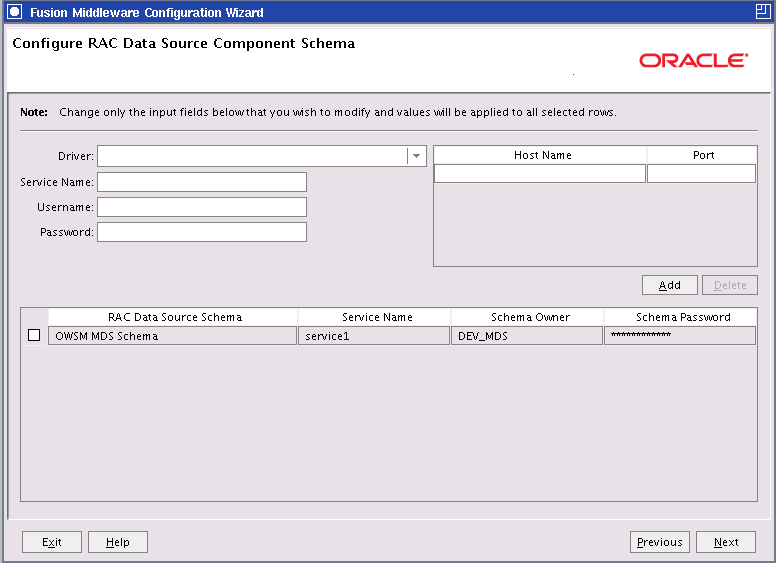
Description of the illustration configracschema.gif
Use this screen to configure the component schemas included in the cell as Oracle RAC schemas.
The component schemas that you selected on the Configure JDBC Component Schema screen for configuration as Oracle RAC schemas are listed on the lower half of the screen.
Note:
For a complete list of the schemas that are available for various products for supported database types, see "Required Schemas and Dependencies" in Oracle Fusion Middleware Repository Creation Utility User's Guide.In the schema list in the lower half of the screen, select the schemas to configure as Oracle RAC schemas by selecting the check box adjacent to each schema name.
Note:
When you select multiple schemas, the text "Varies among component schemas" might be displayed in certain fields, indicating that the current values of those fields are different across the selected schemas. If you change the values in such fields, the new values are applied uniformly across the selected schemas.After selecting the schemas, configure the following fields. The settings apply to all selected schemas:
-
Driver: Select the JDBC driver to use to connect to the database.
-
Service Name: Enter a database Oracle RAC service name.
-
Username: Enter the user name for connecting to the database.
-
Password: Enter the password for the specified user name.
-
Host Name: Enter the name of the server hosting the Oracle RAC database instances.
-
Port: Enter the port number to be used to connect to the server that hosts the database.
Note:
You must specify the host name, instance name, and port number of at least one database instance.To add a database instance, click Add. Specify the host name, instance name, and port.
For the selected schemas, the values that you specify are displayed in the appropriate columns in the schema list.
3.14 Test Component Schema
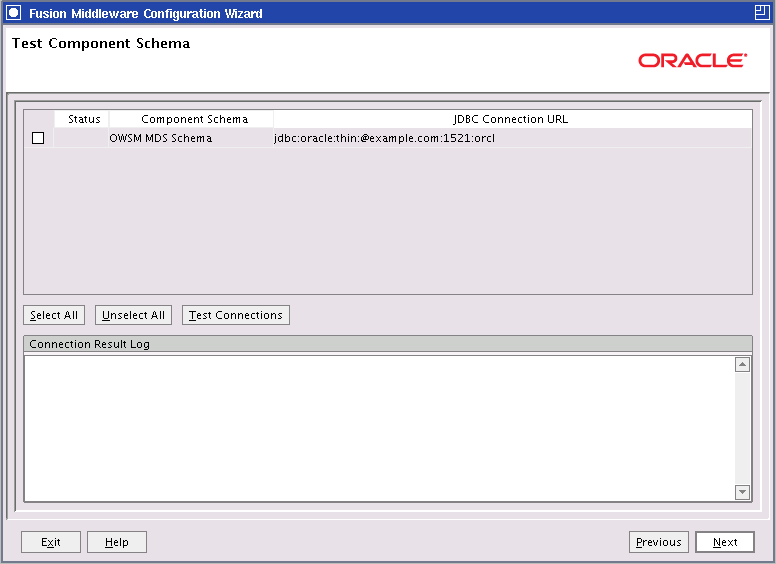
Description of the illustration testschema.gif
Use this screen to test the configurations that you specified for the component schemas on the previous screen.
Select the check boxes adjacent to the names of the schemas to test, and then click Test Connections.
The wizard tests the configuration for each schema by attempting to connect to a URL that is constructed by using the driver, host, port, and other information that you specified while configuring the schema.
The result of the test is indicated in the Status column. Details are displayed in the Connection Result Log section.
When the schema tests complete successfully, click Next to continue.
3.15 Select Optional Configuration
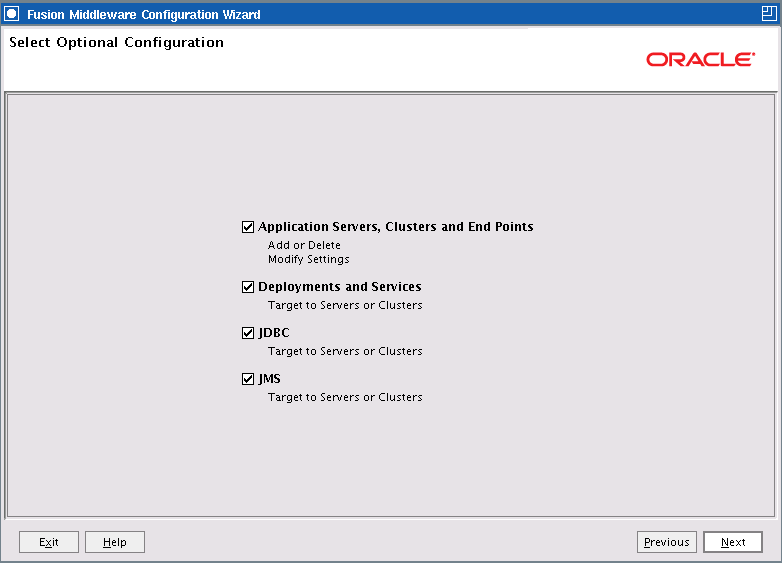
Description of the illustration selectoptionalconfig.gif
Select the categories (if any) for which you want to perform advanced configuration. For each category that you select, the appropriate configuration screen is displayed to allow you to perform advanced configuration. If you do not select any items on this screen, the Configuration Summary screen is displayed next.
Notes:
The categories that are listed on this screen depend on the resources defined in the templates that you selected for the cell.-
Application Servers, Clusters, and End Points: This option is available only in an IBM WebSphere ND environment. It is not available in an IBM WebSphere AS environment.
Select this option to perform any of the following tasks:
-
Add, delete, or clone an Application Server
-
Change the name of an Application Server
-
Toggle development mode on or off for an Application Server
-
Add clusters to the cell, and add servers to a cluster
-
Configure end points (ports) for the Administration Server or any Application Server
-
Change the file store shared directory locations for your clusters, including the log directory, permanent store directory, and temporary store directory
-
-
Deployments and Services: Select this option to perform any of the following tasks. In an IBM WebSphere AS environment, you can only enable or disable the items that are targeted to the Application Server.
-
Change the deployment targets for your clusters or servers
-
Change the service targets for your clusters or servers
-
Change the custom service targets for your servers
-
Change the resource adapter targets for your servers
-
-
JDBC: Select this option to change the JDBC data source targets for your clusters or servers. In an IBM WebSphere AS environment, you can only enable or disable the data sources that are targeted to the Application Server.
-
JMS: Select this option to change the JMS resource targets for your clusters or servers. In an IBM WebSphere AS environment, you can only enable or disable the JMS resources that are targeted to the Application Server.
After selecting the appropriate configuration options, click Next to continue. The screen that is displayed next differs depending on the options that you selected.
3.16 Configure Application Servers
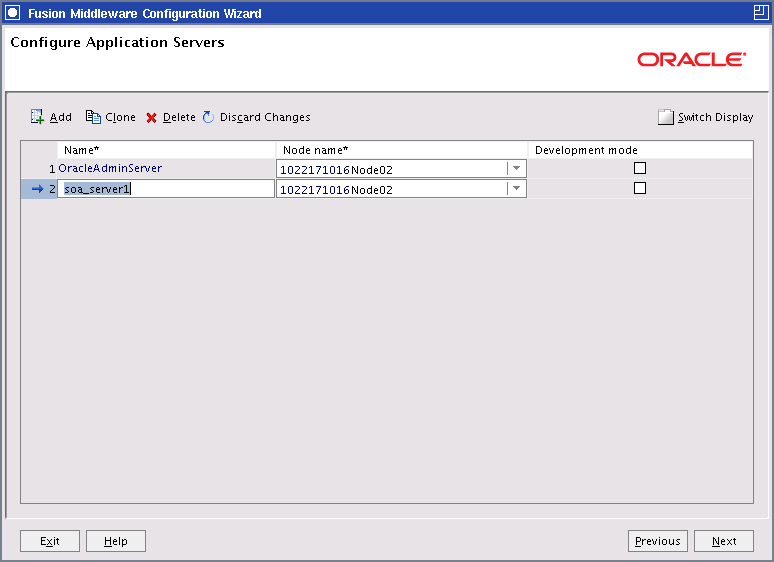
Description of the illustration configappservers.gif
This screen is displayed only in an IBM WebSphere ND environment. From this screen, you can add, clone, or delete Application Servers to any node in the cell. You can also change the settings for an existing Application Server. Required fields are indicated by an asterisk (*).
Note:
Use this screen only to create Application Servers that will either (a) be the primary member of a cluster or (b) will not be part of a cluster. Do not create secondary cluster members on this screen. Instead, use the Configure Additional Cluster Members screen to add secondary cluster members to a cluster.For example, suppose you want to create a three-server cluster with servers soa_server_1, soa_server_2, and soa_server_3. To do so, add the soa_server_1 Application Server on the Configure Application Servers screen. Create the cluster on the Configure Clusters screens, and select soa_server_1 as the primary cluster member. You can then use the Configure Additional Cluster Members screen to add soa_server_2 and soa_server_3 to the cluster.
-
Name: The name of the Application Server. The default name for a new server is new_ManagedServer_n, where n starts at 1 and increments for each new server that you add. To change the server name, click in the Name field and enter the new name.
-
Node name: A list of all available nodes. Click the list to select the node on which this Application Server resides. If you have not yet federated other machines to the current cell, only one node is available on this list.
-
Development mode: Select this check box to run the Application Server in development mode. Leave this check box empty to run the Application Server in production mode. For information about the differences between production mode and development mode in an IBM WebSphere environment, see the IBM WebSphere documentation.
To add a server, click Add and configure the settings for the new server.
To clone an existing server, select the server that you want to clone and click Clone. A new server line is added to the table. The new server inherits all attributes from the existing server. The default name of the new server is clone_source_cloned1, where clone_source is the name of the server that you cloned. Edit the Name field, select the node on which the server resides, and select or deselect the Development mode option.
To delete a server, select the server and click Delete. You can delete only one server at a time.
To switch the display from the default table format to a tabbed format (with one tab for each server), click Switch Display. Click Switch Display again to return to table format.
When you are done adding servers, click Next to continue.
Note:
Any changes that you make on this screen are not saved in the cell configuration until you click Create on the last Configuration Wizard screen. If you exit the wizard, or click Previous to return to an earlier screen, you must make the changes again.3.17 Configure Clusters
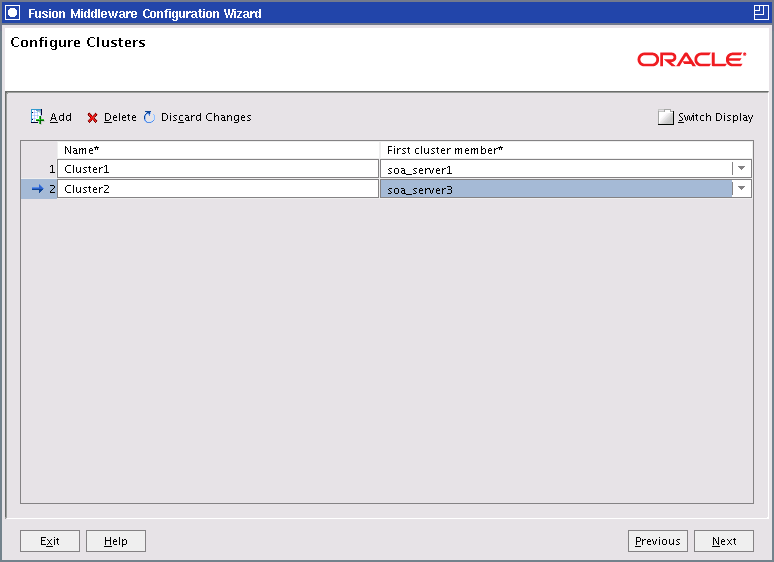
Description of the illustration configcluster.gif
A cluster is a group of Application Servers that work together to provide scalability and high availability for applications. By creating clusters, you can group servers such that they operate as a single unit for hosting applications and resources.
Use this screen to add a cluster and select the Application Server that will be the primary cluster member of the cluster. All additional cluster members are cloned from this primary cluster member. After creating a cluster, you can add additional Application Servers to the cluster on the next screen.
You can also use this screen to delete a cluster or modify the settings for an existing cluster.
To create a cluster:
-
Click Add. A new line appears in the table. The default name for a new cluster is new_Cluster_n, where n starts at 1 and increments for each new cluster that you add. To change the default, enter the new name in the Name column. The name of the cluster must be unique among all component names within the cell.
-
Select an existing Application Server as the primary member of the cluster by selecting the server from the First cluster member list. Only Application Servers that are not yet assigned to a cluster are displayed on this list.
-
Repeat Steps 1 and 2 for each additional cluster that you want to create.
-
When you are done, click Next. You can add additional servers to the cluster on the Configure Additional Cluster Members screen, which is displayed when you click Next.
Note:
Any changes you make on this screen are not saved in the cell configuration until you click Create on the last Configuration Wizard screen. If you exit the wizard, or click Previous to return to an earlier screen, you must make the changes again.
To delete a cluster, select the cluster and click Delete. When you delete a cluster, you do not delete the Application Server that is the primary cluster member; it is merely removed from the cluster. You can delete only one cluster at a time.
To change the settings for a cluster, select the cluster and make the appropriate changes.
To switch the display from the default table format to a tabbed format (with one tab for each cluster), click Switch Display. Click Switch Display again to return to table format.
When you are done configuring your clusters, click Next to continue.
For more information about clusters in an IBM environment, see the IBM WebSphere documentation.
3.18 Configure Additional Cluster Members
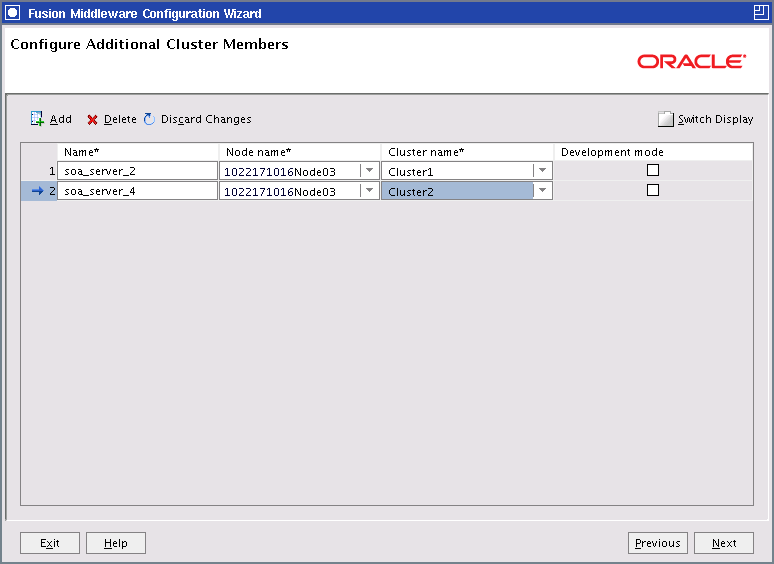
Description of the illustration addclustmembers.gif
Use this screen to add additional Application Servers to a cluster. When you add a new Application Server to a cluster, its attributes are cloned from the primary member of the cluster.
Configure the following settings for the Application Server:
-
Name: The name of the Application Server. The default name for a new server is new_ClusterMember_n, where n starts at 1 and increments for each new server you add. To change the server name, click in the Name field and enter the new name.
-
Node name: A list of all available nodes. Click the list to select the node on which this Application Server resides. If you have not yet federated other machines to the current cell, only one node is available on this list.
-
Cluster name: A list of all available clusters. Select the cluster to which you want to assign this server.
-
Development mode: Select this check box to run the Application Server in development mode. Leave this check box empty to run the Application Server in production mode. For information about the differences between production mode and development mode in an IBM WebSphere environment, see the IBM WebSphere documentation.
To add an additional cluster member:
-
Click Add. A new row is added to the table.
-
Enter the name of the server, and select the appropriate node, cluster, and development mode setting.
-
Repeat Steps 1 and 2 for each cluster member that you want to add.
To delete a cluster member, select the cluster member and click Delete. You can delete only one cluster member at a time.
To switch the display from the default table format to a tabbed format (with one tab for each cluster), click Switch Display. Click Switch Display again to return to table format.
When you are done, click Next to continue.
Note:
Any changes that you make on this screen are not saved in the cell configuration until you click Create on the last Configuration Wizard screen. If you exit the wizard, or click Previous to return to an earlier screen, you must make the changes again.3.19 Configure End Points
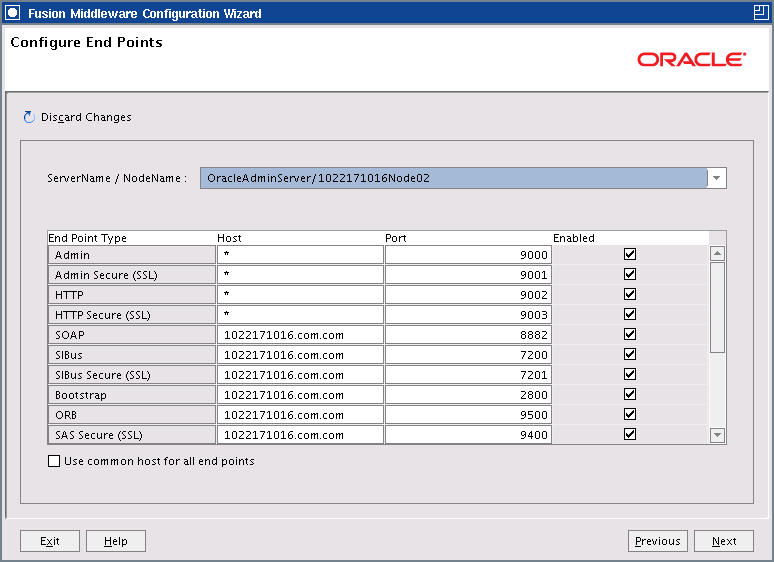
Description of the illustration configendpoints.gif
Use this screen to configure the end points (listener addresses) on each of your servers, including the Administration Server. All end points must be unique in the cell. By default, unique end points are assigned to a server when you add the server to the cell. You do not have to modify them unless you want to use a port other than the default that was configured on that server.
For information about the various end points listed on this screen, see the IBM WebSphere documentation.
Note:
An asterisk (*) in the Host column indicates any local address.To change end points:
-
(IBM WebSphere ND only) From the Server Name / Node Name list, select the server for which you want to change end points. The list contains all servers in the cell, including the Administration Server, Application Servers that are assigned to clusters, and standalone Application Servers that exist on all nodes in the cell.
Note:
In an IBM WebSphere AS environment, there is only one server. The name of this server and node is displayed in the Server Name / Node Name field, and cannot be changed. -
(IBM WebSphere ND only) You can change the host name on which a particular end point resides. To change the host name for an end point, enter the new host name on the appropriate row of the Host column.
To use a common host for all end points on the selected server, select the Use common host for all end points check box. When this check box is selected, the host names for each end point on the currently selected server cannot be edited, except for the Admin end point host name.
-
In the End Point Type column, enter the new end point value on the appropriate row. If you enter a value that is already in use, the following validation error is displayed; click OK and enter another value for the end point.

Description of the illustration validationerror.gif
Notes:
If you plan to run multiple Deployment Managers on the same machine, you must ensure that the end points in each associated cell are unique across all Deployment Manager nodes on the machine.Similarly, if you have Application Servers on remote machines, and those servers are assigned to different cells on the Deployment Manager host, you must ensure that all end points for all Application Servers on a machine are unique.
You will not be warned about conflicting end points that exist in different cells.
-
Repeat Step 3 for each end point that you want to change.
-
You can also disable an end point on any server if you do not need it. To disable one or more end points on the selected server, deselect the check box on the appropriate row of the Enabled column for each end point that you want to disable.
-
When you are done, click Next.
If there are any end point conflicts, the Validation Error dialog box appears, and you must resolve the conflict before you can continue. Identify the conflicting ports, and change the appropriate one.
3.20 Configure File Store Shared Directories
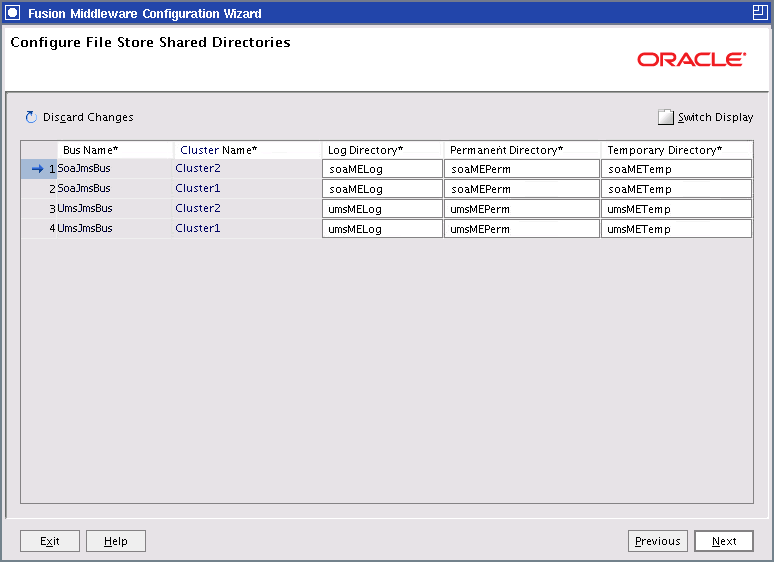
Description of the illustration configfilestoredirs.gif
Use this screen to change the file store shared directories for each of the JMS service integration buses in the cell. For more information about JMS service integration buses, see the IBM WebSphere documentation.
The table contains the following columns.
-
Bus Name: The name of the service bus as defined in the product template's
config.xmlfile. A service bus can be used by multiple clusters, and therefore may have multiple rows in the table. -
Cluster Name: The name of each cluster that uses a service bus. A cluster uses a bus if the product to which the bus applies is targeted to that cluster.
-
Log Directory: The directory in which the log files for the bus will be stored. You can change the directory location.
-
Permanent Directory: The directory in which the permanent file store for the bus will be stored. You can change the directory location.
-
Temporary Directory: The directory in which the temporary file store for the bus will be stored. You can change the directory location.
Note:
Oracle recommends that you change the default directory locations. To change a directory location, enter an absolute path to the new directory location that you want to use. The directories are created when you start one of the Application Servers on the bus.If you keep the default directory locations, these directories are created under the Application Server profile directory for the cell. For example, if the Application Server profile name for the cell is Custom01 on a UNIX operating system, the directories are created under WAS_HOME/profiles/Custom01.
When you are done, click Next.
3.21 Target Deployments to Clusters or Servers
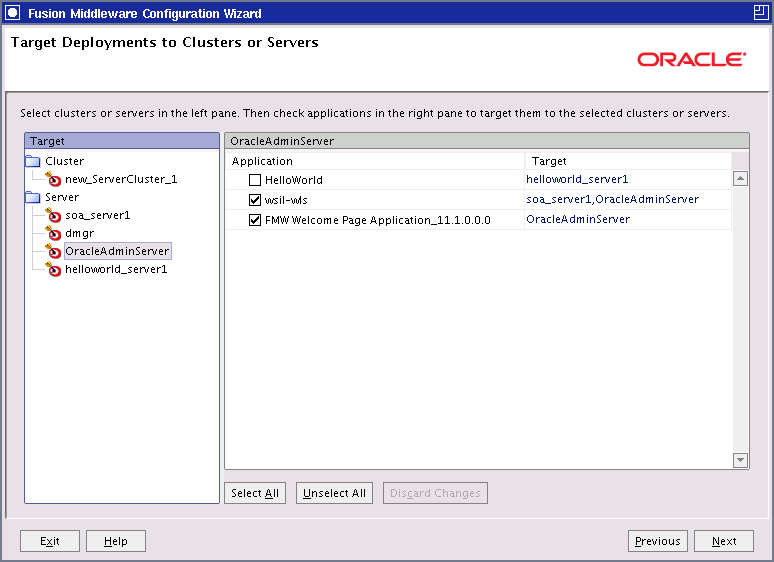
Description of the illustration targetdeployments.gif
Use this screen to target applications for deployment on servers or clusters.
Applications associated with the product for which you are configuring the cell (for example, Oracle SOA Suite) are targeted automatically to the server that was created for that product or to the cluster to which that server is assigned. In this screen, you can target applications to additional servers and clusters.
To target an application deployment to a cluster or server:
-
In the Target list, select the cluster or server on which you want to deploy applications.
The name of the selected target is displayed as the title of the list on the right.
-
In the target_name list, select the check boxes corresponding to the applications to deploy on the selected target.
The applications displayed here vary, depending on the products that you selected in the Add Products to Cell screen, earlier in the wizard.
Note:
When you select a server in the Target list, some of the check boxes in the target_name list might be disabled, indicating applications that are already targeted at the cluster that contains the selected server.After you select applications, the names of the targeted clusters and servers are displayed in the Target column in the target_name list.
-
Repeat Steps 1 and 2 for the other clusters and servers, as required.
-
After making the required selections, click Next.
When you are updating an existing cell, if you delete a server or cluster to which applications are currently targeted, the Configuration Wizard automatically retargets those applications as follows:
-
If the applications were originally targeted solely to the server or cluster that you are now deleting (that is, after you delete the server or cluster, the applications would become untargeted in the modified cell), then the Configuration Wizard automatically retargets the applications to all eligible targets.
An eligible target is any cluster or server that is not defined in the configuration groups specification (
config-groups.xmlfile) of an included template. Servers or clusters that are specified inconfig-groups.xmlare essentially owned by the template and, therefore, are not eligible for automatic targeting. -
If the applications were originally targeted to multiple targets (including servers, clusters, and the Administration Server), and one of the targeted servers or clusters is deleted, then the Configuration Wizard leaves the remaining target associations intact and does not attempt to retarget the applications.
3.22 Target Services to Clusters or Servers
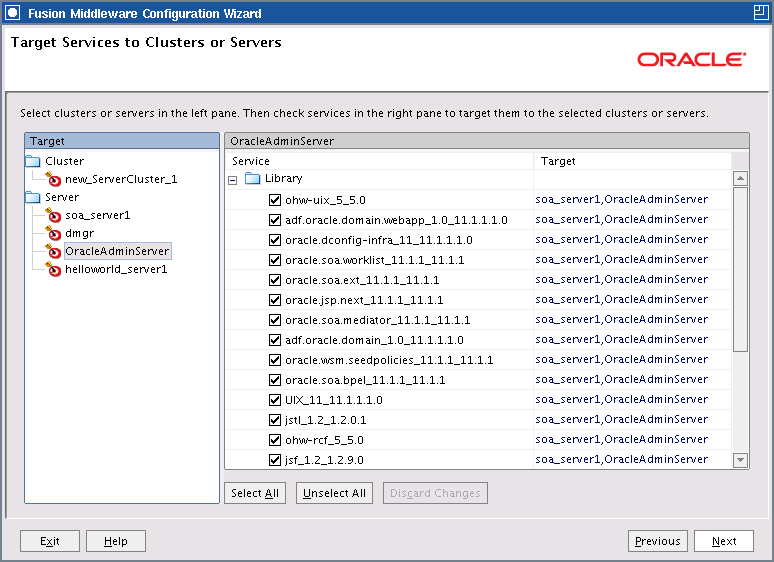
Description of the illustration targetservices.gif
Use this screen to target services (such as libraries, JMS services, or Work Managers) to the appropriate servers or clusters.
Services that are associated with the product for which you are configuring the cell (for example, Oracle SOA Suite) are targeted automatically to the server that was created for that product or to the cluster to which that server is assigned. In this screen, you can target services to additional servers and clusters.
To target services to servers or clusters:
-
In the Target list, select the cluster or server on which you want to deploy services.
The name of the selected target is displayed as the title of the list on the right.
-
In the target_name list, select the check boxes corresponding to the services to deploy on the selected target.
The services displayed here vary, depending on the products that you selected in the Add Products to Cell screen earlier in the wizard.
Note:
When you select a server in the Target list, some of the check boxes in the target_name list might be disabled, indicating services that are already targeted at the cluster that contains the selected server.After you select services, the names of the targeted clusters and servers are displayed in the Target column in the target_name list.
-
Repeat Steps 1 and 2 for the other clusters and servers, as required.
-
After making the required selections, click Next.
When you are updating an existing cell, if you delete a server or cluster to which services are currently targeted, the Configuration Wizard automatically retargets those services as follows:
-
If the services were originally targeted solely to the server or cluster that you are now deleting (that is, after you delete the server or cluster, the services would become untargeted in the modified cell), then the Configuration Wizard automatically retargets the services to all eligible targets.
An eligible target is any cluster or server that is not defined in the configuration groups specification (
config-groups.xmlfile) of an included product template. Servers or clusters that are specified inconfig-groups.xmlare essentially owned by the template and, therefore, are not eligible for automatic targeting. -
If the services were originally targeted to multiple targets (including servers, clusters, and the Administration Server), and one of the targeted servers or clusters is deleted, then the Configuration Wizard leaves the remaining target associations intact and does not attempt to retarget the services.
3.23 Target Custom Services to Servers
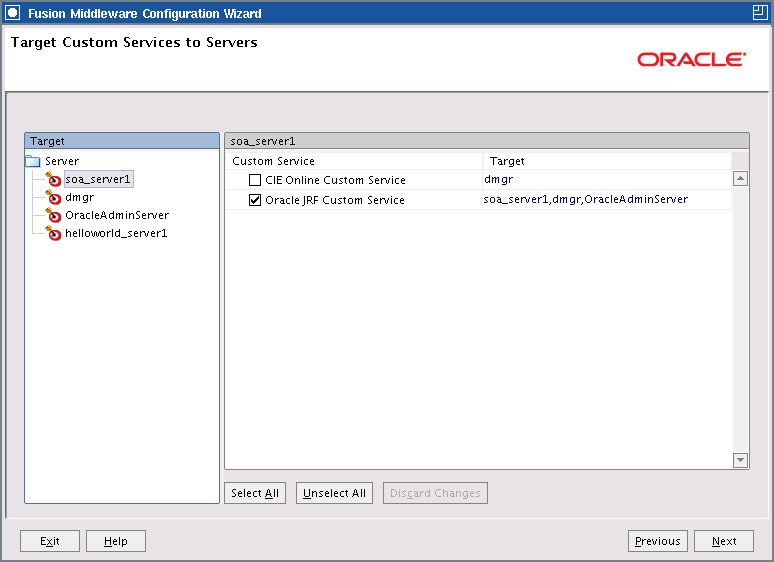
Description of the illustration targetcustom.gif
Use this screen to target custom services to the appropriate servers. You cannot target custom services to clusters. Servers that are assigned to clusters are included in the Target list.
Custom services that are associated with the product for which you are configuring the cell (for example, Oracle SOA Suite) are targeted automatically to the server that was created for that product. In this screen, you can target custom services to additional servers.
To target custom services to servers:
-
In the Target list, select the server to which you want to deploy services.
The name of the selected target is displayed as the title of the list on the right.
-
In the target_name list, select the check boxes corresponding to the services you want to deploy to the currently selected target.
The services displayed here vary, depending on the products that you selected in the Add Products to Cell screen earlier in the wizard.
The Target column in the target_name list displays the names of all servers to which each custom service is currently targeted. This helps you to determine if you need to target a custom service to any other servers other than the currently selected target.
-
Repeat Steps 1 and 2 for the other servers, as required.
-
After making the required selections, click Next.
When you are updating an existing cell, if you delete a server to which custom services are currently targeted, the Configuration Wizard automatically retargets those services as follows:
-
If the custom services were originally targeted solely to the server that you are now deleting (that is, after you delete the server, the custom services would become untargeted in the modified cell), then the Configuration Wizard automatically retargets the custom services to all eligible targets.
An eligible target is any server that is not defined in the configuration groups specification (
config-groups.xmlfile) of an included product template. Servers that are specified inconfig-groups.xmlare essentially owned by the template and, therefore, are not eligible for automatic targeting. -
If the custom services were originally targeted to multiple targets (including servers and the Administration Server), and one of the targeted servers is deleted, then the Configuration Wizard leaves the remaining target associations intact and does not attempt to retarget the services.
3.24 Target Resource Adapters to Servers
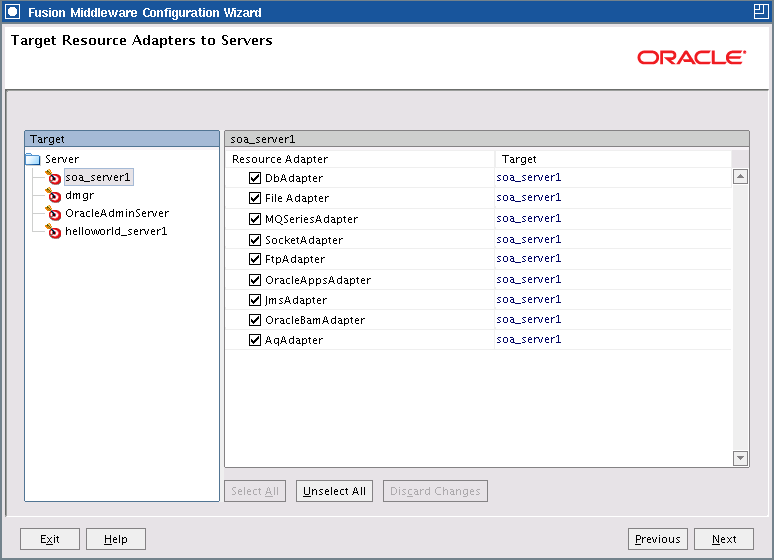
Description of the illustration targetresdapters.gif
Use this screen to target resource adapters to individual servers. You cannot target resource adapters to clusters. Servers that are assigned to clusters are included in the Target list.
Resource adapters that are associated with the product for which you are configuring the cell (for example, Oracle SOA Suite) are targeted automatically to the server that was created for that product. In this screen, you can target resource adapters to additional servers.
To target resource adapters to servers:
-
In the Target list, select the server on which you want to target resource adapters.
The name of the selected target is displayed as the title of the list on the right.
-
In the target_name list, select the check boxes corresponding to the resource adapters that you want to target to the selected server.
The resource adapters that are displayed here vary, depending on the products that you selected in the Add Products to Cell screen earlier in the wizard.
After you select resource adapters, the names of the targeted servers are displayed in the Target column in the target_name list.
-
Repeat Steps 1 and 2 for the other servers, as required.
-
After making the required selections, click Next.
When you are updating an existing cell, if you delete a server to which resource adapters are currently targeted, the Configuration Wizard automatically retargets those resource adapters as follows:
-
If the resource adapters were originally targeted solely to the server that you are now deleting (that is, after you delete the server, the resource adapters would become untargeted in the modified cell), then the Configuration Wizard automatically retargets the resource adapters to all eligible targets.
An eligible target is any server that is not defined in the configuration groups specification (
config-groups.xmlfile) of an included product template. Servers that are specified inconfig-groups.xmlare essentially owned by the template and, therefore, are not eligible for automatic targeting. -
If the resource adapters were originally targeted to multiple targets (including servers and the Administration Server), and one of the targeted servers is deleted, then the Configuration Wizard leaves the remaining target associations intact and does not attempt to retarget the resource adapters.
3.25 Target JDBC Data Sources to Clusters or Servers
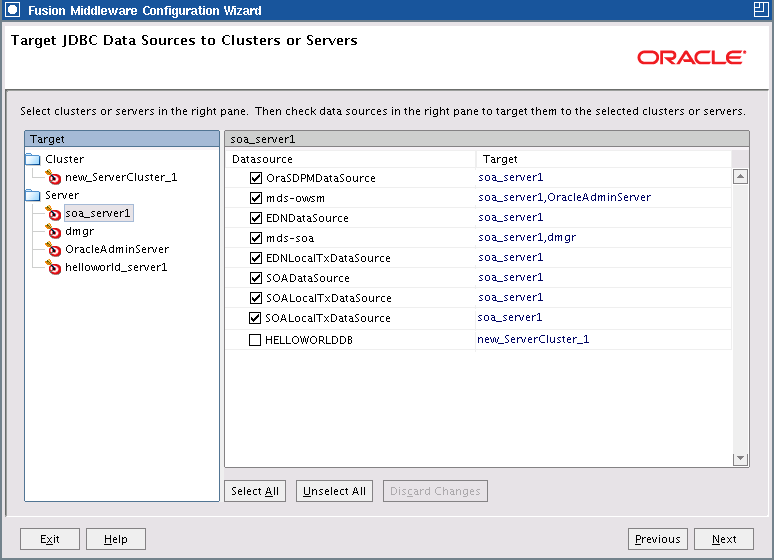
Description of the illustration targetjdbc.gif
Use this screen to target JDBC data sources to servers or clusters.
To target a JDBC data source to a cluster or server:
-
In the Target list, select the cluster or server to which you want to target a data source.
The name of the selected target is displayed as the title of the list on the right.
-
In the target_name list, select the check boxes corresponding to the data sources that you want to target to the selected server or cluster.
Note:
When you select a server in the Target list, some of the check boxes in the target_name list might be disabled, indicating data sources that are already targeted at the cluster that contains the selected server.After you select data sources, the name of the targeted cluster or server is displayed in the Target column in the target_name list.
-
Repeat Steps 1 and 2 for the other clusters and servers, as required.
-
After making the required selections, click Next.
3.26 Target JMS Resources to Clusters or Servers
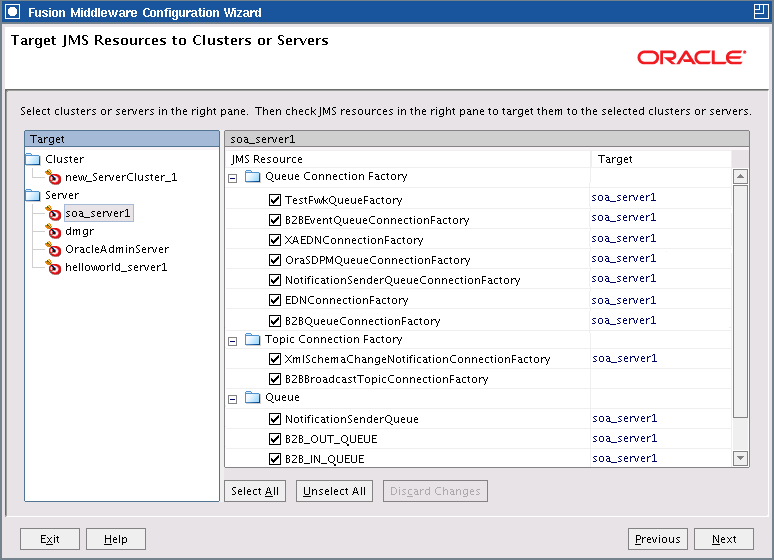
Description of the illustration targetjmsresources.gif
Use this screen to target Java Message Service (JMS) resources to servers or clusters.
To target a JMS resource to a cluster or server:
-
In the Target list, select the cluster or server to which you want to target the JMS resource.
The name of the selected target is displayed as the title of the list on the right.
-
In the target_name list, select the check boxes corresponding to the JMS resources that you want to target to the selected server or cluster.
Note:
When you select a server in the Target list, some of the check boxes in the target_name list might be disabled, indicating JMS resources that are already targeted at the cluster that contains the selected server.After you select JMS resources, the name of the targeted cluster or server is displayed in the Target column in the target_name list.
-
Repeat Steps 1 and 2 for the other clusters and servers, as required.
-
After making the required selections, click Next.
3.27 Configuration Summary
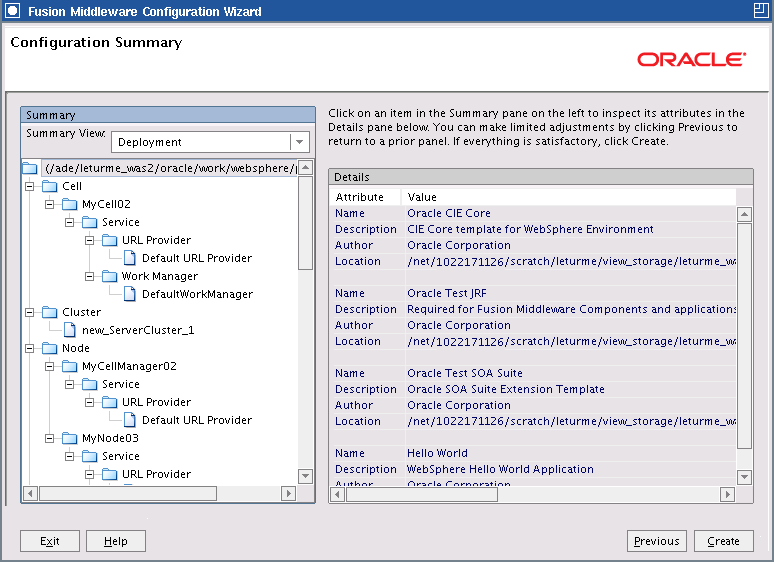
Description of the illustration configsummary.gif
Review the detailed configuration settings of your cell before continuing.
In the Summary section on the left, select an item to display details about that item in the Details section on the right.
You can limit the items that are displayed in the Summary section by selecting a filter option from the Summary View list. For example, to view the JDBC data sources that are assigned to each of your clusters and servers, select JDBC from the Summary View list.
To change the configuration, click Previous to return to the appropriate screen.
When you are done reviewing the configuration, click:
-
Create (if you are creating a new cell)
-
Extend (if you are modifying an existing cell or federating a machine)
3.28 Configuring Cell
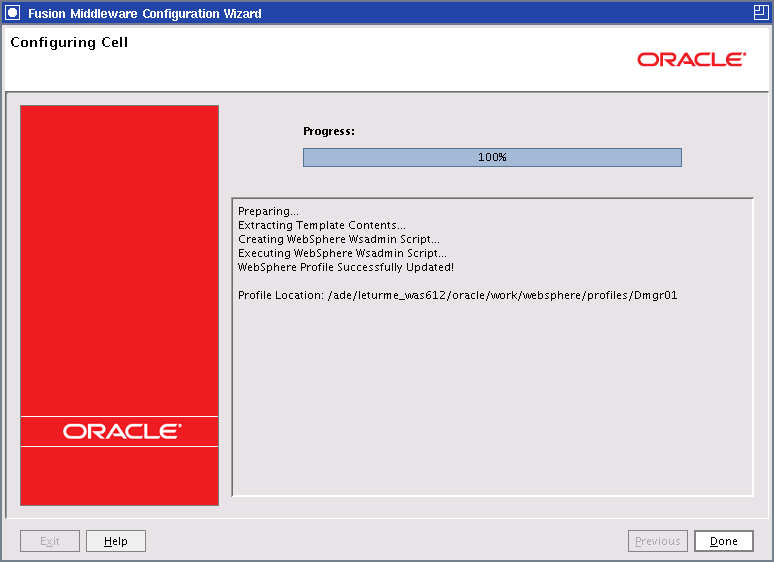
Description of the illustration configuringcell.gif
This screen shows the progress of the cell configuration process.
When the cell configuration process completes, click Done to close the Configuration Wizard.
On Windows operating systems, to start the Deployment Manager after closing the Configuration Wizard, select the Start Deployment Manager check box. This check box is not available on UNIX operating systems.