63 Securing Your WebCenter Portal Application
This chapter describes the security mechanisms and features provided in a WebCenter Portal application, and how you can use Oracle ADF Security to handle authentication and authorization.
This chapter includes the following sections:
-
Section 63.1, "Introduction to WebCenter Portal Application Security"
-
Section 63.12, "Configuring Basic Authentication for Testing Portlet Personalization"
-
Section 63.14, "Registering Custom Certificates with the Keystore"
-
Section 63.15, "Overriding Inherited Security on Portlets and Customizable Components"
-
Section 63.17, "Securing Identity Propagation Through WSRP Producers with WS-Security"
63.1 Introduction to WebCenter Portal Application Security
WebCenter Portal applications are dynamic and often involve input from users in the form of customizations and preferences, and consequently require a flexible security model. The WebCenter security model is based on the ADF security model rather than the more traditional J2EE security model. For more information on ADF security, the section on "Enabling ADF Security in a Fusion Web Application" in the Oracle Fusion Middleware Fusion Developer's Guide for Oracle Application Development Framework.
By default, a WebCenter Portal application is configured with ADF security. A default username and password (weblogic/weblogic1) are created automatically for you, and you can use this username/password combination for testing purposes immediately. For more information about configuring ADF security, see Section 63.3, "Configuring ADF Security."
Default login and logout pages are also provided with the WebCenter Portal Application template.
WebCenter Portal applications can also use two out-of-the-box security tools: the Role Manager task flow, and Page Hierarchy security editor. The Role Manager task flow provides pre-defined runtime security administration functionality to define roles and permissions for users. Using the Page Hierarchy security editor provides a quick way to apply inherited and/or delegated security to application pages. These two security tools are described in Section 63.4, "Using the Role Manager Task Flow," and Section 63.6, "Using the Page Hierarchy Security Editor."
63.2 Creating an Application Role
There are three roles available out-of-the box:
-
Administrator - the default member for the application Administrator role is the enterprise Administrator role, whose default member is
weblogic -
AppConnectionManager - the default member for the AppConnectionManager role is the application Administrator role
-
AppConnectionViewer - the default member for the AppConnectionViewer role is the authenticated-role
The Administrator role is provided so that you can set up navigation and security for your application, and delegate permissions to other users.
The AppConnectionManager and AppConnectionViewer are roles that are defined for managing and viewing application connections respectively. Typically, application connections are configured and managed using Fusion Middleware Control or WLST commands. However, connections for portlet producers and external applications can be configured through the application's runtime Administration page (or the Role Manager taskflow if implemented separately). To manage or view these connections, you must be part of one of these roles. For more information about the default roles, see "Default Application Roles" in the Oracle Fusion Middleware Administrator's Guide for Oracle WebCenter.
You can add members at runtime for these roles using the Administrator page (or the Role Manager taskflow if implemented separately), and in JDeveloper using the JAZN Editor. Out-of-the-box, an administrator will be able to configure external application and portlet producer connections, and any other authenticated user will only be able to view these connections. Similarly, you can add users to the application by selecting the Users tab in the ADF Security Policy editor, clicking the Add (+) icon, and specifying a username and password.
To create an application role:
-
Access the ADF Security Policy editor using any of the following methods:
-
Navigate to the jazn-data.xml file in the Application Resources Panel, under the META-INF folder. Right-click jazn-data.xml and select Open from the context menu. Open the Application Roles tab.
-
Right-click the application name, select Secure and then Application Roles.
-
From the Application menu, select Secure and then Application Roles.
-
-
In the Application Roles editor, click the Add (+) icon and select New Role.
-
Enter a name, a display name, and description for the new role.
-
Save the file.
Similarly, you can add users to the application by opening the Users tab in the ADF Security Policy editor, clicking the Add (+) icon, and specifying a username and password.
63.3 Configuring ADF Security
ADF security is configured by default if you created your application using the WebCenter Portal Application template. This section describes the Configure ADF security wizard, which you can use to override the default settings for a WebCenter Portal application, or if your application does not use the WebCenter Portal application template (i.e., you did not select the "Configure the application with standard portal features" checkbox when you created your application). This section also describes the grants that are generated when you create a WebCenter Portal application, and when services are consumed.
This section contains the following subsections:
63.3.1 Configuring ADF Security Settings
This section describes the Configure ADF security wizard, which you can use to override the default settings for a WebCenter Portal application, or if your application does not use the WebCenter Portal application template (i.e., you did not select the "Configure the application with standard portal features" checkbox when you created your application).
To configure the ADF security settings:
-
Open your portal application.
-
Access the Configure ADF Security Wizard using one of the following methods:
-
From the Application menu, select Secure and then Configure ADF Security.
-
Right-click the application name, select Secure and then Configure ADF Security.
-
-
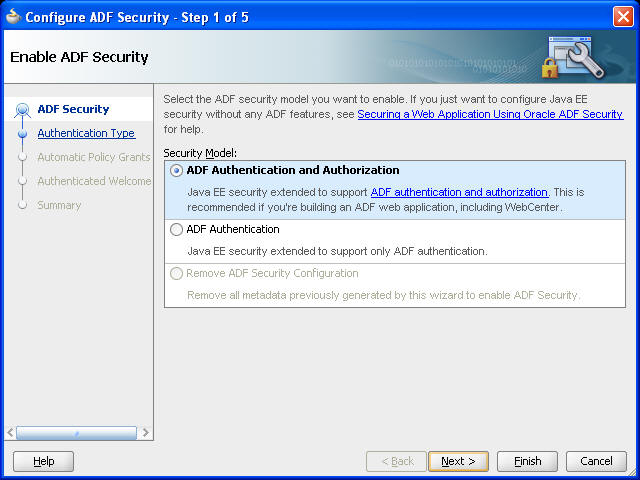
On the Enable ADF Security page, select ADF Authentication and Authorization, which is the typical choice for WebCenter applications.
Figure 63-1 ADF Security Page of the ADF Security Wizard
Description of "Figure 63-1 ADF Security Page of the ADF Security Wizard"
-
Click Next.
-
Notice that form-based authentication is selected by default.
To make the process of securing your application easy, select Form-Based Authentication and then the Generate Default Pages option, as shown in Figure 63-2.
Note:
WebCenter Portal applications provide default login and error pages. You should only select the Generate Default Pages option for applications not built using the WebCenter Portal application template.Alternatively, if you do not select Generate Default Pages, you can create custom login and error pages. For information about creating custom login pages, see Section 63.7, "Creating Login Pages and a Login Component."
Figure 63-2 Authentication Page of ADF Security Wizard
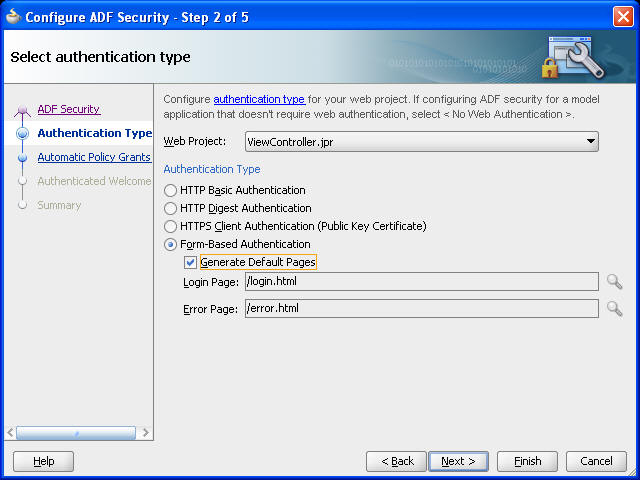
Description of "Figure 63-2 Authentication Page of ADF Security Wizard"
-
Click Next.
-
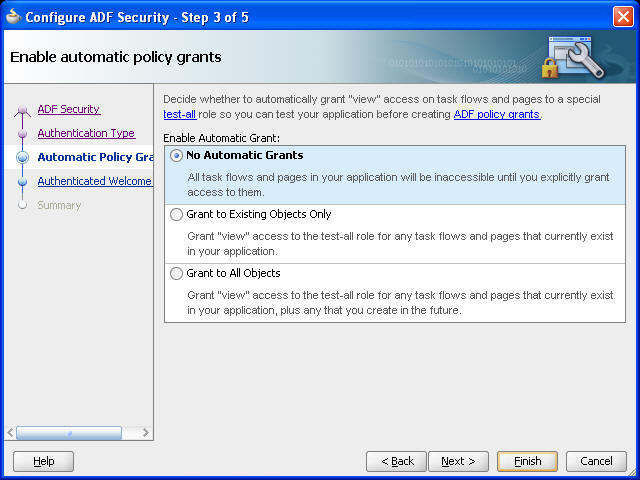
On the Enable automatic policy grants page, shown in Figure 63-3, select whether to make ADF resources public without requiring application developers to first define ADF policy grants. For a standard security implementation, you can select the No Automatic Grant option.
However, in this case, you must individually grant permissions on each page in the application.
When you enable automatic policy grants, a View grant for all ADF resources is made to the
test-allapplication role, whose default member is thepublicrole. This option provides a convenient way to run and test application resources without the restricted access that ADF authorization enforces. You can also disable automatic policy grants to secure all ADF resources by default.Select No Automatic Grant when you want to explicitly configure a policy store to grant access to ADF resources. No automatic grants to the
test-allapplication role are granted. However when WebCenter services task flows are consumed in an application, the WebCenter extension automatically adds appropriate grants for these task flows, giving View access to the roleauthenticated-role. For more information about the specific grants provided through task flows, see Section 63.3.2, "Automated Security Grants for WebCenter Services."Note:
Grants made to the roleauthenticated-roleare visible in the source view of thejazn-data.xmlfile. If the default grant toauthenticated-roleis not appropriate to the application, you can change it by manually updating the source view of the application'sjazn-data.xml.Select Grant to Existing Objects Only when you want JDeveloper to grant View privileges to the
test-all(public) application role and you want this policy to apply to all your application's existing ADF task flows and web pages in the user interface project.Select Grant to All Objects when you want JDeveloper to grant View privileges to the
test-allapplication role and you want this policy to apply to all ADF task flows and web pages that developers create in the user interface project. Note that the Grant to All Objects option appears when you run the wizard for the first time. Subsequently, the Grant to New Objects option appears each time you run the wizard. -
Click Next.
-
Optionally, if you want to display a specific welcome page upon authentication, then select the Redirect Upon Successful Authentication option as shown in Figure 63-4.
You can either create a custom welcome page or let the wizard create a default one. To keep the process simple, select Generate Default.
Figure 63-4 Specify an Authenticated Welcome Page
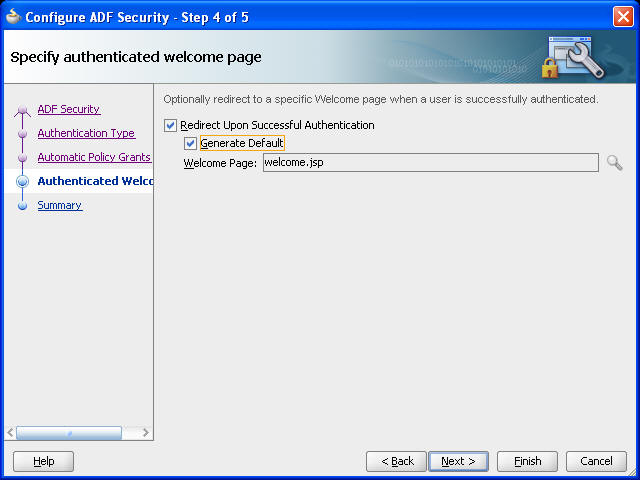
Description of "Figure 63-4 Specify an Authenticated Welcome Page"
-
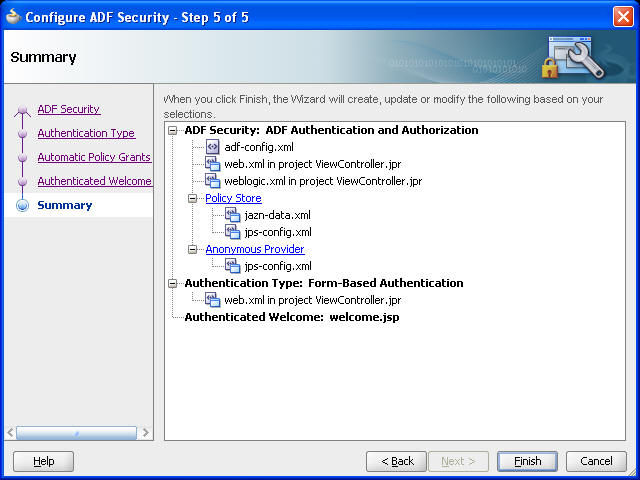
The Summary page opens, as shown in Figure 63-5.
-
Click Finish.
It may take several moments for the wizard to complete.
-
On the Security Infrastructure Created dialog, click OK.
63.3.2 Automated Security Grants for WebCenter Services
Table 63-1 lists the security grants that are given automatically in a WebCenter Portal application, configured with standard Portal features.
Table 63-1 Automated Security Grants for WebCenter Portal Applications
| Role | Grant | Actions | Resource Name |
|---|---|---|---|
|
anonymous-role |
TaskflowPermission |
View |
/oracle/webcenter/siteresources/scopedMD/.* /oracle/webcenter/portalapp/.* /oracle/webcenter/navigationtaskflows/view/pagebreadcrumb-definition.xml#pagebreadcrumb-definition /oracle/webcenter/navigationtaskflows/view/pagemenu-definition.xml#pagemenu-definition /oracle/webcenter/navigationtaskflows/view/pagetree-definition.xml#pagetree-definition /oracle/webcenter/navigationtaskflows/view/.* /oracle/webcenter/.* |
|
RegionPermission |
View |
oracle.webcenter.siteresources.scopedMD.* oracle.webcenter.taskflow.view.ContainerPageDef oracle.webcenter.taskflow.view.ViewerPageDef oracle.webcenter.taskflowstyle.view.PreviewPageDef oracle.webcenter.page.pstemplates.* oracle.webcenter.portalapp.pagetemplates.* oracle.webcenter.portalapp.pages.loginPageDef oracle.webcenter.portalapp.pages.errorPageDef oracle.webcenter.portalapp.pages.navigation_rendererPageDef |
|
|
HierarchicalResource Permission |
View |
serviceID=oracle.webcenter.page,scopeID=s8bba98ff_4cbb_40b8_beee_296c916a23ed,resourceID=s8bba98ff_4cbb_40b8_beee_296c916a23ed |
|
|
authenticated-role |
RegionPermission |
View |
oracle.webcenter.portalwebapp.pages.adminPageDef oracle.webcenter.collab.* oracle.webcenter.doclib.* oracle.webcenter.tagging.* |
|
RegionPermission |
Grant |
oracle.webcenter.taskflow.view.ContainerPageDef |
|
|
HierarchicalResourcePermission |
Personalize,View |
serviceID=oracle.webcenter.page,scopeID=s8bba98ff_4cbb_40b8_beee_296c916a23ed,resourceID=s8bba98ff_4cbb_40b8_beee_296c916a23ed |
|
|
CatalogPermission |
Create, Edit |
/oracle/webcenter/quicklinks/scopedMD/.* |
|
|
Administrator |
HierarchicalResourcePermission |
Create, Delete, Grant, Manage, Personalize,Update, View |
serviceID=oracle.webcenter.page,scopeID=s8bba98ff_4cbb_40b8_beee_296c916a23ed,resourceID=s8bba98ff_4cbb_40b8_beee_296c916a23ed |
|
WebCenterResourcePermission |
Manag |
oracle_webcenter_siteresource_s8bba98ff_4cbb_40b8_beee_296c916a23ed_contentpresenter_.* oracle_webcenter_siteresource_s8bba98ff_4cbb_40b8_beee_296c916a23ed_datacontrol_.* oracle_webcenter_siteresource_s8bba98ff_4cbb_40b8_beee_296c916a23ed_navigation_.* oracle_webcenter_siteresource_s8bba98ff_4cbb_40b8_beee_296c916a23ed_pagestyle_.* oracle_webcenter_siteresource_s8bba98ff_4cbb_40b8_beee_296c916a23ed_catalog_.* oracle_webcenter_siteresource_s8bba98ff_4cbb_40b8_beee_296c916a23ed_pagetemplate_.* oracle_webcenter_siteresource_s8bba98ff_4cbb_40b8_beee_296c916a23ed_skin_.* oracle_webcenter_siteresource_s8bba98ff_4cbb_40b8_beee_296c916a23ed_taskflow_.* oracle_webcenter_siteresource_s8bba98ff_4cbb_40b8_beee_296c916a23ed_taskflowstyle_.* |
Table 63-2 lists the grants that are given when a service is consumed. A service is consumed whenever a component (from the Component Palette) or a task flow (from the Resource Palette) belonging to that service is added to a page.
Grants are added automatically to the jazn-data.xml file. They can be viewed and edited through the ADF Security Policy Editor. For more information, see Section 63.3.1, "Configuring ADF Security Settings."
If ADF security has not been configured for the application, then these grants are not added; however, if security is later configured, grants are added for all services that have been consumed in the application. Common grants are granted whenever any Oracle WebCenter service is consumed.
Table 63-2 Automated Security Grants for WebCenter Services
| Service | Role | Grant | Actions | Resource Name |
|---|---|---|---|---|
|
Common |
anonymous-role |
TaskFlow Permission |
View |
/oracle/webcenter/framework/service/controller/taskflows/resourceViewer.xml#resourceViewer /oracle/webcenter/security/peoplepicker/jsf/taskflows/peoplepicker.xml#peoplepicker /oracle/webcenter/peopleconnections/personalweb/view/jsf/regions/profile-gallery.xml#profile-gallery /oracle/webcenter/peopleconnections/profile/view/jsf/regions/extended/extended-profile.xml#extended-profile /oracle/webcenter/peopleconnections/view/jsf/regions/profile-snapshot.xml#profile-snapshot /oracle/webcenter/peopleconnections/connections/controller/taskflows/connections-main-view-taskflow.xml#connections-main-view-taskflow /oracle/webcenter/peopleconnections/connections/controller/taskflows/connections-mini-view-taskflow.xml#connections-mini-view-taskflow /oracle/webcenter/peopleconnections/connections/controller/taskflows/table-of-connections-taskflow.xml#table-of-connections-taskflow /oracle/webcenter/peopleconnections/wall/controller/taskflows/WallDetailViewer.xml#WallDetailViewer /oracle/webcenter/peopleconnections/wall/controller/taskflows/WallViewer.xml#WallViewer /oracle/webcenter/peopleconnections/kudos/controller/taskflows/KudosDetailViewer.xml#KudosDetailViewer /oracle/webcenter/peopleconnections/kudos/controller/taskflows/KudosMiniViewer.xml#KudosMiniViewer /oracle/webcenter/activitystreaming/controller/taskflows/activity-streaming-mainview.xml#activity-streaming-mainview /oracle/webcenter/activitystreaming/controller/taskflows/activity-streaming-miniview.xml#activity-streaming-miniview /oracle/webcenter/peopleconnections/.* /oracle/webcenter/activitystreaming/.* |
|
authenticated-role |
Region Permission |
View |
oracle.webcenter.security.peoplepicker.pageDefs.oracle_webcenter_security_peoplepicker_jsf_pages_PeoplePickerPagePageDef |
|
|
authenticated-role |
CustomPage Permission |
View |
oracle.webcenter.framework.service.view.pageDefs.resourceExternalPageDef |
|
|
authenticated-role |
Profile Permission |
Edit, Share, View |
/oracle/webcenter/peopleconnections/profile/s8bba98ff_4cbb_40b8_beee_296c916a23ed/.* |
|
|
Administrator |
WCApp Permission |
Manage |
application |
|
|
Administrator |
Profile Permission |
Manage |
/oracle/webcenter/peopleconnections/profile/s8bba98ff_4cbb_40b8_beee_296c916a23ed/.* |
|
|
Announcement |
anonymous-role |
TaskFlow Permission |
View |
/oracle/webcenter/collab/announcement/view/taskflows/main-view-definition.xml#announcement-main-view /oracle/webcenter/collab/announcement/view/taskflows/mini-view-definition.xml#announcement-mini-view /oracle/webcenter/collab/announcement/view/taskflows/link-existing-view-definition.xml#link-existing-view-definition /oracle/webcenter/collab/announcement/view/taskflows/config-view-definition.xml#announcement-config-view /oracle/webcenter/collab/announcement/view/taskflows/announcement-view-definition.xml#announcement-resource-view /oracle/webcenter/collab/announcement/view/taskflows/.* |
|
authenticated-role |
Region Permission |
View |
oracle.webcenter.collab.announcement.view.pageDefs.oracle_webcenter_collab_announcement_view_jsf_pages_AnnouncementLinkExistingViewPageDef oracle.webcenter.collab.announcement.view.pageDefs.oracle_webcenter_collab_announcement_view_jsf_pages_AnnouncementLinkResourceViewPageDef |
|
|
Composer |
anonymous-role |
Taskflow Permission |
View |
/oracle/adfinternal/pageeditor/.* |
|
Discussions |
anonymous-role |
Taskflow Permission |
View |
/oracle/webcenter/collab/forum/view/taskflows/main-task-flow.xml#forum-main /oracle/webcenter/collab/forum/view/taskflows/miniview-task-flow.xml#forum-miniview /oracle/webcenter/collab/forum/view/taskflows/popularTopic-task-flow.xml#forum-popularTopic /oracle/webcenter/collab/forum/view/taskflows/recentTopic-task-flow.xml#forum-recentTopic /oracle/webcenter/collab/forum/view/taskflows/watchedTopic-task-flow.xml#forum-watchedTopic /oracle/webcenter/collab/forum/view/taskflows/watchedForum-task-flow.xml#forum-watchedForum /oracle/webcenter/collab/forum/view/taskflows/config-task-flow.xml#forum-config-view /oracle/webcenter/collab/forum/view/taskflows/link-existing-task-flow.xml#forum-link-existing /oracle/webcenter/collab/forum/view/taskflows/link-new-task-flow.xml#forum-link-new /oracle/webcenter/collab/forum/view/taskflows/message-task-flow.xml#forum-message /oracle/webcenter/collab/forum/view/taskflows/resource-view-task-flow.xml#forum-resource-view /oracle/webcenter/collab/forum/view/taskflows/scope-config-task-flow.xml#forum-scope-config-view /oracle/webcenter/collab/forum/view/taskflows/.* |
|
authenticated-role |
Region Permission |
View |
oracle.webcenter.collab.forum.view.pageDefs.oracle_webcenter_collab_forum_view_jsf_pages_ForumLinkExistingViewPageDef oracle.webcenter.collab.forum.view.pageDefs.oracle_webcenter_collab_forum_view_jsf_pages_ForumLinkNewViewPageDef oracle.webcenter.collab.forum.view.pageDefs.oracle_webcenter_collab_forum_view_jsf_pages_ForumLinkResourceViewPageDef |
|
|
Documents |
anonymous-role |
Taskflow Permission |
View |
/oracle/webcenter/doclib/view/jsf/taskflows/presenter/contentPresenter.xml#doclib-content-presenter /oracle/webcenter/doclib/view/jsf/taskflows/docListViewer.xml#doclib-document-list-viewer /oracle/webcenter/doclib/view/jsf/taskflows/docViewer/docInfo.xml#doclib-document-information /oracle/webcenter/doclib/view/jsf/taskflows/explore/explorer.xml#doclib-explorer /oracle/webcenter/doclib/view/jsf/taskflows/treeNav/treeNavigator.xml#doclib-navigator /oracle/webcenter/doclib/view/jsf/taskflows/docViewer/documentViewer.xml#doclib-document-viewer /oracle/webcenter/doclib/view/jsf/taskflows/folderViewer/folderView.xml#doclib-folder-viewer /oracle/webcenter/doclib/view/jsf/taskflows/mainView.xml#doclib-document-library /oracle/webcenter/doclib/view/jsf/taskflows/miniProperties/miniProperties.xml#doclib-mini-properties /oracle/webcenter/doclib/view/jsf/taskflows/recentDocuments.xml#doclib-recent-documents /oracle/webcenter/doclib/view/jsf/taskflows/richTextEditor/editor.xml#doclib-richtext-editor /oracle/webcenter/doclib/view/jsf/taskflows/upload/uploader.xml#doclib-upload-document /oracle/webcenter/doclib/view/jsf/taskflows/versionHistory/history.xml#doclib-version-history /oracle/webcenter/blog/view/jsf/taskflows/blogDigestViewer/blog-main-view.xml#blog-main-view /oracle/webcenter/doclib/view/jsf/taskflows/.* /oracle/webcenter/blog/view/jsf/taskflows/.* |
|
authenticated-role |
Region Permission |
View |
oracle.webcenter.doclib.view.jsf.* oracle.webcenter.blog.view.jsf.* |
|
|
External Application |
anonymous-role |
Taskflow Permission |
View |
/oracle/adfinternal/extapp/view/fragments/extapp-credential-provisioning-taskflow.xml#extapp-credential-provisioning-taskflow /oracle/adfinternal/extapp/view/fragments/extapp-change-password-taskflow.xml#extapp-change-password-taskflow |
|
Links |
anonymous-role |
Taskflow Permission |
View |
/oracle/webcenter/relationship/view/jsf/resources/links-detail.xml#links-detail /oracle/webcenter/relationship/view/jsf/resources/links-detail-popup.xml#links-detail-popup /oracle/webcenter/relationship/view/jsf/resources/links-to-service.xml#link-to-service /oracle/webcenter/relationship/view/jsf/resources/links-picker-popup.xml#links-picker-popup /oracle/webcenter/relationship/url/view/jsf/taskflows/linkToUrl.xml#link-to-url |
|
Administrator |
Relationship Permission |
Manage |
*s8bba98ff_4cbb_40b8_beee_296c916a23ed/.* |
|
|
Lists |
anonymous-role |
Taskflow Permission |
View |
/oracle/webcenter/list/view/jsf/regions/main-view-task-flow.xml#main-view-task-flow /oracle/webcenter/list/view/jsf/regions/list-instance-view-task-flow.xml#list-instance-view-task-flow /oracle/webcenter/list/view/jsf/regions/.* |
|
authenticated-role |
Region Permission |
View |
/oracle/webcenter/list/templates/lists/.* |
|
|
Administrator |
List Permission |
View |
/oracle/webcenter/list/scopedMD/s8bba98ff_4cbb_40b8_beee_296c916a23ed/lists/.* |
|
|
|
anonymous-role |
Taskflow Permission |
View |
/oracle/webcenter/collab/mail/view/jsf/regions/compose-task-flow.xml#mail-compose-view /oracle/webcenter/collab/mail/view/jsf/regions/content-view-definition.xml#mail-content-view /oracle/webcenter/collab/mail/view/jsf/regions/dl-config-definition.xml#dl-config-view /oracle/webcenter/collab/mail/view/jsf/regions/mini-view-definition.xml#mail-mini-view /oracle/webcenter/collab/mail/view/jsf/regions/.* |
|
authenticated-role |
Region Permission |
View |
oracle.webcenter.collab.mail.view.pageDefs.oracle_webcenter_collab_mail_view_jsf_pages_ComposeviewPageDef oracle.webcenter.collab.mail.view.pageDefs.oracle_webcenter_collab_mail_view_jsf_pages_ContentViewPageDef |
|
|
Notifications |
anonymous-role |
Taskflow Permission |
View |
/oracle/webcenter/notification/view/jsf/regions/SubscriptionPreferences.xml#SubscriptionPreferences /oracle/webcenter/notification/view/jsf/regions/SubscriptionsViewer.xml#SubscriptionsViewer |
|
Page |
anonymous-role |
TaskFlow Permission |
View |
/oracle/webcenter/page/view/jsf/fragments/page-create-page.xml#page-create-page /oracle/webcenter/page/view/jsf/fragments/page-doc-prop-panel-definition.xml#page-doc-prop-panel-definition /oracle/webcenter/page/view/jsf/fragments/page-doc-sec-panel-definition.xml#page-doc-sec-panel-definition /oracle/webcenter/page/view/jsf/fragments/golink-prop-panel-definition.xml#golink-prop-panel-definition |
|
authenticated-role |
Region Permission |
Create |
oracle_webcenter_page_scopedMD_s8bba98ff_4cbb_40b8_beee_296c916a23ed_.* |
|
|
Administrator |
Region Permission |
Customize, Edit, Grant, Personalize, View |
oracle_webcenter_page_scopedMD_s8bba98ff_4cbb_40b8_beee_296c916a23ed_.* |
|
|
Polls |
anonymous-role |
Taskflow Permission |
View |
/oracle/webcenter/collab/survey/view/jsf/taskflows/list-surveys-definition.xml#list-surveys /oracle/webcenter/collab/survey/view/jsf/taskflows/take-survey-definition.xml#take-survey /oracle/webcenter/collab/survey/view/jsf/taskflows/quick-poll-definition.xml#quick-poll /oracle/webcenter/collab/survey/view/jsf/taskflows/view-results-definition.xml#view-results /oracle/webcenter/collab/survey/view/jsf/taskflows/take-polls-definition.xml#take-polls /oracle/webcenter/collab/survey/view/jsf/taskflows/empty-definition.xml#empty-definition /oracle/webcenter/collab/survey/view/jsf/taskflows/.* |
|
Recent Activities |
anonymous-role |
TaskFlow Permission |
View |
/oracle/webcenter/recentactivity/controller/taskflows/recent-activities.xml#recent-activities /oracle/webcenter/recentactivity/controller/taskflows/.* |
|
RSS |
anonymous-role |
TaskFlow Permission |
View |
/oracle/webcenter/rssviewer/view/jsf/fragments/RSSViewerTaskFlow.xml#RSSViewerTaskFlow /oracle/webcenter/rssviewer/view/jsf/fragments/.* |
|
Search |
anonymous-role |
TaskFlow Permission |
View |
/oracle/webcenter/search/controller/taskflows/searchResults.xml#search-view /oracle/webcenter/search/controller/taskflows/localToolbarSearch.xml#search-toolbar /oracle/webcenter/search/controller/taskflows/preferences.xml#search-preferences /oracle/webcenter/search/controller/taskflows/allSavedSearches.xml#all-saved-searches /oracle/webcenter/search/controller/taskflows/simpleSearchResults.xml#search-simple-view /oracle/webcenter/search/controller/taskflows/customize.xml#search-customize /oracle/webcenter/search/controller/taskflows/.* |
|
Tags |
anonymous-role |
TaskFlow Permission |
View |
/oracle/webcenter/tagging/controller/taskflows/related-links.xml#tagging-related-links /oracle/webcenter/tagging/controller/taskflows/launch-dialog.xml#tagging-launch-dialog /oracle/webcenter/tagging/controller/taskflows/tagging-personal-view.xml#tagging-personal-view /oracle/webcenter/tagging/controller/taskflows/tag-selection.xml#tag-selection /oracle/webcenter/tagging/controller/taskflows/related-resources.xml#related-resources /oracle/webcenter/tagging/controller/taskflows/tag-center-task-flow.xml#tag-center /oracle/webcenter/tagging/controller/taskflows/tag-center-related-tags.xml#tag-center-related-tags /oracle/webcenter/tagging/controller/taskflows/tag-center-related-users.xml#tag-center-related-users |
|
authenticated-role |
Region Permission |
View |
oracle.webcenter.tagging.view.pageDefs.oracle_webcenter_tagging_view_jsf_fragments_launch_dialogPageDef oracle.webcenter.tagging.view.pageDefs.oracle_webcenter_tagging_view_jsf_fragments_tag_centerPageDef oracle.webcenter.tagging.view.pageDefs.oracle_webcenter_tagging_view_jsf_fragments_tag_center_related_resourcesPageDef oracle.webcenter.tagging.view.pageDefs.oracle_webcenter_tagging_view_jsf_fragments_tag_center_related_tagsPageDef oracle.webcenter.tagging.view.pageDefs.oracle_webcenter_tagging_view_jsf_fragments_tag_center_related_usersPageDef oracle.webcenter.tagging.view.pageDefs.oracle_webcenter_tagging_view_jsf_fragments_tag_center_tag_selectionPageDef |
|
|
Worklist |
anonymous-role |
TaskFlow Permission |
View |
/oracle/webcenter/worklist/view/jsf/taskFlowDefs/worklist.xml#worklist /oracle/webcenter/worklist/view/jsf/taskFlowDefs/.* |
63.4 Using the Role Manager Task Flow
The Role Manager task flow lets administrators manage application roles, its memberships, and associate service permissions for the role. The Role Manager task flow is available out-of-the-box from the runtime Administration page's Security tab for applications built using the WebCenter Portal application template. For information on how to use the Role Manager runtime to manage and configure users and application roles, see "Managing Users and Application Roles" in the Oracle Fusion Middleware Administrator's Guide for Oracle WebCenter.
To prevent customizations from being overwritten during updates, the source for the Administration page should not be customized. You can, however, choose to write your own administration page if the default administration page is not sufficient, in which case you can use the Role Manager task flow as part of your application's runtime security administration. Follow the steps below to add it a JSF or JSP page and include it in your application.
To add the Role Manager task flow to your WebCenter Portal application:
-
Create a new application choosing WebCenter Portal Application as the application type.
-
Create the application adding any project technology libraries that the application may require. Do not uncheck the Configure the application with standard Portal features check box.
-
Create a new JSF or JSP page.
-
From the Resource Palette, expand WebCenter Services Catalog, and from the list of Task Flows, select the
Security - Role Managertask flow.Figure 63-6 Resource Palette - WebCenter Services Catalog
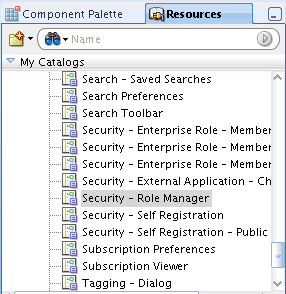
Description of "Figure 63-6 Resource Palette - WebCenter Services Catalog"
-
Drag the Role Manager task flow onto the page you created as a region.
-
Build the application, log in as an administrator, and navigate to the page containing the role Manager task flow.
63.5 Using the Enterprise Role Member Task Flows
The Enterprise Role Member task flows provide additional task flows to the Role Manager task flow that you can add to a page to monitor enterprise users and roles. The members shown are both roles and users, with the result shown in a tree structure. Roles can be further expanded to see their members.
To add the task flows, follow the same steps as for the Role Manager task flow (see Section 63.4, "Using the Role Manager Task Flow"), substituting one of the task flows described below. Note that all of the Enterprise Role Members task flows take a single mandatory parameter which is the enterprise role name.
-
Security - Enterprise Role Members
This task flow shows a list of the members for a specified role.
-
Security - Enterprise Role - Members Search
This task flow does a nested search of members using a pattern for the specified role and shows the list of members.
-
Security - Enterprise Role - Members Viewer
This task flow shows the Members and Search tabs that are shown for the Enterprise Role Members and Members Search task flows in a single page.
63.6 Using the Page Hierarchy Security Editor
This section describes how to use page hierarchy security to provide inherited and delegated security for WebCenter Portal application pages. It includes the following sections:
63.6.1 Introduction to Page Hierarchy Security
This section describes the page hierarchy model and how page hierarchy security works within a WebCenter Portal application.
This section includes the following subsections:
63.6.1.1 Page Hierarchy Model
A page hierarchy has a default security policy that is set at the root of the hierarchy. Unless explicitly overridden, this policy applies to all pages underneath. At any page in the hierarchy, it is possible to override the inherited policy with a new overriding policy, allowing for delegated administration and modifying the policy at the subordinate pages. Once the policy is overridden for a particular page, the children of that page, by default, will inherit the new policy. The policy established at any node is a list of grants indicating what permissions each of the grantees has on that page and its children, if any.
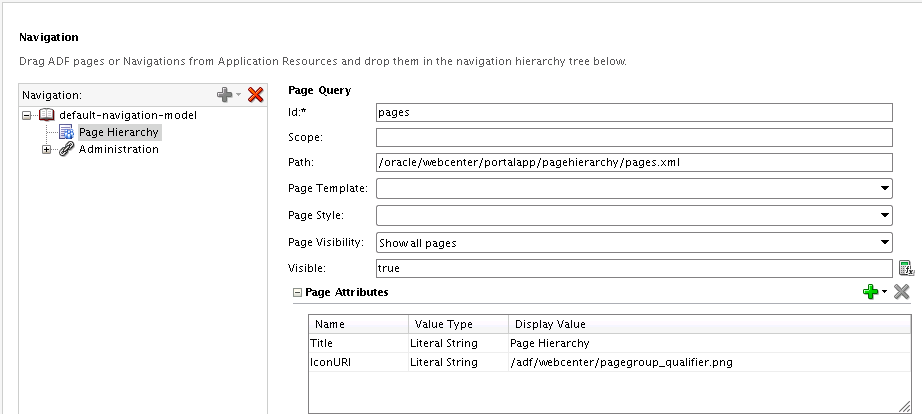
When you create a WebCenter Portal Application, a default navigation model is created for you that also contains the root node of a page hierarchy. These two structures work independently and collectively to provide the navigation flow and secured access to pages for your application. Figure 63-8 shows the default navigation model (default-navigation-model.xml), which includes a node for the default page hierarchy (pages.xml).
You can add additional navigation models to, for example, provide different navigation views for specific user groups. For each navigation you can also add one or more page hierarchy nodes to provide a more granular navigation and security model. For more information about creating new navigation models, see Section 10.2, "Creating a Navigation Model." For more information about adding page hierarchies to a navigation, see Section 10.3.5, "How to Add a Page Hierarchy to a Navigation Model."
Although there is only a single page hierarchy within your application, any node within that hierarchy can be used as the root node in a navigation model. For example, you might have a page hierarchy that contains top level nodes for Human Resources, Support, Sales, Administration, and so forth. Each of these nodes can be added to the navigation model separately to create navigation only to that section of the page hierarchy.
Figure 63-9 Page Hierarchy Root Node Permissions
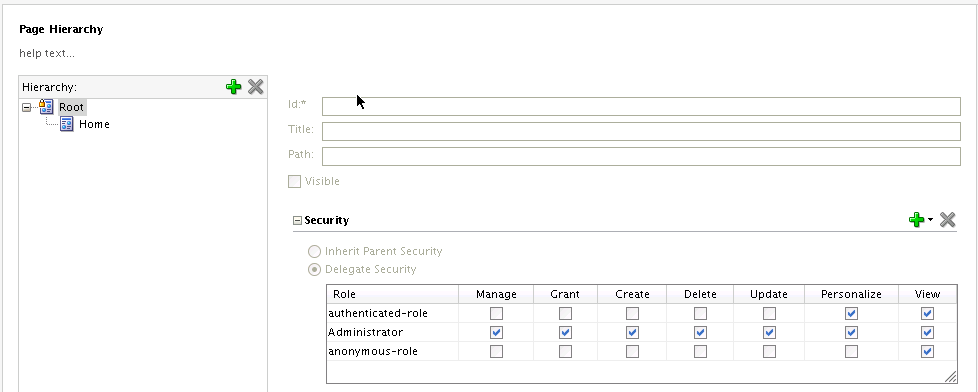
Description of "Figure 63-9 Page Hierarchy Root Node Permissions"
Figure 63-9 shows the page hierarchy root node and the associated permissions. From the root node you can start building your page hierarchy by adding or dragging pages into it. Note that the "Manage" permission appears only on the root node, and only for the administrator. This allows the administrator to delegate security and have full access to all pages within the hierarchy regardless of any security overrides downstream. In short, a user with "manage" permission on the root node is a super admin and has all access to all pages in the entire hierarchy.
63.6.1.2 Page-level and Page Hierarchy Security
A page hierarchy provides an alternative security mechanism to page-level security for your WebCenter Portal application. Although you can add pages to your application and provide security for them without making them a part of a page hierarchy, a page hierarchy provides a convenient and more manageable way to secure the content for large sites. By simply adding a hierarchy node to the hierarchy root or home node and dragging and dropping pages into it, you can very quickly provide basic security for them.
Note:
Although page-level security can co-exist with page hierarchy security, you cannot apply both page-level and page hierarchy security to the same page. Note also that if you add a page to a hierarchy node, all previous page-level permissions are purged.63.6.1.3 Inherited and Delegated Security
The page hierarchy model uses a node structure that provides cascaded, role-based security where each child node inherits its parent's security permissions. By adding pages to a node you can quickly configure security for your application pages.
To be able to perform any action at a particular node, you need to have the required permission at the node or its immediate parent that delegates (overrides) security. However in order to view a page, you need to have view access for all pages up the hierarchy right till the root page.
As well as providing basic security inherited from a node's parent, you can also apply delegated security to child nodes to limit or override the security that would otherwise have been inherited. These aspects of page hierarchy security are described in Section 63.6.2, "Building a Page Hierarchy."
Note:
Inherited security is cascaded through a root node that can initially only be populated by an administrator. For other users to be able to create and delegate permissions the administrator must first delegate those permissions. In all cases, permissions are only cascaded down in the tree (that is, a user cannot change settings for a parent node). A user can also only delegate the rights they have themselves or a subset of those rights to another user.63.6.2 Building a Page Hierarchy
This section explains how to use page hierarchy security to automatically cascade a parent page's role-based security settings to its child pages, and how to "delegate" security for individual page nodes.
This section contains the following subsections:
63.6.2.1 Adding a Page Hierarchy to a Navigation
In addition to the default page hierarchy in the default navigation model, you can add page hierarchy nodes from the default page hierarchy to the navigations within your application as root nodes. For more information about adding a page hierarchy to a navigation, see Section 10.3.5, "How to Add a Page Hierarchy to a Navigation Model."
63.6.2.2 Adding Pages to a Page Hierarchy
This section describes how to add JSF or JSP pages to a page hierarchy.
Note:
To avoid issues with conflicting inherited security models, a page can only appear once in the page hierarchy.To add a JSF or JSP page to a page hierarchy:
-
Open the page hierarchy editor in JDeveloper:
-
Right-click the
/oracle/webcenter/portalapp/pagehierarchyfolderor
-
Right-click any
.jspxpage under/oracle/webcenter/portalappand select Edit Page Hierarchy from the context menu
-
-
Select the node to which you want to add pages, and either:
-
Click the Add page icon and use the browser to locate and add the page
or
-
Drag and drop the page from the Navigator under the appropriate node
-
-
Continue by adding additional pages as required, or use the Remove Page icon to delete any unwanted pages.
63.6.2.3 Delegating Security
This section describes how to override inherited security by delegating permissions for a node and its child pages. You can also delegate security for pages using the runtime Administration page. For more information about delegating security using the runtime Administration page, see "Managing Application Roles and Permissions" in the Oracle Fusion Middleware Administrator's Guide for Oracle WebCenter.
To override inherited security with delegated security:
-
Open the page hierarchy
(pages.xml) in JDeveloper. -
Select the node at which to begin overriding inherited security.
-
Check or uncheck the Visible checkbox to specify whether the page or resource is displayed. Check the checkbox if you want the resource to be displayed to all users at all times. Uncheck the checkbox to hide the resource from all users at all times.
-
Select Delegate Security.
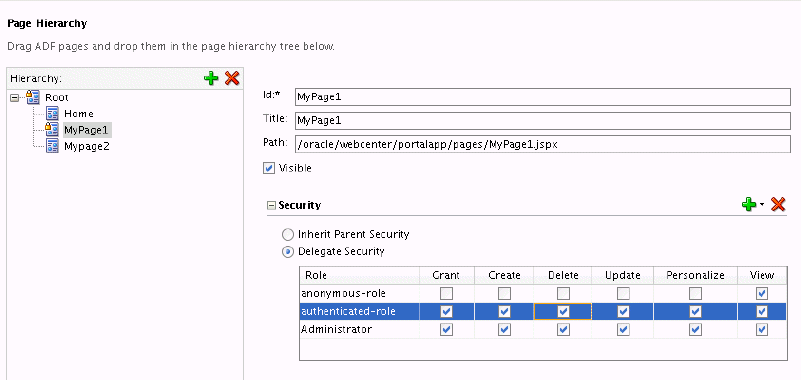
The Security options for delegating security displays (see Figure 63-10).
Figure 63-10 Page Hierarchy - Delegate Security
Description of "Figure 63-10 Page Hierarchy - Delegate Security"
-
Check or uncheck permissions for the roles for this page and its child pages.
-
To specify permissions for another available user role, click the Add icon (+) and select the desired role. A new row will be created in the table for this role. To remove the permissions for an existing role, select the corresponding row in the table and click the Delete (X) icon.
Note:
The role names in the Add list correspond to the application roles that have been defined in the policy store for the application. Delegating security is limited to only application roles at design time. You can, however, add user and enterprise roles at runtime using the runtime Administration page, as described in "Managing Application Roles and Permissions" in the Oracle Fusion Middleware Administrator's Guide for Oracle WebCenter.
63.7 Creating Login Pages and a Login Component
You can add login and logout links to your public welcome page or other page using a login backing bean (LoginBackingBean) so that users can explicitly log in and out while they are in the application. The bean provides methods that can be used by the user to log in and log out.
To use the bean, create a simple page and bind it to the bean to do the login and logout as described in the following steps:
-
Create a JSF page.
-
Add the
LoginBackingBeanto thefaces-config.xmlortaskflow.xmlfile. -
Create a page with user name, password, login and logout links.
-
Bind the user name and password to the bean's user name and password.
-
Map the login and logout links to the
doLoginanddoLogoutmethod respectively as shown in the example below:<af:subform id="pt_sf1" defaultCommand="pt_logincb" rendered="#{attrs.showLogin and !securityContext.authenticated}"> <af:panelFormLayout id="pt_pfl1"> <af:panelLabelAndMessage id="pt_plam1" label="User Name" styleClass="NoLabelWrap" labelStyle="font-size:small;color:white;"> <af:inputText id="pt_it1" simple="true" value="#{o_w_s_l_LoginBackingBean.userName}" columns="15"/> </af:panelLabelAndMessage> <af:panelLabelAndMessage id="pt_plam2" label="Password" styleClass="NoLabelWrap" labelStyle="font-size:small;color:white;"> <af:inputText id="pt_it2" simple="true" value="#{o_w_s_l_LoginBackingBean.password}" columns="15" secret="true"/> </af:panelLabelAndMessage> </af:panelFormLayout> <af:spacer width="3" height="3" id="pt_s2"/> <af:panelGroupLayout id="pt_pgl14" layout="horizontal" halign="end"> <af:commandLink id="pt_logincb" text="Login" action="#{o_w_s_l_LoginBackingBean.doLogin}" inlineStyle="font-size:small;color:white;"/> <af:spacer id="pt_s3" width="5px"/> </af:panelGroupLayout> </af:subform>The login and logout methods return values which can be mapped to actions and used in the navigation rules of
faces-config.xml.
63.8 Creating a Login Portlet
Refer to the Oracle Fusion Middleware Fusion Developer's Guide for Oracle Application Development Framework for information about creating a login portlet for your application.
63.9 Adding Portlets to a Login Page
The Oracle Fusion Middleware Fusion Developer's Guide for Oracle Application Development Framework describes how you can create an ADF Faces-based login page for your application. In this section, you will add some portlets to such a login page so that the login page becomes indistinguishable from the other pages in your WebCenter Portal application.
Make sure your portlet producers have been registered before proceeding. See Section 59.2, "Registering Portlet Producers with a WebCenter Portal Application" for details.
To add portlets to the login page, perform the following steps:
-
Drag a PanelCustomizable onto the
h:formtag that is inside the firstcust:panelCustomizabletag you added to the login page. -
From the Component Palette, select RichTextPortlet Producer, then select the Rich Text portlet from the list and drag it onto the
PanelCustomizablecomponent. -
From the Component Palette, select ADF Faces Core and drag an ObjectSeparator below the Rich Text portlet on the
PanelCustomizablecomponent. -
From the Component Palette, select OmniPortlet Producer, then select the OmniPortlet from the list and drag it onto the
PanelCustomizablecomponent. -
Save the page.
Because the login page is called from the container as part of the login process, the request must be forwarded to the ADF binding filter to establish the appropriate portlet and security context. To do this, you must configure a mapping for the ADF Binding filter in the web.xml file. To do this, perform the following steps:
-
In the Applications Navigator, expand the WEB-INF node, right-click web.xml and select properties to open the property palette.
-
Select Filter Mappings in the left panel and click add to define a new mapping for the
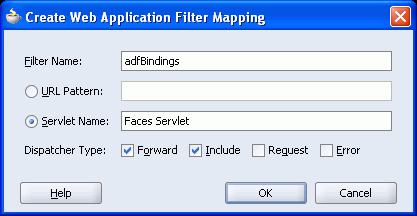
adfBindingsFilter. This displays the Create Web Application Filter Mapping dialog box. -
Specify adfBindings for the filter name and click the Servlet Name option and specify Faces Servlet as the servlet name. Ensure that the Forward and Include dispatcher types are selected as shown in Figure 63-11.
Figure 63-11 Create Web Application Filter Mapping Dialog Box
Description of "Figure 63-11 Create Web Application Filter Mapping Dialog Box"
-
Click OK.
Follow the steps in the Oracle Fusion Middleware Fusion Developer's Guide for Oracle Application Development Framework to complete the creation of the login page.
63.10 Creating a Self-Registration Page
You can create a self-registration page using the WebCenter Spaces self-registration task flow, or build a custom self-registration page based on a provided sample that shows how to use the user and role APIs provided in CreateUserHelper. This type of self-registration provides a way for public users to create their own login and password for your application.
You can also invite users who may, for example, be outside your organization to self-register using the WebCenter Spaces public invitation task flow. For more information about these two types of self-registration pages and their runtime behaviour, see the chapter on "Enabling Self-Registration" in Oracle Fusion Middleware User's Guide for Oracle WebCenter Spaces.
This section contains the following subsections:
63.10.1 Integrating the WebCenter Spaces Self-Registration Task Flow
You can integrate the self-registration page provided in WebCenter Spaces in a WebCenter Portal application as described below. For information about the runtime behaviour of the task flow, see "Enabling Anyone to Self-Register" in the Oracle Fusion Middleware User's Guide for Oracle WebCenter Spaces.
To consume the WebCenter Spaces self-registration task flow:
-
Open or create a WebCenter Portal application in JDeveloper.
-
Create a JSPX page.
-
From the Resource Palette, expand the task flows and drag and drop the self-registration task flow onto the page.
-
Create a mail connection and an external application with public credentials and connect the external application to the mail connection. Make this the mail default connection.
-
Run the page with the self-registration task flow to see the runtime self-registration page.
63.10.2 Building a Custom Self-Registration Page
The example self-registration page described below provides a simple page that accepts the user's firstname, lastname, mailid, login name and password. Use the sample files as a starting point for use within your local environment, or build your own self-registration page and logic using the user and role APIs provided in CreateUserHelper. You can use the property set of the user profile attributes provided in the sample and add more attributes to the user as required.
To create the sample self-registration page:
-
Unzip the security samples files in
security-samples.zipfound in thewebcenter/customportaldirectory in the WebCenter extension bundle. -
Copy the
CreateUserBean.javaandCreateUserHelper.javafiles into the application sources folder for your WebCenter Portal application. -
Copy the
TestCreateUserPage.jspxfile into the public-html folder. -
Edit the
TestCreateUserPage.jspxfile to suit the local environment and local requirements. -
Run the
TestCreateUserPage.jspxpage to view the self-registration page.
63.10.3 Creating a Self-Registration Invitation Page
You can create a public invitation to self-register page in your WebCenter Portal application using the WebCenter Spaces public invitation task flow. For information about the runtime behavior of the task flow, see "Enabling Self-Registration by Invitation Only" in the Oracle Fusion Middleware User's Guide for Oracle WebCenter Spaces.
To consume the self-registration invitation task flow:
-
Open or create a WebCenter Portal application in JDeveloper.
-
Create a JSPX page.
-
From the Resource Palette, expand the task flows and drag and drop the self-registration invitation task flow onto the page.
-
Grant the following
CredentialAccessPermissioninjazn-data.xmltooracle.webcenter.framework.view/-The
jazn-data.xmlfile should like like the following:<permission> <class>oracle.security.jps.service.credstore.CredentialAccessPermission</class> <name>context=SYSTEM,mapName=o.webcenter.security.selfreg,keyName=o.webcenter.security.selfreg.hmackey</name> <actions>read,write</actions> </permission>
-
Run the page with the self-registration task flow to see the runtime self-registration invitation page.
63.11 Creating a Reset Password Page
The following example provides a simple reset password page that accepts a username and new password. Use the sample files as a starting point for use within your local environment, or build your own reset password page and logic using the user and role APIs provided in ResetPasswordHelper to change the password.
To create the sample reset password page:
-
Unzip the security samples files in
security-samples.zipfound in thewebcenter/customportaldirectory in the WebCenter extension bundle. -
Copy the
ResetPasswordBean.javaandResetPasswordHelper.javafiles into the application sources folder for your WebCenter Portal application. -
Copy the
TestResetPasswordPage.jspxfile into the public-html folder. -
Edit the
TestResetPasswordPage.jspxfile to suit the local environment and local requirements. -
Run the
TestResetPasswordPage.jspxpage to view the reset password page.
63.12 Configuring Basic Authentication for Testing Portlet Personalization
Portlet personalizations are tied to particular, authenticated users. Hence, when running a portlet that has an Edit mode, the Personalize option in the portlet's dropdown menu only appears to authenticated users of the application. Anonymous or public users will not have the option to personalize the portlet. If you are a developer creating portlets and pages, then you may want to quickly test the Edit mode of your portlet without creating a complete security model for your application. To perform this sort of testing, you can easily configure some very basic authentication for your application and then remove it when you have finished testing:
Note:
This procedure is useful for any portlet that has an Edit mode (Omniportlet, Web Clipping, JPS, and PDK-Java).-
Create a user
skingand the rolemanager. See the Oracle Fusion Middleware Fusion Developer's Guide for Oracle Application Development Framework for information about creating users and roles. -
Secure your application using the ADF Security Wizard. See the Oracle Fusion Middleware Fusion Developer's Guide for Oracle Application Development Framework for the steps to be performed. On the Login page of the wizard, select HTTP Basic Authentication (RFC 2617). This specifies that the application will use basic authentication.
-
Run the page in the integrated WLS and log in as a valid user and test your portlet's edit mode.
When you are done testing your portlet's Edit mode, you can quickly remove this test security by do the following:
-
In the Applications Navigator, click the project that contains a page with the portlet you want to test.
-
From the Tools menu, choose ADF Security Wizard.
-
If the Welcome page appears, then click Next.
-
Choose Remove All ADF Security Settings.
-
Click Next until you come to the Finish page of the wizard. Click Finish. The security is removed. If you want to ensure that the security has been removed, then exit your browser and rerun the application. When you access the page, you are not prompted to login and the personalize option no longer available from the portlet's dropdown menu.
63.13 Working with External Applications
Oracle WebCenter Framework defines an external application as any application that implements its own authentication process. That is, an application that does not take part in the WebCenter Framework application's single sign-on process. In some cases, the identity management solution may be the same, but the authentication process can be different.
When WebCenter Framework Service interacts with an application that handles its own authentication, you can associate that service with an external application to allow for credential provisioning. Therefore, the use of an external application definition provides a means of accessing content from these independently authenticated applications.
To replicate a single sign-on experience from the end user's perspective, the external application service captures the username and password, and any other credentials for the external application, and supplies it to the WebCenter service requiring it. The WebCenter service then uses this and logs in on behalf of the end user. This username and password combination is securely stored in a credential store configured for the WebLogic domain where the application is deployed.
The user provides login credentials when prompted, and these credentials are mapped to the WebCenter application user and stored in the credential store configured for the domain. The credential store subsequently supplies that information during authentication to the external application. Unless the external application's credentials change, the user supplies the credentials only once as the mapped information is read from the credential store for future requests.
Note:
When logging in to an external application, if you clear the Remember My Login Information checkbox, then the credentials provisioned for that user session are lost if there is a failover in a high availability (HA) environment. You are prompted to specify the credentials again if you try to access the external application content in the same user session.The external applications that are to be used by the WebCenter Portal application can be specified before deployment through a wizard in Oracle JDeveloper, or post-deployment through the application server management interfaces (WebLogic Scripting Tool and Oracle Enterprise Manager). See Oracle Application Server Administrator's Guide for more information.
This section contains the following:
63.13.1 Using External Applications
The WebCenter External Application Service provides a way for mapped user identities to be passed to a web application that requires its own authentication. The support for external applications and credential mapping provided by the WebCenter External Application Service can be used to set up a secured service connection and to provide a seamless automated single sign-on experience for the user.
This is described in the following sections:
63.13.1.1 Secured Service Connections
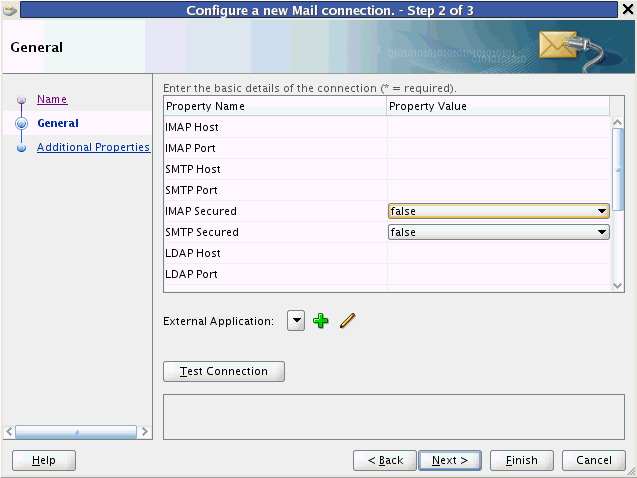
To use an external application definition with a secured service (such as a mail server or portlet producer) you associate the named external application with the connection configuration to the required service. For example, the connection to a mail server requires the user to supply a valid username and password to see their mail. Therefore, by associating an external application to the IMAP server connection definition, the user's credentials are automatically passed as part of the mail request as shown in Figure 63-12.
Note:
The following WebCenter Services must be configured with external applications for credential mapping support to be available:-
Instant Messaging and Presence (IMP)
-
Mail
-
Documents
-
RSS
For more information about the identity propagation mechanisms used by WebCenter Services, see Section 63.16, "Identity Propagation Mechanisms".
Figure 63-12 Configure a New Mail Connection Page
Description of "Figure 63-12 Configure a New Mail Connection Page"
When a portlet producer depends on an application that handles its own authentication, you can associate the producer with an external application so that when you register the producer it is a simple task to select the appropriate external definition that maps to the application that is exposed within the portlet, as shown in Figure 63-13.
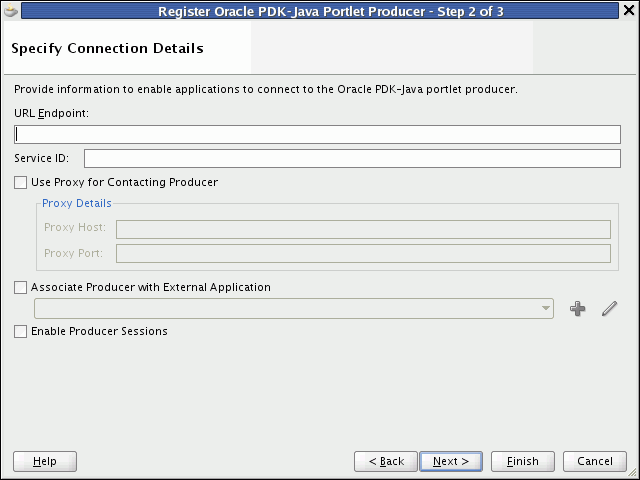
At run time, the producer uses the information associated with the external application to authenticate the user to the application, and consequently consume its portlets. The producer code is responsible for actually performing the authentication interaction with the external application. The external application support provided with WebCenter Framework simply provides the information needed for authentication to the portlet producer. The use of external applications is supported for both Oracle PDK-Java as well as WSRP producers.
For example, a producer provides a stock portfolio portlet from a portlet-producing application that has its own authentication mechanism. In this case the developer:
-
Defines the external application. This can be done through the Oracle JDeveloper wizard or through Oracle Enterprise Manager.
-
Associates the external application with the portlet producer.
63.13.1.2 Automated Single Sign-On
With automated single sign-on, the user directly links to the application and is automatically authenticated to the secured web application, as their credentials are retrieved from the credential store. This provides the end user with a seamless single sign-on experience.
Note:
Automated login is not supported for:-
External applications using BASIC authentication.
-
External applications configured for SSO.
-
External applications with a customized login form (built using ADF Faces) that does not implement the J2EE security container login method
j_security_checkfor authentication. -
External sites that do not support UTF8 encoding
Rather than using a URL directly to the web application, links to the application are proxied through the external application's automated login servlet (adfextapplogin). If the user is not authenticated to the external application and they have not previously stored their credentials in the credential store, they will be challenged for their password through the credential provisioning page discussed below. If, however, the user has previously defined credentials, they will be returned from the credential store and the user will automatically be logged on to the application.
The proxy URL references the external application in question and redirects to the URL that is specified in the external application definition.
/adfextapplogin?extappid=<extappid>
For example, if you had a WebCenter Portal application in which you defined an external application that represented the myoracle.com Web site (external application identifier is "myoracle"), the proxy URL would look like this:
/adfextapplogin?extappid=myoracle
The link's target attribute should also be set appropriately. For example, if you use <a href=>, then set the target attribute appropriately in addition to specifying the target in the href. The target attribute specified for the servlet will determine how the Cancel button functions as described below.
/adfextapplogin?extappid=<extappid> [target= _self | _blank]
If you specify target=_blank the link opens in new window. If you specify target=_self the link opens in current window. If the target parameter is not specified the link opens in current window.
This parameter also affects how the Cancel button on the credential provisioning page works. If _blank is specified, the new window is closed when Cancel is clicked; if _self is specified (or the target parameter is not used), the user is returned to the calling page.
Note:
Automated login for external sites is not supported for sites that do not support UTF8 encoding.63.13.2 Supplying User Credentials
How you allow an end user to define their credentials for an external application depends on the use of the external application. For most services, the credential provisioning screen is incorporated into the task flow that the service exposes and for these no further configuration steps are required. You can, however, add the External Application - Change Password task flow component to applications using these services thereby allowing the end user to preemptively set the appropriate user name and password for each of the external applications that is registered with your WebCenter Portal application.
The External Application - Change Password task flow displays all external applications defined in the application that do not specify shared credentials (for more information about shared credentials, see Section 63.13.3, "Managing External Applications"). Note that the user must to be authenticated to view this task flow.
For the Instant Messaging and Presence service, however, you must explicitly add the External Application - Change Password task flow component to your application from the Resource Palette or Component Palette. For step-by-step instructions on how to configure security for the Instant Messaging and Presence service using the External Application - Change Password task flow component, see Section 34.2.2, "Adding the IMP Service at Design Time".
At run time, the credential provisioning screen displays login data fields composed of the data fields specified through external application registration. Users fill in the data fields with their login information for the specified external application and that login information is passed to the external application or service. Entering the credentials in the provisioning screen also results in the credentials being persisted in the credential store configured for the WebLogic domain.
By default, the login information the user entered is preserved in a credential store, which handles logins for future sessions. The user does not have to enter login information again (unless the user's credentials change). However, the end user can choose to use the information for the current session by deselecting the Remember my Login Information checkbox on the credential provisioning page.
63.13.3 Managing External Applications
This section provides information about registering external applications. Additionally, it describes the process of editing and deleting registration details. It contains the following subsections:
-
Section 63.13.3.2, "Working with External Applications in Oracle JDeveloper"
-
Section 63.13.3.3, "Working with External Applications in Enterprise Manager"
-
Section 63.13.3.4, "Working with External Applications Using WLST"
63.13.3.1 Adding External Application Task Flows
The External Application task flow enables users to manage external application connections at runtime. This task flow provides an interface for users to update their credentials for all external applications as and when these credentials are changed at the back end. That is, users do not need to update credentials through the runtime Administration Console's Services tab if they use this task flow.
The external application task flows that you can add using Oracle JDeveloper are:
-
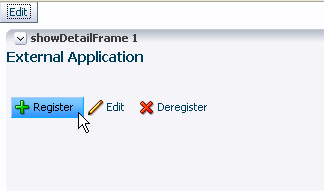
External Application: This task flow enables users to register, modify, and delete connections at runtime.
-
External Application - Change Password: This task flow enables users to change external application passwords at runtime.
For applications created using the WebCenter Portal application template, both these task flows are available out-of-the-box through WebCenter Portal application Administration page (Services tab). For details, see the section "Managing Services, Portlet Producers, and External Applications" in Oracle Fusion Middleware Administrator's Guide for Oracle WebCenter.
In addition, just like other task flows, you can add external application task flows to your application pages. This may be especially useful if you are not using the WebCenter Portal application template and the Administration pages are therefore not part of your project.Special permissions are required to manage or view external application connections through these task flows:
-
AppConnectionManager - Users with this role can register, modify, and delete external application connections at runtime.
-
AppConnectionViewer - Users with this role can view external application connections at runtime. By default, any user who is logged in (that is, has the authenticated-role) is granted this role.
By default, users with the Administrator role can manage external applications. If you want other users to manage connection through these task flows you must grant them the AppConnectionManager role.
To add the external application task flows:
-
Create or open a JSF page in your application where you want the task flow to be added (see Section 5.2.2, "Adding Pages to the Portal").
-
In the Resource Palette, expand My Catalogs, WebCenter Services Catalog, and Task Flows.
-
Drag External Application from the Resource Palette and drop it onto the page inside of the
af:formbeginandendtags. -
Drag External Application - Change Password from the Resource Palette and drop it onto the page inside of the
af:formbeginandendtags after the External Application task flow (af:region - # {bingings.extapp1.regionModel}). -
Grant the AppConnectionManager role to one or more test users, if required:
-
Add the test user
TEST_EXTAPP. -
Grant the AppConnectionManager role.
For information about how to add a user and grant this role, see the section "Creating Test Users" in Oracle Fusion Middleware Fusion Developer's Guide for Oracle Application Development Framework.
-
-
Save and run your page. Login as an administrator or the
TEST_EXTAPPuser defined in the previous step. The screen shown in Figure 63-14 appears.Figure 63-14 External Application Task Flow in a Browser
Description of "Figure 63-14 External Application Task Flow in a Browser"
Note:
At runtime, application administrators can grant users the AppConnectionManager and AppConnectionViewer roles through WebCenter Portal administration (see the section "Adding Members to Application Roles" in Oracle Fusion Middleware Administrator's Guide for Oracle WebCenter.). Alternatively, system administrators can grant AppConnectionManager and AppConnectionViewer roles through Fusion Middleware Control (see, "Granting Application Roles Using Fusion Middleware Control" in Oracle Fusion Middleware Administrator's Guide for Oracle WebCenter.)63.13.3.2 Working with External Applications in Oracle JDeveloper
This section provides information about registering external applications and editing and deleting registration details in Oracle JDeveloper. It contains the following subsections:
-
Section 63.13.3.2.1, "Registering an External Application in Oracle JDeveloper"
-
Section 63.13.3.2.2, "Editing External Application Registration Details in Oracle JDeveloper"
-
Section 63.13.3.2.3, "Deleting External Application Registration Details in Oracle JDeveloper"
63.13.3.2.1 Registering an External Application in Oracle JDeveloper
Use the Register External Application Wizard to identify and store information about the type of data required to authenticate to an external application, such as the names of login fields.
To register an external application in Oracle JDeveloper:
-
In the Applications Navigator, right-click a WebCenter Portal application or project and select New from the context menu.
-
In the New Gallery, select External Applications under the General node.
-
In the right pane, select External Application, and click OK.
This displays the Register External Application Wizard.
-
On the Name page, use the Create external application in option to specify whether the external application can be reused in other WebCenter applications. Select Application Resources to make the external application available only in the WebCenter application in which it is registered, or select Resource Palette to make the external application available from the Resource Palette to any new WebCenter applications you create in Oracle JDeveloper.
If you choose Resource Palette, then the external application connection will be visible under IDE connections in the Resource Palette. If you want to use it in an application, you can right click the external application from resource palette and click Add to Application.
-
In the Name field enter a unique name to identify the application.
This name must be unique within the WebCenter Portal application, and among other connections as well. Note that you cannot edit this field afterward.
-
In the Display Name field enter a name for the application that end users will see in the credential provisioning screens.
You can modify the Display Name at any time as described in Section 63.13.3.2.2, "Editing External Application Registration Details in Oracle JDeveloper". If you leave the field blank the display name is set to the value of the Name field by default.
-
Click Next.
-
On the General page, in the Login URL field enter the URL to which the HTML login page is submitted.
View the HTML source of the application's login form to retrieve this URL.
Note:
The fields on the General pane are only required if the external application being defined participates in click-through login as described in Section 63.13.2, "Supplying User Credentials". -
In the User Name/ID FieldName field, enter the label that the application uses for the user name field, for example,
User Name. -
In the Password FieldName field, enter the label that the application uses for the password field, for example
Password. -
From the Authentication Method list, select the application's login method.
Choose from the following:
-
GET
Presents a page request to a server. Submits the login credentials as part of the login URL.
-
POST
Submits login credentials within the body of a form.
-
-
Click Next.
-
On the Additional Fields page, enter the names and values of any additional fields that are submitted with the external application's login form:
Click the Add Field button to create an input field:
-
Field Name
Enter a unique name for any additional field that requires user input on the external application HTML login form.
-
Field Value
Enter a default value for the corresponding field name.
-
Display to User
Select to display the field on the external application login screen. If the field is not displayed (unchecked), then a default value must be specified, which will be used to login into the external application for all users. If the value is user-specific, then the field must be displayed to the user provisioning page.
Note:
The Delete Field option can be used to delete selected rows. -
-
Click Next.
-
On the Shared Credentials page, select the Specify Shared Credentials check box and specify a Username and Password if you want all authenticated users to access the external application using this credential. Authenticated users will not be challenged to provide their credentials when they access the external application.
-
Click Next.
-
On the Public Credentials page, select the Specify Public Credentials check box and specify a Username and Password to be used for all unauthenticated (public) users accessing the external application. This is required when the external application content is accessed through one of the WebCenter Services (such as Document Library, or Instant Messaging and Presence), and the taskflow is placed on a public page.
-
Click Finish to register the external application.
After registering your external application, you must configure the application to allow the end user to define the username and password. You can do this by dropping an External Application - Change Password task flow component into your application. This allows the end user to preemptively set the appropriate username and password for each of the external applications that is registered with your WebCenter Portal application.
To configure the application to allow the end user to define the username and password, perform the following steps:
-
Open a JSF Page in your ViewController project.
-
From the Resource Palette, under My Catalogs, WebCenter Services Catalog, expand Task Flows.
-
Drag an
External Application - Change Passwordtask flow component onto your page. -
When prompted, choose Region as the way to create the task flow.
-
Secure the page as this taskflow is accessible only to authenticated users
63.13.3.2.2 Editing External Application Registration Details in Oracle JDeveloper
Use the Edit External Application Registration Information Wizard to revise the registration details provided for an external application.
To edit external application registration details:
-
In the Application Navigator, from the Application Resources pane under the Connections node, right-click an external application and select Properties from the context menu.
-
In the Edit External Application Wizard, click a link to show a page and revise its values.
Choose from the following:
-
Name
-
General
-
Additional Fields
-
Shared Credentials
-
Public Credentials
For more information, see Section 63.13.3.2.1, "Registering an External Application in Oracle JDeveloper".
-
-
Click OK to save your changes and exit the wizard, or click Cancel to exit the wizard without saving.
63.13.3.2.3 Deleting External Application Registration Details in Oracle JDeveloper
To delete external application registration information, perform the following steps:
-
In the Application Navigator, from the Application Resources pane under the Connections node, right-click an external application and select Delete from the context menu.
Alternatively, you can select an external application in the Applications Navigator and from the Edit menu, select Delete.
-
In the External Application Delete dialog box, select Yes.
Oracle recommends that you remove any references to services, such as a portlet producer, with which the external application is associated. Failing to do so will likely result in runtime errors, because the components will attempt to communicate with the external application.
63.13.3.3 Working with External Applications in Enterprise Manager
Just as you can create, edit, and delete external application registration details in Oracle JDeveloper, you can also do this in Enterprise Manager. See the section "Working with External Applications" in the Oracle Fusion Middleware User's Guide for Oracle WebCenter Spaces.
63.13.3.4 Working with External Applications Using WLST
As well as Oracle JDeveloper and Enterprise Manager, you can also use WebLogic Scripting Tool (WLST) commands to create, edit, and delete external application registration details. See the section "Working with External Applications" in the Oracle Fusion Middleware User's Guide for Oracle WebCenter Spaces.
63.14 Registering Custom Certificates with the Keystore
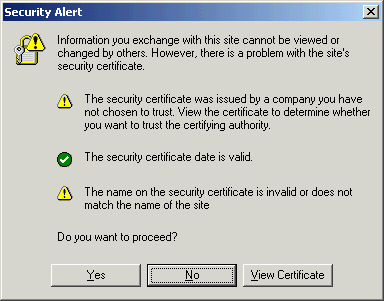
Secure Sockets Layer (SSL) Communication requires the use of trusted certificates issued by a certificate authority, which vouches for the authenticity of the certificates that it issues or signs. Widely accepted certificate authorities are listed in the keystore, the cacerts file, available in the <JDEV_HOME>\jdk\jre\lib\security directory. If a portlet producer uses a security certificate issued by a non-widely accepted certificate authority and you try to access portlets from this producer, a security alert is displayed informing you that the security certificate was issued from a certificate authority you do not trust. This means the certificate is not available in the keystore. To avoid being prompted each time you access such portlets, you must register this certificate with the keystore.
To register a certificate with the keystore, perform the following steps:
-
Navigate to
JDEV_HOME\jdk\jre\lib\security. -
Back up the
cacertsfile. -
Access the producer URL in Internet Explorer to get the certificate.
Note:
Recent versions of FireFox do not provide a means to export certificates. -
In the Security Alert dialog box, shown in Figure 63-15, click View Certificate.
-
In the Certificate dialog box, click the Certification Path tab.
-
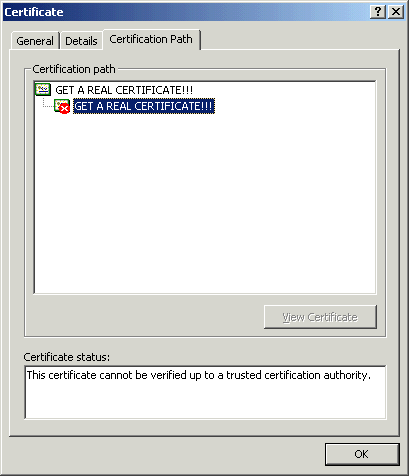
The dummy child certificate is selected by default as shown in Figure 63-16. Select the root certificate and click View Certificate.
-
Click the Details tab, and click Copy to File.
-
In the Certificate Export Wizard, accept the default settings and click Next until you reach the File to Export screen, shown in Figure 63-17.
Figure 63-17 File to Export Screen of the Certificate Export Wizard
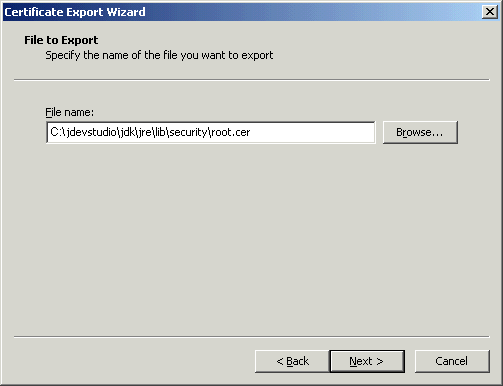
Description of "Figure 63-17 File to Export Screen of the Certificate Export Wizard"
-
In the File Name field, enter
<JDEV_HOME>\jdk\jre\lib\security\root.cerand click Next. -
Click Finish.
-
In the command prompt, set your default directory to
<JDEV_HOME>\jdk\jre\lib\securityand run the following command:keytool -import -file root.cer -keystore cacerts -storepass changeit
By running this command, the
root.cercertificate is imported into the keystore. -
Enter
yat the prompt to confirm that you trust this certificate. -
Verify that the
cacertsfile is updated with the certificate.
63.15 Overriding Inherited Security on Portlets and Customizable Components
Individual actions on portlets and customizable components are not secured by default. Rather, the ability to customize a portlet or customizable component as a whole is inherited from the page permissions. If you want to grant more granular activities within a portlet or customizable component, then you can override the page-level security inheritance and define security directly on the required actions.
The ability of a user to perform actions on portlets and customizable components is inherited from the page security based on the value of the application-wide switch, enableSecurity, in the adf-config.xml file. If you selected the WebCenter Portal application template while creating your application, then the adf-config.xml file is located in the <APPLICATION_NAME>/.adf/META-INF directory. The enableSecurity element is not available by default in adf-config.xml. To override or extend the page-level security inheritance for portlets and customizable components, you must add the portlets security and customizable components security sections in the adf-config.xml file, as shown in Example 63-1 and Example 63-2 and set the enableSecurity element in those sections to true.
Example 63-1 enableSecurity Element in the Portlet Security Section in adf-config.xml
<!--
==============================================================================
PORTLETS ACTIONS SECURITY
==============================================================================
-->
<adfp:adf-config-child xmlns:adfp="http://xmlns.oracle.com/adfp/portlet">
  <adfp:enableSecurity value="true"/>
    <adfp:actionsCategory>
       ..........................................
</adfp:adf-config-child>
Example 63-2 enableSecurity Element in the Customizable Components Security Section in adf-config.xml
<!--
==============================================================================
CUSTOMIZABLE COMPONENTS ACTIONS SECURITY
==============================================================================
-->
<cust:customizableComponentsSecurity
xmlns:cust="http://xmlns.oracle.com/adf/faces/customizable/config">
  <cust:enableSecurity value="true"/>
    <cust:actionsCategory>
       ..........................................
</cust:customizableComponentsSecurity>
Security for actions on portlets and customizable components can be implemented at the following levels:
-
Page level: You can define security for portlets and customizable components such that page-level privileges are inherited by these components. This is the default behavior.
By default, portlets and customizable components inherit allowable actions from the defined page-level permissions such as personalize or customize. That is, a user who has customize privileges on the page has permission on the customize action for the components on that page. The
enableSecurityelement enables you to override the security inheritance behavior and can take either of the following values:-
true: If set totrue(the default), then the ability for a user to modify a component will first be determined from the page permissions and then adjusted according to the current set of actions defined for that type of permission. If a user has customize permission, then the actions that constitute the customize category (move, customize, and so on) are available to the user, but they will be overridden by the actions that are defined in theadf-config.xmlfile. For example, a page designer wants to allow the end user to be able to customize portlets, but not customize the page layout. By settingenableSecuritytotrue, the page designer enforces that users must first have customize permission on the page. SettingcustomizeActionsCategorytofalsefor customizable components will prevent the customization of the page layout, yet still allowing portlet customization. (As the default forcustomizeActionsCategoryistrue, it does not need to be set explicitly for portlets.). -
false: If set tofalse, then all the actions are available to users. The user's page permissions and actions configured inadf-config.xmlare ignored.
-
-
Actions category level: You can define security on all actions for portlets or customizable components that belong to a named category.
You can add an
actionsCategoryelement in theadf-config.xmlfile to define security on multiple actions simultaneously. Depending on theactionCategoryattributes that you enable, appropriate privileges are provided on the portlets or customizable components. -
Actions level: You can define security on individual actions for portlets or customizable components.
You can use the
actionselement in theadf-config.xmlfile to enable or disable individual actions. Depending on theactionsattributes that you enable, appropriate privileges are provided on the portlets or customizable components.
Notes:
-
Privileges can be inherited from the parent only. Inheritance from a component in any other position in the hierarchy is not supported
-
Although the security override implementation for portlets and customizable components is similar, they are independent from each other. Therefore, if you place a portlet inside a customizable component (for example, in a
PanelCustomizablecomponent), the portlet will not inherit override settings from the customizable component. Instead it will use the security override settings that are defined for portlets. -
Settings made at the actions category level or actions level are applicable for all component instances in the application. These settings cannot be made for a single instance of a portlet or customizable component.
Section 63.15.1, "Portlets Security" describes how you can implement security on portlets at the actions category level and actions level. For information on how to define security for actions on customizable components at the application level, see Section 23.5, "Applying Action-Level Restrictions on Panel Customizable and Show Detail Component Actions."
63.15.1 Portlets Security
You can define portlet security if actions on portlets are inherited from the page at the application level by setting enableSecurity to true in the portlets security section of the adf-config.xml file. A value of true implies that the user's permissions are determined from the page permission and then augmented according to the actionsCategory and actions elements specified. By defining actions categories and individual actions, you can control the exposure of the individual actions available within the given page permissions.
To implement security for actions on portlets at various levels as described earlier, you must define security settings at the following sections:
63.15.1.1 Defining Security at the Actions Category Level
You can add an actionsCategory element in the portlets security section in the adf-config.xml file to define the group of actions that are exposed on the portlets within the application. Depending on the actionsCategory attributes that you enable, appropriate privileges are provided on the portlets. Table 63-3 describes the different actionsCategory attributes and the portlet actions they support by default.
Table 63-3 actionsCategory Attributes and Portlets Actions Mapping
| Attribute Value | Actions Supported |
|---|---|
|
viewActionsCategory |
Render isHelpModeAvailable isNormalModeAvailable isAboutModeAvailable isPreviewModeAvailable isDetailModeAvailable isLinkModeAvailable isPrintModeAvailable |
|
customizeActionsCategory |
showMoveAction showRemoveAction isCustomizeModeAvailable showMinimizeAction showMaximizeAction isConfigModeAvailable |
|
personalizeActionsCategory |
isPersonalizeModeAvailable |
Example 63-3 shows the actionsCategory entry that you can add to the portlets security section in the adf-config.xml file. In this example, customizeActionsCategory is set to false to prevent customization. You can use Expression Language (EL) for the values of these elements.
Example 63-3 actionsCategory Element in the Portlets Security Section
<!--
==============================================================================
PORTLETS ACTIONS SECURITY
==============================================================================
-->
<adfp:adf-config-child xmlns:adfp="http://xmlns.oracle.com/adfp/portlet">
  <adfp:enableSecurity value="true"/>
    <adfp:actionsCategory>
      <adfp:actionCategory name="viewActionsCategory" value="true"/>
      <adfp:actionCategory name="customizeActionsCategory" value="false"/>
      <adfp:actionCategory name="personalizeActionsCategory" value="true"/>
    </adfp:actionsCategory>

    <adfp:actions>
    ..........................................
    </adfp:actions>

</adfp:adf-config-child>
63.15.1.2 Defining Security at the Actions Level
You can use the actions element in the portlets security section of the adf-config.xml file to enable or disable individual portlet actions. Depending on the action attributes that you enable, appropriate privileges are provided on the portlets.
Example 63-4 shows an example of an actions entry that you can add to the portlets security section in the adf-config.xml file. You can use EL for the values of these elements. In this case you prevent customization by setting isCustomizeModeAvailable to false.
Example 63-4 actions Element in the Portlets Security Section
<!--
==============================================================================
PORTLETS ACTIONS SECURITY
==============================================================================
-->
<adfp:adf-config-child xmlns:adfp="http://xmlns.oracle.com/adfp/portlet">
  <adfp:enableSecurity value="true"/>
    <adfp:actionsCategory>
    ..........................................
    </adfp:actionsCategory>

    <adfp:actions>
      <adfp:action name="Render" value="true"/>
      <adfp:action name="showMoveAction" value="true"/>
      <adfp:action name="isCustomizeModeAvailable" value="false"/>
      <adfp:action name="isPersonalizeModeAvailable" value="true"/>
    </adfp:actions>

</adfp:adf-config-child>
Using EL to Prevent Customization of Portlets Outside of Business Hours
An example to show when you may need to override inherited portlet security is an application that is configured to disable portlet customization outside of standard business hours. For this, you must first create a managed bean (for example, a managed bean called appBusinessRules), containing the method shown in Example 63-5.
Example 63-5 InsideBizHours Method Defined in appBusinessRules Managed Bean
public boolean isInsideBizHours()
  {
    Calendar rightNow = Calendar.getInstance();
    int      currentHr = rightNow.get(rightNow.HOUR_OF_DAY);

    // Do not allow customize operation outside of standard business hours

    if ((currentHr > 9) && (currentHr < 17))
       return true;
    else
       return false;
  }
You can then reference this managed bean from the actionsCategory element in the portlet security section of the adf-config.xml file, as shown in Example 63-6.
Example 63-6 InsideBizHours Method Referenced in the adf-config.xml File
<adfp:adf-config-child xmlns:adfp="http://xmlns.oracle.com/adfp/portlet">
  <adfp:enableSecurity value="true"/>

    <adfp:actionsCategory>
      <adfp:actionCategory name="customizeActionsCategory"
      value="#{appBusinessRules.InsideBizHours?"true":"false"}"/>
    </adfp:actionsCategory>

</adfp:adf-config-child>
In this example, the customizeActionsCategory will be set to true only if the application is run within business hours. Outside of these hours, the portlet cannot be customized even if the user had that permission granted on the page. All other categories that are not explicitly defined, will be inherited from the page.
Using EL to Prevent Personalization and Customization of Portlets Outside the Corporate Network
In this example the managed bean checks the IP address of the request to determine whether the user has accessed the application through the corporate proxy server or from within the corporate network. In this simple example, assume that if the request has the proxy server's IP address, then it is coming from outside the corporate network. In general it is not advised to base security strictly on IP addresses, because these can be compromised. For this, you must add the method shown in Example 63-7 to the managed bean:
Example 63-7 InsideCorpNetwork Method Defined in appBusinessRules Managed Bean
public boolean isInsideCorpNetwork()
  {
    // Do not allow personalize and customize operations
    // for requests that go through the corporate proxy

    FacesContext       ctx = FacesContext.getCurrentInstance();
    ExternalContext    ectx = ctx.getExternalContext();
    HttpServletRequest myrequest = (HttpServletRequest) ectx.getRequest();
    String             currentIP = myrequest.getRemoteAddr();

    if (currentIP.equals(getProxyServerIP()))
        return false;
    else
        return true;
  }
You can then reference this managed bean from the actionsCategory element in the portlet security section of the adf-config.xml file, as shown in Example 63-8.
Example 63-8 InsideCorpNetwork Method Referenced in the adf-config.xml File
<adfp:adf-config-child xmlns="http://xmlns.oracle.com/adfp/portlet">
  <adfp:enableSecurity value="true"/>

    <adfp:actionsCategory>
      <adfp:actionCategory name="customizeActionsCategory"
                    value="#{appBusinessRules.InsideCorpNetwork?"true":"false"}"/>
      <adfp:actionCategory name="personalizeActionsCategory"
                    value="#{appBusinessRules.InsideCorpNetwork?"true":"false"}"/>
    </adfp:actionsCategory>
</adfp:adf-config-child>
In this example, the customizeActionsCategory and the personalizeActionsCategory will be set to true only if the IP address of the request for the application does not match that of the corporate proxy. The assumption is that the internal requests would have a valid client IP address. All other categories that are not explicitly defined, will be inherited from the page.
63.16 Identity Propagation Mechanisms
The following table lists the identity propagation mechanisms employed by WebCenter Services for propagating the end-user's identity to the various information sources from which content is being integrated into the WebCenter application.
Whenever possible, WS-Security is the preferred means of identity propagation. Where WS-Security cannot be used due to legacy restrictions or pre-defined store-specific standards or specifications, the primary mechanism used is the credential mapping capability provided by the External Applications service to obtain the user's credentials for a remote application using a distinct security provider. For more information about WS-Security, see the Oracle Application Server Web Services Security Guide. For more information about External Applications, see Section 63.13, "Working with External Applications".
Table 63-4 Identity Propagation Mechanisms
| Service | Connection Type | Identity Propagation Mechanism |
|---|---|---|
|
Discussions |
Jive |
Oracle WS-Security |
|
Announcements |
see Discussion Forum |
|
|
Documents |
Oracle Content Server |
Proprietary ID propagation mechanism through socket connection. Can use SSL with mutual authentication, or clear socket with IP authorization (or use External Application option) |
|
File System |
N/A |
|
|
Portal 10g/11g |
JSR-170 (External Application) |
|
|
Day Adapters |
JSR-170 (External Application) |
|
|
|
EMail Connection |
External Application |
|
LDAP Connection |
External Application |
|
|
Events - Personal |
Exchange Server Connection |
External Application |
|
External Application |
HTTP Request from Browser |
External Application |
|
IMP |
Microsoft Live Communication Server (LCS) |
SOAP, Web Services calls. External Application |
|
Oracle WebLogic Communications Services (OWLCS) |
Oracle WS-Security |
|
|
Portlet Producers |
WSRP Producer (Secure) |
Oracle WS-Security (Recommended by WSRP Specification) |
|
WSRP Producer (Non-Secure) |
WSRP userContext in SOAP message (WSRP Specification) |
|
|
JPDK Producer (External App) |
External Application JPDK payload includes the user information and is conveyed to the producer in the ProviderUser. The information also includes a mapped username and password. (Proprietary, Legacy) |
|
|
JPDK Producer (Non-Secure) |
Username in render request (Proprietary, Legacy) |
|
|
Search |
Secure Enterprise Search (SES) |
Web Service Call |
|
Wiki |
Browser Connection |
SSO mechanisms - OSSO/OAM or other WLS supported SSO mechanism |
|
Worklist Service |
BPEL Connection |
Web Service call Oracle WS-Security |
63.17 Securing Identity Propagation Through WSRP Producers with WS-Security
The Web Services for Remote Portlets (WSRP) specification indicates that Web Services Security (WS-Security) can be leveraged for providing secure identity propagation between the consumer and the portlet producer. However, WSRP in and of itself does not provide secure identity propagation of the end user's identity to the portlet producer. The WSRP specification explicitly defers to other security standards for secure identity propagation and does not go into the specific WS-Security profiles or options that may be employed. In the absence of a secure mechanism, WSRP defines the concept of user categories, which can be mapped to security roles like the ones used by the JSR168 portlets. By using a combination of WSRP and WS-Security, you can ensure end-to-end security.
This section covers the following:
63.17.1 Identity Propagation Without WS-Security
When using WSRP without WS-Security, the userContext structure within the SOAP message contains user profile information and user category information. This information is not considered secure and should only be used for personalization and customization functionality. It should not be used for authorization of sensitive resources. This information is also exposed in the JSR168 APIs, isUserInRole(role) and getUserPrincipal. The code in Example 63-9 shows how a sample portlet's markup rendering code uses the isUserInRole API to decide what content to display.
Example 63-9 isUserInRole(role) API
private void doViewHtml(RenderRequest
request, RenderResponse response)
throws PortletException, IOException
{
// To do: markup the required content.
PrintWriter out = response.getWriter();
out.print("<p>Welcome");
out.println("</p>");
if (request.isUserInRole("moderator"))
   {out.println("<p>MODERATOR</p>" );}
else
   {out.println("<p>not moderator</p>" );}
if (request.isUserInRole("participant"))
   {out.println("<p>PARTICIPANT</p>" );}
else
   {out.println("<p>not participant</p>" );}
if (request.isUserInRole("viewer"))
   {out.println("<p>VIEWER</p>" );}
else
   {out.println("<p>not viewer</p>" );}
    }
63.17.2 Identity Propagation with WS-Security
When WS-Security is leveraged with WSRP, the user's identity is propagated outside of the SOAP message body in the WS-Security header. This is a user assertion, using the Username Token format, and is digitally signed to authenticate the consumer and to ensure the integrity of the assertion.
When this mechanism is used, the JSR 168 APIs isUserInRole and getUserPrincipal are established based on the security context resulting from the WS-Security authentication, rather than the information in the SOAP message's userContext.
Also, when an Anonymous (i.e., PUBLIC) client is mapped to a default user using the producer's Default User connection parameter, the WSRP producer must be configured with strict-authentication and a grant must be added to the Policy store. For more information, see "Adding a Grant to the Policy Store for a Mapped User Identity" in the Oracle Fusion Middleware Administrator's Guide for Oracle WebCenter.
The use of WS-Security adds some complexity to the configuration and management of the WebCenter Portal application and the set of producers it consumes. However, when the situation warrants its use, it becomes an important ingredient of the SOA architecture that ensures the security of the information being published by the WebCenter Portal application.
Oracle WebCenter Framework supports the following token profiles (to digitally sign the security token and message body to ensure authenticity and integrity):
-
Username token without password
-
Username token with password
-
SAML token (uses the sender vouches method that the producer uses to confirm the subject assertion)
Digitally signing the security token and the SOAP message body accomplishes the following objectives:
When a portlet producer is generating sensitive information, for example paystub information, it is imperative that it only responds to requests to show the information from a legitimate consumer.
By using WS-Security, and having the consumer digitally sign the security token and the message body, the producer can verify the signature using the public key of the legitimate consumer. If the signature cannot be verified, then it means that the request may have come from a fraudulent consumer. By requiring the verification of the digital signature, the sensitive information will only be sent to the legitimate consumer.
Assertion and Message Integrity
In addition to verifying the identity of the consumer making the Web Service requests, digitally signing the security token and the message body also ensures that the token and the message have not been tampered with. This prevents such problems as man-in-the-middle attacks where a legitimate request might be intercepted and the user name in the security token replaced with another user name to see the paystub information coming back for the other user. By digitally signing the token, it cannot be tampered with. Any modification to the token would result in the inability to verify the signature on the producer end, and would result in a SOAP fault to be returned instead of the requested paystub information.
WS-Security implementation is supported by the Oracle WebCenter Suite WSRP container. Other WSRP vendors may also be able to support the WS-Security configuration of Username Token without password, with XML digital signature on the Username Token and the SOAP Message body.
When using secure identity propagation as described in this section, the user name of the user authenticated to the consumer (WebCenter Portal application) is propagated to the producer without any remapping or providing any credentials. There is an inherent assumption that the producer understands this user name and can locate this user in its associated security domain. Consequently, it is highly desirable to ensure that the consumer and producer share the same security provider (identity store) to simplify the management of this configuration.
Figure 63-18 summarizes the overall WSRP portlet security architecture.
Figure 63-18 WSRP Portlet Security Architecture
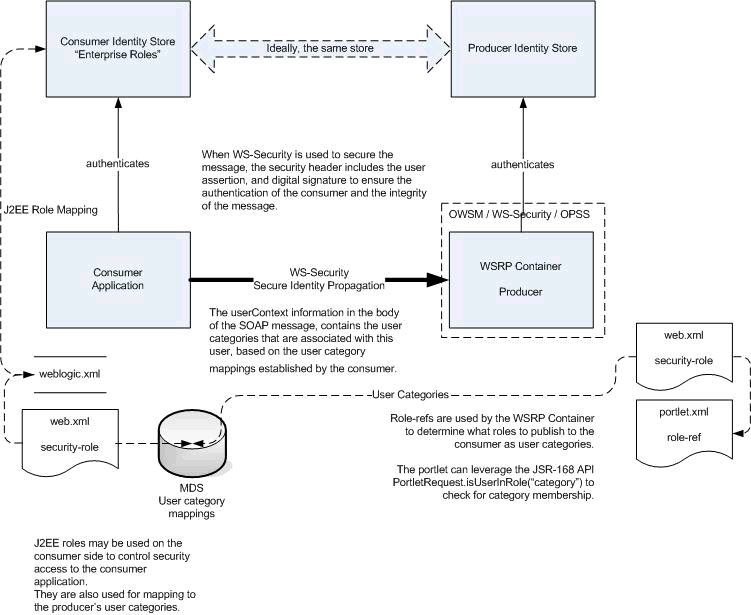
Description of "Figure 63-18 WSRP Portlet Security Architecture"
63.17.3 Configuring Security for WSRP Portlets
Before you configure the producer for WS-Security, you must first deploy your standards-compliant portlet producer to the Oracle WebCenter Suite WSRP Container by performing the steps described in Chapter 57, "Testing and Deploying Your Portlets".
After you have deployed the producer, configure the producer for WS-Security by performing the following steps:
-
Attaching a policy to the producer endpoint
-
Creating the keystores
-
Configuring the producer
-
Configuring the consumer
These steps are described in Oracle Fusion Middleware Administrator's Guide for Oracle WebCenter .
63.18 Implementing PDK-Java Portlet Security
This section describes the available security services for your PDK-Java portlet.
For more detailed information about the PDK classes referred to in this section, see the JavaDoc on OTN by clicking Java Doc API on the Portlet Development page available at
http://www.oracle.com/technology/products/ias/portal/portlet_development_10g1014.html
63.18.1 Assumptions
The following assumptions are made to perform the tasks in this section:
-
You have followed through and understood Section 55.2, "Creating Java Portlets".
-
You built a portlet using the wizard and successfully added it to a page.
63.18.2 Introduction to PDK-Java Portlet Security Features
This section introduces the major features that are available to secure your PDK-Java portlet producers.
63.18.2.1 Identity Propagation
When a user first logs in, they must enter their password to verify their identity and obtain access.
Once the user is authenticated, the producer code has access to the authenticated user's identity from the PortletRenderRequest that is available from the HttpServletRequest object as follows:
PortletRenderRequest pr = (PortletRenderRequest)request.getAttribute
   (HttpCommonConstants.PORTLET_RENDER_REQUEST);
   String userName = pr.getUser().getName();
When using this user identity for sensitive operations, it is important to ensure that you have configured this producer to use basic message authentication to secure the integrity of the identity assertion.
63.18.2.2 Authorization
Authorization determines if a particular user may view or interact with a portlet. For information about how to restrict access toportlets, see Section 63.18.4, "Portlet Security Managers."
63.18.2.3 Message-level Security
To this point, user authentication and authorization are covered, which do not check the authenticity of messages received by a producer. To completely secure your producers, you should also secure the communication with a producer. If the communication is not secured, then it is possible for someone to imitate an application instance and fool the producer into returning sensitive information. There are three types of communication security:
-
Server Authentication restricts access to a producer to a small number of recognized computers. This method compares the IP address or the host name of an incoming HTTP message with a list of trusted hosts. If the IP address or host name is in the list, then the message is passed to the producer. If not, it is rejected before reaching the producer.
-
Message Authentication provides consumer authentication and message integrity. It uses a shared key known to the client (WebCenter application) and the producer to digitally sign messages. See Section 63.18.5, "Message Authentication" for more information.
-
Message Encryption relies on the use of the HTTPS protocol for communication between applications and producers. Messages are strongly encrypted to protect the data therein. Encryption provides a high level of security, but it incurs a performance penalty due to the additional processing required for each message.
-
User Input Escape causes the application to escape any user input strings and treat them as text only to protect against XSS attacks, where an attacker attempts to pass in malicious scripts through user input forms. For example, if a portlet title is customizable, then an attacker might attempt to pass scripts or commands to the portlet through the title parameter entry. For this reason, the default behavior is to escape user input and thus disable any incoming scripts. See Section 63.18.6, "User Input Escape" for more information.
63.18.3 Single Sign-On
Portlets may act as windows into an application. They display summary information and provide a way to access the full functionality of the application. Portlets display some portions of the application in the WebCenter Portal application and typically enable the user to perform some application tasks.
An application may need to authenticate the user accessing the application through the portlet. The following are the possible application authentication methods:
-
External Application. In this case, the Oracle Portal (Oracle Portal) user is different from the application user, but the application user name and password are managed by the Oracle Portal user.
-
No Application Authentication. In this case, the communication between producer and consumer is not protected at all.
63.18.3.1 External Application
An external application uses a different authentication server than the WebCenter Portal application. This means that when a user is logged into the WebCenter Portal application, you want to also log them into the external application without having to type in their user name or password.
Applications that manage the authentication of users can be loosely integrated with the WebCenter Framework if the administrator registers them as external applications. When a user who was previously authenticated by the WebCenter Framework accesses an external application for the first time, WebCenter Framework attempts to authenticate the user with the external application. The authentication process submits an HTTP request that combines the registration information and the user's user name and password for the application. If the user has not yet registered their user name and password for the external application, then the user is prompted for the required information before making the authentication request. When a user supplies a user name and password for an external application, WebCenter Framework maps the new user name and password to the WebCenter Portal application user name and stores them. They will be used the next time the user needs authentication with the external application.
The advantages of an external application implementation are as follows:
-
Provides a single sign-on experience for users. However, users still must maintain different user names and passwords. In addition, the external application user name mapping must be maintained.
-
Allows integration with multiple portals independent of their user repositories and Oracle Single Sign-On.
-
Avoids the requirement of having access to the application source code.
The disadvantages of an external application implementation are as follows:
-
Does not share the same user repository as the portal, which requires additional maintenance of user information by the end user.
-
Transmits the user name and password to the producer in plain text, unless you implement Secure Sockets Layer (SSL).
63.18.3.2 No Application Authentication
The producer trusts the WebCenter Portal application instance sending the request completely. The producer can determine if the user is logged in and the portal user name, but the application has not authenticated the user.
The advantages of no application authentication are as follows:
-
Provides the easiest form of integration and the fastest to implement.
The disadvantages of no application authentication are as follows:
-
Provides the least security.
-
Provides the weakest integration with the WebCenter Portal application.
63.18.4 Portlet Security Managers
Portlet security managers may be implemented within a producer to restrict access to portlets depending on the user details. When a user views a page with a portlet instance on it, security managers determine whether the user has the appropriate privileges to see the portlet. Implementing access control methods in the producer restricts the retrieval of content from a portlet (that is, hides the portlet) from users without the appropriate privileges. Only if the specified characteristics, such as user details and preferences, pass the authorization logic will the content be retrieved for the user. If no portlet security methods are implemented in the producer, then any user name may be passed in, even fictitious, unauthenticated ones.
AuthLevelSecurityManager has access to the following information about authorization level:
-
Strongly authenticated.
The user has signed into the WebCenter application, and requested the portlet in the context of that session.
-
Public or not authenticated.
The user has not logged in within the context of the current session, and does not have a persistent cookie to indicate that such a state previously existed.
To incorporate these security services into your Java portlet, you must update provider.xml and set the security level to strong, weak, or public. Place the following XML right before the </portlet> tag in provider.xml:
<securityManager class="oracle.portal.provider.v2.security.AuthLevelSecurityManager">
   <securityLevel>strong</securityLevel>
</securityManager>
After you make this change to provider.xml, refresh the producer.
For more information about the syntax of provider.xml, see the producer JavaDoc on OTN:
http://www.oracle.com/technology/products/ias/portal/html/javadoc/xml_tag_reference_v2.html
63.18.4.1 Implementing Your Own Security Manager
If your portlet requires special security arrangements which are not provided by the implementations shipped with the PDK, then you must supply your own custom PortletSecurityManager controller class. To do this, extend the oracle.portal.provider.v2.security.PortletSecurityManager class and supply implementations for the two methods specified by the interface. Then replace the class attribute of the securityManager controller element in the XML producer definition with you new class name and configure child elements appropriately.
63.18.5 Message Authentication
Message authentication uses a digital signature. The signature is generated using a Hashed Message Authentication Code (HMAC) algorithm and is based on user information, the shared key, and a UTC (Universal Time, Coordinated) timestamp. The producer authenticates the message using its own copy of the shared key. This technique can be used in Secure Sockets Layer (SSL) communication with a producer instead of client certificates.
For caching purposes, show request signatures are calculated each time a session is set up so producers using message authentication must always have Producer Sessions enabled. This also means that there is a trade-off between performance and security. Shorter session timeouts mean less chance of a message being re-sent illegally, but there is a performance overhead associated with reestablishing a provider session.
A single producer instance cannot support multiple shared keys because it could cause security and administration problems. For instance, if one copy of the shared key is compromised in some way, then the producer administrator has to create a key and distribute it to all of the application clients, who then must update their producer definitions. The way around this problem is to deploy different producer services, specifying a unique shared key for each service. Each producer service has its own deployment properties file so that each service is configured independently of the others. The overhead of deploying multiple producer services within the same producer adapter is relatively small.
While the signature element provides protection against interception and resending of messages, it does nothing to prevent interception and reading of message contents. Messages are still transmitted in plain text. If you are concerned about the content of messages being read by unauthorized people, then this must used in conjunction with SSL to encrypt the message.
The advantage of message authentication is as follows:
-
Ensures that the message received by a producer comes from a legitimate WebCenter Portal application instance.
The disadvantages of message authentication are as follows:
-
Causes administration problems if a producer serves multiple portals. Entails performance implications if made very secure by having a short session timeout.
63.18.6 User Input Escape
By accepting user input without escaping it to text, you run the risk of an XSS attack, where an attacker attempts to pass in malicious scripts through user input forms. For example, if a portlet title is customizable, then an attacker might attempt to pass scripts or commands to the portlet through the title string. PDK-Java provides the following features to ensure that you can protect your portlets from such attacks:
63.18.6.1 Default Container Encoding
To prevent any script inside a portlet title from being executed, the framework default container renderer class encodes any script characters. This default behavior is controlled through a JNDI variable, escapeStrings. When set to true, the markup tags in portlet titles are rendered as visible tag characters. For example, a title customization of <i>title</i> will be rendered as <i>title</i> not title. This mode is secure, but, if it is not the desired behavior, then you can set escapeStrings to false for that producer.
escapeStrings applies to all logical producers within a producer. You can set the value of escapeStrings from the Fusion Middleware Control Console as you would any other JNDI variable. See Section 56.3.5.2, "Setting JNDI Variable Values" for more information.
63.18.6.2 Escape Methods
If you have code that renders customized values, then you must ensure that you escape those input values appropriately to avoid XSS attacks. This requirement applies to code for rendering pages in any mode. PDK-Java supplies two new static methods for this purpose. They are in the Java class oracle.portal.provider.v2.url.UrlUtils, and can be described as follows:
-
public static escapeString(string_text)escapes any script characters in a given string. For example, less than < becomes<. This method is unaffected by theescapeStringsJNDI variable and is the secure, recommended method to use. -
public static escapeStringByFlag(string_text)escapes any script characters in a given string. This method is controlled by theescapeStringsJNDI variable and is therefore less secure and not the recommended method to use.
For example:
title = UrlUtils.escapeString(data.getPortletTitle());
63.19 Troubleshooting Security Issues
This section provides troubleshooting information to help diagnose security related issues for WebCenter Portal applications.
This section includes the following troubleshooting notes:
63.19.1 Error Message Appears When Running a Page with a Content Repository Data Control Method Being Consumed
When you run a page containing a content repository data control method, the following error message appears:
"Unable to locate the credential for key extapp in JPS credential store."
Credentials need to be provisioned explicitly using the change password task flow before you access the page that uses the data control method.
Since the data control is only a model and cannot do anything at the user interface level to allow credential provisioning, you must write an error handler that takes care of the redirection in the user interface. For information about writing an error handler, see the "Customizing Error Handling" section in the Oracle Application Development Framework Developer's Guide.
The following is a sample error handler:
public class ErrorHandler
  extends DCErrorHandlerImpl
{
  public ErrorHandler(boolean b)
  {
    super(b);
  }

  public ErrorHandler()
  {
    super(true);
  }

@Override
  public void reportException(DCBindingContainer formBnd, Exception ex)
  {
   if (ex instanceof AdapterException)
    {
      AdapterException ae = (AdapterException) ex;
      if (ae.getCause() != null &&
          ae.getCause() instanceof ExtAppLoginException)
      {
        ExtAppLoginException eale = (ExtAppLoginException) ae.getCause();
        Throwable t = eale.getCause();
         if (t != null &&
            (t instanceof ExtAppCredentialNotFoundException) ||
            (t instanceof ExtAppInvalidUserCredential))
        {
          String extAppId = eale.getExternalAppId();
          showCredentialsProvisioningDialog(extAppId);
          return;
        }
      }
    }
    super.reportException(formBnd, ex);
  }

  private void showCredentialsProvisioningDialog(String extAppId)
  {
    FacesContext context = FacesContext.getCurrentInstance();
    // Create the dialog UIViewRoot
    ViewHandler viewHandler = context.getApplication().getViewHandler();
    UIViewRoot dialog =
      viewHandler.createView(context,
      "/oracle/adfinternal/extapp/view/pages/CredentialProvisionerDialog.jspx");

     HashMap<String, Object> properties = new HashMap<String, Object>();
     properties.put("width", new Integer(500));
     properties.put("height", new Integer(350));

     HashMap<String, Object> parameters = new HashMap<String, Object>();
     parameters.put("oracle.extapp.id", extAppId);

     RequestContext reqContext = RequestContext.getCurrentInstance();
     //launched from the button, need to specify this for the return listener
     //to be called.
     reqContext.launchDialog(dialog, parameters, null, true, properties);
  }
}
