3 Creating a WebCenter Portal Application
In this lesson, you will create a basic WebCenter Portal application. WebCenter provides an application template that provisions the new application with WebCenter Portal files and libraries – everything you need to develop and deploy a portal.
You will play the role of a portal developer assigned the task of developing the basic structure of the portal. By selecting the option to configure your application with standard portal features, you will ensure that all the necessary portal artifacts, like templates, catalogs, skins, default page, and the Resource Manger, are generated in the application. This will reduce the time required to develop your application.
As a developer, you will learn in this lesson how to work with the existing application template, and then in "Creating a New Page Template with a New Portal Skin" how to modify and change that default page template.
At the end of this lesson, the page you create will look like Figure 3-1 when you log in as Administrator and open the page in a web browser.
Figure 3-1 The Home Page with Administrator Privileges Enabled after Successful Login

Description of "Figure 3-1 The Home Page with Administrator Privileges Enabled after Successful Login"
Introduction
This lesson contains the following steps:
-
Step 1: Create a Custom WebCenter Portal Application
Step 2: Use Seeded Page Templates to Build Your Portal Application
Before you begin the steps in this lesson, ensure you have followed the steps up to this point in the Tutorial.
Step 1: Create a Custom WebCenter Portal Application
Let's begin by creating a WebCenter Portal application, using the WebCenter wizard for creating new portal applications. The wizard uses an out-of-the-box Portal Application template that ensures the appropriate application components are included.
After you create your portal application, you can then configure the necessary connections to a database and content repository, as described in Chapter 6, "Connecting to and Managing Content Repositories."
To create a WebCenter Portal application:
-
In Oracle JDeveloper, in the Application Navigator, choose the New Application icon (Figure 3-2) and click it to launch the application wizard.
Figure 3-2 The New Application Icon in Application Navigator
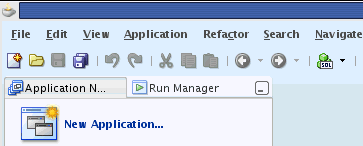
Description of "Figure 3-2 The New Application Icon in Application Navigator"
-
In the New Gallery, under the General category, select Applications.
-
Now in the Items list, navigate down the list and select WebCenter Portal Application, then click OK (Figure 3-3).
Figure 3-3 Create New WebCenter Portal Application
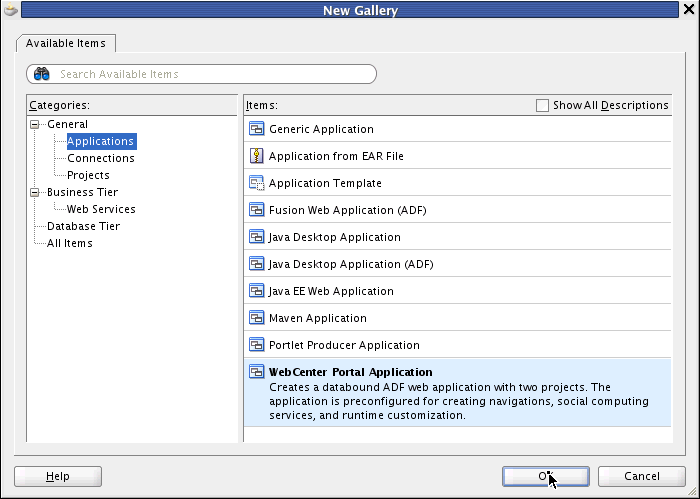
Description of "Figure 3-3 Create New WebCenter Portal Application"
-
On the Application Name tab, in the Application Name field, enter
MyPortalApplication, as shown in Figure 3-4. Click the Browse button in the Directory field to specify the directory on your system where you want your portal application to reside. -
In the Application Package Prefix field (shown in Figure 3-4), enter
my.portal.application.Figure 3-4 Naming Your Application - Step 1 of 5
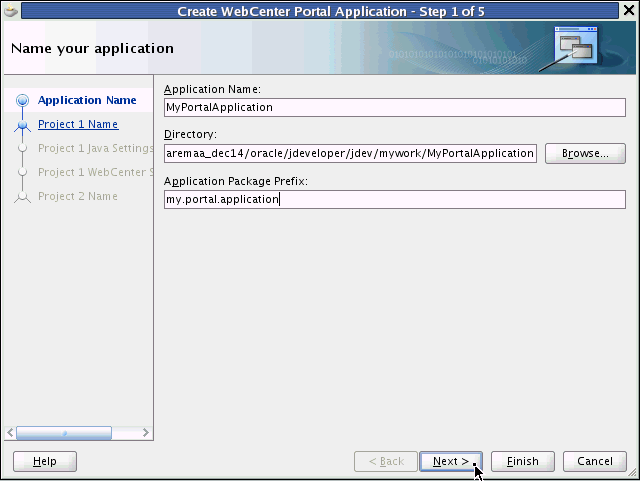
Description of "Figure 3-4 Naming Your Application - Step 1 of 5"
-
Click Next.
The Name your project dialog appears in the wizard, as shown in Figure 3-5. On the Project Name tab, in the Project Name field, note that the project is named
Portalby default.Figure 3-5 Name Your WebCenter Project - Step 2 of 5
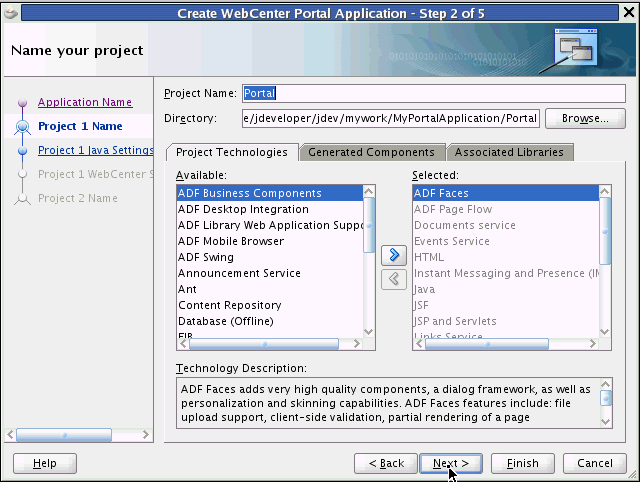
Description of "Figure 3-5 Name Your WebCenter Project - Step 2 of 5"
-
Click Next.
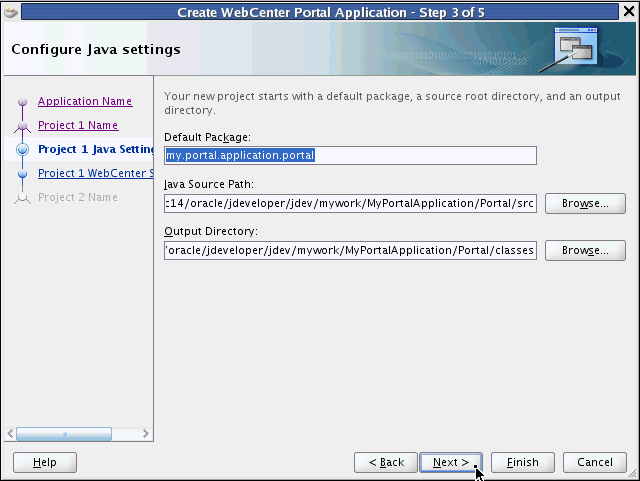
On the Project Java Settings tab, in the Default Package field (Figure 3-6), note that the project package is named
my.portal.application.portalby default. A source root directory and an output directory are also specified by default.Figure 3-6 Configure Java Settings in WebCenter - Step 3 of 5
Description of "Figure 3-6 Configure Java Settings in WebCenter - Step 3 of 5"
-
Click Next.
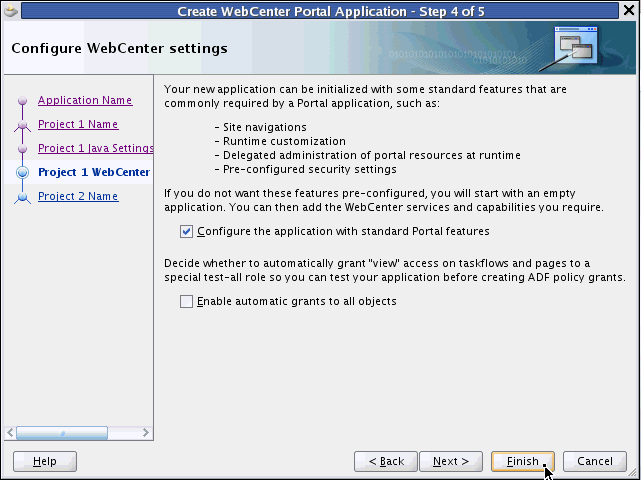
The Configure WebCenter settings dialog appears, as shown in Figure 3-7. Ensure that the checkbox Configure the application with standard Portal features is checked.
Figure 3-7 Configure WebCenter Settings - Step 4 of 5
Description of "Figure 3-7 Configure WebCenter Settings - Step 4 of 5"
-
Click Finish.
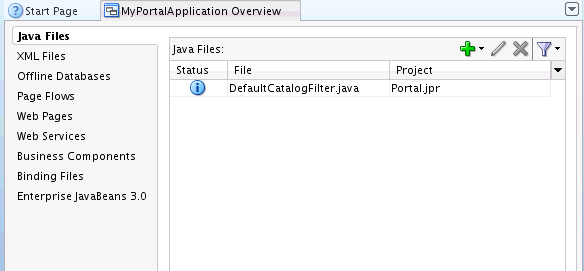
Oracle JDeveloper now configures and generates the base XML files, offline databases, page flows, web pages, business components, web services, binding files, and enterprise Java Beans available for you to build and deploy your WebCenter Portal application, as shown in the MyPortalApplication Overview window (Figure 3-8).
Figure 3-8 The MyPortalApplication Overview Window with Java Files Selected
Description of "Figure 3-8 The MyPortalApplication Overview Window with Java Files Selected"
-
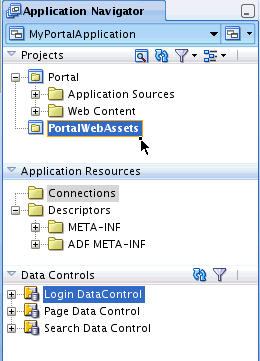
Return to the folders of your portal application in Application Navigator. A collapsed view of the folders shows your default project as named Portal, with Application Sources and Web Content as sub folders, shown in Figure 3-9.
Note PortalWebAssets is also a project. PortalWebAssets are intended to include static resources, like HTML and image files, in a newly created portal web assets project.
Figure 3-9 The MyPortalApplication Project in a Collapsed View in Application Navigator
Description of "Figure 3-9 The MyPortalApplication Project in a Collapsed View in Application Navigator"
Following the steps in the Wizard, your WebCenter Portal application is now populated with a portal project, named Portal, and a static application resources project called by default PortalWebAssets. Your portal project includes features like site navigation, page hierarchies, delegated administration, security, page templates, and runtime customizing. Your portal application can consume portlets, incorporate content management services, and include WebCenter social computing services. PortalWebAssets include static application resources like HTML and image files. By separating the static resources into a separate project, you can deploy those resources to a dedicated server.
-
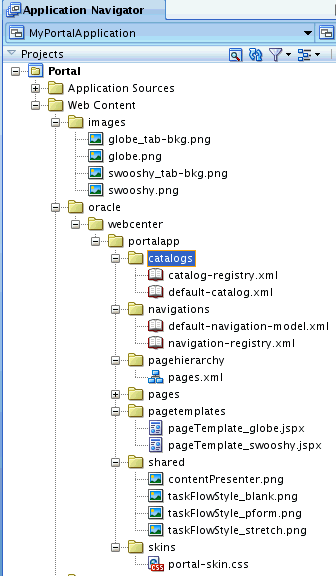
Now expand the various folders and sub folders, like catalogs, navigators, page hierarchy, pages and page templates (shown in Figure 3-10), for a view of the logical structure and parent-child relationships created in your portal application.
Figure 3-10 Expanded Folders in MyPortalApplication Project Shown in Application Navigator
Description of "Figure 3-10 Expanded Folders in MyPortalApplication Project Shown in Application Navigator"
-
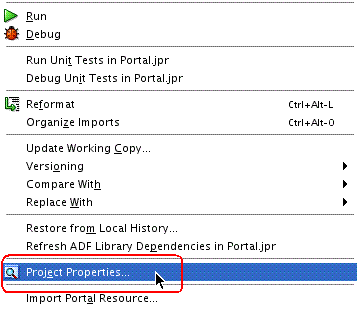
Now you need to change the context root of the portal application. Right-click Portal project and choose the Project Properties menu item, as shown in Figure 3-11.
Figure 3-11 The Project Properties Menu Item Selected to Change the Context Root of the Application
Description of "Figure 3-11 The Project Properties Menu Item Selected to Change the Context Root of the Application "
-
Select the Java EE Application node in the
Javadoclist, which appears in the Java EE Application dialog. In the Java EE Web Context Root field, entermytutorial, as shown in Figure 3-12, and click OK.Ensure that the Java EE web context root is set to
mytutorial.Figure 3-12 The Java EE Application Dialog with mytutorial Entered in the Java EE Web Context Root Field
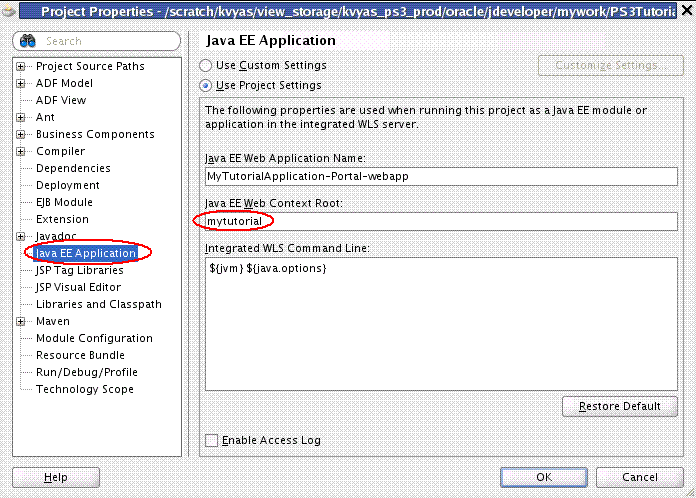
Description of "Figure 3-12 The Java EE Application Dialog with mytutorial Entered in the Java EE Web Context Root Field"
-
Right-click the Portal project and choose Run to run the application.
Oracle JDeveloper now builds the application out of the box and displays the default portal page Home in a web browser, as shown in Figure 3-13.
Initially, this portal displays a single page, rendered as
Home. TheHomepage is based on the seeded Globe page template (discussed in the next section), which provides all the initial functionality of the portal, including a banner, a login form with User Name and Password fields, and a navigation menu with a single link element --Home-- displayed on the web page.Figure 3-13 The Default Home Portal Page in a Web Browser

Description of "Figure 3-13 The Default Home Portal Page in a Web Browser"
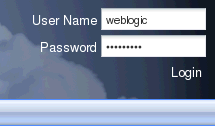
In the upper right corner of the Home page, in the User Name field (Figure 3-14), you can log into the Home page. Enter weblogic as the User Name. (Note that the weblogic user is seeded in the integrated WebLogic Server.) In the Password field, enter weblogic1.
Figure 3-14 Enter User Name and Password To Log in to Home Page
Description of "Figure 3-14 Enter User Name and Password To Log in to Home Page"
Figure 3-15 shows the portal Home page with Administrator privileges enabled after successfully logging in.
Note that Administrator privileges are now enabled because you can see the Administration link in the upper right corner of the web browser. This means the user, specified here as weblogic, has administration privileges for the portal.
Figure 3-15 The Home Page with Administrator Privileges Enabled After Successful Login

Description of "Figure 3-15 The Home Page with Administrator Privileges Enabled After Successful Login"
For more information on creating an application based on the WebCenter Portal Application template, see “Preparing Your Development Environment” in the Oracle Fusion Middleware Developer's Guide for Oracle WebCenter.
Step 2: Use Seeded Page Templates to Build Your Portal Application
When you create a portal, you will base its look and feel on a page template. Page templates enable you to maintain a consistent look and feel across all the pages in your portal, and typically determine the artifacts, like banners, footers and navigation bars, that surround the main content of the page.
Using JDeveloper, you can create and publish page templates. In addition, you can also modify them to meet specific design or runtime requirements in your portal application.
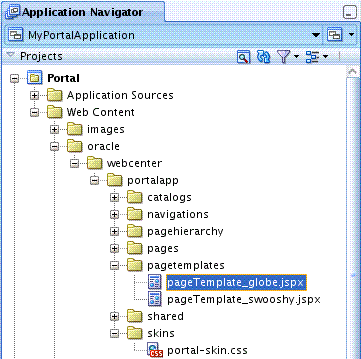
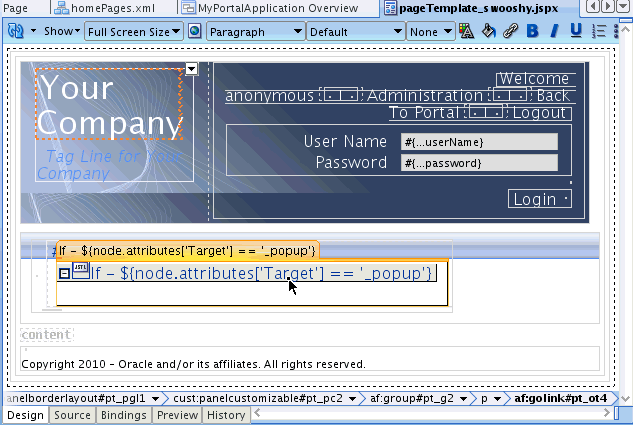
By selecting the Configure the application with standard Portal features option, as shown in Figure 3-7, "Configure WebCenter Settings - Step 4 of 5", two seeded, out-of-the-box templates are added by default to your portal application: pageTemplate_globe.jspx (shown in Figure 3-17) and pageTemplate_swooshy.jspx (Figure 3-18).
Both templates offer essentially the same functionality but with a different set of graphics.
To view the pageTemplate_globe.jspx template:
-
Navigate to the
pagetemplatesfolder in your portal project. -
Double-click the folder and select the
pageTemplate_globe.jspxfile, as shown in Figure 3-16.Figure 3-16 The pageTemplate_globe.jspx File in the Page Templates Folder
Description of "Figure 3-16 The pageTemplate_globe.jspx File in the Page Templates Folder"
-
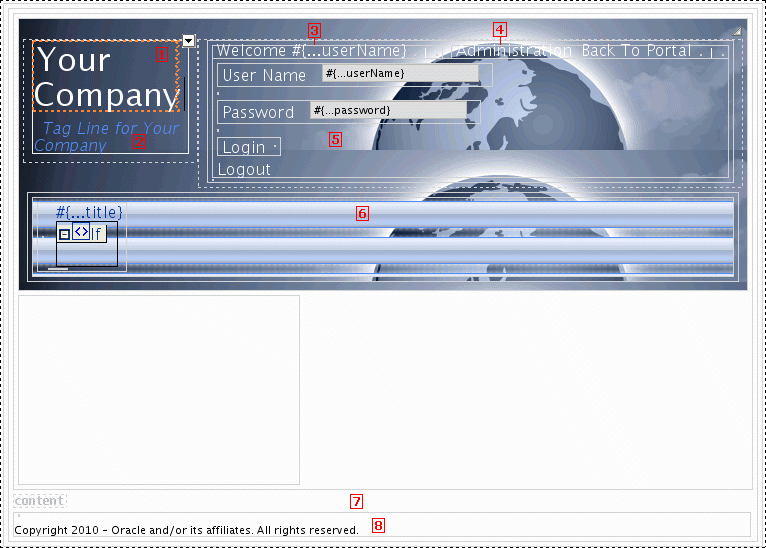
Right-click the page template and choose Open. The file opens in JDeveloper, as shown in Figure 3-17.
Ensure that you select the Design tab in the lower left corner.
Figure 3-17 The pageTemplate_globe.jspx Seeded Page Template
Description of "Figure 3-17 The pageTemplate_globe.jspx Seeded Page Template"
Figure 3-17 shows the pageTemplate_globe.jspx page template with each of its page features and artifacts (enumerated below) called out with their corresponding numbers in the illustration.
-
A link to the portal home page
-
A tag line
-
A welcome message
-
A link to the seeded Administration page
-
A login area that converts to a logout link when users are logged in
-
A navigation bar
-
An area for adding content to pages based on the template
-
A copyright notice
Figure 3-18 shows the pageTemplate_swooshy.jspx page template, but without each of its page features and artifacts enumerated.
Figure 3-18 The Seeded PageTemplate swooshy.jspx
Description of "Figure 3-18 The Seeded PageTemplate swooshy.jspx "
Using JDeveloper, you can modify and edit this default page template to meet your particular requirements. You can also create and build your own page template, as we discover in the next lesson in this Tutorial, ensuring that it has a common navigation bar, footer, and banner, then leave it up to your content contributors to populate the portal with content at runtime.
Following the steps outlined in this Tutorial, you have created a new portal application using Oracle JDeveloper.
In the next lesson, you will learn how to modify and edit an existing page template, with the goal of customizing its behavior to meet the particular needs of your end users. By completing that task, you will create a new page template in your portal application, further customizing its look and feel, and then set that template as an application resource.