5 Changing the Look and Feel of Your Portal Application
In the previous lesson, you changed the default template in your portal application to myTemplate and proceeded to change the default skin to the tutorial skin provided in the folder on your hard drive whose contents you extracted. These changes then appeared in your web browser as a new template and a new skin when you built and ran your application in JDeveloper.
Now in this lesson, you will move ahead to change the default settings for both your template and skin at design time in JDeveloper. When you launch your portal application again in a web browser, these changes will show the new default settings with changed preferences, as well as the new template and skin. In so doing, you'll learn how to change the look and feel of your portal application at design time and how to apply skins to your portal.
A skin is essentially a global style sheet (based on the Cascading Style Sheet specification [CSS]) that you can apply to your entire application. Once you do that, every layout component automatically uses the styles assigned by the skin. You cannot edit that skin at runtime or post-deployment, however.
Skins are important because they enable you to define the appearance of your application and achieve some degree of consistency across multiple pages, so that you can more effectively communicate your company's preferred look and feel.
Introduction
This lesson contains the following steps:
Before you begin the steps in this lesson, ensure you have followed the steps up to this point in the Tutorial.
Step 1: Change the Default Settings For Template and Skin
When you create a WebCenter Portal Application using the WebCenter Application template, a skin is included by default. In this Tutorial, you've extracted a custom skin provided for you, which you've then applied in place of the default skin. Now you need to change the default settings for both the skin and the provided template by changing their preference entries.
To change the default preferences of your portal application at design time, you will need to directly edit the adf-config.xml file in your project. The steps to accomplish this task are described in this section, as follows.
To change the default settings for the skin and template:
-
Open
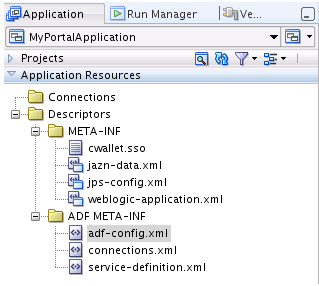
adf-config.xml.To locate this file in JDeveloper, open the Application Resources part of the Application Navigator. Then, open the Descriptors folder and the ADF META-INF folder, as shown in Figure 5-1.
Figure 5-1 Location of the adf-config.xml File in JDeveloper

Description of "Figure 5-1 Location of the adf-config.xml File in JDeveloper"
-
In the ADF META-INF folder, select the
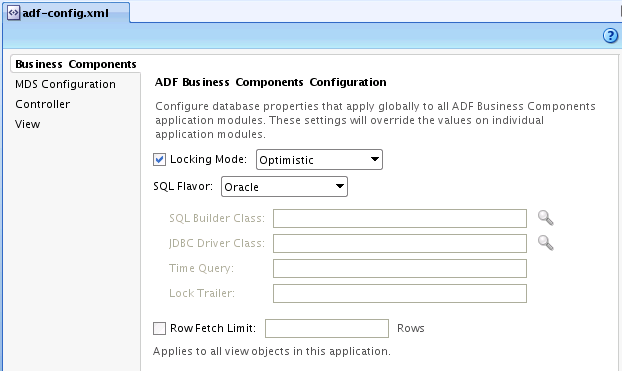
adf-config.xmlfile and open it. The file appears in the Overview tab, as shown in Figure 5-2.Figure 5-2 The adf-config.xml file Specifying Component Configuration

Description of "Figure 5-2 The adf-config.xml file Specifying Component Configuration "
-
Now click the Source view tab in the JDeveloper window to view the XML source contents of the file.
-
In the Search field of the
adf-config.xmlfile, enter the wordpreferences. Navigate in the XML schema to this code (Example 5-1): -
Change the
valueattribute tomyTemplate.jspxand change thedescattribute to "My Site Template", as shown in Example 5-2 -
Navigate in the preference schema to the
descattribute"Default Portal Skin"and thevalueattribute "portal", shown in Example 5-3. Select "portal" and change it to "mycustomskin". -
In the Source view of the adf-config.xml file, note that the
valueattribute is now updated as "mycustomskin", as shown in Figure 5-3.Figure 5-3 The Portal Skin Value Attribute Changed to "mycustomskin"

Description of "Figure 5-3 The Portal Skin Value Attribute Changed to "mycustomskin""
-
Change the
descattribute from "Default Portal Skin" to "Tutorial Skin", shown in Figure 5-4.Figure 5-4 The Changed desc Attribute to Tutorial Skin

Description of "Figure 5-4 The Changed desc Attribute to Tutorial Skin"
-
Save the
adf-config.xmlfile. -
Right-click the Portal project in Application Navigator and select Run to build and launch the application in JDeveloper.
-
When the
Homepage appears in a web browser, log in as Userweblogicand Password asweblogic1to log in and enable Administrator privileges. -
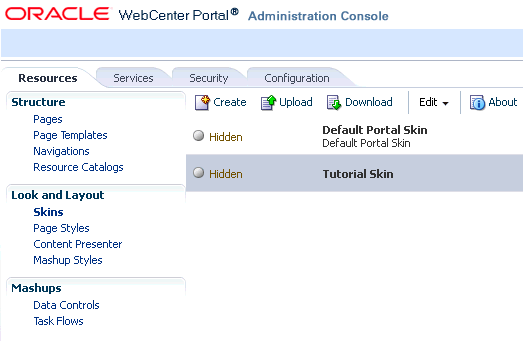
In the Administration Console, click the Resources tab and click the Skins item in the Look and Layout list. As a result of the changes you've made through steps 5 and 8, the
Tutorial Skin, when checked, will be available to the application (Figure 5-5).Tip:
The Administration Console lets you work with resources, services, security, and portal configurations at runtime. The Administration Console includes a Resources tab that lets you work with several portal-specific features at runtime, like pages, page templates, navigation models, resource catalogs, skins, page style, task flows, and so on.The Resource Manager enables portal administrators to manage these resources at runtime. Using the Resource Manager, portal users can also download resources, or an entire application, from the runtime environment, edit them in JDeveloper, and then upload them back into the deployed application.
Figure 5-5 The Tutorial Skin Available When Checked as Skin Resource

Description of "Figure 5-5 The Tutorial Skin Available When Checked as Skin Resource"
Since you are still developing your application (and have not yet deployed it), you can continue to switch back and forth between the runtime view and design time in Oracle JDeveloper to modify the look and feel.
For more information about changing default templates and applying different skins at design time, see Oracle Fusion Middleware Developer's Guide for Oracle WebCenter.
Step 2: Change the Default Page Template at Runtime
The steps that follow describe how you can change the default page template at runtime. You accomplish this by logging in as a user with administrative privileges and clicking the Administration link in the web browser to access the Administration Console. Once in the Administration Console, you will select the Resources tab that lets you work with portal-specific features at runtime, like page templates.
The values you enter in the Administration Console, modifying or changing page templates, will be lost the next time you choose Run from JDeveloper, however.
Tip:
It's important to understand that if you are using the Integrated WebLogic Server in a development environment, running your portal application through JDeveloper as we've been doing in this Tutorial, then any changes you make to the portal at runtime, using the Resource Manager, will be discarded upon redeployment by default. If you use the Resource Manager, for example, to make changes like adding entitlements to a page, changing the layout, or modifying the navigation model, those changes will not be preserved the next time you redeploy your application.To change the default page template from Globe to Swooshy:
-
In the Application Navigator in JDeveloper, right-click the Portal project and choose Run to run the application. The application opens in your web browser, as shown in Figure 5-6.
Figure 5-6 The Home Portal Page with Administration Privileges Enabled

Description of "Figure 5-6 The Home Portal Page with Administration Privileges Enabled"
-
In the default
Homeportal page in the web browser, log in asweblogicandweblogic1as your password.Note that you must log in as a user with administrative privileges. In the Tutorial, the user "weblogic" has administrative privileges.
-
Click the Administration link in the upper right corner of the web page. The Administration Console appears (Figure 5-7).
-
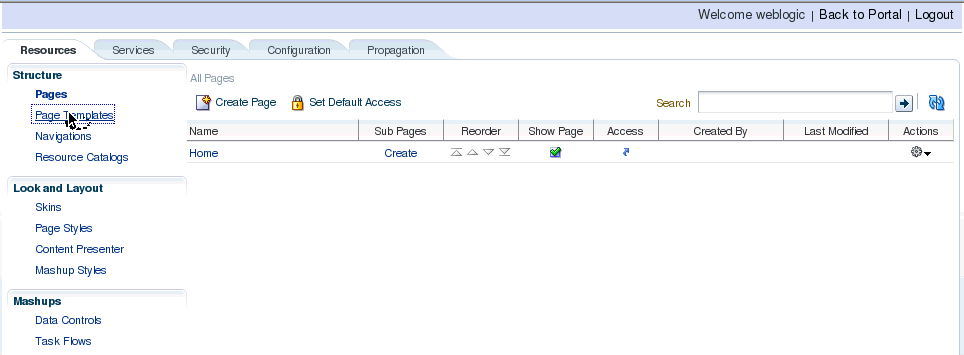
Select the Resources tab and navigate to the Page Templates item in the Structure menu, as shown in Figure 5-7. Note that the Propagation tab will only appear if you have defined the appropriate connection for propagating from stage to production.
Figure 5-7 Administration Console with the Resource Tab and Page Templates Item Selected

Description of "Figure 5-7 Administration Console with the Resource Tab and Page Templates Item Selected"
-
Click the Page Templates item. Both the
Globe PageTemplateand theSwooshy PageTemplateappear, as shown in Figure 5-8, with theGlobe PageTemplatefield highlighted. Note that both templates are marked as available, so you can apply them.Figure 5-8 The Globe PageTemplate Selected in the Page Templates Item

Description of "Figure 5-8 The Globe PageTemplate Selected in the Page Templates Item"
-
Select the Configuration tab in the Administration Console. In the Preferences menu, the
Default Page Templateis specified as theGlobe PageTemplate(Figure 5-9).Figure 5-9 The Globe Template Specified as the Default Page Template in Preferences

Description of "Figure 5-9 The Globe Template Specified as the Default Page Template in Preferences"
-
Change the
Default Page Templateand set it to theSwooshy PageTemplate, as shown in Figure 5-10.Figure 5-10 The Default Page Template Changed to Swooshy Page Template

Description of "Figure 5-10 The Default Page Template Changed to Swooshy Page Template"
-
Click the Back to Portal link. The new page template is applied to the portal.
In this lesson, you've learned how to change the default settings for both your template and skin at design time in JDeveloper by changing their preferences and updating portal resources. With those changes in effect, your portal application will have a different look and feel.
You also learned how to change the default page template at runtime from Globe to Swooshy by accessing the Administration Console and modifying preferences.