This section documents the ability to use a simple membership provider on MVC 4 templates. The configuration OAuth compatible for the application to login using external credentials from third-party providers like Google, Facebook, Twitter, or others.
This tutorial creates an application using a simple membership provider and then adds third-party (Google) OAuth authentication support.
This feature was added in MySQL Connector/NET 6.9.0.
Connector/NET 6.9.x or later
.NET Framework 4.0 or later
Visual Studio 2012 or later
MVC 4
To get started with a new project, do the following:
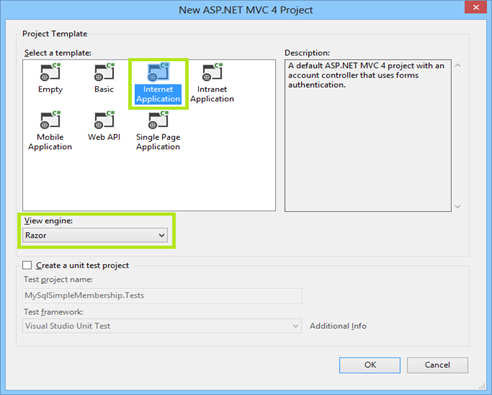
Open Visual Studio, create a new project of ASP.NET MVC 4 Web Application type, and configure the project to use .NET Framework 4.5. The following figure shows and example of the New Project window with the items selected.
Choose the template and view engine that you like. This tutorial uses the Internet Application Template with the Razor view engine (see the next figure). Optionally, you can add a unit test project by selecting Create a unit test project.
Add references to the
MySql.Data,MySql.Data.Entities, andMySql.Webassemblies. The assemblies chosen must match the .NET Framework and Entity Framework versions added to the project by the template.Add a valid MySQL connection string to the
web.configfile, similar to the following example.<add name="MyConnection" connectionString="server=localhost; UserId=root; password=pass; database=MySqlSimpleMembership; logging=true;port=3305" providerName="MySql.Data.MySqlClient"/>Under the
<system.data>node, add configuration information similar to the following example.<membership defaultProvider="MySqlSimpleMembershipProvider"> <providers> <clear/> <add name="MySqlSimpleMembershipProvider" type="MySql.Web.Security.MySqlSimpleMembershipProvider,MySql.Web, Version=6.9.2.0,Culture=neutral,PublicKeyToken=c5687fc88969c44d" applicationName="MySqlSimpleMembershipTest" description="MySQLdefaultapplication" connectionStringName="MyConnection" userTableName="MyUserTable" userIdColumn="MyUserIdColumn" userNameColumn="MyUserNameColumn" autoGenerateTables="True"/> </providers> </membership>Update the configuration with valid values for the following properties:
connectionStringName,userTableName,userIdColumn,userNameColumn, andautoGenerateTables.userTableName: Name of the table to store the user information. This table is independent from the schema generated by the provider, and it can be changed in the future.userId: Name of the column that stores the ID for the records in theuserTableName.userName: Name of the column that stores the name/user for the records in theuserTableName.connectionStringName: This property must match a connection string defined inweb.configfile.autoGenerateTables: This must be set tofalseif the table to handle the credentials already exists.
Update your
DBContextclass with the connection string name configured.Open the
InitializeSimpleMembershipAttribute.csfile from theFilters/folder and locate theSimpleMembershipInitializerclass. Then find theWebSecurity.InitializeDatabaseConnectionmethod call and update the parameters with the configuration forconnectionStringName,userTableName,userIdColumn, anduserNameColumn.If the database configured in the connection string does not exist, then create it.
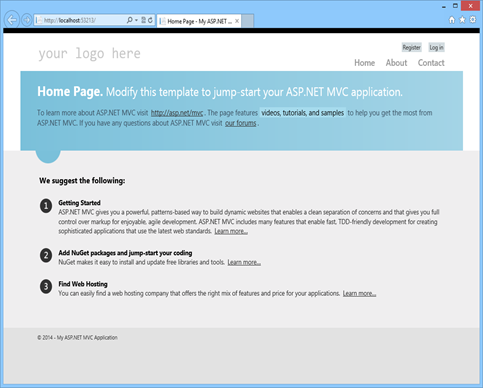
After running the web application, the generated home page is displayed on success (see the figure that follows).
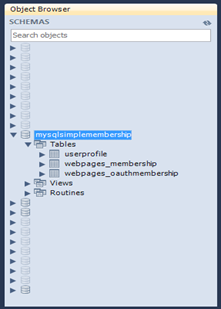
If the application executed with success, then the generated schema will be similar to the following figure showing an object browser open to the tables.
To create a user login, click on the generated web page. Type the user name and password, and then execute the registration form. This action redirects you to the home page with the newly created user logged in.
The data for the newly created user can be located in the
UserProfileandWebpages_Membershiptables.

OAuth is another authentication option for websites that use the simple membership provider. A user can be validated using an external account like Facebook, Twitter, Google, and others.
Use the following steps to enable authentication using a Google account in the application:
Locate the
AuthConfig.csfile in theApp_Startfolder.As this tutorial uses Google, find the
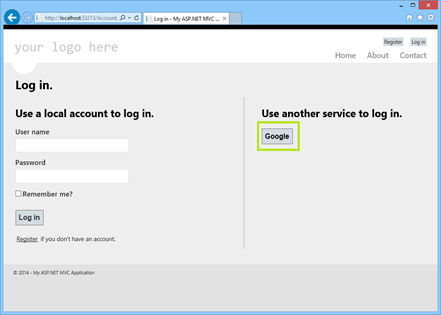
RegisterAuthmethod and uncomment the last line where it callsOauthWebSecurity.RegisterGoogleClient.Run the application. When the application is running, click to open the log in page. Then, click under Use another service to log in (shown in the figure that follows).
This action redirects to the Google login page (at google.com), and requests you to sign in with your Google account information.
After submitting the correct credentials, a message requests permission for your application to access the user's information. Read the description and then click to allow the quoted actions, and to redirect back to the login page of the application.
The application now can register the account. The User name field will be filled in with the appropriate information (in this case, the email address that is associated with the Google account). Click to register the user with your application.
Now the new user is logged into the application from an external source using OAuth. Information about the new user is stored in the
UserProfileandWebpages_OauthMembershiptables.
To use another external option to authenticate users, you must enable the client in the same class where we enabled the Google provider in this tutorial. Typically, providers require you to register your application before allowing OAuth authentication, and once registered they typically provide a token/key and an ID that must be used when registering the provider in the application.