Defining Security & User Options
The contents of this section describe how to maintain a user’s access rights.
Contents
The Big Picture of Application Security
The Big Picture of Row Security
The contents of this section provide background information about application security.
Contents
Importing LDAP Users and User Groups
The Base Package Controls One User, One User Group, And Many Application Services
How To Copy User Groups From The Demonstration Database
Application Security
The system restricts access to its transactions as follows:
· An application service exists for every securable function in the system. For example, an application service exists for every transaction and zone in the system.
· You grant access to the application services to your user groups. For example, you may create a user group called Senior Management and give it access to senior manager-oriented pages and portals.
· When you grant a user group access to an application service, you must also define the actions they can perform. For example, you may indicate a given user group has inquire-only access to an application service, whereas another user group has add, change, freeze, cancel and complete access to the same service. Refer to action level security for more information.
· If the application service has field level security enabled, you must also define the user group’s security level for each secured field on the transaction.
· And finally, you link individual users to the user groups to which they belong. When you link a user to a user group, this user inherits all of the user group’s access rights.
Menu items and menus may be suppressed! If a user doesn’t have access to an application service, s/he will not see the menu item that corresponds with the application service. And, if all menu items on a menu are suppressed, the menu is suppressed.
Importing LDAP Users and User Groups
If your organization uses Lightweight Directory Access Protocol (LDAP), you can import your existing LDAP users and groups into the system. Once imported, all user and group functions are available. You can import all users, a group of users, or a single user. You can resynchronize your LDAP users and groups at any time.
For information on how to set up your system to import users and groups from an LDAP store as well as how to do the import, refer to Importing Users and Groups.
Action Level Security
When you grant a user group access to an application service, you must indicate the actions to which they have access.
· For application services that only query the database, there is a single action to which you must provide access – this is called Inquire.
· For application services that can modify the database, you must define the actions that the user may perform. At a minimum, most maintenance transactions support Add, Change, and Inquire actions. Additional actions are available depending on the application service’s functions.
Important! If an application service supports actions that modify the database other than Add, Change, and Delete; you must provide the user with Change access in addition to the other access rights. Consider a transaction that supports special actions in addition to Add, Change, and Inquire (e.g., Freeze, Complete, Cancel). If you want to give a user access to any of these special actions, you must also give the user access to the Inquire and Change actions.
Field Level Security
Sometimes transaction and action security is not sufficient. There are situations where you may need to restrict access based on the values of data. For example, in Oracle Utilities Customer Care and Billing you might want to prevent certain users from completing a bill for more than $10,000. This is referred to as “field level security”.
Field level security can be complex and idiosyncratic. Implementing field level security always requires some programming by your implementation group. This programming involves the introduction of the specific field-level logic into the respective application service(s).
Field level security logic is added to user exits. Refer to the Public API chapter of the Software Development Kit Developer Guide for more information on how to introduce field-level security logic into an application service’s user exits.
Even though the validation of a user’s field-level security rights requires programming, the definition of a user’s access rights is performed using the same transactions used to define transaction / action level security. This is achieved as follows:
· Create a security type for each type of field-level security.
· Define the various access levels for each security type. For example, assume you have some users who can complete bills for less than $300, and other users who can complete bills for less than $1,000, and still other users who can complete bills for any value. In this scenario, you’d need 3 access levels on this security type:
· Level 1 (lowest): May authorize bills <= $300
· Level 2 (medium): May authorize bills <= $1,000
· Level 3 (highest): May authorize all bills
· Link this security type to each application service where this type of field level security is implemented. This linkage is performed on the security type transaction.
· Defining each user group’s access level for each security type (this is done for each application service on which the security type is applicable).
Highest value grants highest security. The system expects the highest authorization level value to represent highest security level. Moreover, authorization level is an alphanumeric field so care should be taken to ensure that it's set up correctly.
Encryption and Masking
"Encryption" refers to encrypting data stored in a database using an encryption key. Only users whose database access user ID has the appropriate encryption key can retrieve decrypted information. Please refer to your database's encryption guidelines for how to encrypt data.
"Masking" refers to overwriting all or part of a decrypted field value with a masking character before it is presented to a user (or an external system) without the appropriate security access. For example, an implementation can mask the first 12 digits of a credit card number with an asterisk for users who do not have security rights to see credit card numbers.
Multiple masking rules. The system allows different masking rules to be applied to different fields. For example, a credit card number can be masked differently than a social security number. In addition, some user groups may be allowed to see certain fields unmasked.
Masking happens after decryption. It is obvious, but worth emphasizing, that only decrypted data can be masked. This means that if a user does not have authority to retrieve decrypted data then masking is not relevant because the data to be masked would be encrypted.
The topics in this section describe how to mask field values.
Contents
Identify The Fields To Be Masked
Create A Security Type For Each Logical Field
Create An Algorithm For Each Security Type
Create A Feature Configuration For Each Secured Element
Grant Access Rights To The User Groups
Additional Masking Information
Identify The Fields To Be Masked
Your implementation should list every field on every page and XAI service request that requires masking and classify each field into one of the following categories:
· An element that is retrieved by invoking a business object, a business service, or a service script
· A field that is retrieved by invoking a page service
· A field that is retrieved by invoking a search service
· An ad hoc characteristic type's value
Primary keys cannot be masked. A field defined as a unique identifier of a row cannot be configured for masking. Masking a field that is part of the primary key causes a problem when attempting to update the record. This restriction also applies to elements that are part of a "list" in a CLOB on a maintenance object. One or more elements in the list must be defined as a primary identifier of the list. Be sure that primary key elements in the list are not ones that require masking.
Masking applies to strings. Only fields with a data type of String can be masked.
List members that contain different "types". Consider a page with a list that contains a person's phone numbers. You can set up the system so that a person's home phone has different masking rules than their work number. If your implementation has this type of requirement, the list of masked fields should contain an entry for each masking rule.
Create A Security Type For Each Logical Field
Examine the list of masked fields and look for "logical fields". For example, assume your list contains the following masked fields:
· The Person - Main page retrieves information using the person page service. This page contains a grid that contains the various forms of ID associated with the person. Entries in the grid with an ID Type of "Social Security Number" are subject to masking.
· The Control Central - Main page retrieves data by invoking a search service. This service shows a person's primary form of ID in the search results. If a person's primary ID is their social security number then it is subject to masking.
· The Control Central - Account Information page contains a map zone that retrieves data by invoking a service script. One of the elements in this script's schema holds the person's social security number and it is subject to masking.
In the above example, there is a single "logical field" associated with the three secured elements: the social security number.
Examine your list and define the distinct logical fields. For each one, create a security type with two authorization levels:
· 1 - Can only see the element masked
· 2 - Can only see the element unmasked
You should link all of the security types to an application service of your choosing. We recommend linking every masking-oriented security type to a single application service (e.g., CM_MASK) as it makes granting access easier.
Create An Algorithm For Each Security Type
A masking algorithm must be created for each security type. These algorithms determine if a user has the rights to view a given field unmasked, and, if not, how the field should be masked.
The base package provides the algorithm type F1-MASK whose parameters are designed to handle most masking needs. This algorithm type's parameters are described below to provide the complete picture of how to control how a field is masked and who can see it unmasked:
· Masking Character: Enter the character used to overwrite a field's value for users who can only see masked values.
· Number of Unmasked Characters: If some of the field value should remain unmasked at the end of the string, enter the number of unmasked characters.
· Unmasked Characters: If some characters in a field value should never be masked, enter them. For example, if a phone number can contain dashes and parenthesis and you don't want these characters masked, you would enter -().
· Application Service: Enter the application service that you created above.
· Security Type: Enter the security type that you created above.
· Authorization Level: Enter the authorization level that a user must have to see this field unmasked. If you followed the recommendations above, this will be 2.
Create A Feature Configuration For Each Secured Element
Create a feature configuration with a Feature Type of Data Masking. Then add an option for every field that you defined in Identify The Fields To Be Masked.
Each field's option value will have an Option Type of Field Masking and a Value that references the respective algorithm defined above. In addition, the Value will contain mnemonics that differ depending on how the field is retrieved. For example, a field retrieved via a business object call has a different mnemonics than a field retrieved via a page service call. Refer to the Detailed Description of the Field Masking option on the Feature Configuration page for the mnemonic values required for each type of field.
Grant Access Rights To The User Groups
For each security type, identify which users can see its data unmasked and which users can only see its data masked. If the masked and unmasked users fit into existing user groups, no additional user groups are necessary. Otherwise, create new user groups for the masked and unmasked users.
After the user groups for each security type are defined, link each user group to the application service defined above. When a user group is linked to the application service, you will define the authorization level for each security type linked to the application service. If a user group's users should see the security type's field values unmasked, set the authorization level to 2; otherwise set it to 1. Refer to User Group - Application Services for the transaction used to link a user group to an application service.
Flush the cache. Remember that any time you change access rights you should flush the security cache (by entering flushAll.jsp on the URL of the application) if you want the change to take affect immediately.
Additional Masking Information
The following points provide additional information to assist in your masking configuration:
· You should examine the Data Masking feature configuration in the demonstration system because it will probably contain masking rules that will match your own.
· On data input pages, a user might be able to enter or change masked data, such as a bank account number, but not be able to subsequently see what they added or changed.
· External systems can request information by performing a service call via XAI. Please keep in mind that some XAI requests require data to be masked and some do not. For example, a request from an external system to synchronize person information needs the person's social security number unmasked; whereas a request from a web self service application to retrieve the same person information for display purposes needs the person's social security number masked. To implement this type of requirement, different users must be associated with each of the requests and these users must belong to separate user groups with different access rights.
· If you need to mask a field value that is retrieved by invoking a business object (BO), a business service (BS), or a service script (SS), the associated element in the invoked schema must be associated with a meta-data field. It is this field's name that is referenced on the field's respective option value on the Data Masking feature configuration. For example, if you need to mask a bank account number that's returned via a business object call, the element in the schema that holds the bank account number must have either an mdField= attribute or a mapField= attribute that references a field name (for example, BANK_ACCT). This is because when the option value in the Data Masking feature configuration is defined, it references the BANK_ACCT field and not the element name in the schema. Please note that if other BO, BS or SS schema elements reference this meta-data field, the same masking rules will be applied.
· If a maintenance object (MO) contains a CLOB field that holds an XML document and a service call invokes the MO's service program directly, the system will mask individual XML elements in the CLOB if a Determine BO algorithm has been plugged into the maintenance object and the element(s) in the respective BO schema have been secured as described above.
The Base Package Controls One User, One User Group, And Many Application Services
When the system is initially installed, the following information is setup:
· Application services are created for all secured transactions in the base package.
· A user identified by the user id SYSUSER is created.
· A user group identified by the user group code ALL_SERVICES is created. This user group is associated with all application services accessible from the Main and Admin menus. This user group is given access to all access modes for all application services (i.e., all actions on all transactions).
· The user SYSUSER is linked to the ALL_SERVICES user group. This means that this user has access to all transactions and all actions.
When you receive an upgrade:
· New application services are added for the new transactions introduced in the release.
· Existing application services are updated with changes in their access modes (e.g., if a new action is added to a transaction, its application service is updated accordingly).
· The ALL_SERVICES user group is updated so it can access the new / changed application services.
Important! With the exception of Field Level Security information, you should never add, change or remove the above information. This information is owned by the base package. It is provided so that an “initial user” has access to the entire system and can setup user groups and users as per your organization’s business requirements. In other words, do not provide your own users with access to the ALL_SERVICES user group. In addition, if you introduce new transactions, do not add them to this user group. Rather, link them to the user groups you setup to manage your organization’s business requirements.
How To Copy User Groups From The Demonstration Database
Warning! If you are not familiar with the concepts described in the ConfigLab chapter, this section will be difficult to understand. Specifically, you need to understand how a Compare database process is used to copy objects between two databases. Please take the time to familiarize yourself with this concept before attempting to copy a user group from the demonstration database.
Your product's demonstration database may contain sample user groups. These user groups reference logical groups of application services. For example, the "case management user group" references the "case management" application services.
You may find that these sample user groups closely match the user groups needed by your implementation. If this proves true, you should copy these user groups from the demonstration database. This will save you time as you won't have to set up the each such group's application services (but you'll still need to link your users to the appropriate user groups). The topics in this section describe how to copy user groups from the demonstration database.
If You Work In A Non-English Language
One Time Only - Set Up A DB Process To Copy User groups
Run The Copy User Groups DB Process
If You Work In A Non-English Language
The demonstration database is installed in English only. If you work in a non-English language, you must execute the NEWLANG background process on the demonstration database before using it as a Compare Source supporting environment. If you work in a supported language, you should apply the language package to the demonstration database as well.
If you don’t execute NEWLANG on the demonstration database, any objects copied from the demonstration database will not have language rows for the language in which you work and therefore you won’t be able to see the information in the target environment.
One Time Only - Set Up A DB Process To Copy User groups
You need a “copy user group” database process (DB process) setup in the target database (i.e., your implementation’s database). This DB process has a single instruction that references the user group maintenance object (MO). This instruction should have a table rule with an override condition that selects the user groups in question. For example, the override condition #SC_USER_GROUP.USR_GRP_ID LIKE 'CI_%' is used on the DB process that copies user groups prefixed with CI_. The demonstration database contains such a DB process; it’s called CI_COPUG. In order to copy user groups from the demonstration database, you must first copy this DB process from the demonstration database.
Warning! The remainder of this section is confusing as it describes a DB process that copies another DB process. Fortunately, you will only have to do the following once. This is because after you have a “copy user groups” DB process in your target database, you can use it repeatedly to copy user groups from the demonstration database.
You can copy the CI_COPUG DB process from the demonstration database by submitting the CL-COPDB background process in your target database. When you submit this process, you must supply it with an environment reference that points to the demonstration database. If you don’t have an environment reference configured in your target database that references the demonstration database, you must have your technical staff execute a registration script that sets up this environment reference. Refer to Registering ConfigLab Environments for more information.
CL-COPDB is initially delivered ready to copy every DB process that is prefixed with CI_ from the source database (there are numerous sample DB processes in the demonstration database and this process copies them all). If you only want to copy the CI_COPUG DB process, add a table rule to the primary instruction of the CL-COPDB database process to only copy the CI_COPUG DB process. The remainder of this section assumes you have added this table rule.
When the CL-COPDB process runs, it highlights differences between the “copy user groups” DB process in your source database and the target database. The first time you run this process, it creates a root object in the target database to indicate the CI_COPUG DB process will be added to your target database. You can use the Difference Query to review these root objects and approve or reject them.
After you’ve approved the root object(s), submit the CL-APPCH batch process to change your target database. You must supply the CL-APPCH process with two parameters:
· The DB Process used to create the root objects (CL-COPDB)
· The environment reference that identifies the source database (i.e., the demonstration database)
Run The Copy User Groups DB Process
After you have populated the “copy user groups” DB process in your target database, you can override its table rule to edit the list of user groups that will be copied. You need only do this if you don't need all of the user groups that are defined in these DB processes (but it never hurts to have too many user groups as they won't be used unless you link users to them).
At this point, you’re ready to submit the background process identified on your “copy user group” DB processes. This background process highlights the differences between the user groups in the demonstration database and the target database (the target database is the environment in which you submit the background process).
The background process you submit is typically named the same as the DB process that contains the rules. If you used the CL-COPDB background process to transfer the “copy user group” DB processes from the demo database, it will have also setup these batch controls and linked to each the appropriate “copy user groups” DB process. These batch controls have the same name as their related DB process (this is just a naming convention, it’s not a rule). This means, for example, that you’d submit a batch control called CI_COPUG in order to execute the CI_COPUG DB process.
When you submit one of the DB processes defined above, you must supply it with an environment reference that points to the source database (i.e., the demonstration database).
When the process runs, it simply highlights differences between the user groups in the source database and the target database. It creates a root object in the target database for every user group that is not the same in the two environments (actually, it only concerns itself with user group that match the criteria on the DB process's table rule described above). You can use the Difference Query to review these root objects and approve or reject them.
Auto approval. When you submit the process, you can indicate that all root objects should be marked as approved (thus saving yourself the step of manually approving them).
After you’ve approved the root object(s) associated with the user groups that you want copied, submit the CL-APPCH batch process to cause your target database to be changed. You must supply the CL-APPCH process with two parameters:
· The DB process of the “copy user groups” DB process (e.g., CI_COPUG)
· The environment reference that identifies the source database (i.e., the demonstration database)
Some products allow you to limit a user's access to specific rows. For example, in Oracle Utilities Customer Care and Billing, row level security prevents users without appropriate rights from accessing specific accounts.
By granting a user access rights to an account, you are actually granting the user access rights to the account’s bills, payment, adjustments, orders, etc.
The topics in this section describe basic row level security objects.
For a more detailed description of how row level security has been implemented in Oracle Utilities Customer Care and Billing, refer to Administration Guide - Implementing Account Security.
Access Groups, Data Access Roles and Users
We'll use an example from Oracle Utilities Customer Care and Billing to describe how access groups and roles are used to restrict access to accounts. The following diagram illustrates the objects involved with account security:
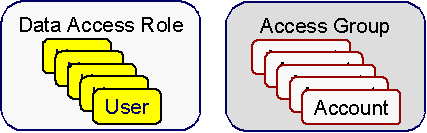
An Access Group defines a group of Accounts that have the same type of security restrictions. A Data Access Role defines a group of Users that have the same access rights (in respect of access to accounts). When you grant a data access role rights to an access group, you are giving all users in the data access role rights to all accounts in the access group.
The following points summarize the data relationships involved with account security:
· An account references a single access group. An access group may be linked to an unlimited number of accounts.
· A data access role has one or more users associated with it. A user may belong to many data access roles.
· A data access role may be linked to one or more access group. An access group may be linked to one or more data access roles.
If you use row level security, setting up your access roles and groups can be easy or challenging - it all depends on your organization's requirements. Refer to the product's Administration Guide - Implementing Account Security for several case studies. These case studies provide examples of how different requirements can be implemented using these concepts.
An application service exists for every transaction in the system. Please refer to Application Security for a description of how application services are used when you grant user groups access rights transactions.
Maintenance of this information is rare. The system is supplied with an application service for every transaction in the system. You will only add application services if you introduce new transactions.
Important! If you introduce a new application service, carefully consider its naming convention. Refer to System Data Naming Convention for more information.
Application Service - Main
Select Admin Menu, Application Service to define an application service.
Description of Page
Enter a unique Application Service code and Description for the application service.
Indicate the application service’s various Access Modes (i.e., actions). Refer to Action Level Security for more information about the significance of these fields.
Where Used
Follow this link to view the tables that reference the Application Service table in the data dictionary schema viewer.
Where Used
Follow this link to open the data dictionary where you can view the tables that reference SC_APP_SERVICE.
Security types are used to define the types of field level security.
Programming is required. You cannot have field level security without introducing logic to user exits. Refer to Field Level Security for more information on how security types are used to define field level security.
Security Type - Main
Select Admin Menu, Security Type to define your security types.
Description of Page
Enter a unique Security Type and Description.
Use the Authorization Level grid to define the different authorization levels recognized for this security type. Enter an Authorization Level Number and its Description.
Programming is required. Note that the values that you enter are not interpreted by the system itself, but by the user exit code used to implement the special security. Check with the developer of the user exit logic for the correct values. Refer to Field Level Security for more information on how security types are used to define field level security.
Use the Application Services grid to define the application service(s) to which this security type is applicable. If this application service is already associated with user groups, you must update each user group to define their respective security level. This is performed using User Group – Application Service.
Where Used
Follow this link to open the data dictionary where you can view the tables that reference CI_SC_TYPE.
A user group is a group of users who have the same degree of security access. Think of a user group as a “role”; associated with a role are:
· The users who play this role
· The application services to which the role’s users have access (along with the actions they can execute for each service and their field level security authorization levels).
Contents
User Group - Application Services
User Group - Main
Select Admin Menu, User Group to view the application services to which a user has access.
Important! Please do not add, change or remove application services from the ALL_SERVICES user group. Refer to The BasePackage Controls One User, One User Group, And Many Application Services for an explanation.
Time saver. You can copy sample user groups from the demonstration database.
Description of Page
Enter a unique User Group code and Description for the user group.
Owner indicates if this user group is owned by the base package or by your implementation (Customer Modification). The system sets the owner to Customer Modification when you add a user group. This information is display-only.
The Application Services grid displays the various application services to which users in this group have access. Please note the following in respect of this grid:
· Use the Application Service search to restrict the application services displayed in the grid. For example, if you only want to see application services that start with the word “field”, you can enter this word and press enter.
· To add additional application services to this user group, navigate to the User Group – Application Services page and click the + icon.
· To remove or change this user group’s access to an application service, click the go to button adjacent to the respective application service. This will cause you to be transferred to the User Group – Application Services tab where you should click the – icon to remove the application service from the user group.
· Note, Owner indicates if this user group / application service relationship is owned by the base package or by your implementation (Customer Modification). The system sets the owner to Customer Modification when you add an application service to the user group. This information is display-only.
Where Used
Follow this link to open the data dictionary where you can view the tables that reference SC_USER_GROUP.
User Group - Application Services
Select Admin Menu, User Group and navigate to the Application Services tab to maintain a user group’s access rights to an application service.
Important! When you grant a user group access rights to an application service, you are actually granting all users in the user group access rights to the application service.
Description of Page
The Application Service scroll contains the application services to which the User Group has access.
Note. You can also use Main page to select the application service for which you wish to change the access privileges. To do this, simply click the go to button adjacent to the respective application service.
To add additional application services to this user group, click the + icon and specify the following:
· Enter the Application Service ID to which the group has access.
· Define the Expiration Date when the group’s access to the application service expires.
Define the Access Modes that users in this group have to the Application Service. When a new application service is added, the system will default all potential Access Modes associate with the Application Service. You need only remove those modes that are not relevant for the User Group. Refer to Action Level Security for more information about access modes.
Important! If an application service supports actions that modify the database other than Add, Change, and Delete; you must provide the user with Change access in addition to the other access rights. Consider a transaction that supports actions in addition to Add, Change, and Inquire (e.g., Freeze, Complete, Cancel). If you want to give a user access to any of these additional actions, you must also give the user access to the Inquire and Change actions.
If you require additional security options, often referred to as “field level” security, then you use Security Type Code and assign an Authorization Level to each. When a new application service is added, the system will display a message indicating how many security types are associated with this application service. Use the search to define each Security Type Code and indicate the appropriate Authorization Level for this user group. Refer to Field Level Security for more information about security types.
User Group - Users
Select Admin Menu, User Group and navigate to the Users tab to maintain the users in a user group.
Description of Page
The scroll area contains the users who are part of this user group.
Note. Keep in mind that when you add a User to a User Group, you are granting this user access to all of the application services defined on the Application Services tab.
The following fields are included for each user:
· Enter the User ID of the user.
· Use Expiration Date to define when the user’s membership in the group expires.
· Owner will be Customer Modification.
Note. You can also add a user to a user group using User - Main.
Refer to The Big Picture of Row Security for a description of how access groups are use to restrict access to specific objects.
Access groups control which groups of users (referred to as Data Access Roles) have rights to accounts (or other objects) associated with the access group. Select Admin Menu, Access Group to define your access groups.
Description of Page
Enter a unique Access Group code and Description for the data access group.
Use the Data Access Role collection to define the data access roles whose users have access to the access group’s accounts (or other objects). Keep in mind that when you add a Data Access Role to an Access Group, you are granting all users who belong to this role access to all of the accounts (or other objects) linked to the access groups. Refer to Access Groups, Data Access Roles and Users for more information.
Note. You can also use Data Access Role - Access Group to maintain a data access role’s access groups.
Where Used
Follow this link to open the data dictionary where you can view the tables that reference CI_ACC_GRP.
Refer to The Big Picture of Row Security for a description of how access groups are use to restrict access to specific objects.
The data access role transaction is used to define two things:
· The users who belong to the data access role.
· The access groups whose accounts (or other objects) may be accessed by these users.
Contents
Data Access Role - Access Group
Data Access Role - Main
Select Admin Menu, Data Access Role to define the users who belong to a data access role.
Description of Page
Enter a unique Data Access Role code and Description for the data access role.
The scroll area contains the Users who belong to this role. A user’s data access roles play a part in determining the accounts (or other objects) whose data they can access. Refer to Access Groups, Data Access Roles and Users for more information.
To add additional users to this data access role, press the + button and specify the following:
· Enter the User ID. Keep in mind that when you add a User to a Data Access Role, you are granting this user access to all of the accounts (or other objects) linked to the data access role’s access groups.
· Use Expiration Date to define when the user’s membership in this data access role expires.
Also maintained on the user page. You can also use User - Access Security tomaintain a user’s membership in data access roles.
Where Used
Follow this link to open the data dictionary where you can view the tables that reference CI_DAR.
Data Access Role - Access Group
Select Admin Menu, Data Access Role and navigate to the Access Groups tab to define the access groups whose accounts (or other objects) may be accessed by the users in this data access role.
Description of Page
Use the Access Group collection to define the access groups whose objects can be accessed by this role’s users. Keep in mind that when you add an Access Group to a Data Access Role, you are granting all users who belong to this role access to all of the accounts (or other objects) linked to the access groups. Refer to Access Groups, Data Access Roles and Users for more information.
Note. You can also use Access Group - Main to maintain an access group’s data access roles.
The user maintenance transaction is used to define a user’s user groups, data access roles, portal preferences, default values, and To Do roles. To access the user maintenance transaction, select Admin Menu, User.
The user maintenance transaction is the same transaction invoked when the user clicks on the preferences button; the only difference is that when the user transaction is invoked from the Administration menu, all input fields are updatable. When the transaction is invoked from the My Preferences Button, many fields are protected to prevent end-users from changing important profile information. Please see the User Preferences page for a description of this transaction.
Where Used
Follow this link to open the data dictionary where you can view the tables that reference SC_USER.