A Scenario – Deploying a Bare-Metal System
This scenario describes the steps required in Ops Center to deploy a bare-metal system in your data center. Deploying a bare-metal system in the data center involves the following steps in Ops Center:
-
Discovering the service processor
-
Configuring the service processor
-
Provisioning the OS
-
Updating the OS
Scenario Assumptions
Discovering the bare-metal server depends on the network information that is available for the service processor. You must use Custom Discovery, Declare Configured Assets or Declare Unconfigured Assets procedure accordingly to discover your bare-metal server.
The following are the assumptions in carrying out the bare-metal deployment:
-
The bare-metal is an unconfigured SPARC T3-1 server.
-
Use Declare Unconfigured Assets procedure to discover the bare-metal server.
-
The required Solaris 10 OS image is imported into Enterprise Manager Ops Center library for provisioning.
-
Configure Server Hardware and Install OS plan is used to configure the discovered service processor and provision the OS.
Plans and Profiles
The Configure Server Hardware and Install OS plan consists of the following steps:
-
Configure service processor
-
Configure RAID controller
-
Update firmware
-
Install and Update OS
For each step in the profile, you must select the appropriate profile or plan. If you do not want to apply any step, you can simply skip the step in the plan. This scenario requires the following steps of the plan:
-
Configure Service Processor
-
Install and Update OS
The list of profiles that are required to create the plan:
-
Configure Service Processor
-
Provision OS
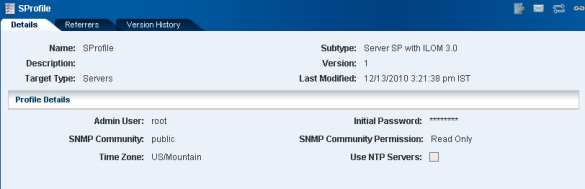
Service Processor Profile Parameters
Use the following information for creating a service processor profile:
-
Processor Subtype – Server SP with ILOM 3.0. The server is a SPARC T3-1 which has ILOM configuration.
-
Provide a new password.
-
If you want to use DNS, provide the IP addresses of three DNS servers, 6 domains names, number of retries, and timeout in seconds.
See Configuring a Service Processor to create a profile.
A sample format of the service processor profile is provided in this illustration.
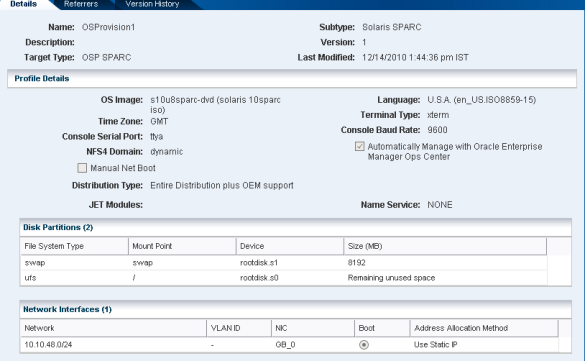
OS Provisioning Profile Parameters
Use the following information for creating an OS provisioning profile:
-
OS image – Oracle Solaris 10 image
-
OS distribution type – Entire Distribution plus OEM Support
-
Language – U.S.A(en_US.ISO8859-15)
-
Time Zone – US/Pacific
-
Terminal Type – xterm
-
Console Serial Port – ttya
-
Console Baud Rate – 9600
-
JET Modules – None
-
Name Service – None
-
Automatically Manage with Oracle Enterprise manager Ops Center – Select this option to install the agent. Ensure that the distribution selected is not lower than End user distribution.
-
Disk partitions – Provide the disk space for swap and root file system.
-
Network – Select the network and the NIC.
See OS Provisioning Profiles to create an OS provisioning profile.
A sample format of the OS provisioning profile is provided in this illustration.
To Create a Configure Server Hardware and Install OS Plan
To Create a Configure Server Hardware and Install OS Plan
-
Select Plan Management section from the Navigation pane.
-
Select Configure Server Hardware and Install OS plan from the Deployments Plan tree.
-
Select Create Plan from Template from the Actions pane. The Create a Deployment Plan window displays.
-
Provide a name and description for the plan. For example, the name of the plan can be "sposplan".
-
Select a failure policy for the job that runs the plan.
-
In the Deployment Plan Steps, select the associated profiles or plans for the following steps:
-
Select the profile from the list for Configure Service Processor.
-
Select the plan for Install and Update OS. Select Do not include this step for all other steps.
-
-
Click Save to create the deployment plan.
The configure server hardware and install OS plan will be created and listed under the deployment tree.
A sample plan is illustrated in this figure.

To Apply the Configure Server Hardware and Install OS Plan
-
Select Plan Management section from the Navigation pane.
-
Select Configure Server Hardware and Install OS plan from the Deployment Plan tree.
-
Select the plan "sposplan" from the list. The plan details are displayed in the center pane.
-
Select Apply Deployment Plan from the Actions pane. The Select Target Assets window displays.
-
Select the server from the available list of items.
-
Click Add to Target list to add the selected server to the target list.
-
Select how you want to apply the plan:
-
Apply with minimal interaction - This is to accept the already set profile values and enter only the required resources at the time of application.
-
Allow me to override any profile values - This is to modify any set profile values.
-
-
Click Next to display the Configure Server Hardware and Install OS wizard.
You must provide the IP address during network resource assignment, complete the wizard and apply the plan.