7 Installing and Configuring Oracle Traffic Director for an Exalogic Enterprise Deployment
This chapter describes how to install and configure Oracle Traffic Director for an Exalogic enterprise deployment.
This chapter contains the following sections:
-
Overview of Installing and Configuring Oracle Traffic Director for an Exalogic Enterprise Deployment
-
Creating and Starting the Traffic Director Administration Server
-
Defining Oracle Traffic Director Virtual Servers for an Exalogic Enterprise Deployment
-
Deploying the Configuration and Testing the Virtual Server Addresses
7.1 Overview of Installing and Configuring Oracle Traffic Director for an Exalogic Enterprise Deployment
Oracle Traffic Director is a software load balancer for load balancing HTTP/S and TCP traffic to servers in the back-end. These back-end servers, which are referred to as origin servers within Oracle Traffic Director, can be application servers, web servers, or LDAP servers.
Table 7-1 describes the steps for installing and configuring Oracle Traffic Director for an Exalogic enterprise deployment.
Table 7-1 Overview of Installing and Configuring Oracle Traffic Director for an Exalogic Enterprise Deployment
| Task | Description | More Information |
|---|---|---|
|
Review Oracle Traffic Director prerequisites. |
For example, be sure that you have set up the required virtual IP addresses, that the user account has root permission on the storage appliance, and that you have already created the initial Oracle WebLogic Server domain for the Oracle SOA topology. |
"Prerequisites" in the Oracle Traffic Director Installation Guide |
|
Install the Oracle Traffic Director software on WEBHOST1 and WEBHOST2. |
You install the software using the directories and mount points you created in Section 4.5, "Configuring Exalogic Storage for Oracle SOA." |
Section 7.2, "Installing Oracle Traffic Director on WEBHOST1 and WEBHOST2" |
|
Create and start an Oracle Traffic Director Administration Server. |
The Oracle Traffic Director administration server hosts the administration console and command-line interface, through which you can create Oracle Traffic Director configurations, deploy them as instances on administration nodes, and manage the instances. |
Section 7.3, "Creating and Starting the Traffic Director Administration Server" |
|
Verify the installation. |
Be sure that the installation was successful before you continue configuring the environment. |
"Verifying the Installation" in the Oracle Traffic Director Installation Guide |
|
Register WEBHOST2 as administration node. |
This ensures that Oracle Traffic Director is up and running on both WEBHOST1 and WEBHOST2. |
|
|
Create a configuration |
The configuration should route requests from the Oracle Traffic Director instances to the managed servers in the Oracle WebLogic Server domain you created in Chapter 8, "Creating a Domain for an Exalogic Enterprise Deployment." The configuration should also define the required origin-server pools to which requests should be routed. |
|
|
Start the Oracle Traffic Director instances |
Start the instances on WEBHOST1 and WEBHOST2, based on the configuration you created earlier in this procedure. |
Section 7.6, "Starting the Oracle Traffic Director Instances" |
|
Define the virtual servers. |
Define the virtual servers required for accessing the various management tools and login screens for the topology. |
|
|
Deploy and test the configuration. |
Deploy the configuration and test the virtual server URLs to be sure you have configured the Oracle Traffic Director instances successfully. |
Section 7.8, "Deploying the Configuration and Testing the Virtual Server Addresses" |
|
Create an active-passive failover group. |
Create a failover group to ensure that requests will continue to be served if WEBHOST1 or WEBHOST2 become unavailable. |
7.2 Installing Oracle Traffic Director on WEBHOST1 and WEBHOST2
This section describes how to install Oracle Traffic Director software.
Note:
Be sure that you are not logged in as root user before installing or performing any action on Oracle Traffic Director.
Note:
Be sure to verify you have obtained all required patches. For more information, see Section 2.5.3, "Applying Patches and Workarounds."
To install Oracle Traffic Director:
-
Extract the contents of the installer zip file to a directory on WEBHOST1.
-
Change directory to the
Disk1subdirectory in the directory in which you unzipped the installer. -
Run the following command:
./runInstaller
-
Follow the instructions on the screen to install the software.
When the Specify Installation Location screen appears, enter the value of the WEB_ORACLE_HOME variable in the Oracle Home Directory field.
The recommended directory location for the WEB_ORACLE_HOME is listed in Table 4-3.
If you need help with any of the other options on the installer screens, click Help, or refer to "Installing Oracle Traffic Director in Graphical Mode" in the Oracle Traffic Director Installation Guide.
Note:
You can ignore the errors derived from missing i386 libraries.
-
Repeat steps 1 through 5 on WEBHOST2.
7.3 Creating and Starting the Traffic Director Administration Server
After you install Oracle Traffic Director on WEBHOST1 and WEBHOST2, you can then create an Oracle Traffic Director administration server.
For more information, see "Managing the Administration Server" in the Oracle Traffic Director Administrator's Guide
To create the Oracle Traffic Director administration server on WEBHOST1 run the tadm command from the WEB_ORACLE_HOME/bin directory, as follows:
-
On WEBHOST1 enter the following command:
WEB_ORACLE_HOME/bin/tadm configure-server --host=otdadminvhn --port=8989 --user=admin
 --instance-home=WEB_ORACLE_ADMININSTANCE

WEB_ORACLE_ADMININSTANCE
Where:
-
WEB_ORACLE_HOME the Oracle Home location you entered in the Oracle Traffic Director installer.
-
WEB_ORACLE_INSTANCE is the recommended value listed in Table 4-3.
-
otdadminvhnis the virtual hostname to be sued for the Oracle Traffic Director administration server and console.
For example:
WEB_ORACLE_HOME/web/bin/tadm configure-server --port=8989 --user=otd_admin --instance-home=/u01/private/oracle/config/adminHA --host=scan0309-1.mycompany.com -
-
Enter the administrator password.
You will later use this password to log in to the Oracle Traffic Director administration console.
A prompt to re-enter the administrator password is displayed, as follows:
Please enter admin-user-password again>
-
Confirm the administrator password by entering it again.
An Administration Server instance of Oracle Traffic Director is created and deployed on the local host in a directory named
admin-serverwithin theWEB_ORACLE_INSTANCEdirectory that you specified in step 1. -
Start the Administration Server by running the following command on WEBHOST1:
WEB_ORACLE_ADMININSTANCE/admin-server/bin/startserv -
Login to the Administration Server using the following URL:
https://OTDADMINVHN:8989
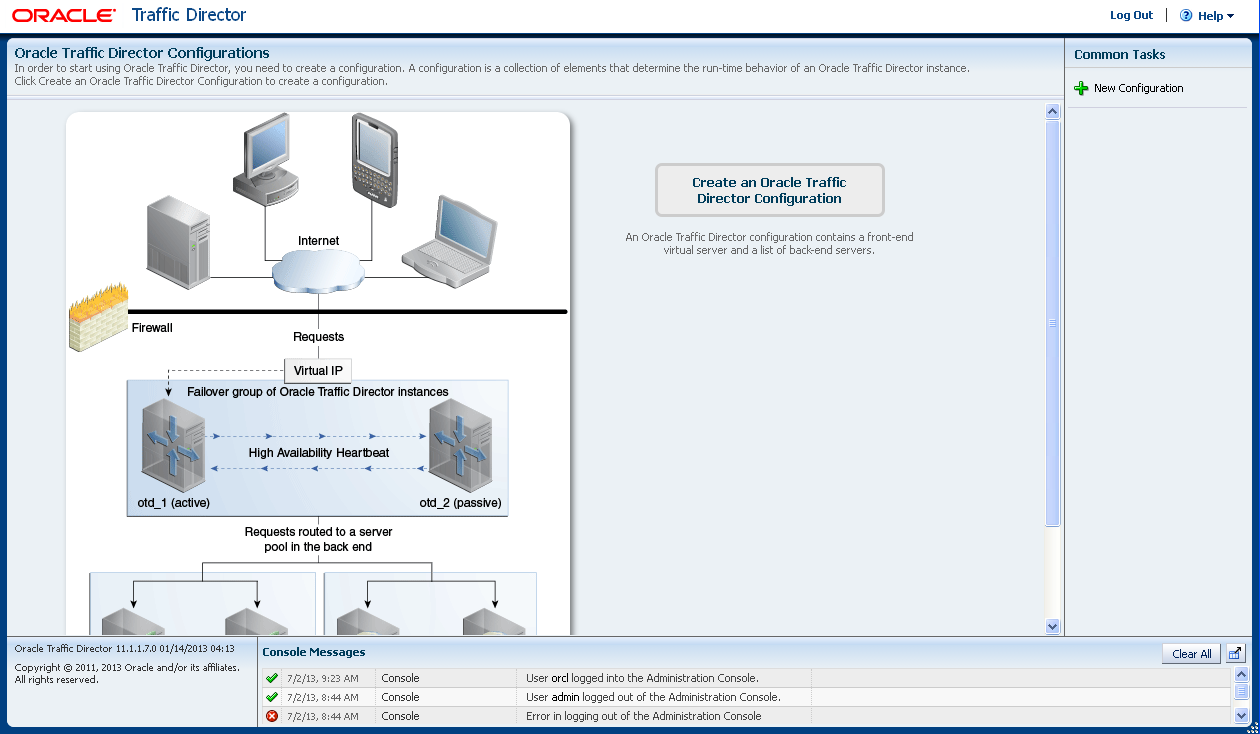
Use the password provided above and verify that you can see the Oracle Traffic Director main page:
Figure 7-1 Oracle Traffic Director Main Page

Description of "Figure 7-1 Oracle Traffic Director Main Page"
7.4 Register WEBHOST2 as an Administration Node
This section assumes you have installed Oracle Traffic Director, started the Administration Server, and verified the installation.
Two Administration Nodes are created using IPoIB addresses in WEBHOST1 and WEBHOST2 (WEBHOST1-PRIV and WEBHOST2-PRIV). See Table 4-3 for the appropriate IP reference.
You can now register both WEBHOST2 with the Oracle Traffic Director administration server using the tadm command from the following directory:
WEB_ORACLE_HOME/bin
Note:
WEBHOST1 is registered when you create the administration server.
To register WEBHOST2 with the Oracle Traffic Director administration Server:
-
On the WEBHOST2, run the
configure-servercommand to register the host with the remote Administration Server as an administration node../tadm configure-server --user=admin --port=8989 --host=OTDADMINVHN --admin-node --node-host=WEBHOST2-PRIV --node-port=8900 --instance-home=WEB_ORACLE_INSTANCEWhere:
-
WEB_ORACLE_HOME is the path to the Oracle Traffic Director Oracle home on WEBHOST2.
-
WEB_ORACLE_INSTANCE is the recommended directory path listed in Table 4-3, "Private Storage Directories".
For more information, see "configure-server" in the Oracle Traffic Director Command-Line Reference or use the
configure-server --helpcommand to see an explanation of the command line options.The following prompt appears after you run
configure-servercommand:This command creates an Administration Node and register it with the following remote Administration Server: https://OTDADMINVHN.mycompany.com Enter admin-user password>
-
-
Enter the admin-user password for the Oracle Traffic Director Administration Server.
The
configure-servercommand attempts to connect to the remote administration server by using the specified administration server host, port, user, and password. The Administration Server on WEBHOST1 must be up and running.If this is the first time that the host on which you are creating the administration node is attempting to connect to the administration server, the server certificate of the administration server is displayed.
-
Enter
yto trust the certificate.The following message is displayed:
OTD-70215 The administration node has been configured successfully.
The node can be started by executing:
WEB_ORACLE_INSTANCE/admin-server/bin/startserv
After you start the administration node, you can create instances of Oracle Traffic Director configurations on the administration node. Note that on each administration node, you can create only one instance of a configuration.
7.5 Creating a Configuration
The next step in installing and configuring Oracle Traffic Director for an Exalogic enterprise deployment is to create a configuration that will route requests to a server pool that consists of the managed servers in your Oracle WebLogic Server domain.
When creating a new configuration, you are required to provide the host and port information for the origin server, which in turn automatically creates (and names) an origin-server pool called origin-server-pool-1. This is the default origin-server pool and this pool can be found when you click the Server Pools option in the administration console. You cannot rename the default origin-server pool.
To create a configuration named SOAEXA by using the administration console:
-
Log in to the administration console using the following URL:
https://OTDADMINVHN:8989
-
In the Common Tasks pane, click New Configuration.
The New Configuration wizard starts.
-
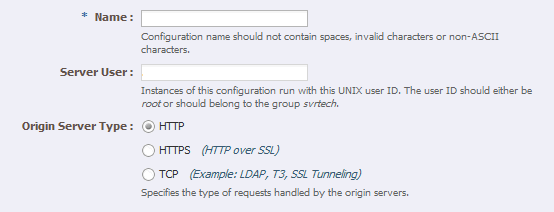
In the Step 1 Configuration Information screen, enter the following information:
-
Name: SOAEXA
-
Server User: oracle
-
Origin Server Type: Make sure HTTP is selected.
-
-
In the Step 2 Listener Information screen, change the port to 7777. Accept the other default values and click Next.
-
In the Step 3 Server Pool Information screen:
-
In the Origin Servers: Host: field, enter
SOAHOST1-PRIV-V1, the port8001, and click Add Server. -
Enter
SOAHOST2-PRIV-V1and the required port, click Add Server and click Next.
-
-
In the Step 4 Deployment Information screen, select WEBHOST2-PRIV node and the Administration Server Node for deployment.
The Review screen appears.
-
Review the information and click Create Configuration.
The Results screen appears.
After the configuration is created, the Results screen of the New Configuration wizard displays a message confirming successful creation of the configuration. If you chose to create instances of the configuration, then a message confirming successful creation of the instances is also displayed.
-
Click Close on the Results screen.
In the New Configuration wizard, if you chose not to create an instance of the configuration, the message Undeployed Configuration is displayed, indicating that the configuration that you just created is yet to be deployed.
7.6 Starting the Oracle Traffic Director Instances
You can start or restart Oracle Traffic Director instances using the OTD Administration Console
To start Oracle Traffic Director instances:
-
Log in to the administration console using the following URL:
https://OTDADMINVHN:8989
-
Click the Configurations button that is situated at the upper left corner of the page.
A list of the available configurations is displayed.
-
Select the configuration for which you want to start the instance.
-
In the navigation pane, select Instances.
-
Click the Start/Restart button for the instance that you want to start.
Note:
To start or restart all instances of the selected configuration, click Start/Restart Instances in the Common Tasks pane. To stop all instances of the configuration, click Stop Instances.
7.7 Defining Oracle Traffic Director Virtual Servers for an Exalogic Enterprise Deployment
To create and configure virtual servers using the administration console, you first create the pools used by them and then use the administration console to create the virtual servers and assign these pools in the creation process. You must also update the appropriate host patterns served by each virtual server. Assign the required routes for these virtual servers in each pertaining chapter in the book.
For more information, see "Creating a Virtual Server" in the Oracle Traffic Director Administrator's Guide. By default, when the SOAEXA configuration was created, a new virtual server for the external soa.mycompany.com access was created (named soaexa). In this section the following additional virtual servers are created for the Oracle SOA configuration:
-
admin.mycompany.com
-
soainternal.mycompany.com
-
osb.mycompany.com
-
osbinternal.mycompany.com
This section contains the following topics:
7.7.1 Creating an Origin-Server Pool
To create and configure virtual servers using the administration console complete the following steps:
Create the following origin-server pools using the administration console:
-
admin-pool
-
soa-pool
-
osb-pool
Note:
A pool for the soa.mycompany.com virtual servers named origin-server-pool1 is created when the configuration is created.
To create an origin-server pool by using the administration console, do the following:
-
Log in to the administration console using the following URL:
https://OTDADMINVHN:8989
-
Click the Configurations button that is situated at the upper left corner of the page.
A list of the available configurations is displayed.
-
Select the SOAEXA configuration for which you want to create a virtual server.
-
In the Common Tasks pane, click New Server Pool.
The New Origin-Server Pool wizard starts.
-
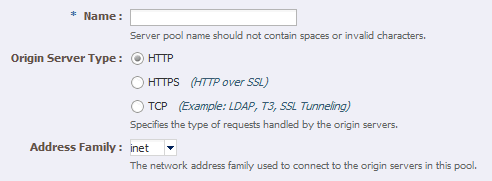
In the Step 1: Server Pool Information screen, create the following Origin Server Pools using the information in Table 7-2 and clicking add.
Table 7-2 Origin-Server Pools and Origin Servers
Origin-Server Pool Origin Server Type Origin Servers admin-pool
HTTP
ADMINVHN.mycompany.com:7001
osb-pool
HTTP
SOAHOST1-PRIV-V2.mycompany.com:8011
SOAHOST2-PRIV-V2.mycompany.com:8011
After the origin-server pool is created, the Results screen of the New Origin-Server Pool wizard displays a message confirming successful creation of the origin-server pool.
-
Click Close on the Results screen.
-
The details of the origin-server pool that you just created are displayed on the Origin-Server Pools page.
-
In addition, the Deployment Pending message is displayed at the top of the main pane. You can either deploy the updated configuration immediately by clicking Deploy Changes, or you can do so later after making further changes as described in Section 7.8, "Deploying the Configuration and Testing the Virtual Server Addresses."
-
7.7.2 Creating the Additional Virtual Servers
Create the following additional virtual servers:
-
admin.mycompany.com
-
soainternal.mycompany.com
-
osb.mycompany.com
-
osbinternal.mycompany.com
Note:
A virtual server soaexa for soa.mycompany.com was implicitly created when the configuration was created (origin.server-pool1).
To create a virtual server using the administration console:
-
Log in to the administration console using the following URL:
https://OTDADMINVHN:8989
-
Click the Configurations button that is situated at the upper left corner of the page.
A list of the available configurations is displayed.
-
Select the configuration for which you want to create a virtual server.
-
In the Common Tasks pane, click New Virtual Server.
The New Virtual Server wizard starts.
-
Create three virtual servers and enter the information in Table 7-3.
-
Select the default (7777) listener.
After the virtual server is created, the Results screen of the New Virtual Server wizard displays a message confirming successful creation of the virtual server.
-
Click Close on the Results screen.
-
The details of the virtual server that you just created are displayed on the Virtual Servers page.
-
In addition, the Deployment Pending message is displayed at the top of the main pane. You can either deploy the updated configuration immediately by clicking Deploy Changes, or you can do so later after making further changes, as described in Section 7.8, "Deploying the Configuration and Testing the Virtual Server Addresses."
-
7.7.3 Updating the Host Pattern Served by the SOAEXA Virtual Server
Once the virtual servers are created, the host patterns served by each virtual server are used for appropriate request routing. Update the HOSTS field for the soa.mycompany.com virtual server, clicking on the virtual server name and updating the HOSTS value to soa.mycompany.com. Verify the values in Table 7-4for the different virtual servers.
Table 7-4 Virtual Server and Host Names
| Name | Host |
|---|---|
|
SOAEXA |
soa.mycompany.com |
|
admin.mycompany.com |
admin.mycompany.com |
|
soainternal.mycompany.com |
WEBHOST1-PRIV-V1 |
|
osbinternal.mycompany.com |
WEBHOST2-PRIV-V1 |
Routes for the virtual servers will be created in each of the domain creation and extension chapters.
7.8 Deploying the Configuration and Testing the Virtual Server Addresses
Deploy the configuration to create an instance of it on an administration node. When you deploy a configuration, the running instances are reconfigured to reflect the configuration changes.
To deploy a configuration using the administration console:
-
Log in to the administration console using the following URL:
https://OTDADMINVHN:8989
-
Click the Configurations button at the upper left corner of the page.
A list of the available configurations is displayed.
-
Select the SOAEXA configuration.
-
Click Deploy.
A message is displayed confirming that the updated configuration was successfully deployed.
-
Click Close.
Verify the deployment by accessing the following URL:
https://OTDADMINVHN.mycompany.com:8989
7.9 Creating a Failover Group for Virtual Hosts
When a request is sent to one of the virtual hosts admin.mycompany.com, osb.mycompany.com, and soa.mycompany.com, the front end load balancer redirects the request to the IP addresses it has been configured to load balance requests to. This IP address is enabled on one of the OTD instances but it can be "migrated" to another OTD instance should a failure occur. You can ensure high availability of Oracle Traffic Director instances by combining two Oracle Traffic Director instances in a failover group represented by one or two virtual IP (VIP) addresses.
You do this by creating an active-passive failover group for the IP address. This failover group lists a primary and a number of secondary instances.
The steps below show you how to create failover groups for the IP addresses associated with the different virtual servers in the configuration.
This SOA enterprise deployment on Exalogic uses four failover groups. One failover group is created for the listen address that is used for load balancing internal/IPoIB requests of the SOA servers. Another failover groups is created for the listen address that is used for load balancing internal/IPoIB requests of the OSB servers. Another two failover groups are created for the EoIB (externally accessible) addresses used by the OTD listeners in each node.
For more information about creating failover groups or other high availability configurations for Oracle traffic Director, see "Configuring Oracle Traffic Director for High Availability" in the Oracle Traffic Director Administrator's Guide.
To create a failover group:
-
Log in to the administration console using the following URL:
https://OTDADMINVHN:8989
-
Click the Configurations button at the upper left corner of the page.
A list of the available configurations appears.
-
Select the configuration for which you want to create a failover group.
-
In the navigation pane, select Failover Groups.
The Failover Groups page is displayed.
-
Click New Failover Group.
The New Failover Group wizard is displayed.
-
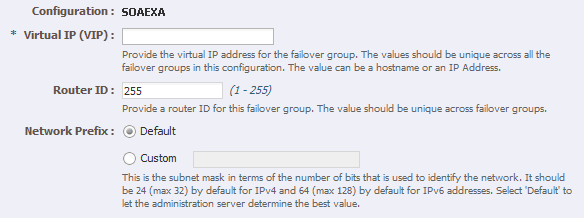
In the Virtual IP (VIP) field, enter the virtual IP address associated with soainternal.mycompany.com (WEBHOST1-PRIV-V1). Check Custom, and provide the number of bits to identify the subnet where the IP lives, and click Next.
Note:
The virtual IP addresses should belong to the same subnet as that of the main NIC that is provided in step 7.
-
In the Step 2: Failover Nodes Information screen, select the Primary and Backup nodes, (OTD Administration Server, WEBHOST2-PRIV-V1), select also the NIC for the virtual IP (typically bond0) and click Next.
The details of the failover group that you just created are displayed on the Failover Groups page.
-
Click Close on the Results screen.
The details of the failover group that you just created are displayed on the Failover Groups page. Repeat the steps to create the appropriate failover groups for the required hostnames according to the values in Table 7-5.
The router ID for each failover group is unique.
Table 7-5 Failover Groups Node and Network Interface Information
Failover Group Primary Node Primary Network Interface Backup Node Backup Network Interface WEBHOST1-PRIV-V1
OTD Administration Server
BOND0
WEBHOST2-PRIV
BOND0
WEBHOST2-PRIV-V1
WEBHOST2-PRIV
BOND0
OTD Administration Server
BOND0
WEBHOST1-VHN1
OTD Administration Server
BOND1
WEBHOST2-VHN1
BOND1
WEBHOST2-VHN1
WEBHOST2-PRIV
BOND1
OTD Administration Server
BOND1
Note:
The failover groups for the external virtual IP addresses are optional since the load balancer fails over requests between the two Oracle Traffic Director instances, but they will provide faster failure detection and failover than the typical load balancer monitors
Note:
A message may be displayed indicating that the failover group could not be started in the involved nodes due to insufficient privileges. To overcome this log to each node as root and run the following command:
WEB_ORACLE_HOME/bin/tadm start-failover --instance-home=WEB_INSTANCE_HOME/ --config=SOAEXA
7.10 Backing the Web Tier
Back up the Oracle Traffic director configuration. For more information, see Section 14.8, "Backing Up the Oracle SOA Enterprise Deployment."


