Release 12.1
Part Number E16345-03
Contents
Previous
Next
| Oracle iSupplier Portal Implementation Guide Release 12.1 Part Number E16345-03 | Contents | Previous | Next |
This chapter covers the following topics:
Prospective Vendor Registration and Supplier Profile Management ease the administrative burden faced by trading partners conducting business.
New suppliers can register with the buying organization to indicate their interest in establishing a business relationship. Suppliers are also able to access and update a profile of key company details online. This information is used by buyers to directly modify supply base information in their purchasing and payables system. Modifying supply base information results in a significant reduction in the volume of forms and direct contact between the two organizations.
Prospective Vendor Registration
The Prospective Vendor Registration feature allows buyer organizations to accept unsolicited registration requests through their own Web page from suppliers with whom the company has not previously conducted business. This self-service registration process provides prospective suppliers with a Web page where suppliers can complete a simple registration form and then submit it for approval by administrators at the buying company. After a buyer administrator approves the supplier's registration request and information on the supplier is added to the buying company's purchasing and payables system, supplier user accounts for that supplier can be created and the supplier users can begin accessing and using the applications.
| Buyer Actions | Supplier Actions | Comments |
|---|---|---|
| N/A | 1. Supplier user clicks registration link on buyer's web site. | N/A |
| N/A | 2. Supplier fills out and submits registration page. | E-mail notification is sent to administrator requesting registration approval. |
| 3. Buyer Administrator approves or rejects the supplier registration request. | N/A | E-mail notification is sent to supplier user who submitted the supplier registration request with request status. |
| 4. If approved, prospective supplier is created, and a user account is set up for user who registered the company. | N/A | User is assigned external user default responsibility. |
Supplier Profiles
After a supplier company's registration request is approved by a buyer administrator, a company profile is created for that supplier. Supplier profiles contain company information such as tax IDs, Dun and Broadcaster numbers, supplier addresses and contact names, descriptions of goods and services provided by the supplier, classification details such as ownership status (for example, minority-owned) and bank account details. Suppliers maintain the information and update it as needed. Suppliers have the responsibility for ensuring the information about their company is current and correct.
Buyer administrators can access and, if necessary, maintain the information contained in a supplier's company profile. As appropriate, buyer administrators use this information to update the purchasing and payables system with any new details that a supplier provides. For example, a supplier may add new addresses or contact information. Buyer administrators can view this new information and use it to update any corresponding site or site contact information in the purchasing and payables system that is no longer current. Through the use of Supplier Management Groups, you can divide the responsibility for maintaining supplier information among several buyer administrators. See Implementing Supplier Profile Management (Optional) later in this chapter for more details on Supplier Management Groups.
New suppliers typically create their own profiles after they are registered. However, if you are implementing supplier profile management, and you have suppliers that already exist in your purchasing and payables system, you can use their existing details to create their profile rather than have the supplier re-enter all the information.
| Buyer Actions | Supplier Actions | Comments |
|---|---|---|
| N/A | 1. Supplier accesses self-service registration website, completes and submits registration form. | Notification of registration request is sent to buyer administrator(s). Registration request also appears as "Pending Approval" on the Pending Supplier Registration pages. |
| 2. Buyer administrator views registration request and approves or rejects the request. | N/A | If approved, a supplier record and user account is created for the requester from the supplier. The requestor is then assigned the default responsibility for newly registered user. Notification is sent to supplier with request status. |
| 3. Buyer administrator assigns new user Supplier Profile Manager responsibility | N/A | N/A |
| N/A | 4. Supplier user can begin creating supplier profile. | Supplier specifies company summary information, defines an address book and a contact directory, adds bank account details, and declares any appropriate business classifications or certifications (for example, minority-owned status). The supplier also identifies the goods and services the company can provide. |
| Buyer Actions | Supplier Action | Comments |
|---|---|---|
| 1. Buyer administrator accesses the information for the existing supplier. | N/A | Supplier information must already exist in the purchasing and payables system. A supplier profile should be created by buyer administrators before any suppliers are granted the Supplier Profile Manager responsibility (Step 4). |
| 2. Buyer administrator uses existing supplier site information to create entries in the supplier's Address Book. | N/A | Supplier site information from purchasing and payables system is used to create address name and address detail entries in the Address Book. |
| 3. Buyer administrator uses existing site contact information to create entries in the supplier Contact Directory. | N/A | Information is obtained from supplier contacts defined in purchasing and payables system. Contacts can be associated with additional addresses if needed. |
| 4. Buyer administrator (that has been granted Supplier User Administrator responsibility) uses bank account site assignment information to create bank account address assignments. | Approved bank accounts automatically appear in the bank accounts window. A concurrent program must be run to migrate the account site assignments details. | |
| 5. Buyer administrator grants authorized supplier users the Supplier Profile Manager responsibility. | ||
| 7. Supplier users update company profile information when needed. | ||
| 8. Buyer administrator(s) view updated information and decide whether to update the information in their purchasing and payables system. | Any new address information provided by a supplier is used to update supplier site records in the purchasing and payables system. New contact information is used to update supplier contact records. |
Supplier Management Groups
Supplier Management Groups allow you to combine one or more operating units into a single management group for the purpose of administering supplier accounts. Multiple buyer administrators can be assigned to each Supplier Management Group, enabling the supplier administration workload to be balanced among several different buyer administrators, with each administrator being responsible for maintaining only a subset of the buying organization's operating unit information.
Companies frequently segregate their business operations to ensure effective management. These segregations are done by geography or line of business, or be established for administrative or legal reasons. For example, a manufacturer might have several production departments, only one of which deals with distributors in Europe. Or, a financial services company might have a separate division for each type of consulting service that it offers. These operational organizations are called operating units. While business may be divided into multiple operating units, the management and administration of the supply base may be organized into groups of operating units.
Operating units are typically distinguished from one another by, among other things, the supplier sites and the supplier contacts with which the buying personnel for that operating unit interact.
Suppliers can add or update their company information (for example, they open a new office and therefore add a new address). When suppliers do this, buyer administrators decide whether to use the new information to update the existing purchasing and payables system information for the operating units they administer. This way, buyer administrators can use supplier information to keep their operating unit information up to date. Buyer administrators can view all supplier information, but they can only update operating units that belong to their supplier management group.
When creating supplier management groups, you select which operating units comprise the group, so the make up of the different supplier management groups should be carefully planned. It is possible that more than one team of administrators could be maintaining the supplier details for the same operating unit, and therefore this operating unit could potentially be included in more than one supplier management group. However, use of such overlapping supplier management groups are not recommended.
The following example shows a typical buying organization divided into a number operating units. Different operating unit deal with particular parts the pan-European supplier Industrial Hydraulics, Ltd. Thus, two supplier management groups have been defined so that the relevant details about Industrial Hydraulics can be updated into the appropriate operating units. One contains the headquarters site and the other contains both the London, Frankfurt, and Paris sites.
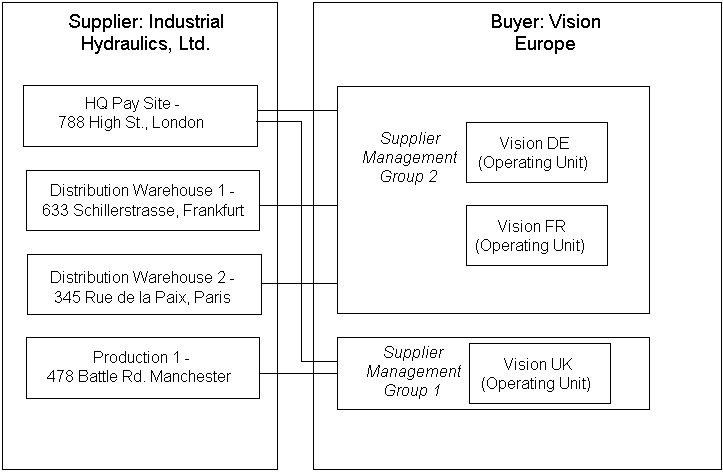
This section provides the following topics:
Implementing Supplier Management Groups
Implementing Prospective Vendor Registration (Optional)
Implementing Supplier Profile Management (Optional)
Supplier management groups are defined in terms of a buying organization's operating units. Each supplier management group is maintained by one or more buyer administrators. Supplier management groups allow buyer administrators to use supplier profile information for mass updates to all the operating units that they administer. Using supplier management groups allows you to control which operating units a particular buyer administrator can maintain.
To implement supplier management groups:
Plan Your Supplier Management Groups.
Create Your Supplier Management Groups.
Create and Assign Customized Responsibilities for Buyer Approvers.
Assign Customized Responsibilities to Users.
The purpose of supplier management groups is to allow buyer administrators to view supplier information and, where appropriate, use that information to update the operating units they administer.
Each supplier management group consists of one or more operating units. How you allocate your company's operating units among your supplier management groups is a design decision that you would base on the business practices that your company uses to maintain its supply base.
For example, company A has a centralized control center for all its suppliers and has a single supplier management group that contains all operating units for the company. Company B, however, distributes control over suppliers regionally and so has multiple supplier management groups, each containing only the operating units appropriate for that region.
In some cases, the same operating unit may be contained in multiple supplier management groups. This is not recommended, however, since it can lead to confusion between the overlapping groups. The confusion being whether an update to a supplier's profile has been applied to each of the supplier management groups' operating units within the purchasing and payables system.
Before defining your supplier management groups you should:
Identify all the operating units that are within your enterprise and decide which ones will participate in a supplier management group.
Determine how to divide up your operating units and compile lists of units for each group.
Determine a unique name for each management group that you create.
Determine the unique name for each customized responsibility that you create to access each supplier management group.
Identify the buyer administrators for each supplier management group.
Use the information that you gather to implement your supplier management groups as detailed in the instructions in the subsequent steps.
Supplier management groups are collections of operating units that are grouped together to provide easy administration of supplier information. Each Supplier Management Group is defined using the HR Security Profile.
To create Supplier Management Groups defined by Operating Unit:
Access the Super HRMS Manager responsibility.
Select Security and then Global Profile.
Global Profile Page
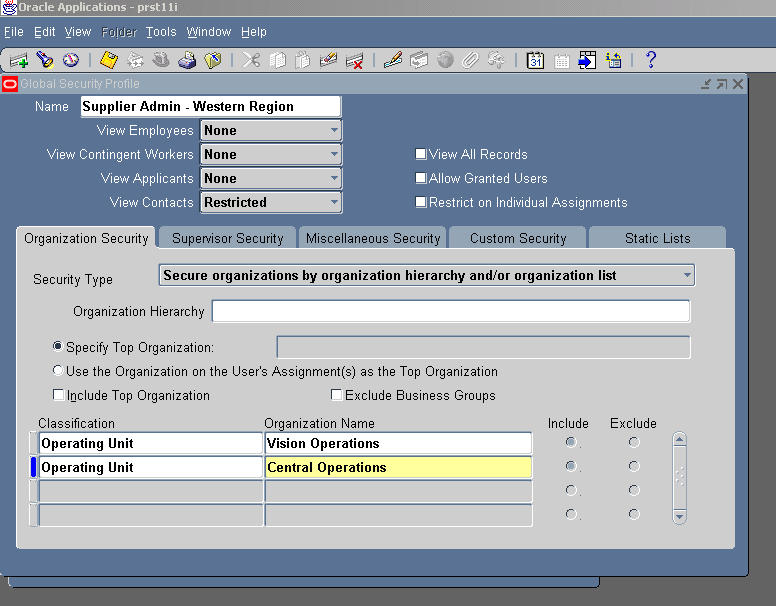
On the Global Security Profile form, enter a name. This is the unique name for your supplier management group that you identified during your planning phase.
Verify the Employee, View Contingent Workers, and View Applicants fields are set to None, and the View Contacts field is set to Restricted.
On the Organization Security tab, select Secure organizations by organization hierarchy and/or organization list as Security Type.
Use the multi-row table to specify all the operating units that comprise this supplier management group. These can be from multiple business groups.
Enter Operating Unit as the Classification.
Select the operating unit from the Organizations menu.
Continue until you have defined all the operating units for this group.
Save your work.
After all of the required security profiles are defined, run the Security List Maintenance concurrent program with the appropriate Request Parameters. Where there are no other security profiles in the system, the Generate Lists parameter should be set to All Global Profiles.
If your supplier profile management assignments mirror your business group structure, you can create security profiles associated with business groups and then assign the security profile to the appropriate responsibility.
Access the Human Resources responsibility.
Select Security, then Define Security Profile, then Security Profile
Select a business group and continue creating your security profile.
Save your work.
After all of the required security profiles are defined, run the Security List Maintenance concurrent program with the appropriate Request Parameters. Where there are no other security profiles in the system, the Generate Lists parameter should be set to All Global Profiles.
See the Implementing Oracle HRMS manual for information on security profiles.
Within each supplier management group, only those operating units that have financials, payables, purchasing, and receivables setup are utilized. The system ignores any operating units in the group that do not have these options setup, and will not promote any of the supplier's profile details to these operating units.
There can only be a single supplier management group associated with a specific responsibility. Thus, if you need to assign multiple administrators the same responsibility so that they can manage different groups of operating units, you must create a customized responsibility for each separate supplier management group.
Use the Supplier Profile Administration responsibility as the model for each of these customized responsibilities. After you have created your responsibilities, you assign them to the appropriate buyers. These buyers can then approve registration requests as well as maintain supplier profiles.
You can assign the same supplier management group to multiple responsibilities.
To create a customized responsibility:
Access the System Administrator responsibility.
Select Security, then Responsibility, then Define.
On the Responsibilities form:
Enter a name for your new responsibility (for example, Supplier Profile Administrator - Western Region).
Enter a unique ID for your new responsibility.
Enter Oracle Internet Supplier Portal as the Application.
Enter Standard as the Data Group.
Enter Oracle Internet Supplier Portal as the Data Group application.
Enter Supplier Management as the Menu value.
In the Available From section, ensure Oracle SSWA is selected.
When you finish entering your responsibility definition, your form should look similar to Figure 4-2.
Responsibility Definition Form
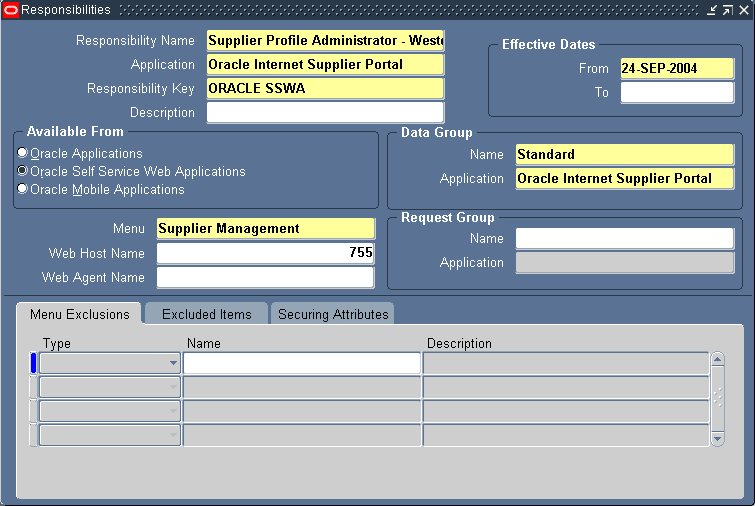
Save your work.
Return to the Responsibility navigator.
Select Profile, then System.
Find System Profile Values Page
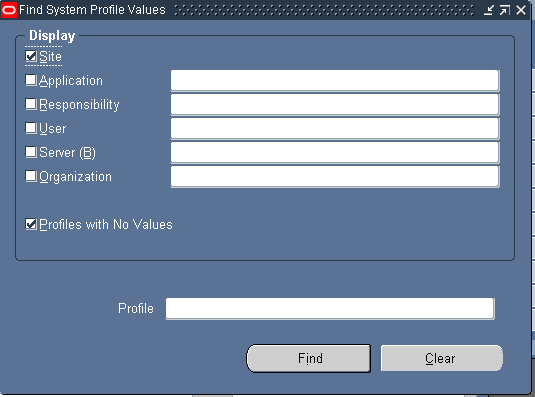
On the Find System Profile Values form, enter HR: Security Profile (or just HR: Sec%) in the Profile search field. Click Find.
System Profile Values Page
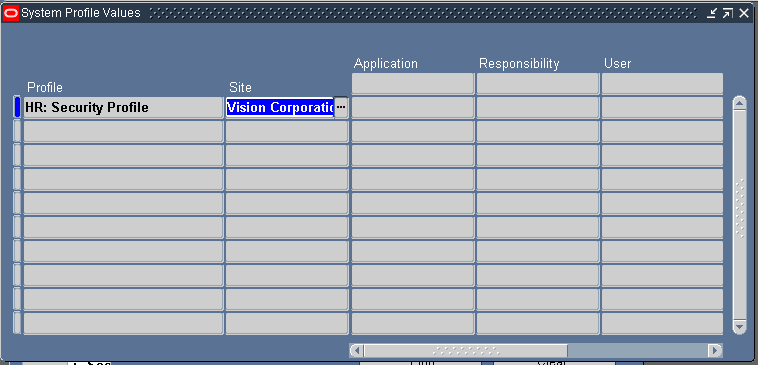
The System Profile Values form shows the default site value for HR:Security Profile. If there is no value, search for and select a Security Profile for the site default.
Note: If you do not set a default site level for HR: Security Profile and a user is given a responsibility that is not associated with a security profile, the user has administrative access to all operating units in the company.
To assign a security profile to a particular responsibility, return to the Find System Profile Values form. Keep HR: Security Profile in the Profile search field.
Find System Profiles Page
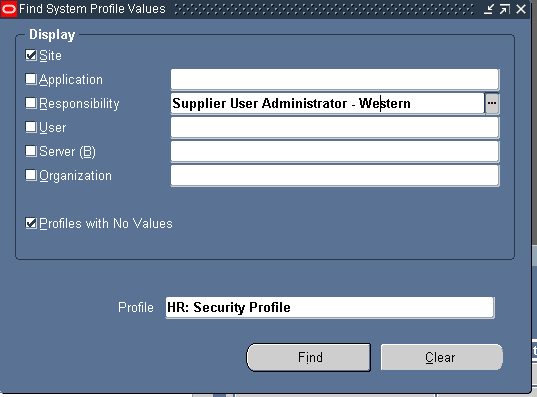
Select the Responsibility checkbox. In the Responsibility search field query up the responsibility to which you want to assign a security profile. Click Find.
System Profile Values Page
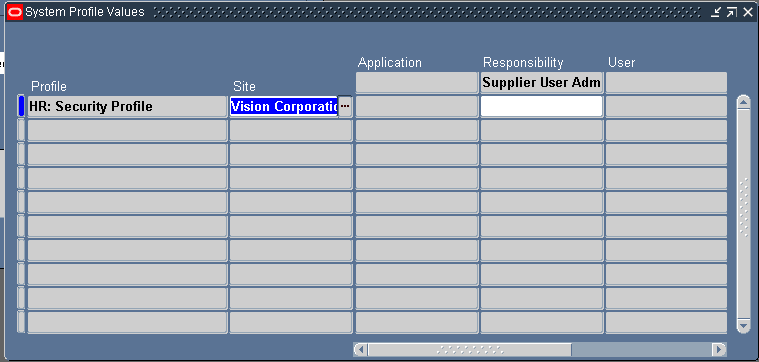
When the System Profile Values form displays, an unprotected field at the intersection of the Profile row and the Responsibility column appears. Click that field and search for the supplier management group that you want to assign to the responsibility.
When you have assigned the correct supplier management group to this responsibility, save your work.
See the Oracle E-Business Suite System Administration Guide for instructions on setting system profile options.
After you have created the required responsibilities and assigned them their appropriate security profiles, you must assign the appropriate responsibilities to your buyer administrators or approvers. A buyer administrator can assign multiple responsibilities (and can therefore administer multiple supplier management groups) and multiple administrators can share the same responsibility (and therefore manage the same supplier management group).
See the Oracle E-Business Suite System Administration Guide for instructions on assigning responsibilities to user.
The Prospective Vendor Registration feature allows a buying organization to establish links from its own websites to a registration page where suppliers can register their primary company details. The Prospective Vendor Registration feature provides the flexibility to allow multiple business groups within the buying organization to accept and process separate registration requests.
| Buyer Actions | Supplier Actions | Comment |
|---|---|---|
| N/A | 1. Supplier user clicks registration link on buyer's web site. | Registration link contains encrypted ID and associates the user with a particular operating unit. |
| N/A | 2. Supplier fills out and submits registration page. | E-mail notification is sent requesting registration approval. The request is viewable in the system in pending status. Any buyer administrator whose supplier management group includes the operating unit encrypted in the link to the registration page used by the supplier receives a notification of the request. There is no hierarchy of approvers. |
| 3. Buyer Administrator whose supplier management group includes the operating unit approves or rejects the supplier registration request. | N/A | E-mail notification is sent to supplier user who submitted the supplier registration request with request status. |
| 4.If approved, prospective supplier is created, and a user account is set up for user who registered the company. | N/A | User is assigned external user default responsibility. |
The registration process automatically:
Uses the address name provided in the registration request information to create a supplier site.
Uses the address details to create the site details.
Validates the information supplied against existing supplier information to prevent duplication of information. If duplicate information is found, a rejection notification is sent to the user who submitted the registration request.
Creates a user account for the person submitting the registration request. An approval notification including a temporary password is sent to the supplier user who submitted the registration request.
Uses the customized registration link to associate the supplier company with one of the buyer's operating units (and by extension with each supplier management group that includes the operating unit).
To implement the Self-Service Registration feature you must:
Install the FPI Patchset.
Set the default application responsibilities to be automatically assigned to new supplier users.
Create Striped Registration Page Links.
To implement the Prospective Vendor Registration feature, you must first apply the TCA and HR patches for FPI.
To simplify the registration process, you can set a default responsibility for each collaboration suite application. Then when Sourcing Buyers or Supplier User Administrators invite supplier users to register, they can pre-select the applications to be granted to each user.
At approval time (once the supplier user has completed and submitted the registration request) the default responsibilities associated with the applications that were previously selected appear on the approval page. The approver can accept these default responsibility selections or modify them as needed. The defaults can be deselected and/or additional external responsibilities can be granted. Note that default responsibilities must be flagged as external responsibilities using the instructions in the previous step.
Access the System Administrator responsibility.
Select Profile, then System.
On the Find System Profile Values form, enter one of the following in the Profile search field:
Sourcing Default Responsibility.
iSP Default Responsibility for External User.
Collaborative Planning Responsibility.
For each profile, define a default responsibility. Typical defaults include:
Sourcing Supplier for Sourcing Default Responsibility.
Supplier Portal Full Access for iSP Default Responsibility for External User.
Supply Chain Collaboration Planner for Collaborative Planning Responsibility.
See Oracle E-Business Suite System Administration Guide for instructions on setting system profile options.
The buying organization may want to associate its registered suppliers with different organizations that are within the company. Typically, this occurs because different parts of the business attract distinct types of suppliers (for example, metal processing for the manufacturing division versus contract services for the consulting division). Such divisions are achieved by creating multiple registration page links from the buying organization's website. Each link contains a reference to a particular operating unit, and the supplier who uses that link when registering is associated with that operating unit. By using striped registration page links, the buying organization, through the registration process itself, can control the association of an operating unit with a supplier.
To create registration page links striped by operating unit:
Access the Purchasing Super User Responsibility.
Select Setup, then Profile Management Configuration, then Organization Encryption.
Select the operating units to be encrypted.
Click Encrypt.
The encryption string for that operating unit is displayed.
Create customized hyperlinks from the home page to the registration page. There should be one hyperlink for each encrypted operating unit ID. The hyperlink format is: <A HREF= "http or https://host:port/OA_HTML/jsp/pos/suppreg/SupplierRegister.jsp?ouid=<encrypted operating unit ID>">registration link text</A>
By using Supplier Profile Management, buying organizations can allow suppliers to enter and maintain information on their company. This enables the supplier to be responsible for adding new information and ensuring that existing information is up to date. Through profile management, suppliers can provide the buying organization with key details about their company, such as location and contact information, major business classifications, banking details, and category information about the goods and services that they provide. Allowing suppliers to enter and update this information eases the administrative burden of maintaining the business relationship information between the buyer and supplier companies.
Supplier profiles consist of:
Supplier Summary Information
Supplier Address Book
Supplier Contact Directory
Business Classification/Certification Information
Product and Services Listing
Supplier Bank Account Details
As suppliers enter new information or change existing information, buyer administrators are notified of the changes, and the status of the profile information is updated. Buyer administrators can review the changes and use the changes to the Address Book, the Contact Directory, and the Bank Account details to update the corresponding information in the purchasing and payables systems. When using details of the supplier's profile to update the purchasing and payables system, updates are only applied to the operating units in the supplier management group administered by the buyer administrator. Supplier address book details are used to create and update site records in the purchasing and payables system. Contact Directory entries are used to create or update site contact records. Bank Account details are used to update the payables system as well as site assignment information.
For addresses and contacts, the update process creates links between the supplier's profile and the details stored in particular operating units in the purchasing and payables system. These links are used to ensure that when a change is made to an address book or contact delivery entry in the supplier's profile, the system knows which operating unit to update when the buyer administrator promotes the changes to the purchasing and payables system. If the supplier's details are used in multiple operating units that are covered by multiple supplier management groups, any update by a buyer administrator only uses the subset of links applicable to their supplier management group.
Establishing these links is particularly important for existing suppliers who have details in different operating units in the purchasing and payables system but do not yet have a supplier profile. Tools are provided that allow buyer administrators to use the details from the purchasing and payables system to create Address Book and Contact Directories entries, automatically establishing the links between the appropriate records. This ensures that when suppliers subsequently change any of their profile details, the relevant records in the purchasing and payables system can be updated using the links established. If instead, existing suppliers are allowed to create their own address book and contact directory records, these will not be linked to any of the corresponding records that already exist in the purchasing and payables system. It will be up to the buyer administrators to manually link these records to the corresponding details in the purchasing and payables systems.
To implement the Supplier Profile Maintenance feature, you must:
Install FPI Patchset (Required).
Define Business Classifications List of Values (Optional).
Set Up Products and Services Classifications (Optional).
Create Address Books for Existing Suppliers (Required).
Create Contact Directory for Existing Suppliers (Required).
Migrate Account Assignments for Existing Supplier Bank Accounts.
Assign Supplier Profile Manager Responsibility to Appropriate Supplier Users (Required).
Steps 1-3 are only performed once. Steps 4-6 are performed once for each existing supplier.
To implement the Supplier Profile Maintenance feature you must first install the TCA and HR patches for patchset FPI. Note that if you previously implemented the Supplier Self-Service Registration feature, you have already installed these patches and do not need to install them again.
You can define a list of business classifications that you would like new and existing suppliers to use to classify themselves. For example, you may have legal requirements to which you must adhere that differentiate between types of suppliers or for which a particular supplier must be certified. The business type and certification status can be tracked in the Supplier Profile.
The system comes pre-seeded with the following values:
Minority Owned
Woman Owned
Small Business
Hubzone
Veteran Owned
Service Disabled Veteran Owned
You cannot delete or update Minority Owned, Woman Owned, and Small Business values, but you can remove or update the other values, and you can add additional values as needed.
To define the classifications available to your suppliers:
Access the Application Developer responsibility.
Select Application, then Lookups.
Select Application Object Library.
Search the Type field for POS_BUSINESS_CLASSIFICATIONS.
Lookup Types Page
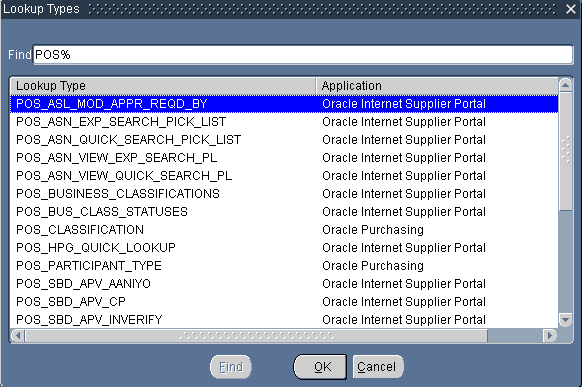
Click OK to display the existing business classifications.
Application Object Library Lookups Page
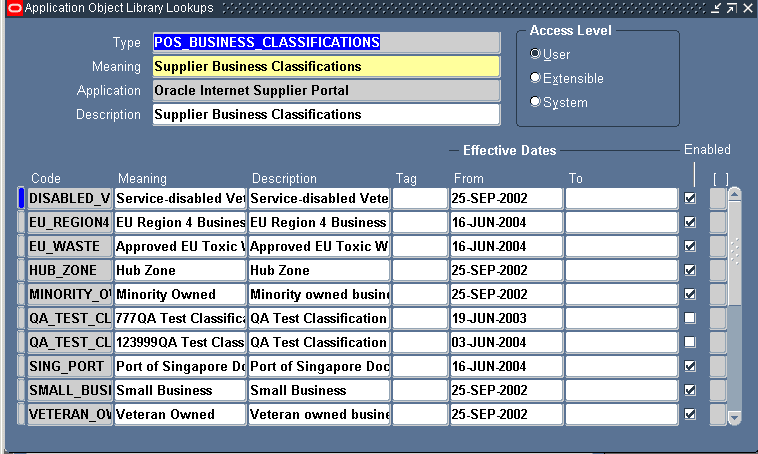
Edit the list to include your new classifications. Deselect the Enabled checkbox to remove any existing classifications. Add a new row to the table to include any new classification.
Save your work.
You can use the values available from the Purchasing Item Categories flexfield to set up a list or hierarchy of products and service categories by which you would like your suppliers to classify themselves. This affords the buying organization the opportunity to gather much more detailed information than can be determined only from the supplier's SIC code or similar information. Once you have identified the appropriate categories, suppliers can classify themselves in their profiles.
The Products and Services Classification setup should only be done once. Any subsequent change to the configuration would cause suppliers to lose any existing category data entered.
To set up products and services categories:
Access the Purchasing Super User Responsibility.
Select Setup, then Profile Management Configuration, then Products and Services Setup.
On the Products and Services Category Setup page, ensure the appropriate segments are in the Selected Segments section. The Products and Services Category Setup page will display a list of available category segments. The segments to be used for the definition need to be selected. Where it is intended for a hierarchy to be established, the segments should be ordered to match the levels required in the hierarchy.
Note: The POS: Product and Service Segment Definition option can only reference segments with a validation type of Independent, Dependent, Translatable Independent, Translatable Dependent, and/or Table. Segments with any other validation type cannot be used. Also, segments with a validation type of Table cannot have blank variables in any of the table columns or the WHERE/ORDER BY fields.
Note: If you wish to use segments whose validation types do not follow the rules above, you must either change the validation type or define a new segment with a proper validation type.
Click Apply.
To filter out unnecessary product/service values:
Not all the category values used by the Item Categories flexfield may be appropriate for selection by your suppliers. You can filter category values so they are not visible to suppliers and thus cannot be selected for categorization.
Access the Purchasing Super User or the Purchasing Manager associated with the operating unit you wish to update.
Select Setup, then Items, then Categories, then Default Category Sets.
Find and note the category set used for the Purchasing Functional Area.
Select Category Sets.
Find the Operating Unit for which you wish to filter the item display. (Note the search field searches on Operating Unit code not name.)
On the Category Sets form, search for the category set identified above.
Note the Flex Structure value.
Close the form and select Category Codes.
On the Find Structures form, enter the flex structure name identified above. Click Find.
On the Categories form, deselect the Viewable by Supplier checkbox for any categories you wish to hide from your suppliers.
Save your work.
For each supplier's profile, there is one address book. This book contains the address names and address details for all that supplier's locations.
If the supplier already exists in your purchasing and payables system, they already have site name and detail information for particular operating units. When you implement the supplier profile feature, you use this existing supplier information to create entries in the supplier's address book. You should create address book entries using existing information before you allow existing supplier users access to their profiles. This way, you can ensure that the links between the existing supplier site information and the new supplier address book records are created correctly. Creating links between existing site records and the supplier address book ensures that future updates to addresses will be processed correctly, and the appropriate site information in the purchasing and payables system will be updated when new information is added or existing information is changed in the supplier profile. If you allow suppliers to create entries in their address book before you have created the links between the address book and the existing site information, you (or a buyer administrator) will have to manually link any new address information to the existing site information.
Creating Address Book Entries Using Existing Site Record Information
Your existing suppliers will most likely have sites divided among several of your buying organization's operating units and there may be discrepancies between the data stored in the different operating units. When you create the supplier's address book, you want to consolidate as much of this location information as possible. The Supplier Profile Management feature provides tools that simplify the creation of address book entries using existing site information. These tools allow you to select common site records in multiple operating units and use their details to create a single address record. You can also identify potentially conflicting or inconsistent site information across operating units and modify the information as needed to allow for the correct creation of an address.
For example, there may be site records in different operating units that share a common name but have inconsistent details, or sites that have the same details but different names. Once you have begun using site records to create address entries, there may be sites that cannot be used because they would conflict with the newly created address name or details.
Rules for Handling Site and Address Inconsistencies
When creating addresses, buyer administrators can only view and use existing details for sites in the operating units within their supplier management group. They can review site information and then select multiple site records to use to create address entries. Any inconsistencies or conflicts in the site records they have selected will be highlighted to the buyer administrator so that they can take the appropriate remedial action.
For example, assume that a supplier has a site record called HQ defined in two operating units and that one has site details of 507 5th Ave., New York, and the other has site detail of 567 Market St., San Francisco. You can select both sites and try to create an HQ address, but a warning will be generated since the system will not be able to determine which is the correct HQ entry to use.
When the system detects conflicting site name or details information between sites you have selected for address creation, you receive a message and can choose from the following options:
If you have selected sites that have duplicate site names but different site details, you receive an error message and should do one of the following:
Deselect one of the conflicting entries and continue generating addresses, so that the correct record is used to generate the address.
Cancel and modify the site details of one of the entries to mirror the details of the other before attempting to create addresses again. This modification must be made in the purchasing and payables system.
If there are duplicate site details but different site names, you receive a warning message asking you whether you wish to create separate addresses that share the same details. In this case you should:
Deselect one of the conflicting entries and continue generating the addresses.
Cancel and modify the site details of one of the entries to mirror the details of the other. This modification must be made in the purchasing and payables system.
Continue with both site/address combinations to create multiple address entries.
Address Book Creation Example
The following example shows how existing supplier site information can be used by buyer administrators to create address book entries for an existing supplier.
Assume that a supplier exists in your purchasing and payables system with six site records. These sites are setup across four operating units as shown in the table below. Also, assume that there are two supplier management groups (Group 1 and Group 2) that each contain two of the operating units.
| Management Group | Operating Unit | Site Name | Site Details |
|---|---|---|---|
| Management Group 1 (G1) | Vision Europe | HQ | 4558 High St., London |
| South | 674 Via DeVinci, Milan | ||
| Vision France | HQ | 324 Rue de la Paix, Paris | |
| Management Group 2 (G2) | Vision Consulting | HQ | 4558 High St., London |
| Central | 4558 High St., London | ||
| Southeast | 345 Via Verdi, Rome | ||
| Vision Services | Central | 324 Rue de la Paix, Paris | |
| North | 455 Sveagatan, Stockholm | ||
| South | 345 Via Verdi, Rome | ||
| HQ | 567 Banhofstrasse, Zurich | ||
| East | 345 Via Verdi, Rome |
The buyer administrator for management group G1 accesses the Create Address from Site Details page and sees the following addresses listed as available for address creation. At this point, no addresses actually exist in the address book, so all the site entries (site name/site details combinations) defined for his operating units are available for address creation.
Step 1: Buyer Administrator for Group One Creates Address Book Entries
| Address Book Entries | Sites Available to Create Addresses | Sites Not Available to Create Addresses |
|---|---|---|
| N/A | HQ 4558 High St., London | N/A |
| N/A | South 674 Via DeVinci, Milan | N/A |
| N/A | HQ 324 Rue de la Paix, Paris | N/A |
The buyer administrator knows that the London site represents the supplier's HQ and that the Paris site needs to me renamed to something more appropriate, so the buyer selects only the London and the Milan sites for address creation. The addresses for London and Milan are created in the address book, and the Paris HQ site becomes unavailable for address creation since its site details conflict with those for an existing HQ address.
At this point, the buyer administrator for supplier management group G1 has created all the addresses possible.
| Address Book Entries | Sites Available to Create Addresses | Sites Not Available to Create Addresses |
|---|---|---|
| HQ 4558 High St. London | N/A | HQ 324 Rue de la Paix, Paris |
| South 674 Via DeVinci, Milan | N/A | N/A |
Step 2: Buyer Administrator for Group Two Creates Address Book Entries
Now the buyer administrator for management group G2 starts creating entries for the address book.
When he or she initially accesses the Create Addresses from Site Details page, he or she sees six out of eight sites that are available for address creation. There are eight possible sites defined in the operating units that he administers. Two of the possible sites (HQ and South) are unavailable since their site names conflict with the two existing addresses previously created by the buyer administrator for management G1.
He also notices that the site entry, HQ/4558 High St., London shows up as available for address creation. This is because its details exactly match the HQ address record previously created by the administrator for supplier management group G1. If it is selected for address creation, it is simply linked to the existing address.
| Address Book Entries | Sites Available to Create Addresses | Sites Not Available to Create Addresses |
|---|---|---|
| HQ 4558 High St. London | HQ 4558 High St., London | South 345 Via Verdi, Rome |
| South 674 Via DeVinci, Milan | Central 4558 High St., London | HQ 567 Banhofstrasse, Zurich |
| N/A | Central 324 Rue de la Paix, Paris | N/A |
| N/A | North 455 Sveagatan, Stockholm | N/A |
| N/A | Southeast 345 Via Verdi, Rome | N/A |
| N/A | East 345 Via Verdi, Rome | N/A |
If the buyer administrator for supplier management group G2 selects all the available sites shown in the table above and tries to create addresses, the system will return an error message because two of the entries share the same site name (Central) but different details. (Note this error always precedes the similar warning message that is raised if a site selected for address creation shares the same details as an existing address but has a different name. The Central site in the Vision Consulting operating unit shares the same details as the new HQ address).
The buyer administrator can choose to modify the details for one site to make it match the other or deselect one of the conflicting sites. In this example, the administrator selects the Central/324 Rue de la Paix, Paris site to be known as Central.
The administrator also receives the warning message that the warning message that two of the site entries share the same details but have different names. This is only a warning. Two addresses can have the same address details as long as they have differing names. In the example, the buyer administrator deselects the Southeast site entry and continues creating addresses.
Once the buyer administrator for management group G2 has resolved all conflicting site information, the final address book for the supplier contains the addresses shown below.
| Address Book Entries | Sites Available to Create Addresses | Sites Not Available to Create Addresses |
|---|---|---|
| HQ 4558 High St. London | N/A | HQ 324 Rue de la Paix, Paris |
| South 674 Via DeVinci, Milan | N/A | Central 4558 High St., London |
| Central 324 Rue de la Paix, Paris | N/A | Southeast 345 Via Verdi |
| North 455 Sveagatan, Stockholm | N/A | N/A |
| East 345 Via Verdi, Rome | N/A | N/A |
To Create Addresses Using Existing Supplier Site Information:
Access the Supplier Profile Administrator responsibility.
On the Supplier Manage Profile page, search for the supplier whose site address information you wish to use to create entries in the Address Directory.
When the search results appear, select the supplier and click the View Details icon.
On the Supplier Details page, click Address Book.
On the Address Book page, click Create from Sites.
The Create Address from Site Details page, by default, displays all sites within the operating units you administer that are available for address creation. If necessary, you can enter values in the Site Name and/or Operating Unit and query again to reduce the number of search results.
Only those sites from operating units that have setups for financials, payables, purchasing and receivables options will be displayed in the Create from Sites page.
To see any site entries unavailable to you (because the site name conflicts with existing address names), select Sites not available to create an Address.
Select the site(s) for which you wish to create an address, and click Create Address. If there are conflicts between the addresses you are trying to create, you must correct them.
The Confirmation page notifies you the address was created successfully.
Managing Site Details
After all the addresses have been created for a supplier, the Manage Site Details page can be used by administrators to maintain the sites that are linked to an address. Existing sites can be unlinked from the address (so that any changes to the address will not be reflected in that particular site), eligible sites can be linked with the address and the administrator can check to see if there are any sites that are similar to the address but that would need to be modified before they can be linked to the address.
To find out which sites exist but need to be updated before they can be used to create an address or linked to an existing address:
Access the address book and click the Manage Site Details icon for the existing address.
On the Manage Site Details page, select Supplier sites similar to the Address that cannot be linked, and then click Go.
The Site Details page for that supplier address shows any sites which conflict with this address. It also shows the operating unit containing that site. Use this information to access the purchasing and payables system and modify the site to remove the conflict.
Address Creation for New Suppliers
When a new supplier registers with the system, an address is automatically created in the address book using the address name provided by the supplier during registration. Also, supplier profile administrators (on the buying side) and supplier profile managers (on the supplier side) can create new addresses at any time. These addresses can be updated by the supplier and managed by the buyer. The buyer can incorporate the new supplier address information into the purchasing and payables system by navigating to the Address Book page, selecting the address, and clicking Update to Sites.
Each supplier's profile also contains a Contact Directory. This directory contains the names and communication details for all of the contacts at the supplier that are appropriate for conducting business with the buying organization. Management of the Contact Directory is similar to that for the Address Book.
If the supplier already exists in your purchasing and payables system, it will already have contact details in one or more of your operating units. When you create the supplier profile, you must use this existing site contact information to create the entries in the supplier's Contact Directory. These should be created before you allow existing supplier profile managers access to their profiles. This ensures that the links between the existing supplier site contact information and the new supplier profile are created correctly. Creating links between existing site contact records and the supplier contact directory ensures that future updates to contacts will be processed correctly and the appropriate site contact information in the purchasing and payables system will be updated when new information is added or existing information is changes in the supplier profile. If you allow suppliers to create entries in their contact directory before you create the links between the contacts and the existing site contact information, you will have to manually link any new contact information to the existing site contact records.
Creating Contact Directory Entries Using Existing Site Contact Record Information
As with addresses, existing suppliers will most likely have site contacts defined for multiple sites across several buying organization's operating units. There may be discrepancies between the data stored in the different sites and/or operating units. When you create the supplier's contact directory, you want to consolidate as much of this contact information as possible.
Each site contact will create a new Contact Directory record unless there is an exact match between the first name, last name and phone number for the contacts. These is no check for similar site contact records.
Since site contacts are defined for specific sites, a corresponding address entry for that site must exist in the Address Book before the site contact can be used to create an entry in the Contact Directory. Until the address exists, the site contact will not be available on the Create Site Contacts page.
Creating the Contract Directories Using Existing Information
An address must exist for each site whose site contacts you wish to setup into the Contact Directory.
To use existing site contact information to create a Contact Directory for the supplier:
Access the Supplier Profile Administrator responsibility.
On the Supplier Manage Profile page, search for the supplier whose site information you wish to use to create entries in the Contact Directory.
When the search results display, select the supplier and click the View Details icon.
On the Supplier Details page, click Contact Directory.
On the Contact Directory page, click "Create from Site Contacts."
On the Create Contact Directory Entries from Site Contacts page, select the contacts you wish to create and click Create Contact Directory Entry. This will create an entry for every site contact/site details defined for the supplier in the purchasing and payables system.
Associating Additional Addresses with a Site Contact
When you use the existing supplier information to create entries in your Contact Directory, an entry is created for each site/contact combination you select. However, in addition to the contact/address combination created by the system, you may wish to associate a particular contact with additional addresses in the Address book.
To associate a contact with an additional address:
Access the Contact Directory page to display all the contacts you have defined for this supplier.
Click the Manage Address Details icon to display the Manage Address Details page for that contact.
Select the Addresses available to be linked to the contact radio button, and click Go. The Manage Address Details page redisplays with any additional supplier addresses to which the contact can be linked.
Select the address(es) and click Add Link to Contact. This creates a new link between the contact and the address.
Creating Additional Contacts
After the system has been implemented, suppliers can create new contacts and associate them with addresses. Buyer administrators can choose to accept these new contacts and, additionally, choose to incorporate the new information back into their core system by selecting the new entries and clicking the Update to Site Contacts button.
Each supplier can maintain their bank account and account assignment information in their profile. This allows suppliers to specify the bank accounts they have and the locations where the accounts are used.
For existing suppliers, bank account details will be automatically visible in their profile. However, account assignment information will not be available until the details have been migrated from the payables system into their profile. This is done using a concurrent request script.
The script will migrate the supplier and site assignment details for each account into the supplier's profile. If there are inconsistencies between the site assignment settings in different operating units (such as the account site assignment is primary in one operating unit but not in another), then the details will not be migrated to the profile.
To migrate account Assignments for Supplier Bank Accounts:
Access the Purchasing Super User responsibility.
From the File menu, select Switch Responsibility.
In the Responsibilities window, choose Supplier Profile Administrator.
From the View menu, select Requests.
In the Find Requests window, click Submit New Request.
In the Submit a New Request window, select Single Request, and then select OK.
In the Submit Request window, select Migrate Account Assignment for Supplier Bank Accounts
Click within the Parameters section. In the Parameters window, select the appropriate supplier name, and then select OK.
Click Submit.
Note the Request ID for the request you submitted.
If you would like to submit another request, click Yes. If you are finished, click No.
Once you have the supplier profile successfully implemented, you should assign the appropriate supplier users the Supplier Profile Manager responsibility. This enables them to access and update their supplier profiles.
See the Oracle E-Business Suite System Administration Guide for instructions on assigning responsibilities.
Any update performed by a Supplier Profile Manager triggers a notification to the Supplier Profile Administrator(s). The administrators can access the changed profile and accept the update or reverse it. Accepting the update will promote the addition/changes into the purchasing and payables systems as appropriate.
Buyers need to schedule the Business Classification Re-Certification Notification concurrent program to run on a daily basis for sending reminder notifications to the designated supplier users.
Navigate to Purchasing>Reports> Run. The Submit a New Request page displays.
Select a Single Request option.
Click OK. The Submit Request page displays.
Search and select the Business Classification Recertification Notification item from the Name LOV.
Click Schedule. The Schedule page displays.
In the Run the Job region, select Periodically.
Enter the value as 1 in the Re-Run field.
Select the Days item from the list.
Click OK.
Click Submit.
![]()
Copyright © 2009, 2010, Oracle and/or its affiliates. All rights reserved.