Managing Tasks
This chapter covers the following topics:
- About Tasks
- Viewing Tasks Assigned to You
- Opening a Task
- Addressing a Task
- Creating and Sending a Task
- Resolving a Failed Task
About Tasks
In Collaborator Workbench, tasks enable you to send work items to other users, to share information and to interact with the automated demand chain processes. Tasks appear in the My Tasks module. A task usually corresponds to a worksheet that you send to another user or receive from another user. The task also can include a short message, links to Web sites, and attached files.
Note: When you receive a task, you might also receive an e-mail notification in your e-mail system, if the sender has selected this as an option.
The underlying Workflow Engine also sends tasks, generally to alert you of exceptions, provide forecasts, or communicate messages and information during appropriate circumstances.
Types of Tasks
There are three types of tasks:
-
User tasks, which are sent to bring information to the attention and treatment of individual users.
-
Selection tasks, which present a list of options for you to choose among. Each choice directs the Workflow Engine to continue in a different way.
-
Group tasks, which are sent for the attention and treatment of all users from a specific group defined in the workflow instance. Each user in the group receives the task. Users can respond individually to the task.
Only the Workflow Engine can send a selection task or group task; that is, your implementors have set up workflows to include such tasks, to meet the needs of your organization.
Task Timeout Procedures
Tasks that are sent to you by the Workflow Engine may also have a timeout period. This means that if you do not mark the task as done before the due date, then the task will expire or time out. Then the Workflow Engine continues with an alternative procedure.
User Tasks and Selection Tasks
A user task times out if the user does not mark the task as done before the response period has ended. The timeout procedure for a user task is as follows:
-
The user is sent an e-mail notification that the task has timed out.
-
The task is removed from the user's task list.
-
The Workflow Engine continues with an alternative procedure that has been defined within the workflow for this circumstance.
Group Tasks
A group task times out if one or more of the users in the group do not mark the task as done before the response period has ended. The timeout procedure for a group task is as follows:
-
A user who is responsible for the relevant task receives an e-mail message notification of all the users within the group that have not marked the task as done. For example, this may be the group manager, or a supporting job function.
-
The task stays in the My Tasks module of the users who have not marked it as done.
-
The Workflow Engine continues with an alternative procedure that has been defined within the workflow for this circumstance.
Task Timeout Alert
If you see that a task due date is written in red text, then that is an indication that the response period has nearly ended and the task is going to time out fairly soon.
See also:
-
Viewing Tasks Assigned to You
-
Addressing a Task
-
Creating and Sending a Task
Viewing Tasks Assigned to You
In Collaborator Workbench, a task is a unit of work, usually associated with a worksheet. A task can come either from another user or from automated workflows that have been set up especially for your enterprise. All unaddressed tasks assigned to you are listed in a module called My Tasks, which looks like the following:

Note: If a task due date is shown in red text, that means the response period has nearly ended and the task is going to time out fairly soon.
To refresh My Tasks
Click Save & Refresh in the My Tasks module.
Any changes made in My Tasks are communicated to the Collaborator Workbench engine.
The date and time of your last My Tasks refresh is shown in the lower right corner of the My Tasks display.
The My Tasks module is initialized when it is first displayed, but it is not automatically updated when new tasks arrive. Also, when you make changes in this module, they are not immediately communicated to the Collaborator Workbench engine.
Note: Click Save & Refresh before you go to another page or log off; otherwise, your changes will be lost.
To view all assigned tasks
The My Tasks module does not necessarily display all your tasks. To check for additional tasks:
-
Click the More link in the bottom right corner of My Tasks.
-
My Tasks fills the wide pane and shows all current tasks.
To display My Tasks
If Collaborator Workbench does not currently display My Tasks, do the following:
-
Click Personalize.
-
Select the check box next to My Tasks and then click Next.
-
Click Next again and then click Finish
See also:
-
About Tasks
-
Configuring My Tasks
-
Opening a Task
-
Addressing a Task
-
Opening a Task
When you are sent a task, it brings with it information that is relevant to you. The information may be a Collaborator Workbench worksheet, an Oracle Demantra component worksheet, a link to another Web site, or an attachment. You should view all the information that is sent with the task before you respond.
For each task, My Tasks includes the following information:
-
The Message field. This can contain a link to a Web site or a worksheet.
-
An Assign Date field that shows when the task was sent to you.
-
A Due Date field that shows the date by which the task should be completed, if applicable. If you do not complete a task by its due date, Oracle Demantra automatically continues with actions as specified by your implementors.
Note: If a task due date is displayed in red, the response period for that task has nearly ended and the task is going to time out fairly soon.
-
A description field that describes more details about the task.
-
The Attachment button that indicates that a file has been attached to the task. The suitable application for viewing the attachment is started in a separate window.
To open a task
Click the task link in the My Tasks module.
A new browser window opens with the link destination.
The task link can be a Web page that contains more information about the task that you are viewing. If the link is to a worksheet, then Oracle Demantra Demand Management or the Oracle Demantra component will open without requiring a separate login.
To view an attachment to a task
Click the Attachment button beside the task.
The attachment opens with the appropriate application in a new window or a message box appears asking if you want to open the attachment from its source or save it.
See also Addressing a Task.
Addressing a Task
In general, you address a task in two stages:
-
Examining the associated worksheet and editing or approving data as appropriate. How you do this depends upon your organizational needs.
-
Marking the task as done so that the Workflow Engine can continue with the workflow.
Note: When you receive a task, the Workflow Engine waits until the task status has been changed to Done before continuing with the workflow instance. It is therefore very important that you mark tasks as done after you have attended to the task requirements.
To mark a task as done
Before you mark a task as done, make sure that you have reviewed all the relevant information and that you have addressed any concerns or issues. Then do the following:
-
First:
-
For a regular task, select the check box to the left of the task.
-
For a selection task, select the appropriate response from the dropdown list in the Select value column. The check box next to the task is automatically checked.
-
-
Click the Save & Refresh link at the bottom of the task list.
The task is removed from My Tasks and the updated task list is shown.
Caution: Click Save & Refresh before you go to another page or log off; otherwise, your changes will be lost.
To cancel the done status
If you have not yet refreshed the My Tasks list, you can cancel your change:
-
For a regular task, clear the check box next to the task whose status you want to change from done incomplete.
-
For a selection task, use the dropdown box to select a response from the list.
To mark all tasks as read
Click Mark Tasks as Read.
The bold emphasis is removed from the text in the list. This does not occur automatically when a task is marked as Done.
See also Opening a Task.
Creating and Sending a Task
Depending on how your Collaborator Workbench has been configured, you may be able to create tasks.
To create and send a task
-
Start by doing one of the following:
-
Within My Worksheets, click Send on the worksheet that you want to send.
-
Within My Tasks, click Create Task.
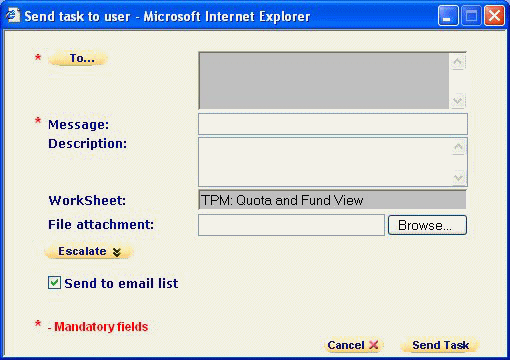
The Send Task to User dialog box appears.
-
-
Click To..... and select the users and groups to receive the task.
-
In the Message field, type a short text message.
This will be the task message that the recipient sees. The worksheet that you are sending will be added automatically as a link from the Message text.
-
In the Description field, type a short description.
This description will be displayed below the task message in the recipient's My Tasks module.
-
To link the task subject line to a Web page, enter the full path to the file in URL field.
Note: You must enter the full URL, including server name and directory hierarchy. The http:// part will be added automatically if omitted.
-
To attach a file to the task, enter the path to the file in the File Attachment field or click the Browse button to find it.
-
To ensure that this task is completed by a specific time, click Escalate and then provide the following information:
Due Date Date and time by which this task must be completed Alert Time Date and time at which an alert will be displayed To Additional e-mail addresses -
To send an e-mail notification to the recipient of the task, select the Send email list check box. (Depending on how your system has been configured, this option may not be available.)
-
Click Send Task.
When the recipient next logs in (or refreshes My Tasks), he or she will see the new task.
Resolving a Failed Task
When a workflow fails, the Workflow Engine automatically sends a selection task to user who initiated that workflow. This task provides options for continuing. (The Workflow Engine also sends e-mail to the person who initiated that workflow.)
To resolve a failed task
-
Within My Tasks, find the failed task, which is displayed with the options to Retry, Continue, or Abort.
-
Try to identify the cause of the failure.
A failure can happen for a variety of reasons, for example, an invalid worksheet or user, a database communication error, the Web server being down, or failure of an invoked external application. Check for such error conditions.
-
Specify how to proceed.
-
If you have corrected the underlying problem and you want to rerun the step that failed, click Retry.
-
If you have corrected the underlying problem and have performed the failed step manually, click Continue.
-
If you want to cancel execution of this workflow instance, click Abort.
-
-
Click the Save & Refresh link at the bottom of the task list.
If you cannot determine the cause, gather as much related information as possible, and contact Oracle Customer Support.