Getting Started with Worksheets
This chapter covers the following topics:
- Overview
- Opening a Worksheet
- Tutorial: Getting Acquainted with Worksheets
- Worksheet Usage Modes
- User Access
Overview
Oracle Demantra provides real-time access to your sales data, organized into multiple hierarchies that reflect the needs of your organization. An underlying spreadsheet provides a set of calculated (and input) values that you can use at any hierarchy level.
Within Oracle Demantra, you work almost entirely within worksheets. A worksheet retrieves a set of data associated with given hierarchy levels, optionally filtered; the data generally includes raw sales data, the forecast, and intermediate data. After you open a worksheet, you select an item (for example, an SKU or a product family or type) and a location (for example, a store or a region), and then the worksheet displays data for that item-location combination. Worksheets are extremely flexible and can retrieve and display data in a wide variety of ways, as described in Creating and Redefining Worksheets.
You can create and open worksheets only in the web version, not in the desktop version. The available desktop functions are Member Management and Chaining Management.
See also:
-
Opening a Worksheet
-
Oracle Demantra URLs
Opening a Worksheet
The first time you log onto Oracle Demantra (see First-Time Logon), the system typically downloads and installs software. This operation is quick and occurs only once for each machine you use.
-
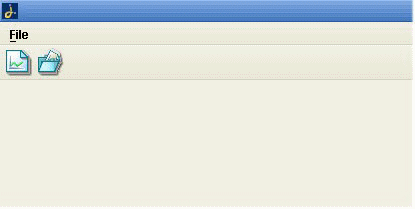
After you log on, Oracle Demantra displays a new browser window. The page contains a menu bar, a toolbar, and a workspace that is initially empty.
The toolbar icons are Create new worksheet and Open existing worksheet.
-
Click File > Open.
-
Click a worksheet in the list and then click Open.
Now the work area displays a worksheet, and the menu bar and toolbar have many more options.
See also:
-
Creating and Redefining Worksheets
-
Viewing Data
To display My Worksheets
-
Click the Personalize link in the upper right of Collaborator Workbench.
-
Select the check box next to My Worksheets and then click Next.
-
Click Next again and then click Finish.
To open a worksheet from My Worksheets
-
Click a worksheet within My Worksheets. Or click the Open button on the upper right of a content pane.
-
Depending on how the worksheet was configured, you may now be prompted to filter the data. In this case, one or more selection pages are displayed when the worksheet is opened, as follows:
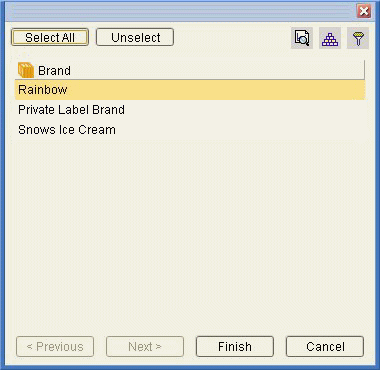
-
On each selection page, click one or more choices or click Select All to select the whole list.
-
Click Next or click Finish.
For information on using a worksheet, see Introduction to Oracle Demantra.
To run or rerun a worksheet
Depending on how Oracle Demantra was configured, it may or may not automatically run the worksheet that you open.
Within the worksheet, click Data > Rerun.
See also Configuring My Worksheets.
Tutorial: Getting Acquainted with Worksheets
To view and edit data, you work within an environment called a worksheet. Each worksheet is a working environment designed to support specific business processes. The worksheets in your solution are unique and are not documented here specifically. However, all worksheets share certain common characteristics and behavior. This exercise is meant to help you get acquainted with any worksheet.
-
Click File > Open. Or click the Open button.
-
Click a worksheet in the list and then click Open.
-
In rare cases, you may now be prompted to filter the data. See To prefilter a worksheet.
Oracle Demantra now displays the worksheet.
-
Scan the worksheet and identify each element of it, using Elements of a Worksheet as a guide.
-
Then select the data to display:
-
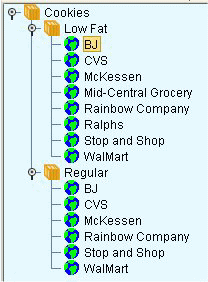
If the worksheet uses a Members Browser, click the magnifying glasses to expand the hierarchy and then click the leaf node that you want to view.
-
If the worksheet has selection lists, select from the left list first, then the next list to its right, and so on.
The rest of the worksheet now shows data relevant to this selection. Notice that the focus has changed to the current selection in each tab or tile of the worksheet.
Some areas of the worksheet might be at a lower level than your selection. For example, you may have selected a Brand, while a graph shows sales for a given SKU. Because you have not yet selected a SKU, that graph arbitrarily chose a SKU within that brand.
-
If the worksheet includes any table in crosstab format, click a row or column that corresponds to the elements that are shown in that breakout.
For example, if a worksheet tables shows SKUs as rows in the table, choose a SKU by selecting a row.
The rest of the worksheet now shows data for this specific selection. This includes any embedded worksheets as well as any other subtabs, if the subtabs are synchronized; see Controlling Subtab Synchronization.
-
Still within a worksheet table, use the keyboard to move from element to element. Notice that in this case, the subtabs are not automatically refreshed, for performance reasons; this is true even if the subtab synchronization is on.
Elements of a Worksheet
Any worksheet contains some or all of the following possible elements:
Selector
Most worksheets contain an area that you use to select the data to display. This area has one of the following forms:
-
Members Browser:
-
Selection lists:

Tables
A worksheet table displays data for the current selection.
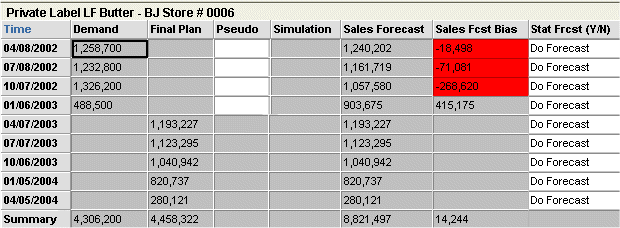
Some tables display a breakdown by item, location, or other organizational level.
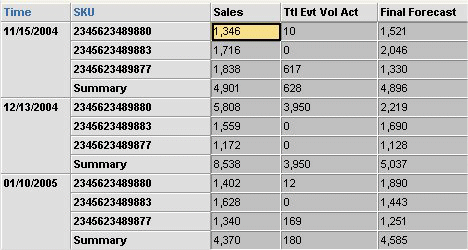
In this example, each SKU in the worksheet is shown side-by-side with the others, inside the table. This table is in crosstab format. Many other variations are possible. For example, the SKUs could be shown across the top of the table instead.
Graphs
A worksheet graph displays data for the current selection. By default, the horizontal axis shows time, and the vertical axis shows one or more series.
Activity Details Subtab
The Activity Details subtab displays promotions and the promotion hierarchy related to the current selection.
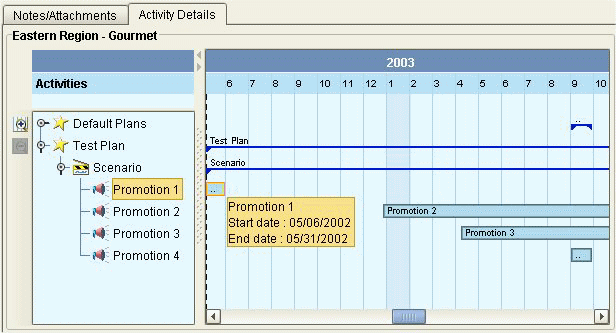
If this is included in your worksheet, it may appear in the lower right. If your worksheet contains multiple tiles, however, it can appear anywhere on the screen.
Notes/Attachments Subtab
The Notes/Attachments subtab displays notes and attachments related to the current selection:
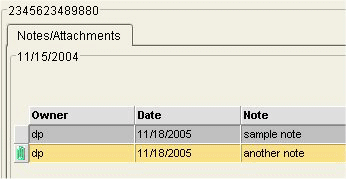
If this is included in your worksheet, it may appear in the lower right. If your worksheet contains multiple tiles, however, it can appear anywhere on the screen.
Embedded Worksheets (Subtab Worksheets)
A worksheet can included embedded worksheets, which can include any of the elements listed here. These may appear in the lower right. If your worksheet contains multiple tiles, however, these embedded worksheets can appear anywhere on the screen. Each embedded worksheet is displayed within a subtab, as follows:
Controlling Subtab Synchronization
The subtabs of a worksheet (included embedded worksheets) may or may not be synchronized with the rest of the worksheet. A worksheet runs faster if synchronization is off. On the other hand, if you are creating or modifying promotions, you might find it less confusing to keep synchronization switched on so that you can immediately see your changes.
To control the synchronization, do one of the following:
-
Click one of the following toggle buttons in the toolbar.
Automatically synchronize the subtabs with the rest of worksheet
Synchronize on demand
-
Select Options > Synchronize On Demand or Synchronize Automatically.
Worksheet Usage Modes
You can use a worksheet in three general ways:
-
You can use a worksheet in its normal, online mode.
-
You can take a worksheet offline, and then edit data and notes without needing access to the Oracle Demantra server. Later you can bring the worksheet back online. Oracle Demantra uploads your changes into the database.
-
You can work remotely using a pure HTML user interface, provided that you have access to the Oracle Demantra server. This mode allows you to view and edit data when it is not possible or desirable to download the Oracle Demantra applet and Java.
You can do most of the same activities in any of these modes. For details on the differences, see Working Offline and Logging in Remotely.
User Access
Depending on the implementation and on your access, you might not see the same data as other users of the system. Your access can be different from that of another user in many ways:
-
The data you see might be filtered. For example, if you are an account manager, you might not be able to see accounts that are not yours.
-
You might not see the same aggregation levels. And you should be able to see only those units of measure that make sense for the levels you see.
-
You can see a given promotion only if you have permission to see all item-location combinations with which the promotion is associated.
-
You might not see the same series.
-
You could belong to different collaboration groups. See Who's Online.
-
You might not have access to all menus listed in the documentation.
-
You might have additional menu items, created by your implementors. These menu items would be on the right-click menu.
-
You can use only worksheets that are public or that you defined. Only the owner of a worksheet can change its definition.
You should also be aware that an individual worksheet might have additional filters applied to it. You can see those filters at any time.