Demantra Data Tables and Integration Processes
This chapter describes the Demantra table structure (at a high level) and gives the basic data requirements. It also describes ways you can import data into and export data from Demantra.
This chapter covers the following topics:
- Demantra Data Tables
- Data Assumptions and Requirements
- Loading Basic Data
- Loading Series and Promotions
- Executing Integration Interfaces
- Configure Series Load and Purge Options
- Loading Supplementary Data
- Exporting Data
- Configuration Notes
Demantra Data Tables
When you configure Demantra, it is not necessary to work directly with the database, except in minor ways such as creating standalone tables. Also, you should use the Demantra configuration tools as much as possible, to avoid making database changes that could damage your configuration. However, it is useful to have a general understanding of the Demantra table structure and its many interconnections.
First, Demantra stores most of its basic data in the following internal tables:
| items | Contains one record for each lowest-level item, with fields to indicate the membership of that item in every higher item-type level. |
| location | Contains one record for each lowest-level location, with fields to indicate the membership of that item in every higher location-type level. |
| mdp_matrix | Contains one record for each known combination of lowest-level item and lowest-level location. This includes all combinations that have had sales, as well as any combinations created manually in the user interfaces. Matrix series select data from this table. |
| sales_data | Contains one record for each lowest-level item, lowest-level location, and date—for all combinations and dates where sales actually occurred. Sales series select data from this table. |
| promotion_data | Contains one record for each lowest-level item, lowest-level location, promotion, and date—for all combinations, promotions, and dates where promotions actually occurred. Promotion series select data from this table. |
| Inputs | Contains one record for each date, through a date in the far future. You use this table to store purely time-dependent information, such as 4-4-5 calendars and global causal factors. The Inputs table extends through the year 2030 for internally maintained records. The columns representing the time aggregations are not populated. The Inputs table includes the following holidays as observed in the USA:
|
Demantra also has the following tables:
-
Several tables (promotion_dates, promotion_levels, and promotion_members) that indicate the combinations and dates to which each promotion applies.
-
A table (group_attributes) that lists all the levels defined in Demantra.
-
One table for each level, which lists the members of that level and their attributes. If you have defined series on this level, data for that series is also stored here.
-
A table that describes all the series defined in Demantra. For each series, this information includes details such as the table from which the series data should be retrieved.
-
Tables that describe causal factors that the Analytical Engine should use.
As you can see, you should never directly edit any of these tables. These tables are interconnected and must be kept synchronized whenever new data is loaded or whenever structural changes are made.
You can, however, add your own tables to use in drop-down series or other purposes.
Data Assumptions and Requirements
Demantra requires input data that describes the items, the locations at which the items are sold, and all sales of those items, at each location over time. It is important to understand the Demantra requirements for this data.
Lowest-Level Item Data
Demantra requires the following fields for each record in the item data:
-
A unique code that can be used as the identifier for any lowest-level item.
-
A unique description, which is a short string that serves as a user-friendly name of the item. If no description is available, use the code.
-
Additional codes that indicate the membership of this item within all levels of the item hierarchy. See “Member Identifiers”.
-
Additional fields that describe this item, as needed.
-
Additional fields that specify unit conversion factors for this item, if needed. See “Unit Conversion Data”.
Also, it is useful to be able to display quantities in different units of measure. The default unit of measure is called units, which simply counts the number of individually packaged product units. Sometimes you need to convert quantities to another unit such as case, carton, or truckload. In order to do so, you need a conversion factor, and that can be different for different items. This means that the item data usually also includes unit conversion factors.
Lowest-Level Location Data
Demantra requires the following fields for each record in the location data:
-
A unique code that can be used as the identifier for any lowest-level location.
-
A unique description, which is a short string that serves as a user-friendly name of the location. If no description is available, use the code.
-
Additional codes that indicate the membership of this location within all levels of the location hierarchy. See “Member Identifiers” .
-
Additional fields that describe this location, as needed.
Sales Data
Demantra requires the following fields for each record in the sales data:
-
The unique code of the item being sold.
-
The unique code of the location of the sale.
-
The date of the sale.
-
The number of units that were sold for this item, location, and date. This field must be numeric. See “Unit Conversion Data”.
-
Price per unit for this item, at this location and date. This field must be numeric. “Unit Conversion Data”.
-
Additional fields as needed.
Aggregation in Time
You must choose the smallest time unit that you will use within Demantra. Correspondingly, you must also specify the start of that time unit (such as the starting day of the week) and an aggregation method for Demantra to use when importing data (backwards or forwards).
However, it is not necessary to pre-aggregate the raw data in time. The Demantra loading and integration tools can perform that aggregation if needed. That is, if you import multiple sales records for different dates for the same item-location combination, Demantra automatically sums them up into the time unit to which those dates belong.
Note: Together, the item, location, and date will form the primary key for the sales record. That is, Demantra stores no more than one record for each combination of item, location, and date.
Data Denormalization
As you build the data model, you will probably import data from multiple sources in the enterprise. Some of these sources probably store data in a normalized manner. For example, one table would store the relationship between a product group and the product family, and another table would store the relationship between a product family and the marketing class.
Before you import data into Demantra, you will need to denormalize the data and get it into the flattened formats described in this section.
Loading Basic Data
To load the basic data, you use the Data Model Wizard, which helps you describe the location, format, and structure of your raw data.
The Raw Data
Before you can build a Demantra data model, you must have some sample data. You then use the Data Model Wizard to describe that data so that the system can load it.
This data can be in the form of either text files or database tables:
-
If you use text files, the files must be either comma-delimited or tab-delimited.
-
If you use database tables, you must create these tables before you start the Data Model Wizard. These tables must be within the same database user name as the Demantra database.
The Data Model Wizard assumes that you have one, two, or three source tables or files as follows:
| Number of sources | First source | Second source | Third source |
|---|---|---|---|
| 1 | sales, locations, and items | ||
| 2 | sales and locations | items | |
| 3 | sales | locations | items |
What the Data Model Wizard Does
The Data Model Wizard prompts you for the location and format of the raw data, as well as the number of sources. If you have two or three sources, the wizard prompts you for details on how to join them.
Then if your sources are text files, the wizard helps you map them into staging tables. If your sources are database tables, your tables are the staging tables. In either case, the wizard helps you describe the contents of the staging tables so that you can build a model on them.
You specify how to use the fields in the staging tables, generally using each field in a level definition or in a series definition. Demantra ignores any field for which you do not specify a use.
As a final result, the Data Model Wizard creates a batch script and database procedures. The script executes the procedures, which load the data into the Demantra internal tables and synchronize the tables as needed.
Loading Series and Promotions
To load series and promotions, you use the Integration Interface Wizard, which provides a flexible way to import data into Demantra. (It also can be used to export data; see “Exporting Data”.)
Integration Interfaces
Within the Integration Interface Wizard, you create integration interfaces. An integration interface consists of at least one of the following:
-
A data profile, which specifies how to import Demantra series, at the aggregation levels that you choose. You can import sales series, promotion series and other level series, but not matrix series.
-
A level profile, which specifies how to import promotions and their attributes.
Note: When you import promotions, any existing promotions are not changed.
Executing Integration Interfaces
Once you have created an integration interface, you can execute it in either of two ways:
-
You can incorporate the integration interface in a workflow controlled by the Workflow Manager. See “Overview of Workflow Step Types”.
-
You can use the separate Standalone Integration Tool, which is Demantra_root/Demand Planner/Integration/aps.bat. (This tool consists of a subset of the APS, packaged as an executable file.)
API to Modify Integration Interface in Workflow Description
When integrating data from a source instance into Demantra, there may be a need to modify an existing integration interface. For example: a pre-seeded integration profile is defined to import ten price lists by item. It is desired to use this pre-seeded integration profile, but to only import three of price lists. To accomplish this, the price list import workflow is triggered by collecting 3 price lists in APS Collections, modifying the integration interface such that the remaining 7 price list series are set to ‘No load’ and ‘No purge,’ and then running the transfer step.
The API provides control over the following data profiles:
-
Load options:
-
Override
-
Accumulate, or
-
No load
-
-
Purge options:
-
No purge
-
All dates
-
All dates within a time range
-
-
Time definitions
-
Time Filter:
-
Relative
-
Fixed
-
-
Date Range:
-
From
-
Until
-
Setup
Notify the Application Server that you've modified Integration Profiles so it refreshes its cache.
API_NOTIFY_APS_INTEGRATION(ii_profile_id INT)
The following procedural APIs can be leveraged within the workflow to modify a pre-defined integration interface:
This is the API to modify an Integration Profile's Series Attributes:
API_MODIFY_INTEG_SERIES_ATTR
(ii_profile_id INT, ii_series_id INT, ii_load_option INT, ii_purge_option INT)
Where,
-
ii_profile_id is transfer_query.id
-
ii_series_id is transfer_query_series.series_id (and also computed_fields.forecast_type_id)
-
ii_load_option is:
-
“0” Override
-
“1” Accumulate
-
“2” No Load
-
-
ii_purge_option is:
-
“0” No Purge
-
“1” Purge All
-
“2” Purge Within
-
This is the API to modify an Integration Profile’s Fixed Date:
API_MODIFY_INTEG_SERIES_FDATE
(ii_profile_id INT, id_from_date DATE, id_until_date DATE)
Where,
-
ii_profile_id is transfer_query.id
-
id_from_date is transfer_query.from_date
-
id_until_date is transfer_query.until_date
This is the API to modify an Integration Profile’s Relative Date:
API_MODIFY_INTEG_SERIES_RDATE
(ii_profile_id INT, id_rel_from_date INT, id_rel_until_date INT)
Where,
-
id_rel_from_date is transfer_query.relative_from_date
-
id_rel_until_date is transfer_query.relative_until_date
To configure and deploy APS on Unix/Linux:
For this procedure, please refer to the latest Demantra Installation Guide.
Maintaining Data Consistency
If you import data using actual proportions (rather than matrix proportions), be sure to run the MANUALS_INS_INTEGRATION procedure after you run the integration interface. (Note that you can run database procedures from a workflow.)
Depending on your database, it may be necessary to run additional database scripts.
API to Create, Modify or Delete Users
The API_CREATE_ORA_DEM_USER command is available to create, modify or delete users from the Demantra application using the command prompt or batch routine. In addition, you can add level filters to an existing user using the API_ADD_ORA_DEM_LEVEL_FILTERS command.
This is the API to create, modify or delete users:
API_CREATE_ORA_DEM_USER
(User name, Password, Permission, First name, Last name, Company, Phone number, Fax number, Email, Language, User group, Component, Series group, Update action)
Where,
-
User name is the Demantra user name (for example, jsmith)
-
Password is the user's password (for example, pw1234).
-
Permission is the user's permission level (for example, DP).
Possible permission categories are:
Category Description Product Modules DM Demand Manager (casual user) 2, 3, 4 DMA Demand Management Administrator 1, 2, 3, 4 PTP Predictive Trade Planning user 2, 3, 4, 6 PTPA Predictive Trade Planning Administrator 1, 2, 3, 4, 6 Product modules are:
1 - Demantra Administrative Tools
2 - Demantra Demand Planner
3 - Demantra Demand Planner Web
4 - Demantra Collaborator Workbench
6 - Demantra Promotion Effectiveness
-
First name is the user's first name (for example, John).
-
Last name is the user's last name (for example, Smith).
-
Company is the company name (for example, ABC Ltd.).
-
Phone number is the user's phone number (for example, 012 3456789).
-
Fax number is the user's fax number (for example, 012 1111111).
-
Email is the user's email address (for example, jsmith@ABC.com).
-
Language is the language preference of the user (for example, 0=English).
-
User group is the group to which the user is assigned (for example, p_portal).
-
IS_COMPONENT is the product component (for example, 156=Demand Management)
-
Series group provides the overriding allocation of series available to the user (for example, 204=Sales)
-
Update action indicates whether the user is added, modified or deleted (for example, ADD)
Options include:
ADD - Used only to add users. An error message appears if the user already exists.
UPDATE - Used to update existing user details.
REPLACE - If the user already exists, then the user along with all related data is first deleted. Then the process uses the ADD method and the user is recreated. All parameters must have values. The three id values are all integer values.
The User name and Password parameters are mandatory.
Running the API_CREATE_ORA_DEM_USER procedure from the command prompt:
EXEC API_CREATE_ORA_DEM_UESR ('jsmith', 'pw1234', 'DP', 'John', 'Smith', 'ABC Ltd.', '012 3456789', '012 111111111', 'jsmith@ABC.com', '0', 'p_portal', '4', NULL, 'ADD')
Running the API_CREATE_ORA_DEM_USER procedure from a script:
DECLARE
                IS_USER_NAME VARCHAR2(200);
                IS_PASSWORD VARCHAR2(200);
                IS_USER_PERMISSION VARCHAR2(200);
                IS_FIRST_NAME VARCHAR2(200);
                IS_LAST_NAME VARCHAR2(200);
                IS_COMPANY VARCHAR2(200);
                IS_PHONE_NUM VARCHAR2(200);
                IS_FAX_NUM VARCHAR2(200);
                IS_EMAIL VARCHAR2(200);
                IS_LANGUAGE VARCHAR2(200);
                IS_USER_SECURITY_GROUP VARCHAR2(200);
                IS_COMPONENT VARCHAR2(200);
                IS_SERIES_GROUP VARCHAR2(200);
                IS_UPDATE_ACTION VARCHAR2(200);
BEGIN
                IS_USER_NAME := 'jsmith';
                IS_PASSWORD := 'pw1234';
                IS_USER_PERMISSION := 'DP';
                IS_FIRST_NAME := 'John';
                IS_LAST_NAME := 'Smith';
                IS_COMPANY := 'ABC Ltd.';
                IS_PHONE_NUM := '012 3456789';
                IS_FAX_NUM   := '012 1111111';
                IS_EMAIL     := 'jsmith@ABC.com';
                IS_LANGUAGE  := '0';
                IS_USER_SECURITY_GROUP := 'p_portal';
                IS_COMPONENT     := '4';
                IS_SERIES_GROUP  := '1';
                IS_UPDATE_ACTION := 'REPLACE';

API_CREATE_ORA_DEM_USER)
                IS_USER_NAME => IS_USER_NAME,
                IS_PASSWORD => IS_PASSWORD,
                IS_USER_PERMISSION => IS_USER_PERMISSION,
                IS_FIRST_NAME => IS_FIRST_NAME,
                IS_LAST_NAME => IS_LAST_NAME,
                IS_COMPANY => IS_COMPANY,
                IS_PHONE_NUM => IS_PHONE_NUM,
                IS_FAX_NUM => IS_FAX_NUM,
                IS_EMAIL => IS_EMAIL,
                IS_LANGUAGE => IS_LANGUAGE,
                IS_USER_SECURITY_GROUP => IS_USER_SECURITY_GROUP,
                IS_COMPONENT => IS_COMPONENT,
                IS_SERIES_GROUP => IS_SERIES_GROUP,
                IS_UPDATE_ACTION => IS_UPDATE_ACTION);
END;
/
This is the API to add level filters to an existing user:
API_ADD_ORA_DEM_LEVEL_FILTERS
(User name, Level Id, Member Id, Permission Id)
Where,
-
User name is the Demantra user name (for example, jsmith).
-
Level Id is the internal level id value (for example, 6)
-
Member Id is the internal member id value (for example, 1)
-
Permission id is the permission id value (for example, 4)
Permission id value options:
1 - Not Visible
2 - Read Only
3 - Read & Write
4 - Full Control
Permission id values are derived from the table SECURITY_PERMISSION.
Running API_ADD_ORA_DEM_LEVEL_FILTERS from the command prompt
EXEC API_ADD_ORA_DEM_LEVEL_FILTERS ('jsmith', 6, 1, 4);
Configure Series Load and Purge Options
The Integration Interface provides the ability to set purge and load options for each series. This controls whether the import integration profile overrides, accumulates, or purges (nulls out) the data for the specified integration profile date range.
The location of the Purge Data Before Import profile option within the integration profile wizard is shown:
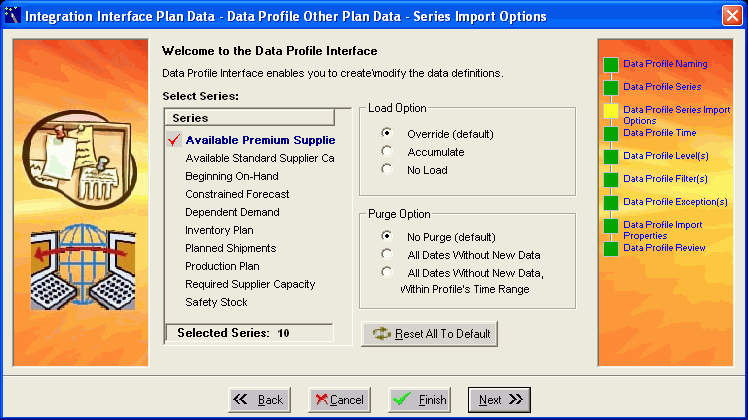
Selected Series: This list box displays the selected series in the profile that were checked on the Data Profile Series page.
Load Option: The selected radio button indicates the load option for the series that is adjacent to the red check mark. The available load options are Override, Accumulate, or No Load. The default selection is Override.
Purge Option: The selected radio button indicates the purge option for the series that is adjacent to the red check mark. The default selection is No Purge.
Reset All: This button resets all series that appear in Selected Series list box to the default settings.
Note: To maintain backwards compatibility with old profiles, when upgrading:
-
Set the Load Option to Override, and
-
Set the Purge Option to No Purge.
| Setting | Description |
|---|---|
| Override | Override values on existing dates |
| Accumulate | Add values from the profile data to the values on existing dates |
| No load | Don’t load data |
| Setting | Description |
|---|---|
| No purge | Do not purge |
| Purge (null out ) all data on existing dates | Purge (null out ) all data on existing dates |
| Purge (null out ) all data on existing dates | Purge (null out ) all data on existing dates |
| Settings | Option Explanation | Results |
|---|---|---|
| Override, No Purge | Override values on existing dates. Do not purge. | Loads data for series in the date range of the profile. Overrides values on existing dates. Inserts the dates and values that are in the profile data, but not in the system. |
| Accumulate, No Purge | Add values from the profile data to the values on existing dates. Do not purge. | Loads data for series in the date range of the profile. Adds the values from the profile data to the values on existing dates. Inserts the dates and values that are not in the system. |
| No Load, No Purge | Don't load data. Do not purge. | Does nothing to this series |
| Override, All Dates Without New Data, Within Profile’s Time Range | Override values on existing dates. Purge (null out) data within profile dates. | Loads data for series in the date range of the profile. Overrides values on existing dates. Purges (null out) values for dates in the range of the profile that are not in the loading data. |
| Accumulate, All Dates Without New Data, Within Profile’s Time Range | Add values from the profile data to the values on existing dates. Purge (null out) data within profile dates. | Loads data for series in the date range of the profile. Adds the values from the profile data to the values on existing dates. Purges (null out) values for dates in the range of the profile that are not in the loading data. |
| No Load, All Dates Without New Data, Within Profile’s Time Range | Don't load data. Purge (null out) data within profile dates. | Purges (null out) all values in the system within the time range of the profile. |
| Override, All Dates Without New Data | Override values on existing dates. Purge (null out) data within profile dates. | Loads data for series in the date range of the profile. Overrides values on existing dates. Inserts the dates and values that are in the profile data, but not in the system. Purges (null out) values for all dates that are not in the loading data. |
| Accumulate, All Dates Without New Data | Add values from the profile data to the values on existing dates. Purge (null out) data within profile dates. | Loads data for series in the date range of the profile. Adds the values from the profile data to the values on existing dates. Inserts the dates and values that are not in the system. Purges (null out) values for all dates that are not in the loading data. |
| No Load, All Dates Without New Data | Don't load data. Purge (null out) data within profile dates. | Purges (null out) all values for all dates in the system. |
Caution: Only combinations with some data in the integration profile will be purged. Combinations with no data will not be purged or overridden.
Loading Supplementary Data
To load other data, such as lookup tables, you use the Demantra import tool (Tools > Import File).
In contrast to the Integration Interface Wizard, this tool does not load the data into Demantra internal tables; it is inappropriate for importing series or levels. Nor does it provide a way to export data.
Unlike the Data Model Wizard, this tool does not create the tables into which you are importing data. You must first create the tables.
Import Interfaces
Within the import tool, you create import interfaces. An import interface consists of at least one profile. Each profile corresponds to one table; note that multiple files can be loaded into a single table.
The import tool creates a batch script that executes the import interface.
Executing Import Interfaces
To execute an import interface, you run the corresponding batch script. If the data needs to be loaded only once, you can run the script manually. If the data needs periodic refreshing, you can run the batch script from a workflow controlled by the Workflow Manager. See “Overview of Workflow Step Types”.
Exporting Data
To export series and level members, you use the Integration Interface Wizard, which is introduced in “Loading Series and Promotions”. When you define an interface, you specify how that interface will be used: for import, for export, or for both import and export. You can execute the interface in a couple of ways; see “Executing Integration Interfaces”.
The Integration Interface Wizard provides slightly different functionality for export than for import:
-
You can export sales series, promotion series and other level series, but not matrix series.
-
You can export any kind of level, not just general levels.
-
You can export members and attributes of a general level, but you cannot export the population attributes of the members. (The population attributes specify the item-location combinations to which each promotion applies.)
Note that an export profile creates a database view, and the data in that view is then exported to the specified export file. The view is created when you run the export process, not before.
Also note that if you want to export a series that uses a client expression, you must first run the Business Logic Engine to evaluate the expression, split the resulting data to the lowest level, and save it to the database. You can run the Business Logic Engine from within a workflow; see “Overview of Workflow Step Types".
Configuration Notes
This section contains configuration notes related to dependencies.
Dependencies
Before you can set up integration, you will need sample data.
Tools
The following table summarizes the core Demantra import and export tools:
You can also use the Demantra Enterprise Integrator (powered by Pervasive).