Configuring Levels
This chapter describes how to configure levels with the Configure > Levels option.
This chapter covers the following topics:
- Before Configuring Levels
- Creating a Level
- Filtering a Level
- Configuring an Existing Level
- Adding Attributes to a Level
- Dropdown Security
- Filtering an Attribute Drop-down List
- Specifying Default Parents for a New Member
- Adding a Population Attribute to a General Level
- Creating a time aggregation
- Viewing the Members of a Level
- Removing Levels
Before Configuring Levels
Before you use Configure > Levels option, be sure to do the following:
-
Read the “Levels” Chapter and make sure you understand the basic data requirements of Demantra.
-
If you are using Promotion Effectiveness, DSM, or Promotion Optimization, use the Demantra database procedures to set up an initial set of levels for those products; see “Configuring Promotion Effectiveness”, “Configuring DSM”, and “Configuring Promotion Optimization for PTP”.
-
Load some sample data for items, locations, and sales, by using the batch script created by the Data Model Wizard. Make sure that this data contains all the codes needed to define the desired item and location levels.
-
Carefully plan the levels you will configure.
-
Use the Data Model Wizard as much as possible before using Configure > Levels.
Creating a Level
To create a new level
-
Click Configuration > Configure Levels. Or click the Configure Levels button.
The system displays a screen showing the levels. The disabled levels are indicated by an X symbol.
-
Right-click the level button and then select New.
The first screen is General Properties.
-
Complete the fields in this screen as follows:
-
If you are creating a general level, the following fields are also required:
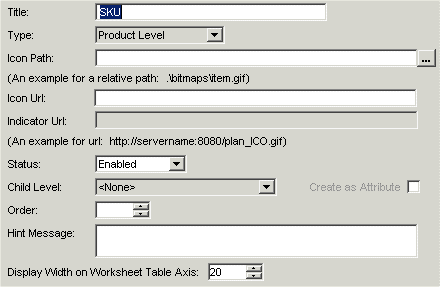
Icon Path Path and filename for the GIF file that contains a graphic to represent this level in the desktop user interfaces. The path must be relative to the Demand Planner\Desktop directory, for example: bitmaps/location.bmp Icon URL Web address for the GIF file that contains a graphic to represent this level in the Web-based user interfaces. Indicator URL Web address for the GIF file that contains an indicator for this level.
This option applies only to general levels that have no children. Worksheet tables use this graphic to indicate the combinations and times with which a member of this level is associated.Note: For other kinds of levels, Demantra has default icons.
-
Click Next.
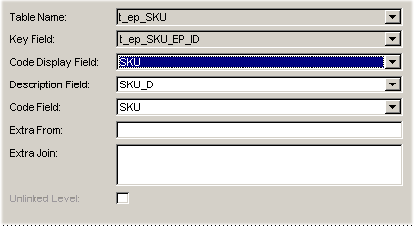
The Data Properties screen appears.
-
In Table Name, specify the name of the table in which Demantra should store information related to this level. As soon as you enter this name, Business Modeler automatically populates the following four fields.
-
If the level is to be unlinked, click Unlinked Level.
Unlinked levels are used only for a special kind of series aggregation within worksheets.
-
Click Next.
The General Attributes screen appears. If needed, add attributes as described in “Adding Attributes to a Level”.
-
Click Next.
The Defaults screen appears. If needed, specify the default parents of any manually created member of this level. See “Specifying Default Parents for a New Member”.
Filtering a Level
Most levels span all the sales data; any sales record is associated with exactly one member of each level. You can, however, create filtered levels. A filtered level contains a filtered subset of the sales data.
To create a filtered level, you add an SQL WHERE clause to filter the data. You can also join the underlying data to another table of your choice. Each level internally has an SQL query. Normally this query can refer only to fields in the following tables:
| Level type | Table where code field is found |
|---|---|
| Item | Items |
| Location | Location |
| Combination | mdp_matrix |
| Time | Inputs |
Specifying the "Extra From" Field for a Level
In rare cases, you may need to refer to data in other tables. In such a case, use the Extra From field. In this field, specify an optional list of additional tables (separated by commas) that contain data relevant to this level.
Specifying the "Extra Join" Field for a Level
If you need to filter the level, use the Extra Join field. Internally, the Extra Join field is added to the WHERE clause in the SQL query that retrieves data for this level.
The syntax of this field is as follows:
table.column operator other_table.other_column
Where, operator is a comparison operator that is one of the following:
| = <> > >= < <= |
And table.column and other_table.other_column are key columns in the database.
Configuring an Existing Level
To configure an existing level
-
Click Configuration > Configure Levels. Or click the Configure Levels button.
The system displays a screen showing the levels. The disabled levels are indicated by an X symbol.
-
Double-click the level or right-click the level and then select Open > General Properties.
The General Properties screen appears.
-
Make edits as needed to the following fields:
-
Click Next.
The Data Properties screen appears.
-
Make edits as needed to the following fields:
-
Click Next.
The General Attributes screen appears. If needed, add attributes as described in “To add a new attribute to a level”.
-
Click Finish.
Or, if you are configuring a general level, click Next. The Population Attributes screen appears; see “Adding a Population Attribute to a General Level”.
Adding Attributes to a Level
Attributes provide additional information about a level. When you add an attribute to a level, Demantra automatically adds a new column to the internal table that it uses for that level.
To view attributes of a member, the user can right-click the member within the Members Browser of a worksheet.
To add a new attribute to a level
-
Click Configuration > Configure Levels. Or click the Configure Levels button.
Business Modeler displays the Configure Levels screen.
-
Right-click the level and select Open > General Attributes.
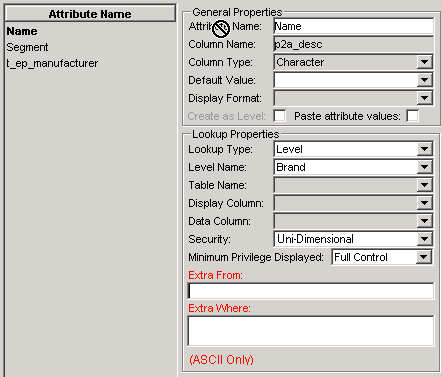
Business Modeler displays the attributes associated with this level.
-
Right-click the empty space in the Attribute Name list and then select Add.
A new row is added to the list.
-
In Attribute Name, enter the name for the attribute.
-
Specify the following general information for the attribute
-
If this attribute should have a drop-down list, then do the following:
-
Select one of the following options for Lookup Type:
-
Select Table if the attribute values are in a table.
-
Select Level if the attribute values are members of a level.
-
-
If you selected Table, then complete values for this attribute as follows:
Table Name Select a table containing the reference values from the drop-down list. Display Column Select the column that has the user-friendly attribute descriptions. Data Column Select the column that has the corresponding numeric code values for the attribute. -
If you selected Level, then for Level Name, select the level that contains the attribute values.
-
For either Table or Level, optionally specify additional criteria to control the drop-down list
Extra From Comma-separated list of additional tables to include in the query that retrieves the drop-down list. See “Using Extra From for an Attribute” Extra Where True/false SQL expression that filters this list further. See “Using Extra Where for an Attribute”. -
If you selected “Level,” the fields “Security” and “Minimum Privilege displayed” will become enabled. To configure these, refer to the section “Dropdown Security” at the end of this procedure.
-
-
Click Next.
The Defaults screen appears. If needed, specify the default parents of any manually created member of this level. See “Specifying Default Parents for a New Member”.
To delete an attribute from a level
-
In the Attribute Name list, right-click the attribute.
-
Click Delete.
See also
“Before Configuring Levels”
Dropdown Security
The fields “Security” and “Minimum Privilege Displayed” are enabled when Lookup Type is set to Level, or when Lookup Type is set to Table and the specified Table Name is a level table. Examples of level tables include Location, Items, Promotion, and Settlement. These control which level members a worksheet will be able to access.
If the lookup type is set as ‘Table’ but the table name is a level table, as listed in GTABLE column of GROUP_TABLES, security will be applied as though the lookup was on a Level.
Security
This dropdown has the following four options:
| None (default) | Dropdown security is turned off. |
| Direct | Security will be respected on the level being looked up and its direct parent level. If security has been defined explicitly on the level (for example, Site) a user will see those Sites to which they have access. If security has been defined on the immediate parent (for example, Account), the user will see only those Sites they have access to, as inherited through Account restrictions. |
| Uni-Dimensional | Security will be respected within the complete dimensional hierarchy of the level being looked up—both the direct parent hierarchy and indirect sibling hierarchies within the single dimension (item, location or GL). For example, if security has been defined on the ‘Customer’ level and a Lookup is created on the ‘Site’ level, a user would be restricted to seeing only those Sites for which they have access, as inferred from ‘Customer’ security. |
| Cross-dimensional | Security will be inherited across hierarchies via matrix relationships. For example, if security has been defined on the ‘Region’ level and a dropdown is created to lookup on ‘Item’ level in the Item hierarchy, the user will be restricted to only those products selling into the Regions they have access to, as determined through mdp_matrix. |
Minimum Privilege Displayed
When security is enabled (all but ‘None’ option), only those level members for which the user has Full Control or Read & Write access will be visible in the dropdown by default. If a user has no visibility or read-only visibility to a member, they will not be able to select that member as part of their planning process, particularly for hierarchical objects such as Accounts or Product Category.
However, in some instances a member may be secured as Read Only but accessible. For example, Promotion Type. The user will be unable to change the value, but should be able to select it when planning a promotion.
This access is controlled by the Minimum Privilege Displayed parameter, which has the following three options:
| Read Only | User can view all members of this level but cannot select or modify them. |
| Read & Write (default) | User can view, select, and edit members of this level but cannot delete members. |
| Full Control | User can view, select, edit, and delete members of this level. |
Filtering an Attribute Drop-down List
Sometimes it is useful to filter the drop-down list of an attribute, and to filter this list in a context-specific way. For example, the value of one attribute sometimes should restrict the list of choices for another attribute. Demantra provides options to enable you to filter the drop-down list.
Note: The MaxAvailableFilterMembers parameter specifies the maximum number of entries that a filtered drop-down list can display.
Using Extra From for an Attribute
For a drop-down attribute, the values are taken either from a table or from a level (which of course is also in a table). You can provide a comma-separated list of other tables that should be included in the query that returns the drop-down list.
Using Extra Where for an Attribute
For a drop-down attribute, you can specify a SQL expression that filters the drop-down list. The syntax of this expression is generally as follows:
-
table.column operator other_table.other_column
Here operator is a comparison operator, one of the following:
-
=
<>
>
>=
<
<=
And table.column and other_table.other_column are key columns in the database.
A user sees the drop-down list for an attribute within the member properties window (right-click > Edit) of the Web client. Your Extra Where clause may need to refer to the value of an attribute (or population attribute) that is present in that window. To do so, you can include either of the following syntax elements in your Extra Where clause:
#att.null-warning.attribute-name#
#pop.null-warning.attribute-name.level-name#
Here:
| att or pop | Indicates the type of attribute that you are referring to:
|
| null-warning | Indicates what to do if the attribute has a null value. Use one of the following keywords:
Set this appropriately so that users do not see an error. |
| attribute-name | Name of the attribute to consider. Specifically:
|
| level-name | Name of the level (from the population attribute) whose member IDs will be accessed in this expression. |
For example, the syntax #pop.oknull.population.Selling Entity# refers to the Selling Entity member of a population attribute.
Specifying Default Parents for a New Member
When a user manually creates a new member of a given level, the user must specify the parents of that member. You can optionally specify the default parent members to be used in this case.
For each level, Demantra provides a predefined default member, which is initially named Default level name. You can choose whether to display this member and you can rename it. This predefined default member is not normally associated with any data, however. If you have data loaded in the system, you can instead choose an existing member to use as the default member. So, for example, you could use any of the following as the default member of the Brand level:
-
The predefined default member: Default Brand
-
The predefined default member, renamed by you: Unspecified Brand
-
An existing member: Acme
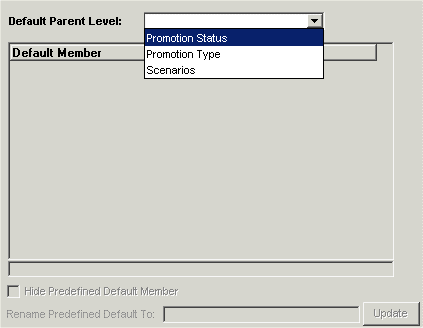
Remember that a given level can have multiple parent levels. This means that you can specify a default within each of those parent levels. For example, in the demo, the Promotion level has three parents: Promotion Status, Promotion Type, and Scenario. When a user creates a new promotion, you may want the user to have a default value for each of these.
To specify default parents
-
Click Configuration > Configure Levels. Or click the Configure Levels button.
Business Modeler displays the Configure Levels screen.
-
Right-click the level and select Open > Defaults.
Business Modeler displays information about the parents of this level. For example, if you view the defaults for the Promotion level (in the demo), you will see the following:
-
For each parent level of this level, optionally do the following:
-
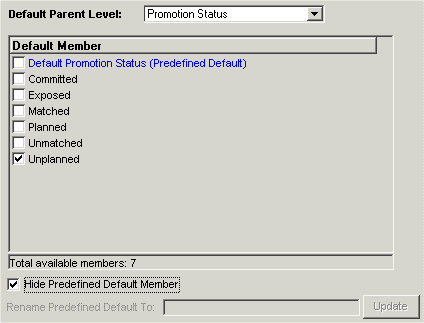
Select the parent level from Default Parent Level.
The Default Member area then lists all the members of this parent level.
-
To indicate which member should be the default parent within this level, select the check box next to that member.
-
If you are not using the predefined default member (shown in blue) as the default, you might want to hide this member. To do so, select Hide Predefined Default.
-
To rename the predefined default member, type a new name in Rename Predefined Default To and then click Update. You cannot rename this member if you have chosen to hide it.
-
When you are done specifying the default for this parent level, select another parent level from Default Parent Level, and then repeat the preceding steps.
-
Adding a Population Attribute to a General Level
A general level can have population attributes in addition to general attributes. A population attribute specifies a set of item-location combinations and consecutive time buckets with which the general level is associated.
Note: General levels are not supported in Demand Planner and Demand Replenisher.
To add a population attribute to a general level
-
Click Configuration > Configure Levels. Or click the Configure Levels button.
Business Modeler displays the Configure Levels screen.
-
Right-click a general level and select Open > Population Attributes.
Business Modeler displays the population attributes associated with this level.
-
Right-click the Attribute Name list and then select Add.
A new row is added to the list.
-
In Attribute Name, enter the name for the attribute.
As soon as you move the cursor out of this field, the Business Modeler automatically generates names for the tables associated with this level.
-
If you want the attribute to be visible, select the Visible check box.
If an attribute is visible, its properties are available for editing by the user in Demantra. It is recommended that an attribute be configured as non-visible when you do not wish the user to have the ability to edit the attributes. If the attribute is non-visible, it can be edited only in the database.
-
On the right side of the screen, complete the fields as follows:
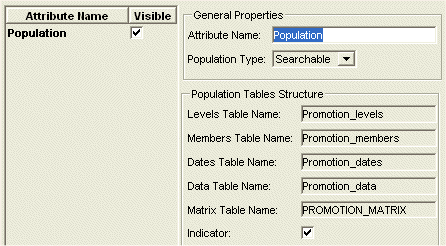
Population Type Select Searchable or Descriptive. A general level can have only one searchable population attribute and any number of descriptive population attributes.
If a population attribute is searchable, then each member of the general level is directly linked with the associated item-location combinations and time buckets. Internally, Demantra automatically joins the data for use by the Analytical Engine.
If a population attribute is descriptive, it is available to the users but is not available to the Analytical Engine.Indicator Specifies whether the cells in a worksheet table should display an indicator if a general level is associated with them. It is useful to enable this indicator for the benefit of users of the worksheet. This option is enabled only for the searchable population attribute. -
When you are done adding population attributes, click Finish.
Or, if you are configuring a general level at the lowest level, click Next. See “Configuring the Activity Browser”.
To delete a population attribute from a general level
-
In the Attribute Name list, right-click the attribute and then select Delete.
See also
“Before Configuring Levels”
Creating a time aggregation
A time aggregation aggregates data by time, and time aggregations are often used for custom calendars. Your solution can use time aggregations, custom time units, or a combination of both. Use the following guidelines to determine which you need:
To create a time aggregation
-
Within the database, either add either a column to the Inputs table or add an entire table to store the data.
-
Follow the procedure in “Creating a Level”.
Note: time aggregations are supported only in the Web products. For the equivalent functionality in the desktop products, create a group expression; see “Configuring Desktop Group Expressions”.
See also
-
“Configuring Time Units”
-
Sorting the time aggregation
time aggregations are populated such that an alphabetical sort on code generates a chronological result in the description. In other words, instead of an alphabetical result: April, August, December, February, March, and so on; the result is January, February, March, April, and so on.
Please populate the code appropriately to generate the desired sort. The sort is controlled by an associated code, for example:
| Code | Description |
|---|---|
| 1 | JAN-01 |
| 2 | FEB-01 |
| 3 | MAR-01 |
| and so on |
Viewing the Members of a Level
You can view the members of any level.
To view the members of a level
-
Click Configuration > Configure Levels. Or click the Configure Levels button.
-
Right-click the level and select Level's Members.
Business Modeler displays a screen like the following:
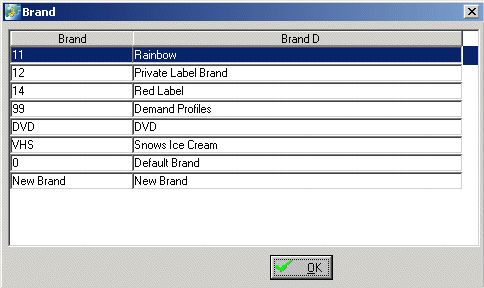
Each row shows the code display field and description for one member of this level. The column headers show the name of the table fields that store these two labels.
The same data is displayed in the standard filter user interface in Demand Management and other Demantra products.
Removing Levels
You can disable a level, removing it from visibility in the user interfaces. You can also delete levels.
To disable a level
-
Click Configuration > Configure Levels. Or click the Configure Levels button.
The system displays a screen showing the levels. The disabled levels are indicated by an X symbol.
-
Double-click the level or right-click the level and then select Open > General Properties.
The General Properties screen appears.
-
Change the Status field to Disabled.
-
Click Next repeatedly until the Finish button is no longer grayed out.
-
Click Finish.
You can enable the level later in much the same way.
-
Click Configuration > Configure Levels. Or click the Configure Levels button.
The system displays a screen showing the levels.
-
Right-click the general level and then select Delete. This task applies to the Business Modeler. See “Logging onto the Business Modeler”.
