Configuring Units, Indexes, and Update-Lock Expressions
This chapter describes how to perform miscellaneous configuration tasks.
This chapter covers the following topics:
- Before Configuring Units and Indexes
- Configuring Indexes and Exchange Rates
- Editing Values for Indexes and Exchange Rates
- Configuring Units
- Associating Units with Levels
- Configuring Time Units
- Configuring Update-Lock Expressions
Before Configuring Units and Indexes
Before you configure units and indexes, be sure to do the following:
-
Read the “Units, Indexes, and Exchange Rates” Chapter and make sure you understand how unit conversion data and the #UNIT# token are used.
-
Load unit version data.
Configuring Indexes and Exchange Rates
Monetary units of measure can use financial indexes and exchange rates. Each index and exchange rate is stored in a different table, except for the placeholder index (constant, equals one for all dates).
The placeholder index is used to switch a worksheet back to the same monetary units that are used in the imported data. By default this is called dollar $, because monetary values are usually imported in dollars.
To create an index or exchange rate
-
Click Configuration > Configure Indexes.
The Configure Indexes and Exchange Rates dialog box appears.
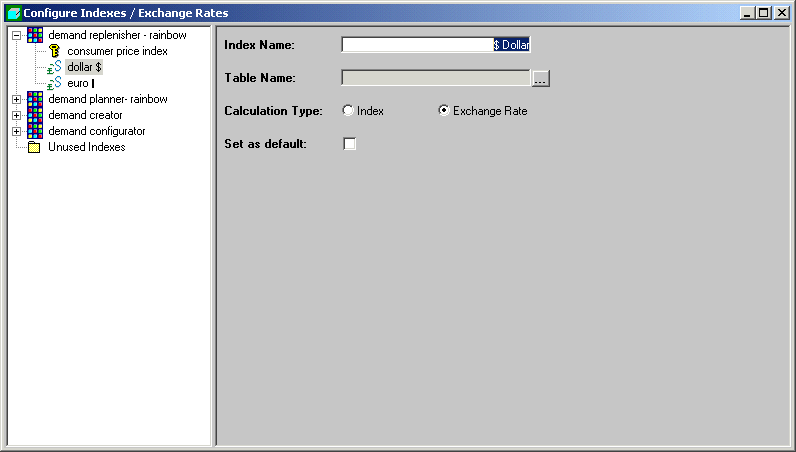
-
Click File > New. Or click the New button.
-
In Index Name, type the name of the index or exchange rate, as it should appear in worksheets.
-
In Table Name, type the name of the table in which Demantra should store information for this index or exchange rate. Demantra will automatically create this table.
Note: For simplicity, use the same name as you used for the index or exchange rate.
-
For Calculation Type, click one of the radio buttons to indicate whether this is an index or an exchange rate.
-
Click File > Save.
-
To enter data for this index or exchange rate:
-
Click the ellipsis (...) button next to the Table Name field.
Business Modeler displays the following window:
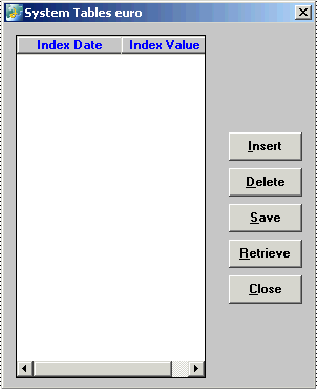
-
To add an entry, click Insert.
-
For Index Date, specify a date, using the date format required by the database.
-
For Index Value, specify the value that takes effect on the specified date. This value is multiplied by the base unit price.
-
Repeat as needed. When you are done, click Save.
-
Click Close.
-
-
The new index or exchange rate is not associated with any component. See “Creating or Modifying a Component”.
To edit an index or exchange rate
-
In the left side of the dialog box, click the name of any component that includes the index or exchange rate. This expands the display so that you can see the indexes and exchange rates in that component.
-
Click the index or exchange rate.
-
Modify as needed.
-
Click File > Save.
To delete an index or exchange rate
-
Select an index or exchange rate.
-
Click Delete.
-
Business Modeler prompts for confirmation.
-
Click OK.
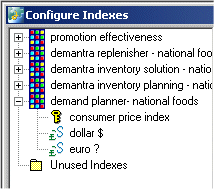
To see which indexes a component uses
-
In the left side of the dialog box, click the plus sign (+) to the left of the component name.
The hierarchy expands to display all the indexes and exchange rates that are used in this component.
To assign indexes and exchange rates to a component, see “Creating or Modifying a Component”.
Editing Values for Indexes and Exchange Rates
To edit values for the indexes
-
Click System > Maintain > Edit Installed Indexes.
The Installed Indexes List dialog box appears.
-
Click a table and then click OK.
A dialog box appears for the selected table.
-
To insert new values, click Insert and then type values in the new row that appears.
-
To update the list after inserting new values, click Update. Or, to reset the list to the original values, click Reset.
Configuring Units
If the database contains the appropriate unit conversion data, you can define two general kinds of units of measure to use in Demantra:
-
Size units, which measure the size of a sale: cases, truckloads, and so on.
-
Monetary units, which measure the value of a sale. You can also specify indexes and exchange rates associated with the unit.
The procedure is slightly different for these two kinds of units.
To create a size unit
-
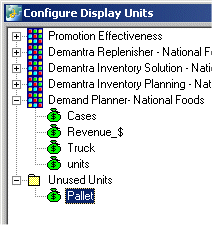
Click Configuration > Configure Display Units.
-
The Configure Display Units dialog box appears.
-
-
Click File > New. Or click the New button.
-
In Display Units, type the name of this unit of measure, as it should appear in worksheets.
-
In Data Table, type the name of the table (such as t_ep_sku) in which Demantra contains conversion factors for this unit.
Note: The conversion factors must be imported, because these factors are generally different for each SKU and may vary over time.
-
In Data Field, type the name of the field in this table that contains the conversion factors for this unit.
-
In Data Expression, type an expression that retrieves the conversion factors for this unit.
-
Click File > Save.
-
The new unit is not associated with any component. To make this unit available to users, see “Creating or Modifying a Component”.
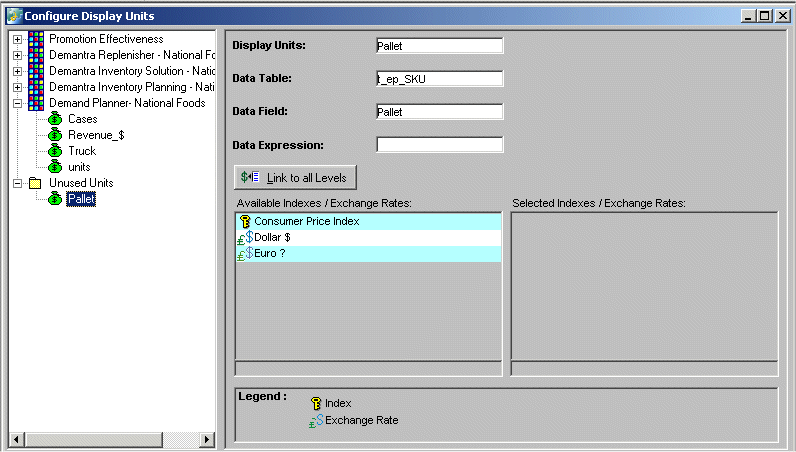
To create a monetary unit
-
Click Configuration > Configure Display Units.
The Configure Display Units dialog box appears.
-
Click File > New. Or click the New button.
-
In Display Units, type the name of this unit of measure, as it should appear in worksheets.
-
In Data Table, type the name of the table in which Demantra contains conversion factors for this unit.
-
In Data Field, type the name of the field in this table that contains the conversion factors for this unit.
-
In Data Expression, type an expression that retrieves the conversion factors for this unit.
-
For each index and exchange rates by which this unit could potentially be multiplied, drag the index/exchange rate from the left list to the right list. Within a worksheet, the user will be able to select one of these at a time.
-
Click File > Save.
-
The new unit is not associated with any component. To make this unit available to users, see “Creating or Modifying a Component”.
To edit a unit
-
Click Configuration > Configure System Units.
The Configure Display Units dialog box appears.
-
In the left side of the dialog box, click the name of any component that includes the unit. This expands the display so that you can see the units in that component.
-
Select a unit.
-
Modify as needed.
-
Click File > Save.
To delete a unit
-
Click Configuration > Configure System Units.
The Configure Display Units dialog box appears.
-
In the left side of the dialog box, click the name of any component that includes the unit. This expands the display so that you can see the units in that component.
-
Select a unit.
-
Click File > Delete.
-
Business Modeler prompts for confirmation.
-
-
Click OK.
To see which units a component uses
-
Click Configuration > Configure System Units.
The Configure Display Units dialog box appears.
-
In the left side of the dialog box, click the plus sign (+) to the left of the component name. The hierarchy expands to display all the units that are used in this component.
To assign units to a component, see “Creating or Modifying a Component”.
Associating Units with Levels
Before users can access a unit of measure, you must associate that unit of measure with each aggregation level with which it could conceivably be used. Within a worksheet, the user will be able to select any unit associated with any aggregation level that the worksheet uses.
There are two equivalent approaches you can use:
-
You can use an option that associates a unit with all existing levels, and then you can make further changes for any levels that should not use this unit.
-
You can associate the unit with each level one at a time.
The approach you choose depends on how many levels you have and how many of them should use a given unit.
To associate a unit with all levels
-
Click Configuration > Configure System Units.
The Configure Display Units dialog box appears.
-
In the left side of the dialog box, click the name of any component that includes the unit. This expands the display so that you can see the units in that component.
-
Select a unit.
-
Click Link Unit to All Levels.
-
Optionally remove this unit from specific levels, if needed, as described below.
To associate a unit with a level
-
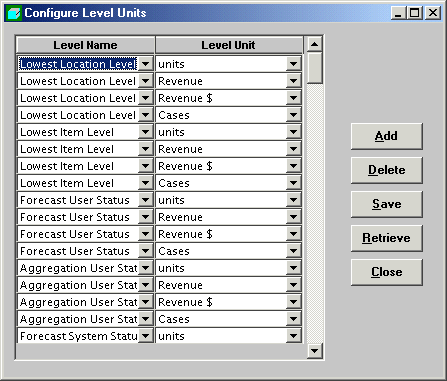
Click Configuration > Configure Units for Levels.
The system then displays the following list, which includes one line for each existing level-unit association.
-
Click Add.
-
In the Group column, select the level.
-
Do one of the following:
-
Click the corresponding cell in the Group Unit column and select a unit value.
-
Click the appropriate cell in the Group Unit column and modify its value.
-
-
Click Save to save the configuration.
-
Click Close to close the dialog box.
To remove a unit from a level
-
Click Configuration > Configure Units for Levels.
The system then lists all the existing level-unit associations.
-
Click the line that corresponds to the association you want to remove.
-
Click Delete.
-
Click Save to save the configuration.
-
Click Close to close the dialog box.
Configuring Time Units
Any Demantra solution has a base time unit (often weeks or months). Demantra provides some larger predefined time units, and you can add others. In general, there are two types of time units:
-
Simple time units (such as quarters) are simple multiples of the base time unit. For these, you just provide a scaling factor. For example, for a weekly system, a quarter consists of 13 time units. These time units are assumed to divide evenly into one year, and Demantra automatically figures out which base time bucket each date belongs to.
-
Data-dependent time units (such as 4-4-5 time units) require explicit data. That is, they must be assigned explicitly to each date in the system, within the Inputs table. For an example, see “Units, Indexes, and Exchange Rates”.
To configure a simple time unit
-
Click Tools > Maintain > Edit Time Resolution.
-
Click Insert.
-
In the Description column, type a name for the time unit.
-
In the Time Scale column, type the number of base time units in this new time unit. Ignore the Inputs Column field.
-
To save changes, click Save. Or to exit without saving changes, click Cancel.
To configure a data-dependent time unit
-
Using a database tool, add a column to the Inputs table that indicates how to group the base time buckets.
-
Within the Business Modeler, click Tools > Maintain > Edit Time Resolution.
-
Click Insert.
-
In the Description column, type a name for the time unit.
-
In the Inputs Column field, select the column from Inputs that contains the data for this time unit. Ignore the Time Scale column.
-
To save changes, click Save. Or to exit without saving changes, click Cancel.
-
Click Tools > Maintain > Edit Time Resolution.
-
Click a row in the Time Resolution screen.
-
Click Delete.
-
To save changes, click Save. Or to exit without saving changes, click Cancel.
See also
“Creating a Time Aggregation”
Configuring Update-Lock Expressions
An update-lock expression checks to see if a condition is met for each combination and if so, and prevents users from updating the database (saving the changes to the combination). This expression evaluates to either true or false. If the expression evaluates to true, then when the user tries to save the combination, a message is displayed and the worksheet data is not saved. The user must correct the data before the worksheet can be saved.
To configure an update-lock expression
-
Click Configuration > Configure Update Locks.
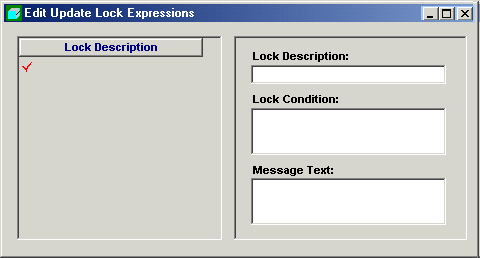
The Edit Update-Lock Expressions dialog box appears.
-
Click the New button.
-
In the Lock Description field, add or edit the title of the expression.
-
Click the Lock Condition field.
The Client Expression Editor appears.
-
Create or edit an expression that evaluates to either true or false. See “Specifying Server and Client Expressions”.
Note: Be sure that any constant values are expressed as the correct type of data (numeric, string, or date) for the expression you use. For example, be sure to use double quotes around constant string values if your expression uses a string-type series.
-
In the Message Text field, create or edit the message to be displayed when the update-lock expression returns true. This message should be as informative as possible so that the user knows which of his or her edits is responsible for the update-lock condition.
-
Click the Save button.
To delete the contents of a field
-
Click the Delete button.
To refresh data from the database
-
Click the Retrieve button.