Series and Level Integration
This chapter describes how to use the Integration Interface Wizard, which you use to import or export series data and level members.
This chapter covers the following topics:
- Before Using the Integration Interface Wizard
- Creating or Modifying an Integration Interface
- Creating a Data Import Profile
- Creating a Data Export Profile
- Specifying Series Data to Import or Export
- Creating an Export Profile for Any Level
- Creating an Import Profile for a General Level
- Deleting an Integration Interface
- Details of the Staging Tables
- Executing an Integration Interface
- Checking the Integration Queue
Before Using the Integration Interface Wizard
Before you use the Integration Interface Wizard, be sure to do the following:
-
Read the “Integration” Chapter and make sure you understand the different options for importing and exporting data.
-
Define the series and levels that you plan to import or export.
-
If you are importing data, make sure you know what database procedures to run in order to keep the Demantra tables synchronized.
-
Consider the following option provided by the Business Modeler: When you create an integration interface, the Business Modeler can automatically create a database user/schema that is pre-filtered to display only the data selected in that integration interface. This database user is provided for convenience and can be used within the Demantra solution or elsewhere. Demantra does not use this database user directly.
If you choose to create this user; the Business Modeler automatically uses the user name and password that you used to log into the Business Modeler. This means that you must use the following overall process for each integration interface you want to create:
-
Decide what database user name and password you want to associate with that integration interface.
Note: Make sure that the database does not yet ‘contain a user with this name. The Business Modeler will not change an existing user.
-
Log onto the Business Modeler as a component owner. Create the user.
-
Log into the Business Modeler as that user.
-
Within the Business Modeler, create the integration interface. Be sure to enable the option Create DB User for Interface Objects.
Note: Whenever the Demantra user's password is changed, the database user's password must also be changed (if the user is an interface database user).
-
Creating or Modifying an Integration Interface
Before you perform data import or export, you define a reusable integration interface. This will contain any number of data profiles and level profiles. The profiles define the details of the integration.
To create or modify an integration interface
-
Click Tools > Integration Interface.
The Create/Modify Integration Interface screen appears.
-
Do one of the following:
-
Click New Integration Interface and then click OK. Or double-click New Integration Interface.
-
Click the button corresponding to the integration interface that you want to edit.
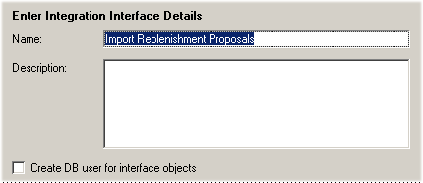
The Integration Interface Details screen appears.
-
Specify or edit the name and description for this integration interface.
-
Select or clear the Create DB User for Interface Objects check box.
If selected, you will create a database user who can view only the data as configured in this integration interface.
Note: The new database user will receive the username and password with which you logged into the Business Modeler.
If the database user already exists, it is not changed.
-
-
Click Next. Or click Cancel and proceed to the next stage without saving changes.
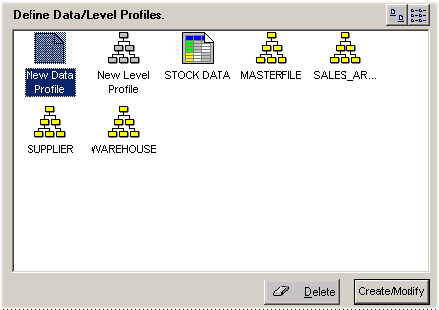
The Integration Interface Selection screen appears. Here you define data profiles and level profiles within this integration interface.
-
To display the profiles in list format instead, click the list format icon on the upper right.
-
Do at least one of the following:
-
Define a data profile, as described in “Creating a Data Import Profile” or “Creating a Data Export Profile” .
-
Define a level profile, as described in “Creating an Import Profile for a General Level”.
-
-
Click Finish.
See also
Making Changes Available to Users
Creating a Data Import Profile
A data import profile describes how to import series data aggregated to a specific aggregation level or levels, with optional filtering. You can include sales series or promotion series, but not matrix series.
Important: Create import integration profiles using the Business Modeler installed on the server where Oracle Demantra is installed, and not using Business Modeler installed on the client personal computer.
In the case where the E-Business Suite Administrator navigates to the Collaborator Workbench > Planning Applications > Business Modeler, this deploys the silent install of the Business Modeler locally on C:\Program Files\Oracle Demantra Spectrum.
See Desktop and Business Modeler Automatic Install.
When the user creates an Integration Profile, the system creates a batch file on the machine from which Business Modeler is initiated. An executable step of the corresponding workflow references the batch file location on the server. In order for the workflow to process the batch file, the path to the batch file in the executable step of the workflow needs to reference the correct location (on the server). In the case where the user launches Business Modeler from the client PC, the workflow errors, because it looks for the batch file on the server, while it exists on the client PC.
To create a data import profile
-
Open the integration interface, as described in “Creating or Modifying an Integration Interface”.
-
Click Next to display the Define Data/Levels Profile screen.
-
Click New Data Profile and then click Create/Modify. Or double-click New Data Profile.
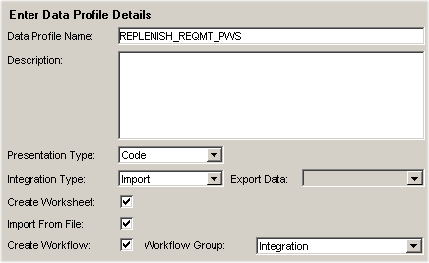
The Integration Interface Wizard displays the following screen.
-
Specify the following details for the data profile.
-
If your system does not include the Workflow module, then the preceding screen includes the following field:
Create Process Batch Select this check box to automatically create a batch file that uses this data profile. The name of the batch file is given in the final step of the wizard. -
Click Next.
-
In the next set of screens, the Integration Interface Wizard prompts you for information about the data to import. This process is similar to creating worksheets. If you are not familiar with that process, see “Specifying Series Data to Import or Export”.
-
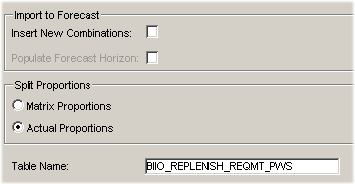
After you specify the data to import, the Integration Interface Wizard prompts you for additional import details.
-
Specify the following information:
Note: Make a note of the name of the staging table. For an introduction, see “Details of the Staging Tables”.
-
Click Next.
-
If you are importing data from a staging table rather than a file, skip ahead to Step 17.
-
If you are importing data from a file, the Integration Interface Wizard prompts you for details about that file.
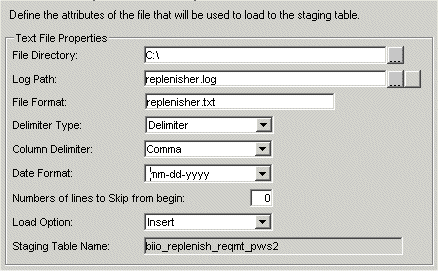
-
Specify the following information:
-
Click Next.
-
If you are importing from a file, the Integration Interface Wizard displays a screen that shows additional details of the imported data.

This screen shows one row for each field that the imported data contains.
-
Specify which columns to import. By default, all columns are imported; to prevent a column from being imported, select the Active check box.
-
Specify the order of the fields. To move a field, click the field and then click the up or down arrows until the field has reached the appropriate location.
-
If you chose the fixed width option earlier, you must now specify the widths of each of these fields. To do so, enter the starting and ending column position.
-
-
Click Next.
-
The Integration Interface Wizard displays a screen that reviews your selections.
-
Review the displayed information and do one of the following:
-
To make further edits, click Back.
-
To finish the data profile, click Finish.
The Integration Interface Selection screen appears. See “Creating or Modifying an Integration Interface".
-
Creating a Data Export Profile
A data import profile describes how to export series data aggregated to a specific aggregation level or levels, with optional filtering. You can include sales series or promotion series, but not matrix series.
If you want to export a series that uses a client expression, you must first run the Business Logic Engine to evaluate the expression, split the resulting data to the lowest level, and save it to the database. If you are exporting data within a workflow, you use the BLE step type for this purpose.
To create a data export profile
-
Open the integration interface, as described in “Creating or Modifying an Integration Interface”.
-
Click Next to display the Define Data/Levels Profile screen.
-
Click New Data Profile and then click Create/Modify. Or double-click New Data Profile.
The Integration Interface Wizard displays a screen where you name the new data profile.
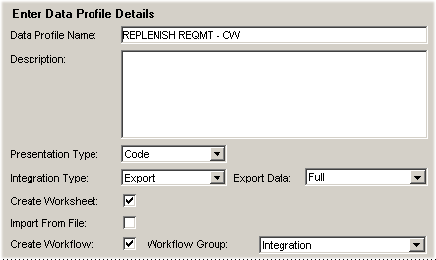
-
Specify the following details for the data profile.
Name Unique name for the data profile. Description Optional description. Presentation Type Specifies how level members are identified in the profile:
If you select Description, each member is identified by its description field.
If you select Code, each member is identified by its code display field.Integration Type Export.
For information on import profiles, see “Creating a Data Import Profile”.Export Data Select one of the following options:
Full - use this to export all data
Incremental - use this to export only changed dataCreate Worksheet Select this check box if you want Demantra to create a worksheet that you can use to view the data. Create Workflow Select this check box to automatically create a workflow schema that uses this data profile. This option is available only if your system includes the Workflow module. Workflow Group Specify the schema group that this workflow should belong to. This option is available only if your system includes the Workflow module. -
If your system does not include the Workflow module, then the preceding screen includes the following field:
Create Process Batch Select this check box to automatically create an external batch file that uses this data profile. The name of the batch file is given in the final step of the wizard. -
Click Next.
-
In the next set of screens, the Integration Interface Wizard prompts you for information about the data to export. See “Specifying Series Data to Import or Export”.
-
After you specify the data to export, the Integration Interface Wizard prompts you for additional export details.
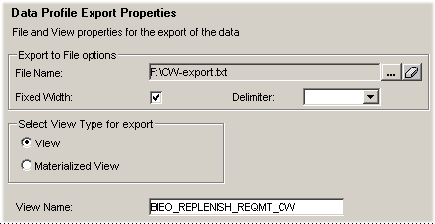
-
Specify the following information:
File Name Full directory path and filename of the file to which you are exporting data. Note that Demantra appends a unique time stamp to the end of the file so that you can export multiple times and see each result. Fixed Width Select if you want to export data in fixed width format. Leave this option unselected if you want to specify a field delimiter instead. Column Delimiter Choose the delimiter that Demantra should use between fields when it exports the data. This option is enabled only if Fixed Width is not selected. Select Type of View for Export Choose one of the following:
View - Retrieves data from the database.
Materialized view - Saves data as a cube allowing quick and flexible analysis. (This option is enabled only for Oracle.)View Name Name of internal table into which Demantra will export this data. If you change this name, it must not include spaces.
Also, the view is created only after you run the export process. The columns in the view are not necessarily in the same order as in the exported file. -
Click Next.
The Integration Interface Wizard prompts you to specify the fields to export.
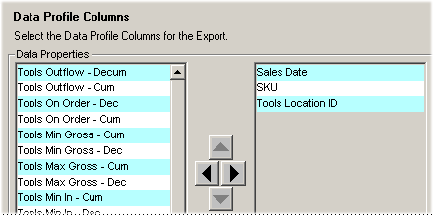
-
For each field that you want to export, click that field in the left list and then click the right-pointing arrow.
-
To change the order of the fields, click a field and then click the up or down arrow.
-
Click Next.
-
-
If you chose the fixed width option earlier, you must now specify the widths of each of these fields. The Integration Interface Wizard displays the following screen.

-
For each field, specify a numeric field width.
-
Click Next.
-
-
The Integration Interface Wizard displays a screen that reviews your selections.
-
Review the displayed information and do one of the following:
-
To make further edits, click Back.
-
To finish the data profile, click Finish.
The Integration Interface Selection screen appears. See “Creating or Modifying an Integration Interface”.
-
Specifying Series Data to Import or Export
When you define a data profile for import or export (or both), a series of screens prompt you for information about the data.
Tip: It is generally good to import data at the lowest level possible.
If you need to load both sales series and promotion series, you probably should define separate data profiles for the two sets. You would likely want to import the promotion series at the promotion level, while you would import the sales series at some other level.
To specify series data for import or export
-
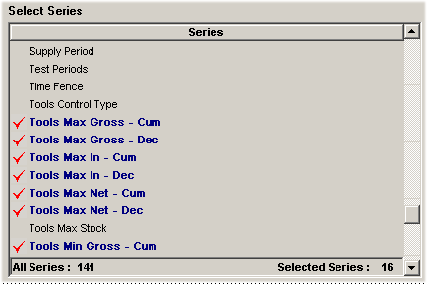
The Integration Interface Wizard prompts you for the series to import or export in this data profile.
-
Click each series you want to include so that it appears with a check mark.
Note: Be sure to select only series that have an update field.
-
Click Next.
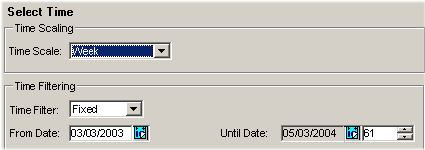
The Integration Interface Wizard prompts you for information about the time resolution and span of time to include in this data profile.
-
In the Time Scale box, specify the time resolution of the data to import or export.
-
In the Time Filter box, choose one of the following:
-
Choose Relative if you always want the import or export to use a time range relative to the date when you run the integration profile.
-
Choose Fixed if you always want the import or export to use a specific time range, regardless of when you run the integration profile.
-
-
In the From Date and To Date boxes, enter values depending on the time filter you have chosen, as follows:
Time Filter Box Action Relative From Date/ To Date Specify periods in both From and To with the current (computer) date as the reference point.
For example: If the Time Scale is Month, and you want data starting from six months before today until six months after, enter -6 (negative) in From Date, and 6 in To Date.Fixed From Date Enter a specific date as a starting point. This is enabled only from the calendar. To Date Specify the number of periods you want to include, starting from the From date. The unit period is what you selected in Time Scale.
For example: If the Time Scale is Year, From Date is 01/01/96, and you want data from then until 12/31/98, enter 3 in To Date. -
Click Next.
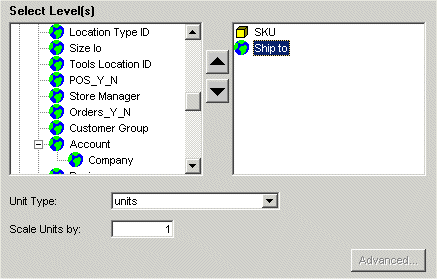
The Integration Interface Wizard prompts you for the levels at which the imported or exported data should be aggregated. For example, in the data profile shown here, data is imported for SKU-Ship to combinations.
-
Double-click each level you want to use, so that it appears in the right column.
-
Optionally move a selected level to an earlier or later position in the right column.
Note: The order in which the levels are listed in the right column controls the order of the fields in the staging table that Demantra creates for this data profile.
-
In the Scale Units by box, specify the factor by which all data in the import or export is to be divided.
-
In the Unit Type box, select the unit of measure to use in the imported or exported data.
-
If the Index box is displayed, choose an index from the drop-down list.
-
The Index menu lists all the time-dependent indexes and exchange rates that are associated with this unit.
-
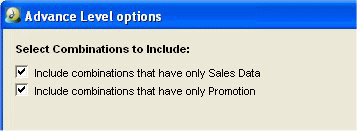
Optionally click the Advanced button in the lower right. Oracle displays a dialog box with additional options.
-
Select or deselect these check boxes as needed, and then click OK.
-
Click Next.
-
-
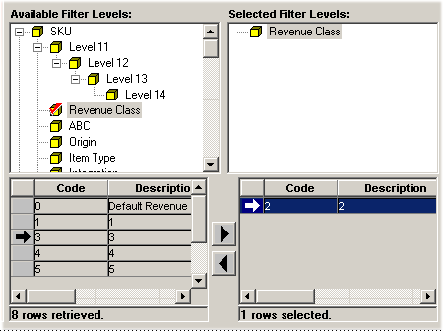
Now you can optionally filter the imported or exported data.
-
Find the aggregation level at which you want to filter data and move it from the Available Filter Levels list into the Selected Filter Levels list,
-
In the Available Members list, find a member that you want to include in the imported or exported data and move it into the Selected Members list.
-
Continue to move members from the Available Members list into the Selected Members list, until the latter list includes all the members you want.
-
Click Next.
-
-
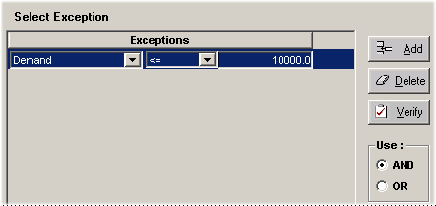
If you are defining an export integration profile, optionally define one or more exceptions.
-
Click Add.
-
In the new row, click the arrow to the right of the series box and select a series from the dropdown list.
Note: Not all series are necessarily available for exceptions, depending upon the series definition. See “Available for Exceptions”.
-
Click the arrow to the right of the operator box and select an operator from the dropdown list.
-
In the number box, type the required number.
-
You can apply additional exceptions. Select the AND or the OR radio button to specify that the relationship between the exceptions.
-
Click Next.
-
-
Continue to define the data profile as in the following topics.
-
Creating a Data Import Profile: Step 8
-
Creating a Data Export Profile: Step 8
-
Creating an Export Profile for Any Level
You can define a profile that describes how to export the members and attributes of any level.
Note: An export profile creates a database view, and the data in that view is then exported to the specified export file. The view is created only after you run the export process.
To create a level export profile for any level
-
In the Integration Interface Selection screen, double-click the New Level button.
-
Specify a name and description for the level profile.
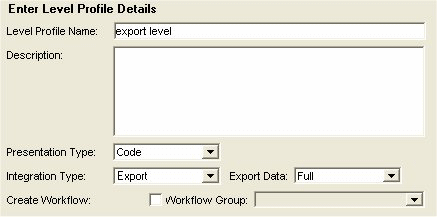
Name Unique name for the level profile. Description Optional description. Presentation Type Specifies how level members are identified in the profile:
If you select Description, each member is identified by its description field.
If you select Code, each member is identified by its code display field.Integration Type Export.
For information on level import.export profiles, see “Creating an Import Profile for a General Level”.Export Data Select one of the following options:
Full—use this to export all data
Incremental—use this to export only changed dataCreate Workflow Select this check box to automatically create a workflow schema that uses this data profile. This option is available only if your system includes the Workflow module. Workflow Group Specify the schema group that this workflow should belong to. This option is available only if your system includes the Workflow module. -
Click Next.
-
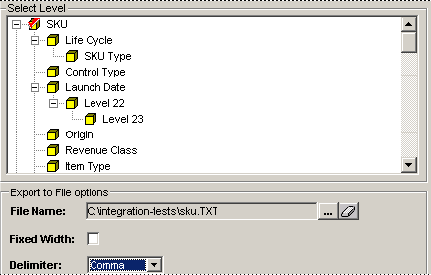
The Integration Interface Wizard displays a screen like the following.
-
-
Click the level to import or export.
-
Specify information about the file to export to, as follows. This file does not have to exist beforehand:
File Name Specify the path and filename of the export file. Fixed Width If selected, each data item will be trimmed or filled to a specific field width, as specified later. Delimiter A symbol used to separate the data elements in the file. Use this option only if you do not check Fixed Width. -
Click Next.
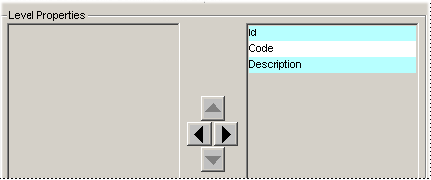
The Integration Interface Wizard displays a screen that lists the columns you can export for this level. In general, these columns correspond to identifiers and attributes of members of this level.
-
For each field that you want to export or import, click that field in the left list and then click the right-pointing arrow.
-
To change the order of the fields, click a field and then click the up or down arrow.
-
Click Next.
-
-
If you chose the fixed width option earlier, you must now specify the widths of each field of the export file.
The Integration Interface Wizard displays the following screen.

-
In the Field Width box, enter the required width of each field, in characters.
-
Click Preview Structure.
The Integration Interface Wizard displays a screen that reviews your selections.
-
Review the displayed information, and then do one of the following:
-
To make further edits, click Back.
-
To finish the data profile, click Finish.
The Integration Interface Selection screen appears.
See “Creating or Modifying an Integration Interface”.
-
Creating an Import Profile for a General Level
For a general level, you can define a profile that you can use to import or export the members and attributes of the level.
-
You can export members and attributes of a general level, but you cannot export the population attributes of the members. (The population attributes specify the item-location combinations to which each promotion applies.)
-
An export profile creates a database view, and the data in that view is then exported to the specified export file. The view is created only after you run the export process.
-
This import/export profile addresses only the members and attributes of the level. In the case of promotions, you generally also need to import or export the associated promotion series. To do so, create a data profile that includes the promotion series; see “Creating a Data Import Profile”.
-
When you import a member that already exists, Demantra updates the member with the new attribute values.
To create a level profile for an integration interface
-
In the Integration Interface Selection screen, double-click the New Level button.
-
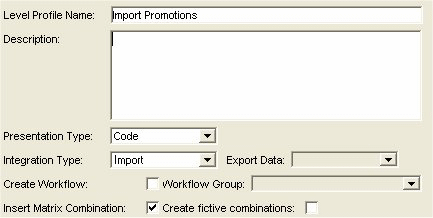
Specify a name and description for the level profile.
-
Click Next.
-
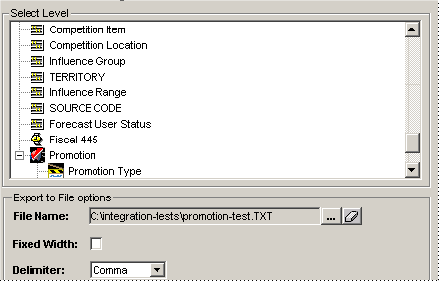
The Integration Interface Wizard displays a screen like the following.
-
-
Click a general level.
-
If you want to export this general level, specify the following:
File Name Specify the path and filename of the export file. This is the file to which the members and attributes of the general level will be exported. The associated population attributes are not exported. Fixed Width If selected, each data item will be trimmed or filled to a specific field width, as specified later. Delimiter A symbol used to separate the data elements in the file. Use this option only if you do not check Fixed Width. -
Click Next.
-
If you specified an export file, the Integration Interface Wizard displays a screen where you specify the columns in the file. In general, these columns correspond to identifiers and general attributes of members of this general level. Population attributes are not shown.
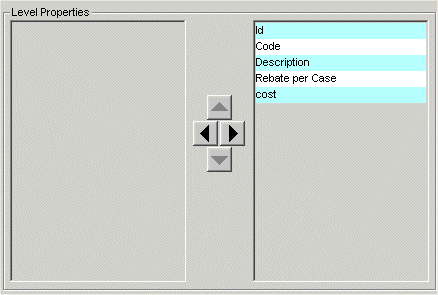
For each field that you want to export or import, click that field in the left list and then click the right-pointing arrow.
-
To change the order of the fields, click a field and then click the up or down arrow. Click Next.
If you chose the fixed width option earlier, the Integration Interface Wizard displays the following screen.

-
In the Field Width box, enter the required width of each field, in characters. Click Next.
The Integration Interface Wizard displays a screen where you specify the staging table or tables for this level.

You will import data into or export data from these tables. These tables have the following meaning:
Note: Make a note of the names of the staging tables. For an introduction, see “Details of the Staging Tables”.
-
Click Preview Structure.
The Integration Interface Wizard displays a screen that reviews your selections.
-
If you are importing data from a staging table rather than a file, click Create to create that staging table.
-
Review the displayed information and do one of the following:
-
To make further edits, click Back.
-
To finish the data profile, click Finish.
The Integration Interface Selection screen appears.
See “Creating or Modifying an Integration Interface”.
-
Deleting an Integration Interface
To delete an integration interface
-
Click Tools > Integration Interface.
The Create/Modify Integration Interface screen appears.
-
Click the button corresponding to the integration interface that you want to delete.
-
Click Delete.
Details of the Staging Tables
It is critical to understand the structure and purpose of the staging tables generated by this tool, especially as you will have to share this information with other groups or organizations who will provide the data to load. Demantra generates three kinds of staging tables, each with its own structure. This section describes the general rules that Demantra uses to create these tables.
Note: It is outside the scope of this documentation to describe how to load data into the staging tables.
Introduction
Oracle Demantra automatically creates staging tables as follows:
-
For a data import profile, Oracle Demantra creates a staging table to contain the series data aggregated to the specified level or levels.
-
For a general level import profile, Oracle Demantra creates a staging table to contain the level members that will be added. If the general level also includes a population attribute (as in the case of promotions), then Oracle Demantra creates an additional staging table to contain the population associated with each level member.
The Integration Interface Wizard initializes the names of these staging tables, but you can rename the tables within the wizard if needed. The default names start with biio_, but you should make a note of the names of your tables, as displayed within the Integration Interface Wizard.
You will also have examine the structure of your staging tables, to ensure that the correct data is loaded into them. The SQL command desc tablename is useful for this task; see your database documentation. The following sections provide guidelines for understanding the fields in these tables.
For each staging table, the Integration Interface Wizard also creates an error table. The error table has the same structure as the corresponding staging table, with the addition of a new column that is meant to contain any error message associated with that record. The error table has the same name as the corresponding staging table, with _err appended to the end.
Staging Table for a Data Profile
The staging table associated with a data profile is intended to contain one row for a given date and combination. For that date and combination, this row contains data for each series that is being loaded. The staging table has the following fields:
-
The first field (Sdate) is meant to contain the date for the data you are loading. This can be any bucket date that lies within the span of time specified by the data profile; see Step 2.
A bucket date is the calendar date of the first day within a given bucket. For example, if you are using a weekly system starting on Monday, all dates must fall on Mondays.
-
The next fields (Level1, Level2, and so on) are meant to contain either the codes or the descriptions for each member to which this data applies. These are character fields and are required.
-
Pay attention to the Presentation Type used in the data profile. If the Presentation Type is Code, then these fields should contain the codes of the parent members. Likewise, if the Presentation Type is Description, then these fields should contain the descriptions.
-
As you can see, these fields are not labeled to indicate the level to which they refer. Demantra considers the order in which you listed the levels within the integration wizard; see Step 3. The Level1 field contains the first level, Level2 contains the second level, and so on.
-
-
The rest of the fields are meant to contain the values for each series for the selected member(s) and date. The following rules apply:
-
These fields are not required.
-
The name of each field is the same as the update field name that you specified for the series. (See “Specifying Data Properties of a Series”.) This can be confusing if your series names and update field names are not the similar.
-
Except in the case of dropdown series, each of these fields has the same data type as the series itself.
-
For a drop-down series, the import field is expecting to contain the value that is shown within the drop-down list in the worksheet (rather than the internal value that is instead stored). Oracle Demantra automatically converts the imported value to the appropriate internal value.
For example, consider a drop-down series that uses the Promotion Type Level as a lookup:
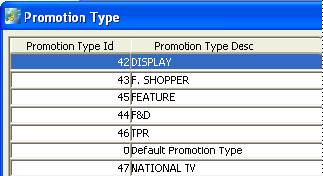
This series stores the values shown in the left column but displays the values shown in the right. When loading data for this series, you would provide values as shown in the right column.
Oracle Demantra looks up the value that you provide, finds the corresponding internal value, and imports the internal value into the database. If Oracle Demantra cannot find the value that you provide, this record is not imported and Oracle Demantra writes an error to the corresponding error table.
-
Main Staging Table for a Level Profile
The main staging table associated with a level profile is intended to contain one row for each member. That staging table has the following fields. For all these fields, field names depend on the level you are loading.
-
The first field is meant to contain the codes of the members that you are loading. This is a character field and is required.
-
The second field is meant to contain the descriptions of the members that you are loading. This is a longer character field and is required.
-
The next fields are meant to contain the codes for each immediate parent. These are character fields and are required.
-
The rest of the fields are meant to contain the attribute values for each member that you are loading. The following rules apply:
-
None of these fields are required.
Note: If you omit values for these fields, Demantra leaves the corresponding attributes as null. Oracle Demantra does not use any level or attribute defaults during import.
-
The name of each field is the same as the column name that you specified for the attribute. This can be confusing if your attribute names and column names are not the same.
-
Except in the case of lookup attributes, each of these fields has the same data type as the attribute itself.
-
For a lookup attribute, the import field is always a character field.
-
For a lookup attribute of type table, the import field is meant to contain the same data as used in the display column of the table, as specified in the level editor here:
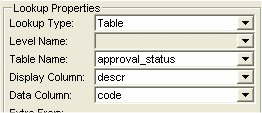
For example, suppose that the approval_status table is as follows:
Code DESCR 1 Submit 2 Submitted 3 Approved 4 Re-Review In this case, the staging table is expecting to receive the description fields, such as “Submit." Oracle Demantra uses the lookup table, finds the corresponding codes, and inserts those into the level table. If Oracle Demantra cannot find the given field in the lookup table, the promotion is not imported and Oracle Demantra writes an error to the corresponding error table.
-
For a lookup attribute of type level, the import field is meant to contain the description field of the member, as displayed in the right side of the Level Members screen:
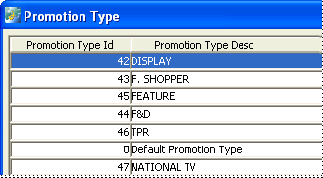
For example, you would load the data “Feature” into the field for this level-type attribute. Oracle Demantra looks up this description in the level table, finds the corresponding code, and inserts that into the level table for the member that you are importing. If Oracle Demantra cannot find the given description, the promotion is not imported and Oracle Demantra writes an error to the corresponding error table.
-
Population Staging Table for a Level Profile
If you define an import profile for a promotion or other general level, Oracle Demantra also creates a staging table (for example, biio_population) to hold the population of the promotions that you are loading. This staging table describes the population of each promotion. Specifically, it contains the same information as this window:
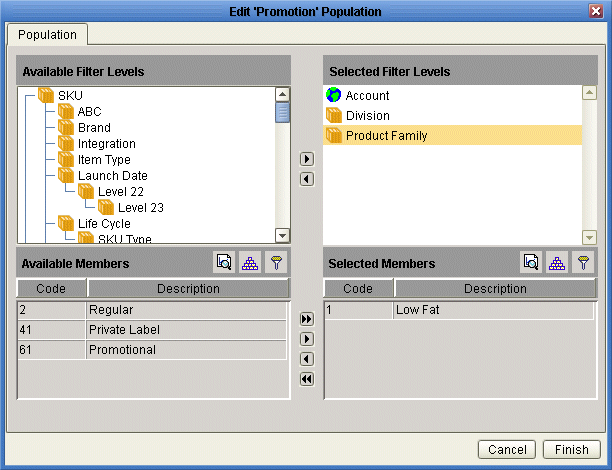
For each promotion, the table can contain multiple rows. Each row specifies a level and a member of that level, just as the preceding screen does (the previous screen shows that this promotion is associated with the Low Fat member of the Product Family). This table has the following structure:
| Field | Data Type | Purpose |
|---|---|---|
| LEVEL_MEMBER | varchar2 (40) | Code of the promotion (or other general level) member that you are loading. |
| FROM_date | date | Start date for this promotion member. |
| UNTIL_date | date | End date for this promotion member. |
| FILTER_LEVEL | varchar2 (50) | Name of a level, for example “Product Family” or “SKU”. |
| LEVEL_ORDER | number (15) | Use 1 for a location-type level or 2 for an item-type level. |
| FILTER_MEMBER | varchar2 (50) | Description of a member of this level, for example “Low Fat”. |
Executing an Integration Interface
Once you have created an integration interface, you can use it in either of two ways:
-
You can incorporate the integration interface in a workflow controlled by the Workflow Manager.
To automate import or export, you add the appropriate integration interface to the workflow or workflows that you have defined for the users. You use the workflow step Transfer Step to initiate the import/export process. Internally, in this case, the APS layer performs the integration.
-
You can use the separate Standalone Integration Tool, which is Demantra_root/Demand Planner/Integration/aps.bat. (This tool consists of a subset of the APS, packaged as an executable file.) To use this tool, open a shell, change to the directory in which the tool resides, and enter the following command:
aps.bat option "integration interface name" "profile name"
Here, option must be one of the following options, to specify what to import or export:
-
EXPORT_DATA
-
IMPORT_DATA
-
EXPORT_LEVEL
-
IMPORT_LEVEL
-
Also, integration interface name must be the name of an integration interface that has already been defined, and profile name is the name of a data profile or level profile within that interface
The double quotes are needed only if there are spaces within the interface name or the profile name.
Note: If you are importing data, and if the data profile specifies actual proportions (rather than matrix proportions), be sure to run the MANUALS_INS_INTEGRATION procedure after you run the integration interface.
Checking the Integration Queue
You can check the status of the integration tasks.
To view the integration queue
-
Start Demand Planner or Demand Replenisher.
-
Click Window > Integration Queue Monitor.
The Integration Queue Monitor window appears. The window shows the Oracle Demantra tasks initiated for the integrated application. You can see the following information: