Creating Workflows
This chapter describes how to create Demantra workflows, which are automated or semi-automated processes that you can use for a wide variety of purposes.
This chapter covers the following topics:
- Creating or Editing Workflow Schemas
- Parameters Used as Arguments for a Workflow
- Deleting Workflow Schemas
Creating or Editing Workflow Schemas
You can edit any workflow schema that you created, but you cannot edit schemas created by other users. When you edit a schema, the changes will be used in any new instances of the workflow schema. Any instances of the schema that are currently running are unaffected.
Note: If you are configuring a method that changes attribute values, the workflow must include an Edit Member Step as its first step. Otherwise, the changed values will not be saved to the database.
Note: You do not have to create the whole schema in one editing session. You can save your changes and then return to edit the schema.
Note: You can mark a schema as archived, which prevents it from being used. It is good practice to archive any schema that is not yet finalized, to prevent it from being used before it is ready.
To create or edit a workflow schema
-
Log onto the Workflow Editor as described in “Logging into the Workflow Manager.”
-
Do one of the following:
-
To create a new schema, click New Schema at the bottom of the page.
-
To edit a schema, click Edit in the row corresponding to that schema. Or click the schema name.
The Workflow Editor appears.

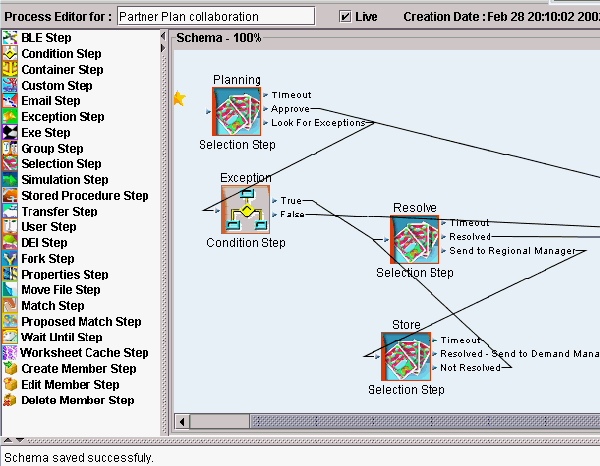
This screen has three panes:
-
The left pane lists all the available steps that you can include in the workflow.
-
The right pane shows the definition of the workflow itself.
-
The message pane at the bottom of the window contains information, such as a warning of a failed validation or confirmation of a successful save.
-
-
Do one of the following:
-
To make the schema to be available for use, select the Live check box.
-
To make the schema unavailable, clear the Live check box.
-
-
Add the required steps to the workflow. To add a step to the workflow:
-
In the left pane, double-click the icon corresponding to the step.
The Workflow Editor displays a popup window that prompts you for information about the step.
-
Specify the step properties. The properties depend on the kind of step you are adding. For details, see “Workflow Steps”.
-
Click OK.
The step is added to the right pane.
-
Within the right pane, optionally reposition the step icon to improve readability.
-
-
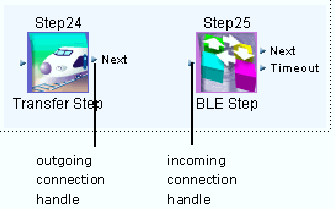
Connect the steps in the required order. To link two steps, click the outgoing connection handle of the first step and drag to the incoming connection handle of the next steps.

Note the following rules:
-
An outgoing connection handle can be linked to only one following step. The Container Step is the exception.
-
A step that is contained within a Container Step cannot have any of its outgoing connection handles connected to other steps.
-
The Selection Step has multiple outgoing steps. To define the outgoing connection handles and to add the links, you use the properties dialog box. See “Defining and Linking to Selections”.
-
-
To specify which step starts the workflow, right-click the step and then select Set as Start step.
This step is labelled with a yellow star. If a different step had previously been marked as the starting step, that mark is cleared automatically.
Each schema must specify a step from which the execution starts.
-
To save your workflow to the database, click Save. Or click Back to cancel your changes.
Note: When you save a schema, it is automatically checked for validity. You cannot save an invalid schema. Click Verify to verify before saving.
-
Click Back to return to the main screen.
To edit an existing step
Parameters Used as Arguments for a Workflow
When you configure a workflow as a method, Demantra can pass arguments in memory to any method. Considered as a group, these arguments are the context dictionary for the method. For each argument, Demantra passes a variable name and its associated value. The available arguments generally fall within three categories:
-
System information, such as the ID of the worksheet from which the method was launched
-
Member information, such as the unique identifier of the member
-
User inputs, such as specific, keyed-in details provided in the method input dialog box. For example, a maximum budget can be supplied to the Optimization method.
In order to make these arguments available to a workflow step, you must explicitly configure the variables that each workflow step should receive. To do so, you type each variable name in the Name column of the Parameters list for that step, as follows:

In this example, the first two arguments are standard member variables, from the table in “Available Arguments”. These arguments can be used in any method.
The remaining three arguments are input variables; these variables refer to attributes of the member. Specifically these are the names of the columns in which these attributes are stored (Product Family, Brand, and Name).
Note: In the Parameters list:
-
The parameter names are case-sensitive.
-
The descriptions are not used by the method.
-
If a value is null in this table, then the value is taken from the member from which the method was launched.
-
If the value is not null, then it is used instead of the value taken from that member.
Dictionary Step
Functionality to update member attributes as part of a Workflow process can be beneficial:
-
As part of a Workflow to load new data from an external data source, such as a Supply Plan from Strategic Network Optimization. For example, set the status of Supply Plan members to ‘Load In Process’ to indicate to users who are viewing data that this data is being updated.
-
As part of a Workflow to approve a Supply Plan. For example, set the status of the Supply Plan members to ‘Approved’.
The dictionary allows for get and set capabilities on member attributes. A custom step called the ‘DictionaryStep’ (com.demantra.workflow.step.DictionaryStep) allows users to specify an attribute name, and a value to assign to that attribute.
To accomplish this, two parameters must be specified:
-
Name – Attribute name. This is the name of the parameter on the dictionary that will be modified. When a level method is executed, it places all the level attributes as parameters on the dictionary. The attribute names are the internal column name in uppercase letters. The reference is case insensitive. To support passing parameters between steps, the dictionary also adds the parameter to the dictionary, if the attribute does not already exist on the member.
-
Value – Attribute value. This is the value that the attribute receives. The dictionary step modifies the value only if the attribute type matches the value. In other words, if the name is of type “character,” it can be updated with any numeric and alphanumeric character. If the name is of type “number,” it will only allow numeric updates. Values can also reference a different attribute, in this case you enclose the reference attribute internal name with parenthesis {}.
Protected attributes.
The dictionary step assumes the following attributes as protected because of dangerous side affects of modifying them:
-
member_id
-
current_worksheet
-
METHOD_STATUS
-
appserver_root
-
application_root
-
create_combinations_param
-
default_filters
-
combination_path
-
view_name
-
user_id
-
worksheet_filter
-
level_id
-
ws_id
The reference to the attribute value can be one of the following:
-
A fixed varchar or numerical value, such as Approved or 10,000. Strings do not require quotes around them.
-
A lookup on another attribute value. These are indicated using parenthesis {}, such as {other_attribute}. If a token is used, the step will look up the value of {other_attribute} and apply that value to the attribute named, such as {attribute_name}. In this case, the attributes must be of the same type, such as varchar, number, or date.
-
Lookups on other tables. For complex situations such as attributes that are lookups on another table, the value itself is stored in Oracle Demantra as an integer that maps to a value, such as ‘Unplanned’, ‘Planned’, ‘Closed’. The dictionary step works in such a way that the value can be specified as the lookup value, such as ‘Unplanned” and not the integer. This makes workflows easier to review and understand. In other words, it is easier to parse a workflow in which a step sets the status to ‘Planned’ than one that sets the status to ‘1’ – the internal id of the ‘Planned’ status. If the attribute is defined as a lookup on a set of values, Status = {Unplanned, Planned, Closed}, the set value must be one from this set. Otherwise an exception will be thrown.
-
A date attribute.
Broader lookups are not supported. This means the value cannot be a SQL query, such as:
value = “select name from TABLE_A where x=y”
The DictionaryStep ensures the value is an acceptable value for the attribute named. For example, if the attribute is of type ‘number’, the value must be a number. If the attribute is a lookup on a set of values, the value must be one from this set.
The value is set in the dictionary. In order to ensure the value is saved to the dictionary, the final step in the workflow must be an ‘Edit Member’ step to ensure the dictionary context of the level method is saved back to the database.
Logging is handled by removing the comment “appserver.workflow.general” in the logconf.lcf file.
In case there are conflicts of parameter names a properties file (“DictionaryStep.properties”) in conjunction with DictionaryStep in Common.jar that controls the name, value parameters.
To leverage the Dictionary Step functionality:
-
Login to Workflow Manager.
-
Create a New Schema by selecting New Schema.
-
On the left hand side, select Custom Step from the list of available steps.
-
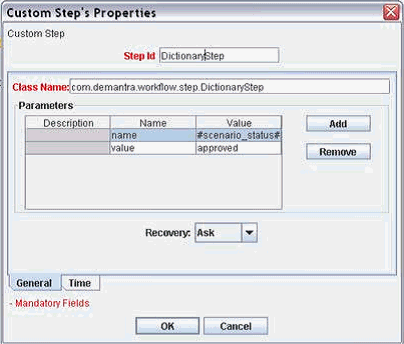
Give the step a unique identifying name. Specify the class name as com.demantra.workflow.step.DictionaryStep. Also specify the name of the attribute the step will set and the value; rows are added to the parameters table by selecting Add on the right hand side.
In the example below, the DictionaryStep will lookup the attribute/parameter “scenario_status” on the dictionary, and then set it to “approved”.

Important: In order for methods to be able to save values to the database there should always be an “EditMemberStep” preceding the DictionaryStep.
##
## DictionaryStep properties
##

# the step parameter name-token used for DictionaryStep step.param.name=name
# the step parameter value-token used for DictionaryStep step.param.value=value
# the step parameter refrence tokens
step.param.refrence.left={
step.param.refrence.right=}
# log4j logger category to use logger.category=appserver.workflow.general
Level Methods. The ability to set an attribute value through a level method continues. This functionality supports workflow-based setting of member attributes, such as setting values implicitly through a workflow, versus explicitly through a user-initiated method.
Relative Path Requirements
Some workflows contain executable (.exe) steps that point to specific batch files to be executed. Since those paths are absolute, there is a need to correct paths to the executable files for each installation. In order to remedy the use of an absolute path in workflow steps, Oracle Demantra provides support for a relative path to files or applications referenced by workflow steps in the Demantra Workflow Manager.
This parameter is automatically assigned to every launched workflow dictionary. It can be used to define a physical root path to a folder containing key files or executables leveraged by Workflow schemas in the Workflow Manager.
Relative path requirements fall under two cases:
-
Case 1: Relative to web application folder structure, in other words, one folder above the WEB-INF folder
-
Case 2: Relative to the Demantra application folder, in other words, the folders in which the engine, Demand Planner desktop, Business Modeler and the integration standalone aps.bat are installed.
To accommodate these two relative path requirements, two new path tokens are provided. Every running workflow schema will have these parameters in their dictionary. They will be automatically assigned by the Workflow process creator. Using these parameters eliminates the need to change workflow steps that run external files. In most cases, the reference to these files can now be relative to the install folder.
Case 1: Using the appserver_root Parameter for Web Application
The appserver_root parameter, located within the sys_params table, provides support for a relative path to files or applications referenced by workflow steps in the Demantra Workflow Manager. If the appserver_root parameter is null, or empty, then its default value is one folder above the WEB-INF folder of the Demantra application install.
Note: Typically the folder located directly above WEB-INF is labeled as the ‘demantra’ folder, but this name can be changed during installation.
Workflow token #appserver_root#
-
By default, this token is calculated dynamically from the context of the Demantra WEB APPLICATION, in other words, one folder above the WEB-INF folder. When the Oracle Demantra application server starts, a servlet is executed that calculates the physical path to the root of the virtual folder where Demantra is installed, and then assigns it to a global variable that is visible in the application scope.
-
Parameter value: The parameter appserver_root exists by default in SYS_PARAMS with a null value. If its value is non null, it will take precedence over the previously calculated value.
-
Parameter description: The directory where the Demantra Web Application is deployed. If it is NULL, the default is one folder above WEB-INF
-
Security: Regular users can read the parameter values in the Business Modeler, but only consultants can modify them.
For example, the relative path: #appserver_root#\optimization,
where #appserver_root# is defined as C:\[demantra_install_directory]\demantra
results in the physical path: C:\[demantra_install_directory]\demantra\optimization.
In this way, workflows can be pre-configured in an application independently of where the application is eventually installed. In other words, C: drive versus D: drive, Oracle folder versus demantra folder, and so on.
The appserver_root parameter can then be used by the executable step in a workflow schema to run an executable file independently of where the application is eventually installed, thus achieving functionality that is outside the prepackaged scope of the Demantra platform.
For example: appserver_root='F:\Program Files\[demantra_install_directory]\Custom'. This takes precedence and every path that references the #appserver_root# token is calculated relative to this parameter.
Note: This functionality works "out-of-the-box" on all Windows or LINUX or UNIX files systems, provided Demantra is installed cohesively, in other words, under one root folder. Any arrangement deviating from that will require custom configuration.
Case 2: Using the application_root Parameter for Demantra Application
-
By default, this token takes its value from the existing installer-populated parameter "AppServerLocation".
-
Parameter value: An additional parameter application_root in SYS_PARAMS. Its default value is null. If its value is non null, it will take precedence over AppServerLocation..
-
Parameter description: The directory where the Demantra Application is deployed. If it is NULL, the value is taken from the AppServerLocation parameter setting.
-
Security: Regular users can read the parameter values in the Business Modeler, but only consultants can modify them.
For example: application_root='F:\Program Files\[demantra_install_directory]\Custom'. This takes precedence and every path that references the #application_root# token is calculated relative to this parameter.
Example 1:
Assuming you have following path to Demantra WEB-INF:
F:\[demantra_install_directory]\Collaborator\demantra\WEB-INF,
#appserver_root# will be dynamically assigned a value of:
F:\[demantra_install_directory]\Collaborator\demantra
Example 2:
In order to run the Engine from an Exe Step, the following command line would be leveraged:
#application_root#\..\..\Demand Planner\Analytical Engines\bin\EngineManager.exe
-
The \..\..\ path segment 'backs out’ of the 'demantra' folder, and then navigates to the appropriate Engine folder.
-
Note that the workflow parameter is referenced as a token, #application_root#.
Important: The selection of the value for the application_root parameter must be such that all files referred to by the Workflow are in folders below the common application_root.
Relative Path to Promotion Optimizer
To run Promotion Optimization in a new install, configure the parameters in the OPLstep of the Call Promotion Optimizer workflow schema to leverage the #application_root# parameter.
For example, the following parameters are passed to the OPLStep:
-
Parameter: MODEL_PATH
-
Value: #application_root#\optimization\OPL\promoopt.opl
By default, the #application_root# parameter is left blank, or null. Therefore, if Demantra is installed as C:\[demantra_install_directory]\ with a virtual directory of 'demantra', this example parameter value results in the physical path: C:\[demantra_install_directory]\Collaborator\demantra\optimization\OPL\promoopt.opl
Deleting Workflow Schemas
You can delete any workflow schema that you created, as long as no instances of that schema are currently running. You cannot delete schemas created by other users.
To delete a workflow schema
-
Log onto the Workflow Editor as described in “Logging into the Workflow Manager”.
-
On the Workflow Management page, click Delete next to the schema.
-
Click OK to confirm the deletion.