Configuring Methods
This chapter describes how to configure methods that the users can run within worksheets or within a Members Browser content pane.bp
This chapter covers the following topics:
- Configuring a New Level Method
- Passing Arguments to a Method
- Modifying a Level Method
- Deleting a Level Method
Configuring a New Level Method
Note: For information on setting the Security Threshold for a method, see the section Custom Methods in the chapter Levels.
-
Define a workflow schema to use as the method. See “Creating or Editing Workflow Schemas.”
Note: If you are configuring a method that changes attribute values, the workflow must include an Edit Member Step as its first step. Otherwise, the changed values will not be saved to the database.
-
If the workflow includes a Custom Step, create the Java class that the step should invoke.
-
If this method should be available only within a specific worksheet, define that worksheet. See the Oracle Demantra Demand Management User's Guide or other user manual.
If the method applies to all worksheets, this step is not necessary.
-
Log into the Business Modeler.
-
Click Configuration > Configure Methods.
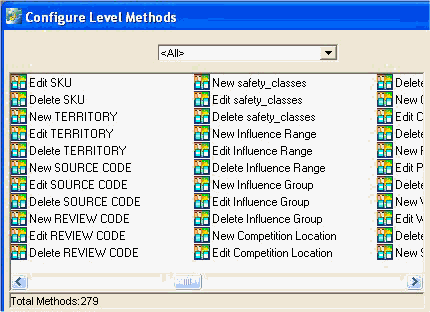
The system displays a screen showing the existing methods, including all the predefined methods.
-
Optionally click the Detail Style icon to re-display this screen with the full method names:

-
Optionally click a level name in the drop down list at the top of the screen. The screen is re-displayed with only the methods associated with that level.
-
Click the New Method icon and then click OK. Or double-click New Method.
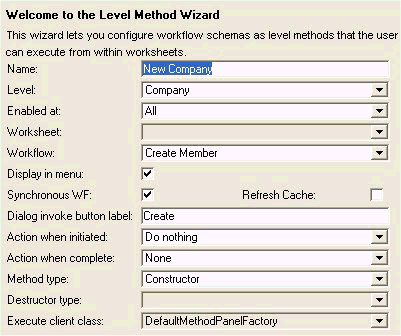
The first screen is General Properties.

-
Complete the fields in this screen as follows:
Name Name of this method, to display in the right-click menu of the worksheet. The method will be visible only in the Web-based worksheets. Level Level at which this method will be available. Enabled at Specifies where this method will be available.
All to make this method available in all worksheets.
Worksheet to make this method available in a single worksheet.
No to make this method unavailable.Worksheet Worksheet where this method will be available. Workflow The workflow that will be executed when users run this method. This field is required for methods of type Custom. Display in menu Deselect this check box if you want to hide this method or leave it selected to have it displayed in the right-click menu, as specified. Synchronous WF Specifies whether this workflow should be run synchronously or asynchronously.
If the workflow runs synchronously, that means that before doing anything else, the user must wait until the workflow has completed.Refresh Cache Specifies whether this method should refresh the local members cache. Dialog invoke button label When the user selects this method from the right-click menu, the worksheet displays a dialog box that asks the user to confirm whether to proceed or not.
This option specifies the text on the “OK” option.Action when initiated Specifies what Demantra will do when the method is initiated. The choices are as follows:
Do nothing (typically setting)
Save Data (immediately saves the worksheet data, automatically)
Ask to Save (displays a dialog box to ask if the user wants to save the worksheet data immediately)
Explanation: Level methods operate on the server. If you create a level method that does something based on client expressions in the worksheet, it is necessary to save the worksheet data before launching that method. The Save Data setting is useful in such a case.
In other cases, you may want to give users the option of saving data before running the method. For these cases, use the Ask to Save setting.Action when complete Specifies what Demantra will do when the method has completed its execution. The choices are as follows:
Reload (reruns the worksheet)
Reload and Message (reruns the worksheet and displays the output dialog box)
Message and Ask (displays the output dialog box and asks if the user wants to rerun the worksheet)
None (displays the output dialog box)
The output dialog box is not displayed unless you have specified a message or at least one attribute to display on it.Method type For a list of Method Types see the Methods and Workflows chapter.
Constructor, Destructor, and Edit type methods can also run workflows. The workflow is run after the level member is created, removed, or edited.Destructor type Applies to destructor methods. This option specifies the type of deletion:
Delete member only. This deletes the member from the level table but does not delete data related to that member. Note that when parent members are deleted, their child members will be deleted as well.
Delete member and data. This deletes the member from the level table and all related history/forecast data. Specifically, it deletes associated data in the MDP_MATRIX and SALES_DATA tables.Execute client class Indicates the Java class that Demantra runs when a user executes this method. Display population Controls the style of user interface to use for the population attribute, if the member has a population attribute. See “Presentation Styles for Population Attributes”. -
Click Next.
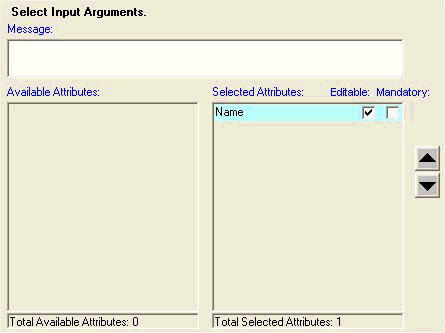
The next screen is Input.

Here you specify the appearance of the input screen of the method.
-
Optionally specify a message to display at the top of the input screen.
-
For each attribute that the user should be able to edit, double-click that attribute to move it from the Available Attributes column to the Selected Attributes column.
-
If the attribute should be editable, make sure the Editable check box is selected.
Note: If you are configuring a method that changes attribute values, the workflow must include an Edit Member Step as its first step. Otherwise, the changed values will not be saved to the database.
-
If the attribute should also be mandatory, make sure the Mandatory check box is selected.
-
To change the order in which these attributes are displayed, use the up and down buttons on the right of the screen.
-
Click Next.
Note: If you do not specify a message or at least one attribute, the method input dialog box is not displayed when the user runs the method.
-
-
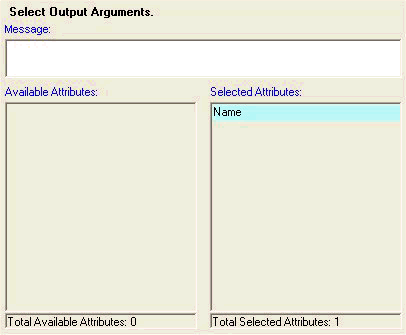
The next screen is Output.

Here you specify the appearance of the output screen of the method.
-
Optionally specify a message to display at the top of the output screen.
-
For each attribute to display, double-click that attribute to move it from the Available Attributes column to the Selected Attributes column.
-
To change the order in which these attributes are displayed, use the up and down buttons on the right of the screen.
Note: If you do not specify a message or at least one attribute, the method output dialog box is not displayed when the user runs the method.
-
-
Click Finish.
See also
“Making Changes Available to Users”
Presentation Styles for Population Attributes
You can choose the presentation style for the population attribute of any level that has this kind of attribute. A population attribute is a set of item-location combinations and a range of dates. Promotions, for example, have population attributes. Other general levels could also have population attributes.
Detail Style
With this style, part of the method input dialog box summarizes the item-location combinations and shows the range of dates, as follows:

Here, when the user clicks Edit, Demantra displays a screen where the user can select the levels and the members of those levels.
Simple Style
With this style, the method input dialog box does not summarize the population attribute; instead it displays just the Define (or Edit) button:

When the user clicks this button, Demantra displays a screen with two tabs. On one tab, the user can select the levels and the members of those levels. On the other tab, the user can specify the range of dates.
Passing Arguments to a Method
Demantra can pass arguments in memory to the method. Considered as a group, these arguments are the context dictionary. For each argument, Demantra passes a variable name and its associated value.
Available Arguments
The available arguments are as follows.
In order to pass arguments to the method, you must explicitly configure the variables that each workflow step should receive. To do so, you type the parameter names on the Parameters list for that step; see “Properties Used as Arguments for a Method”.
Note: The parameter names are case-sensitive.
For the input variables, you also specify which variables to pass when you configure the method. Specifically you select the desired attributes on the Select Input Arguments screen.
Modifying a Level Method
To modify a level method
-
If necessary, redefine the workflow schema that you are using within the method. See “Creating or Editing Workflow Schemas”.
-
Log into the Business Modeler.
-
Click Configuration > Configure Methods.
The system displays a screen showing the existing methods, including all the predefined methods.
-
Optionally click a level name in the drop-down list at the top of the screen. The screen is re-displayed with only the methods associated with that level.
-
Click the method icon and then click OK. Or double-click the method name.
-
Make changes as needed and click Finish.
Deleting a Level Method
-
Click Configuration > Configure Methods.
The system displays a screen showing the existing methods, including all the predefined methods.
-
Optionally click a level name in the drop-down list at the top of the screen. The screen is re-displayed with only the methods associated with that level.
-
Click the method icon and then click Delete.
-
Click OK.
-
If the workflow schema is not used elsewhere, delete it. See “Deleting Workflow Schemas”.