Setting Up Tags and Contextualization
This chapter covers the following topics:
- Tag Setup
- Customizing Business Rules in OWB
- Contextualization Entities
- Contextualization Methods
- Tag-Based Contextualization
- Contextualization by Schedule
- Manual Contextualization
- Non-contextualized Rows
- Reason Code Setup
- Loading Tag Data into Summary Tables
- Menus and Responsibility for Contextualization
- Understanding Actual and Virtual Meters
- Understanding the Meter Readings Process Flow
- Viewing Meter Summary
- Viewing Meters
- Adding Meters
- Updating Meters
- Assigning Meters
Tag Setup
To set up a tag, you must load the Tag Master and associate the tag with entities. You can optionally set up a business rule.
To set up a tag:
-
In the Microsoft Excel template, update the tags in MTH_TAG_MASTER_UI.csv
-
Load the Tag Master by running the MTH_TAG_MASTER_XS_MAP in OWB Mappings.
-
Set up the tags using the Tag Setup user interface. Refer to the "Setting Up Tags" topic in the Oracle Manufacturing Operations Center User's Guide for more information.
-
Optionally, you can set up business rules in Oracle Warehouse Builder (OWB).
Hard-coded tag values are as follows:
| Tag Value | Meaning | Comment |
| 1 | Run | Equipment is in use. |
| 2 | Idle | Equipment is not in use and is available. |
| 3 | Down | Equipment not in use and is not available. |
Customizing Business Rules in OWB
To customize business rules in OWB:
-
Filter condition setup
-
Join condition setup
-
Business rule setup
-
Business rule synchronization
Example
Consider the following example:
-
Equipment Mixer1, belonging to Plant1, is fitted with two devices which read its temperature and pressure.
-
Unless the line pressure and mixer temperature reaches a certain level, the equipment is not considered to be available.
-
The conditions for the equipment to be available are:
-
Temperature must be > 100 F
-
Pressure must be > 50 psi
-
-
Input tags configured:
-
TAG_PRS_MIXER1
-
TAG_TEMP_MIXER1
-
-
Output tags configured:
-
TAG_STATUS_MIXER1
-
Filter Condition Setup
-
Open MTH_TMPL_2_TO_1_BIZ_RULE_PMAP in the editor in MTH project pluggable map.
-
Click on the Tag Filter header.
-
Click on the Edit button against the Filter Condition in the left panel
-
In the Expression Builder, enter the tag details which will be the components of the Business Rule.
-
In this example, the tags are:
-
TAG_PRS_MIXER1
-
TAG_TEMP_MIXER1
-
-
Validate the expression before closing the Expression Builder.
Join Condition Setup
-
For the status tag value, temperature and pressure tags are only joined when:
-
Group ID is the same
-
Equipment is the same
-
-
Select the Joiner.
-
Click the Edit button.
-
Enter the condition in the Join Condition window.
Business Rule Setup
To specify the business rule:
-
Define the output tag and its value.
-
Click the Expression Editor button for the Tag Code's Outgroup of Business Rule.
-
Enter the Status Tag.
-
For Tag Data, click the Expression Editor button for the Tag Data's Outgroup of Business Rule, and enter the condition.
-
Save the Pluggable Mapping.
Business Rule Synchronization
-
Open the MTH_DD_BUSINESS_RULES_MAP mapping in the editor.
-
Select the MTH_DD_BUSINESS_RULES_MAP in the Selected Object List.
-
Right-click on the Object and select Synchronize.
-
Select the Pluggable Map.
-
Set the synchronization to Inbound, from pluggable mapping.
-
Set the Matching Strategy to Match by Object Name.
-
Set the Synchronize Strategy to Replace.
-
Click the OK button.
-
Save the Map.
-
Redeploy the Business Rule Map.
Contextualization Entities
Manufacturing Operations Center contextualizes tag data for the following entities:
-
Equipment: Equipment context is available from the setup between the tag and equipment. No additional logic is available to get the equipment context if the association is not specified during tag setup.
-
Workorder: Work order context comes from the tag or the equipment production schedule.
-
Operation: The operation context comes from a tag or equipment production schedule.
-
Item: The item context can come from a tag or the equipment production schedule.
-
Shift: The shift context is available from the equipment shift schedule.
-
Hour: The Hour context is available from the Hours table based on the reading time for the tag.
Contextualization Methods
You must specify one of the following contextualization methods at the equipment level during contextualization setup:
-
Tag based Contextualization: Business context is given through equipment tags.
-
Schedule based Contextualization: Business context is determined by referring to schedules.
-
Manual Contextualization: Business context is entered manually and is not available as a tag and should not be determined by referring to schedules.
You must construct the primary key for Work Order, Segment, Shift, Equipment, Item in the required format in the transaction tables. The formats for primary keys are:
-
Work Order: '<Work order id>-<MOC Plant code>"
-
Segment: "<Segment number>-<Work order id>-<Plant code>"
-
Item: "<Equipment_item_id>-<Organization_code>"
If the primary key is not in the required format, contextualization errors can occur.
Tag-Based Contextualization
The logic for tag-based contextualization is as follows:
| Tag | Description |
| Equipment | Equipment context is obtained from the tag-equipment mapping. |
| Scrap Quantity | Equipment scrapped quantity |
| Output Quantity | Equipment output quantity including good and bad quantities |
| Rework Quantity | Equipment reworked quantity |
| Rejected Quantity | Rejected quantity which includes rework and scrap |
| Completed Quantity | Completed quantity without reject or scrap |
| Shift | Shift ID is obtained by comparing the reading time and the equipment shift from time and to time |
| Workorder | The ID from the source system; ip_entity_id/batch_id/repetitive_schedule_id |
| Item | The Inventory Item ID from the source system |
| Segment | The Operation number |
If tags are not available for Equipment and Shift, the context can be determined by using the schedules method.
Warning: You must construct the primary key for Work Order, Segment, and Item in the required format in the transaction tables. If the primary key is not properly constructed in the required format, contextualization errors and complications can occur.
Contextualization by Schedule
The logic for contextualization by schedule is as follows:
| Tag | Description |
| Equipment | The equipment context is acquired by referring to the tag setup. |
| Shift | The shift of the equipment is located in the read time in the Equipments Shifts Table. |
| Workorder | The work order is located in the read time in the scheduled from and to date of a work order in mth_equip_production_schedules_f. |
| Operation | The operation is located in the Equipment Production Schedules by using the shift and the equipment. |
| Item | Using work order, find the item from the Equipment Production Schedules table. |
Manual Contextualization
If the manual contextualization method is selected, Manufacturing Operations Center does not apply any logic to get the context, and the context is entered manually in the manual contextualization user interface. Manufacturing Operations Center only gets the equipment context from the tag setup.
Non-contextualized Rows
If context is missing after applying the contextualization logic, Manufacturing Operations Center moves the rows to either the mth_tag_readings or the errors table.
-
If a missing context is set up as mandatory, it is moved to the errors table.
-
If a missing context is set up as optional, it is moved to the readings table.
Reason Code Setup
Use Tags to display reasons for downtime status or scrap quantity. As a one-time setup, you can define a list of all possible reason codes and reason meanings in the plant. In the business meaning setup for the reason tag, map the value of the tag to a reason code.
Reason Code can be setup utilizing FND Lookup. Three lookup types seeded by MOC include:
-
MTH_SCRAP_REASON (for setting up scrap reasons)
-
MTH_EQUIP_DOWNTIME_REASON (for setting up downtime reason)
Reason Code setup is accessed from the Development Manager responsibility in the Lookups Menu.
Loading Tag Data into Summary Tables
You must pass the equipment status readings continuously to the MOC application. For a period that does not have a status reading, the MOC application uses the status from the previous reading to fill the gap. If you are loading the energy meter readings or equipment output for the following entities, you must pass the reading time as one second less than the actual reading time as the MOC application considers the end of the hour as XX:59:59 for separating the hourly boundaries by one second:
-
Scrap Quantity
-
Output Quantity
-
Rework Quantity
-
Rejected Quantity
-
Completed Quantity
To load tag data into summary tables:
-
Load the device data to the tag_readings raw table by running one of the process flows:
-
MTH_RAW_TO_OUTPUT_STS_INIT_PF in the MTH Utilities project under the MTHDDIIP module for an initial data collection
-
MTH_RAW_TO_OUTPUT_STS_INCR_PF in the MTH Utilities project under the MTHDDICP module for an incremental data collection
-
-
Load the data into tag readings tables by running one of the following process flows:
-
MTH_DEV_DATA_INIT_PF in the MTH Utilities project under the MTHDDIIP module for an initial data collection
-
MTH_DEV_DATA_INCR_PF in the MTH Utilities project under the MTHDDICP module for an incremental data collection
MOC enables you to process the data on tag readings in any valid time zone of your choice. If the tag data coming from the PLCs are from a time zone different from that of the MOC server, MOC ETLs for processing the tag readings allow the tag readings to be converted to the MOC server timezone during processing. Refer to the "Source Data Time Zone " topic in the Manufacturing Operations Center Introduction chapter for more information on time zones. If you want to convert the raw tag data coming from the PLCs into the server time zone, that is different from the time zone in which the PLCs are operating, then you must specify valid values for from_tz (timezone in which PLC data is collected )and to_tz parameters (MOC timezone) when you run the process flows.
-
-
Load the data into summary tables by running one of the following process flows:
-
MTH_EQUIP_SUMMARY_INIT_PF in the MTH Utilities project under the MTHDDIIP module for an initial data collection
-
MTH_EQUIP_SUMMARY_INCR_PF in the MTH Utilities project under the MTHDDICP module for an incremental data collection
-
-
Load data into equipment production performance and sustainability aspect summary tables by running one of the following process flows:
-
MTH_EPP_INIT_PF in the MTH project under the MTHDDIIP module for an initial data collection.
-
MTH_EPP_INCR_PF in the MTH project under the MTHDDICP module for an incremental data collection.
-
-
If reasons are imported through tags, load Reasons Reading by running one of the following process flows:
-
MTH_TAG_REASONS_INIT_PF in the MTH Utilities project under the MTHDDIIP module for an initial data collection
-
MTH_ TAG_REASONS _INCR_PF in the MTH Utilities project under the MTHDDICP module for an incremental data collection
-
Menus and Responsibility for Contextualization
Contextualization Setup
Responsibility: Manufacturing Operations Center Administrator
Menu: Manufacturing Operations Center Administrator Menu
Manual Contextualization
Responsibility: Manufacturing Operations Center User
Menu: Manufacturing Operations Center User Menu
Understanding Actual and Virtual Meters
In most organizations, equipments are the primary source of Green House Gas Emissions (GHGE). The equipments include not only production equipment, but also non-production equipment, such as refrigeration, air conditioning, and water and wastewater management systems.
Oracle MOC enables you to track electricity usage and GHGE at the source, either through sensors, meters, and virtual meters and provides a very effective GHGE abatement or Carbon reduction strategy.
Actual meters are physical instruments that are used to record electricity usage in association with smart meters (i.e. building, floor, lighting equipment, manufacturing equipment etc.) You can associate Actual Meters with Tags for data collection, load readings using .csv files, or enter the readings manually in the Actual Meters Data Entry page. Refer to the "Microsoft Excel Template Data Collection" topic for information on the .csv files for loading data. Refer to topics “Adding an Actual Meter” in this guide for information on adding meters and “Performing Actual Meters Data Entry” in the Oracle Manufacturing Operations Center User’s Guide for more information on entering data manually.
Virtual meters are expressions that are derived to calculate the electricity consumption for certain usages that cannot be measured by actual meters. A virtual meter can be modeled and associated with any entity without having a physical meter, where estimation of energy consumption is required. Virtual meters can be Meter-based or Power Rating- based. A virtual meter that is modeled to estimate consumption based on allocation/aggregation of other actual or virtual meter measurements is called Meter-based virtual meter. A virtual meter that calculates the electricity consumption by directly using power-rating and operational data of equipment is called a Power Rating-based virtual meter. A meter can also be associated with a usage category to realize consumption monitoring by different usage groups such as lights, computer systems, etc.
Energy consumption data collected from smart meters is contextualized with production variables such as equipment status (i.e. idle, run, alarm), time period, work-order, and item. Resulting from contextualization capability, advanced process improvements can be driven by segregating energy consumption as Value added and Non-value added energy in manufacturing processes.
Understanding the Meter Readings Process Flow
Oracle Manufacturing Operations Center provides manufacturing capability to shop floor for production companies that are sensitive to environmental issues and energy usages. Energy consumption data collected from smart meters is contextualized with production variables such as equipment status (i.e. idle, run, down), time period, work-order, and item. You can obtain valuable data resulting from contextualization capability, and design advanced process improvements driven by segregating energy consumption as Value added and Non-value added energy in manufacturing processes.
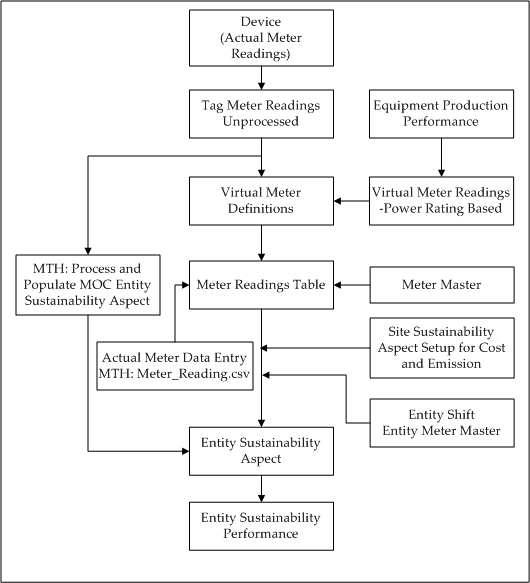
The carbon emission and energy usages (sustainability aspect) for an entity are calculated by processing the meter readings that are obtained from both the Actual and Virtual Meters assigned to the entity. Each meter is associated with a tag and tag data source. For evaluation, a meter must be associated with an Active tag. If a tag becomes inactive, then the meter also becomes inactive. Refer to the topic “Tag Setup” in this chapter and “Setting Up Tags” in the Oracle Manufacturing Operations Center User’s Guide for more information on how to set up tags. The unprocessed tag meter readings are stored in the Actual Meter Readings table. If the tag meter readings are Cumulative, then they are converted to Incremental readings before being stored in the Meter Readings table. You can also enter meter readings directly that are also stored in the Meter Readings table, using the Actual Meter Data Entry page and the MTH : Meter_Readings.csv template.
The data in the Power Rating Based Virtual Meter Readings table is obtained from the Equipment Production Performance, Entity Shift, and Shift Availability tables.
The readings in the Meter Readings table are processed by validating with the Entity Meter Master and Entity Shift. When you run the MTH : Process and Populate MOC Entity Sustainability Aspect concurrent program, data from the Meter Readings table is utilized in calculating the carbon emission and electricity usage costs, that are stored in the Entity Sustainability Aspect table. These calculations are based on the site sustainability aspect setup for emission and cost respectively. Refer to the “Running the MTH : Process and Populate MOC Entity Sustainability Aspect Concurrent Program” topic of the Oracle Manufacturing Operations Center User’s Guide for more information. The following figure is a graphical representation of the process flow:
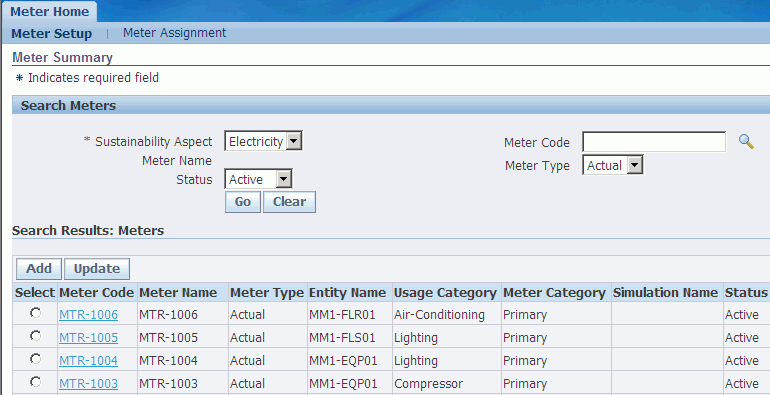
Viewing Meter Summary
Use the Meter Summary page to view the summary of the meters for a sustainability aspect.
To view meter summary
-
Using the Manufacturing Operations Center Administrator responsibility, navigate to the Meter Home page. The Meter Summary page appears.
-
Select the Sustainability Aspect to search for all meters for a specific sustainability aspect. Options are Electricity and Gas. Required.
-
Enter any of the following criteria to narrow the search:
-
Meter Name to find a meter using its name
-
Status as:
-
Active to find all active meters.
-
Inactive to find all inactive meters.
-
-
Meter Code to find a meter using its code
-
Meter Type as:
-
Actual to find all actual meters
-
Virtual to find all virtual meters
-
-
-
Click Go. The Search Results: Meters region displays the results of the search.
-
The following fields display:
-
Meter Code is the code for the meter.
-
Meter Name is the name of the meter.
-
Meter Type displays as Actual or Virtual.
-
Entity Name is the name of the entity with which the meter is associated.
-
Usage Category is the usage category for the meter.
-
Meter Category displays as Primary or Simulation.
-
Simulation Name displays if the meter category is Simulation.
-
Status displays as Active or Inactive.
-
-
Click a Meter Code to view the details of a meter.
-
Click Add to add a meter.
-
Click Update to update a meter.
Viewing Meters
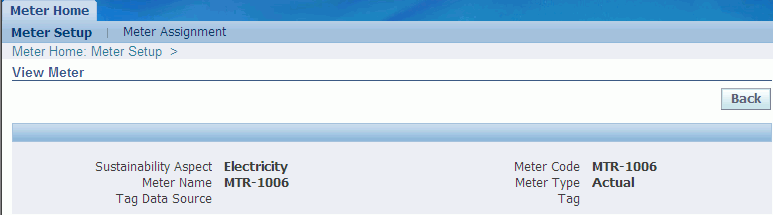
Use the View Meter page to view the details of a meter.
To view a meter
-
Navigate to the Meter Summary page.
-
Search for meters as described in the “Viewing Meter Summary” topic.
-
Click the Meter Code of the meter for which you want to view the details in the search results.
-
The View Meter page displays the meter details.
Adding Meters
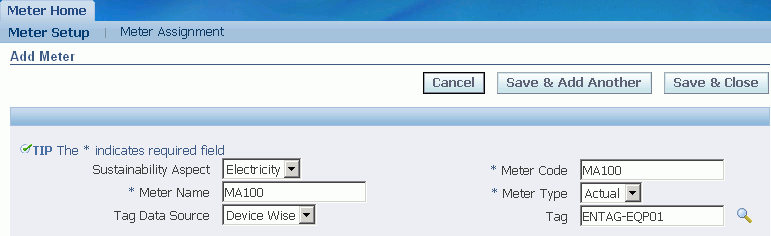
Use the Add Meter page to add a meter.
To add a meter
-
Navigate to the Meter Summary page.
-
Select the Sustainability Aspect for which you want to add a meter.
-
Click Add. The Add Meter page appears.
-
Enter the Meter Code and Meter Name.
-
Select the Meter Type as Actual or Virtual.
-
Select the Tag Data Source from the list of values (LOV). All the tags available in the Tag Master display in the LOV.
-
Select a Tag to which you want to associate the meter.
-
Click Save and Add Another to save the meter and add another meter.
-
Click Save and Close to add the meter and close the page.
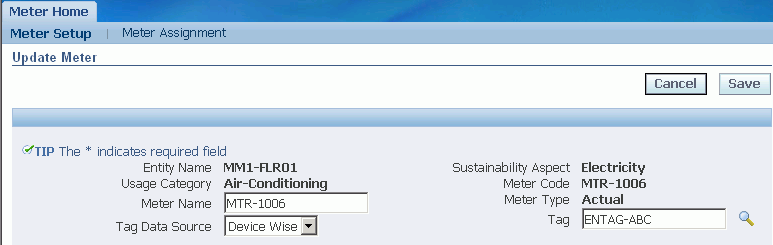
Updating Meters
Use the Update Meter page to update a meter.
To update a meter
-
Navigate to the Meter Summary page.
-
Search for the meter to update.
-
Click Update. The Update Meter page appears.
-
Update the following fields:
-
Meter Name
-
Meter Type
-
Tag Data Source
-
Tag: If the meter type is Actual, then this field is enabled. Only Active tags display in the LOV.
-
Virtual Meter Type: If the meter type is Virtual, then this field is enabled. Options are: Power Rating Based and Meter Based.
-
-
Click Save.
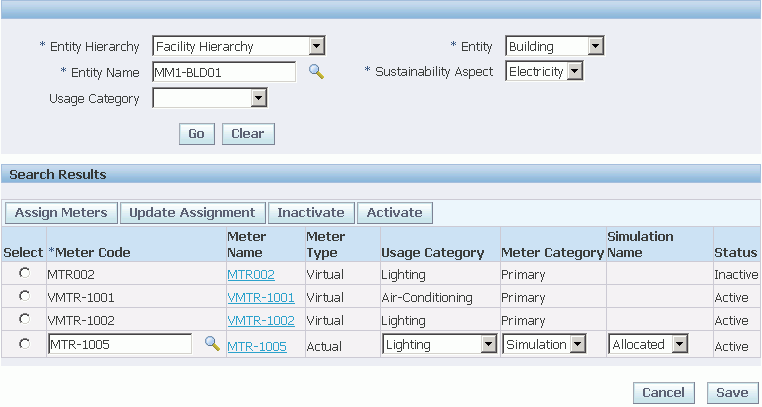
Assigning Meters
Use the Assign Meters page to assign meters to an entity. An actual meter can be assigned to any number of combinations of entity name, usage category, meter category, and simulation name. But a virtual meter can be assigned to only one such combination.
To assign a meter
-
Using the Manufacturing Operations Center Administrator responsibility, navigate to the Meter Home page.
-
Select the Meter Assignment tab. The Meter Assignment page appears.
-
Select the Entity Hierarchy and Entity to which you want to assign meters.
-
Select the Entity Name to assign the meter and the Sustainability Aspect for the meter.
-
Optionally, select the Usage Category for the meter.
-
Click Go. All the meters assigned for the selected criteria display.
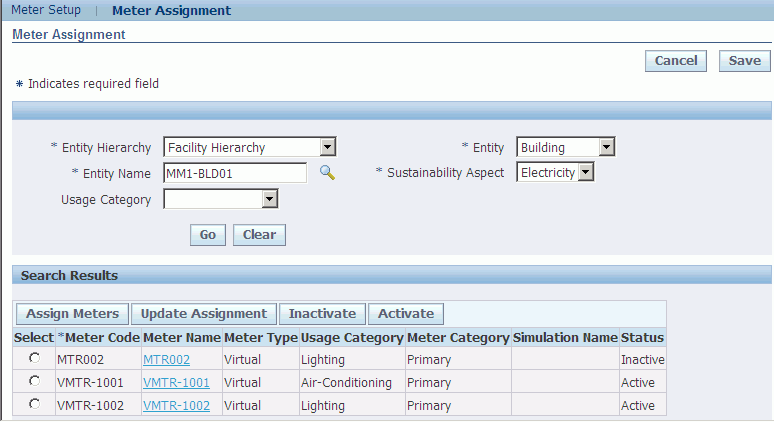
-
Click Assign Meters. Select a Meter Code to assign. The Meter Name and Meter Type display.
-
Select the Usage Category for the meter.
-
Select the Meter Category as Primary or Simulation.
-
Select the Simulation Name as Estimated or Allocated. If you select the Meter Category as Simulation, then this field is enabled. Status displays as Active by default.
-
Click Save.
-
To update an assignment, select the meter assignment that you want to update and click Update Assignment. You can update Usage Category and Meter Category of an assignment.
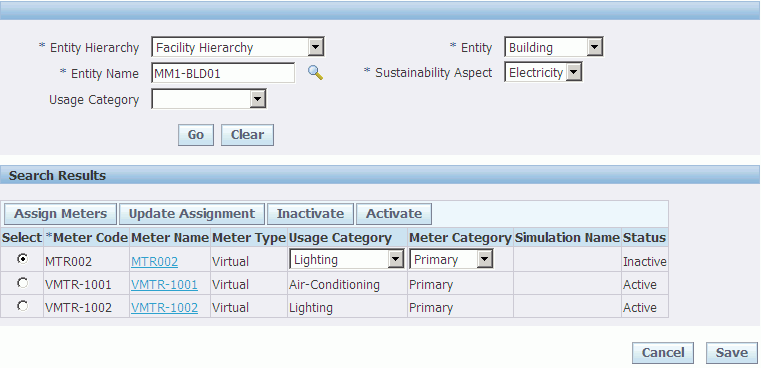
-
Click Inactivate to inactivate a meter assignment.
-
Click Activate to activate an inactive meter assignment.