Price Protection Dashboard
This chapter covers the following topics:
- Dashboard Overview
- Creating Price Protection Transactions
- Adjustments and Approvals
- Executing Price Protection Transactions
- Creating an Inventory Claim
- Creating Customer Claims
- Additional Claims
- Viewing Transaction History
Dashboard Overview
The Price Protection Dashboard lets you view Price Protection Transactions from all of your suppliers.
Page Layout
The Price Protection Dashboard overview page displays a view of all transactions. This page displays header level transaction information and includes distributor and customer claims information based on inventory calculations and existing customer claims. To view the details of the claims associated with a price protection transaction, you can navigate to the Customer Claim Details page by clicking the Total Customer Claim Amount link.
Additional page level features include the ability to personalize views of the overview table and import price transactions. You can also manually create a price protection transaction by clicking the Create Transaction button.
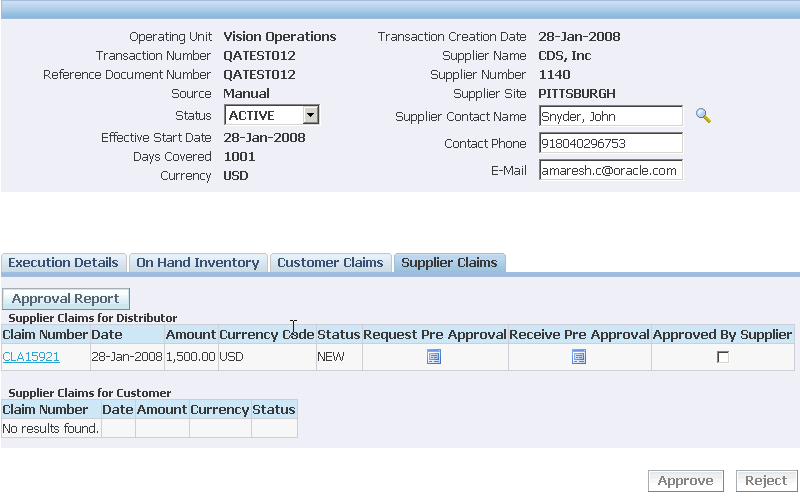
You can view Inbound Price Transaction Details for each transaction by clicking the Transaction Number link. From this page you can view and update Execution Details, On-Hand Inventory, Supplier Claims, and Customer Claims.
Creating and Updating Price Protection Transactions
You can create and update Price Protection transactions using the Price Protection Dashboard. An approved transaction can consist of four sections or tabs:
-
Execution Details - This tab provides an overview into the price protection transaction execution processes and indicates the status of each of the execution activities. Based on the manual or automated setup of the processes, the execution steps are run manually or initiated automatically. The setup can be done at the operating unit level (trade management system paramaters) or at the supplier site (trade management supplier trade profile).
-
On-Hand Inventory - The data on this page is used to calculate the inventory claim that is to be raised with the supplier. It is important that the Recalculate button is available till after the effective start date of a future-dated price protection transaction. This is because you can calculate on-hand and covered inventory for the transaction in advance.
-
Supplier Claims - This tab provides an overview of all the claims that have been raised with the supplier and associated to the specific price protection transaction. Typically, it can be a single supplier inventory claim to cover the changes in the covered inventory resulting from price changes or material returns, or can contain one or many claims issued to the supplier on behalf of the end customers. Once a supplier claim has been generated, the inventory fields for the item line are read-only and cannot be updated. In order to raise additional claims, you must create an additional item line for the transaction and raise a new inventory claim that is associated to the existing claim. If you did not enable the Claims Pre-approval Required check box on the supplier trade profile, claims are created in a Pending Close status. If pre-approval is required, then the claim is created in the Pending Approval status and the user must request approval. Based on the approved amount by the supplier, the claim amount is updated accordingly.
-
Customer Claims - This tab provides an overview into all the claims that have been filed for the end customers for the specified price protection transaction. Once the price protection transaction is approved, the Customer Claims tab is automatically populated with the customer sales data for the covered period. Old Price in this tab denotes the latest AR invoice unit price for that customer. Additional information for the end customer inventory information is also populated. You can create multiple claims based on the unique combination of Customer and Currency.
Note: A new transaction has only the On-Hand Inventory and Execution Details tabs. After a price protection transaction is approved, all four tabs become available.
Use the following steps to create or update a Price Protection transaction:
-
Create and update Price Protection transaction header information.
-
Create and update transaction line information.
-
Enter item and type of price change in the On Hand Inventory tab.
-
Update and adjust covered inventory for claim processing if you enabled adjustments on the Supplier Trade Profile page.
-
Initiate execution processes for price change notifications for a non-approved transaction.
-
Generate claims
-
Request approval of the inventory adjustment. If you have not made any inventory adjustments, request approval of the transaction.
-
Execute updates to price lists and purchase orders for the approved transaction.
-
Settle claims
-
Close the transaction
Creating Price Protection Transactions
To enter Price Protection transactions
-
Navigate to the Price Protection Transactions Dashboard.
-
Click on the Create Transactions button to enter a new price protection transaction.
-
Enter the Transaction Number or leave blank to let the application assign a transaction number.
-
Enter the Reference Document Number provided by your supplier.
-
Enter the Effective Start Date. This is the date from which the price protection changes are applicable. This date can be a past or future date.
Note: You can change this date at any time for a transaction that is in Active or Pending Adjustment status. Once the transaction is pending approval or has been approved you can no longer update the effective start date.
-
Enter the Days Covered. The days covered indicate the date range when the inbound inventory receipts are to be covered. The Days Covered value defaults from the supplier trade profile.
-
Enter Currency.
-
Enter either the Supplier Name or Supplier Number, and select the Supplier Site
-
Enter Supplier Contact Name, Contact Phone, and Email.
Note: You can either enter a supplier contact name or select one. For an existing supplier name, the contact phone and email information are automatically populated.
-
Click Apply to save the transaction you created in Active status and open the Price Protection Transaction Details page in which you can enter product, pricing, and inventory information. If the transaction you created has an effective start date that is current or in the past, clicking Apply saves the transaction in the Pending Adjustment status.
Note: Entering inventory and pricing information provides the price protection administrator with an estimate of the covered inventory information and the claim amount as of the current date.
Adjustments and Approvals
A price protection transaction is an agreement between supplier and distributor to cover distributor inventory against loss of value incurred as a result of changes in item prices by supplier. Based on your selections on the supplier trade profile, you can make adjustments to the items and quantities covered and request approval for these adjustments.
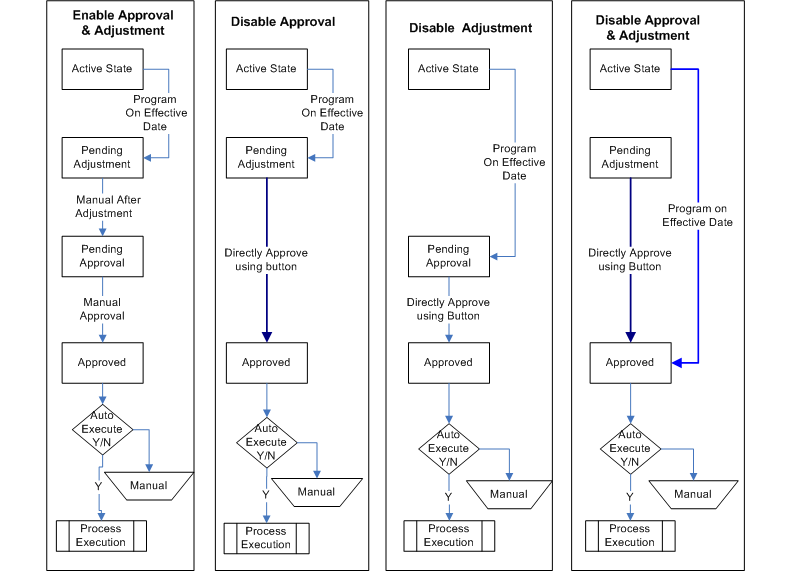
The behavior of a price protection transaction depends on the effective date of the transaction and the adjustments and approvals settings that you configure on the supplier trade profile.
Transactions with an effective start date in the future behave as follows:
-
The transaction automatically moves from the Active status to the Pending Adjustment status on the effective date. You make adjustments and request for approval.
Note: Although you can make adjustments to the covered inventory before the effective date, the system recalculates the inventory on the effective date and overwrites your adjustments.
-
If you disabled approvals on the supplier trade profile, the transaction automatically moves from the Active status to the Pending Adjustment status on the effective date. You make adjustments and if you are a listed approver, you click the Approve button to take the transaction to Approved status.
-
If you disabled adjustments on the supplier trade profile, the transaction automatically moves to the Pending Approval status on the effective date. You can then request for approval to take the transaction to the Approved status.
-
If you disabled both adjustments and approval, the transaction automatically moves to the Approved status on the effective date.
Transactions with a current effective start date or one in the past behave as follows:
-
The transaction is already in the Pending Adjustment status. You make adjustments and request for approval.
-
If you disabled approvals on the supplier trade profile, you make adjustments. Then, if you are a listed approver, you click the Approve button to take the transaction from its initial Pending Adjustment status to the Approved status.
-
If you disabled adjustments on the supplier trade profile, you request for approval to take the transaction from its initial Pending Adjustment status to the Pending Approval status.
-
If you disabled both adjustments and approval, and if you are a listed approver, click on the Approve button to take the transaction from its initial Pending Adjustment status to the Approved status.
The diagram below illustrates these flows.
Adjusting Covered Inventory Item Prices
If the supplier drops or increases the price on items covered by the price protection agreement and you have enabled adjustment on the Supplier Trade Profile page, you can make price adjustments on the relevant prices protection transactions. For this active or pending adjustment transaction, you must also enter the covered and approved inventory for the item as agreed upon.
To make price adjustments
-
From the Price Protection Dashboard, select a transaction in Active or Pending Adjustment status. The Transaction Details page opens.
-
In the On-Hand Inventory tab of the Price Protection Transaction Details page, click the Add Another Line button.
-
Enter an Item Number. Item Number is the distributor's internal part number. The Supplier Item Number is the number defined by the supplier.
Note: You can enter either the Supplier Item Number or the Item Number. If you choose to enter the Supplier Item Number, then the Item Number is automatically populated. If you choose to enter the Item Number, then the Supplier Item Number is automatically populated. You can map items between distributor and supplier inventory using the Supplier Trade Profile window.
-
The description and the price at which the item is being procured is automatically populated. In addition, the system calculates and displays the on-hand inventory for this item. The Manufacturer, Supplier, and Serial number information should be made available based on the implementation of the application and should be configured at the system level and based on the Supplier and Supplier profiles.
-
Select the New Price change type.
Note: If you disabled adjustment on the Supplier Trade Profile page, you cannot enter a price change adjustment on covered inventory items.
-
Enter the new price in the Change Value field.
-
Enter the covered and approved inventory details for this item per the agreement in the respective fields.
-
Click Save to save your work. A Confirmation message appears.
Note: Cancel deletes any changes made but not committed. Save commits any changes and displays these on the same page. Apply saves the changes and takes you to the previous page.
-
Click Recalculate to view the new covered inventory value after adjustments.
-
Based on the approvals setting on the Supplier Trade Profile page, you can continue to approve the new adjustment or merely the transaction. For more information, see Approving Transactions.
Adjusting Covered and Approved Inventory by Item
If you enabled adjustments on the supplier trade profile, you can directly adjust the amount of approved price protection coverage on items that the supplier has agreed to cover. You can do this only for active and pending adjustment transactions.
Use the following steps to make such adjustments.
-
Navigate to the On Hand Inventory tab of the Price Protection Transaction Details page
-
Select any of the following change types for an item line.
-
Amount Decrease - Select this to enter the quantity of decrease in the covered inventory for the selected item.
-
New Price - Select this to enter the new price if the supplier increases or decreases the price of the item.
-
Percent Decrease - Select this to enter the percentage of decrease in the covered quantity of the selected item.
-
Percent Increase - Select this to enter the percentage of increase in the covered quantity of the selected item.
-
-
Enter a change value.
-
Then enter adjusted covered and approved inventory quantities for the item.
-
Save your changes.
-
To view the new covered inventory value after adjustments, click Recalculate.
-
You can click on the details icon next to the Covered Inventory field to review the covered inventory details for this product, identify the inventory that falls outside of the effective date of the covered period, and make warehouse adjustments. For information, see Adjusting Covered Inventory by Warehouse.
-
Based on the approvals setting on the Supplier Trade Profile page, you can continue to approve the new adjustment or merely the transaction. For more information, see Approving Transactions.
Adjusting Covered Inventory by Warehouse
For transactions in active or pending adjustment status, you can make adjustments to the covered inventory for an item by using the Include check box to include or exclude warehouse inventory that is out of range. Based on a day tolerance specified in the application by the supplier, the adjust details section of the Covered Inventory Details page displays inventory that is outside the effective date range. In addition, for a warehouse you can choose to include or exclude inventory by receipts.
Note: Adjustments that you make before the effective date of a price protection transaction are overwritten on the effective date when the system recalculates on-hand inventory. You can neither save nor apply any adjustments before the effective date of a transaction. These adjustments merely enable you to view the probable claim amount.
Use the following steps to make adjustments by warehouses.
-
From the Price Protection Dashboard, select a transaction in Active or Pending Adjustment status. The Transaction Details page opens.
-
Click on the Details icon in the On Hand Inventory tab of the Transaction Details page to navigate to the Covered Inventory Details page.
-
Select the warehouse you need to exclude from the covered inventory.
-
Click on the Add Another Line button to include another warehouse.
Note: This warehouse must have inventory for this item.
-
Enter the quantity of inventory that you want to include from this new warehouse.
-
Save your changes. When you click Save, the system calculates the on-hand inventory for this item at this warehouse and displays this value.
-
To view the new covered inventory value after adjustments, click Recalculate.
-
Based on the approvals setting on the Supplier Trade Profile page, you can continue to approve the new adjustment or merely the transaction. For more information, see Approving Transactions.
Use the following steps to make further adjustments by warehouse based on inventory received dates.
-
From the Price Protection Dashboard, select a transaction in Active or Pending Adjustment status. The Transaction Details page opens.
-
Click on the Details icon in the On-Hand Inventory tab. The Covered Inventory Details page opens.
-
From the Covered Inventory Details page, click on the Adjustment icon. The Covered Inventory By Receipt Dates page appears.
-
The page displays quantities of the item received at the warehouse by date and the number of days by which these quantities are out of range.
-
Select to include or exclude these quantities from the covered inventory.
-
Save your adjustments.
-
Click Apply to return to the Covered Inventory Details page and view revisions to warehouse quantity included and covered inventory values.
-
To view the new covered inventory value after adjustments, click Recalculate.
-
Based on the approvals setting on the Supplier Trade Profile page, you can continue to approve the new adjustment or merely the transaction. For more information, see Approving Transactions.
Approving Transactions
If you enabled approvals on the Supplier Trade Profile page, and you are satisfied with the covered inventory adjustments you made, you can submit the transaction for internal approval. Price protection refers to the AME setup to pickup approver information. Based on the approval set up in AME, you can send the notification to a single user or a group of users. For more information on setting up approval methods and approvers, see Setting Up Approval Rules, Oracle Price Protection Implementation Guide.
You can set up multiple approvers for sequential or parallel approval. Parallel approvals include the consensus and first responder methods. By the Consensus method, all listed approvers must approve before the transaction status can change to approved. By the First Responder method, the status of the transaction is determined by the response of the first approver who responds. In the Sequential method, the chain of approvals stops at the first rejection and this determines the fate of the transaction.
The Oracle workflow FYI notification is sent to the approver. The notification contains the hyperlink to open the price protection transaction. The approver approves or rejects the transaction in the price protection transaction page.
Use the following steps to approve a price protection transaction
-
Navigate to the Price Protection Dashboard.
-
Select to view all transactions that are pending adjustment or pending approval and click Go.
-
Click on the Transaction Number of the transaction that you would like to review and approve.
-
If you enabled approval and adjustments on the Supplier Trade Profile page, click on the Request Approval button to have your adjustments approved. The transaction status changes from Pending Adjustment or Active to Pending Approval and a Confirmation page appears listing the approvers.
If you enabled approval but disabled adjustments on the Supplier Trade Profile page, click on the Request Approval button to have the transaction approved. A Confirmation page appears listing the approvers.
-
Click Submit to submit the transaction for approval. Notifications are then sent to approvers.
-
Approvers can navigate from the notification to the Transaction Details page and click on the Approve button to approve the transaction. Based on the approval voting method you set up in Oracle Approvals Management, the list of approvers and their vote, the status of the transaction changes to either Approved or Rejected.
-
If you disabled approval and adjustments on the Supplier Trade Profile page, you can directly click the Approve button to approve the transaction after you create it.
If you only disabled approval on the Supplier Trade Profile page, you can click the Approve button to approve the your adjustments after you make adjustment. The transaction status then changes to Approved.
-
After the transaction status changes to Approved, you can raise a supplier or customer claim. You can also initiate execution processes. For more information, see Executing Price Protection Transactions and Creating an Inventory Claim.
Executing Price Protection Transactions
The execution processes included in the Price Protection application can be configured to work at an operating unit level or at the supplier site level. These processes include notifications on changes in prices and updates to prices lists.
You can configure all processes for automatic execution for an active transaction. You can also generate claims and create new notifications, and execution processes. For more information, see the Oracle Price Protection Implementation Guide.
Otherwise, you can manually execute price change notifications for non-approved transactions by selecting the correct execution process and clicking on the Execute button next to it. After the transaction is approved, you can update inbound and outbound price lists.
When the distributor does not want to pass on the price protection benefits to their customers, the Notify Pricing Department execution step is not applicable. Similarly, the Customer Claims tab and the Submit Customer Claims to Supplier are not applicable.
When the price protection transaction is approved, the transaction status is updated to Approved. The status of the price protection is automatically changed to Active while approving the transaction when the effective date of the transaction is less than or equal to the system date. For the transactions having the effective date as a future date, the request Price Protection Initiate Execution Processes concurrent request updates the transaction status from Approved to Active. Once the transaction status becomes active, you can execute claims, notifications, update, and create execution processes.
Initiating Execution Processes
The price on open Purchase Orders is updated to the new price from the Price Protection transaction. The program updates the price for Standard Purchase Orders and Blanket Releases in the following statuses:
-
Standard PO
-
Approved purchase order without receipts
-
Requires approval
-
On hold
-
-
Blanket Releases
-
Approved
-
Requires re-approval
-
On hold
-
Purchase Order Notification
The following Purchase Orders and Releases are included in the notification sent to users:
-
Standard Purchase Order
-
Incomplete
-
In process
-
Freeze
-
Partially received
-
Pending receiving transactions
-
Approved purchase order with receipts
-
-
Blanket Releases
-
Incomplete
-
In process
-
Freeze
-
PO with Pending receiving transactions
Note: Closed or cancelled purchase orders and releases are not updated and notifications are not created.
-
If there are any errors during program execution, then the status will be updated as Error.
Update Item Cost
Material Cost of items are updated to the new price from the price protection transaction. Standard and average cost updates are supported in the current release of Oracle Price Protection.
Required setup for Item Cost Update include cost adjustment account setup in the Supplier Trade Profile or at the operating unit level.
The following validations are processed prior to item cost updates:
-
If the price protection transaction is for a price decrease and the existing item cost in any organization is lower than the new price from supplier, then the following warning message displays:
One or more inventory organizations has an incorrect item cost.
-
If the price protection transaction is for a price increase and the existing item cost in any organization is higher than the new price from supplier, then the following warning message displays:
One or more inventory organizations has an incorrect item cost.
If there are any errors during program execution, then the status will be updated as Error.
Update Item List Price
Item list prices are updated to the new price from the price protection transaction. List price is set up for the master organization(s) under the operating unit.
If there are any errors during program execution, then the status will be updated as Warning. The failure reason and description display in the log of the program.
Notification for Inbound Price Lists
All active supplier price lists for the supplier corresponding to the items in the price protection transaction are included in the notification sent to users.
Notification for Outbound Price Lists
All active outbound price lists corresponding to the items in the price protection transaction are included in the notification sent to users.
Notification for Promotions
All active offers corresponding to the items in the price protection transaction are included in the notification sent to users.
To initiate the price protection execution process
-
Navigate to the Submit Request window.
-
Select the Price Protection Initiate Execution Processes concurrent request.
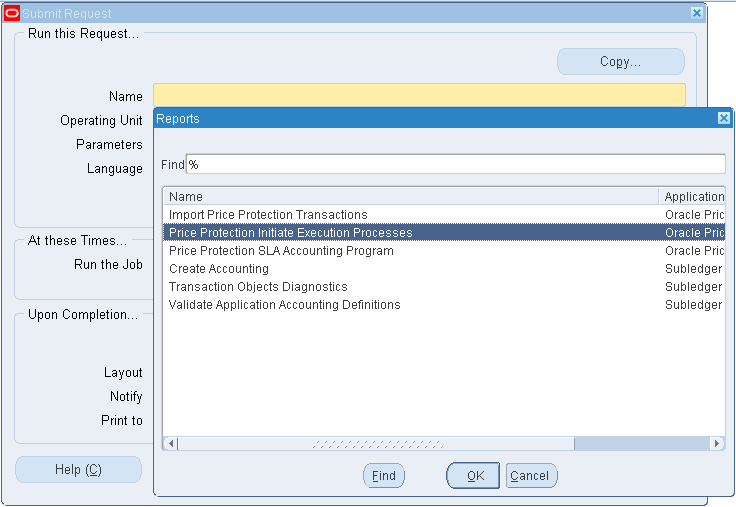
-
Enter the Operating Unit in the Parameters window and click OK.
-
Click the Submit button to run the concurrent request.
You can now execute claims and notifications.
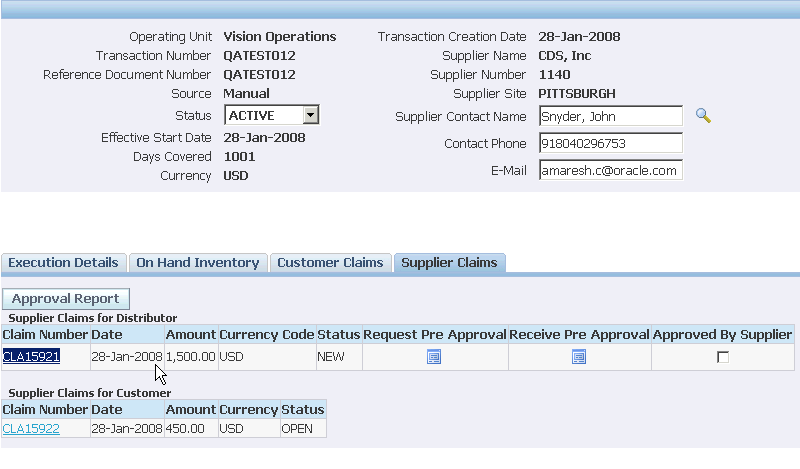
Creating an Inventory Claim
This is a manual workflow-triggered process based on the setup. You can only initiate the process to generate a supplier inventory claim when the effective date of the price protection transaction is equal to or prior to the system date. The critical piece of the supplier inventory claim is the calculation for the supplier inventory.
The initial view of the supplier claims displays a table definition without any lines.
Navigate to the Covered Inventory tab to initiate the supplier inventory claim. If the user navigation is from the execution details page, then all lines on the covered inventory tab are selected by default. You can then choose to generate the inventory claim for all lines, or specific inventory lines by clicking the Create Supplier Claim button.
This initiates the claim creation process in the Trade Management application. Once the claim is created, the claim appears in the Supplier Claims tab of the price protection transaction. If the last refresh of the concurrent job for the inventory calculation has not occurred on the effective date, then you will receive a warning and the application will trigger the calculate process.
Covered Inventory Claim: Pre-Approval Process
The pre-approval process for the Covered Inventory Claim usually consists of the distributor sending in covered inventory information by product and by price drop for the on-hand, in-transit inventory to the supplier. The supplier then approves or rejects the inventory claim based on the data provided. Approved amounts can vary based on the distributor calculations and the supplier calculations. In this case, the supplier approves the distributor claim for a quantity different from that requested.
This process for pre-approval is configured as a part of the Price Protection application and uses the BPEL workflow engine. If pre-approval is required, then a Business Intelligence Publisher report containing the covered inventory data information must be sent as an attachment to the supplier contact. Once approved with an updated quantity, the supplier claim amount is adjusted in the Trade Management application. When the covered inventory claim process has been initiated, the On-Hand Inventory tab does not enable the Calculate, Save, or Apply buttons and updates are not allowed.
Where pre-approval in not required, a claim associated to the price protection transaction is created in the price protection module and is available in the Open status to allow further processing in the Trade Management application.
Once the initial claim is raised in Trade Management, you cannot update the covered inventory claims data for the selected line. When additional inventory claims are to be generated, the claim process must be initiated using the Generate Supplier Claim by selecting a row on the covered inventory tab. Once all the selected rows on a price transaction have been used for claim creation, the generate supplier claims button is disabled.
To create on-hand inventory claims
-
From the Price Protection Dashboard, select an active Transaction. The Inbound Price Transaction page appears and displays the Execution Details tab information.
Note: You can also create On-hand inventory claims from the On-hand tab by selecting the transaction lines manually for which the claims needs to be created.
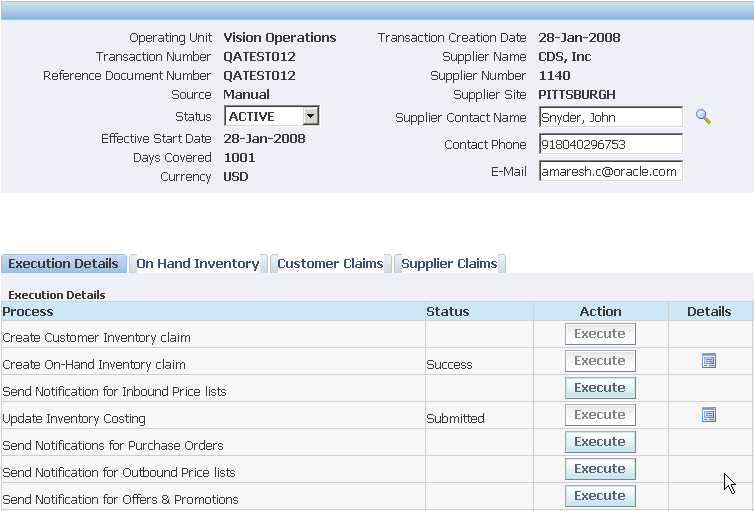
-
Click the Execute button on the Create On-Hand Inventory Claim line. The Status line is updated to Submitted and then to Success when the claim has been created.
-
Click the Supplier Claim tab to view Supplier Claims for Distributor details. Note that the amounts for price increase display as negative amounts.
Creating Customer Claims
The customer claims page is available as a part of the solution if the benefits of the price protection transaction are to be passed down to the customer. In this case, a part or all of the benefits from the supplier are passed to end customers, and the end customers can submit claims for inventory that they have in stock. If such a claim is raised, then the customer claims are consolidated and passed on to the supplier with basic details that include customer, product, covered inventory, and the claimed amount.
Information regarding price protection claims associated with customer accounts is stored in the Oracle Price Protection application. When customer accounts are merged, the price protection claims information is transferred to the master account.
When two customer accounts are merged, the following information is transferred to the master account:
-
Existing Customer Claims
-
Customer Claims History
The Customer Claims page can be an empty table to start with. The customer claim customer population is triggered by the price protection execution date and the system date. If the execution date is in the future, then the customer claims table is populated with a list of customers who have purchased the product in the covered period. This is a configured setup at the time of implementation. If not in use, you can select customers and enter the claim related data manually. The grouping is by customer and product combination.
Additional Buttons include Create Supplier Claim and Create Customer Claim.
To create customer claims
-
From the Price Protection Dashboard, select an Active transaction.
-
Click the Customer Claims tab.
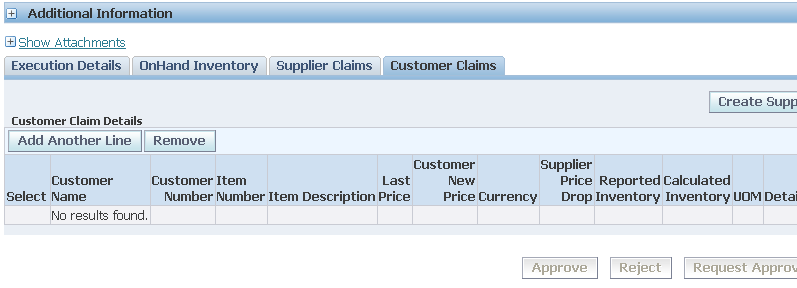
-
Click the Add Another Line button.
-
Enter a Customer Name.
-
Enter an Item Number.
-
Enter the Customer New Price.
-
Enter Reported Inventory.
-
Click Save to save your work.
-
Click the Supplier Claims button to create a Supplier Claim.
-
Select the Supplier Claims tab to view the supplier claim.
Additional Claims
Additional Claim (Duplicate lines) functionality lets you add lines with duplicate items in the On-Hand Inventory and Customer Claims mid-tabs. A duplicate line refers to a line that has the same item number which already exists in another line for which a claim is already created.
Additional Claim Functionality - On-Hand Inventory
A duplicate line is allowed only when the claim for a previous line is created successfully (i.e. SUPP_DIST_CLAIM_STATUS status for the earlier line must be 'Y'). The Change Type and Change Value can be different for the duplicate line than that of the previous line.
-
When a regular transaction line (non-duplicate) is added in the On-Hand Inventory mid-tab, the status of various flags in the DPP_TRANSACTION_LINES_ALL table are shown below:
UPDATE_PURCHASING_DOCS NOTIFY_PURCHASING_DOCS UPDATE_INVENTORY_COSTING UPDATE_ITEM_LIST_PRICE NOTIFY_INBOUND_PRICELIST NOTIFY_OUTBOUND_PRICELIST NOTIFY_PROMOTIONS_PRICELIST SUPP_DIST_CLAIM_STATUS N N N N N N N N However, when a duplicate line is added in the On-Hand Inventory mid-tab, all flags except the claim flag will be in status ‘D’ as shown:
UPDATE_PURCHASING_DOCS NOTIFY_PURCHASING_DOCS UPDATE_INVENTORY_COSTING UPDATE_ITEM_LIST_PRICE NOTIFY_INBOUND_PRICELIST NOTIFY_OUTBOUND_PRICELIST NOTIFY_PROMOTIONS_PRICELIST SUPP_DIST_CLAIM_STATUS D D D D D D D N This will ensure that NO execution process can be triggered for the duplicate lines except Supplier claim creation.
-
When a duplicate line is being added, the values for Prior Price, On-Hand Inventory, Covered Inventory, and Approved Inventory will not be retrieved. The corresponding inventory breakup by warehouse and receipts dates will not be available. The Last Refreshed Date should be null in this case.
-
You can edit the following fields when a duplicate line is added: Prior Price’, ‘Change Type’, ‘Change Value’, ‘Covered Inventory’ & ‘Approved Inventory’. All the fields should be frozen as soon as the claim is created for that line.
-
Prior Price
-
Change Type
-
Change Value
-
Covered Inventory
-
Approved Inventory
All fields are frozen when the claim is created for that line.
-
-
The prerequisite for closing a transaction is: All execution processes should have completed successfully for all transaction lines (except for duplicate lines), and all supplier claims should be closed. (all flags for all transaction lines must be ‘Y’ or ‘D’).
-
You can remove the duplicate transaction line from the On-Hand Inventory mid-tab provided that claim has not been created for this line, even if a line exists in the Customer Claims mid-tab with the same item number. The flag status is as follows:
UPDATE_PURCHASING_DOCS NOTIFY_PURCHASING_DOCS UPDATE_INVENTORY_COSTING UPDATE_ITEM_LIST_PRICE NOTIFY_INBOUND_PRICELIST NOTIFY_OUTBOUND_PRICELIST NOTIFY_PROMOTIONS_PRICELIST SUPP_DIST_CLAIM_STATUS D D D D D D D N Line Removal Logic for the On-Hand Tab:
-
If no execution process is run and no corresponding customer claims line is added, then REMOVE ALLOWED.
-
If a duplicate line and claim is not created (non claim process in status D), then REMOVE ALLOWED.
-
-
The Manually Adjusted flag will always be checked for a duplicate line since inventory values are always entered manually for such lines.
-
Recalculate functionality does not apply to duplicate lines. These lines should be ignored while processing Recalculate All. If any execution process flag listed above is ‘D’, then a transaction line should be ignored while recalculating.
-
The Item Inventory Report displays the consolidated total for an item. For example, if there is one transaction line for Item A with inventory of 20 units, and there is another line for Item A (duplicate line) with inventory of 30 units, then the Item Inventory Report displays an inventory of 50 units of Item A.
Additional Claim Functionality - Customer Claims
An additional (duplicate) line is allowed only when either a Supplier or Customer claim for a previous line is created successfully. For example, SUPPLIER_CLAIM_CREATED or CUSTOMER_CLAIM_CREATED status for the previous line must be ‘Y’ in DPP_CUSTOMER_CLAIMS_ALL.
-
When a duplicate line is added to the Customer Claims mid-tab, the status for both claim flags is ‘N’.
-
The Calculated Inventory is not retrieved for the duplicate line and there will be no Customer Inventory Details Report for such line.
-
The Customer Claims Report displays the consolidated total for a customer and item combination.
-
All remaining behavior remains the same as that of normal lines.
Viewing Transaction History
The Price Transaction History page displays critical updates to the price transaction. This includes: updates to inventory, execution detail updates, effective start date, status change, and approval and pre-approval actions associated with the price protection transaction.
-
Transaction Details History
-
On-Hand Details History
-
Customer Claims History
-
Execution Details History
-
Approvals History
To display price protection transaction history
-
Navigate to the Price Protection Dashboard.
-
Select a transaction.
-
Click the History button to display the History page.