Reports
This chapter describes how to create, view, and download Standard and Comparison reports.
This chapter covers the following topics:
Overview
Oracle iSetup Reporter takes extracted data as input to generate standard reports and comparison reports. You can choose the data objects to generate the desired report and view the report online or download it as PDF, RTF, or Excel formats. The report online view also allows you to search for a record from within the report.
Managing Report Preferences
Use these pages to create, update, and view your preferences for reports.
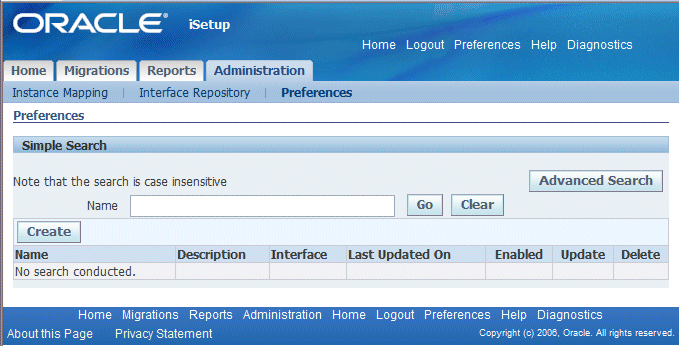
Searching for Preferences
Search for a personalization based on a user's name. The results of such a search will be the preferences set by that user. The results table will list:
-
Name
-
Description
-
Interface
-
Last Updated On
-
Enabled
-
Update (icon)
-
Delete (icon)
Search for Preferences
Creating a Preference
-
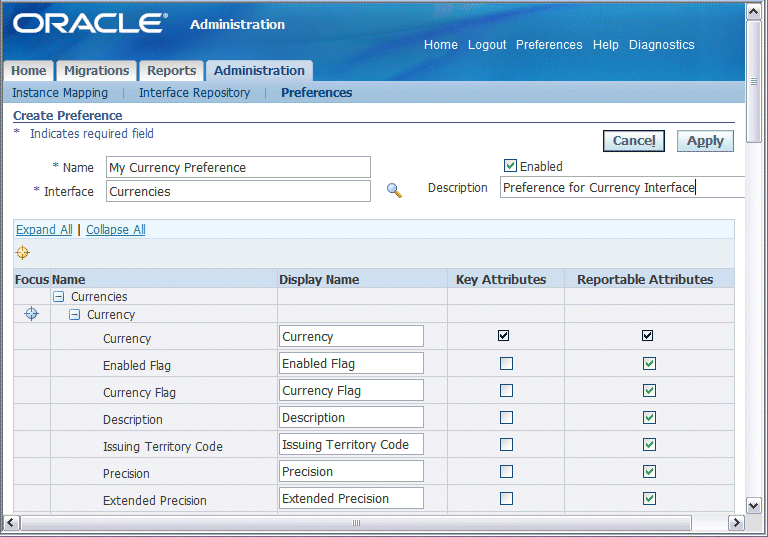
Click the Create button to create a preference.
-
Enter the following for your preference:
-
Name - Name of the preference.
-
Enabled - Check this box to enable the preference.
-
Interface - This LOV lists only those APIs that are not personalized.
-
Description
-
Note: The Personalization name must be unique for a user.
Based on the API picked in the LOV above, the HGrid will be rendered with the following columns:
-
Name: The name of the sources intended with the attributes owned by the corresponding source.
-
Display Name - Displays the user defined name for attributes
-
Key Attributes - This box is read-only for developer-marked keys; users are not able to update this. To add key attributes, users can check the box and add the key attributes.
-
Reportable Attributes - By default all attributes are checked. Uncheck this box to prevent an attribute from appearing in reports. Developer-marked key attributes appear as read-only.
Note: An attribute that is checked as a Key Attribute must be checked as a Reportable Attribute.
Create Preference
Updating a Preference
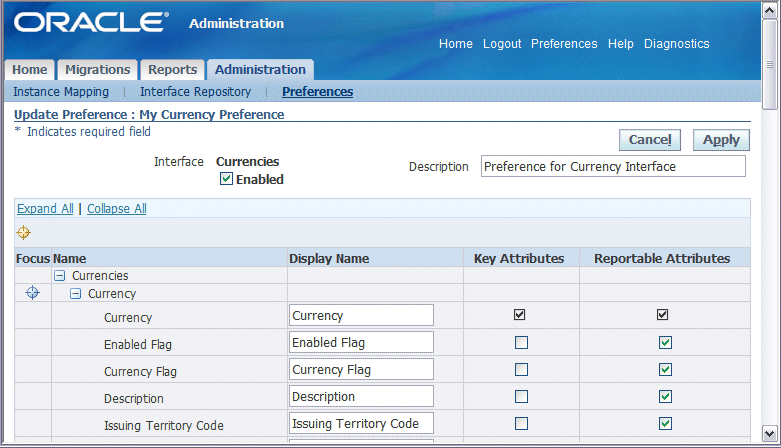
From the Search Results table, you can navigate to this page using the Update icon for a selected preference.
You can update all the fields for a preference except for Name and Interface.
Update Preference
Deleting a Preference
Use this page to delete a preference. From the Search Results table, you can navigate to this page using the Delete icon for a selected preference.
Viewing a Preference
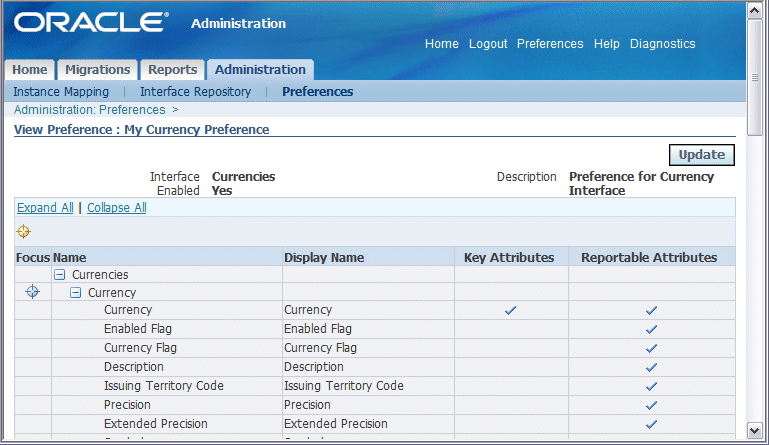
This page provides details for a preference. From the Search Results table, you can navigate to this page by clicking on the link provided for a preference.
View Preference
Standard Reports
Standard Reports are generated for a single extract.
Standard Reports
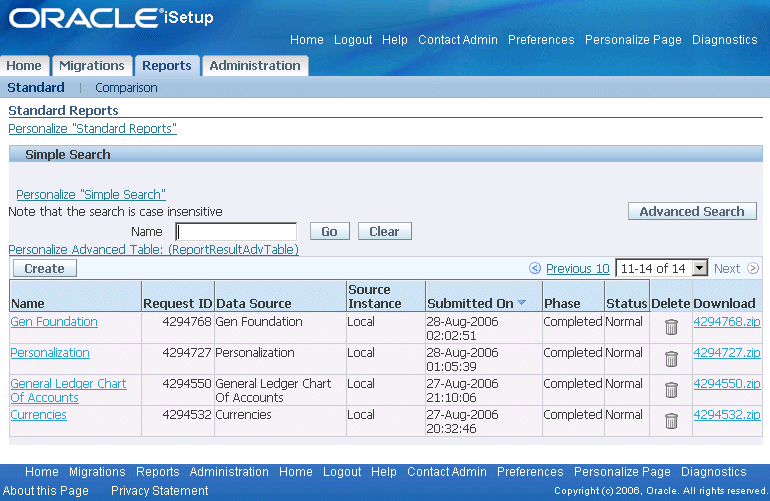
Searching for Standard Reports
You can either do a Simple Search or an Advanced Search.
In Advanced Search, you can search on the following attributes of the standard report:
-
Name
-
Request ID
-
Data Source
-
Source Instance
-
Submitted On
-
Phase
-
Status
In addition, you can have the search results match any or all the criteria you specify by selecting an appropriate option.
The report can be deleted by clicking on the Delete icon.
If the downloadable report option was chosen, a link appears in the Download column. Use this link to download the generated report in the form of a ZIP file.
Advanced Search for Standard Reports
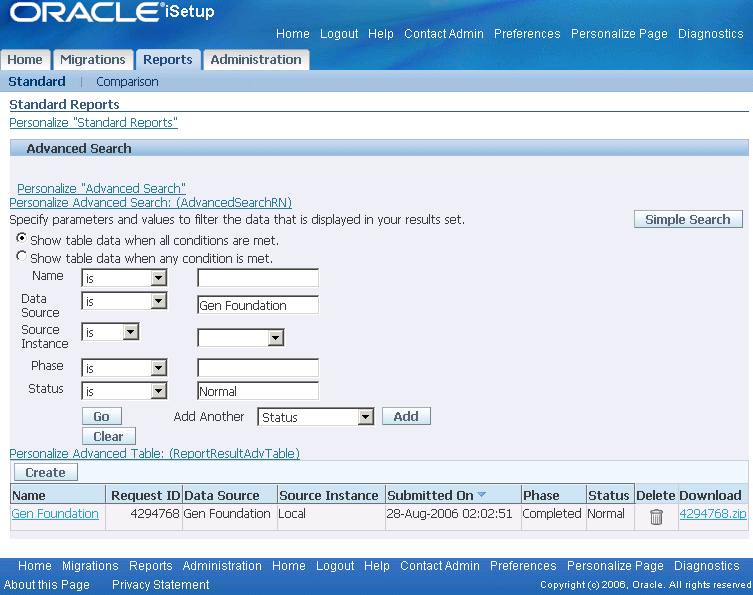
Search Results
All standard reports that match your search criteria are listed in a table format. Use the search results page to:
-
View the details of a selected report
-
Create a standard report by clicking Create
-
Download a report by clicking on the ZIP file link
Note: This option is only available for reports where a download format was specified during report generation.
-
Delete a report by clicking the Delete icon
Creating a Standard Report
You can initiate a standard report create process either by:
-
Clicking Create in the Standard Reports page from the Reports tab > Standard subtab.
-
Selecting an extract on the Extracts Search page and clicking Report.
-
Clicking Report on the Extract Details page.
Create Standard Report: Set Report Parameters
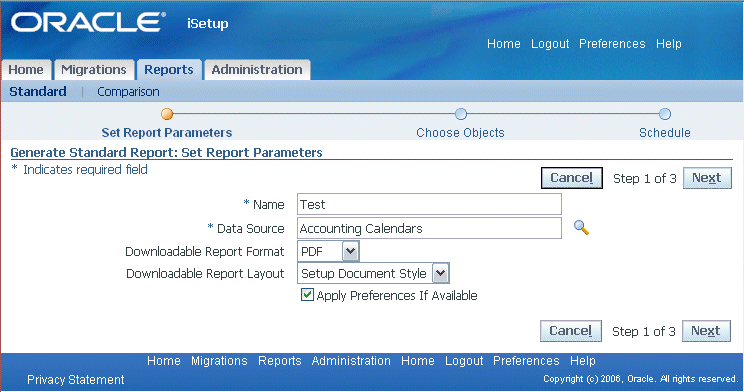
Following are the steps to create a standard report:
-
Name: Enter a unique name for the report. This is a required field.
-
Data Source: Select a Data Source for the report from a search. This is a required field.
Note: The extract must have Phase as Completed, Status as Normal, and must be Active status or have one or more data objects enabled for reporting. When the creation is initiated from the Extracts Search or the Details page, this information is populated.
-
Downloadable Report Format: In addition to the online report, you can also select the format for a downloadable report. You can download the report as a .PDF, .RTF, or .XLS. The recommended format is PDF.
-
Downloadable Report Layout: You can also choose one of the two downloadable layouts, Hierarchical or Setup Object Style (BR-100 style document). This dropdown list is available only if ‘PDF’ or ‘RTF’ is chosen as the downloadable report format.
-
Apply Preferences if Available: If one or more interfaces in the extract have preferences configured for them, checking this box will apply those preferences while generating the report. On the same note, if this box is not checked, the user-configured preferences will not be applied on the interfaces during report generation.
-
Click Next. Based on the extract selected, a list of data objects is displayed. Select at least one data object for reporting.
Generate Standard Report: Choose Objects
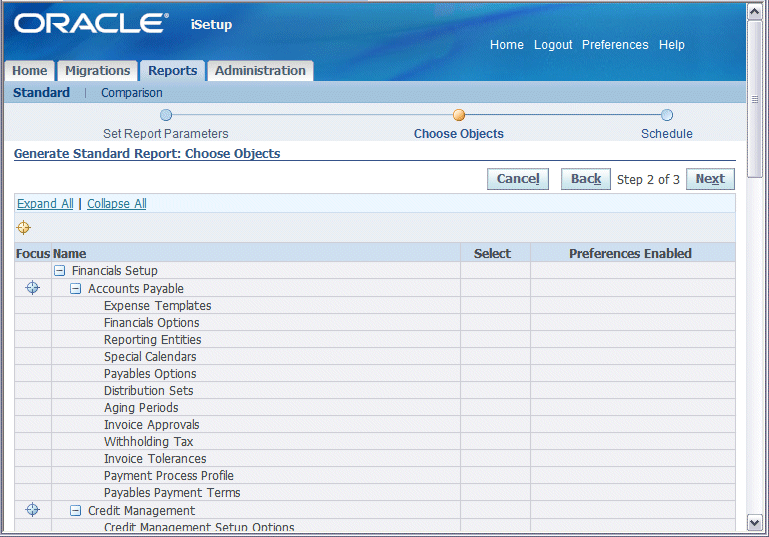
-
Preferences Enabled: This column displays a tick icon corresponding to those interfaces for which preferences will be applied. This column appears only if the 'Apply Preferences if Available' box on the previous page is checked.
-
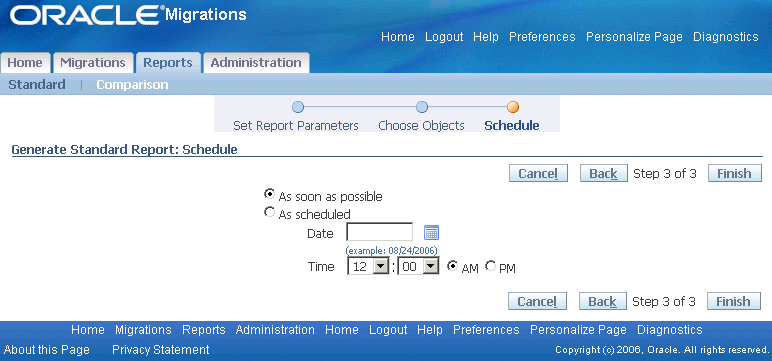
Schedule: Create the standard report as soon as possible or schedule it for a later date and time.
Generate Standard Report: Schedule
-
Finish: Click Finish to submit the report creation process.
This takes you to the Standard Reports Search page with a confirmation.
Viewing a Standard Report
Click the desired standard report name to view the details of a report.
This view displays the data objects that were part of the data source. The View icon is enabled only for the objects that were selected for the report.
While the report is being generated, the View icon maybe disabled for objects which are being processed. This view also displays the number of records contained in each data object.
Refresh: Refresh the page to get the current status. The Refresh button appears as long as the status of the report is not Complete.
View Log: Click View Log to see the log generated during the generation of this report.
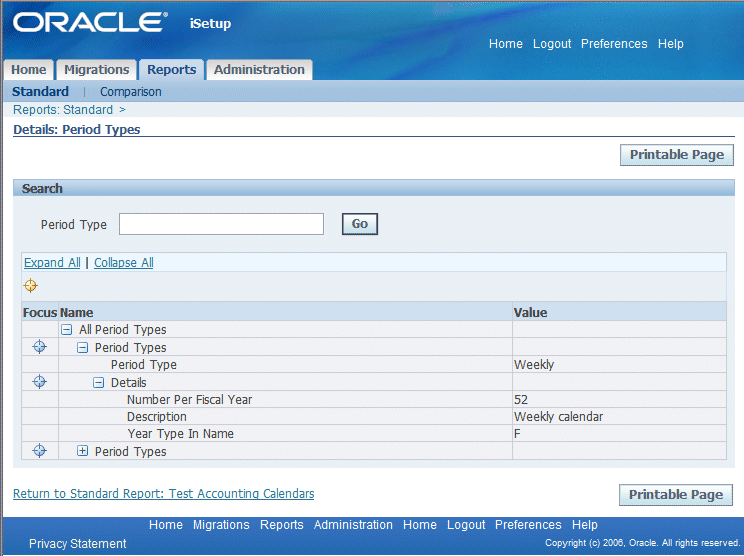
Online Report Layout: Use this dropdown list to choose a Hierarchical view or Tabular view of the online report. Click the View icon in any of the interfaces to view the online report.
Hierarchical Layout: Records are displayed in a hierarchical fashion. You can search for a record by using the available search criteria and clicking Go.
Hierarchical Layout
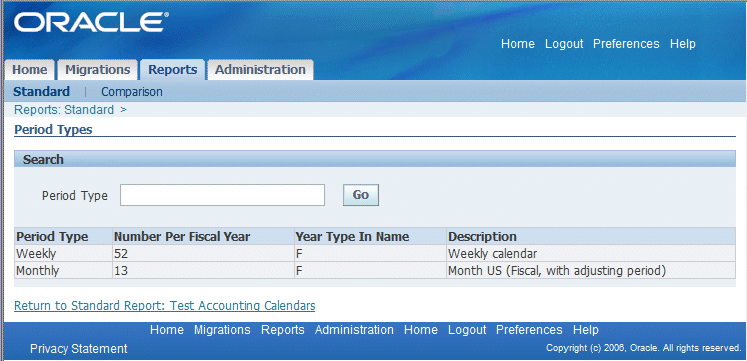
Tabular Layout: In a tabular layout:
-
Records are displayed in a tabular format.
-
The detail records for each master row are also listed in the last few columns of the table.
-
Clicking on the detail records takes the user to the detail level, listing all the detail records of that master in the form of a table.
-
The master level record is also displayed in a hide-show region.
-
You can navigate to any of the master records in the hierarchy by clicking the locator links generated on top of the page.
-
You can also search at each level using the available search criteria and clicking Go.
Tabular Layout
Note: The online report retrieves records based on the profile option AZ: Reporter Max Records, which can be set to a maximum of 200. To restrict your search use the search filters available on the Report Details page.
Click Printable Page for a print version of the standard report.
Downloading a Standard Report
If you had specified a download format for the report, a ZIP file containing the downloadable report is available on the Standard Reports Search page. Click the Download link for the required report. You can also download the report from the Standard Report Details page.
Note: The download capability is available if:
-
A download format was specified during creation of a standard report.
-
The report is generated without any errors and the Phase is Complete and the Status is Normal.
The downloaded file name is the report Request ID and is generated by the system.
The downloaded ZIP file contains the following files and folders:
-
File index.html: This file contains details of the request such as the report name, date of submission, data source name, preferences enabled. It also contains details of the hierarchy of objects in the selection set with the number of records for that data object. The View Detail icon takes you to the report for the data object.
-
Folder Publishedfiles: This folder contains the different object reports.
-
Folder index_files: This folder contains images that appear in the index.html file.
Once you have downloaded the report, you need to extract the contents to a folder. Open the index.html file to access the report.
Note: It is recommended that you navigate to the reports through the links in the index.html file.
Deleting a Standard Report
Click the Delete icon in the Standard Reports page to delete a report. This takes you to the Warning page where you must confirm the delete action. Once you confirm the deletion, you return to the Standard Reports Search page.
Comparison Reports
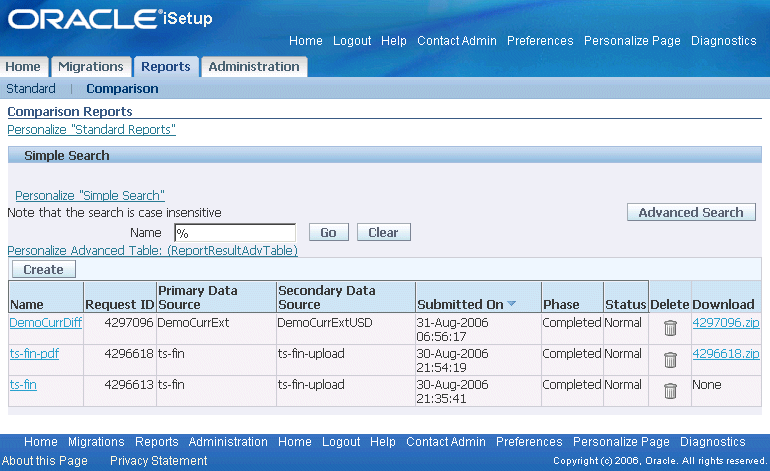
A comparison report is generated from two extracts. You can create a new comparison report or view an existing comparison report.
Comparison Reports
Searching for Comparison Reports
You can either do a Simple Search or an Advanced Search.
In Advanced Search, you can search on the following attributes of the comparison report:
-
Name
-
Request ID
-
Primary Data Source
-
Secondary Data Source
-
Submitted On
-
Phase
-
Status
In addition, you can have the search results match any or all the criteria you specify by selecting an appropriate button.
Advanced Search for Comparison Reports
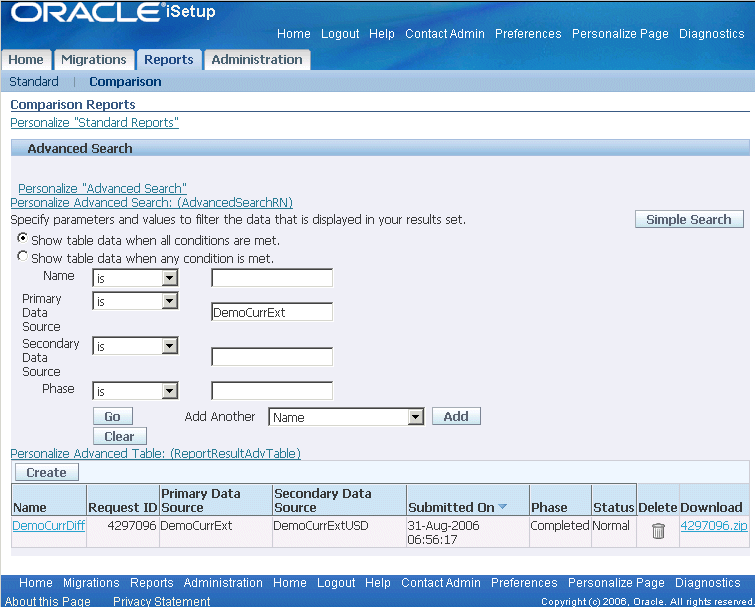
Search Results
All comparison reports that match your search criteria are displayed in a table format. Use the search results page to:
-
View the details of a selected report
-
Create a comparison report by clicking Create
-
Download a report by clicking the ZIP file
-
Delete a report by clicking the Delete icon
Creating a Comparison Report
From the Reports tab > Comparison subtab, click Create.
Generate Comparison Report: Set Report Parameters
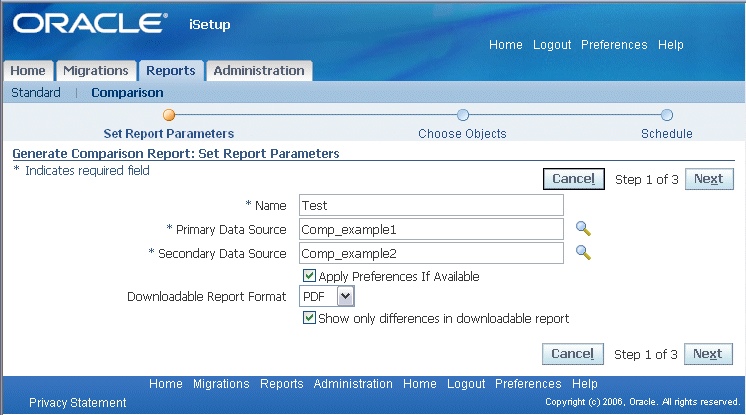
Following are the steps to create a comparison report:
-
Name: Enter a unique name for the comparison report. This is a required field.
-
Primary Data Source: Select a Primary Data Source.
-
Secondary Data Source: Select a Secondary Data Source.
-
Downloadable Report Format: In addition to the online report, you can also select the format for a downloadable report. You can download the comparison report as a .PDF, or .RTF. The recommended format is PDF.
-
Apply Preferences if Available: If one or more interfaces in the extract have preferences configured for them, checking this box will apply those preferences while generating the report. On the same note, if this box is not checked, the user-configured preferences will not be applied on the interfaces during report generation.
-
Click the check box "Show only differences in downloadable report" if you want only the differences to be reflected in the downloadable report.
-
Click Next. Based on the snapshots you have selected, the common objects of the two snapshots are listed. Select the objects on which you want to generate the report.
In the table showing the common objects, the Preferences Enabled column displays a tick icon corresponding to those interfaces for which preferences will be applied. This column would appear only if the 'Apply Preferences if Available' box in on the previous page is checked.
Generate Comparison Report: Choose Objects

Note: A comparison report cannot be generated if the extracts do not have any common objects.
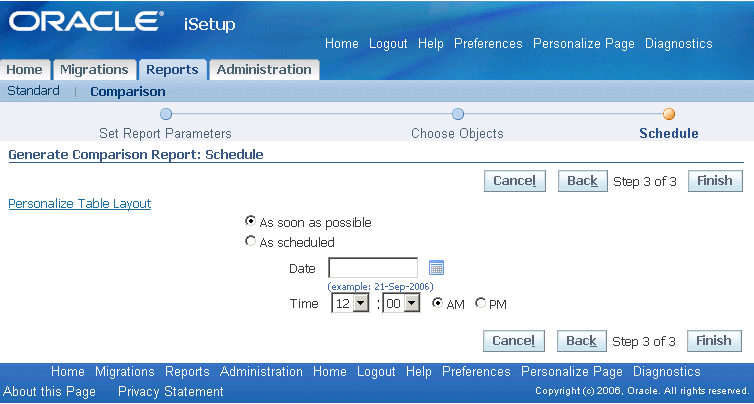
-
Schedule: Create the report as soon as possible or schedule it for a later date and time.
Generate Comparison Report: Schedule
Viewing a Comparison Report
Click the report name to view the details of a report.
This view displays the objects that form the report and the number of records that are exclusive to the primary data source, exclusive to secondary data source, and records that are different as well as identical records.
Refresh: Refresh the page to get the current status. The Refresh button appears as long as the status of the report is not Complete.
View Log: Click View Log to see the log generated during the generation of this report.
To view the report generated for a data object, click on any of the difference count. Only the records of the clicked difference type is displayed. For example, clicking on the ‘Exclusive to Primary Data Object’ count will display only those records that are exclusive to the primary data source.
This page allows you to search based on the difference types and the search criteria available for that interface.
Click the object name to view the contents of the object. A comparison view of the contents of the primary data source and secondary data source appears.
| Legend | Description |
|---|---|
|
|
Record only available in the Primary Data Source. |
|
|
Record only available in the Secondary Data Source. |
|
|
Record is present in the Primary and the Secondary Data Source, but has differences in some attributes. |
|
|
The attribute that is different for a record, which is present in the Primary and the Secondary Data Source. |
Attribute differences are identified with the not equal to icon in the Different column.
Click Printable Page for a print version of the comparison report.
Downloading a Comparison Report
If you had specified a download format for the report, a ZIP file containing the report is available on the Comparison Reports page. Click the Download link for the required report. You can also initiate the download from the Comparison Report Details page.
Note:
-
Download would be available if:
-
A download format was specified during creation of a comparison report.
-
Report is generated without any errors and the Phase is Complete and the Status is Normal.
-
-
Download file name is the report Request ID and is generated by the system.
The downloaded ZIP file contains the following files and folders:
-
File index.html: This file contains details of the request such as the report name, date of submission, data source name. It contains the details of the hierarchy of data objects as in the Selection Set of the Primary Data Source and the number of records that are different for those common data objects, which were selected for reporting. The View Detail icon takes you to the report for the data object.
-
Folder Publishedfiles: This folder contains the different object reports.
-
Folder index_files: This folder contains images that appear in the index.html file.
Once you have downloaded the report, you need to extract the contents to a folder. Open the index.html file to access the report.
Deleting a Comparison Report
Click the Delete icon in the Comparison Reports page to delete a report. This takes you to the Warning page where you must confirm the delete action. Once you confirm the deletion, you return to the Comparison Reports Search page.