Defining Responsibilities and Users
This chapter covers the following topics:
- Defining Responsibilities and Users
- Creating Responsibilities
- Creating Internal Users
- Setting Up Supplier Users
- Setting Up Customer Users
Defining Responsibilities and Users
You can securely collaborate with internal users, suppliers, and customers. You can set up users and grant them responsibilities to enable specific business functions. You can further restrict access to specific items, catalogs, or change management objects with role-based security.
| Task | Required? |
| Creating Responsibilities | |
| Creating Internal Users | Yes |
| Setting Up Supplier Users | |
| Setting Up Customer Users |
Creating Responsibilities
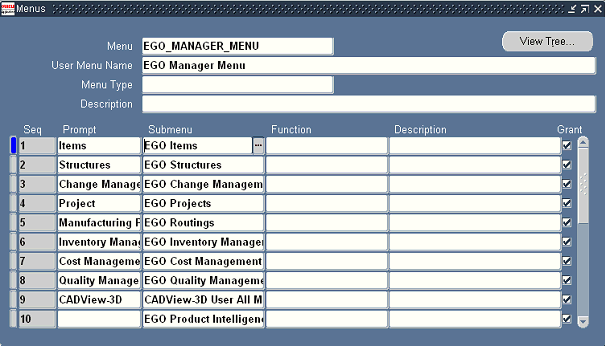
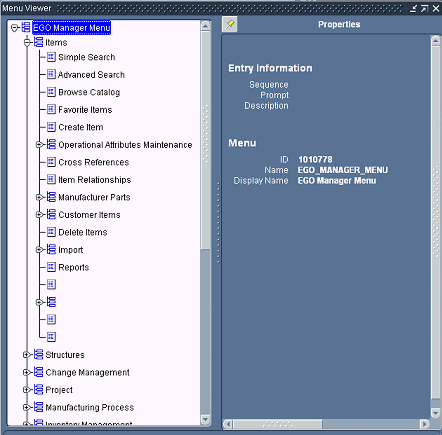
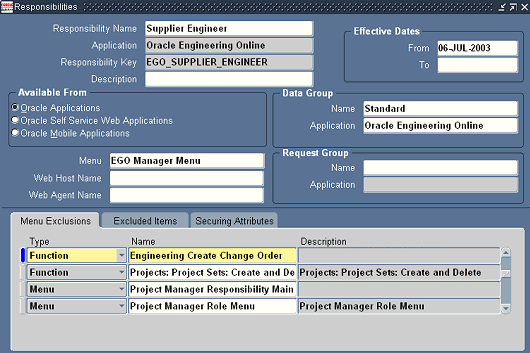
The top-level menu for the seeded responsibilities (Development Manager, Development Engineer, and Supplier Engineer) is the EGO Manager Menu (EGO_MANAGER_MENU); you should view the seeded menus and functions before creating ones of your own. To view the seeded menus and functions, open the EGO Manager Menu in the Application Developer's Menu form and click the View Tree button. In the Menu Viewer you can expand each menu as you decide which menus to include in your custom responsibilities. If a node appears with no prompt under a menu, then you should include that function to ensure that all the menu items work correctly. You can use menu exclusion rules when defining your responsibilities if you need to exclude any specific menus or functions for a user.
Top level menu with seeded responsibilities
Menu Viewer
Defining responsibilities with menu exclusions
Creating Internal Users
You can define E-Business Suite users and assign them responsibilities that grant them access to specific E-Business Suite applications. After creating an employee, customer or supplier, create a user account to which you then link the employee, customer, or supplier. Each internal user should have an employee ID with an e-mail address specified so he or she can receive notifications. You can assign internal users a custom responsibility or one of the following seeded responsibilities:
-
Development Engineer
-
Development Manager
-
Manufacturing Engineer
-
Product Manager
-
Program Manager
-
Supplier Engineer
Setting Up Supplier Users
You can securely collaborate with suppliers. You can set up E-Business Suite users for each of the suppliers with whom you collaborate on product and component designs.
Assuming the supplier company has already been defined in Oracle Purchasing or Oracle Sourcing, you can register a supplier user in Oracle Sourcing using the Sourcing Super User responsibility. You need to specify the supplier's e-mail address as the user ID so that the system can e-mail the supplier his or her password. After the supplier user is registered via Oracle Sourcing, you can assign him or her a responsibility such as Supplier Engineer, which specifies the functions available to that supplier user. For example, the seeded responsibility Supplier Engineer provides a restricted set of functions that enable the supplier to view specific items (secured with item roles), create issues and change requests for an item, but not create or view change orders.
For more details about registering and setting up supplier users, see the Oracle Sourcing Implementation and Administration Guide and Oracle E-Business Suite System Administrator's Guide Documentation Set.
Setting Up Customer Users
You can securely collaborate with your customers. You can set up E-Business Suite users for each of the customers with whom you collaborate on product and component information.
Assuming that you have already defined the customer company in the Oracle E-Business Suite, create customer users by selecting the Trading Community Manager responsibility. In the Customers – Standard form create a new Customer Type of Person. You must specify a valid Address.
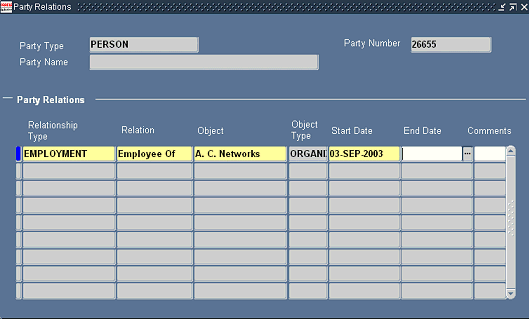
Then navigate to the Party Relations window and assign the person to the customer company as follows:
Relationship Type
EMPLOYMENT
Relation
Employee Of
Object
Company name
Start Date
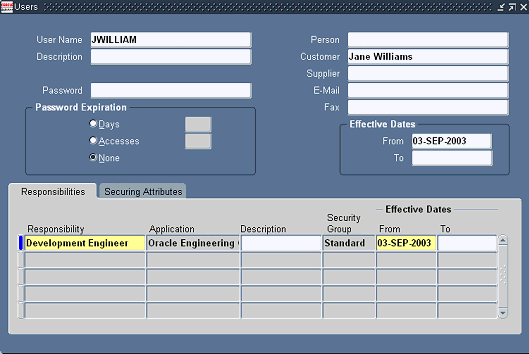
Specify a start date. After assigning a person to the customer company, select the System Administrator responsibility to define the customer user. Then, in the Users form, enter the required information and specify the customer person name in the Customer field.
For more details about setting up customer users, see the Oracle Receivables Users Guide and Oracle E-Business Suite System Administrator's Guide Documentation Set.
Creating a new customer person

Setting up party relations for a new customer person
Defining a customer user