Setup
This chapter covers the following topics:
- Overview of Setting Up the Golden Tax Adaptor
- Setting Profile Options
- Setting Up Descriptive Flexfields
- Defining Item Cross-References
- Setting Up Flexible Address
- Setting Up System Options
- Setting Up Transfer Rules
- Defining Master Items
- Item Export
- Customer Export
Overview of Setting Up the Golden Tax Adaptor
The following flow shows the required setup for implementing the Golden Tax Adaptor.
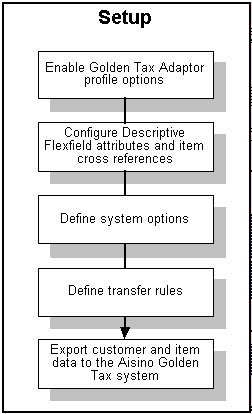
Key setup steps include:
-
Enable Golden Tax Adaptor profile options
-
Configure descriptive flexfields for inventory item and receivables transaction lines
-
Define item cross-references (optional)
-
Set up flexible address (optional)
-
Define Golden Tax System options
-
Define transfer rules
-
Export customer and item master data
Setting Profile Options
You must enable the following profile options:
-
AR: Golden Tax Enabled
-
AR: Golden Tax Import Directory
-
CE: Mask Internal Bank Account Numbers
| User | Sys Admin | Sys Admin | Sys Admin | Sys Admin | |||
|---|---|---|---|---|---|---|---|
| Profile Option | User | User | Resp | App | Site | Required | Default Value |
| AR: Golden Tax Enabled | - | - | - | - | Yes | Yes | No |
| AR: Golden Tax Import Directory | Yes | Yes | Yes | Yes | Yes | No | - |
| CE: Mask Internal Bank Account Numbers | Yes | Yes | Yes | Yes | Yes | No | - |
| Yes | You can update the profile option |
| - | You can view the profile option value but you cannot change it. |
| No | You cannot view or change the profile option value. |
AR: Golden Tax Enabled:
This profile must be set to Yes to use the Golden Tax Adaptor feature. You can update this profile option at the site level only.
Yes: Enables the Golden Tax Adaptor
No: Disables the Golden Tax Adaptor
AR: Golden Tax Import Directory
Use the Golden Tax Import Directory profile option to define the default path of the VAT invoices data file that is received from the Aisino Golden Tax System. The path you specify here is defaulted when you run the Golden Tax Invoice Import program, and it can be overridden. You can update this profile option at all levels.
CE: Mask Internal Bank Account Numbers
Use the CE: Mask Internal Bank Account Numbers profile option to mask bank account numbers on Golden Tax invoice workbench and Golden Tax Discrepancy report. If you want to use the Golden Tax Invoice Export concurrent program to export data, the CE:Mask Internal Bank Account Numbers profile option must be set to No.
You can update this profile option at all levels.
Related Topics
See: Setting User Profile Options, Oracle Applications System Administrator's Guide and Defining Preferences with User Profile Options, Oracle Applications System Administrator's Guide.
Setting Up Descriptive Flexfields
The Chinese VAT regime classifies items by the following attributes:
-
Item Model
-
Tax Denomination
These attributes are required to create the VAT invoice.
Descriptive flexfields for Inventory Master Items and Receivables Line Transactions can be configured to capture these attributes. You can assign any two attributes of these flexfields for this purpose. Once the flexfields are configured, you can enter the values when new items are created, or when receivables transactions are entered. When available at both levels, the system uses the attributes entered on the receivables transaction line. For a receivables transaction that is created for a non inventory item, the descriptive flexfield at the AR transaction line level becomes very useful.
To define the inventory item descriptive flexfield
-
From the System Administrator responsibility, navigate to the Descriptive Flexfield Segments window.
-
In the Applications field, select Inventory (Items).
-
Select an existing context or define a new context.

-
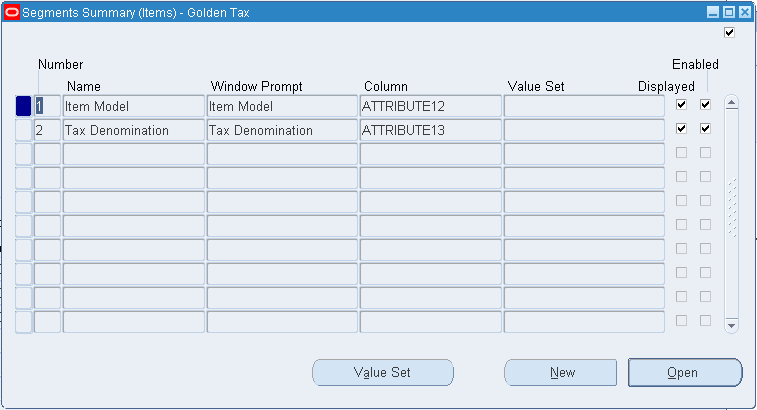
Click Segments. System displays the Segments Summary window. In the Segments window you can assign any two attributes to define Item Model and Tax Denomination.
-
Save your work.
-
Freeze the flexfield and compile.
To define the Receivables Line Transaction descriptive flexfield
-
From the System Administrator responsibility, navigate to the Descriptive Flexfield Segments window.
-
In the Applications field, select the Receivables Line Transaction flexfield.
-
Select an existing context or define a new context.
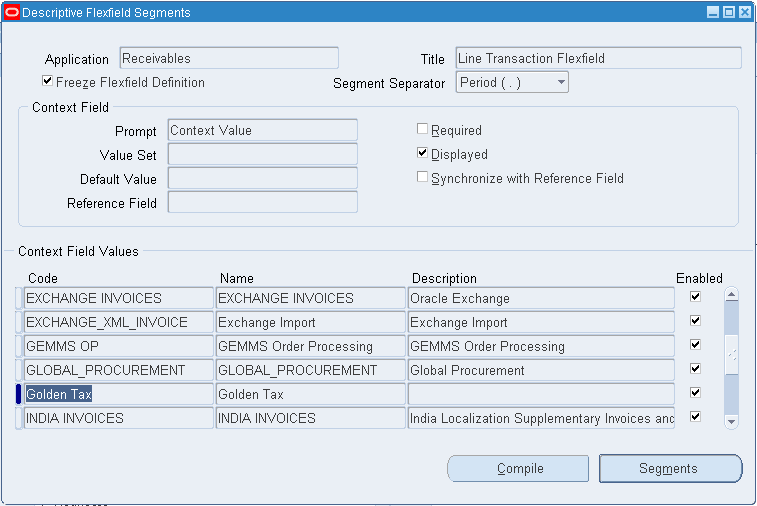
-
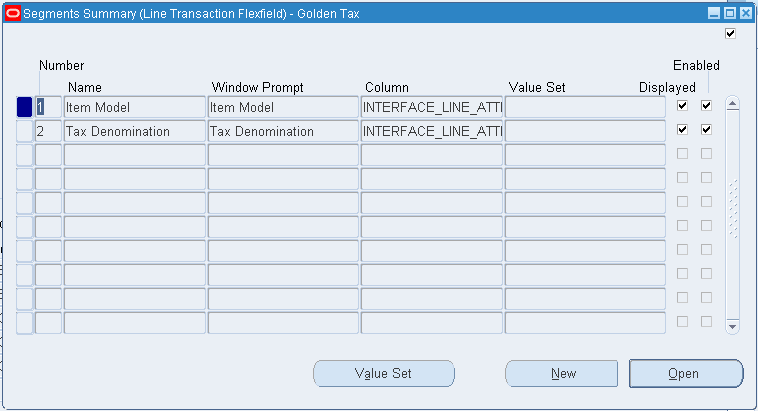
Click Segments. System displays the Segments Summary window. In the Segments window you can assign any two attributes to define Item Model and Tax Denomination.
-
Save your work.
-
Freeze the flexfield and compile.
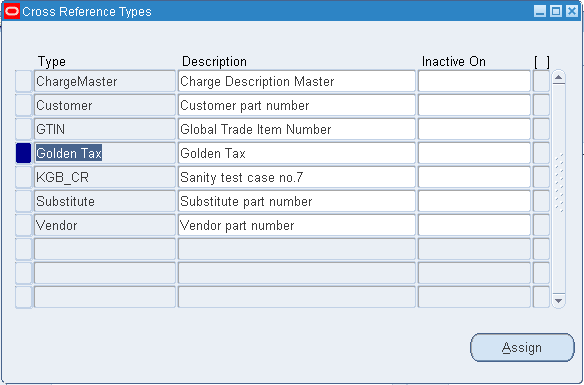
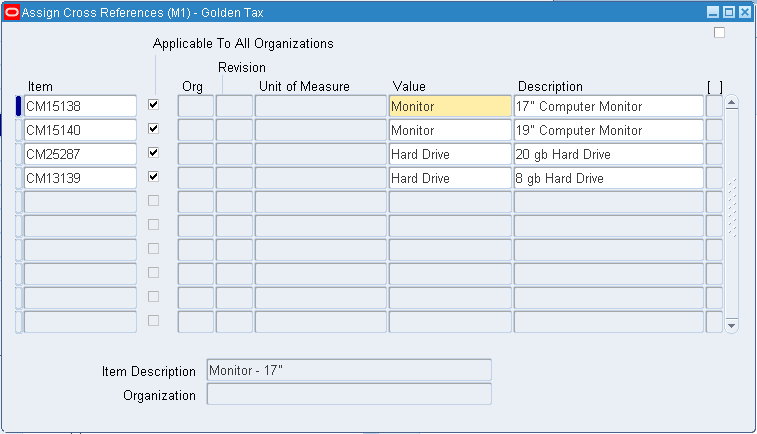
Defining Item Cross-References
You can use the item cross-reference feature in Oracle Inventory to define item descriptions in the Golden Tax System. This is useful when the item description that must be printed on the VAT invoice is different than the internal item description. When receivables invoices are transferred to the Golden Tax Adaptor, the item description from the cross-reference is transferred and printed on the VAT invoice.
To define item cross references
-
From the Inventory responsibility, navigate to the Cross Reference Types window.
-
Enter a new cross-reference type or an existing type.)
-
Click Assign. The Assign Cross References window appears.
-
Select an Item and enter a Value (required).
-
Save your work.
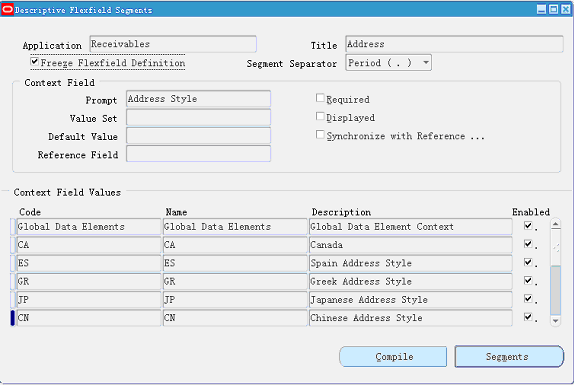
Setting Up Flexible Address
Flexible Address Formats let you enter and validate addresses in the country-specific format. Following are the setup steps you need to perform to implement this feature to support customer address in Chinese. You need to assign China to the Address Style field and implement Flexible Addresses for the Address Alternate Name field.
To assign address styles
-
Navigate to the Countries and Territories window.
-
Query China.
-
In the Address Style field, select China.
-
Save your work.

To set up flexible address formatting
-
Navigate to the Descriptive Flexfield Segments window.
-
In the Title field, query the Address descriptive flexfield.
-
In the Context Field Values region, select the CN (Chinese Address Style) code.
-
Click the Segments button.
-
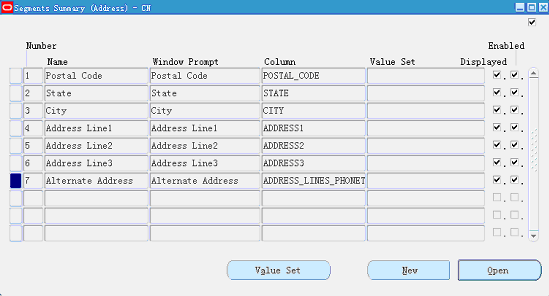
In Segment Summary window, in addition to other segments, add the Alternate Address segment and ADDRESS_LINES_PHONETIC column. For example:
-
Save your work.
-
Freeze the flexfield and compile.
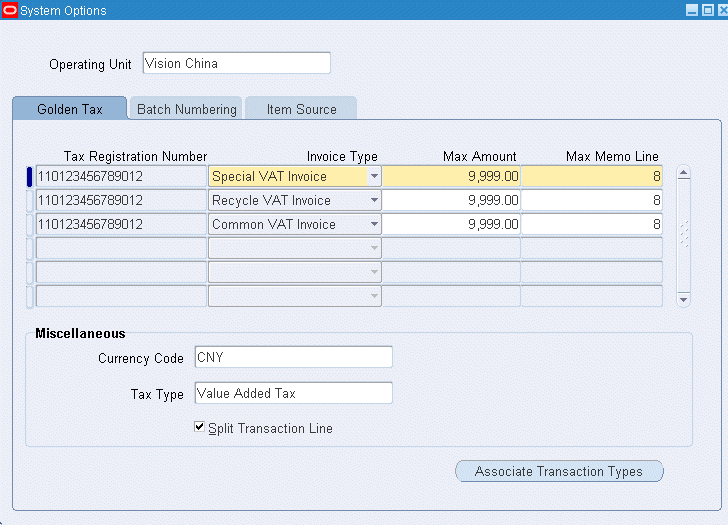
Setting Up System Options
Use the System Options window to define setup information for each operating unit.
The Chinese VAT regime enforces limitations for maximum amounts and maximum memo lines for all VAT invoices. Therefore, if an AR invoice exceeds these limits, then it must be split into multiple VAT invoices. You can define these limitations in the System Options window.
To define system options
-
From the Golden Tax Adaptor responsibility, navigate to the System Options window.
-
Select the Golden Tax tab and enter data in the following fields:
-
Tax Registration Number: This is the transaction tax registration number of the business establishment that is issuing the VAT invoice. In Oracle E-Business Tax, you can define the tax registration number for a business establishment. A business establishment can be a legal entity, an operating unit, an inventory organization (warehouse), or a location. When a new receivables transaction is created or imported from Oracle Order Management, the tax registration number for the tax line is determined as follows:
-
If the inventory organization (warehouse) is specified on the transaction line, then the tax registration number of the inventory organization is used. Invoices imported from Oracle Order Management would most likely have the warehouse specified in the invoice line.
-
If the inventory organization is not specified, then the tax registration number of the legal entity is used.
-
If a single receivables invoice includes tax lines of different tax registration numbers. For example, when invoice lines for different warehouses are included in the same invoice, then the receivables invoice is split into multiple VAT invoices because only a single VAT invoice can be issued against a single tax registration number.
-
-
Invoice Type: Select one of the following VAT invoice types:
-
Special VAT Invoice: When a sale is made to another organization, the Special VAT Invoice is issued.
-
Common VAT Invoice: If the sale is made to an individual, the Common VAT Invoice is issued.
-
Recycle VAT Invoice. A company that runs a recycle business, as a general taxpayer, should use the Recycle VAT Invoice type.
-
-
Max Amount: The maximum amount allowed on a single VAT invoice. This limit is specified by the Chinese VAT regime for the business establishment with the specified tax registration number.
-
Max Memo Line: The maximum lines allowed on a single VAT invoice. This limit is specified by the Chinese VAT regime for the business establishment with the specified tax registration number.
-
Currency Code: This value indicates the currency in which VAT invoices will be issued. Receivables invoice amounts in any other currency will be converted to this currency before they are transferred to the Golden Tax Adaptor. The maximum amount limit is applied to the converted amount.
-
Tax Type: This value indicates the Chinese VAT tax type. In China, VAT invoices must be created only when VAT is applicable; VAT invoices are not generated for other tax types. Receivables invoices with tax lines belonging only to this tax type are transferred to the Golden Tax Adaptor.
-
Split Transaction Line indicator: This attribute indicates how a receivables invoice should be split when the invoice amount exceeds the maximum amount limit. If the attribute is selected, then an invoice line is split and distributed between two child invoices. Otherwise, the entire invoice line is moved to the next child invoice. This example shows a receivables invoice with two lines:
Line No. Line Amount (CNY) 1 6000 2 7000 The maximum amount limit is 10000 CNY. In this example, if the attribute is selected, then the invoice is split into two child invoices as shown by these examples:
1st Invoice:
Line No. Line Amount (CNY) 1 6000 2 4000 2nd Invoice:
Line No. Line Amount (CNY) 1 3000 If the attribute is not selected, then the entire line amount (7000 CNY) is shifted to the second child invoice. However, if the invoice line amount itself exceeds the maximum amount limit, then it is always split. In addition, if the unit price exceeds the maximum amount limit, then that invoice is not transferred and an exception is generated.
-
-
Click the Associate Transaction Types button.
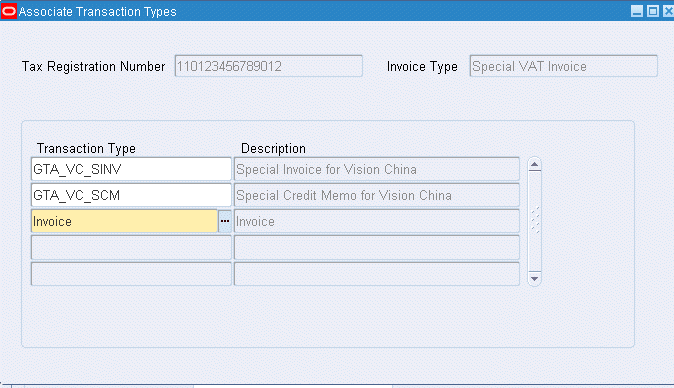
-
Use the Transaction Type field to associate the transaction types to the combination of the tax registration number and invoice type under an operating unit. Every transaction type can only be associated to one invoice type under a tax registration number. At least one transaction type should be associated to a combination of tax registration number and transaction type.
-
Select the Batch Numbering tab.
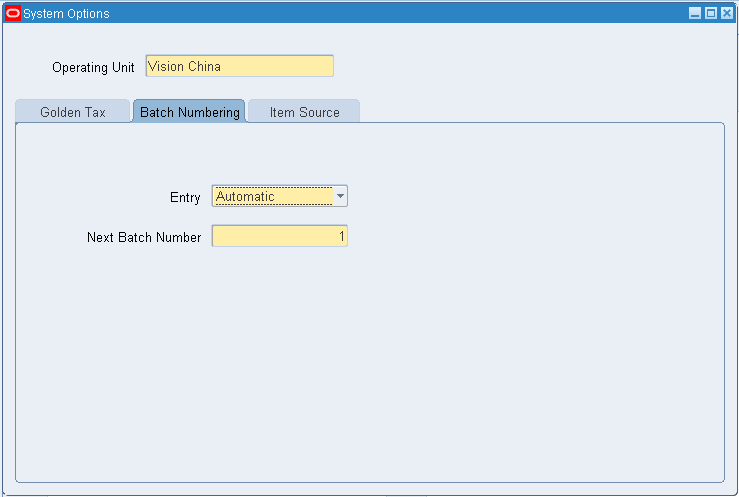
-
Select Automatic or Manual for batch number entry. This batch numbering refers to the batches created when the Golden Tax Adaptor data is exported to a data file from the workbench or when using the Golden Tax Invoice Export concurrent program.
-
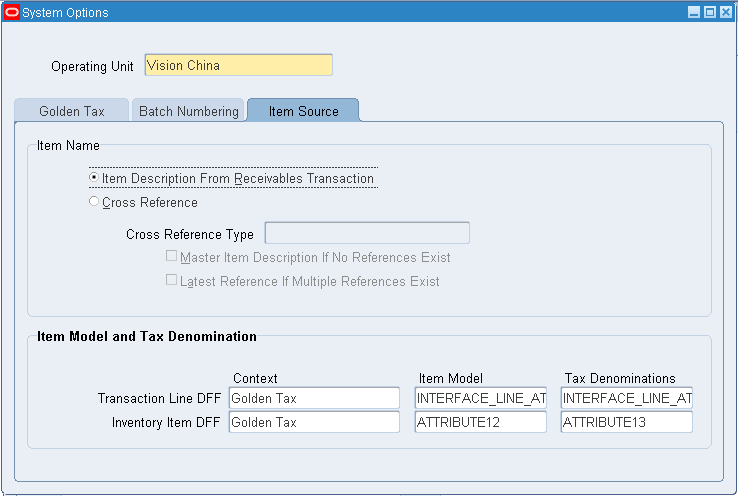
Select the Item Source tab and enter the following attributes:
-
Item Name: In this region, define whether the item cross reference functionality is applicable, and indicate how the item description that prints on the VAT invoice is derived.
-
Item Description From Receivables Transaction: If you select this radio button, then the item description on the receivables transaction line is transferred to the Golden Tax Adaptor. For receivables transaction lines for non-inventory items, the description on the transaction line is always transferred.
-
Cross Reference: Select this radio button if the item description from the item cross references should be transferred to the Golden Tax Adaptor.
-
Cross Reference Type: Select the cross reference type to specify which item description is to be printed on the VAT invoices.
-
Master Item Description If No References Exist: This is applicable if you have selected that the cross reference should be used, but you have not defined the cross reference for an item. Select this check box if you want to transfer the item description on the master item. If a cross reference is not defined for an item and this attribute is not selected, then that receivables invoice is not transferred to the Golden Tax Adaptor, and an exception message displays on the report that is created when you run the Receivables Transfer to Golden Tax concurrent program. You can then define a cross reference for the specific item and run the transfer.
-
Latest Reference If Multiple References Exist: This is applicable when you have selected the cross reference radio button, but a specific item has multiple cross references defined against it under the cross reference type indicated in this window. If this check box is selected, then the most recent cross reference is transferred to the Golden Tax Adaptor. When multiple cross references exist for an item and this check box is not selected, then that receivables transaction is not transferred to the Golden Tax Adaptor, and an exception message displays on the report that is created when you run the Receivables Transfer to Golden Tax concurrent program. You can resolve the exception by deleting the invalid cross references and run the transfer.
-
-
Item Model and Tax Denomination: In this region, define the contexts and attributes of the Inventory Item Descriptive flexfield and the Receivables Line Transaction flexfield that are configured for capturing and storing these additional Golden Tax attributes:
-
Item Model
-
Tax Denomination
These attributes are mandatory for generating VAT invoices, and you must set up at least one of these flexfields.
-
-
Setting Up Transfer Rules
You can set up transfer rules to define the filter criteria for your transfer of receivables invoices to the Golden Tax Adaptor. You can define multiple transfer rules within an operating unit. You can set up one rule as the primary rule that is provided by default when you run the transfer program.
To set up transfer rules
-
From the Golden Tax Adaptor responsibility, navigate to the Transfer Rules window.
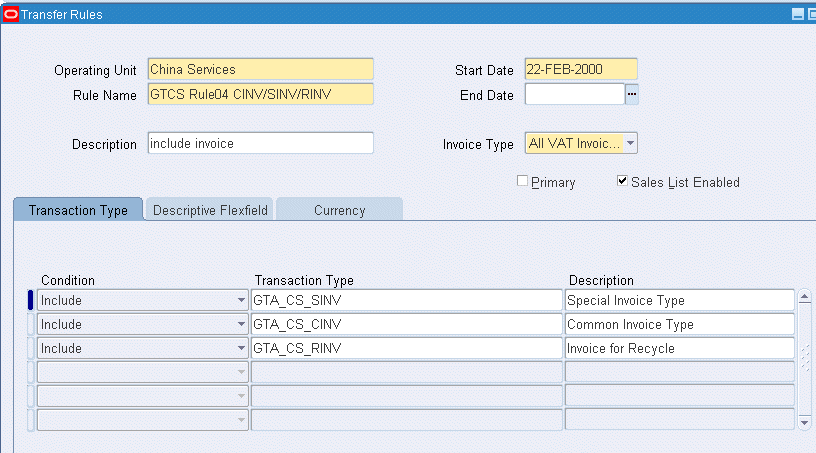
-
Select an Operating Unit (required.)
-
Enter a Rule Name (required.)
-
Select the Primary Rule check box if this is the primary rule. You can have only one primary rule that is effective in an operating unit. The primary rule is provided by default when you run the Receivables Transfer to Golden Tax process.
-
Select the Sales List Enabled check box to create sales list VAT invoices. If you select this check box, then you are not required to split the receivables transaction according to the maximum lines limit.
-
Enter a description.
-
Enter Effective Dates (required.)
-
Select the Invoice Type. You can define a transfer rule for all invoice types or a specific invoice type.
-
Exclude or include specific receivables transaction types. If you include a specific transaction type, then only the receivables transactions with that transaction type are transferred to the Golden Tax Adaptor. If you exclude a specific transaction type, then all receivables transactions except those that belong to this transaction type are transferred.
-
Select the Descriptive Flexfield tab.
-
On the Descriptive Flexfield tab, set transfer rules using the Receivables Transaction Information Flexfield attributes. Similar to the Transaction Type in step 8, you can exclude or include specific flexfield contexts and attributes.
-
Select the Currency tab.
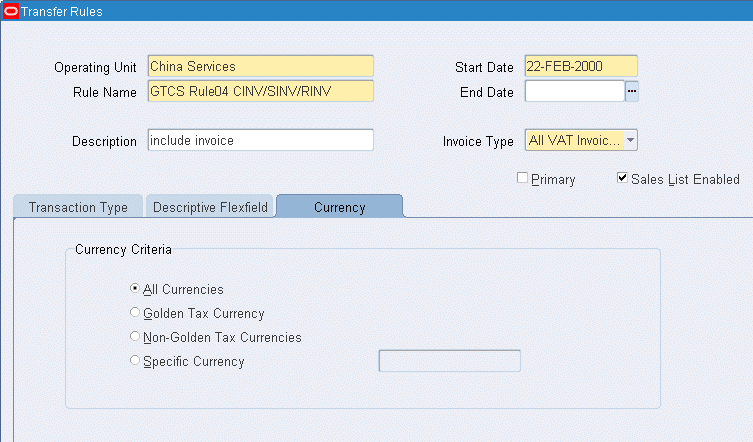
-
You can define the transfer rule based on invoice currency. You can select to transfer invoices that are created in a specific currency or in all currencies. For example, if you are working with a foreign currency and you set this to Non-Golden Tax Currencies, then only foreign currency invoices using this rule are transferred.
-
Save your work.
Defining Master Items
When setting up the Inventory Item Descriptive flexfield, you can assign any two attributes to define Item Model and Tax Denomination. Define these attributes when you create new items.
To define master items
-
From the Inventory responsibility, navigate to the Master Item window.
-
Enter descriptive values for the flexfield attributes for Item Model and Tax Denomination.

Item Export
The Golden Tax Item Export concurrent request exports item related information from the Oracle application into a flat file. The output file can then be imported into the Aisino Golden Tax System.
This exportation eliminates the need to manually create item master records in the Aisino Golden Tax System. If item cross-reference functionality is used, then the appropriate cross references are exported. You can also use Item Descriptive flexfields to set up and define item model attributes.
Parameters
| Parameter | Required | Default Value | List of Values |
|---|---|---|---|
| Master Organization | Yes | - | Master Organizations of Operating Unit selected |
| Item Number From | No | - | - |
| Item Number To | No | - | - |
| Category Set | No | - | - |
| Item Category Name From | No | - | Category set chosen |
| Item Category Name To | No | - | Category set chosen |
| Item Name Source | Yes | - | Master Item Description and Latest Item Cross Reference Description |
| Cross Reference Type | Yes if you select Latest Item Cross Reference Description for Item Name Source | - | All cross reference types |
| Item Status | No | - | Item status |
| Creation Date From | No | - | - |
| Creation Date To | No | - | - |
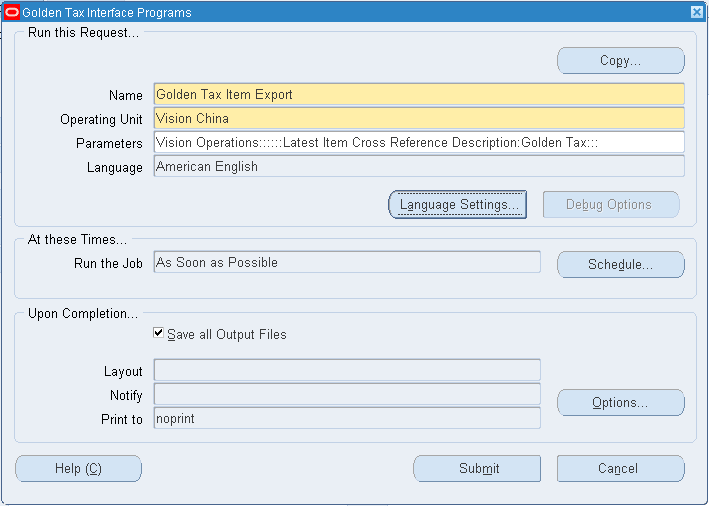
To run Golden Tax Item Export
-
From the Golden Tax Adaptor responsibility, navigate to the Golden Tax Interface Programs window.
-
In the Name field, select Golden Tax Item Export. The Parameters window appears.
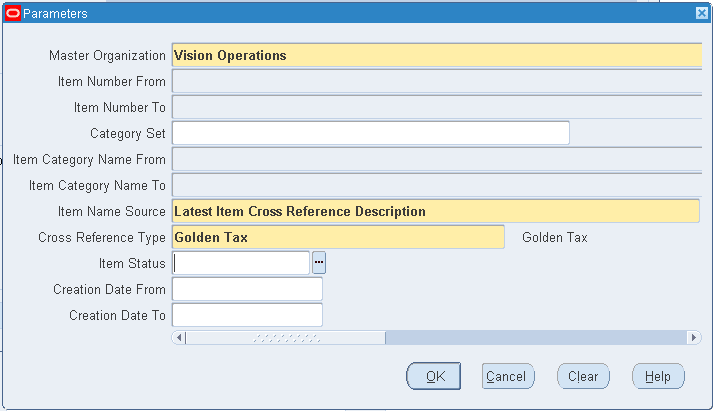
-
Enter request parameters and click OK.
-
In the Golden Tax Interface Programs window, click Submit.
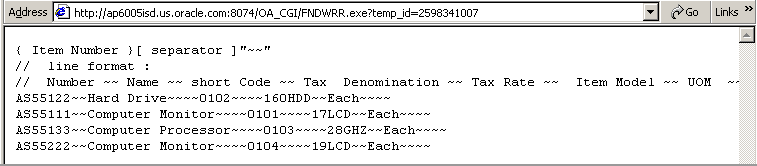
This example shows the flat file produced from the Golden Tax Item Export concurrent request:
Customer Export
The Golden Tax Customer Export concurrent request exports customer-related information from the Oracle application to a flat file. The output file can then be imported into the Aisino Golden Tax system.
Parameters
| Parameter | Required | Default Value | List of Values |
|---|---|---|---|
| Customer Number From | - | - | - |
| Customer Number To | - | - | - |
| Customer Name From | - | - | - |
| Customer Name To | - | - | - |
| Creation Date From | - | - | - |
| Creation Date To | - | - | - |
To run Golden Tax Customer Export
-
From the Golden Tax Adaptor responsibility, navigate to the Golden Tax Interface Programs window.
-
In the Name field, select Golden Tax Customer Export. The Parameters window appears.
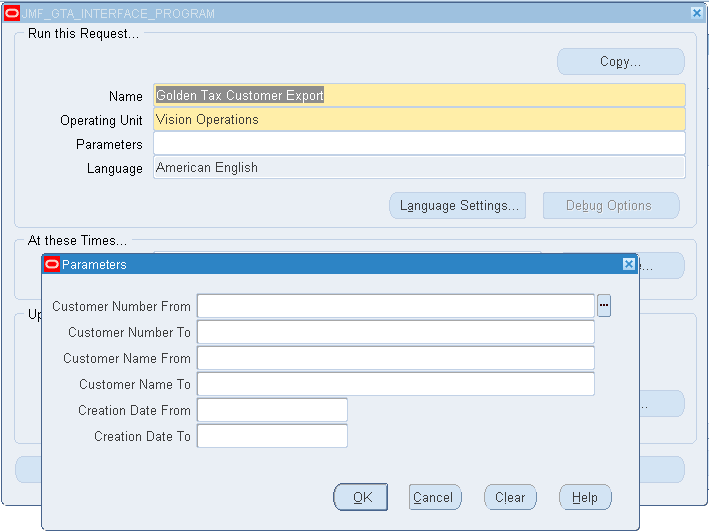
-
Enter request parameters and click OK.
-
In the Golden Tax Interface Programs window, click Submit.
This example illustrates the flat file that is produced from the Golden Tax Customer Export concurrent request:
