Oracle US Federal Human Resources Implementation Guide
Contents
Title and Copyright Information
- Getting Started with the Configuration Workbench
- Quick Start Implementation
- Quick Evaluation of Prototypes Using the Configuration Workbench
- Upgrade HR Foundation
- Full Implementation
- Configuration Workbench for Enterprise and Workforce Management
- Configuration Models for Your Enterprise Framework
- Defining Jobs in the Configuration Workbench
- Defining Positions in the Configuration Workbench
- Defining Grades in the Configuration Workbench
- Configuration Workbench for Compensation, Benefits, and Payroll
- Configuration Workbench for Payroll Process Management
- Defining Regional Jobs, Positions or Grades in the Configuration Workbench
- Converting Benefits Enrollments
- Overview
- Using the Spread Sheet Framework
- Create a Function and Download the Spread Sheet
- Upload and Download Spread Sheets
- Configuration Workbench for Data Conversion
- Configuration Workbench for HR Information Systems
- Configuration Workbench for Migrating Data
Implementation
Implementation Steps
Note: If you are implementing the Oracle HRMS Multi-Tenant functionality, you must refer to the Oracle HRMS Multi-Tenant Functionality white paper on My Oracle Support, Note ID: 760500.1
Before You Start
Before you begin implementing Oracle HRMS, you must ensure your legislation-specific startup data is installed. The installation is normally done by the MIS Manager. You need this startup data before you use Elements, Payment Methods or Legislation Specific Flexfield Structures.
See Oracle E-Business Suite Installation Guide: Using Rapid Install for more information.
Also, check to see whether there are any post installation steps you need to perform before you start to implement Oracle HRMS.
See: Post Install Steps.
Post Install Steps
There are two generic post install utilities for Oracle HRMS:
-
DataInstall enables you to specify all the legislations that you want to install for HR and Payroll, and HR only. This means that when you subsequently perform an installation or upgrade, you can install your legislations in a single operation. DataInstall provides a series of menus from which you can specify the legislation and product combinations.
-
AutoPatch (adpatch) applies the installation or upgrade combinations that you have previously specified in DataInstall.
Canada and USA
If you are installing Oracle Payroll (Canada and US) you also need to install Quantum, a third party taxation product, produced by Vertex, that Oracle Payroll (Canada and US) uses.
France
If you are installing a French localization, there are two additional post install steps for that must be completed for Oracle HR for France. These are:
-
Run the Seed French Data process
-
Create a new EUL (End User Layer) in Discoverer and enable user access to database tables and views by running the Grant HR Access to Discoverer process
US Federal HR
If you are installing the US Federal HR localization, there is one additional step to be able to produce bitmap reports.
To Run the DataInstall Utility (Required)
To specify legislations using DataInstall:
-
Run the DataInstall utility to select legislations using the command:
jre oracle.apps.per.DataInstall <APPS Username> <APPS password>
Note: In multiple ledger installs, supply the username and password of the first APPS account.
The DataInstall Main Menu is displayed.
-
Choose option 1. This displays a screen showing a list of product localization combinations that you can choose.
For each product or localization that already has legislation data on the database, the Action will be defaulted to upgrade. This cannot be changed.
-
Federal HR only: Choose both Oracle Federal HR and Oracle Human Resources from the list of product localizations.
-
Select any new installations that you want to implement. For example, if you wanted to install Canada Payroll, number 3, you would type 3I. This would also set the action on Canada Human Resources to Install as dependencies are maintained.
If you are installing an additional legislation, to correct a mistake use the Clear option. If you have selected to install an additional Payroll and HR legislation, clearing the Payroll legislation will clear the HR legislation also.
You cannot use Force Install for upgrades. You only need to use Force Install if you want to reapply steps in the Global Legislation Driver that have already been applied.
-
If you select a localization other than US or UK, you are returned to the main menu.
If you select a US or UK localization the DataInstall - College Data Option screen is displayed showing whether college data is currently installed for US and UK localizations. The install option is only available if you have no existing college data. If you have existing data then the localization will default to Upgrade, though this can be changed.
Choose Remain if you want to keep the existing data and not apply the upgrade, or choose Clear to set the action to null.
You cannot use Force Install at this point.
Press Return to display the main menu and make further changes or exit.
-
US and Canada only: If you have installed Oracle Payroll, select the JIT/Geocodes option from the DataInstall menu to load the latest JIT/Geocodes data.
This option is also available to Oracle HR customers who wish to validate US or Canadian addresses using Vertex Geocodes data and/or maintain employee tax data in Oracle HR. However, customers who do not have Oracle Payroll must obtain a license from Vertex before installing this data.
Press Return to display the main menu and make further changes or exit.
-
When you choose to exit the DataInstall Actions Confirmation screen is displayed.
Select Y to save your changes and exit, or select N to exit without saving your changes.
When you have exited, the DataInstall Actions Summary screen is displayed. This summarizes the actions that will be taken when the program exits, or when ADPATCH is run with the Global Legislation driver.
Run the Global Legislation Driver using AutoPatch (adpatch) (Required)
-
The Generic HR Post Install Driver delivers the generic entity horizon and all the selected localizations. To run it, type in the following commands:
$ cd $PER_TOP/patch/115/driver
$ adpatch
Then apply the driver hrglobal.drv
-
After applying the Global Legislation Driver, examine the out file hrlegend.lst. This logs any localizations selected in the DataInstall utility but which have not been applied by this driver. Refer to the Installation Manual to ensure that everything has been applied correctly, or contact World-wide Support.
-
UK only: Examine the following out files:
-
pegbutcl.lst. This file logs the step that removes previously seeded user tables for the UK legislation before delivering the latest version. It may also show where seed data names have been changed between releases.
-
perleggb.lst. This file logs the housekeeping step that gets rid of redundant UK seed data after delivery of the latest version. It also records the new balance feeds that have been inserted following an upgrade from Oracle Human Resources to Oracle HRMS.
-
The log file produced by the FFXBCP formula compilation step. The name of the FFXBCP log follows the naming convention of the <request_id> log, and is included in the last section of the adpatch log.
These files are used by Oracle Support Services to diagnose problems with seed data following an upgrade. SQL errors indicate severe problems. Keep these files for reference in the event of any future problems with UK seed data.
-
Install Quantum for Oracle Payroll (Canada and US) (Conditionally Required)
-
Set up a directory structure to hold the Quantum product.
By default, Oracle Payroll looks for the Quantum product in the $PAY_TOP/vendor/quantum directory, however, you can choose where it is placed and override the default location.
Tip: You could create a $PAY_TOP/vendor/quantum_versions directory and a $PAY_TOP/vendor/quantum symbolic link pointing to the correct version of Quantum, since the Quantum products release cycle may be different from Oracle Payroll.
-
Unpack the Quantum Components from the CD.
Oracle Applications provide a CD on which will be a ZIP file called pyvendor.zip in a directory called pay. On the ZIP file will be one directory per operating system that is supported by Oracle Payroll (US). Uncompress the pyvendor.zip file and move the required version into the directory structure created in Step 1. For example, uncompress the file then do the following:
$ mv SOLARIS/2.2.4 $PAY_TOP/vendor/quantum_versions
$ ln -s $PAY_TOP/vendor/quantum_versions/2.2.4 $PAY_TOP/vendor/quantum
The extraction from the compressed file will create a directory called (<operating system>/2.2.4) and two sub directories (lib and utils) along with a number of files in each directory. One of the files created is devenv, this devenv file is the same as the $FND_TOP/usrxit/devenv file except that some of the lines are uncommented. The uncommented lines relate to instructions on how the Oracle Payroll process PYUGEN should be linked. The lines that are uncommented are:
VND_VERTEX='$(PAY_TOP)/vendor/quantum'
VND_LINK='$(VND_VERTEX)/lib/libvprt.a \
          $(VND_VERTEX)/lib/libqutil.a \
          $(VND_VERTEX)/libloc.a \
          $(VND_VERTEX)/lib/libcb63.a'
$ ln -s $PAY_TOP/vendor/quantum_versions/2.2.4 $PAY_TOP/vendor/quantum
VNDPAYSL='$(PAY_TOP)/lib/py3c.o $(PAY_TOP)/lib/py3v.o $(VND_LINK)'
VNDPAYPL='$(PAY_TOP)/lib/py3c.o $(PAY_TOP)/lib/py3v.o $(VND_LINK)'
export VND_VERTEX VND_LINK VNDPAYPL VNDPAYSL
Note: Some of these settings relate to the location of the Quantum product, thus if the Quantum product is not in $PAY_TOP/vendor/quantum this file needs to be edited.
If you have made any changes to your $FND_TOP/usrxit/devenv file, you must merge these differences into the file. If you have not already made any changes then you can simply copy 2.2.4/devenv to $FND_TOP_usrxit/devenv.
-
Relink the Oracle Payroll executable PYUGEN using adrelink.
$ adrelink force=y ranlib=y "pay PYUGEN"
Ensure that the adrelink completed successfully by checking the log file.
-
Build the Quantum product's data files.
To build Quantum's data files, firstly create a directory to hold the data files. Oracle Payroll assumes that these data files are in $PAY_TOP/vendor/quantum/data.
Secondly, run the utility dbcreate that is in the Quantum utils directory. This utility will show a menu of either Payroll or Geocoder. Choose the Payroll option and at the prompt "Enter the Payroll datasource name:" enter the directory into which the data files are to be placed, for example, /apps/pay/11.5/vendor/quantum/data. Once the processing is complete, the menu will reappear and the utility can be exited.
Note: Ensure that the file permissions of the data files are set to readable for all the relevant users. If this is not done then Oracle Payroll will not be able to access these files.
-
Populate the Quantum data files.
Once the data files have been created they need to be populated with taxation data. The taxation data is held in a file called qfpt.dat, which will be delivered in the pyvendor.zip file. Copy this file into the Quantum product area. Once this has been done the data file update utility can be run. This is located in the utils directory called vprtmupd. Select the Update Payroll Tax option from the menu, and answer the displayed questions. The first prompts for the datasource, this should be the location of the data files created in the previous step. The second is the location of the qfpt.dat file. For example:
Enter Datasource: /apps/[ay/11.5/vendor/quantum/data
Enter the path of the update file:  /apps/pay/11.5/vendor/quantum
Note: The update file supplied is a default file, it is not guaranteed to calculate taxes correctly. Its purpose is to allow you to perform testing prior to contacting Vertex to request the correct update file.
-
Register the Quantum Data Files location.
If the data files for Quantum have not been placed in the default location ($PAY_TOP/vendor/quantum/data), then the location of these files must be supplied to Oracle Payroll. This is performed by placing a row in the PAY_ACTION_PARAMETERS table:
SQL> insert into pay_action_parameters
2 values ('TAX_DATA', '/apps/quantum/data');
Run the Seed French Data process (France)
-
This process creates and populates some of the user defined tables used by the various French reports for the Business Group of the current responsibility. It also delivers the example data for the Bilan Social. It should be run for each Business Group that contains data for the French legislation.
For information on the user defined tables created by this process see: User Defined Tables Used by the Bilan Social, Oracle HRMS Enterprise and Workforce Management Guide , and User Defined Tables, Oracle HRMS Configuring, Reporting, and System Administration Guide
Run the Seed French Data process in the Submit Requests window.
Create an EUL and Enable User Access to Database Tables and Views by Running the Grant HR Access to Discoverer process (France)
In order to use the supplied business area and Discoverer workbooks you must perform the following steps:
-
Create an EUL
If you do not have an existing Oracle Discoverer EUL you must create one before you can import the HR France - Bilan Social business area.
See: Oracle Discoverer Administration Guide for further information on creating an EUL.
-
Import the hrfrbsel.eex file
Once you have a suitable EUL you must import the hrfrbsel.eex file. This will deliver the HR France - Bilan Social business area. This file is contained in the Bilan Social Discoverer Components zip file that can be obtained from Oracle World Wide Support.
See: Oracle Discoverer Administration Guide for further information on importing files.
-
Run the Grant HR Access to Discoverer process
The EUL user must be given the correct permissions in order to access the tables and views in the database that are used by the Bilan Social. To do this, you must run Grant HR Access to Discoverer process in the Submit Requests window.
You will now be prompted to enter the following parameters:
-
the connect string for the database on which the Bilan Social data is stored
-
your EUL user name
-
your EUL password
Choose Submit. The process will now run and assign the appropriate permissions to your EUL user.
-
HR Print Reports (US Federal)
To be able to produce bitmap and postscript reports, you must relink ar60runb.
-
Chenv to the environment.
-
Make sure that FND_TOP and APPL_TOP are correct.
-
cd $FND_TOP/bin
-
adrelink.sh force=y "fnd ar60runb"
Implementation Checklist
Use the following checklists to record which parts of Oracle HRMS you want to use. Then refer to the implementation flowcharts to see the high level steps you must complete for each business function you have chosen to implement.
 < Post Install Steps (Required)
Refer to the Post Install Steps to see any steps you must perform before you implement Oracle HRMS.
< Administration (Required)
Includes key and descriptive flexfields, Extra Information Types (EITs), currencies, "View All" HRMS User, and lookups.
< Enterprise and Workforce Management (Required)
Includes organizations, jobs, positions, budgets, person types, HR budgets, complaint tracking, and government reporting.
< Compensation and Benefits (Optional)
Includes grades and their relationship to pay, mass salary actions, compensation and awards, benefits eligibility, leave and absence management, and element sets.
< Workforce Sourcing and Deployment (Required)
Includes person types, assignment statuses and special personal information.
< Talent Management (Optional)
Includes recruitment, career management, evaluation and appraisals and succession planning.
< Workforce Intelligence (Optional)
Includes predefined Discoverer workbooks and a predefined Discoverer End User Layer based on HRMS transactional tables.
< HR Information Systems (Optional)
Includes reports, letter generation, configuration, task flows, user security, US Federal workflow and maintenance forms, audit requirements and Oracle Applications Help, and Web Applications Desktop Integrator (Web ADI). Includes setting the frequency for US federal processes and reports.
Implementation Flowchart
Some of the steps outlined in this section are Required, and some are Optional. Required with Defaults means that the setup functionality comes with predefined, default values in the database; however, you should review those defaults and decide whether to change them to suit your business needs. If you want or need to change them, you should perform that setup step. You need to perform Optional steps only if you plan to use the related feature or complete certain business functions.
Administration
Work Structures 1
Work Structures 2
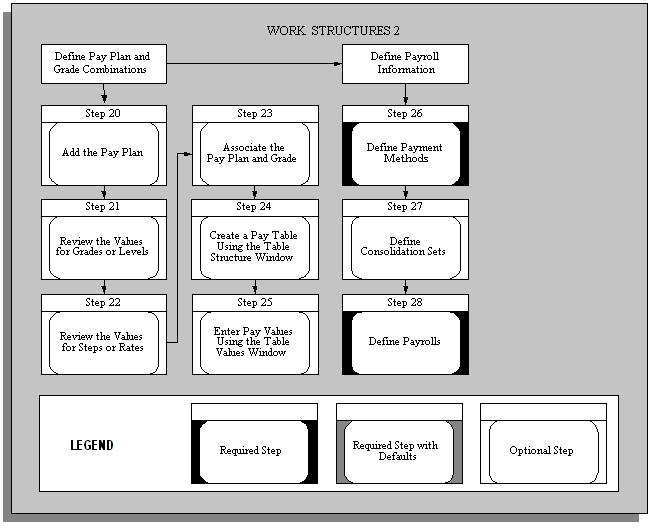
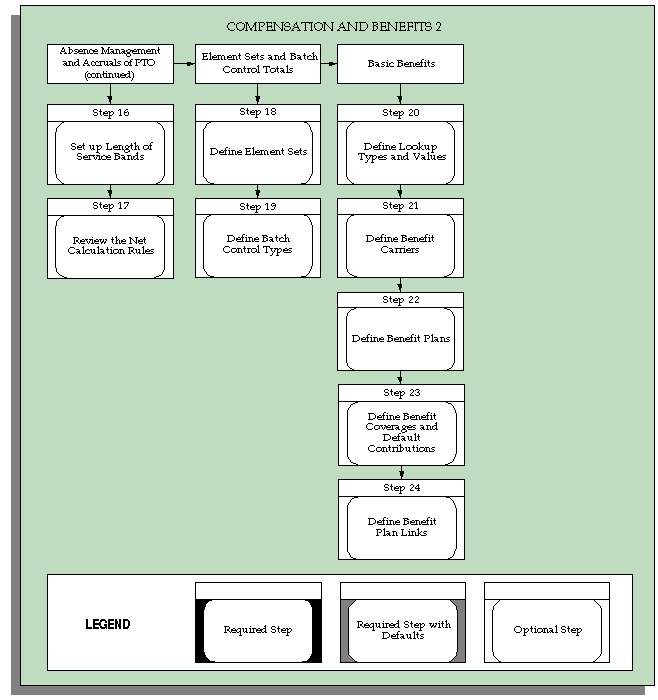
Compensation and Benefits 1
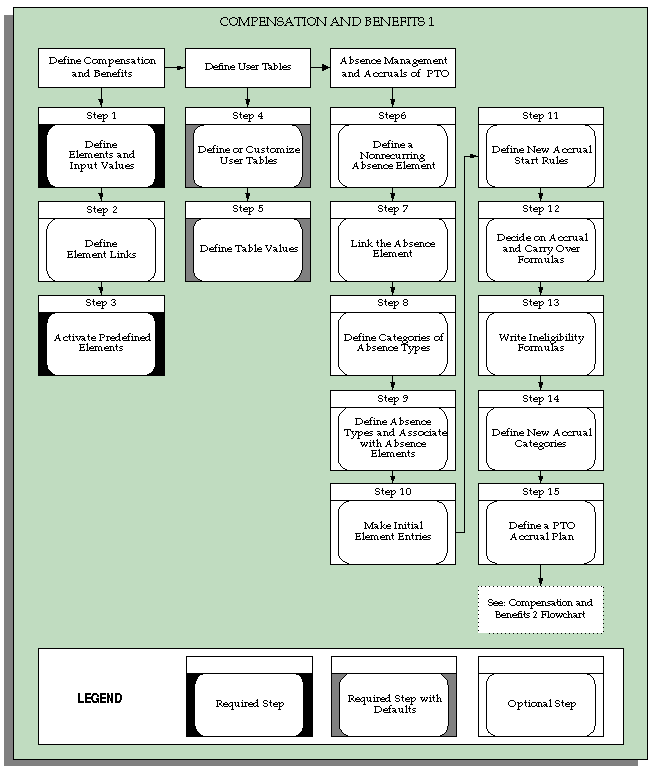
Compensation and Benefits 2
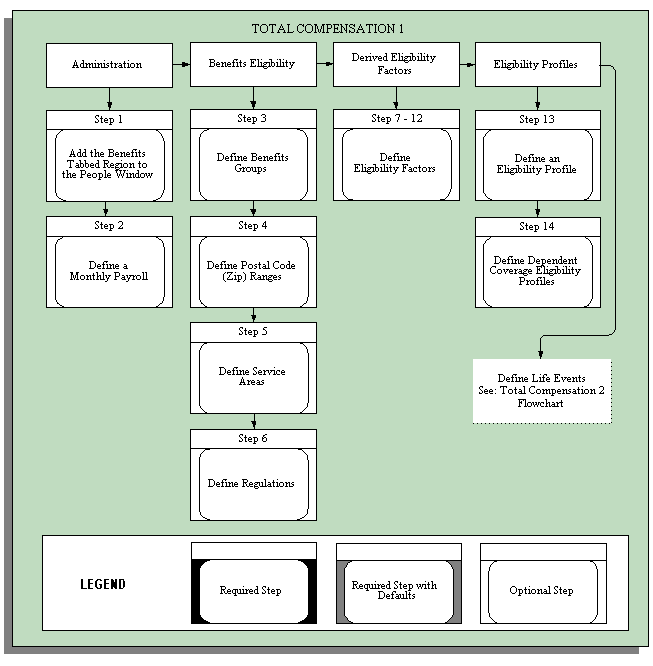
Total Compensation 1
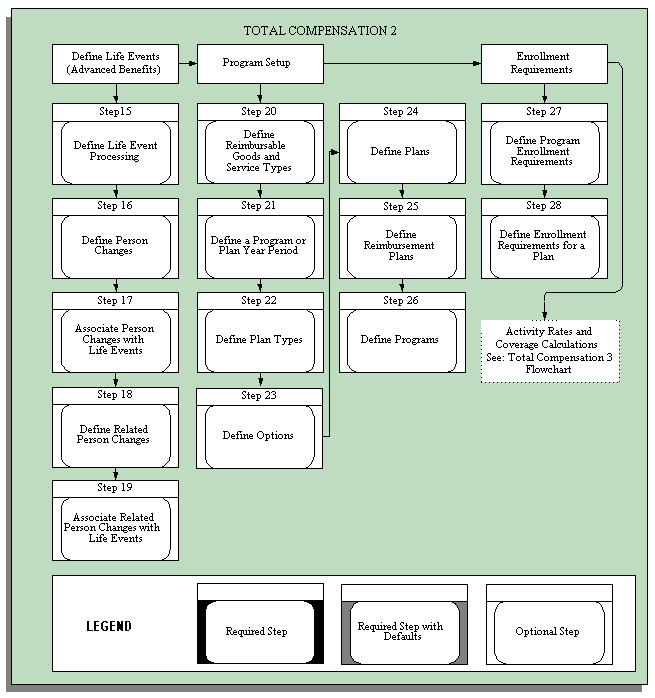
Total Compensation 2
Total Compensation 3

Total Compensation 4

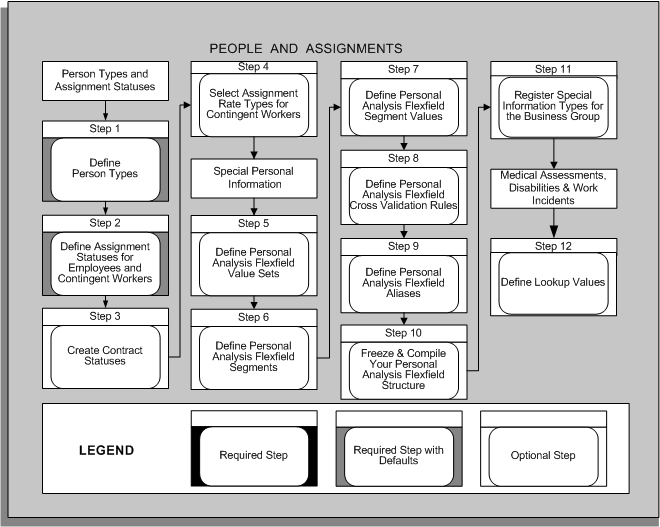
People and Assignments
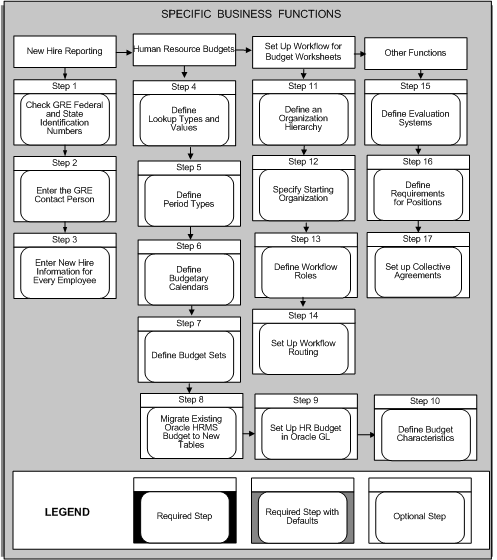
Specific Business Functions
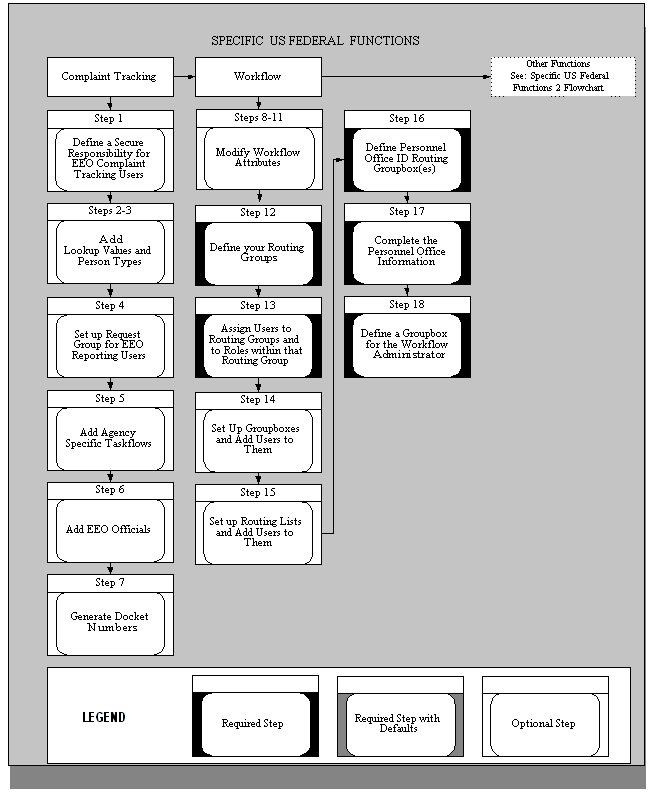
Specific US Federal Functions 1
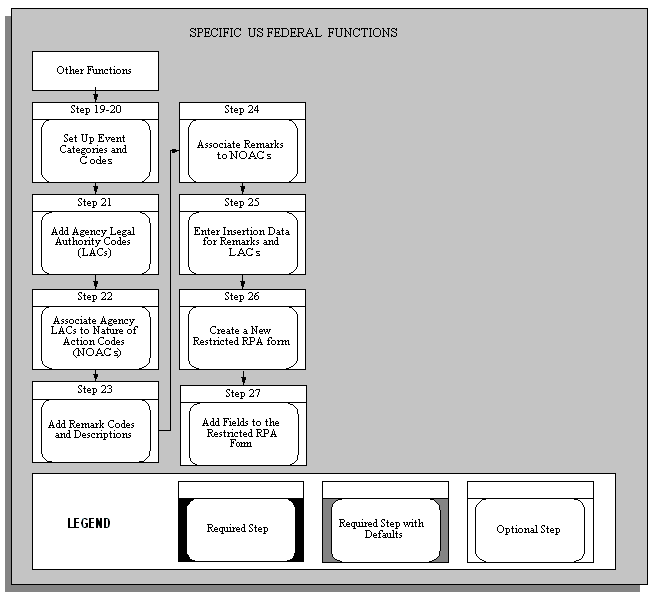
Specific US Federal Functions 2
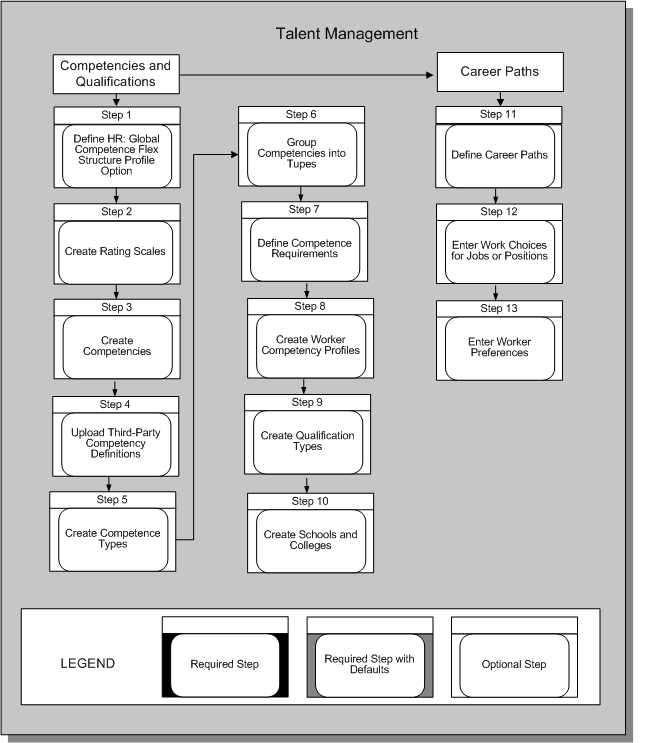
Talent Management
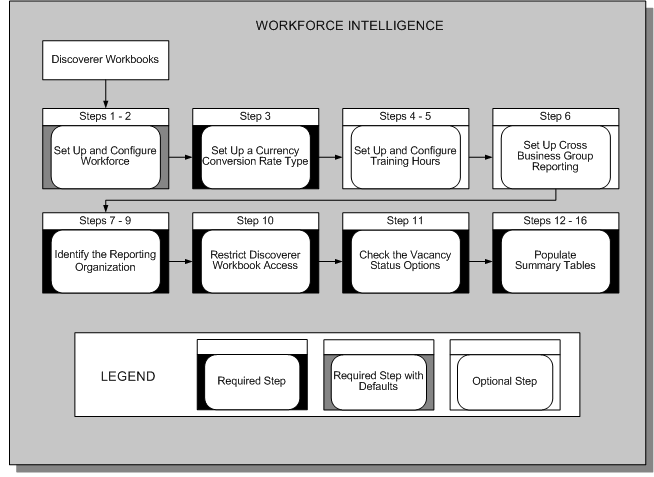
Workforce Intelligence
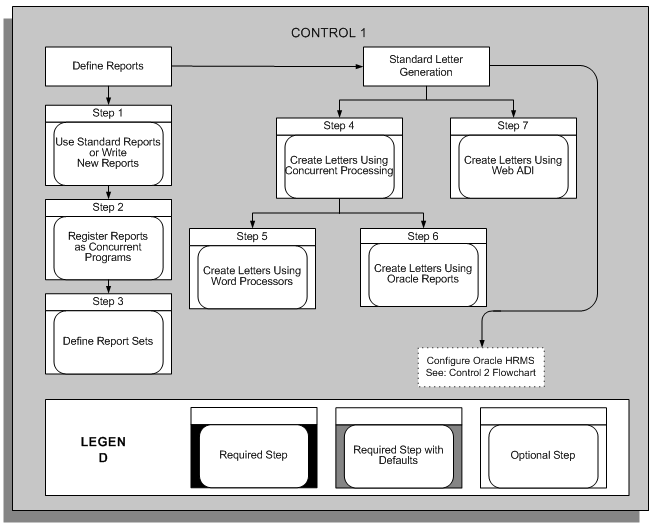
Control 1
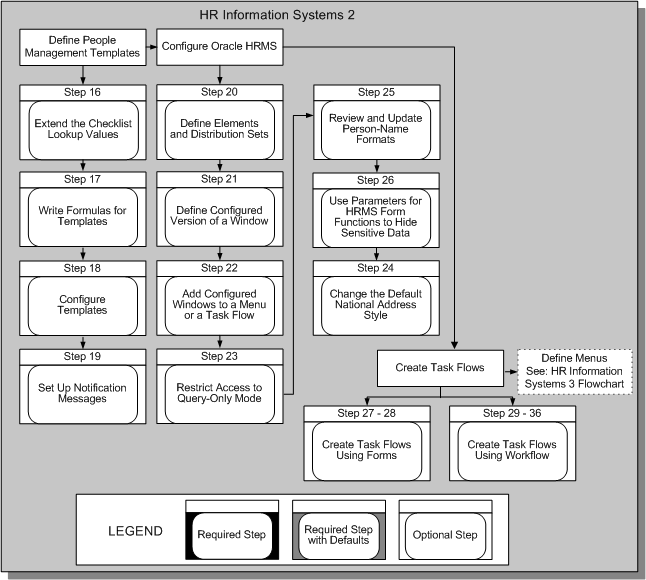
HR Information Systems 2
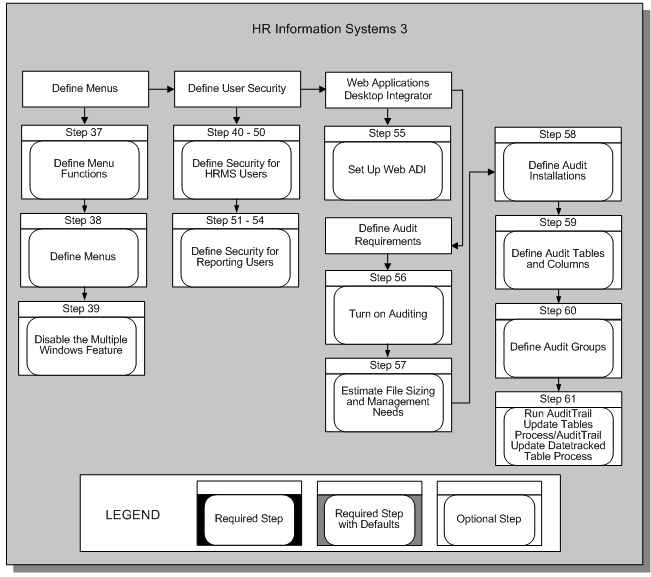
HR Information Systems 3
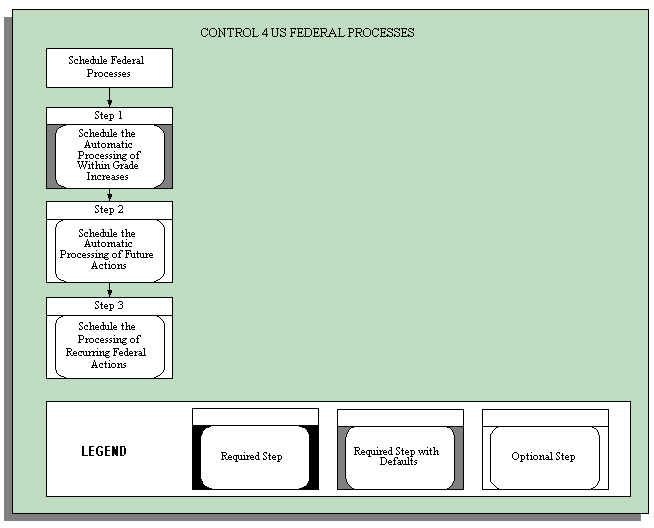
Control 4 US Federal Processes
Administration
The administration steps are usually performed by the System Administrator. Sign on to the system using your System Administrator username and password. Contact your DBA if you do not know this information.
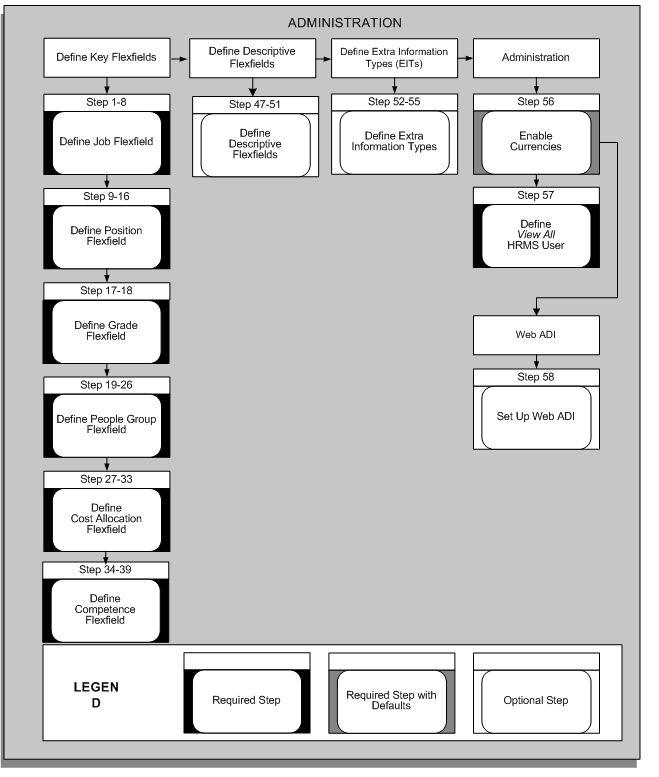
Define Key Flexfields
There are six Key Flexfield Structures you must define before you can define a Business Group in Oracle HRMS. These are:
-
Job
-
Position
-
Grade
-
People Group
-
Cost Allocation
-
Competence
You can also define the Collective Agreement Grades flexfield at this time, or you can do it after defining your Business Group.
The application comes with predefined information. The entire flexfield information for Grade is predefined as are the value sets for the Job and Position key flexfield segments. You can define additional segments of Job and Position, as well as those in People Group and Cost Allocation based on your agency's requirements.
Before you begin your implementation of these key flexfields you must clearly specify your requirements. This specification must include the following details for each key flexfield:
-
The Structure Name and the number of Segments
-
The Flexfield Segment Names, Order, Validation Options and Qualifiers
-
The Flexfield Value Sets to be used and any lists of values
After you have completed the definition of a key flexfield, you need to run the Create Key Flexfield Database Items process concurrent process to generate Database Items for the individual segments of the Flexfield. This applies to your Job, Position, Grade, Competence, and People Group Key Flexfields only.
Important: If you used the Configuration Workbench, you have already defined the structures for your Job, Position, and Grade key flexfields. You may want to add more validation, such as cross-validation. The Workbench created default structures for the other flexfields associated with a business group (People Group, Cost Allocation, and Competence). If you plan to use these flexfields in your implementation, you must update the default structures to display the segments you require.
Define Job Flexfield
After you have specified your requirements for recording and reporting Job information, follow this implementation sequence:
Step 1: Define Job Flexfield Value Sets
To validate the values which a user can enter for any segment, you must define a specific Value Set. A predefined value set for Occupational Series is provided, GHR_US_OCC_SERIES.
The attributes of the Value Set control the type of values that can be entered, and how many characters each segment can hold. The attributes of the Value Set will also control how the values are to be validated.
Value Sets can be shared by different segments of the same flexfield, or by segments of any other flexfield.
Use the Value Sets window.
See: Defining Value Sets, Oracle Applications Developer's Guide
Step 2: Define Job Flexfield Segments
Define the first segment of the Job key flexfield the Occupational Series using the supplied value set, GHR_US_OCC_SERIES. Define the remaining segments that you want to use for your Business Group
Note the Occupational Series segment number. You use this information later when you enter the US Federal Org Information for your business groups.
You must enter Yes in the Allow Dynamic Inserts field. If you enter No, you will not be able to create new job name combinations in the Job window.
Note: You do not need to use a Value Set to validate a segment. If you do not specify a Value Set then a user can enter any alphanumeric value up to a limit of 150 characters.
Use the Key Flexfield Segments window.
See: Setting up the Job Key Flexfield, Oracle HRMS Configuring, Reporting, and System Administration Guide, Oracle US Federal Human Resource Key Flexfields, Oracle HRMS Configuring, Reporting, and System Administration Guide
See: Defining Key Flexfield Structures, Oracle Applications Flexfields Guide
Step 3: Define Job Flexfield Segment Values
If you have chosen Independent or Dependent validation for a Value Set used by a Job Flexfield Segment, you must define your list of valid values for the Value Set.
Use the Segment Values window
See: Defining Segment Values, Oracle Applications Flexfields Guide
Step 4: Define Job Flexfield Cross Validation Rules
Define any Cross Validation Rules you want to use to control the combinations of segment values which a user can enter.
You define Rules to Include or Exclude combinations of segment values. For each segment, you can define a Low to High range of values.
Use the Cross-Validation Rule window
See: Defining Cross-Validation Rules, Oracle Applications Flexfields Guide
Step 5: Define Job Flexfield Aliases
Define Aliases for common combinations of segment values if you want to provide these as default options.
Use the Shorthand Aliases window
See: Defining Shorthand Aliases, Oracle Applications Flexfields Guide
Step 6: Freeze and Compile Your Job Flexfield Structure
You are now ready to freeze your Job Flexfield definition. Navigate to the Key Flexfield Segments window. Enter Yes in the Freeze Flexfield Definition field and save your changes. The application now freezes and compiles your Job Flexfield definition. Compiling the flexfield definition enables the Job Flexfield window with the defaults, values and rules that you have defined.
Use the Key Flexfield Segments window
See: Defining Key Flexfield Structures, Oracle Applications Flexfields Guide
Step 7: Run Create Key Flexfield Database Items Process
If you want to make use of the individual segments of the flexfield as separate Database Items you can run this concurrent process from the Submit a New Request window. The only parameter associated with this process is the Key Flexfield Name.
Use the Submit a New Request window
See: Submitting a Request, Oracle Applications User's Guide
Define Position Flexfield
The following steps for defining position flexfield value sets, segments, and segment values depend on whether you plan to use the National Finance Center (NFC) as your provider. Follow the instructions indicated for NFC implementations; otherwise, follow those for non-NFC implementations. The remaining steps on cross validation rules, aliases, and freezing and compiling your position definition apply to both implementations.
Step 8: Define Position Flexfield Value Sets for Non-NFC Implementations
To validate the values which a user can enter for any segment, you must define a specific Value Set.
The following value sets have been predefined for the required US Federal HR segments for position:
-
Position Title (GHR_US_POSITION_TITLE)
-
Position Description Number (GHR_US_POS_DESC_NUM)
-
Sequence Number (GHR_US_SEQUENCE_NUM)
-
Agency/Subelement Code (GHR_US_AGENCY_CODE)
The attributes of the Value Set control the type of values that you can enter, and how many characters each segment can hold. The attributes of the Value Set also control how the application validates the values.
Value Sets can be shared by different segments of the same flexfield, or by segments of any other flexfield.
Use the Value Set window.
See: Defining Value Sets, Oracle Applications Developer's Guide
Step 9: Define Position Flexfield Segments for non-NFC Implementations
At a minimum, you must define the following four required segments using the supplied value sets.
-
Use one of the first five segments (Segment 1, 2, 3, 4, or 5) for Position Title
-
Use the remaining segments for Position Description Number, Sequence Number, and Agency/Subelement Code
You can define up to 30 segments within the structure. For the segments that you add, you can define a list of valid codes or values.
Note the segment numbers for Position Title, Position Description Number, Sequence Number, and Agency/Subelement Code. You use this information later when you enter the US Federal Org Information for your business groups.
You must enter Yes in the Allow Dynamic Inserts field. If you enter No, you will not be able to create new position name combinations in the Position window.
Note: You do not need to use a Value Set to validate a segment. If you do not specify a Value Set then a user can enter any alphanumeric value up to a limit of 150 characters.
Use the Key Flexfield Segments window.
See: Setting up the Position Key Flexfield for Non-NFC Implementations, Oracle HRMS Configuring, Reporting, and System Administration Guide,
See:Oracle US Federal Human Resource Key Flexfields, Oracle HRMS Configuring, Reporting, and System Administration Guide
See: Defining Key Flexfield Structures, Oracle Applications Flexfields Guide
Step 10: Define Position Flexfield Segment Values for Non-NFC Implementations
If you have chosen Independent or Dependent validation for a Value Set used by a Position Flexfield Segment, you must define your list of valid values for the Value Set.
Use the Define Segment Values window
See: Defining Segment Values, Oracle Applications Flexfields Guide
Step 11: Define Position Flexfield Value Sets for NFC Implementations
To validate the values which a user can enter for any segment, you must define a specific Value Set.
You must define or modify the following Value Sets for the required US Federal HR segments for position:
-
Position Title (GHR_US_POSITION_TITLE)
-
OPM Agency Code (GHR_US_AGENCY_CODE).
-
NFC Agency Code (GHR_US_NFC_AGENCY_CODE)
-
Personnel Office ID (GHR_US_PERSONNEL_OFFICE_ID)
-
Position Number (GHR_US_POS_DESC_NUM)
-
Sequence Number (GHR_US_SEQUENCE_NUM)
-
Valid Grade (GHR_GRADES)
The attributes of the Value Set control the type of values that you can enter, and how many characters each segment can hold. The attributes of the Value Set also control how the application validates the values.
Value Sets can be shared by different segments of the same flexfield, or by segments of any other flexfield.
Use the Value Set window.
See: Setting up the Position Key Flexfield for NFC Implementations, Oracle HRMS Configuring, Reporting, and System Administration Guide
See:Oracle US Federal Human Resource Key Flexfields, Oracle HRMS Configuring, Reporting, and System Administration Guide
See: Defining Value Sets, Oracle Applications Developer's Guide
Step 12: Define Position Flexfield Segments for NFC Implementations
You must define the following segments using the value sets you defined in the previous step in the order indicated and defined with the required prompt.
| Segment | Data Item | Required Prompt | Further Information |
|---|---|---|---|
| Segment1 | Position Title | Position title | none |
| Segment2 | OPM Agency Code | OPM Agency Code | The OPM code for the agency is the NFC Department Code |
| Segment3 | NFC Agency code | NFC Agency Code | NFC agency code values |
| Segment4 | Personnel Office ID | Personnel Office ID | none |
| Segment5 | Position Description Number | Position Number | Displays the Master Record or the Individual Record number |
| Segment6 | Sequence Number | Sequence Number | Not displayed Although you define this segment, you do not display it as part of the key flexfield. |
| Segment7 | Grade | Valid Grade | none |
Note the segment numbers. You use this information later when you enter the US Federal Org Information for your business groups.
You can define up to 30 segments within the structure. For the segments that you add, you can define a list of valid codes or values.
You must enter Yes in the Allow Dynamic Inserts field. If you enter No, you will not be able to create new position name combinations in the Position window.
Note: You do not need to use a Value Set to validate a segment. If you do not specify a Value Set then a user can enter any alphanumeric value up to a limit of 150 characters.
Use the Key Flexfield Segments window.
See: Setting up the Position Key Flexfield for NFC Implementations, Oracle HRMS Configuring, Reporting, and System Administration Guide
See: Oracle US Federal Human Resource Key Flexfields, Oracle HRMS Configuring, Reporting, and System Administration Guide
See: Defining Key Flexfield Structures, Oracle Applications Flexfields Guide
Step 13: Define Position Flexfield Segment Values for NFC Implementations
Define values for the following value sets such as valid table information, whether the value is required and displayed, its maximum size and its description size:
-
GHR_US_POSITION_TITLE
-
GHR_US AGENCY_CODE
-
GHR_US_NFC_AGENCY_CODE
-
GHR_US_PERSONNEL_OFFICE_ID
-
GHR_US_POS_DESC_NUM
-
GHR_US_SEQUENCE_NUMBER
-
GHR_GRADES
If you have chosen Independent or Dependent validation for a Value Set used by a Position Flexfield Segment, you must define your list of valid values for the Value Set.
Use the Define Segment Values window and the Valid Table Information window.
See: Setting up the Position Key Flexfield for NFC Implementations, Oracle HRMS Configuring, Reporting, and System Administration Guide
See: Oracle US Federal Human Resource Key Flexfields, Oracle HRMS Configuring, Reporting, and System Administration Guide
See: Defining Segment Values, Oracle Applications Flexfields Guide
Step 14: Define Position Flexfield Cross Validation Rules
Define any Cross Validation Rules you want to use to control the combinations of segment values which a user can enter.
You define Rules to Include or Exclude combinations of segment values. For each segment, you can define a Low to High range of values.
Use the Cross-Validation Rule window.
See: Defining Cross-Validation Rules, Oracle Applications Flexfields Guide
Step 15: Define Position Flexfield Aliases
Define Aliases for common combinations of segment values if you want to provide these as default options.
Use the Shorthand Aliases window.
See: Defining Shorthand Aliases, Oracle Applications Flexfields Guide
Step 16: Freeze and Compile Your Position Flexfield Structure
You are now ready to freeze your Position Flexfield definition. Navigate to the Key Flexfield Segments window. Enter Yes in the Freeze Flexfield Definition field and save your changes. The application now freezes and compiles your Position Flexfield definition. Compiling the flexfield definition enables the Position Flexfield window with the defaults, values and rules that you have defined.
Use the Key Flexfield Segments window.
See: Defining Key Flexfield Structures, Oracle Applications Flexfields Guide
Step 17: Run Create Key Flexfield Database Items process
To use the individual segments of the flexfield as separate Database Items you can run this concurrent process from the Submit a New Request window. The only parameter associated with this process is the Key Flexfield Name.
Use the Submit a New Request window
See: Submitting a Request, Oracle Applications User's Guide
Define Grade Flexfield
The Grade key flexfield structure is predefined for you upon installation and is not extensible. The structure contains two segments:
-
define the pay plan (GHR_US_PAY_PLAN) is the first segment
-
define the grade (GHR_US_GRADE_OR_LEVEL) is the second segment
You only need to freeze and compile the predefined structure. Later on during implementation you associate the US Federal Grade flexfield with the Business Group you set up.
To view the structure, use the Key Flexfield Segments window.
See: Oracle US Federal Human Resource Key Flexfields, Oracle HRMS Configuring, Reporting, and System Administration Guide
Step 18: Freeze and Compile the Grade Flexfield Structure
Navigate to the Key Flexfield Segments window. Query the US Federal Grade Key Flexfield. (US Federal Grade Flexfield is the code name; US Government Grade Flexfield is the View name). Enter Yes in the Freeze Flexfield Definition field. The application now freezes and compiles your Grade Group Flexfield definition.
Use the Key Flexfield Segments window
See: Defining Key Flexfield Structures, Oracle Applications Flexfields Guide
Step 19: Run Create Key Flexfield Database Items process
If you want to make use of the individual segments of the flexfield as separate Database Items you can run this concurrent process from the Submit a New Request window. The only parameter associated with this process is the Key Flexfield Name.
Use the Submit a New Request window
See: Submitting a Request, Oracle Applications User's Guide
Define People Group Flexfield
People Group information is associated with employee and contingent worker assignments and is used to identify special groups of employees in your enterprise, such as members of a union.
Note: You must define at least one segment for the People Group Key Flexfield.
If you do not, you will not be able to use the Assignment window for employees, applicants, or contingent workers.
After you have specified your requirements to take best advantage of the flexibility of the application for recording and reporting People Group information in your enterprise, the implementation sequence you follow is:
Step 20: Define People Group Flexfield Value Sets
To validate the values which a user can enter for any segment, you must define a specific Value Set.
The attributes of the Value Set control the type of values that can be entered, and how many characters each segment can hold. The attributes of the Value Set will also control how the values are to be validated.
Value Sets can be shared by different segments of the same flexfield, or by segments of any other flexfield.
Use the Value Set window.
See: Defining Value Sets, Oracle Applications Developer's Guide
Step 21: Define People Group Flexfield Segments
Define a structure for your People Group Flexfield which contains the segments you want to use for your Business Group. You will use this structure to enter People Group details in the Assignment window.
You must enter Yes in the Allow Dynamic Inserts field. If you enter No, you will not be able to enter People Group information in the Assignment window.
Note: You do not need to use a Value Set to validate a segment. If you do not specify a Value Set then a user can enter any alphanumeric value up to a limit of 150 characters.
Use the Key Flexfield Segments window
See: Defining Key Flexfield Structures, Oracle Applications Flexfields Guide
See: Oracle US Federal Human Resource Key Flexfields, Oracle HRMS Configuring, Reporting, and System Administration Guide
Step 22: Define People Group Flexfield Segment Values
If you have chosen Independent or Dependent validation for a Value Set used by a People Group Flexfield Segment, you must define your list of valid values for the Value Set.
Use the Define Segment Values window
See: Defining Segment Values, Oracle Applications Flexfields Guide
Step 23: Define People Group Flexfield Cross Validation Rules
Define any Cross Validation Rules you want to use to control the combinations of segment values which a user can enter.
You define Rules to Include or Exclude combinations of segment values. For each segment, you can define a Low to High range of values.
Use the Cross-Validation Rule window
See: Defining Cross-Validation Rules, Oracle Applications Flexfields Guide
Step 24: Define People Group Flexfield Aliases
Define Aliases for common combinations of segment values if you want to provide these as default options.
Use the Shorthand Aliases window
See: Defining Shorthand Aliases, Oracle Applications Flexfields Guide
Step 25: Freeze and Compile Your People Group Flexfield Structure
You are now ready to freeze your People Group Flexfield definition. Navigate to the Key Flexfield Segments window. Enter Yes in the Freeze Flexfield Definition field and save your changes. The application now freezes and compiles your People Group Flexfield definition. Compiling the flexfield definition enables the People Group Flexfield window with the defaults, values and rules that you have defined.
Use the Key Flexfield Segments window
See: Defining Key Flexfield Structures, Oracle Applications Flexfields Guide
Step 26: Run Create Key Flexfield Database Items process
If you want to make use of the individual segments of the flexfield as separate Database Items you can run this concurrent process from the Submit a New Request window. The only parameter associated with this process is the Key Flexfield Name.
Use the Submit a New Request window
See: Submitting a Request, Oracle Applications User's Guide
Define Cost Allocation Flexfield
Cost Allocation information normally records the details of employee costing associated with payroll results. If you have installed Oracle Payroll, you can accumulate the costs associated with your payroll results and transfer these to your General Ledger system. If you have not installed Oracle Payroll you can use the costing flexfield to enter your cost allocation information.
After you have specified your requirements for recording and reporting costing information, follow this implementation sequence:
Warning: You must define at least one segment for the Cost Allocation Key Flexfield. If you do not, you will experience problems using windows with the flexfield window.
Step 27: Define Cost Allocation Flexfield Value Sets
To validate the values which a user can enter for any segment, you must define a specific Value Set.
The attributes of the Value Set control the type of values that can be entered, and how many characters each segment can hold. The attributes of the Value Set will also control how the values are to be validated.
Value Sets can be shared by different segments of the same flexfield, or by segments of any other flexfield.
Use the Value Set window.
See: Defining Value Sets, Oracle Applications Developer's Guide
Step 28: Define Cost Allocation Flexfield Segments and Qualifiers
Define a structure for your Cost Allocation Flexfield which contains the segments you want to use for your Business Group. You will use this structure to enter your payroll costing details in Oracle HRMS.
You must enter Yes in the Allow Dynamic Inserts field. If you enter No, you will not be able to enter Costing details anywhere on the system.
Note: You do not need to use a Value Set to validate a segment. If you do not specify a Value Set then a user can enter any alphanumeric value up to a limit of 150 characters.
The Cost Allocation Flexfield is the only key flexfield in Oracle HRMS that makes use of Qualifiers. You use Segment Qualifiers to control the level at which costing information can be entered to the system. Each Qualifier determines the level at which costing information can be entered. The following table illustrates the six possible choices for each segment:
| Qualifier | Effect on window |
|---|---|
| Payroll | Enter segment values in the Payroll window. |
| Link | Enter segment values in the Element Link window. |
| Balancing | Enter balancing segment values in the Element Link window. |
| Organization | Enter segment values in the Costing Information window for the Organization. |
| Assignment | Enter segment values in the Costing window for the assignment. |
| Entry | Enter segment values in the Element Entries window. |
Use the Key Flexfield Segments window
See: Defining Key Flexfield Structures, Oracle Applications Flexfields Guide
Step 29: Define Cost Allocation Flexfield Segment Values
If you have chosen Independent or Dependent validation for a Value Set used by a Cost Allocation Flexfield Segment, you must define your list of valid values for the Value Set.
Use the Define Segment Values window.
See: Defining Segment Values, Oracle Applications Flexfields Guide
Step 30: Define Cost Allocation Flexfield Cross Validation Rules
Define any Cross Validation Rules you want to use to control the combinations of segment values which a user can enter.
You define Rules to Include or Exclude combinations of segment values. For each segment, you can define a Low to High range of values.
Use the Cross-Validation Rule window
See: Defining Cross-Validation Rules, Oracle Applications Flexfields Guide
Step 31: Define Cost Allocation Flexfield Aliases
Define Aliases for common combinations of segment values if you want to provide these as default options.
Use the Shorthand Aliases window
See: Defining Shorthand Aliases, Oracle Applications Flexfields Guide
Step 32: Freeze and Compile Your Cost Allocation Flexfield Structure
You are now ready to freeze your Cost Allocation Flexfield definition. Navigate to the Key Flexfield Segments window. Enter Yes in the Freeze Flexfield Definition field and save your changes. The application now freezes and compiles your Cost Allocation Flexfield definition. Compiling the flexfield definition enables the Cost Allocation Flexfield window with the defaults, values and rules that you have defined.
Use the Key Flexfield Segments window
See: Defining Key Flexfield Structures, Oracle Applications Flexfields Guide
Define Competence Key Flexfield
The Competence Key Flexfield is used to record information about a multi-level competencies. This enables you to record more details about a competence.
After you have specified your requirements to take best advantage of the flexibility of Oracle Human Resource Management Systems for recording and reporting competence information in your enterprise, the implementation sequence which you follow is:
Step 33: Define Competence Flexfield Value Sets
To validate the values that a user can enter for any segment, you must define a specific Value Set.
The attributes of the Value Set will control the type of values that can be entered, and how many characters each segment can hold. The attributes of the Value Set will also control how the values are to be validated.
Value Sets can be shared by different segments of the same flexfield, or by segments of any other flexfield.
Use the Value Set window.
See: Defining Value Sets, Oracle Applications Developer's Guide
Step 34: Define Competence Flexfield Segments
Define a structure for your Competence Flexfield that contains the segments you want to use. You will use this structure to enter your competence details in the Competence window.
You must enter Yes in the Allow Dynamic Inserts field. If you enter No, you will not be able to enter new details in the Competence window.
You must specify one of the segments as the Default Attribute using the flexfield qualifier. You must also attach the Others flexfield qualifier to all other segments in the structure.
If you intend to upload SkillScape competencies you should try to ensure that you set up segment 1 to record the competence name as this is the segment into which the competence name is automatically uploaded. If you define another segment to hold the competence name you must alter the file $PER_TOP/patch/115/sql/peducomp.sql so that the reference to segment1 is changed to the segment in which you hold the name.
Note: You do not need to use a Value Set to validate a segment. If you do not specify a Value Set then a user can enter any alphanumeric value up to a limit of 150 characters.
Use the Key Flexfield Segments window.
See: Defining Key Flexfield Structures, Oracle Applications Flexfields Guide
Step 35: Define Competence Flexfield Segments Values
If you have chosen Independent or Dependent validation for a Value Set used by a Competence Flexfield Segment, you must define your list of valid values for the Value Set.
Use the Segment Values window.
See: Defining Segment Values, Oracle Applications Flexfields Guide
Step 36: Define Competence Flexfield Cross-Validation Rules
Define any Cross-Validation Rules you want to use to control the combinations of segment values which a user can enter.
You define Rules to Include or Exclude combinations of segment values. For each segment, you can define a Low to High range of values.
Use the Cross-Validation Rule window.
See: Defining Cross-Validation Rules, Oracle Applications Flexfields Guide
Step 37: Define Competence Flexfield Aliases
Define Aliases for common combinations of segment values if you want to provide these as default options.
Use the Define Shorthand Aliases window.
See: Defining Shorthand Aliases, Oracle Applications Flexfields Guide
Step 38: Freeze and Compile Your Competence Flexfield Structure
You are now ready to freeze your Competence Flexfield definition. Navigate to the Define Key Flexfield Segments window. Enter Yes in the Freeze Flexfield Definition field and save your changes. The application now freezes and compiles your Competence Flexfield definition. Compiling the flexfield definition enables the flexfield window with the defaults, values and rules that you have defined.
Use the Key Flexfield Segments window.
See: Defining Key Flexfield Structures, Oracle Applications Flexfields Guide
Define Collective Agreement Grades Key Flexfield
The Collective Agreement Grades Key Flexfield records information about how an employee is graded or ranked in a collective agreement. The Collective Agreement Grades Key Flexfield enables you to specify any number of structures. Each grade structure is defined as a separate structure of the flexfield. You then link a specific structure to a collective agreement in the Agreement Grades window.
Note: Oracle US Federal HRMS does not use this flexfield. You may skip these steps and proceed to Defining Descriptive Flexfields.
It is not mandatory to define your collective agreement grades key flexfield now. You can do it after you have defined your Business Groups.
After you have specified your requirements for recording and reporting agreement grade information in your enterprise, the implementation sequence which you follow is:
Step 39: Design your Collective Agreement Grades Flexfield Structures
You need to design a Collective Agreement Grades Flexfield Structure for each Grade Structure you want to hold in Oracle Human Resources. For each structure you must include the following:
-
The Structure Title (the Grade Structure) and the number of Segments.
-
The Flexfield Segment Names (the Grade Factors), Order and Validation Options.
-
The Flexfield Value Sets to be used and any lists of values.
Note: Your system administrator performs this step.
Step 40: Define Collective Agreement Grades Flexfield Value Sets
To validate the values that a user can enter for any segment, you must define a specific Value Set.
The attributes of the Value Set will control the type of values that can be entered, and how many characters each segment can hold. The attributes of the Value Set will also control how the values are to be validated.
Value Sets can be shared by different segments of the same flexfield, or by segments of any other flexfield.
Use the Value Set window.
See: Defining Value Sets, Oracle Applications Developer's Guide
Step 41: Define Collective Agreement Grades Flexfield Segments
Define a structure for your Collective Agreement Grades Flexfield that contains the segments you want to use. You use this structure to create your Reference Grades in the Define Agreement Grades window.
You must enter Yes in the Allow Dynamic Inserts field. If you enter No, you cannot enter new details in the Define Agreement Grades window.
When you access the grades in the Assignment window they display in the numerical order defined in the Number column of the Segments Summary window.
Note: You do not need to use a Value Set to validate a segment. If you do not specify a Value Set then a user can enter any alphanumeric value up to a limit of 150 characters.
Use the Key Flexfield Segments window.
See: Defining Key Flexfield Structures, Oracle Applications Flexfields Guide
Step 42: Define Collective Agreement Grades Flexfield Segments Values
If you have chosen Independent or Dependent validation for a Value Set used by a Collective Agreement Grades Flexfield Segment, you must define your list of valid values for the Value Set.
Use the Segment Values window.
See: Defining Segment Values, Oracle Applications Flexfields Guide
Step 43: Define Collective Agreement Grades Flexfield Cross-Validation Rules
Define any Cross-Validation Rules you want to use to control the combinations of segment values which a user can enter.
You define Rules to Include or Exclude combinations of segment values. For each segment, you can define a Low to High range of values.
Use the Cross-Validation Rule window.
See: Defining Cross-Validation Rules, Oracle Applications Flexfields Guide
Step 44: Define Collective Agreement Grades Flexfield Aliases
Define Aliases for common combinations of segment values if you want to provide these as default options.
Use the Define Shorthand Aliases window.
See: Defining Shorthand Aliases, Oracle Applications Flexfields Guide
Step 45: Freeze and Compile Your Collective Agreement Grades Flexfield Structure
You are now ready to freeze your Collective Agreement Grades Flexfield definition. Navigate to the Define Key Flexfield Segments window. Enter Yes in the Freeze Flexfield Definition field and save your changes. Oracle Human Resource Management Systems now freezes and compiles your Collective Agreement Grades Flexfield definition. Compiling the flexfield definition enables the flexfield window with the defaults, values and rules that you have defined.
Use the Key Flexfield Segments window.
See: Defining Key Flexfield Structures, Oracle Applications Flexfields Guide
Descriptive Flexfields
Use descriptive flexfields in Oracle HRMS to define your own additional fields to the standard windows. For example, if you want to record Driver's License Number for any person you can define a segment of the Additional Personal Details flexfield to record this additional information.
After this, you can enter a Driver's License Number in the Person window after the standard Personal details.
Note: The descriptive flexfield is defined at the level of the base-table. This means that any window which uses the base-table will display the same descriptive flexfield segments. In this example, the Driver's License Number will appear in the Contact window, as well as the Person window.
Before you begin to implement any descriptive flexfield you must clearly specify your requirements. You must include the following details:
-
The Context and the number of Segments for each Context
-
The Flexfield Segment Names, Order and Validation Options
-
The Flexfield Value Sets to be used and any lists of values
You can define two types of descriptive flexfield Segments:
-
Global Segments
Segments always appear in the flexfield window.
-
Context-Sensitive Segments
Segments appear only when a defined context exists. You can prompt a user to enter the context, or you can provide the context automatically from a reference field in the same region.
Note: Often you can choose between using a code, a 'base-table' field, and a field which contains a meaning or description. You should always use base-table fields as reference fields for Context-Sensitive segments. These fields usually have the same name as the column in the base table.
Some of the Standard Reports supplied with the system include descriptive segment values. If you follow this suggestion, these reports will be able to use the prompts you define - otherwise they will apply a generic prompt to the data.
Note: If you want to include descriptive flexfield Segment Values in the Lookups list for DateTrack History you need to modify the DateTrack History Views that are supplied with the system.
Define Descriptive Flexfields
Step 46: Register a Reference Field
You must use the Application Developer Responsibility to update the definition of the descriptive flexfield. From the Descriptive Flexfields window, navigate to the Reference Fields block and enter the name of the Reference Field you want to use.
Warning: Some descriptive flexfields are predefined and protected. These are used to deal with specific legislative and reporting needs of individual countries or industries.
Do not attempt to alter the definitions of these protected flexfields. These definitions are a fundamental part of Oracle HRMS. Any change to them may lead to errors in the operating of the application.
Oracle HRMS may use other segments of these flexfields in the future. Therefore, do not add segments to any protected flexfield. This can impair your ability to upgrade your system.
Use the Descriptive Flexfields window
Step 47: Define Flexfield Value Sets
If you want to validate the values which a user can enter for any segment you must define a specific Value Set.
-
The attributes of the Value Set will control the type of values that can be entered, and how many characters each segment can hold.
-
The attributes of the Value Set will also control how the values are to be validated.
Note: Value Sets can be shared by different segments of the same flexfield, or by segments of any other flexfield.
Use the Value Set window.
See: Defining Value Sets, Oracle Applications Developer's Guide
Step 48: Define Descriptive Flexfield Segments.
Define the segments of your descriptive flexfield for each Context.
You do not need to use a Value Set to validate a segment. If you do not specify a Value Set then a user can enter any alphanumeric value up to a limit of 150 characters.
-
Use Global Context to define any segments which will always appear in the flexfield window.
-
Enter your own Context Name to define segments which will appear only for that context.
-
Freeze and compile your descriptive flexfield definitions.
Warning: Any segment you define as "Required" is required for every record on the system. You can encounter two common problems:
-
If you define a 'Required' segment after you have entered records: Existing records will not have any value in this segment and the system will prompt you with an error when you query an existing record.
-
Some descriptive flexfields are used in more than one block. For example, any 'Required' segments for Additional Personal Details must be entered for every Employee,Contingent Worker, Applicant or Contact.
Use the Descriptive Flexfield Segments window.
-
See: Defining Descriptive Flexfield Structures, Oracle Applications Flexfields Guide
Step 49: Define Flexfield Segment Values
If you have chosen Independent validation for a Value Set used by a descriptive flexfield Segment, you must define a list of valid values for the Value Set.
Use the Define Segment Values window.
See: Defining Segment Values, Oracle Applications Flexfields Guide
Step 50: Run Create Descriptive Flexfields Database Items Process
When you have defined your descriptive flexfields you should run the Create Descriptive Flexfields Database Items process to create database items for your non-context-sensitive descriptive flexfield segments.
You should rerun this process whenever you create additional non-context-sensitive descriptive flexfield segments.
Note: If you require Database Items for Context Sensitive flexfield segments you should consult your Oracle Support Representative for full details of how to add other Database Items.
Use the Submit a New Request window
See: Submitting a Request, Oracle Applications User's Guide
Extra Information Types (EITs)
Extra Information Types are a type of descriptive flexfield that let you add an unlimited number of information types to six of the most important entities in Oracle HRMS.
For example, you might want to use the EIT on Assignment to hold information about project work within an assignment.
Note: With Organizations you can group the EITs by classification so that when a user selects a classification they see the EITs associated with the classification. You must undertake some additional steps to implement EITs for an Organization
Define EITs (Excluding Organizations)
Step 51: Define Extra Information Types
Once you have decided which extra information types you require, select the relevant descriptive flexfield by title. Create a new record in the Context Field Values region and enter the name of your new Information Type in the Code field. Enter the segment values and compile the descriptive flexfield.
Important: There are some predefined EITs in Oracle US Federal Human Resources. These definitions are a fundamental part of your installation and any change to them may lead to errors in the operation of the system. Do not attempt to alter the definitions of these protected flexfields or to add other segments to them. It is possible that Oracle will use other segments of these flexfields in the future. Any changes you make can affect your ability to upgrade your system in the future.
Use the Descriptive Flexfield Segments window.
See: Setting up Extra Information Types (Excluding Organization EITs), Oracle HRMS Configuring, Reporting, and System Administration Guide
Step 52: Set Up Responsibility Access for Extra Information Types
EITs do not appear automatically in any responsibility. You must set up responsibility level access for EITs. Alternatively, use CustomForm security to add individual EITs to a specific taskflow window. This level of security is usually defined later in the implementation when you need to restrict access for users.
Note: This security does not apply to EITs on organizations.
Use the Information Types Security window.
See: Setting Up Extra Information Types for a Responsibility, Oracle HRMS Configuring, Reporting, and System Administration Guide.
Define EITs for Organization
EITs for organization classifications are set up differently from other EITs. When you define them you must also associate them with the Classification of the Organization. When a user selects the classification then the system will display the correct set of EITs.
Step 53: Define Organization Classification
Define a new organization classification if you want to group your EITs in a specific way. You do not need to do this, if you can use a classification that already exists.
Use the Application Utilities Lookups window.
See: Adding Lookup Types and Values, Oracle HRMS Configuring, Reporting, and System Administration Guide
Step 54: Set up Extra Information Types for an Organization Classification
Define a new EIT and then enter a row into the HR_ORG_INFORMATION TYPES table. Then specify for which organization classifications this EIT is available.
See: Setting Up Extra Information Types for an Organization Classification, Oracle HRMS Configuring, Reporting, and System Administration Guide
System Administration
These are tasks for your System Administrator.
Important: If you used the Configuration Workbench, you can skip these steps. The Workbench enables the currencies for the countries in which your enterprise operates, and creates a user called HRMS_USER for each business group.
Step 55: Enable Currencies
All major currencies are predefined with Oracle Applications. The codes used are the ISO standard codes for currencies. However, you must enable the specific currencies you want to use for your base currency, or for any compensation and benefit information.
The 'base currency' is the default currency used by your Business Group, USD.
Note: Oracle HRMS does not use extended precision. You can control the precision in any calculation using a formula.
Use the Currencies window
See: Enabling Currencies, Oracle HRMS Configuring, Reporting, and System Administration Guide.
Step 56: Define 'View All' HRMS User
Before you can access any of the HRMS windows you must create a new Application User. with access to one of the default Responsibilities supplied with the system.
Use the Users window.
See: Users Window, Oracle Applications System Administrator's Guide
Step 57: Define Lookup Types and Values Optional Step
Lookups supply many of the lists of values in Oracle HRMS. For example, both Title and Nationality in the Person window use Lookups.
You can add new Lookups Values at any time. You can set the Enable Flag for a Value to No, so that it will no longer appear in the list, or you can use the Start and End Dates to control when a value will appear in a list.
See: Adding Lookup Types and Values, Oracle HRMS Configuring, Reporting, and System Administration Guide
Enterprise and Workforce Management
Organization Structures
To begin modelling your enterprise, you set up the business groups, legal entities, and operating companies that comprise your organizational framework. You can define these organizations and locations yourself, or complete a configuration interview in the Configuration Workbench. The workbench creates the organizations and locations and places them in a hierarchy for you. The workbench creates a "View All" responsibility for each business group, and sets the required user profile options.
When the organizational framework is in place, you can extend it by creating additional internal and external organizations, and their locations, and by building the organizations into hierarchies.
If you use the Configuration Workbench, then you can skip steps 1, 2, and 3, although you can optionally perform step 2 to add user profile options to the responsibilities that the workbench creates. If you do not use the Configuration Workbench, then follow the steps below to configure your enterprise framework.
To find out what organization structures the workbench sets up see: Key Concepts for Representing Enterprises, Oracle HRMS Enterprise and Workforce Management Guide
Step 1: Set Up Your Business Groups Required Step
You can use the Startup business group with all of its default definitions, which you can use with the default responsibility (Option 1), or you can define other business groups to meet your own needs (Option 2).
To find out how many business groups you require, see: Key Concepts for Representing Enterprises
Option 1: Adapt the Startup Business Group
-
Select the default Oracle Human Resources responsibility with the security group 'Standard'. This enables you to see all the records for the startup Business Group.
-
Adapt the startup Business Group to your own Business Group requirements.
Warning: The Setup business group has a default legislation code of US and a default base currency of USD.
If you intend to process payrolls in your business group, or you intend to implement legislation for another territory, you must create a new business group with a valid legislation code and base currency. The system uses these values to copy in the predefined data it needs to comply with local legislative and processing requirements.
You cannot change these definitions after they have been saved.
See: Creating an Organization, Oracle HRMS Enterprise and Workforce Management Guide
Option 2: Create New Business Groups and Responsibilities
-
Create a new Business Group.
See: Creating an Organization, Oracle HRMS Enterprise and Workforce Management Guide
-
Set up a responsibility for the business group in the Responsibilities window.
Step 2: Set User Profile Option Values for Responsibilities Required Step
Note: Use Standard HRMS security, rather than the Security Groups Enabled model during implementation. You can change to the Security Groups Enabled model later in your implementation. See: Security Models, Oracle HRMS Configuring, Reporting, and System Administration Guide
-
Set the HR User Profile Options for any new responsibilities you create. You must set up the HR: User Type, HR: Security Profile and the HR: Business Group options, at responsibility level.
-
You can set also set up other User Profile Options for new responsibilities you created or the workbench generated.
See: System Profile Values Window, Oracle Applications System Administrator's Guide
See: User Profiles, Oracle HRMS Configuring, Reporting, and System Administration Guide
Step 3: Set User Profile Option Values for Responsibility
Set the HR User Profile Options for the new responsibility. You must set up the HR: User Type option. Setting the HR: User Type option determines:
-
the default address style
-
if set to HR User, the application displays the United States International Style address window
-
if set to HR with Payroll, the application displays the US Style address window
-
-
the names for the HR elements
-
if set to HR User, the application uses the predefined Federal element names
-
if set to HR with Payroll, the application uses the element names you define for the Federal elements
-
-
the termination rules
-
if set to HR User, the application uses the Actual Termination
-
if set to HR with Payroll, the application uses the Final Processing rules
-
You can also set up other User Profile Options.
Use the System Profile Values window.
See: System Profile Values Window, Oracle Applications System Administrator's Guide
Step 4: Define Lookup Types and Values
Lookups supply many of the lists of values in Oracle HRMS. For example, the Job, Position, Person, and Assignment windows use Lookups for Extra Information.
Many Lookup Types have been predefined and include value sets. Others are predefined, such as Appropriation Codes and Bargaining Unit Status, but you need to define values for them.
For information about which Lookup Types are predefined and contain value sets and which ones are extensible, refer to the reference tables:
-
Assignment Information Types, Oracle HRMS Configuring, Reporting, and System Administration Guide
-
RPA Extra Information Type Descriptions, Oracle HRMS Configuring, Reporting, and System Administration Guide
-
Elements, Oracle HRMS Configuring, Reporting, and System Administration Guide
-
Location Information Type Description, Oracle HRMS Configuring, Reporting, and System Administration Guide
-
Organization Information Type Description, Oracle HRMS Configuring, Reporting, and System Administration Guide
-
Person Information Types, Oracle HRMS Configuring, Reporting, and System Administration Guide
-
Position Information Types, Oracle HRMS Configuring, Reporting, and System Administration Guide
-
RPA Extra Information Types and NOACs, Oracle HRMS Configuring, Reporting, and System Administration Guide
-
Person Analysis Special Information Types, Oracle HRMS Configuring, Reporting, and System Administration Guide
Lookup Values are the valid entries that appear in the list of values. They make choosing information quick and easy, and they ensure that users enter only valid data into Oracle HRMS.
You can add new Lookups Values at any time to extensible Lookup types. You can set the Enable Flag for a Value to No, so that it will no longer appear in the list of values, or you can use the Start and End Dates to control when a value will appear in a list for all non-system Lookup Types.
Use the Application Utilities Lookups window.
See: Adding Lookup Types and Values, Oracle HRMS Configuring, Reporting, and System Administration Guide
Step 5: Create Locations
Create each work location used by your agency and associate it with a Duty Station, using the supplied Duty Stations Lookups. You define each location and address once only. This saves you time if you have several organizations with the same address.
The Location name is displayed on the Assignment form. To more easily identify the specific Duty Station Location, it is recommended that you enter the Duty Station number as the location name.
Use the Location window.
See:Setting up Locations, Oracle HRMS Enterprise and Workforce Management Guide
Step 6: Set Up Your Key Organization Structures Required Step
Create the legal entities and operating companies you require to represent your enterprise. The operating companies and legal entities are key organization structures that form your basic enterprise framework, to find out what they represent, see: Key Concepts for Representing Enterprises, Oracle HRMS Enterprise and Workforce Management Guide
To find out how many operating companies and legal entities you require, see: Configuration Models for Your Enterprise Framework
See: Setting up Organizations, Oracle HRMS Enterprise and Workforce Management Guide
Step 7: Set Up Your Additional Organization Structures Optional Step
You can extend your basic enterprise structure by creating additional organizations and locations to represent internal divisions or departments, and external organizations for reporting or third-party payments.
See: Extending the Enterprise Framework, Oracle HRMS Enterprise and Workforce Management Guide
See: Setting Up Organizations, Oracle HRMS Enterprise and Workforce Management Guide
The Configuration Workbench creates legal entities for HR purposes only. If you want to integrate Oracle Payroll with Oracle Cash Management, see: the Oracle Cash Management User Guide
Step 8: Enter Organization Classifications and Additional Information
Enter the appropriate classifications for each organization and details for any Extra Information types.
Use the Organization window.
See: Entering Organization Classifications, Oracle HRMS Enterprise and Workforce Management Guide
See: Entering Additional Information, Oracle HRMS Enterprise and Workforce Management Guide
Step 9: Enter Business Group Additional Information
For each business group you set up, you need to enter additional information, specifying the names of the key flexfield structures that you set up previously for Job, Position, Grade, Group, and Costing. This information is required to process and update to the HR database Requests for Personnel Actions.
Use the Organization window.
See: Entering Business Group Information, Oracle HRMS Enterprise and Workforce Management Guide
Step 10: Set up HR Organization and US Federal Org Reporting Information
You specify HR Organization for all organizations to which you intend to assign employees. For these organizations, you also enter the US Federal Org Report information which is required when generating federal reports such as the Notification of Personnel Action and the Central Personnel Data File (CPDF) reports.
Use the Organization window.
See: Federal reports, see HR Organizations: Entering US Federal Reporting Information, Oracle HRMS Enterprise and Workforce Management Guide
Step 11: Run the Create Federal HR Valid Combinations
The application provides a concurrent manager process that supplies valid grade and pay plan combinations that are used during implementation when defining your agency's positions.
Use the Submit Request Window.
See: Running the Federal Valid Combinations Process, Oracle HRMS Compensation and Benefits Management Guide
Step 12: Set Up Auto Orgs Optional Step
You can enable the automatic creation of HR organizations using the Auto Orgs functionality. If your enterprise has a close relationship between its financial structure and line management hierarchy, then this means you only have to maintain your financial structure in GL and the corresponding line manager hierarchy is automatically synchronized.
See: Implementing Automatic Company Cost Center Creation, Oracle HRMS Enterprise and Workforce Management Guide
Step 13: Define Organization Hierarchies Optional Step
You can represent your management or other reporting structures by arranging organizations into reporting hierarchies. An organization can belong to any number of hierarchies, but it can only appear once in any hierarchy.
Organization reporting lines change often and you can generate a new version of a hierarchy at any time with start and end dates. In this way, you can keep the history of your organizational changes, and you can also use this feature to help you plan future changes.
When you use DateTrack you see the "current" hierarchy for your effective date.
Important: Your primary reporting hierarchy will usually show your current management reporting structure. You can define other hierarchies for other reporting needs.
You can create organization hierarchies using the:
-
Organization Hierarchy Window
See: Creating Organization Hierarchies, Oracle HRMS Enterprise and Workforce Management Guide
-
Organization Hierarchy Diagrammers (they enable you to create your hierarchies graphically, and to make intuitive drag-and-drop changes).
See: Adding Organizations or Positions to a Hierarchy, Oracle HRMS Enterprise and Workforce Management Guide
Step 14: Use Organization and Geographic Hierarchies for Calendar Events Optional Step
You use geographical and organizational hierarchies to identify the group of people you want a calendar event to apply. Calendar events represent important dates that affect the working time of your workforce such as a public holiday.
See: Setting Up Calendar Events, Oracle HRMS Workforce Sourcing, Deployment, and Talent Management Guide
You can use organizational hierarchies when you define calendar events in your enterprise. If the calendar event applies to people in your organizations, you can select an organization hierarchy as the type of coverage for the event. For example, if you have a planned factory closure, you can define it as an organizational holiday and apply it to the factory organization in your hierarchy. The calendar event becomes applicable to the people in the factory organization who are scheduled to work at the time of the event.
See: Creating Organization Hierarchies, Oracle HRMS Enterprise and Workforce Management Guide
You use the geographical hierarchy as the type of coverage for calendar events that apply to a geographic entity, such as, a country, state, or region. For example, if you are an enterprise operating in multiple countries, you can define calendar events for the public holidays in those countries. The calendar event becomes applicable to people if they work in the country you include in the event.
See: Generic Hierarchies Overview, Oracle HRMS Enterprise and Workforce Management Guide
Jobs
If you used the Configuration Workbench, you may already have loaded jobs from a spreadsheet in the Workbench. You can skip the Define Jobs step.
Step 15: Define Job Groups
As part of a working relationship, a person can simultaneously perform a number of roles in addition to being an employee or contingent worker. These can range from initiatives defined by the enterprise, such as fire warden, to legislative defined roles such as Health and Safety Representative. In Oracle HRMS, these are know as supplementary roles. Supplementary roles are set up as jobs in the Job window
Each job is held in a Job Group. The Job Group is used to store jobs of a similar type together in one group. All standard jobs created in Oracle HRMS, that is, those jobs that define the role the person is employed to fulfil, must be stored in the default HR Job Group. This Job Group is automatically created for your business group.
If you want to set up supplementary roles you must set up additional job groups to store these roles.
Use the Job Groups window.
See: Creating a Job Group, Oracle HRMS Enterprise and Workforce Management Guide
Step 16: Define Jobs
Jobs provide a way to categorize related positions, independent of specific organizations. You use the Job window to define a job and associate it to an Occupational Series Code.
A 'Job Name' is a unique combination of values in the segments of the job flexfield structure that you have linked to your business group.
There are a number of ways to add information about a job. Primarily, you use Extra Information flexfields to store additional job-related information.
Use the Job window.
See: Defining a Job, Oracle HRMS Enterprise and Workforce Management Guide
Positions
If you used the Configuration Workbench, you may already have loaded positions from a spreadsheet in the Workbench. You can skip the Define Positions step.
Step 17: Create Classified Position Descriptions (Optional)
Many agencies require classified position descriptions that describe the position's responsibilities, requirements, and working conditions. You can create as well as classify position descriptions.
Use the Position Description window.
See: Classifying Position Descriptions, Oracle HRMS Enterprise and Workforce Management Guide
Step 18: Define Position Hiring Statuses
Each position must have a hiring status: Proposed, Active, Frozen, Eliminated or Deleted. You can create user names for these system hiring statuses, and define more than one user name for each system name, if required.
Use the User Types and Statuses window.
See: Defining Hiring Statuses, Oracle HRMS Enterprise and Workforce Management Guide
Step 19: Define Positions
In Oracle HRMS a position is a job within an organization. You use positions to define your structural information.
A 'Position Name' is a unique combination of values in the segments of the position flexfield structure that you have linked to your business group.
Use the Position window.
HRMS provides Position Copy and Mass Position Update windows that enable you to automate the reorganization of your workforce. If you want to restrict the positions that appear in these windows to those falling within the user's security profile, you must attach secure versions of the forms to the menu. The secure versions of the function names are PQHWSCET1 (Position Copy) and PQHWSCET2 (Mass Position Update).
See: Define a Position, Oracle HRMS Enterprise and Workforce Management Guide
Step 20: Enter Additional Information about Positions
You use Extra Information flexfield to store additional position-related information.
See: Define a Position, Oracle HRMS Enterprise and Workforce Management Guide
Step 21: Set up the Synchronize Positions Process to Run Nightly
Oracle HRMS uses the Synchronize Positions process to update the non-datetracked Positions table (PER_ALL_POSITIONS) with changes made to the datetracked table (HR_ALL_POSITIONS_F). When you run the process, any datetracked changes with an effective date on or before today are applied to the non-datetracked table. Future dated changes are not applied until they become effective.
Running the Synchronize Positions process every night ensures that the application automatically updates the table with the position changes that become effective each day. If a power or computer failure disrupts this process, you can start it manually from the Submit a New Request window.
Warning: Ensure that the resubmission interval is set to run every night.
Use the Submit a New Request window.
See: Submitting a Request, Oracle Applications User Guide
Step 22: Create a Position Hierarchy
You structure position hierarchies to represent the management reporting lines for your agency's departments and sections. Hierarchies represent reporting relationships that cross organizations, position and organization information for the Requests for Personnel Action, and hierarchical relationships for the Organizational Component Translation report.
You can create position hierarchies using the:
-
Position Hierarchy Window
See: Creating a Position Hierarchy, Oracle HRMS Enterprise and Workforce Management Guide
-
Position Hierarchy Diagrammers (they enable you to create your hierarchies graphically, and to make intuitive drag-and-drop changes).
See: Adding Organizations or Positions to a Hierarchy, Oracle HRMS Enterprise and Workforce Management Guide
Define a Context for Mass Actions
The Contexts form determines what information you can view, enter, and change on the Mass Assignment Update and Position Copy forms. A predefined global Context form contains the default position and assignment attribution that appear on the forms. When you create a new Context, you can choose the attributes to display based on a user's Application, Legislation, and Responsibility.
Step 23: Set Up a New Context
Create a new context defining the Application, Legislation, and Responsibility. Define the attributes to include in the Display, Change List, and Criteria columns.
Use the Contexts window.
See: Defining a Context for Mass Actions, Oracle HRMS Configuring, Reporting, and System Administration Guide
Complaint Tracking
Before your agency enters a complaint into the application, you must set up the Complaint Tracking window according to your agency's requirements.
Setup involves consideration of implementing security for users of Complaint Tracking windows and reports, adding agency-specific fields and Lookup values to windows, and setting up EEO Officials in the application.
Your setup may include one or more of the following steps, depending on your implementation:
Step 24: Define a Secure Responsibility for EEO Complaint Tracking Users
Use the Security Profile window.
See: Defining a Security Profile, Oracle HRMS Configuring, Reporting, and System Administration Guide
Step 25: Add lookup values for:
-
Serviced HR Office (GHR_US_HR_OFFICE)
-
Serviced EEO Office (GHR_US_EEO_OFFICE)
-
Servicing Organization (GHR_US_SERVICED ORG)
-
Servicing organizations are those involved in processing the complaints.
-
Discriminating organizations (GHR_US_DISCRIMINATING_ORG)
-
Information Inquiry (GHR_US_INFO_INQUIRY_COSTS)
-
Pre Complaint (GHR_US_PRE_COMPL_COSTS)
-
Formal Complaint (GHR_US_FORMAL_COMPL_COSTS)
-
Investigation (GHR_US_INVESTIGATION_COSTS)
-
FAA Final Agency Decision (GHR_US_FAD_COSTS)
-
Hearing (GHR_US_HEARING_COMPL_COSTS)
-
FAD Final Agency Action (GHR_US_FAA_COSTS)
-
Appellate (GHR_US_APPELLATE_COSTS)
-
Civil Action (GHR_US_CIVIL_ACTION_COSTS)
-
Other (GHR_US_OTHER_COSTS)
-
Amendment (GHR_US_AMENDMENT_COSTS)
Use the Lookup Values window.
Use the Application Utilities Lookups window.
See: Adding Lookup Types and Values, Oracle HRMS Configuring, Reporting, and System Administration Guide, Removing Lookup Values, Oracle HRMS Configuring, Reporting, and System Administration Guide
Step 26: Set up person types
By defining additional person types, such as ADR Facilitator or Administrative Judge, you can include information when you enter people in the application that allows you to query them by type of function.
See: Defining Person Types, Oracle HRMS Enterprise and Workforce Management Guide
Step 27: Define a request group for EEO reporting users.
See: Request Groups, Oracle HRMS Configuring, Reporting, and System Administration Guide
Step 28: Add agency-specific taskflows
Use the Define Taskflow window.
See: Defining Taskflows, Oracle HRMS Configuring, Reporting, and System Administration Guide
Step 29: Enter EEO Officials into the application
Complaint officials must be entered in the application before they can be assigned to a complaint.
Use the People window.
See: Entering a New Person, Oracle HRMS Workforce Sourcing, Deployment, and Talent Management Guide
See: Entering People Involved in Processing the Complaint, Oracle HRMS Enterprise and Workforce Management Guide
Step 30: Generate docket numbers
If you do not want to enter docket numbers manually in the Complaint Tracking window, you can generate your own docket numbers using the same SQL operation that you do to generate numbers for Request Number field in an RPA (Request for Personal Action).
New Hire Reporting
Step 31: Check GRE Federal and State Identification Numbers
Ensure that a federal identification number and a SUI identification number, if appropriate, is on record for each GRE that submits New Hire reports.
Use the Organization window.
See: GREs: Entering the IRS Identification Number, Oracle HRMS Enterprise and Workforce Management Guide
Step 32: Enter the GRE Contact Person
Enter the GRE contact person.
Use the Organization window.
See: Entering New Hire Report Information for a GRE, Oracle HRMS Enterprise and Workforce Management Guide
Step 33: Enter New Hire Information for Every Employee
When you use the online system to hire an employee you enter the appropriate New Hire status in the Employment Information region of the Person window.
-
The default is null
-
Enter Incl or Excl
-
The status automatically changes to Done after a run of the New Hire report includes the employee.
Warning: When you load your current employees into the database, the default New Hire Status is null. You must enter a value of Done or Excl in the New Hire Status field if you do not want to include them in your first run of the New Hire report.
Do this manually, or as part of your data loading.
Use the Person window.
See: Entering Additional Personal Information (People Window), Oracle HRMS Workforce Sourcing, Deployment, and Talent Management Guide
Evaluation Systems
Step 34: Define Evaluation Types Optional Step
With Oracle HRMS you can record summary evaluation information for Jobs, or Positions in the Evaluation window.
Define the name of your evaluation system as a value for the Lookup Type EVAL_SYSTEM.
To record detailed evaluation scores for the Hay System or any other system you can enable the Additional Evaluation Details descriptive flexfield to hold and validate this information.
You can also hold comment or review information for each evaluation you undertake.
Note: If you use more than one evaluation system you may want to define the segments as context sensitive to the System Name.
Use the Application Utilities Lookups window.
See: Adding Lookup Types and Values, Oracle HRMS Configuring, Reporting, and System Administration Guide
Human Resource Budgets
Step 35: Define Lookup Types and Values Optional Step
Oracle HRMS delivers the following seeded budget measurement units: Money, Hours, Headcount, Full Time Equivalent, and Percent Full Time Equivalent. You cannot extend the delivered budget measurement units, but you can copy and rename an existing measurement unit.
Define values for BUDGET_MEASUREMENT_TYPE.
Use the Application Utilities Lookups window.
See: Adding Lookup Types and Values, Oracle HRMS Configuring, Reporting, and System Administration Guide
You can configure the application to recalculate and update Assignment Budget Values (ABV) for FTE automatically when determining factors (such as working hours or frequency) change. A related concurrent process (Calculate Assignment Budget Values) helps you initialize assignment records with budget values.
See: Recalculating Assignment Budget Values, Oracle HRMS Enterprise and Workforce Management Guide
See: Running the Calculate Assignment Budget Values Process, Oracle HRMS Enterprise and Workforce Management Guide
Step 36: Define Period Types Optional Step
The most common period types are already predefined in Oracle HRMS. You can change the names of these predefined types but you cannot add any new types.
Use the Period Types window.
See: Renaming Period Types, Oracle HRMS Enterprise and Workforce Management Guide
Step 37: Define Budgetary Calendars Optional Step
You use calendars to define the budget years for your staffing budgets.
Use the Budgetary Calendar window.
See: Defining Budgetary Calendars, Oracle HRMS Enterprise and Workforce Management Guide
Step 38: Define Budget Sets Optional Step
A budget set is comprised of one or more elements. You define a budget set to record the money or hours or other budget measurement units in your budget. Oracle HRMS uses budget sets to track actual expenditures and commitments.
Use the Budget Set window.
See: Defining Budget Sets, Oracle HRMS Enterprise and Workforce Management Guide
Step 39: Migrate an Existing Oracle HRMS Budget to the New Budget Tables Optional Step
If you created a budget in Oracle HRMS prior to Release 11i, you can use an existing budget as the basis for a new budget worksheet.
Run the Migrate Budget Data process from the Submit Requests window to migrate an existing budget to the new database tables for Budgets.
See: Migrating a Budget to Oracle HRMS, Oracle HRMS Enterprise and Workforce Management Guide
Step 40: Set Up the HR Budget in Oracle General Ledger Optional Step
If you are transferring a budget from Oracle HRMS to Oracle General Ledger, you must first define the budget in Oracle General Ledger.
Use the Define Budget window in Oracle General Ledger to define the budget.
See: Setting Up an Oracle HRMS Budget for Transfer to Oracle General Ledger, Oracle HRMS Enterprise and Workforce Management Guide
Step 41: Define Budget Characteristics Optional Step
You set up budget characteristics to define the Oracle HRMS work structure for which you are establishing a budget. The primary entities against which you can create a budget are job, position, grade, and organization. You can also create a budget for a combination of these entities.
Defining the characteristics of a budget also requires you to define the budget measurement units (Money or Headcount, for example). Optionally, you can select the elements that are used to process budget funding commitments during a budgetary period. For budgets that are transferred to Oracle General Ledger, you can map Oracle HRMS Costing Segments to GL Chart of Account Segments.
Use the Budget Characteristics window.
See: Defining Budget Characteristics, Oracle HRMS Enterprise and Workforce Management Guide
Set Up Workflow for Budget Worksheets Optional Step s
If you use Oracle Workflow to delegate a budget worksheet through an organization hierarchy or to route a worksheet for approval, you must set up HRMS roles and routing for your budgeting personnel. A manager responsible for a budget can only delegate a budget worksheet to another manager in the organization hierarchy who has a valid HRMS role, and is a member of the applicable routing list or hierarchy.
Step 42: Define an Organization Hierarchy Optional Step
Create an organization hierarchy if needed. Organization hierarchies enable you to restrict the number of budget line items that appear in your budget, and delegate to other managers.
Use the Organization Hierarchy or the Global Organization Hierarchy window.
See: Creating Organization Hierarchies, Oracle HRMS Enterprise and Workforce Management Guide
Step 43: Specify Starting Organization Optional Step
Specify the organization hierarchy and the organization within the hierarchy where the budget is effective. This action enables the budget in subordinate organizations as well.
Use the Budget Characteristics window.
See: Defining Budget Characteristics, Oracle HRMS Enterprise and Workforce Management Guide
Step 44: Define HRMS Roles Optional Step
Define the roles that you are going to use in your enterprise for routing budget worksheets.
Use the Maintain Roles window.
See: Defining HRMS Roles for Transactions, Oracle HRMS Enterprise and Workforce Management Guide
Step 45: Set Up Workflow Routing Optional Step
When you set up workflow, you have a choice of how to route each transaction type (position transaction, budget worksheet, budget reallocation transaction). The routing styles include:
-
routing list
-
position hierarchy
-
supervisory hierarchy
Choose one routing style for each transaction type.
Use the Transaction Type Wizard.
See: Transaction Type Wizard, Oracle HRMS Enterprise and Workforce Management Guide
Person Types
Step 46: Define Person Types Required Step
You can define your own names to identify the "types" of people in your system.
Note: Person Type is a common option for Form Customization.
Use the Person Types window.
See: Defining Person Types, Oracle HRMS Enterprise and Workforce Management Guide
Collective Agreements
A collective agreement is an agreement that defines the terms and conditions of employment for all employees that are covered by its terms. Agreements are typically negotiated and agreed by external bodies such as Trade Unions and Representatives of Employers.
Step 47: Setting Up Collective Agreements Optional Step
If your enterprise uses collective agreements, follow the steps in the referenced topic to enter a collective agreement, set up the eligibility criteria for the agreement, and to apply the values defined in the agreement to the eligible employees.
See: Setting Up a Collective Agreement, Oracle HRMS Enterprise and Workforce Management Guide
Medical Assessments, Disabilities and Work Incidents
Step 48: Define Lookup Types and Values Optional Step
If you want to record medical assessments, disabilities, or work incidents for the people in your enterprise, you must define Lookup Values for the Lookup Types that are used in those windows.
See: User and Extensible Lookups, Oracle HRMS Configuring, Reporting, and System Administration Guide
Use the Application Utilities Lookups window.
See: Adding Lookup Types and Values, Oracle HRMS Configuring, Reporting, and System Administration Guide
Checklists
Step 49: Set Up Checklist Templates Optional Step
If you want to use the Checklist functionality to automatically allocate checklists and tasks to people and assignments, you must first set up the checklist templates and tasks.
See: Setting Up Checklists, Oracle HRMS Enterprise and Workforce Management Guide
Compensation, Benefits, and Payroll
Follow the implementation steps in this section to set up your compensation and benefits plans, including grade/step progression schemes and absence plans. This section includes the following implementation areas:
-
Grade Related Information: Set up grades to record the relative status of employee assignments
-
Elements: Define elements to represent a variety of earnings and deductions, as well as other employer liabilities
-
Compensation Awards: Distribute one-time and recurring awards
-
Benefits: Set up health and welfare offerings
-
Leave and Absence Management: Set up paid time off schemes to administer the vacation or sick leave rules of your enterprise
-
Element Sets and Batch Control Totals: Group elements together to restrict processing; set up batch controls to calculate numerical input values with Batch Element Entry
If you plan to load details of employee entry history you should consider using a fixed date, such as 01-JAN-1901, as a default for your initial setup definitions. This will simplify your data-entry.
Grade Related Information
If you have agency-specific pay plans, you can add them to the system. The grade and step values are also extensible.
Step 1: Add the Pay Plan
The Federal Maintenance Pay Plan window lists the predefined pay plans. Use this window to add other pay plans and to indicate whether the pay plan is eligible for Within-Grade-Increases.
Use the Pay Plan window.
See: Add a Pay Plan, Oracle HRMS Compensation and Benefits Management Guide
Step 2: Review the Values for Grades or Levels
The product comes with an extensive list of values for grades and steps that you can extend, GHR_US_GRADE_OR_LEVEL.
Use the Lookup Values window.
See: Add Grades, Oracle HRMS Compensation and Benefits Management Guide
Step 3: Review the Values for Steps or Rates
The product comes with an extensive list of values for grades and steps that you can extend, GHR_US_STEP.
Use the Lookup Tables window.
See: Add Steps, Oracle HRMS Compensation and Benefits Management Guide
Step 4: Associate the Pay Plan and Grade
To create valid pay plan and grade combinations, you associate the pay plan with the appropriate grade or level.
Use the Grades window.
See: Associate Pay Plans and Grades, Oracle HRMS Compensation and Benefits Management Guide
Step 5: Create a Pay Table
A pay table can include one or more pay plans. For example, the Oracle Federal Standard Pay Table includes several pay plans. You can create your agency-specific basic and special rate pay tables.
Use the Table Structure window.
See: Set up Pay Tables, Oracle HRMS Compensation and Benefits Management Guide
Step 6: Enter the Pay Values
You enter and can later maintain the values for the pay tables.
Use the Table Values window.
See: Enter Pay Values, Oracle HRMS Compensation and Benefits Management Guide
Define Payroll Information
You must include a payroll in the employee assignment before you can make nonrecurring entries of any element for an employee. Nonrecurring entries are only valid for one payroll period.
Step 7: Define Payment Methods
Standard categories of payment methods such as Direct Deposit are predefined with your system. You can define your own names for each of these methods.
Use the Organizational Payment Method window.
Step 8: Define Consolidation Sets
When you define your business group the system will automatically generate a default Consolidation Set. If you have not installed Oracle Payroll you can skip this step.
Consolidation sets are used by Oracle Payroll where you want to gather the results from different payroll runs into a single set for reporting or transfer to other systems. You can define any number of additional consolidation sets.
Use the Consolidation Sets window.
Step 9: Define Payrolls
You define your own payroll groups to meet your business needs for processing and payment. Agencies must define at least:
-
One biweekly payroll and name it BiWeekly.
The biweekly payroll is the one that most federal offices use. The effective date for the payroll should begin at a date that accommodates all records that the agency plans to convert.
-
One monthly payroll
The monthly payroll is used as the default benefits assignment payroll for ex-employees and beneficiaries. The effective date for the payroll should begin at a date that accommodates all records that the agency plans to convert.
Note: The payroll calendar is different from the budgetary calendar in Oracle HR. You define your budgetary calendar for headcount or staffing budgets.
Use the Payroll window.
Elements
Before you define any elements, you should make all of your decisions about the definitions and rules for eligibility.
Define Input Value Validation Optional Step s
Step 10: Define Lookup Types and Values Optional Step
You define new Lookup Types to create additional lists of values to validate any element input value with a character datatype.
Note: You can also use Lookup Types to validate a flexfield segment. Use the Table Validation option for the Value Set and use the Lookups table as the source of your list.
You can add new Lookup Values at any time. You can set the Enable Flag for a Value to No, so that it will no longer appear in the list of values, or you can use the Start and End Dates to control when a value will appear in a list.
Use the Application Utilities Lookups window.
See: Adding Lookup Types and Values, Oracle HRMS Configuring, Reporting, and System Administration Guide
Step 11: Define User Tables Optional Step
With Oracle HRMS you can set up any number of User-Defined Tables. A user-defined table is a "matrix" of columns that hold different values for the same row. You can access this information using the GET_TABLE_VALUE function in any formula.
For example, you may want to set up a single table to hold union pay rates, deductions, and benefit levels for different job groups. Use the rows to hold "Job Group" and the columns to hold the specific values for each job group.
You can define exact row values or an inclusive range of values.
Use the Table Structure window.
See: Setting Up User Tables, Columns and Rows: , Oracle HRMS Configuring, Reporting, and System Administration Guide
Step 12: Define Table Values Optional Step
You now need to define the table values.
Use the Table Values window.
See: Entering Table Values, Oracle HRMS Configuring, Reporting, and System Administration Guide
Step 13: Define Element Validation Formulas Optional Step
When you define input values you can use a formula to validate any entry to that input value.
Important: You must define the formula before you define the element input value. The type of formula is Element Input Validation.
Use the Formula window.
See: Writing Formulas for Validation, Oracle HRMS FastFormula User Guide
Define Other Elements Optional Step s
Step 14: Define Elements and Input Values
Elements are the basic components of all compensation and benefit types. The product comes with predefined elements that you use with a Request for Personnel Action (RPA). Nature of Action Codes (NOACs) determine how you initiate, update, or modify an element using the RPA. You can also create elements using the Element window.
See: Defining an Element, Oracle HRMS Compensation and Benefits Management Guide.
Step 15: Define Element Links
You can give an entry to an employee only when they are eligible for that element. Employees are eligible for an element when their assignment details match the link details.
You can link an element to any combination of organization, group, grade, job, position, payroll, location, or employment category. However, the Oracle US Federal Human Resources predefined elements must be linked to all payrolls.
Use the Element Link window.
See: Defining Element Links, Oracle HRMS Compensation and Benefits Management Guide
Step 16: Activate Predefined Elements
When you install Oracle HRMS a number of predefined elements are installed. These elements represent the legislative deductions that are processed in the payroll run.
To activate these predefined elements you need only define links for them. You must link the elements predefined for Oracle US Federal Human Resources to all payrolls. You cannot change the assignment components for these predefined links.
Use the Element Link window.
See: Defining Element Links, Oracle HRMS Compensation and Benefits Management Guide
Benefits
Oracle HRMS predefines standard US federal benefits, including Federal Employee Health Benefits (FEHB), Thrift Savings Plans (TSP), and Thrift Savings Plan Catch-Up Contribution plans. (If you set up TSP, it is assumed that you will set up TSP Catchup as well.)
See: Federal Employee Health Benefits Overview, Oracle HRMS Compensation and Benefits Management Guide, Thrift Savings Plan Overview, Oracle HRMS Compensation and Benefits Management Guide.
To set up agency-specific programs, you can use the standard and advanced benefits features.
You can use the Plan Copy feature to copy programs and plans to provide a starting point for similar plans.
This sequence of setup steps for Benefits assumes you are using the Total Compensation Setup Wizard, which is the recommended approach. If you prefer to set up your plan design using individual windows, follow the steps in Benefits Implementation Without Total Compensation Setup Wizard, Oracle HRMS Compensation and Benefits Management Guide
Step 17: Define a Monthly Payroll Required Step
You must define a monthly payroll for each business group you maintain. When you process employee terminations, a copy of the person's assignment record is created as a benefits assignment. Benefits assignments are used to maintain eligibility for continuing benefits, and always have a payroll with a monthly period.
Note: If you have already defined payroll information, including monthly payrolls for each Business Group, you can skip this step.
Use the Payroll window.
See:Defining Benefits Defaults for a Business Group, Oracle HRMS Enterprise and Workforce Management Guide
Step 18: Set Up the Base Plan Design Using the Total Compensation Setup Wizard Required Step
The Total Compensation Setup Wizard provides a step-by-step process for creating Health and Welfare programs and the business processing rules you associate with them. The Wizard guides you through the setup process, reducing the likelihood of implementation errors.
Your base plan design includes compensation objects (programs, plan types, plans, and options), enrollment periods, eligibility profiles, life event reasons, default enrollments, and activity rates. You complete the other components of your plan design using the relevant windows as described in the following steps.
See: Total Compensation Setup Wizard, Oracle HRMS Compensation and Benefits Management Guide
Step 19: Define Collapsing Life Event Reasons (Advanced Benefits) Optional Step
You create a collapsing life event definition for those instances when a combination of two or more detected life events results in either a different life event or the voiding of the detected events.
Use the Collapsing Rules window.
See: Defining a Collapsing Life Event (Advanced Benefits), Oracle HRMS Compensation and Benefits Management Guide
Step 20: Convert Current Enrollments Optional Step
You can use Total Compensation Setup Wizard to convert benefits enrollments from third-party and legacy systems.
See: Converting Benefits Enrollments
Action Items and Certifications (Advanced Benefits) Optional Step s
You can set up any certifications that a benefits participant must provide to satisfy the enrollment requirements for a compensation object. When a participant fails to provide the required certification, the application suspends the election pending the completion of the action item.
Step 21: Set Up Certifications for Compensation Objects Optional Step
Typical certifications include date of birth and proof of good health.
Use the Certifications window.
See: Defining Certifications for Enrollment in a Plan, Oracle HRMS Compensation and Benefits Management Guide
Step 22: Define Action Item Due Dates Optional Step
As part of implementation, you define the required completion date of each action item.
Use the Action Types window.
See: Defining an Action Item Due Date, Oracle HRMS Compensation and Benefits Management Guide
Actual Premiums Optional Step s
A premium is the amount paid by a plan sponsor to the supplier of the benefit. Typically, you calculate premiums on a per-participant basis, but the application also supports premium calculation based on total enrolled participants and total volume of elected coverage.
Step 23: Calculate Actual Premium Costs Optional Step
You maintain the criteria that the Premium Calculation Process uses to calculate the actual premium cost that a plan sponsor owes to a benefits supplier.
Use the Actual Premiums window.
See: Defining an Actual Premium, Oracle HRMS Compensation and Benefits Management Guide
Flex Credit Calculations (Advanced Benefits) Optional Step s
Step 24: Define Characteristics of Benefit Pools Optional Step
You define benefit pools to limit how a participant can spend flex credits and how excess flex credits can be rolled over, distributed as cash, or forfeited.
Use the Benefit Pools window.
See: Defining the General Characteristics of a Benefits Pool, Oracle HRMS Compensation and Benefits Management Guide
Step 25: Define Flex Credits Optional Step
You define a flex credit calculation and link the calculation with a compensation object. The compensation object to which you link a flex credit calculation must be part of a program regardless of the level at which you define flex credits.
Use the Flex Credit Definitions window.
See: Defining Flex Credits, Oracle HRMS Compensation and Benefits Management Guide
Additional Setup for Health and Welfare Optional Step s
Step 26: Define Reporting Groups Optional Step
You can define a reporting group that you link to one or more programs and plans. When you run a report for a reporting group, the report results are based on the programs and plans that you include in the reporting group.
You can also define the regulatory bodies and regulations govern a reporting group.
Use the Reporting Groups window.
See: Defining a Reporting Group, Oracle HRMS Compensation and Benefits Management Guide
Step 27: Define Reimbursable Goods and Service Types Optional Step
Define goods and services that you approve for reimbursement. You then associate one or more goods and services types with a reimbursement plan.
Use the Goods and Services window.
See: Defining Reimbursable Goods and Service Types, Oracle HRMS Compensation and Benefits Management Guide
Step 28: Define Reimbursement Plans Optional Step
Use reimbursement plans to define goods and services that eligible participants may purchase. The participant can submit a reimbursement claim for the cost of the good or service that was purchased out-of-pocket.
Use the Plan Reimbursement window.
See: Defining a Reimbursement Plan, Oracle HRMS Compensation and Benefits Management Guide
Step 29: Define Communications Optional Step
You define the communications you send to employees and other potential participants. You specify the conditions that trigger a communication and the delivery method and medium.
Use the Communication Types window.
See: Defining Communication Types, Oracle HRMS Compensation and Benefits Management Guide
Step 30: Define Benefit Balances Optional Step
Benefit balances are useful for transitioning legacy system data to Oracle HRMS. You define a benefit balance type and then assign a value to that type for a given person using the Person Benefit Balances window.
Use the Benefit Balances window.
See: Defining a Benefit Balance, Oracle HRMS Compensation and Benefits Management Guide
Step 31: Maintain Desktop Activities List Optional Step
The Maintain Online Activities window lets you define the functions and windows that are available from the Desktop Activities list of the Online Benefits Services windows.
Use the Maintain Online Activities window.
See: Maintaining Online Activities, Oracle HRMS Compensation and Benefits Management Guide
Step 32: Maintain Pop Up Messages Optional Step
You can configure messages to display in the Online Benefit Services window based on user events that you define. You create the message text in the Messages window
Use the Maintain Pop Up Messages window.
See: Maintaining Pop Up Messages, Oracle HRMS Compensation and Benefits Management Guide
Step 33: Set Up Primary Care Provider Access Optional Step
You can define restrictions on the selection of a primary care provider and set high-level configuration options for web-based PCP database searches through Oracle Self-Service Benefits.
Use the Maintain Plan Primary Care Providers window.
See: Maintaining Primary Care Providers for a Plan, Oracle HRMS Compensation and Benefits Management Guide
Absence Management and Accruals
You can set up as many plans as you need to permit employees to accrue PTO to use for vacation or sick leave. Each plan has the units of Hours or Days, and can have its own rules regarding accrual frequency, accrual bands, ceilings, carryover, start dates, entitlement of employees with different assignment statuses, and so on.
Note: Oracle Federal Human Resources includes predefined accrual elements that can accept reverse payroll data from an agency. However, you need to set up an absence type and link the predefined elements to it.
Set Up Absence Management
Step 34: Set Up Proration and Notifications Optional Step
If you want to associate recurring elements with absence types, you must set up proration and retro notifications. This ensures that absences that end in the middle of a payroll period are detected and processed by the payroll run, and that retrospective changes to absences are recorded in the Retro Notifications report.
Note: Proration is available to Oracle Payroll users in selected localizations only.
See: Setting Up Absence Management, Oracle HRMS Compensation and Benefits Management Guide
Step 35: Define an Absence Element Optional Step
For each of your accrual plans, or each type of absence you are tracking, you define a nonrecurring element and input value to hold the actual time taken for vacation or sick leave.
If you use Oracle Payroll and the proration functionality is available for your localization, you can use a recurring element instead. This enables you to begin processing a long term absence before you enter an end date, and to apportion time correctly over payroll periods.
Use the Element window.
See: Defining and Linking an Absence Element, Oracle HRMS Compensation and Benefits Management Guide
Step 36: Link the Absence Element Optional Step
Link each absence element to define who is eligible to take this kind of absence.
Use the Element Link window.
See: Defining Element Links, Oracle HRMS Compensation and Benefits Management Guide
Step 37: Define Categories of Absence Types Optional Step
Define categories of absence types as values for the Lookup Type ABSENCE_CATEGORY, and your absence reasons as values for the Lookup Type ABSENCE_REASON.
Use the Application Utilities Lookups window.
See: Adding Lookup Types and Values, Oracle HRMS Configuring, Reporting, and System Administration Guide
Step 38: Define Absence Types and Associate with Absence Elements Optional Step
If you expect to record absent time using the Absence Detail window, define absence types, associating each with an absence element.
Use the Absence Attendance Type window.
See: Defining an Absence Type, Oracle HRMS Compensation and Benefits Management Guide
Step 39: Make Initial Element Entries Optional Step
For an absence type with a decreasing balance, use the Element Entries window or the Element Entry API to make initial element entries for employees eligible for the type. You can also initialize a decreasing balance by entering a negative value using BEE. For example, if you enter -16 hours using BEE, a decreasing balance starts at 16 hours. However, be aware that using BEE creates an absence record that will show on employees' absence history.
If you want to make batch entries, see Making Batch Element Entries Using BEE, Oracle HRMS Configuring, Reporting, and System Administration Guide.
Step 40: Create Payroll Formula to Calculate Absence Duration Optional Step
If you defined a recurring element, create a payroll formula that handles proration to process the element and calculate the appropriate absence duration in each pay period (taking into account the number of days or hours in a month, working and shift patterns, public holidays, and so on).
See: Sample Payroll Formulas Enabled for Proration, Oracle HRMS FastFormula User Guide
Step 41: Set Up Automatic Absence Duration Calculation Optional Step
If you want the application to automatically calculate the duration of an absence, then you can either set up schedules and calendar events or create a basic formula.
Define schedules and calendar events that are relevant to your enterprise and assign them to various levels in your work structures. The application uses the worker's schedule assigned to their primary assignment and their applicable calendar events to determine the duration of the absence. This ensures the people in your enterprise inherit work schedule information and the application can use this information to calculate the absence duration.
See: Setting Up Availability, Oracle HRMS Workforce Sourcing, Deployment, and Talent Management Guide
If you do not want the application to use the schedules and calendar events information to calculate absence duration, then you can write a formula to calculate absence duration from the absence start and end dates, and set the profile option HR: Absence Duration Auto Overwrite to Yes.
See: Writing Formulas to Calculate Absence Duration, Oracle HRMS FastFormula User Guide
Set Up Accrual Plans
After completing the absence management setup steps, follow these additional steps to set up a PTO accrual plan:
Step 42: Define New Accrual Start Rules Optional Step
There are three seeded start rules: Hire Date, Beginning of Calendar Year, and Six Months After Hire Date. If you need other rules, define them as values for the Lookup Type US_ACCRUAL_START_TYPE.
Use the Application Utilities Lookups window.
See: Adding Lookup Types and Values, Oracle HRMS Configuring, Reporting, and System Administration Guide
Step 43: Decide on Accrual and Carry Over Formulas Optional Step
Decide which Accrual and Carry Over formulas to use. You can use the seeded formulas, configure them, or write your own.
Use the Formula window.
See: Writing Formulas for Accrual Plans, Oracle HRMS FastFormula User Guide
Step 44: Write Ineligibility Formula Optional Step
If your Accrual formula defines a period of ineligibility and you want to use Batch Element Entry (BEE) to enter absences against the accrual plan, define an Ineligibility formula. BEE calls this formula to check whether an employee is eligible to use accrued PTO.
Note: If you use the seeded Accrual formulas, you do not need to define an Ineligibility formula. They use a period of ineligibility entered on the Accrual Plan form, and BEE validation can use the same value.
Use the Formula window.
See: Writing Formulas for Accrual Plans, Oracle HRMS FastFormula User Guide
Step 45: Define New Accrual Categories Optional Step
There are several seeded accrual categories. If you need additional categories, define them as values for the Lookup Type US_PTO_ACCRUAL.
Use the Application Utilities Lookups window.
See: Adding Lookup Types and Values, Oracle HRMS Configuring, Reporting, and System Administration Guide
Step 46: Select PTO Balance Type Optional Step
Oracle Payroll users: If you want to use a payroll balance to store gross accruals, decide whether the payroll run should update accruals as of the run's date earned (the date the payroll run uses to determine which element entries to process) or date paid (the date that appears on pay advices). Select your choice for the business group.
See: Business Groups: Selecting a PTO Balance Type, Oracle HRMS Enterprise and Workforce Management Guide
Step 47: Create Balance Dimensions Optional Step
Oracle Payroll users: If you want to use a payroll balance to store gross accruals, consider whether you need to define a new balance dimension. Dimensions are predefined that reset the balance each year on 1 January, 1 June, or hire date anniversary. If you require your balance to accumulate over a different period of time, or reset at a different date, you must create your own balance dimension.
See: Balances in Oracle Payroll
Step 48: Define a PTO Accrual Plan Optional Step
Define the accrual plan, selecting the formulas and absence element it is to use.
Use the Accrual Plan window.
See: Defining a PTO Accrual Plan, Oracle HRMS Compensation and Benefits Management Guide
Step 49: Set Up Length of Service Bands Optional Step
Optionally, set up length of service bands for the plan.
Use the Accrual Bands window.
See: Setting Up Length of Service Bands, Oracle HRMS Compensation and Benefits Management Guide
Step 50: Review the Net Calculation Rules Optional Step
Review the net calculation rules for the plan. If necessary, create additional elements and associate them with the plan by selecting them in the Net Calculation Rules window.
See: Changing Net Accrual Calculations, Oracle HRMS Compensation and Benefits Management Guide
Element Sets and Batch Control Totals
Step 51: Define Element Sets Optional Step
In Oracle HRMS you can define a set of elements to:
-
Restrict access to elements using Form Customization
-
Distribute costs across a Distribution Set of elements
-
Process a restricted set in a Payroll Run
-
Enter values for a restricted set using BEE (Batch Element Entry)
You define an element set as a named list of elements such as Salary, or Salary and Bonus. You can also define an element set using the classification. For example, you can restrict access to all elements in the classification Earnings.
Use the Element and Distribution Set window.
See: Defining an Element or Distribution Set , Oracle HRMS Compensation and Benefits Management Guide
Step 52: Define Batch Control Types Optional Step
If you use Batch Element Entry, you can set up batch control types to sum the entries in any numerical input value. This enables users to validate a BEE batch against control totals to check for missing lines or miskeying of amounts.
Use the Application Utilities Lookups window.
See: Setting Up BEE Validation Using Control Totals, Oracle HRMS Configuring, Reporting, and System Administration Guide
Basic Benefits
If you are beginning a new setup for benefits administration, implement the Standard Benefits. Basic Benefits provides a limited set of features and is provided mainly for compatibility with earlier releases.
Step 53: Set Up Basic Benefits Optional Step
To set up basic benefits, you define elements for benefits plans, use element links to establish eligibility, and create benefit carriers as organizations.
See: Setting up Basic Benefits, Oracle HRMS Compensation and Benefits Management Guide
Workforce Sourcing and Deployment
Oracle HRMS enables you to define your own names to identify the 'types' of people in your system, and to identify the status of employees and contingent workers in each assignment using your own names.
Recruitment
Step 1: Define Assignment Statuses for Applicants
Assignment Statuses for applicants enable you to define the distinct stages of your own recruitment processes.
With Oracle HRMS you can use your own names to identify these stages. For example, you might want to define a special status to identify applicants who have been invited to a First Interview and applicants who have been Rejected on Application.
These user statuses enable you to track the recruitment circumstances of all your applicants.
Note: Do not modify the predefined Oracle US Federal HR assignment statuses, because they are used in the Request for Personnel Action process.
Use the Assignment Statuses window.
See: Defining Assignment Statuses, Oracle HRMS Workforce Sourcing, Deployment, and Talent Management Guide
Setup for Employees and Contingent Workers
Step 2: Define Assignment Statuses for Employees and Contingent Workers Required Step
With Oracle HRMS you can identify the status of employees and contingent workers in each assignment using your own names.
Note: Do not modify the predefined Oracle US Federal HR assignment statuses, because they are used in the Request for Personnel Action process.
Use the Assignment Statuses window.
See: Defining Assignment Statuses, Oracle HRMS Workforce Sourcing, Deployment, and Talent Management Guide
Step 3: Create Contract Statuses Optional Step
Oracle HRMS enables you to create up to 250 different contract statuses to help track and identify employees.
See: Creating Contract Statuses, Oracle HRMS Enterprise and Workforce Management Guide
Step 4: Select Assignment Rate Types for Contingent Workers Optional Step
This step applies only if you are not using Oracle Services Procurement to provide purchase order information for contingent workers.
Oracle HRMS enables you to record payment rate information for contingent workers. You select an assignment rate type (such as Standard Rate or Weekend Rate) and associate it with a rate basis (such as Hourly Rate or Weekly Rate). You can then associate this combination of rate type and basis with an assignment rate (a monetary value) for specific contingent worker assignments.
See: Defining a Combination of Assignment Rate Type and Basis, Oracle HRMS Enterprise and Workforce Management Guide
You can define additional rate basis values for your assignment rate types by adding to the existing lookup type RATE_BASIS.
See: Adding Lookup Types and Values, Oracle HRMS Configuring, Reporting, and System Administration Guide
Step 5: Set Up Availability Information Optional Step
Use the integrated features from Oracle HRMS and Common Application Components (CAC) to set up information such as shifts, schedules, and calendar events to help you determine a worker's availability.
See: Setting Up Availability, Oracle HRMS Workforce Sourcing, Deployment, and Talent Management Guide
Special Personal Information (Personal Analysis Key Flexfield Structures)
Use the Personal Analysis Key Flexfield to record special personal information that is not included as standard information. You define each type of information as a separate Structure of the flexfield. For example, you might set up a structure to hold medical information.
This flexfield is used in the following areas:
-
Special Information details for People
-
Matching requirements for Jobs and Positions
You need to design a Personal Analysis Flexfield Structure for each Special Information Type you want to hold in Oracle HRMS. For each structure you must include the following:
-
The Structure Name and the number of Segments.
-
The Flexfield Segment Names, Order and Validation Options.
-
The Flexfield Value Sets to be used and any lists of values.
Defining the Flexfield Structure is a task for your System Administrator.
Note: You cannot use the Create Key Flexfield Database Items process to create database items for the segments of your Personal Analysis Flexfield structures.
Step 6: Run the Create Federal HR Special Info Types Process
The application provides a concurrent manager process that configures the Personal Analysis key flexfield to store Oracle US Federal HR-related information and associates it to the People window. The Special Information stores information for education, conditions of employment, conduct performance, language, performance appraisal, and special consideration.
Use the Submit Request Window.
See: Running the Federal Special Information Types Process, Oracle HRMS Workforce Sourcing, Deployment, and Talent Management Guide
Step 7: Define Personal Analysis Flexfield Value Sets
If you want to validate the values which a user can enter for any segment you must define a specific Value Set.
The attributes of the Value Set will control the type of values that can be entered, and how many characters each segment can hold. The attributes of the Value Set will also control how the values are to be validated.
Value Sets can be shared by different segments of the same flexfield, or by segments of any other flexfield.
Use the Value Set window.
See: Defining Value Sets, Oracle Applications Flexfields Guide
Step 8: Define Personal Analysis Flexfield Segments
Define a structure for your Personal Analysis Flexfield which contains the segments you want to use. You will use this structure to enter details in the Special Information Types window.
You must enter Yes in the Allow Dynamic Inserts field. If you enter No, you will not be able to enter new details in the Special Information Types window.
Note: You do not need to use a Value Set to validate a segment. If you do not specify a Value Set then a user can enter any alphanumeric value up to a limit of 150 characters.
Use the Key Flexfield Segments window.
See: Defining Key Flexfield Structures, Oracle Applications Flexfields Guide
Step 9: Define Personal Analysis Flexfield Segment Values
If you have chosen Independent or Dependent validation for a Value Set used by a Personal Analysis Flexfield Segment, you must define your list of valid values for the Value Set.
Use the Segment Values window.
See: Defining Segment Values, Oracle Applications Flexfields Guide
Step 10: Define Personal Analysis Flexfield Cross Validation Rules
Define any Cross Validation Rules you want to use to control the combinations of segment values which a user can enter.
You define Rules to Include or Exclude combinations of segment values. For each segment, you can define a Low to High range of values.
Use the Cross-Validation Rule window
See: Defining Cross-Validation Rules, Oracle Applications Flexfields Guide
Step 11: Define Personal Analysis Flexfield Aliases
Define Aliases for common combinations of segment values if you want to provide these as default options.
Use the Shorthand Aliases window
See: Defining Shorthand Aliases, Oracle Applications Flexfields Guide
Step 12: Freeze and Compile Your Personal Analysis Flexfield Structure
You are now ready to freeze your flexfield definition. Navigate to the Define Flexfield Segments window. Enter Yes in the Freeze Flexfield Definition field and save your changes. Oracle Human Resource Management Systems now freezes and compiles your Personal Analysis Flexfield definition. Compiling the flexfield definition enables the flexfield window with the defaults, values and rules that you have defined.
Use the Key Flexfield Segments window
See: Defining Key Flexfield Structures, Oracle Applications Flexfields Guide
Step 13: Register Special Information Types for the Business Group
After you have defined your Personal Analysis Flexfield Structures you must link them to your Business Group.
You do this using your view-all responsibility.
-
Select each Information Type you want to use in this Business Group.
-
Select the categories for each type.
-
Job for Job Requirements
-
Position for Position Requirements
-
Skills for use with Oracle Training Administration
-
Other for use with Person Special Information
-
OSHA for a special information type set up to record information about employees' work-related injuries or illness
Tip: If you do not check the Other category, you cannot use the type to hold information for a person. This means that you could also use the Special Information Types to hold any type of information for a Job or a Position only.
-
Use the Special Information Types window.
See: Enabling Special Information Types, Oracle HRMS Workforce Sourcing, Deployment, and Talent Management Guide
Requirements Matching
If you have decided to set up competencies, you can enter these as requirements for jobs and positions and match them against people's competence profiles.
If you have other job and position requirements that you want to record, but not define as competencies, you can set them up using the Personal Analysis key flexfield. You can set up each type of requirement as a Special Information Type, which is one instance of the flexfield.
For each Special Information Type, you can also choose whether to enable entry of information for people so that you can match people against the job or position requirements. A standard report (Skills Matching) has been provided to match the requirements of a job and the Special Information details of people in the system.
Important: US users: If you want to include essential job or position requirements in your ADA reporting, make sure you have entered these requirements for your jobs or positions.
Step 14: Define Requirements for Jobs Optional Step
You can define the attributes required by any employee who is assigned to a job. These attributes may be Essential or Desirable.
Definitions of requirements can use the same personal analysis flexfield structures and segments you have defined for special personal information.
Use the Job window.
See: Entering Job and Position Requirements, Oracle HRMS Enterprise and Workforce Management Guide
Step 15: Define Requirements for Positions Optional Step
After you define positions in your enterprise, you can define the attributes required by any employee assigned to that position. These attributes may be Essential or Desirable. The requirements are based on the same personal analysis flexfield structures you have defined for special personal information.
Use the Position window.
See: Entering Job and Position Requirements, Oracle HRMS Enterprise and Workforce Management Guide
Create Restricted RPAS
The product comes with a standard RPA and a restricted version, Oracle Federal Restricted Request for Personnel Action. The standard unrestricted form includes all the fields that the Personnelist can access. The restricted form limits the data fields provided and masks commonly restricted data items, such as the social security number and date of birth.
Step 16: Create a new Restricted RPA form
Adding a new form is a task for the application administrator.
Use the Lookup Type window, GHR_US_RESTRICTED_FORM.
See: Creating a Restricted RPA, Oracle HRMS Workforce Sourcing, Deployment, and Talent Management Guide
Step 17: Add fields to the Restricted RPA form
Restricted forms don't change the underlying process methods, only the view of the data. You can limit users' access and view of specific fields and data items. Fields can be coded as Non Display or Display Only.
Use the Restricted Form Process Methods window.
See: Creating a Restricted RPA, Oracle HRMS Workforce Sourcing, Deployment, and Talent Management Guide
Talent Management
Talent Management is the management of worker competencies and objectives to meet enterprise goals. Oracle HRMS, Oracle SSHR, and Oracle Learning Management (OLM) each supply key components of the Talent Management functionality. This topic describes the implementation process for the Oracle HRMS competencies, qualifications, and career path functions.
Oracle Performance Management is a separately licensed product. You must purchase a separate Oracle Performance Management license in addition to an Oracle Self-Service HR license to use the Appraisals, Questionnaire Administration, and Objectives Management self-service functions.
See: Oracle Performance Management Overview, Oracle Performance Management Implementation and User Guide
See: Implementing Oracle Performance Management, Oracle Performance Management Implementation and User Guide
Competencies
Competencies are measurable skills a workforce must acquire or possess to enable the enterprise to achieve its goals.
Step 1: Set HR:Global Competence Flex Structure Profile Option Optional Step
Each business group has a competence key flexfield structure. For global competencies, you can define an additional competence key flexfield or use an existing, business-group-specific structure. In either case, you identify the structure for creating global competencies on the HR:Global Competence Flex Structure Profile Option. Otherwise, you cannot create global competencies.
Use the System Profile Values window.
See: User Profiles, Oracle HRMS Configuring, Reporting, and System Administration Guide
Step 2: Create Proficiency Rating Scales Optional Step
You can use generic proficiency rating scales to assess competencies during an appraisal.
Use the Rating Scales window.
See: Creating a Rating Scale, Oracle HRMS Workforce Sourcing, Deployment, and Talent Management Guide
Step 3: Create Competencies Optional Step
Create definitions of competencies recognized and required by your enterprise to meet business goals.
Use the Competencies window.
See: Creating a Competency, Oracle HRMS Workforce Sourcing, Deployment, and Talent Management Guide
Step 4: Upload Third-Party Competency Definitions Optional Step
As an alternative or in addition to creating individual competencies, you can upload competencies supplied by third-parties, such as vendors who supply competency definitions for specific lines of business.
See: Uploading Third-Party Competency Information, Oracle HRMS Workforce Sourcing, Deployment, and Talent Management Guide
Step 5: Create Competency Types Optional Step
For ease of management and retrieval, you can group competencies into competency types. You define competency types using the lookup COMPETENCE_TYPE.
Use the Application Utilities Lookups window.
See: Adding Lookup Types and Values, Oracle HRMS Configuring, Reporting, and System Administration Guide
Step 6: Group Competencies into Types Optional Step
Associate individual competencies with one or more defined competency types.
Use the Competence Types window.
See: Grouping Competencies into Types, Oracle HRMS Workforce Sourcing, Deployment, and Talent Management Guide
Step 7: Define Competency Requirements Optional Step
You can define competency requirements for business groups, jobs, organizations, and positions. You can compare an individual's competencies with those required for a job or position, for example, to assist with promotion, training, or compensation plans.
Use the Competence Requirements window.
Defining Competency Requirements, Oracle HRMS Workforce Sourcing, Deployment, and Talent Management Guide
Step 8: Create Worker Competency Profiles Optional Step
A competency is a record of a worker's proficiency in competencies of interest to the enterprise. Users can compare worker competency profiles with the competency requirements of jobs or positions when searching for suitable candidates, for example.
See: Creating a Competency Profile, Oracle HRMS Workforce Sourcing, Deployment, and Talent Management
Qualifications
For each worker, you can record qualifications achieved and educational establishments attended.
Step 9: Create Qualification Types Optional Step
You can define all qualification types your enterprise recognizes.
Use the Qualification Types window.
See: Creating Qualification Types, Oracle HRMS Workforce Sourcing, Deployment, and Talent Management Guide
Step 10: Create Schools and Colleges Optional Step
You can define all schools and colleges that deliver the qualifications your enterprise recognizes, so that users can select an educational establishment when recording a worker's qualifications. Alternatively, users can enter school and college names manually for each qualification.
Note: School and college definitions are available to all business groups; therefore, define them once only.
Use the Schools and Colleges window.
See: Creating Schools and Colleges, Oracle HRMS Workforce Sourcing, Deployment, and Talent Management Guide
Career Paths
Career Paths show the progression opportunities that are available to workers in your enterprise. You can define career paths based on either jobs or positions.
Step 11: Define Career Paths Optional Step
Define the career-progression routes available to workers in your enterprise.
Important: In the US, for AAP-Workforce Analysis reporting use the career path functionality to build the lines of progression for the jobs included in your AAP plans.
Use the Career Path Names and Map Career Paths windows.
See: Defining Career Paths, Oracle HRMS Workforce Sourcing, Deployment, and Talent Management Guide
Step 12: Enter Work Choices for Jobs or Positions Optional Step
You can record requirements, such as work location and work schedule, for jobs and positions.
Use the Work Choices window.
See: Entering Work Choices for a Job or Position, Oracle HRMS Workforce Sourcing, Deployment, and Talent Management Guide
Step 13: Enter Worker Preferences Optional Step
For each worker, you can enter work preferences, such as the preferred work location or working schedule. You can compare this information with job or position requirements when career planning or looking for candidates.
Use the Work Preferences window.
See: Entering Work Preferences, Oracle HRMS Workforce Sourcing, Deployment, and Talent Management Guide
Workforce Intelligence
These implementation steps are required to enable you to view data in the HRMS Discoverer business areas and workbooks. They assume that you already have installed Discoverer. For information on Discoverer installation, see: Discoverer Administration Guide.
Discoverer Workbooks
Follow the steps below to implement Workforce Intelligence Discoverer workbook reports. If you do not complete these steps, reports will be available to you, but they will not display data correctly. You need to perform some of these steps periodically, so that the reports reflect changes in your enterprise data. See: Programs to Populate Workforce Intelligence Discoverer Reports, Oracle HRMS Configuring, Reporting, and System Administration Guide
Set Up and Configure Workforce Required Step s
Workforce is not necessarily a count of the number of employees within your enterprise. Instead, it is a count based on employee assignments and budget measurement type. Calculations depend either on your budget measurement values for assignments, or they use a FastFormula..
Step 1: Set budget measurement values Optional Step
Set budget measurement values for each employee assignment within Oracle Human Resources. Reports and performance measures then calculate workforce using the budget values.
If you do not set a budget measurement value for an assignment, and a Business Group default does not exist, the reports and performance measures either calculate workforce using Oracle FastFormula, or they will not include the workforce for an assignment.
Use the Assignment Budget Values window.
See: Entering Assignment Budget Values, Oracle HRMS Enterprise and Workforce Management Guide
Step 2: Setup the Workforce FastFormula Templates Optional Step
If you want to configure how workforce is counted do not set a budget measurement type and assignment measurement value for an assignment. The reports will then use Oracle FastFormula to calculate workforce.
HRMSi provides two predefined workforce formulas:
-
TEMPLATE_HEAD
-
TEMPLATE_FTE
Use the Formula window.
See: Configuring Workforce Calculations using Oracle FastFormula, Oracle HRMS Configuring, Reporting, and System Administration Guide
Set Up a Currency Conversion Rate Type Required Step s
Step 3: Enter a Currency Conversion Rate Type Required Step
Workforce Intelligence uses the conversion rates set up in the GL Daily Rate window. You can enter a specific conversion rate type for Workforce Intelligence, such as Corporate or Spot.
Use the Oracle Human Resources Table Values window.
See: Entering a Conversion Rate Type, Oracle HRMS Configuring, Reporting, and System Administration Guide
Set Up and Configure Training Hours Optional Step s
Within Oracle Training Administration OTA you can record the duration of a training event using a time period of your choice.
For example, rather than recording an event in hours you might record it in weeks or months. To enable the workbooks to display the number of hours of a training event, a predefined Oracle FastFormula, TEMPLATE_BIS_TRAINING_CONVERT_DURATION, converts your time periods into hours.
OTA is installed with four predefined time periods. If you record the duration of events using these predefined time periods the formula automatically converts them into the following hours:
-
D (Day) = 8 Hours
-
W (Week) = 40 Hours
-
M (Month) = 169 Hours
-
Y (Year) = 2028 Hours
Note: You set up time periods in Oracle Training Administration using the Lookup type FREQUENCY.
Step 4: Amend the Default Training Hours Optional Step
Amend the FastFormula TEMPLATE_BIS_TRAINING_CONVERT_DURATION if you have set up different time periods using the Lookup type FREQUENCY.
Use the Formula window.
See: Amending the Default Training Hours, Oracle HRMS Configuring, Reporting, and System Administration Guide
Step 5: Add Additional Training Time Periods Optional Step
Amend the FastFormula TEMPLATE_BIS_TRAINING_CONVERT_DURATION if the number of hours per time period does not match those of your enterprise.
Use the Formula window.
See: Adding Additional Training Time Periods, Oracle HRMS Configuring, Reporting, and System Administration Guide
Set up Cross Business Group Reporting Optional Step s
If users are using a local security profile they will only be able to see information in a specific business group. The business group is defined in the security profile attached to the responsibility.
For Discoverer reports, you may want to enable users to see data that spans business groups.
Step 6: Provide users with a global security profile Optional Step
If you want to enable cross business reporting, provide users with a global security profile. A global security profile provides cross business group reporting because it does not specify a business group.
Use the Global Security Profile window.
See: Defining a Security Profile, Oracle HRMS Configuring, Reporting, and System Administration Guide
Identify the Reporting Organization Required Step s
HRMS Discoverer workbooks will not run unless the application can identify an organization to report on. If a workbook cannot identify the reporting organization, it will fail to generate certain report parameter lists and will produce the following error message when displaying the report parameter page:
“No values were found for the parameter Organization whilst attempting to build the list of values. To run this report your system must have the parameter Organization set up. Please contact your system administrator.”
The application identifies an organization through a business group. You must therefore ensure that you assign a business group correctly to report users. How you assign the business group depends on which security model you implement and whether you are using a local or global security profile. See the options below.
Step 7: Set the Profile Option HR: Security Optional Step
If you have implemented the standard HRMS security model, with a local security profile, you must set the profile option HR: Security to the business group you want to report on.
The reports identify the business group through the profile option HR: Business Group. The application automatically sets this profile option to the value in the HR: Security profile option.
Set up the business group in the profile option HR: Security. Use the System Profile Values window.
See: System Profile Values Window , Oracle E-Business Suite System Administrator's Guide - Security
Step 8: Set the Profile Option HR: Business Group Optional Step
If you have implemented the standard HRMS security model, with a global security profile, the HR: Business Group profile option is not set automatically.
Set the profile option HR: Business Group at responsibility level to the business group that you want to report on.
Use the System Profile Values window.
See: Defining Preferences with User Profile Options, Oracle E-Business Suite System Administrator's Guide - Security
Step 9: Associate a Business Group with a Security Profile Optional Step
If you have implemented the Security Groups Enabled security model, the HR: Business Group profile option is not used. You associate a business group with a security profile.
Use the Assign Security Profile window.
See: Assigning Security Profiles, Oracle HRMS Configuring, Reporting, and System Administration Guide
Restrict Discoverer Workbook Access Required Step s
Step 10: Grant Access to Discoverer Business Areas Required Step
Grant access privileges to the Discoverer business area to determine which workbooks users can create or view.
Use Oracle Discoverer Administration Edition.
See: Grant Business Area Access, Oracle HRMS Configuring, Reporting, and System Administration Guide
Check the Vacancy Status Options Required Step s
Step 11: Check the Vacancy Status Options Required Step
To ensure the reports that cover vacancies return accurate results, you need to ensure that users close vacancies by using the status of CLOSED. You may have to obsolete an old vacancy status option that results in the status of C.
Use the Application Utilities Lookups window.
See: Check the Vacancy Status Options, Oracle HRMS Configuring, Reporting, and System Administration Guide
Populate Summary Tables Required Step s
To ensure your HRMS Discoverer workbooks run correctly and efficiently, you need to run concurrent programs to populate summary tables with your hierarchy data and workforce measurement values.
For a full discussion of these concurrent programs, and when you need to run them, see: Programs for Populating Workforce Intelligence Discoverer Reports, Oracle HRMS Configuring, Reporting, and System Administration Guide
Step 12: Populate the Organization Hierarchy Summary Table Required Step
All reports that use organization hierarchy gather information from the Organization Hierarchy Summary table. Populate this summary table with your organization hierarchy data. The table ensures that you are getting the best possible performance from your reports.
To populate the summary table, run the concurrent program HRI Load All Organization Hierarchy Versions.
Use the Submit Requests window.
See: Populating the Organization Hierarchy Summary Table, Oracle HRMS Configuring, Reporting, and System Administration Guide
Step 13: Populate the Supervisor Hierarchy History Table Required Step
All reports that use supervisor hierarchy gather information from the Supervisor Hierarchy Summary table. Populate this summary table with your supervisor hierarchy data. The table ensures that you are getting the best possible performance from your reports.
To populate the summary table, run the concurrent program HRI Load All Supervisor Hierarchies.
Use the Submit Requests window.
See: Populating the Supervisor Hierarchy History Table, Oracle HRMS Configuring, Reporting, and System Administration Guide
Step 14: Populate the Workforce Measurement Value History Table Required Step
Many reports use Workforce Measurement Values (WMVs). WMVs currently include headcount and full-time equivalent (FTE) assignment budget values.
Run the concurrent program HRI Load Workforce Measurement Value History to populate the Workforce Measurement Value History table with the WMVs used by your reports.
Use the Submit Requests window.
See: Populating the Workforce Measurement Value History Table, Oracle HRMS Configuring, Reporting, and System Administration Guide
Step 15: Populate the Generic Hierarchy Summary Table Required Step
Some US specific Discoverer workbooks use a 'Vets, EEO, AAP, OSHA, Multi Work Sites' hierarchy. They require information about the current generic hierarchy.
Run the concurrent program HRI Load All Generic Hierarchy Versions to calculate and collect the required data.
Use the Submit Requests window.
See: Populating the Generic Hierarchy Summary Table, Oracle HRMS Configuring, Reporting, and System Administration Guide
Step 16: Collect Organization Hierarchy Structures Optional Step
The Organization Rollup – Current folder in the Discoverer End User Layer uses organization hierarchies held in the HRI_ORG_PARAMS and HRI_ORG_PARAM_LIST tables. If you build Discoverer reports using the Organization Rollup – Current folder, you must populate these tables with your organization hierarchies.
To populate the tables, run the concurrent program BIS Load Organization Hierarchy Summary Table.
See: Collecting Organization Hierarchy Structures, Oracle HRMS Configuring, Reporting, and System Administration Guide
HR Information Systems
Reports
Step 1: Use Standard Reports or Write New Reports Optional Step
A number of standard reports are supplied with Oracle HRMS. These reports have been written using Oracle Reports V.2 and registered as concurrent programs with the Standard Requests Submission (SRS) feature of Oracle Applications.
You can use these Standard Reports or write your own reports and register these as additional reports which users can request from the Submit a New Request window.
Step 2: Register Reports as Concurrent Programs Optional Step
After you have written your new reports and saved them in the correct subdirectory, you must register the report as a concurrent program. You also register the parameters which can be submitted with the report. For example, you may have written a report to display personal details and you want to submit employee name to limit the output to include one person at a time.
Use the Concurrent Programs window.
See: Concurrent Programs Window, Oracle Applications System Administrator's Guide
Step 3: Define Report Sets Optional Step
You can define sets of Reports:
-
To restrict user access to specific reports.
A set of reports can be linked to a Responsibility.
-
To simplify requesting a report
You can run a report set in one request, rather than a request for each report.
Use the Request Set window.
Standard Letter Generation
You can use standard letters in HRMS to help you to manage your enterprise's recruitment or enrollments, for example. You do this by issuing standard letters to applicants or students, triggered by changes in assignment or enrollment status.
Oracle HRMS provides you with three different methods to create standard letters:
-
Method 1 Concurrent Processing using Word Processors, Oracle HRMS Configuring, Reporting, and System Administration Guide
-
Method 2: Concurrent Processing using Oracle Reports, Oracle HRMS Configuring, Reporting, and System Administration Guide
-
Method 3: Create Mail Merge Letters using Web ADI, Oracle HRMS Configuring, Reporting, and System Administration Guide
Method 1 - Concurrent Processing using Word Processors
You can create standard letters using Multimate, WordPerfect or Microsoft Word.
Step 4: Plan Standard Letter Requirements Optional Step
You need to identify the database information to include in the letters.
See: Planning Standard Letter Requirements, Oracle HRMS Configuring, Reporting, and System Administration Guide
Step 5: Write a SQL*Plus Script Optional Step
Oracle HRMS supplies you with SQL*Plus scripts as templates for extracting database information for standard letters. You can copy the SQL*Plus script templates and modify them to create the standard letters you require.
See: Writing a SQL*Plus Script for MultiMate or WordPerfect, Oracle HRMS Configuring, Reporting, and System Administration Guide
See: Writing a SQL*Plus Script for Microsoft Word, Oracle HRMS Configuring, Reporting, and System Administration Guide
Step 6: Register the SQL*Plus Script Optional Step
Register your SQL*Plus program with Oracle HRMS. You register your program so that you can run it as a concurrent program. Name the file PERWP*** (or OTAWP***). You must use this prefix for the system to recognize it as a type of letter.
Use the Concurrent Programs window.
See: Registering the SQL*Plus Script, Oracle HRMS Configuring, Reporting, and System Administration Guide
Step 7: Link the SQL*Plus Script to the Letter Optional Step
Link your SQL*Plus script with a letter and one or more statuses. In Oracle Human Resources, you can link one or more applicant assignment statuses with each recruitment letter. A request for the letter is then created automatically when an applicant is given an associated assignment status. For example, you can link your standard recruitment rejection letter to the status Rejected so that the letter is triggered when you set an applicant's assignment status to Rejected
Use the Letter window.
See: Linking the SQL*Plus Script with aLetter, Oracle HRMS Configuring, Reporting, and System Administration Guide
Step 8: Writing a Skeleton Letter Optional Step
Write a skeleton letter using your word processor. Include the appropriate merge codes from the data source for the word processor you are using.
See: Writing a Skeleton Letter, Oracle HRMS Configuring, Reporting, and System Administration Guide
Step 9: Requesting Letters Optional Step
When you, or other users, set the status for an applicant or enrollment that triggers your standard letters, Oracle HRMS creates a letter request automatically, with the status of Pending. It also adds the applicant's or student's name to the request. You can view the pending request and names through the Request Letter window.
Use the Request Letter window.
See: Requesting Letters/Running the Report, Oracle HRMS Configuring, Reporting, and System Administration Guide
Step 10: Merging the Data Files Optional Step
You now need to merge the data in the Data File with your skeleton letters.
See: Merging the Data File with the Standard Letter, Oracle HRMS Configuring, Reporting, and System Administration Guide
Method 2 - Concurrent Processing using Oracle Reports
You can create a report for each letter using Oracle Reports, or another tool of your choice. The report contains the skeleton letter text and Select statements specifying the data to be extracted from the Oracle database.
Step 11: Plan Standard Letter Requirements Optional Step
You need to identify the database information to include in the letters.
See: Planning Standard Letter Requirements, Oracle HRMS Configuring, Reporting, and System Administration Guide
Step 12: Write and Register the Report Optional Step
You now need to write and register the report.
See: Writing and Registering the Report, Oracle HRMS Configuring, Reporting, and System Administration Guide
Step 13: Link the Report with a Letter Optional Step
You need to link your report with a letter and one or more statuses. In Oracle Human Resources, you can link one or more applicant assignment statuses with each recruitment letter. A request for the letter is then created automatically when an applicant is given an associated assignment status. In Oracle Training Administration, you can link one or more enrollment statuses with each enrollment letter. A request for the letter is then created automatically when an enrollment is given an associated status.
Use the Letter window.
See: Linking the Report With a Letter, Oracle HRMS Configuring, Reporting, and System Administration Guide
Step 14: Run the Report Optional Step
When you, or other users, set the status for an applicant or enrollment that triggers your standard letters, Oracle HRMS creates a letter request automatically, with the status of Pending. It also adds the applicant's or student's name to the request. You can view the pending request and names through the Request Letter window.
Then, when you change the letter request from Pending to Requested, Oracle HRMS runs the report that you created.
Use the Request Letter window.
See: Registering Letters/Running the Report, Oracle HRMS Configuring, Reporting, and System Administration Guide
Method 3 Create Mail Merge Letters Using Web ADI
Step 15: Create Mail Merge Letters Optional Step
Define Web ADI integrators and layouts and set up template letters.
See Creating Mail Merge Letters Using Web ADI, Oracle HRMS Configuring, Reporting, and System Administration Guide
People Management Templates
Step 16: Extend the Checklist Lookup Values Optional Step
You can add your own values to the supplied list of checklist items and statuses to be included in a template.
Define values for the CHECKLIST_ITEM and CHECKLIST_STATUS Lookup Types.
Define values for BUDGET_MEASUREMENT_TYPES
Use the Application Utilities Lookups window.
See: Adding Lookup Types and Values, Oracle HRMS Configuring, Reporting, and System Administration Guide
Step 17: Write Formulas for Templates Optional Step
You can use formulas to configure the people management templates in the following ways:
-
Template Validation Formula
-
Template Information Formula
-
People Management Message Formula for the Assignment Field
-
People Management Message Formula for the Message Tokens
Use the Formulas window.
See: Writing Formulas for Templates, Oracle HRMS FastFormula User Guide
Step 18: Configure Templates Optional Step
You can use the People Management Configurator to create templates for your users to use. We recommend that you use one of the supplied templates as a basis for your configured version.
Use the People Management Configurator.
See: Using the People Management Configurator, Oracle HRMS Configuring, Reporting, and System Administration Guide
Step 19: Set up Notification Messages Optional Step
You can setup additional notification messages to be used with the people management templates.
Use Oracle Workflow
See: Notification Messages Issued from Templates Forms, Oracle HRMS Configuring, Reporting, and System Administration Guide
Oracle HRMS Configuration
Step 20: Define Elements and Distribution Sets Optional Step
Select element classifications or individual elements to define a set. There are three types of set:
-
Customization set
-
Run set
-
Distribution set
Use the Element and Distribution Set window.
See: Defining an Element or Distribution Set, Oracle HRMS Compensation and Benefits Management Guide.
Step 21: Define Configured Version of a Window Optional Step
Form Customization lets you restrict the types of information a user can access in a specific window.
You can define your own window titles for any window configuration option. Remember that the user guides and the online help use the default window names to identify windows.
You can call the configured window in two ways:
-
Define a customized node in a task flow
-
Add the customization as an argument to the menu function which calls the window
Use the Form Customization window.
See: Configuring a Window With Customform, Oracle HRMS Configuring, Reporting, and System Administration Guide
Step 22: Add Configured Window to a Menu or a Task flow Optional Step
You must add your configured windows to a menu or task flow.
See: Adding Configured Windows to a Menu or a Task Flow, Oracle HRMS Configuring, Reporting, and System Administration Guide.
Step 23: Restrict Access to Query-Only Mode Optional Step
You can restrict access to query-only mode for an individual form.
See: Restricting Access to Query-Only Mode, Oracle HRMS Configuring, Reporting, and System Administration Guide.
Step 24: Change the Default National Address Style Optional Step
The Personal Address Information descriptive flexfield holds the different national address styles. Configure them from the Descriptive Flexfield Segments window.
See: Changing Default National Address Styles, Oracle HRMS Configuring, Reporting, and System Administration Guide
If Oracle payroll is not installed (HR: User Type system profile option set to HR User), the application displays the default United States International Style Address window. You use this window to enter all primary and secondary addresses for employees and their contacts at Oracle HR sites. You can also enter addresses for all the US contiguous states, Military or US Territories, as well as international addresses.
See: Entering People's Addresses at Sites without Oracle Payroll, Oracle HRMS Enterprise and Workforce Management Guide
If you are using the National Finance Center as a provider, you must also attach value sets to the personal address information descriptive flexfield segments.
See: Setting up the National Finance Center (NFC) Interfaces, Oracle HRMS Configuring, Reporting, and System Administration Guide
Step 25: Review and Update Person-Name Formats Optional Step
HRMS supplies a format definition for a person's full name and other name definitions for use in custom code. You can change the supplied person-name format definitions and create additional format definitions to suit enterprise requirements.
See: Person-Name Formats, Oracle HRMS Workforce Sourcing, Deployment, and Talent Management Guide
Step 26: Use Parameters for HRMS Form Functions to Hide Sensitive Data Optional Step
You can prevent sensitive data from appearing on the Enter a person window by using parameters for HRMS window functions.
See: Using Parameters for HRMS Form Functions, Oracle HRMS Configuring, Reporting, and System Administration Guide
Task Flows
A task flow defines the selection of windows you want to use when performing a specific task. These can be arranged in sequence or as branched groups of Nodes, and you can include configured windows as nodes in your task flow.
Warning: Do not use apostrophes (') or percent (%) symbols in task flow names or task flow node names.
You can create task flows using:
-
Forms, Oracle HRMS Configuring, Reporting, and System Administration Guide
-
Workflow, Oracle HRMS Configuring, Reporting, and System Administration Guide
Create Task Flows Using Forms
Step 27: Define Task Flow Nodes Optional Step
All of the task flow windows provided with Oracle HRMS have nodes predefined for them. You can define new task flow nodes to provide different versions of these windows. For example, if you wanted to use CustomForm on a specific node in a task flow.
Use the Define Task Flow Nodes window.
See: Defining Task Flow Nodes, Oracle HRMS Configuring, Reporting, and System Administration Guide
Step 28: Define Task Flows Optional Step
Arrange the nodes of your task flows in sequential or branched groups
Use the Task Flow window.
See: Defining Task Flows, Oracle HRMS Configuring, Reporting, and System Administration Guide
Create Task Flows Using Workflow
Step 29: Create a Top Level Process Optional Step
You must define a top level process for each task flow. The top level process can contain sub processes, but not any other top level processes.
You use the Process Diagrammers within Oracle Workflow to create your task flows. You do this by adding and connecting the windows you want to appear.
You must create a top level process, sub processes are optional.
See: Creating a Top Level Process, Oracle HRMS Configuring, Reporting, and System Administration Guide
Step 30: Create Sub Processes Optional Step
You can group a logical set of task flow windows into a sub process, which can then be used by several top level processes. This simplifies process modelling. Each sub process can contain other sub processes. There are two rules to note regarding sub processes:
-
A sub process cannot be defined as runnable.
-
When you use a sub process in another process, you must connect the sub process to the Top Node window.
See: Creating Sub Processes, Oracle HRMS Configuring, Reporting, and System Administration Guide
Step 31: Create Button Labels Optional Step
You can enter the label you want to appear on the task flowed windows, such as Photo (for the Picture window), and such. Each task flow window activity has an attribute called Button Label. Use this attribute to override the default button label for a window and to define an access key (or keyboard shortcut).
See: Creating Button Labels, Oracle HRMS Configuring, Reporting, and System Administration Guide
Step 32: Position Button Display Optional Step
You can position the display order of buttons on the window. For example, you might want the first button to display the Picture window.
See: Positioning Button Display, Oracle HRMS Configuring, Reporting, and System Administration Guide
Step 33: Identify Windows or Blocks to Display Optional Step
If you are creating task flows using the combined People and Assignment window, complete this step, otherwise skip this step.
For most task flow windows, you must display the first block of the window on entry. However, when you use the Combined People and Assignment window in a task flow, you must specify whether to display the People window (or block) or the Assignment window on entry.
See: Identifying Windows or Blocks to Display, Oracle HRMS Configuring, Reporting, and System Administration Guide
Step 34: Identify Configured Forms to Include in the Task Flow Optional Step
If you have created a configured version of a window, you can use it in the task flow. If not, you can skip this step.
See: Identifying Configured Forms to Include in the Task Flow, Oracle HRMS Configuring, Reporting, and System Administration Guide
Step 35: Verify and Save the Workflow Optional Step
When you have completed the task flow definition within Oracle Workflow, use the Workflow Verify function to check that your workflow conforms to Oracle Workflow modeling rules. When you have successfully verified the Workflow, save it to the HRMS database.
See: Verifying and Saving the Workflow, Oracle HRMS Configuring, Reporting, and System Administration Guide
Step 36: Generate a Task Flow From Oracle Workflow Optional Step
After modelling a task flow in Oracle Workflow and saving it to the database, you must generate task flow definitions.
Use the Define Task Flow window.
See: Generating a Task Flow From Oracle Workflow, Oracle HRMS Configuring, Reporting, and System Administration Guide
Menus
Step 37: Define Menu Functions Optional Step
Menus are composed of submenus and functions and all Oracle Applications are supplied with default functions and menus to give you access to all of the available windows.
Warning: You should not modify the default functions and menus supplied with the system. On upgrade, these defaults will be overwritten.
If you want to add window configuration options or task flows you should define your own menus.
Use the Form Functions window.
See: Defining Menu Functions, Oracle HRMS Configuring, Reporting, and System Administration Guide
Step 38: Define Menus Optional Step
The supplied menus give you access to all of the available submenus. However, a number of seeded functions are not enabled on these menus. You need to add them for the responsibilities that should have access to these functions:
Use the Menus window.
See: Defining Menus, Oracle HRMS Configuring, Reporting, and System Administration Guide
Step 39: Disable the Multiple Windows Feature Optional Step
In most Oracle Applications, you can open multiple windows from the Navigator window without closing the window you already have open. HRMS, however, does not support Multiform functionality.
Important: You must disable this feature on menu structures that access Oracle HRMS windows.
See: Disabling Multiple Windows, Oracle HRMS Configuring, Reporting, and System Administration Guide
User Security
Any system that holds human resource and payroll information must be secured against unauthorized access. To reach employee information you need the correct security clearance.
The responsibility for defining and maintaining the internal security of your system is usually given to your system administrator.
Defining Security for HRMS Users
Defining the access limits of each user is a multi-stage process which defines which records a user can see and which forms and windows they can see and use.
There are two security models to enable you to set up the right type of security for your enterprise:
-
Set up standard security if your enterprise sets up a different responsibility for each business group.
-
Security Groups Enabled security model
Use Security Groups Enabled security if your enterprise wants to enable many business groups for one responsibility. This type of security is most commonly used by Service Centers.
See Defining Security for HRMS Users, Oracle HRMS Implementation Guide
Defining Security for Reporting Users
You can also create reporting users who have read only access to data. This can be useful if you want to permit access to the data from another system.
See: Defining Security for Reporting Users, Oracle HRMS Implementation Guide.
Defining Security for HRMS Users (Optional)
Step 40: Set up the Enable Security Groups option for your Security Model
-
If you are using Standard HRMS security, ensure that the Enable Security Groups profile option is set to No at site and application level.
-
If you are using Security Groups Enabled security, ensure that the Enable Security Groups profile option is set to Yes at the application level.
Important: Once you have changed to Security Groups Enabled Security you cannot revert to the Standard Security model.
Use the System Profiles Value window
See: System Profile Values Window, Oracle Applications System Administrator's Guide
Step 41: (Security Groups Enabled Model only) Run the Enable Multiple Security Group Process
If you are using the Security Groups Enabled model, you must run the Enable Multiple Security Group process to set up Oracle HRMS to use security groups.
Use the Submit a New Request window
See: Submitting a Request, Oracle Applications User's Guide
Step 42: Define a Security Profile
Use the Security Profile window (to give access to a single business group) or the Global Security Profile window (to allow users to access records from more than one business group).
See: Defining a Security Profile, Oracle HRMS Configuring, Reporting, and System Administration Guide
Step 43: Ensure Required Functions or Menus are Set Up
This is required for the responsibility. For menu functions calling configured forms or task flows, you must enter a parameter in the Parameter field of the Form Functions window.
See: Defining Menu Functions, Oracle HRMS Configuring, Reporting, and System Administration Guide
Step 44: Ensure Required Request Group is Set Up
You can define the groups of standard reports and processes that a user can run from the Submit a New Request window. Every responsibility can have access to one request group.
Use the Request Group window.
See: Defining Menu Functions, Oracle HRMS Configuring, Reporting, and System Administration Guide
See: Request Groups Window, Oracle Applications System Administrator's Guide
Step 45: Define a Responsibility
You need to define a responsibility.
Use the Responsibilities window.
See: Responsibilities Window, Oracle Applications System Administrator's Guide
Step 46: Set the User Profile Option Values for Responsibility
Set the HR User Profile Options for the new responsibility.
You must set up the following:
-
HR: User Type
Use this profile option to limit field access on windows shared between Oracle Human Resources and Oracle Payroll.
-
HR:Cross Business Group
Set this profile option to Yes if you want users to be able to view some information across all business groups in your enterprise.
For details of the information you can make available to users across business groups, see User Profiles, Oracle HRMS Configuring, Reporting, and System Administration Guide
-
HR: Security Profile
-
If you are using the Standard Security model, enter the security profile for the responsibility. This must be set up at responsibility level, otherwise the default view-all security profile is used. Using Standard HRMS security you can only set up one security profile for a responsibility.
-
If you are using the Security Groups Enabled security model, do not set up or amend the HR: Security Profile option using the System Profile Values window. To set up or change this profile option use the Assign Security Profile window.
You can set also set up other User Profile Options.
-
Use the System Profile Values window.
See: System Profile Values Window, Oracle Applications System Administrator's Guide
Step 47: Associate a Responsibility With a Set of Help Files
Oracle Applications Help for HRMS defaults to Global help, but you can associate a responsibility with a set of help files for a localization, such as Canada, US or UK, or for a verticalization such as Oracle Federal HRMS. You do this by setting the user profile Help_Localization_Code.
See: User Profiles, Oracle HRMS Configuring, Reporting, and System Administration Guide
In addition to associating a responsibility with a localization or a verticalization you can also specify that a particular responsibility should have access to a configured subset of the localized or verticalized help files.
See: Customizing Oracle Applications Help, Oracle Applications System Administrator's Guide
Step 48: Create Usernames and Passwords
-
If you are using the Standard Security model, you need to create usernames and passwords and link responsibilities to users.
-
If you are using the Security Groups Enabled security model, you need to create usernames and passwords. Do not link responsibilities and security groups (business groups) to users in the Users window for HRMS; instead, use the HRMS Assign Security Profile window.
Important: If you do enter a responsibility and security group in this window when using Security Groups Enabled security, you still need to use the Assign Security Profile window, to link your user to a responsibility and security profile. If you do not use the Assign Security Profile window, the default view-all security profile is used and your user will be able to see all records in the business group.
Use the Users window.
See: Users Window, Oracle Applications System Administrator's Guide
Step 49: (Security Groups Enabled Model only) Assign Security Profiles
If you are using the Security Groups Enabled model, associate a security profile with a user, responsibility and business group.
Important: You cannot use the HRMS Assign Security Profile window to link responsibilities to users if you are setting up Standard Security.
Use the Assign Security Profile window.
See: Assigning Security Profiles, Oracle HRMS Configuring, Reporting, and System Administration Guide
Step 50: Run Security List Maintenance Process (PERSLM)
Oracle HRMS uses the Security List Maintenance process to generate the lists of organizations, positions, payrolls, employees, contingent workers, and applicants that each security profile can access.
Important: When you initiate the Security List Maintenance process you must enter the resubmission interval to run the process every night
You must do this so that the system will automatically update the lists with the data changes you make every day.
If a power or computer failure should disrupt this process, you can initiate it manually from the Submit a New Request window.
When this process has completed successfully you can sign on to the system using the new username and responsibility.
Use the Submit a New Request window
See: Submitting a Request, Oracle Applications User's Guide
Defining Security for Reporting Users (Optional)
Step 51: Create a New Reporting User Oracle ID
If you want reporting users to have the same restricted access to records as your online users, ask your ORACLE Database Administrator to create a new ORACLE User ID.
Reporting Users have read only access to data. This can be useful if you want to permit access to the data from another system.
Note: You need to inform Reporting Users of their Reporting Username and Password.
Step 52: Register the New Oracle ID
Register the new ORACLE ID with Application Object Library.
Use the Register window.
Step 53: Define a Security Profile
Using a view-all responsibility, you can define security profiles in the Security Profile window.
Use the Security Profile window.
See: Defining a Security Profile, Oracle HRMS Configuring, Reporting, and System Administration Guide
Step 54: Run Generate Secure User Process (SECGEN)
The Generate Secure User process will grant permissions to the new Reporting User ORACLE ID. Until you run this process, reporting users cannot access Oracle HRMS data using this security profile.
-
Select Generate Secure User.
-
In the Parameters window, enter the security profile you created for the ORACLE ID.
-
Submit your request.
A concurrent request ID appears in the ID field. You can check the progress of your request on the View Concurrent Requests window.
Use the Submit a New Request window
See: Submitting a Request, Oracle Applications User's Guide
Web Applications Desktop Integrator (Web ADI)
Step 55: Set Up Web ADI Optional Step
You can set up Web Applications Desktop Integrator (Web ADI) to export information from your Oracle HRMS database to desktop applications, for example, spreadsheets.
See Implementing Web ADI for Use with Oracle HRMS, Oracle HRMS Configuring, Reporting, and System Administration Guide
See: Upgrade Information for Converting from ADE to Web ADI, Oracle HRMS Configuring, Reporting, and System Administration Guide
Audit Requirements
Step 56: Turn on Auditing Optional Step
To turn on Auditing, set the AuditTrail:Activate profile option to Yes at Site or Application level.
Use the System Profile Values window.
See: System Profile Values Window, Oracle Applications System Administrator's Guide
Turning Audit on has no noticeable effect on the performance of the system and users will not be aware of any extra delay in committing their transactions.
Step 57: Estimate File Sizing and Management Needs Optional Step
Whenever you choose to audit the actions of users of the system you are deciding to keep the details of all the transactions which take place. This will include before and after details as well as the details of who made the change and when.
Warning: In normal use the auditing of data can soon generate large volumes of audit data, which even when stored in a compressed format will continue to grow in size until you reach the limits imposed by your environment. If you reach the limits during active use then users will be unable to use the system until you remedy the problem.
You are strongly advised to consider the scope of your audit activities and how you will use the data you accumulate. Also you should consider how often you will report on the audit data, and when you will archive and purge your audit data.
If you need more advice on this you should contact your Oracle Support representative.
Step 58: Define Audit Installations Optional Step
If you have installed more than one Oracle Application you can audit across multiple installations. For Oracle HRMS you should enable auditing for the HR user and the APPLSYS user.
Use the Audit Installations window.
See: Audit Installations Window, Oracle Applications System Administrator's Guide
Step 59: Define Audit Tables and Columns Optional Step
With Oracle Applications you can define the level of detail you want to audit. You define the individual fields of each record that you want to audit.
-
Query the Table you want to audit
-
Enter the columns you want to audit for that table
Use the Audit Tables window.
See:Audit Tables Window, Oracle Applications System Administrator's Guide
Step 60: Define Audit Groups Optional Step
You can define one or more Audit Groups for your installation. You might find this useful if you have more than one Oracle Application installed.
Use the Audit Groups window.
See: Audit Groups Window, Oracle Applications System Administrator's Guide
Step 61: Run AuditTrail Update Tables Process and AuditTrail Update Datetracked Tables Process Optional Step
To start the AuditTrail activity you must submit the AuditTrail Update Tables Process for all tables, and the AuditTrail Update Datetracked Tables Process for all datetracked tables.
Use the Submit a New Request window.
See: Submitting a Request, Oracle Applications User's Guide
Modification of US Federal Workflow
Oracle Federal HR has predefined workflow attributes for several processes. You can customize the attributes for the following Item Types as follows:
-
GHR Personnel Action
If you route an action at least once or save it to your workflow worklist, the application does not send an FYI Notification when it successfully updates an action. (An FYI Notification is a message in your worklist that informs you of an action taken by the application.)
You can customize the workflow process to have the application send an FYI Notification to the person who performs the Update to HR, or to the person who performs the update to HR and the Approver.
-
GHR Within Grade Increase
The application does not send an FYI Notification to the Personnel Office (POI) worklist when it successfully updates an Automatic Within Grade Increase (WGI) action. You can customize the workflow process to have the application send a Notification to the POI worklist.
When an Automatic WGI is processed for an employee, the action is sent to the POI worklist for approval. You can customize the workflow process to require a Supervisor's approval before it is sent to the POI for approval.
-
US Federal HR - FESI
If you have implemented the product to use the National Finance Center (NFC) as a provider, the application notifies you when the application generates the position or personnel NFC extract or when there is an error. If do not want to receive a notification, for example, unless there is an error, you can change the Notification Type attribute.
See: Copying the Original Workflow Item Type, Oracle HRMS Configuring, Reporting, and System Administration Guide
See: Changing a Workflow Attribute, Oracle HRMS Configuring, Reporting, and System Administration Guide
See: Setting up the National Finance Center (NFC) Interfaces, Oracle HRMS Configuring, Reporting, and System Administration Guide
Step 62: Configure GHR Personnel Action: Notify Update HR User
When a personnel action is successfully updated to the HR database, the application does not send a Notification to the person who last updated the action to the HR database. If you want this person to receive an FYI Notification, change the default attribute from No to Yes.
Use Workflow to change this attribute.
See: Changing a Workflow Attribute, Oracle HRMS Configuring, Reporting, and System Administration Guide
Step 63: Configure GHR Personnel Action: Notify Only Update HR User
When a personnel action is successfully updated to the database, the application sends a Notification to the last person who updated the action to the HR database. If you want the Approver to also receive the Notification, change the default attribute from Yes to No.
Use Workflow to change this attribute.
See: Changing a Workflow Attribute, Oracle HRMS Configuring, Reporting, and System Administration Guide
Step 64: Configure GHR Within Grade Increase: Use Personnel Office Only
When an Automatic WGI action is processed, the application sends a Notification to the Personnel Office (POI). If you want the supervisor to receive a Notification so that he or she can approve the action before it's sent to the Personnel Office, change the default attribute from Yes to No.
Use Workflow to change this attribute.
See: Changing a Workflow Attribute, Oracle HRMS Configuring, Reporting, and System Administration Guide
Step 65: Configure GHR Within Grade Increase: Notify Personnel Office (POI) of Update to HR Success
When an Automatic WGI action is successfully updated to the HR database, the application does not send a Notification to the POI. If you want the POI to receive a Notification, change the default attribute from No to Yes.
Use Workflow to change this attribute.
See: Changing a Workflow Attribute, Oracle HRMS Configuring, Reporting, and System Administration Guide
US Federal Workflow Routing
You can route forms such as the Request for Personnel Action and the Position Description to a variety of destinations including individuals, groupboxes, or routing lists. You use the Routing Groups and Groupboxes and Routing Lists maintenance forms to set up your routing groups, groupboxes, and routing lists.
Step 66: Define Your Routing Group
Use the Routing Group and Groupbox Details window or the Routing Group and Routing List Details window.
Arrange your Routing Groups so that users who need to exchange information are part of the same Routing Group. You can assign users to more than one Routing Group, but once an action is initiated within a Routing Group, you can only route it to other members of the same Routing Group, not to a different Routing Group.
See: Setting Up Routing Groups, Oracle HRMS Configuring, Reporting, and System Administration Guide
Step 67: Assign Users to Routing Groups and to Roles within that Routing Group
Roles are designations that describe each member's workflow activities within a Routing Group. You can assign multiple roles to each user in a Routing Group.
Use the People Extra Information window.
See: Adding a User to a Routing Group, Oracle HRMS Configuring, Reporting, and System Administration Guide
Step 68: Set Up Groupboxes and Add Users to Them
Groupboxes are a convenient way to pool work for multiple users, so that any user assigned to the Groupbox can process the action. Use the Routing Group and Groupbox Details window.
See: Setting up Groupboxes, Oracle HRMS Configuring, Reporting, and System Administration Guide
Step 69: Set Up Routing Lists and Add Users to Them
A routing list is a predefined list of routing destinations. The list defines the order in which a person or groupbox receives a workflow notification.
Use the Routing Group and Routing List Details window.
See: Setting up Routing Lists, Oracle HRMS Configuring, Reporting, and System Administration Guide
Define the Personnel Office ID Information Required Step s
Step 70: Define a Routing Groupbox
The Personnel Office ID (POI) groupbox is used as a standard groupbox, a central routing point for RPAs, a destination where the application sends actions that have errors (RPAs, Mass Action and Auto WGI processes).
To have the application route personnel actions to the Personnel Office, you need to define a Routing Group and Groupbox for each Personnel Office ID that your agency uses. You must also add one member who will be the Approving Official.
Use the Routing Group and Groupbox Details window.
See: Setting up Routing Groups, Groupboxes, and Routing Lists, Oracle HRMS Configuring, Reporting, and System Administration Guide
Step 71: Complete the Personnel Office Information
For each POI that your agency uses, you must complete the POI groupbox information on the Personnel Office ID Federal Maintenance Form by entering the Groupbox Name and the Approver's Full Name. The application enters the Approving Officer's name, working title, and approval date on the Notifications of Personnel Action for all mass actions. After you set up the groupbox for the Personnel Office ID, you enter the Approving Officer's name and enter the groupbox name that you set up for the Personnel Office.
Use the Personnel Office Identifiers window.
See: Maintaining Personnel Office ID Information, Oracle HRMS Configuring, Reporting, and System Administration Guide
Define a Groupbox Required Step s
Step 72: Define a Groupbox for the Workflow Administrator
If there's an error when routing a Within Grade Increase, Position Description, or other personnel action, and the application does not find a designated groupbox, such as a Personnel Office groupbox, it sends the notification to the Workflow Administrator's groupbox.
Use the Routing Group and Groupbox Details window.
See: Setting up a Workflow Administrator's Groupbox, Oracle HRMS Configuring, Reporting, and System Administration Guide
Agency Legal Authority Codes, Remarks, and Insertion Data
If your agency has agency-specific Legal Authority Codes (LACs), Remarks, and accompanying insertion data, you can add them and associate them to Nature of Action Codes (NOACs).
Step 73: Add Agency LACs
You can add new LACs or update existing ones.
Use the Lookup Values window, GHR_US_LEGAL_AUTH_CODE.
See: Defining Legal Authority Codes, Oracle HRMS Configuring, Reporting, and System Administration Guide
Step 74: Associate Agency LACs to NOACs
After adding a LAC, you can associate it to a NOAC. You can associate a single LAC to more than one NOAC, as well as several LACs to one NOAC.
Use the NOA Legal Authorities Federal Maintenance window.
See: Associating Legal Authority Codes to NOACs, Oracle HRMS Configuring, Reporting, and System Administration Guide
Step 75: Add Remark Codes and Descriptions
If your agency maintains agency-specific Remarks, you can add and update their Codes and Descriptions.
Use the Remarks Codes and Descriptions Federal Maintenance window.
See: Adding and Deleting Remarks, Oracle HRMS Configuring, Reporting, and System Administration Guide
Step 76: Associate Remarks and NOACs.
You can associate several Remarks to a single NOAC, as well as a single Remark to several NOACs.
If you are using the National Finance Center (NFC) as a provider, you must make the Remarks listed by NFC required.
Use the Remark Codes and Descriptions Federal Maintenance window.
See: Associating Remarks to NOACs, Oracle HRMS Configuring, Reporting, and System Administration Guide
See: Setting up the National Finance Center (NFC) Interfaces, Oracle HRMS Configuring, Reporting, and System Administration Guide
Step 77: Enter Insertion Data for Remarks and Legal Authority Codes
The product includes descriptive flexfields for NOAC, Remark, and Legal Authority descriptions. These flexfields have five context-sensitive segments for insertion values that correspond to the underscores in the descriptions.
Note: Underscores represent insertion data only. Make sure that your Remarks, Legal Authority Codes, or NOACs do not contain underscores unless they have corresponding insertion segments.
Adding insertion data is a task for the application administrator.
Use the Descriptive Flexfield Segments window.
See: Insertion Data, Oracle HRMS Configuring, Reporting, and System Administration Guide.
Productivity Event Categories and Codes
Step 78: Set up Event Categories
Define Categories in Lookup type GHR_US_EVENT_CATEGORIES. A category may contain multiple events. Entries include Code, Meaning, and Description.
Use the Lookup Types window.
See: Setting up Event Codes, Oracle HRMS Configuring, Reporting, and System Administration Guide
Step 79: Set up Event Codes
When you route an RPA, the application enters an RPA status in the Routing History. Some actions that you take to process an RPA are external to the routing process, such as obtaining confirmation from another organization. You can record these actions as events. For each event you can enter a Start Date Description, End Date Description, Category Code, Standard completion Time, From Date, and To Date.
Use the Enter and Maintain Event Codes window.
See: Setting up Event Codes, Oracle HRMS Configuring, Reporting, and System Administration Guide
Note: If you need to capture more information related to a category, you can extend this Lookup type by defining other Attributes.
National Finance Center Interface (NFC)
Step 80: Setting up the NFC Interfaces Optional Step
If your agency uses the National Finance Center as a provider, you must configure the application before your users can submit position and personnel data to the NFC.
See: Setting up the National Finance Center (NFC) Interfaces, Oracle HRMS Configuring, Reporting, and System Administration Guide
Schedule for US Federal Processes
Step 81: Set the Frequency for Producing Federal Reports
You can determine when and how often the application processes federal reports, such as the Notification of Personnel Action, or the Central Personnel Data File (CPDF) Dynamics and Status reports, or system extracts such as the NFC Position Outbound Interface.
Use the Concurrent Manager Submit Requests window.
See: Reports and Processes in Oracle HR, Oracle HRMS Configuring, Reporting, and System Administration Guide
See: Setting up the National Finance Center (NFC) Interfaces, Oracle HRMS Configuring, Reporting, and System Administration Guide
Step 82: Set the Frequency for Running the Within Grade Increases (WGI) process
The default WGI process automatically determines eligible employees, creates an RPA, and updates a WGI when the employee's WGI Pay Date is reached. Your system administrator can customize the workflow process to require a response from the Personnel Office or the Supervisor:
-
Personnel Office receives a notification and no response is required
-
Personnel Office receives a notification and a response is required
-
Supervisor receives a notification and a response is required. The system then sends the notification to the Personnel Office.
Your system administrator can further customize the WGI eligibility criteria with user hooks. For example, the system administrator might customize the WGI eligibility to include a procedure that checks Rating of Record on the US Government Performance Appraisal flexfield.
The system identifies employees eligible for a WGI 90 days before the WGI Pay Date and generates a future effective WGI Request for Personnel Action. You can schedule the frequency with which the system processes automatic Within Grade Increases.
Use the Concurrent Manager Submit Requests window.
See: Scheduling the Automatic WGI Process, Oracle HRMS Compensation and Benefits Management Guide
Step 83: Schedule Future Action Updates
You can process and update Requests for Personnel Action that have a future effective date. When the effective date is reached, the application performs a final update and generates a Notification of Personnel Action. You can set the frequency with which the application processes all RPAs that have come due.
Use the Concurrent Manager Submit Requests window.
See: Scheduling Future Dated RPA Actions, Oracle HRMS Workforce Sourcing, Deployment, and Talent Management Guide
Implementation
Further Implementation Steps
Step 1: Technical Essays Optional Step
This section includes technical essays for Oracle HRMS.