Production Scheduler Workbench
This topic provides a basic understanding of the Production Scheduler Workbench including the bucketed load for a selected set of plant resources, continuous resource load, and a chart of activities to assist in the rescheduling of batches and firm planned orders. The Gantt Chart lets you change plant assignments, adjust bucket sizes, and filter batches and firm planned orders based on selected criteria.
This chapter covers the following topics:
- Understanding the Production Scheduler Workbench
- Using the Production Scheduler Workbench
- Configuring Scheduler Startup Parameters
- Using the Filter
- Displaying the Document Properties
- Displaying the Operation Properties
- Displaying the Activity Properties
- Displaying the Resource Properties
- Rescheduling a Batch or Firm Planned Order
- Rescheduling Batch Steps
- Displaying Composite Resources
- Rescheduling a List of Batches
- Changing or Finding an Organization
Understanding the Production Scheduler Workbench
The Production Scheduler Workbench provides a graphical display of scheduled production activities. Batches and firm planned orders are depicted as horizontal bars. View resource load information such as requirements versus capacity in the following formats:
Use the Production Scheduler Workbench as a reactive scheduling tool to address unanticipated events such as material shortages or unavailable resources. The Production Supervisor responsibility can reschedule batches, firm planned orders, and operations with a drag-and-drop operation.
The Production Scheduler Workbench offers the following capabilities:
-
Display scheduled production activities for a specified plant graphically in a Gantt Chart framework.
-
Reschedule batches, firm planned orders, and operations using a drag-and-drop operation.
-
Gain access to appropriate batch and firm planned order panes for creation and maintenance tasks.
Continuous Resource Load
The Production Supervisor can display the horizon as a continuous resource load graph for a selected set of plant resources.
Bucketed Resource Load
The Production Supervisor can display the bucketed load for a selected set of plant resources, and view resource load information in either a tabular format or a vertical bar format.
Understanding the Gantt Chart in the Production Scheduler
The Gantt Chart is a tool that depicts project tasks with their associated resources in a timeline. Gantt Charts let you track the progress of the project from start to finish.
Project
A project is a set of activities that ends with specific accomplishment, and has nonroutine tasks, distinct start and finish dates, and resource constraints such as time, money, people, and equipment.
Tasks
Tasks are activities that must be completed to achieve the project goal. It is customary to break the project into tasks and subtasks. Tasks have a start date and time, and an end date and time. The Production Scheduler Workbench uses routings as the high-level tasks. The routing subtasks are composed of operations organized into stepwise activities that use human and material resources.
Milestones
Milestones are important checkpoints or interim goals for a project. The production routing start dates and end dates are milestones.
Gantt Chart
The Gantt Chart displays shop activities in a timeline. It provides a means to reschedule batches and firm planned orders graphically using the drag-and-drop operation.
The Gantt Chart provides the following capabilities:
-
Display batches, firm planned orders, and their related operations, activities, and resources for a specified plant.
-
Change the current plant to another production facility.
-
Reschedule batches, firm planned orders, and operations with a drag-and-drop operation.
-
Integrate completely with other Process Execution functions.
-
Adjust bucket sizes that affects the Gantt Chart and associated resource load versus capacity view.
-
Filter out batches and firm planned orders shown on the Gantt Chart and store the user-defined selection criteria in the database.
-
Reschedule, create, and maintain batch or firm planned order functions controlled through the Security Function.
-
Use of the workday calendar to schedule batches and firm planned orders.
Resource Load versus Capacity
The Resource Load functionality provides the following capabilities:
-
Select from a list of resources to display load.
-
Display either continuous or bucketed resource load.
-
Access the Batch List pane to display firm planned orders and batches that consume the selected resource. Reschedule batches and firm planned orders from this pane.
Production Scheduler Workbench Layout
The Production Scheduler Workbench lets you view all scheduled batches and firm planned orders for a particular plant. Reschedule batches and firm planned orders interactively. Reschedule operations using drag-and-drop operations.
The workbench has four panes:
-
Top left pane, the navigator, set as default.
-
Top right pane, the Gantt Chart, set as default.
-
Bottom left pane, the Selected Resources.
-
Bottom right pane, the Resource Load Versus Capacity graph.
The Production Scheduler Workbench view defaults to the hierarchical navigator and the Gantt Chart panes. The Selected Resources and Resource Load Versus Capacity panes appear when you select Show or Hide Resource Load on the tool palette.
Navigator Pane
There are four levels of information or branches in the navigator:
-
Document, as a batch or firm planned order with product information
-
Operation with version
-
Activity
-
Resource
The top-level batch or firm planned order is created dynamically as you display the Production Scheduler Workbench. It is based on the filter criteria defined for the default plant. When a node is expanded in the navigator, horizontal bar charts representing each child node also display.
Gantt Chart Pane
The Gantt Chart pane consists of a timeline that appears at the top of the pane, and a horizontal bar chart. The timeline represents a time axis or bucket for the horizontal bar chart. The Gantt Chart mirrors the information presented in the navigator. The color of the horizontal bar chart represents the status of the batch or FPO.
-
Batches that are finite scheduled (scheduled by WPS engine of Manufacturing Scheduling) and in pending state display in yellow.
-
Batches that are not finite scheduled and in pending state display in blue.
-
Batches in WIP state display in green.
-
Batches in completed state display in dark green.
The same color representation of status applies to batch steps. The horizontal bar charts show scheduled production activities over time for each:
-
Batch
-
Firm Planned Order
-
Operation
-
Activity
-
Resource
The left vertical edge of a horizontal bar represents the start date. The right vertical edge of a horizontal bar represents the end date. A vertical line displays below the current date.
The Gantt Chart pane lets you:
-
Reschedule batches, firm planned orders, and operations manually using a drag-and-drop operation or through direct access to the Reschedule dialog box. You can only reschedule pending production documents with drag-and-drop. Use the Reschedule dialog box to reschedule work as described in "Rescheduling a Batch or Firm Planned Order."
-
View the properties of each object shown in the Gantt Chart such as batch, firm planned order, operation, activity, and resource. Properties displays the information about dates, quantities, and descriptions.
All horizontal bar charts may not be visible, since the start date of the related objects may fall outside of the time interval determined by the window boundaries. To make a particular object visible in the Gantt Chart:
-
Move the horizontal scroll bar until the desired object displays.
-
Enter a new start date in the date field on the tool palette. The Gantt Chart scrolls to the first batch or firm planned order for which the start date is found to be the closest to the entered date.
-
Double-click on the desired object in the navigator to make the timeline scroll to the start date of the selected object in the navigator.
-
Use the Adjust Unit Width slider to adjust the minor scale on the workbench.
Selected Resources Pane
The Selected Resources pane displays details regarding resources selected through the Select Resources dialog box. When you click Select Resources, the Select Resources dialog box displays. This lets you select the available resources to display in the Resource Load Versus Capacity pane. Only resources belonging to the current plant are shown.
Resource Load Versus Capacity Pane
This pane displays the Required resource load versus the Available resource capacity for the selected resources that display in the Select Resources pane. This pane shares the same timeline as the Gantt Chart pane.
The Required resource load, Available resource capacity, and Overload resource capacity key indicators display to the right of the graphic menu. The key indicators are:
-
Required, the number of units required by the resource for all batches in that time bucket.
-
Available, the number of resource capacity units in that time bucket. These may be already assigned.
-
Overload, the number of resource units that are required but already committed.
The graphic menu provides the following choices:
-
Table displays a tabular format. The top number in the table represents the Required resource load. The bottom number represents the Available resource capacity.
-
Continuous displays a continuous graph. Non-bucketed lines representing Required, Available, and Overload resources accurate to the minute.
-
Bar displays a bar graph. The number on the left represents the Required resource load. The number on the right represents the Available resource capacity.
When you select:
-
Table or Bar, the Required and Available key indicators display.
-
Continuous, the Required, Available, and Overload key indicators display.
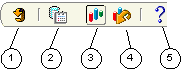
Identifying Buttons on the Scheduler Workbench
The following discussion and graphic identify and explain each of the tools that display on the Scheduler Workbench tool palette:
1 is the Refresh button. Click it to refresh panes with data retrieved from the database.
2 is the Enable/Disable Scheduling button. Click it to enable scheduling in the Scheduler Workbench. Click it again to disable scheduling in the Scheduler Workbench.
3 is the Show/Hide Resource Load button. Click it to show the resource load. Click it again to hide the resource load.
4 is the Refresh Resource Load button. Click it to refresh the load for a selected resource.
5 is the Help button. Click it to display online help for the current window or dialog box.
The following is a graphic of the previously described toolbar buttons:
Adjusting Timescale Unit Width on the Workbench
Move the Adjust Unit Width slider to the left to decrease the interval step size of the timescale, or move the slider to the right to increase the interval step size of the timescale.
Adjusting the Minor Scale Interval on the Workbench
The timescale consists of a major scale interval and a minor scale interval in units ranging from 15 minutes to one month:
-
Right-click the minor scale interval on the workbench.
-
Select one of the following to resize the minor time scale interval:
-
15 minutes
-
30 minutes
-
Hours
-
Days
-
Weeks
-
Months
-
The unit interval adjusts to the scale unit selected.
Rescheduling During Nonworking Time
Planners can schedule the shop floor to accommodate nonworking time. The Gantt chart pane highlights nonworking time by use of a color that contrasts with the background color used to represent work time during the workday.
Rescheduling Without a Defined Shop Day
If a workday calendar exists, but there is no work day defined for the dates that a batch is scheduled, then the application issues a warning:
No work day has been defined on the workday calendar for a day during this batch. Reschedule batch anyway (Y/N)?
If you click Y (Yes), then the application continues the rescheduling process. If you click N (No), then you return to the Reschedule window. This does not occur if you reschedule a firm planned order.
Using the Real Calendar to Display the Timeline
If the dates you schedule fall outside the workday calendar date range, or a workday calendar is not assigned to the current organization, then the real calendar displays on the timeline. Weekends then appear as workdays.
The workday calendar does not extend infinitely in either direction of the dates displayed. Therefore, the real calendar displays on either side of its limits.
Yielding a Finite Scheduled Plan
The Advanced Planning and Scheduling (APS) application replaces the Work In Process Planning Scheduler (WPS) finite scheduling process and yields a finite scheduled plan. If the details of a batch or planned order are returned from APS, then it is the same as scheduling a batch in WPS. The Finite Scheduled indicator is selected when the WPS engine reschedules the batch details. Batch details are related to the routing that is returned or scheduled by APS. APS allows either order header planning or order detail planning.
Using the Production Scheduler Workbench
The Production Scheduler Workbench lets you manage shop floor schedules. Refer to the "Understanding the Production Scheduler Workbench" topic for a complete explanation of the tool palette and layout of the window panes.
Prerequisites
-
Set up the Display Nonworking Days parameter.
-
Create batches and firm planned orders.
To display the Production Scheduler Workbench:
Choose Production Scheduler from the Production Supervisor responsibility menu.
Refer to "Configuring Scheduler Startup Parameters" for a complete discussion on the use of this window.
To display the resource load in table, continuous, or bar formats:
-
Click Show/Hide Resource Load to display the resource load.
-
Click Select Resource(s) to display the Select Resource(s) dialog box.
-
Select one or more resources.
-
Click OK.
-
Select one of the following display formats:
-
Table to display the resource load with the Required hours in the top cell and the Available hours in the bottom cell.
-
Continuous to display the resource load with a three-dimensional overlay of Required hours, Available hours, and Overload hours. This format identifies resource contentions. Each horizontal line represents the scaled number of hours that display in the left pane.
-
Bar to display a bar graph of the Required hours on the left and the Available hours on the right.
Extend the vertical lines that separate each format up to the dates listed in the Gantt Chart pane to determine the date.
-
-
Click Show/Hide Resource Load again to hide the resource load.
To go to the current date:
Following are the methods to go to the current date:
-
Click Go To Today.
-
Enter the current date and time.
The graph adjusts to the current date and time, indicated by a vertical line from the top to the bottom of the Gantt Chart pane.
To display the product information tooltip:
-
Position the cursor over a batch or firm planned order on the Gantt chart. The tooltip displays the batch or firm planned order with its status, main product code, planned or actual quantity, and UOM.
-
Move the cursor to hide the tooltip.
To display the operation tooltip:
-
Position the cursor over an operation bar on the Gantt chart. The tooltip displays the operation and its version. The operation version displays to the right of the slash mark (/).
-
Move the cursor to hide the tooltip.
Configuring Scheduler Startup Parameters
The Scheduler Workbench Startup Parameters dialog box lets you configure the Scheduler Workbench view.
Prerequisites
-
Create batches and firm planned orders.
To configure startup parameters:
-
Navigate to the Scheduler Workbench Startup Parameters dialog box.
-
Enter the From Date as the starting date and time to begin viewing the production schedule for the organization. Use the LOV to display the Calendar date-time editor. Required.
-
Enter the To Date as the ending date and time to end viewing the production schedule for the organization.
-
Enter From Document as the starting document number to include in the scheduler window.
-
Enter To Document as the last document number to include in the scheduler window.
-
Select one or both of the following:
-
Batch to display the specified batch document or all batches found for the specified parameters.
-
FPO to display the specified firm planned order document number or all firm planned orders found for the specified parameters.
-
Batch Status
-
Select one or more of the following:
-
Pending to display pending batches.
-
WIP to display work in process batches.
-
Completed to display completed batches.
-
-
Enter the Product, Ingredient, or Resource. Keep the % in each of these fields to display all components found for the specified parameters.
Resource Type
-
Enter the Resource Type as:
-
Auxiliary to display all auxiliary resources found for the specified parameters.
-
Primary to display all primary resources found for the specified parameters.
-
Secondary to display all secondary resources found for the specified parameters.
-
-
Click Gantt Chart to display the Scheduler Workbench window.
Using the Filter
The Filter dialog box lets you narrow the Scheduler Workbench display of documents, statuses of batches or firm planned orders, product codes, ingredients used, and resource types.
Prerequisites
-
Create batches and firm planned orders.
To use the filter:
-
Click Filter...
-
Enter one or more of the following fields to narrow the information displayed:
-
Starting date and time in the From window.
-
Ending date and time in the To window.
-
From Document and To Document to find batches within a specific range of batch numbers.
-
Product code of the primary product produced in the batch.
-
Ingredient Used in the product.
-
Resource used in the routing.
-
-
Select Batches or Firm Planned Orders to filter by document type.
-
Select Batch Status as any combination of Pending, WIP, or Completed.
-
Select Resource Type as any combination of Auxiliary, Primary, or Secondary.
-
Click Apply to view the results of the filtering.
-
Click OK to close the dialog box.
Displaying the Document Properties
The Document Properties dialog box lets you display scheduling and status information about batches and firm planned orders.
Prerequisites
-
Create batches and firm planned orders.
To display document properties:
-
In the navigator, right-click the batch or firm planned order node and choose Properties. The Document Properties dialog box displays.
Batch or FPO
-
The following fields are display only:
-
The document name displays next to Batch or FPO.
-
Product displays the main product with its description.
-
Planned Start Date displays the planned start date and time of the batch or FPO.
-
Planned End Date indicates the planned completion date and time of the batch or FPO.
-
Actual Start Date displays the actual start date and time of the batch or FPO.
-
Status is the current status of the batch or FPO.
-
Planned Quantity displays the quantity of material to be produced and its UOM.
-
Actual Quantity displays the actual quantity of material produced for the first product in the batch or FPO.
Note: This displays only for batches in WIP and completed status.
-
Finite Scheduled displays if the batch is scheduled by the Manufacturing Scheduling WPS engine.
-
-
Click Recipe to display information about the recipe derived from the recipe validity rule used to create the batch or FPO.
Recipe
-
The following fields are display only:
-
Recipe indicates the recipe code.
-
Version indicates the recipe version.
-
Description indicates the recipe description.
-
Formula indicates the formula used in the document type.
-
Version indicates the formula version.
-
Description indicates the formula description.
-
Routing indicates the routing used in the document type.
-
Version indicates the routing version.
-
Description indicates the routing description.
-
-
Click OK to close the dialog box.
To display batch details:
In the navigator, right-click the batch or firm planned order node and choose Details.
Refer to the "Editing a Batch" topic for a detailed description of this window.
Displaying the Operation Properties
The Operation Properties dialog box lets you display information about operations in each of the routing steps in a batch or firm planned order.
Prerequisites
-
Create batches and firm planned orders.
To display the operation properties:
-
In the navigator, right-click the operation node and choose Properties. The Operation Properties dialog box displays.
-
The following fields are display only:
-
Operation displays the operation code. Its version displays to the right of the slash mark (/), and its description displays on the next row.
-
Step displays the step number.
-
Planned Start Date displays the planned start date and time of the step.
-
Planned End Date displays the planned completion date and time of the step.
-
Status displays the status of the step.
-
Planned Quantity displays the planned step quantity.
-
Displaying the Activity Properties
The Activity Properties dialog box lets you display information about activities in each of the operations in a batch or firm planned order.
Prerequisites
-
Create batches and firm planned orders.
To display the activity properties:
-
In the navigator, right-click the activity node and choose Properties. The Activity Properties dialog box displays.
-
The following fields are display only:
-
Activity displays the activity code and description.
-
Start Date displays the start date and time of the activity.
-
End Date displays the completion date and time of the activity.
-
Cost Analysis Code displays the cost analysis code and description.
-
Displaying the Resource Properties
The Resource Properties dialog box lets you display information about each of the resources assigned to activities in a batch or firm planned order.
Prerequisites
-
Create batches and firm planned orders.
To display the resource properties:
-
In the navigator, right-click the resource node and choose Properties. The Resource Properties dialog box displays.
-
The following fields are display only:
-
Resource displays the resource code and description.
-
Plan Count displays how many resources are needed for the activity.
-
Plan Quantity displays how much material is planned for the activity and the UOM for this material.
-
Plan Usage displays how long the resource runs and the usage UOM, which is usually in hours.
-
Offset Interval displays the time offset from the start of the activity to when the resource is actually used.
-
Planned Start Date displays the planned start date and time for the resource.
-
Planned End Date displays the planned completion date and time for the resource.
-
Resource Type indicates if the resource is Primary, Secondary, or Auxiliary.
-
Charge indicates the charge number.
-
Scale Type indicates the scale type used to scale the resource. Options are Fixed, Scalable, and By Charge.
-
Rescheduling a Batch or Firm Planned Order
The Reschedule dialog box lets you reschedule a batch or firm planned order. You can use drag-and-drop or the resize option to reschedule pending documents.
Prerequisites
-
Create batches and firm planned orders.
To reschedule a batch or firm planned order using the navigator:
-
In the navigator, right-click the batch or firm planned order node and choose Reschedule.
-
Batch or Firm Planned Order displays the document number.
-
Enter a new Start Date and time.
-
Enter a new End Date and time.
-
Select Use Workday Calendar to use the workday calendar to reschedule the batch or firm planned order.
-
Click Reschedule.
-
If the batch is finite scheduled, then the following message displays:
This batch was previously scheduled by Manufacturing Scheduler, continue (Y/N)?
Click Yes to reschedule. This action resets the Finite Scheduled indicator on the Batch Details window.
To reschedule a batch or firm planned order using the resize option:
-
In the Gantt Chart pane, click the graph line next to the batch or firm planned order to reschedule. A small hand appears to indicate that you can reschedule it. Two handles appear on the line. The left handle adjusts the Start Date. The right handle adjusts the End Date.
-
Reschedule the batch or firm planned order using one of these methods:
-
Drag the left handle to the left to decrease the Start Date.
-
Drag the right handle to the right to increase the End Date.
The Reschedule dialog box appears with the selected Start Date and End Date and the option to use the workday calendar. You can edit these entries.
-
-
Click Reschedule.
-
If the batch is finite scheduled, then the following message displays:
This batch was previously scheduled by Manufacturing Scheduler, continue (Y/N)?
Click Yes to reschedule. This action resets the Finite Scheduled indicator on the Batch Details window.
To reschedule a batch or firm planned order using the drag-and-drop option:
-
In the Gantt Chart pane, click the batch or firm planned order you want to reschedule.
-
Drag the batch or firm planned order to its new location on the schedule and drop it. The Reschedule dialog box appears with the selected Start Date and End Date.
-
You can edit the Start Date and the End Date.
-
Select Use Workday Calendar to reschedule the batch or firm planned order using the workday calendar.
-
Click Reschedule.
-
If the batch is finite scheduled, then the following message displays:
This batch was previously scheduled by Manufacturing Scheduler, continue (Y/N)?
Click Yes to reschedule. This action resets the Finite Scheduled indicator on the Batch Details window.
To display batch or firm planned order details:
In the navigator, right-click the batch or firm planned order node and choose Details.
Rescheduling Batch Steps
The Reschedule dialog box lets you reschedule batch steps.
Prerequisites
-
Create batches and firm planned orders.
To reschedule batch steps using the navigator:
-
In the navigator, right-click the batch step node and choose Reschedule.
-
Step displays the step number and code.
-
Enter a new Start Date and time.
-
Enter a new End Date and time.
-
Select Reschedule Preceding Steps to reschedule the steps preceding Step.
-
Select Reschedule Succeeding Steps to reschedule the steps succeeding Step.
-
Select Use Workday Calendar to use the workday calendar to reschedule the batch steps.
-
Click Reschedule.
-
If the batch is finite scheduled, then the following message displays:
This batch step was previously scheduled by Manufacturing Scheduler, continue (Y/N)?
Click Yes to reschedule. This action resets the Finite Scheduled indicator on the Batch Details window.
To reschedule batch steps using the resize option:
-
In the Gantt Chart pane, click the graph line next to the batch step you want to reschedule. A small hand appears to indicate that you can reschedule the step. Two handles appear on the line. The left handle adjusts the Start Date. The right handle adjusts the End Date.
-
Reschedule the step using one of these methods:
-
Drag the left handle to the left to decrease the Start Date.
-
Drag the right handle to the right to increase the End Date.
-
-
The Reschedule dialog box appears with the selected Start Date and End Date and the option to use the workday calendar. You can edit these entries.
-
Click Reschedule.
-
If the batch is finite scheduled, then the following message displays:
This batch step was previously scheduled by Manufacturing Scheduler, continue (Y/N)?
Click Yes to reschedule. This action resets the Finite Scheduled indicator on the Batch Details window.
To reschedule batch steps using the drag-and-drop option:
-
In the Gantt Chart pane, click the batch step you want to reschedule.
-
Drag the step to its new location on the schedule and drop it. The Reschedule dialog box appears with the selected Start Date and End Date and the option to use the workday calendar. You can edit the Start Date and the End Date.
-
Click Reschedule.
-
If the batch is finite scheduled, then the following message displays:
This batch step was previously scheduled by Manufacturing Scheduler, continue (Y/N)?
Click Yes to reschedule. This action resets the Finite Scheduled indicator on the Batch Details window.
Displaying Composite Resources
The resource composite view lets the production planner display the load versus capacity graph of a selected set of resources. From this graph, you can request all batches and firm planned orders that consume a selected resource within a selected time bucket.
Prerequisites
-
Create batches and firm planned orders.
To select resources for a composite resource view:
-
Use one of these methods to display the resource load pane:
-
Click Show/Hide Resource Load.
-
From the Actions menu, choose Show/Hide Resource Load.
-
-
Click Select Resource(s)... to display the Select Resource(s) dialog box.
-
Select one of these methods to move resources:
-
Click the desired resource in Available Resources, then click the single right-arrow button to move it to the Selected Resources.
-
Click the double right-arrow button to move all items in Available Resources to the Selected Resources.
-
To remove resources from the composite resource view:
-
Click Select Resource(s)... to display the Select Resource(s) dialog box.
-
Select one of these methods to move resources:
-
Click the desired resource in Selected Resources, then click the single left-arrow button to move it to the Available Resources.
-
Click the double right-arrow button to move all items in the Selected Resources to the Available Resources.
-
Rescheduling a List of Batches
The Reschedule dialog box lets you reschedule one or several batches that are consuming a particular resource for a given period of time. You cannot change the start date for a WIP batch. If you want to reschedule a particular WIP batch, then override the plan completion date. The application reschedules batches that have changed the planned start or completion dates. If the Gantt chart is in view mode, then you cannot reschedule a batch. Click on the Enable/Disable Scheduling icon on the toolbar to switch from view mode to the scheduling mode.
Prerequisites
-
Create batches and firm planned orders.
To reschedule a list of batches or firm planned orders:
-
Use one of these methods to display the resource load pane:
-
Click Show/Hide Resource Load.
-
From the Actions menu, choose Show/Hide Resource Load.
-
-
Type the scheduled date and time in the Go To field and press Enter. The Gantt chart displays the scheduled start date entered.
-
Click Select Resource(s) to display the Select Resource(s) dialog box.
-
Use one of these methods to move resources:
-
Click the desired resource in Available Resources, then click the single right-arrow button to move it to the Selected Resources.
-
Click the double right-arrow button to move all items in Available Resources to the Selected Resources.
-
-
Click OK.
-
Double-click the desired time bucket in the Resource Load graph. The Reschedule dialog box displays. All documents consuming the selected resource within the selected time bucket are displayed in the Reschedule dialog box.
-
Determine if you want to use the workday calendar in the rescheduling. Select Use Workday Calendar to use the workday calendar.
-
Document displays the document number.
-
Start Date displays the batch start date and time. You can edit this field if the batch is not released.
-
End Date displays the batch completion date and time. You can edit this field to redistribute the scheduled workload.
-
Duration displays the time until the scheduled End Date in hours and minutes.
-
Document Type displays the Batch or Firm Planned Order document type.
-
Status displays the current status of the listed document type.
-
Click Reschedule to reschedule the batches, or click Cancel to cancel the action. All edited batches are rescheduled.
Changing or Finding an Organization
The Change Organization dialog box lets you change or find an organization.
Prerequisites
-
Create batches and firm planned orders.
To change an organization:
-
From the Actions menu, choose Change Organization. The Change Organization dialog box displays.
-
Select the Organization.
To find an organization:
-
From the Actions menu, choose Change Organization. The Change Organization dialog box displays.
-
Enter the desired organization in the Find field.