Installation and Upgrade
This chapter describes the utilities you use to install a new Oracle E-Business Suite system and to upgrade an existing system to a new release version.
This chapter covers the following topics:
About Installations and Upgrades
This section summarizes the installation and upgrade process and briefly describes the main features of Rapid Install , the utility you use to install a new Oracle E-Business Suite system. In addition to the installation capability, Rapid Install is also one of the utilities you use when upgrading your system from an existing release to a new release level.
Installations
The basic use of Rapid Install is to install a new, fully configured Oracle E-Business Suite system. The resulting installation includes a complete set of Oracle E-Business Suite products, a certified database tier and application tier technology stack, all patches, product family release update packs, and any other updates that are available at the time of the software release.
The technology stack consists of database tier and the application tier components that are required to run the new system. For example, a new installation includes a fresh database (and the associated Oracle homes) certified for a specific Oracle E-Business Suite version, as well as the latest application tier components.
All products, regardless of their licensed status, are installed. During the installation, you have an opportunity to specify the products you have licensed and thereby register them as active in your system. This action marks them for inclusion in patching and other tasks required to update and maintain your system after the initial installation.
Note: For full details of the installation process and Rapid Install, see Oracle E-Business Suite Installation Guide: Using Rapid Install.
Upgrades
As a part of an upgrade, you enter configuration parameters in the Rapid Install wizard and run Rapid Install as one of the pre-upgrade preparatory steps. Rapid Install uses the parameters to lay down the file system and install the new database tier and application tier technology stack. You may migrate or upgrade your existing database as one of the pre-upgrade tasks.
In addition, you use AutoPatch at various times during the upgrade process to apply upgrade-related patches and to run the upgrade driver that brings your Oracle E-Business Suite system up to the full release level.
Note: For details of the upgrade process, see Oracle E-Business Suite Upgrade Guide: Release 11i to Release 12.1.1. For more information about the full capabilities of AutoPatch, see Oracle E-Business Suite Patching Procedures.
Overview of Rapid Install
With Rapid Install, you can perform the following tasks:
-
Install a new, fully configured Oracle E-Business Suite system, including the latest certified Oracle E-Business Suite technology stack and all patches, product family release update packs, and other updates available at the time of the relevant release.
-
Lay down the file system and configure server processes for an upgraded system.
-
Install a new database tier or application tier technology stack.
Rapid Install employs a wizard that guides you through the screens used to carry out each selected task. On the wizard screens, you enter configuration values for your system. They are typically saved in the Applications database for later use.
Previous releases of Oracle E-Business Suite used a text file (config.txt) to store the configuration values you supply. Release 12 only uses this file in certain specific circumstances, for example to support restarts where the database has not yet been created.
If you run Rapid Install again, you typically point it to the stored information, so that it can use those details in operations such as creating the Oracle E-Business Suite file system, installing a fresh database, registering products, managing NLS requirements, configuring port connections, and creating and running the start and stop scripts for the database and listeners.
Storing the configuration enables you to perform a distributed install (repeat the process across multiple machines) without having to re-enter the system configuration information each time for every run of the Rapid Install wizard. Storing the configuration details allows you to enter the information only once, and then use the same system configuration to run the install on all required machines.
The main configuration engine used by Rapid Install is called AutoConfig. Rapid Install supplies the configuration information to AutoConfig, which stores it for each node in a node-specific configuration file called a context file.
AutoConfig also simplifies and standardizes the management of your system configuration. At any time after the initial installation, you can use the Configuration Editor in Oracle Applications Manager (OAM) to update various system settings, and then run an AutoConfig script to populate the system configuration files with the new values.
Note: For more information, see AutoConfig in Oracle E-Business Suite Concepts.
Installing New Systems
Rapid Install automatically supplies values for most of the many parameters your system needs. You do, however, have an initial choice to make: you can either supply a number of your own parameters and carry out a Standard install, or you can opt for an Express install, and let Rapid Install supply default values for most parameters.
A Standard install gives you more flexibility to configure your system to meet particular requirements for your site, while an Express install is useful if you know that the default settings will suffice, or you wish to set up a test system where the settings are not critical.
Both types offer the option of installing either a fresh database (one that is fully configured but contains no transaction data) or a Vision Demo database (one that contains sample transaction data for a fictitious company, which you can use for training or demonstration purposes).
Installation Strategies and Terminology
The installation process for Oracle E-Business Suite Release 12.1.1 continues the evolution towards meeting the needs of a grid-style environment. To this end, the process has been streamlined, requiring fewer screens and decisions than in previous releases. It is becoming more common to start with a basic system and add machines to it, in order to meet growth or other deployment needs.
As you use Rapid Install , you should be familiar with these terms:
-
A Server is a process or group of processes that provides a particular functionality, often referred to as a service. For example, the HTTP server is a process that listens for and processes HTTP requests.
-
A Node is a logical grouping of servers, and therefore fundamentally a software concept rather than a hardware concept. However, it can still be used to refer to a machine in the (common) case where all nodes are located on a single machine. For example, an application node is a combination of a specific machine configuration and file system that together support the services needed for it to participate as a component of the application tier.
-
Tier is a logical grouping of services, potentially spread across more than one physical machine. The three-tier architecture that comprises an Oracle E-Business Suite installation is made up of the database tier (supports and manages the database), the application tier (supports and manages the various Applications components, and is sometimes known as a middle tier), and the desktop tier (provides the user interface by way of an add-on component to a standard Web browser).
Note: See Oracle E-Business Suite Concepts for more information about the Applications architecture in Release 12.
Distributed Installations
An installation of a distributed (multi-node) system by Rapid Install includes the setup of a shared application node file system and associated provision for load balancing.
As the default for nodes running the same operating system, Rapid Install creates a system that shares not only the APPL_TOP and COMMON_TOP file systems, but the application node technology stack as well. All application node files are installed on a single shared disk resource that is mounted from each application node machine, making it possible for any application node to be used to provide standard services, such as serving forms or web pages, or concurrent processing. Load balancing distributes processing activity evenly across networks, so that no single machine is overloaded.
Upgrading a Release 11i System to Release 12.1.1
As a part of an upgrade from Release 11i to Release 12.1.1, you enter configuration parameters in the Rapid Install wizard and run Rapid Install as one of the pre-upgrade tasks. Rapid Install uses those parameters to lay down the file system and install the new technology stack. You must migrate or upgrade your existing database to the version certified for this release as one of the pre-upgrade tasks.
After you complete the pre-upgrade tasks, you run AutoPatch to apply the patches and run the drivers that upgrade your products and database to the most current release level. You then run Rapid Install a second time to configure and start the servers and services.
Note: See Oracle E-Business Suite Upgrade Guide: Release 11i to Release 12.1.1 for full details of the upgrade process.
Installing a New Technology Stack
You can upgrade an existing database tier or application tier node to a new technology stack by running Rapid Install to install only the technology stack components, without upgrading products. In addition to creating the relevant new ORACLE_HOMEs, this process uses AutoConfig to generate new configuration files for use with the updated technology stack.
Note: For more details of installing a new technology stack, see Chapter 4 of Oracle E-Business Suite Installation Guide: Using Rapid Install.
The Rapid Install Interface
You start Rapid Install from the command line. It then runs the Java-based Rapid Install wizard, which presents a series of screens that step you through the process of collecting configuration parameter values.
You indicate the installation action you want. The wizard then displays default configuration values for that process. Using a combination of text input boxes and drop-down lists, you either accept the defaults or enter new values, based on the operation you have chosen.
Input Fields and Drop-down Lists
In the Rapid Install interface, input fields and drop-down lists allow you to:
-
Complete or accept the default shown in the input fields (provided they are not grayed out).
-
Type information directly into input boxes, or select information from the list of valid options in the fields that have a drop-down menu.
-
View all valid options for an input field (in drop-down lists). Click an option to select it.
-
Replace an option in a drop-down list. Combo boxes give you the ability to replace an option on the list by typing a valid option in the box. Whenever this type of input is allowed, it is noted in the text.
Buttons and Keys
Use the Rapid Install interface buttons and keys to:
-
Select from mutually exclusive options by clicking the appropriate radio button.
-
Move between options (with the Tab key or Up or Down Arrow keys).
-
Cancel the Rapid Install process or move either Back to the previous screen or forward to the Next screen.
-
Move hidden fields into view (with vertical and horizontal scroll bars).
Help
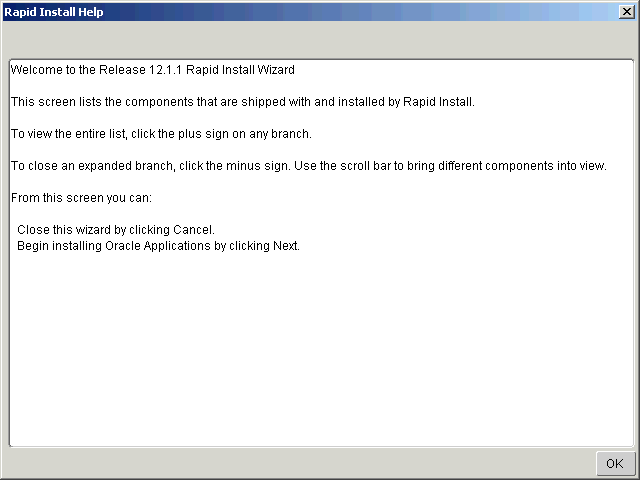
Most Rapid Install screens offer mouse-over help for individual fields by providing a description of the information that goes in the field in a small text box when you move the mouse over the field. In addition most screens display a Help button. Click it to see screen-level help, consisting of a general description of the screen and a summary of the input fields that it displays.
Screen-level help looks like this:

Running Rapid Install
This section outlines only the basics of Rapid Install operation. For a complete description, see Oracle E-Business Suite Installation Guide: Using Rapid Install.
-
Create operating system accounts.
Create the operating system accounts that will be used in the installation of the database node and the application node file systems.
-
Perform other setup tasks.
The instructions may direct you to perform other setup tasks, such as installing additional software. For any additional requirements, see Oracle E-Business Suite Installation and Upgrade Notes for your platform.
-
Set up the stage area.
As preparation for running Rapid Install, you must run a Perl script that creates the install directory and copies the contents of the software bundle to the appropriate location in the file system.
-
Start Rapid Install, using the commands appropriate for your operating system.
UNIX
$ cd /u01/Stage12/startCD/Disk1/rapidwiz
$ ./rapidwiz
-
Review installed components.
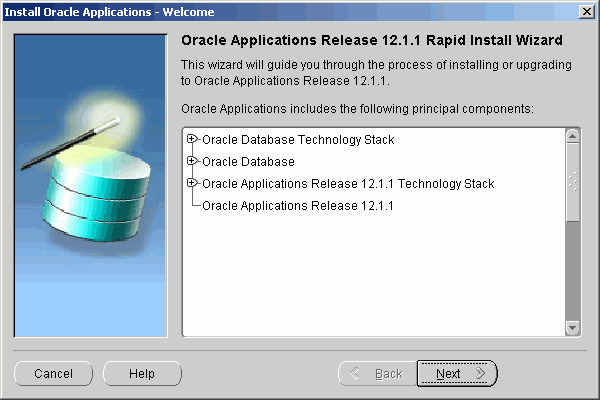
On the Welcome screen, Rapid Install lists the components will be installed for Release 12.1.1.
Rapid Install Welcome Screen

No decision is required. Click Next to continue.
-
Choose the screen flow.
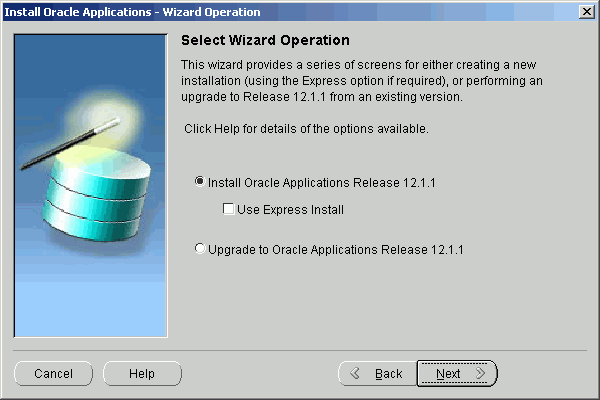
On the Wizard Operation screen, choose a screen flow.
To perform a Standard install, click Install Oracle Applications Release 12.1.1.
Choosing to Install Oracle Applications Release 12.1.1

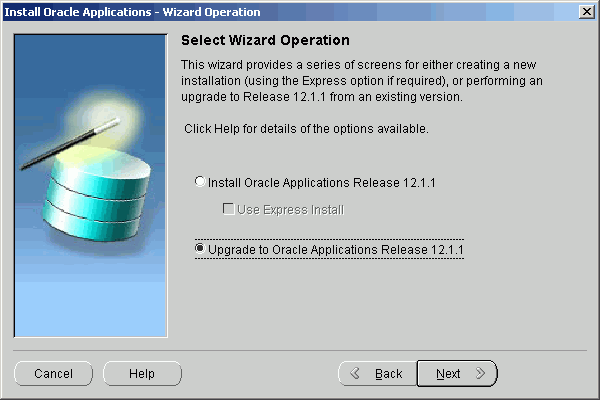
To perform an upgrade, click Upgrade to Oracle Applications Release 12.1.1.
Choosing to Upgrade to Oracle Applications Release 12.1.1

Click Next. The wizard continues with the appropriate screen flow.
-
Complete the wizard screens,
The remaining wizard screens prompt for the parameters necessary to complete the installation or upgrade. Once you complete the wizard, Rapid Install verifies that all parameters necessary to create working environment are present, and begins to set up your system.