Maintenance
This chapter discusses the AD utilities designed to help you perform the routine maintenance tasks that will help ensure that your Oracle E-Business Suite system continues to run smoothly.
This chapter covers the following topics:
- About System Maintenance
- AD Administration Overview
- Running AD Administration Interactively
- Generating Applications Files
- Maintaining Applications Files
- Managing Database Entities
- Using Maintenance Mode
- Using AD Relink
- Relinking AD Executables
About System Maintenance
After your system is installed, it will be necessary to perform certain maintenance tasks to keep it running smoothly. For example, you will generate form files, maintain snapshot information, relink executables, compile or validate the APPS schema, and so on. Some tasks are routine and should be performed on a regular basis. Other tasks are non-routine and generally performed infrequently.
You run maintenance tasks from the command line using AD Administration. Once you start this utility, it presents the tasks in menu form, grouped generally by type of activity you will perform. For example, the tasks associated with compiling and reloading Applications database entities are grouped on the same menu.
In addition to the AD Administration maintenance tasks, this chapter describes AD Relink, a command line utility used to relink AD executables.
Important: You cannot relink AD utilities executables using AD Administration.
AD Administration Overview
AD Administration manages most of the maintenance tasks required for your Oracle E-Business Suite system. Currently, these maintenance tasks are grouped by types on the AD Administration main menu.
When you start AD Administration from the command line, it prompts you for the basic system-specific information it needs. For example, you need to supply a name for the log file where processing actions and error messages will be recorded.
Note: For more information, see Prompts in Chapter 1.
Once you respond to these prompts, AD Administration displays the main menu, which serves as the gateway to various submenus where you select the individual maintenance tasks. For example, on the Generate Applications Files menu, you can run tasks that generate message files, forms files, report files, message files, or product JAR files. These submenu tasks may also require you to respond to prompts to collect task-specific information. For example, some tasks require you to enter the number of workers you want to employ to process the jobs associated with the task.
Note: For more information, see Processing Tasks in Parallel in Chapter 1.
When you respond to AD Administration prompts, you are running the utility interactively. However, like AutoPatch and AD Controller, you can also run AD Administration non-interactively, specifying a previously created defaults file that contains the information necessary to run a specific maintenance task without user intervention.
Note: For more information, see Interactive and Non-Interactive Processing in Chapter 1.
Prompts
In addition to the basic prompts described in Chapter 1, AD Administration may require additional information that is specific to one of the submenu tasks. If so, it displays additional prompts. For example, when running the Generate Product JAR files task from the Generate Applications Files menu, AD Administration prompts you as follows:
Do you wish to force generation of all jar files? [No]:
The task-specific prompts are described more fully in the discussion of each task.
Preparing for Non-Interactive Processing
The discussion of command line prompts assumes you are running AD Administration interactively. You respond to the standard prompts and those required for specific tasks you choose from the AD main menu and submenus. AD Administration can also run some tasks non-interactively by using the information you store in a defaults file, instead of requiring you to respond to prompts.
Note: For more information, see Interactive and Non-Interactive Processing in Chapter 1. Also see Scheduling Non-Interactive Maintenance in Oracle E-Business Suite Maintenance Procedures.
Specifying a Menu Option in the AD Administration Defaults File
The same defaults file can be used to run different AD Administration tasks a single file can contain all your choices for the different menu options. In order to choose which task the defaults file will run, you add menu_option= <menu choice> to the utility start command. This overrides any menu-specific key stroke information stored in the defaults file initially, and allows you to use the defaults file for any of the AD Administration menu items. It also ensures that the menu option you intended for the defaults file is always valid, even if the menu items are renumbered or relocated in subsequent releases.
| menu_option Value | Corresponding AD Administration Menu Choice |
|---|---|
| GEN_MESSAGES | Generate message files |
| GEN_FORMS | Generate form files |
| GEN_REPORTS | Generate reports files |
| GEN_JARS | Generate product JAR files |
| RELINK | Relink Applications programs |
| COPY_FILES | Copy files to destinations |
| CONVERT_CHARSET | Convert character set |
| SCAN_APPLTOP | Scan the APPL_TOP for exceptions |
| SCAN_CUSTOM_DIR | Scan a CUSTOM directory for exceptions |
| LIST_SNAPSHOT | List snapshots |
| UPDATE_CURRENT_VIEW | Update current view snapshot |
| CREATE_SNAPSHOT | Create named snapshot |
| EXPORT_SNAPSHOT | Export snapshot to file |
| IMPORT_SNAPSHOT | Import snapshot from file |
| DELETE_SNAPSHOT | Delete named snapshot |
| CHECK_FILES | Check for missing files |
| CMP_INVALID | Compile APPS schema |
| CMP_MENU | Compile menu information |
| CMP_FLEXFIELDS | Compile flexfield data in AOL tables |
| RELOAD_JARS | Reload JAR files to database |
| VALIDATE_APPS | Validate APPS schema |
| CREATE_GRANTS | Recreate grants and synonyms for APPS schema |
| MAINTAIN_MLS | Maintain multi-lingual tables |
| CHECK_DUAL | Check DUAL table |
| ENABLE_MAINT_MODE | Enable Maintenance Mode |
| DISABLE_MAINT_MODE | Disable Maintenance Mode |
The AD Administration Interface
You start AD Administration from the command line. However, all maintenance tasks are initiated from the AD Administration Main Menu. This section describes some of the common features used to run this utility.
Main Menu
After you start AD Administration and respond to the prompts, the AD Administration Main Menu appears.
AD Administration Main Menu
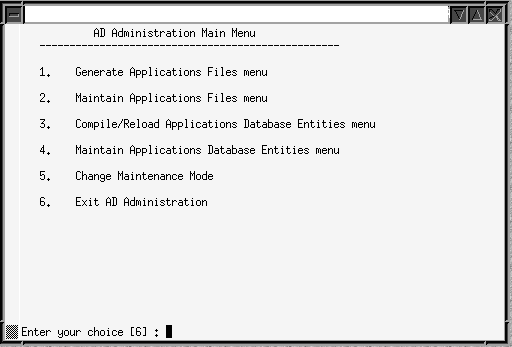
This menu displays the submenus where the individual maintenance tasks are grouped. To choose a submenu, type the number of the menu at the prompt. To exit AD Administration, press [Return].
Available Options
Depending on your system configuration, the submenus for AD Administration may show slightly different option names and numbers from the ones displayed here.
Running AD Administration Interactively
Complete the steps in this section to display the AD Administration Main Menu and access the submenus and the maintenance tasks.
-
Set the environment.
You must set the environment in order to apply the environment variables that define your system. This task is common to many AD utilities. See Setting the Environment in Chapter 1 for the basic steps.
-
From any directory, start AD Administration with this command:
$ adadmin
The utility starts and displays the first prompt.
-
Respond to prompts.
Supply the information requested by the AD Administration prompts. The basic AD command line prompts are described in Chapter 1. Prompts that are unique to options are described in this chapter in the section that describes the option.
When you complete the prompts, the Main Menu appears.
-
Choose maintenance tasks.
On the Main Menu, choose a submenu. The submenus and the options they display are described fully beginning with Generate Applications Files in the next section.
-
Exit AD Administration.
You can exit AD Administration from the Main Menu by choosing option 6 (Exit AD Administration) at the screen prompt. You can also choose to exit the utility at any prompt by typing abort on the command line. See Restart Files in Chapter 1 for information about restarting AD utilities after using the abort command.
Generating Applications Files
You may need to generate Applications files from time to time during your Applications life cycle. You access the associated tasks from the Generate Applications Files menu.
Generate Applications Files Menu
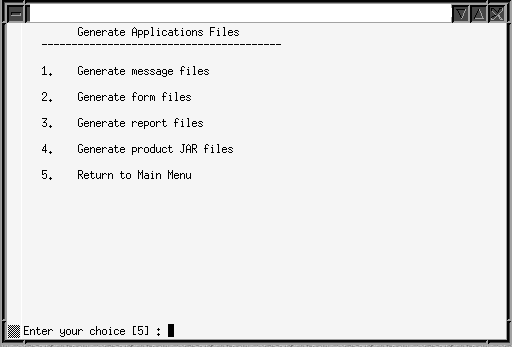
If system users are having difficulty accessing messages, forms, or reports, you may be able to resolve the issue by generating the associated files. Or, when you apply a patch that adds or changes product functionality, you may want to generate the associated files after you apply the patch, instead of running the generate driver during the patching downtime. The Generate Files tasks may be performed on any server, as required.
You do not have to shut down your system to generate files. However, users that access the files being generated (for example, for Human Resources forms) must log off.
Note: For more information, see Generating Product Files in Oracle E-Business Suite Maintenance Procedures.
Generate Message Files
Oracle E-Business Suite uses files to display messages. This task generates binary message files (extension .msb) from Oracle Application Object Library tables.
Caution: Run this task only when instructed to do so in a patch readme file, or by Oracle Support Services.
Generate Form and Report Files
These activities are carried out in much the same way.
-
Generate forms files
Generates executable Oracle forms files (extension .fmx) from the binary forms definition files (extension .fmb). The definition files are located under AU_TOP, and the executable files are stored under each product’s directory.
-
Generate report files
Generates the binary Oracle Reports report files (extension .rdf).
The prompts and behavior work in similar fashion, except as noted:
-
Ask for the number of workers and generate selected objects for selected products in parallel
-
Display the current character set (from NLS_LANG) and ask if you want to generate form or report objects in this character set
-
Ask if you want to regenerate Oracle Forms PL/SQL library files, menu files, and executable files (forms files only)
-
Ask for the products associated with the form or report objects
-
Ask if you want to generate specific form or report objects for each selected product
-
Display the current set of installed languages and ask if you want to generate form or report files in these languages
-
Create a list of all objects to generate
-
Display the list of objects to be generated (specific objects or all objects)
Generate Product JAR Files
Generate Java archive (JAR) files whenever you upgrade the Oracle Developer technology stack, or when advised by Oracle Support Services. This task signs JAR files (if on a Web server) and also does the following:
-
Generates product JAR files in JAVA_TOP and copies them to APPL_TOP
-
Generates other Java-related files under APPL_TOP and JAVA_TOP
-
Recreates Java libraries (appsborg.zip and appsborg2.zip) under APPL_TOP and JAVA_TOP
When you run the task, it prompts:
Do you wish to force generation of all jar files? [No]
If you choose No, it generates only JAR files that are missing or out-of-date. If you choose Yes, all JAR files are generated (more time-consuming).
If AD Administration displays a list of warnings or errors and objects that did not generate successfully and asks if you want to continue as if successful, review the log file to determine if the problems require attention. If you choose not to continue and restart your session at a later time, AD Administration attempts to regenerate only the files that did not generate successfully.
Maintaining Applications Files
Certain maintenance tasks are required to keep your Applications files up to date. For example, you may need to copy product files to a central location or convert files in the APPL_TOP to another character set. These tasks are grouped on the Maintain Applications Files menu.
Maintaining Applications Files Menu
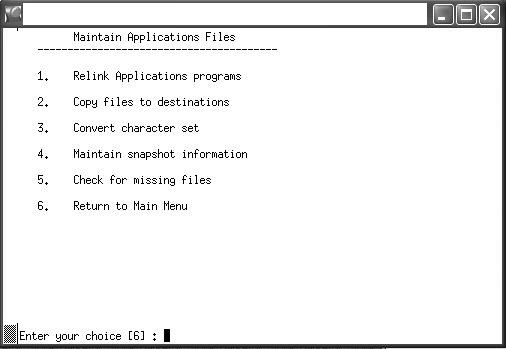
You can run any of these tasks by choosing it from this menu.
Relink Applications Programs
Relinks Oracle E-Business Suite executable programs with the Oracle server libraries so that they function with the Oracle database. For each product, you can choose whether to link all executables or specific ones only.
The default is to relink without debug information. You should use the debug option only when requested to do so by Oracle Support Services.
Important: AD Administration cannot be used to link executables for the AD products themselves. You must use AD Relink for this. See Relinking AD Executables in Oracle E-Business Suite Maintenance Procedures.
Copy Files to Destinations
Copies files from each product area to central locations where they can be easily referenced by non-Applications programs. This option uses revision-based copy logic to ensure that the destination file versions are the same as, or higher than, the source file versions.
Oracle recommends that you do not use the force option to overwrite existing files, unless so instructed by Oracle Support Services. Copying files with this option updates all JAR files, resulting in them all being downloaded to each client again and causing runtime performance degradation.
The file types and their respective destinations are shown in the following table:
| These files ... | ... are copied to: (UNIX) | ... are copied to: (Windows) |
|---|---|---|
| Java files | $JAVA_TOP | %JAVA_TOP% |
| HTML files | $OAH_TOP | %OAH_TOP% |
| Media files | $OAM_TOP | %OAM_TOP% |
The directories for the variables are specified in the adovars.env file (UNIX) or the adovars.cmd file (Windows).
When this option is used to copy reports files, the default destination is under AU_TOP.
Convert Character Set
Prepares the files in the APPL_TOP for conversion to another character set, and then performs the conversion.
Note: For more information, see Globalization Support in Oracle E-Business Suite Concepts.
When you choose this option, AD Administration presents another submenu, which contains options for scanning your files in preparation for the conversion. The scan searches for exceptions - files that will have incomplete (lossy) conversions - so that you can fix potential problems before you actually convert the character set. Choose one of the following scan options.
Tip: Always verify the compatibility of the database character set before converting the APPL_TOP character set.
The options are:
-
Scan the APPL_TOP for exceptions.
Scans the APPL_TOP and creates three files in the admin\<SID>\out directory.
Review the files listed in admanifest_excp.lst. Fix files that report lossy conversion before you convert the character set. Repeat this task until there are no entries in admanifest_excp.lst. If you need to see more detail, review admanifest_lossy.lst.
-
Scan a CUSTOM directory for exceptions.
Collects the same information as the first task, but scans custom Applications directories rather than the APPL_TOP directory.
-
Convert character set.
Run this task only if admanifest_excp.lst has no entries. It prompts you for the manifest file (admanifest.lst) created when you ran the scan option(s).
The utility backs up the product source files and the APPL_TOP/admin source files. It saves product files in the <PROD>_TOP directories in the format <prod>_ s_<char_set>.zip. It saves admin source files in the APPL_TOP/admin directory in the format admin_s_<char_set>.zip
Maintain Snapshot Information
There are two types of snapshots: APPL_TOP snapshots and global snapshots. An APPL_TOP snapshot lists patches and versions of files in the APPL_TOP. A global snapshot lists patches and latest versions of files in the entire Applications system (that is, across all APPL_TOPs).
Both APPL_TOP snapshots and global snapshots may be either current view snapshots or named view snapshots. A current view snapshot is created once and updated when appropriate to maintain a consistent view. A partial view snapshot allows you to synchronize only selected files from a current view. A named view snapshot is a copy of the current view snapshot at a particular time (not necessarily the latest current view snapshot), and is not updated.
Patch Wizard uses the information contained in the global current view snapshot to determine which patches have already been applied. AutoPatch uses the APPL_TOP current view snapshot to determine if all prerequisite patches have been applied to that APPL_TOP. Snapshot information is stored in the AD_SNAPSHOTS, AD_ SNAPSHOT_FILES, and AD_SNAPSHOT_BUGFIXES tables.
During a new installation, Rapid Install creates a current snapshot as a baseline. Each time you run AutoPatch, it automatically creates a new (updated) snapshot so that the information is current as of the application of the patch.
Snapshot information maintenance is performed by choosing Maintain Snapshot Information from the Maintain Applications Files menu, and then selecting the required option.
Maintain Snapshot Information Main Menu
These options allow you to:
-
List snapshots stored in the system
-
Update a current view snapshot (full or partial APPL_TOP and global)
-
Create a named snapshot (you select a current view snapshot to copy and name)
-
Export a snapshot to file (you select a snapshot to export to a text file)
-
Import a snapshot from a text file (you select a snapshot to import from a text file)
-
Delete a named snapshot
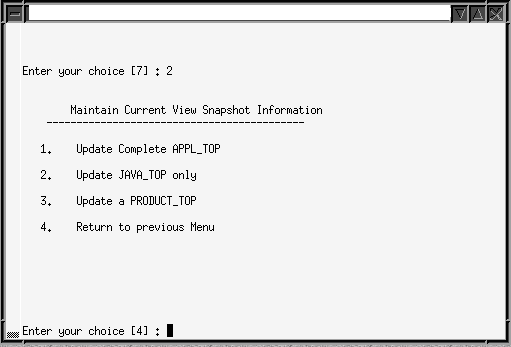
Maintain Current View Snapshot Information
When you maintain a current view snapshot, you can choose to synchronize selected files (to maintain a partial snapshot), instead of synchronizing all files for the entire APPL_TOP. Use this option when you have copied only a few files to the APPL_TOP.
-
Select the Update Current View Snapshot option from the Maintain Snapshot Information menu.
Maintain Current View Snapshot Information Menu
-
From the Maintain Current View Snapshot Information menu, you can select one of the following options:
-
Update Complete APPL_TOP
This is the original functionality of the Update Current View Snapshot option. It synchronizes all the files in your APPL_TOP.
-
Update JAVA_TOP only
Synchronizes only the files in the JAVA_TOP. At the prompt, enter the path to the JAVA_TOP subdirectory where the files were copied. If the files were copied to more than one directory, press Enter. AD Administration scans the entire JAVA_TOP and updates the information in both the current view and the global view snapshots.
-
Update a <PRODUCT>_TOP
Synchronizes only the files in a specific <PRODUCT>_TOP. Enter the product abbreviation, then provide the subdirectory information at the prompt.
Enter the path to a single subdirectory in the <PRODUCT>_TOP. If the files were copied to more than one directory in the <PRODUCT>_TOP, press Enter. AD Administration scans the entire <PRODUCT>_TOP and updates the information in both the current and the global view snapshots.
-
Check for Missing Files
Verifies that all files needed to run Oracle E-Business Suite for the current configuration are in the current APPL_TOP. Choose this task if you suspect there are files missing in your APPL_TOP.
Managing Database Entities
Database entities are database objects or data in the database related to Oracle E-Business Suite. Tasks for managing entities are grouped into two options on the AD Administration Main Menu: one for compiling or reloading entities and one for verifying their integrity.
Compiling or Reloading Database Entities
To compile or reload database entities, choose the Compile/Reload Applications Database Entities Menu option from the AD Administration Main Menu.
Compile/Reload Applications Database Entities Menu
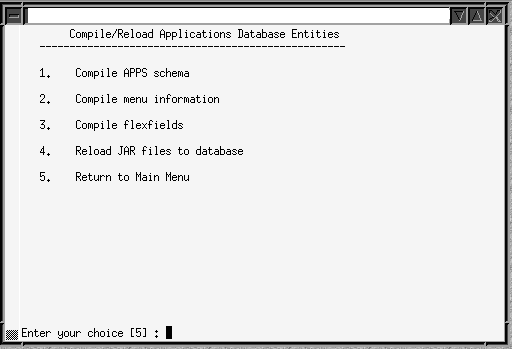
You run the tasks on this menu any time you need to compile or reload database objects; for example, after you upload new menu entries, or apply a patch that changes the setup of flexfields. Run these tasks only on the node where the core AD technology directories are located.
Compile APPS schema
Spawns parallel workers to compile invalid database objects in the APPS schema.
Note: For more information, see Compiling Invalid Objects in Oracle E-Business Suite Maintenance Procedures.
Compile Menu Information
Compiles menu data structures. Choose this task after you have uploaded menu entries to the FND_MENU_ENTRIES table, or if Compile Security concurrent requests submitted from the Menus form (after changing menu entries) fail for any reason.
AD Administration asks if you want to force compilation of all menus. If you choose the default (No), only menus with changes are compiled. If you enter Yes, all menus are compiled. Compiling all menus is generally not required.
Compile Flexfields
Compiles flexfield data structures in Oracle Application Object Library (FND) tables. Choose this task after you apply a patch that changes the setup of flexfields. Patches usually indicate when you should perform this step
Flexfields automatically compile data when you use them for the first time, so running this task is generally not required. However, compiling flexfields at a specific time can alleviate potential runtime performance issues. For example, you may choose to compile them when system usage is known to be low, rather than automatically on first use.
Reload JAR files to Database
Reloads all appropriate Oracle E-Business Suite JAR files into the database. Choose this task if all Oracle E-Business Suite Java classes are removed from your database; for example, if the database Java Virtual Machine (JVM) is reloaded because of database corruption.
Maintaining Applications Database Entities
During normal system use, the integrity of your database can be compromised, for example through user error or after you apply an inappropriate patch. It is advisable to verify the integrity of database entities as a regular maintenance procedure, or whenever the behavior of your system indicates that database entities may have been corrupted.
To perform these maintenance tasks, select the Maintain Applications Database Entities Menu option from the AD Administration Main Menu.
Maintain Applications Database Entities Menu
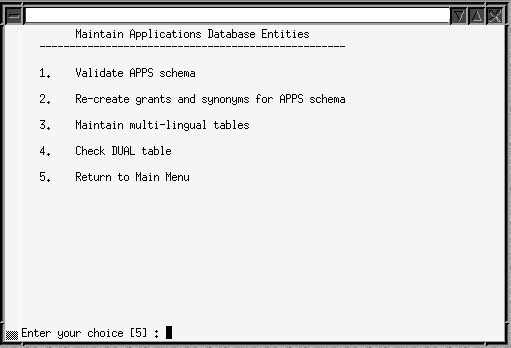
Some tasks on this menu report on issues, or potential issues, with database entities, and others actually remedy the issues.
Validate APPS schema
Verifies the integrity of the APPS schema. It produces a report named <APPS schema name>.lst. that lists issues and potential issues, grouped by the action required:
-
Issues you must fix (not specific to the APPS schema)
-
Issues you must fix (specific to the APPS schema)
-
Issues you may want to address (specific to the APPS schema)
The report is located in $APPL_TOP/admin/<SID>/out (UNIX), where <SID> is the value of the ORACLE_SID or TWO_TASK variable, or in %APPL_ TOP%\admin\<SID>\out (Windows), where <SID> is the value of the LOCAL variable. Each section of the file contains instructions for resolving the issues that are listed. Most issues can be fixed by either compiling invalid database objects or recreating grants and synonyms.
Note: For more information, see Validating the APPS Schema in Oracle E-Business Suite Maintenance Procedures.
Recreate Grants and Synonyms for APPS Schema
This task recreates grants and synonyms for the Oracle E-Business Suite public schema (APPLSYSPUB), recreates grants on some packages from SYSTEM to APPS, and spawns parallel workers to recreate grants and synonyms linking sequences and tables in the base schemas to the APPS schema.
Typically, you run this task after the Validate APPS schema task has reported issues with missing grants and synonyms.
Maintain Multi-Lingual Tables
Run this task after you add a language. It prompts you for the number of workers, then updates all multilingual tables.
Check DUAL Table
Some Oracle E-Business Suite products must access the DUAL table. It must exist in the SYS schema and contain exactly one row. This tasks verifies the existence of this table and the single row.
Important: If the DUAL table does not exist, or if it does not contain only one row, the Oracle E-Business Suite products that access it will fail to operate correctly.
Using Maintenance Mode
Maintenance mode controls the system downtime period by managing user logons. You toggle Maintenance Mode from enabled to disabled from the Change Maintenance Mode menu.
Note: For more information, see Preparing your System for Patching in Oracle E-Business Suite Patching Procedures. See also Maintenance Mode in Chapter 9 of Oracle E-Business Suite Concepts.
Choose Change Maintenance Mode from the AD Administration Main Menu. The menu appears, displaying the current maintenance mode status at the top of the screen.
Change Maintenance Mode Menu
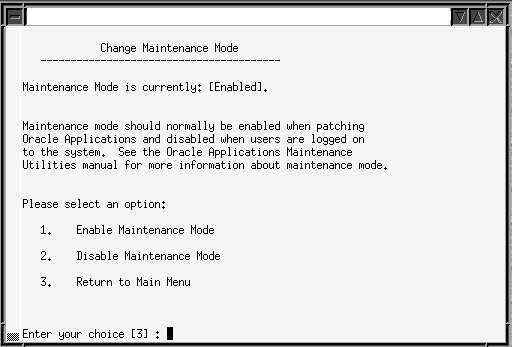
Select option 1 to enable Maintenance mode, or option 2 to disable it.
Maintenance mode must be enabled before running AutoPatch and disabled during normal day-to-day operation.
Using AD Relink
You use AD Relink to relink AD executables with the Oracle server product libraries when required, to ensure they will keep functioning properly with the Oracle database. You can relink multiple AD executables simultaneously.
Important: AD executables cannot be relinked using the Relink Applications Executables task on the AD Administration Maintain Applications Files submenu.
Log Files
As you run AD Relink, it creates a log file (adrelink.log) where it records errors and messages. AD Relink appends information about the latest relink action to the end of the file. This file is located in APPL_TOP/admin/log. If an error occurs while you are using AD Relink, or if you are not sure that the relinking was successful, review this file to see what issues should be fixed. It is also advisable to review the file even if no issues are suspected, to confirm the operation was successful.
Relinking errors encountered during an AD Administration or an AutoPatch session are recorded in the main log files for those utilities. See Log Files in Chapter 1.
Tip: To recover disk space, or simply as good housekeeping practice, you can delete the adrelink.log file if you do not need the information. A new log file is created each time AD Relink runs.
Relinking AD Executables
You use AD Relink to relink AD executables with the Oracle server product libraries to keep them functioning properly with the Oracle database. While you link product executables using the Relink Applications Executables task on the AD Administration Maintain Applications Files submenu, you cannot use it to relink an AD executable. Instead, you must relink AD executables using AD Relink. You can relink multiple AD executables simultaneously.
Log Files
As you run AD Relink, it creates a log file (adrelink.log) where it records errors and messages. AD Relink appends information about the latest relink action to the end of the file. This file is located in APPL_TOP/admin/log. If an error occurs while you are using AD Relink, or if you are not sure that the relinking was successful, review this file to see what issues should be fixed.
Relinking errors encountered during an AD Administration or an AutoPatch session are recorded in the main log files for those utilities. See Log Files in Chapter 1.
To recover disk space, you can delete the adrelink.log file if you do not need the information. A new log file is created each time AD Relink runs.
Command Line Arguments
You can modify or refine the operation of AD Relink with the command line arguments in the following table.
| force | Description |
|---|---|
| Purpose | Indicates which executable programs to relink |
| Values |
|
| Default | none (must enter either y or n) |
| Example | adrelink force=n |
| backup_mode | Description |
|---|---|
| Purpose | Indicates whether you want to back up executables |
| Values |
|
| Default | backup_mode=file |
| Example | adrelink force=n backup_mode=all |
Note: These command line arguments are intended for use with the AD Relink utility only.
Files that are critical to running Oracle E-Business Suite are listed in the adlinkbk.txt file, which is located in APPL_TOP/admin. Using the backup_mode=file argument directs AD Relink to back up only these files.
The AD Relink Interface
You run AD Relink from the command line. It does not use menus or input screens.
Running AD Relink
Run AD Relink as follows.
-
Set the environment.
You must set the environment to indicate the location of the configuration parameters that define your system. This task is common to many AD utilities. See Setting the Environment in Chapter 1 for the basic steps.
-
Relink files.
Run AD Relink with the appropriate command for your operating system:
UNIX
S adrelink.sh force=n "ad <executable name>"
Windows
C:\> sh adrelink.sh force=n "ad <executable name>"
Note: See Relinking AD Executables in Oracle E-Business Suite Maintenance Procedures for a complete description of running this utility with the various command line arguments.