Setting Up
This chapter covers the following topics:
- Overview of Setting Up
- Step 1 - Choose a configuration (mandatory)
- Step 2 - Copy from Template Collection Plans (mandatory)
- Step 3 - Update of Sequence prefix and suffix (mandatory)
- Step 4 - Update of values for seeded collection elements (optional)
- Step 5 - Update of menu entry to point to the correct plan (mandatory)
- Step 6 - Modify Collection Plan Details and Plan Element Prompts (optional)
- Step 7 - Update 'Execute a SQL script' Text (conditionally mandatory)
- Step 8 - Set Up Collection Plan Security (optional)
- Step 9 - Add user defined elements to the plans (optional)
- Step 10 - Link user defined plans to the system (optional)
- Step 11 - Link Corrective Action system to Nonconformance and Disposition system (optional)
- Step 12 - Link the Transactional Collection Plan to the Nonconformance and Disposition system (optional)
- Step 13 - De-link Collection Plans from the Nonconformance and Disposition system (optional)
- Step 14 - Organize the Plan Elements into Folders (optional)
- Step 15 - Set Up Profile Options (optional)
- Step 16 - Setup within other modules (conditionally mandatory)
- Considerations Prior to Implementation
- Maintaining a Reference Copy of Collection Plans (optional)
Overview of Setting Up
This chapter outlines the steps necessary to set up Oracle Quality in order to use the Nonconformance and Disposition Solution Templates.
The Nonconformance and Disposition Solution is delivered as a set of template collection plans and related seeded data. To utilize the solution, real collection plans need to be created and set up for use. These plans should also be modified according to your specific business needs. The following is a setup checklist:
Setup Checklist
-
Choose a configuration
-
Copy from template collection plans
-
Update of Sequence prefix and suffix
-
Update of values for seeded collection elements
-
Update of menu option to point to the correct plan
-
Modify collection plan details and plan element prompts
-
Update 'Execute a SQL Script' text
-
Set up collection plan security
-
Add user defined elements to the plans
-
Link user defined plans to the system
-
Link corrective action system to the nonconformance and disposition system
-
Link transaction collection plan to the system
-
Unlink unnecessary plans from the system
-
Organize the plan elements into folders
-
Set up Profile Options: Autoquery set to No
-
Setup complete in other modules
-
Maintain a reference copy of the plans
Step 1 - Choose a configuration (mandatory)
In order to accommodate a customer's choice to implement a complete Nonconformance and Disposition Solution, purely in Oracle Quality, or only portions of it, the following configurations are supported:
| Configuration | Details and Usage | Parent Plan |
|---|---|---|
| Nonconformance and Disposition | This configuration consists of all collection plans and related seeded data used for implementing Nonconformance and Disposition Management. (the master set of the next two configurations) This is the recommended configuration for business that require integrated, Nonconformance Management and Disposition tracking. |
Template Nonconformance Master Plan |
| Disposition Only | This configuration consists of all collection plans and related seeded data, used for Disposition Management only. | Template Disposition Header Plan (Disposition Only) |
| Nonconformance Only | This configuration consists of all collection plans and related seeded data, used for Nonconformance Management only. Use this configuration if your business does not require a systematic method to track disposition. |
Template Nonconformance Master Plan (Nonconformance only) |
Step 2 - Copy from Template Collection Plans (mandatory)
Based on the configuration you had chosen in the previous step, copy the entire structure of template collection plans into a set of real collection plans. The plans can be copied using the Copy Collection Plans process. It is required to specify the target or destination organization in which this set of plans will be used, as well as the user-defined names for these plans.
.
Note: Template collection plans cannot store quality results and cannot be updated.
To copy templates: (text added for conversion)
-
Navigate to Quality: Setup > Copy Collection Plans.
Copy Collection Plans Page

-
Select Template from the Collection Plan Type list of values.
-
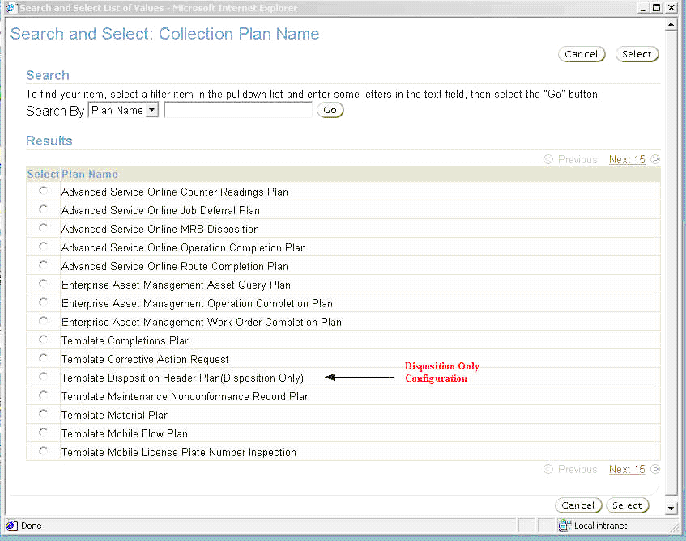
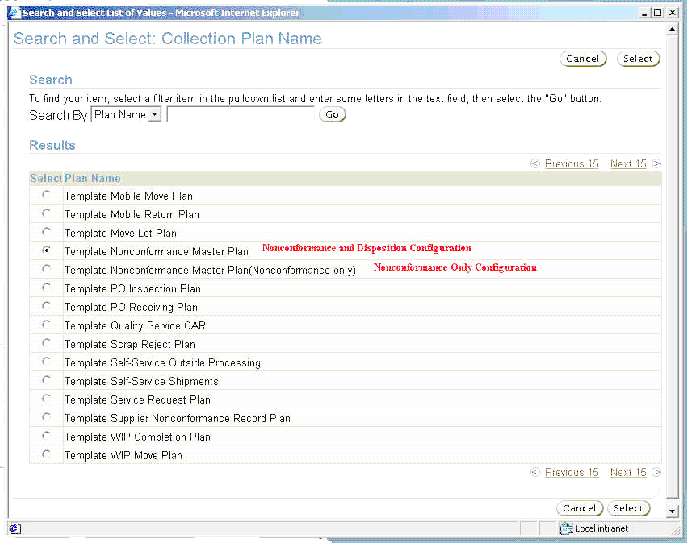
Select a parent Collection Plan Name. Depending on the configuration (step 1) chosen for implementation. You can use the search page, as well, to search on the available template plans.
Partial List of Seeded Template Collection Plans with Disposition Configuration Highlighted
Partial List of Seeded Template Collection Plans with Nonconformance Configurations Highlighted
-
The Organization will not be populated and is not necessary because the template plans are not assigned to an organization.
-
Choose Search.
-
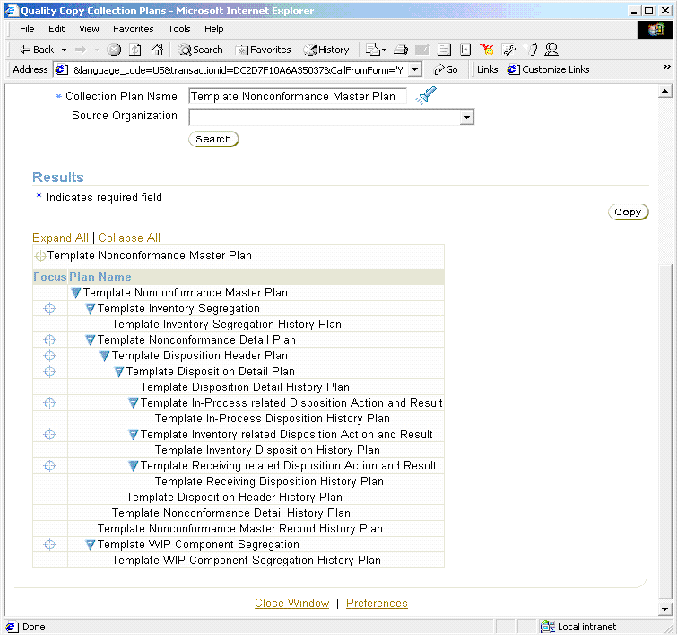
Review the hierarchy of plans within the Results region.
Parent-Child Plan Structure for Nonconformance and Disposition Collection Plans
-
Choose Copy.
-
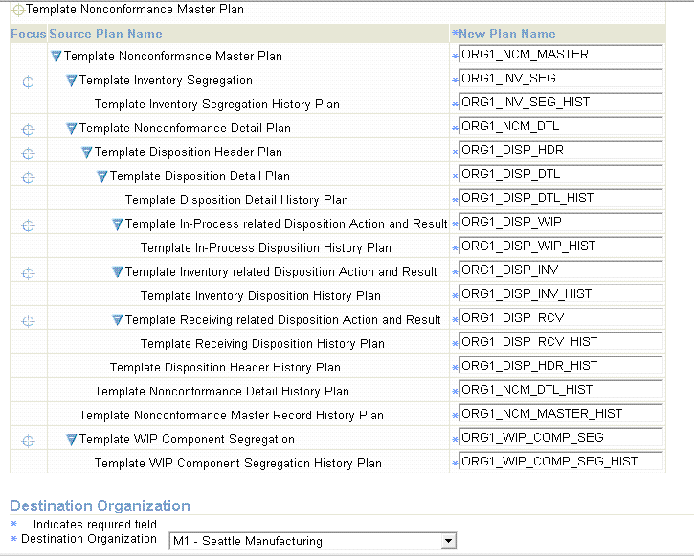
Enter New Plan Names for each of the template plan names displayed within the Source Plan Name column.
Note: Each individual plan name is required, and the plan names should be unique.
New Collection Plans to be copied from Template
-
Select a Destination Organization. The collection plan structure will be copied to this organization.
-
Choose Finish. Plans with names you have chosen will be created with elements, values, actions, and parent-child relationships, copied from the template plans.
-
You can optionally implement the process that enables suppliers to log nonconformances via Oracle iSupplier Portal, prior to shipment. You can also log nonconformances within Oracle Enterprise Asset Management; you can copy the following stand-alone template collection plans:
-
Template Supplier Nonconformance Record Plan
-
Template Maintenance Nonconformance Record Plan
-
The steps to copy are similar to the steps described earlier, with the exception that these plans do not have a parent-child collection plan structure.
-
Step 3 - Update of Sequence prefix and suffix (mandatory)
The Nonconformance and Disposition Solution generates a sequence number for uniquely identifying the individual Nonconformance and Disposition Numbers. If your business practice requires a specific manner of identifying these sequentially generated numbers, you can set up the appropriate prefix and suffix information; this should be performed before using and entering data in the Nonconformance and Disposition Collection Plans.
Note: After quality results have been entered for sequence collection elements and saved into the nonconformance and disposition collection plans, the prefix/suffix cannot be changed.
-
Navigate to the Collection Elements window. (N) Quality: Setup > Collection Element.
-
Select Nonconformance Number and Disposition Number from the Collection Element list of values.
Update of Sequence Collection Element Attributes
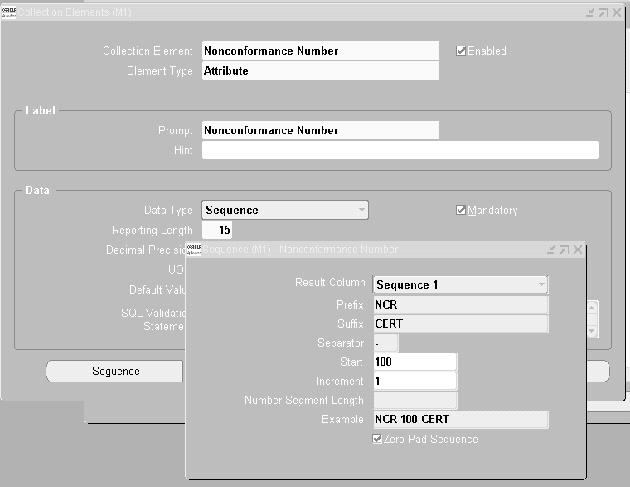
-
Choose Sequence.
-
Enter your desired Prefix, Suffix, Separator, Increment, and Number Segment Length.
-
Repeat these steps for the Disposition Number (Collection Element).
-
Save your work.
Step 4 - Update of values for seeded collection elements (optional)
Oracle Quality has seeded commonly used values for some collection elements, as part of the seeded data. Depending on applicability of these values to your organization process, these values can be modified either at the collection element level, or at the plan level.
As part of the Nonconformance and Disposition Solution, many seeded collection elements have been provided. Some of these elements are listed below:
-
Nonconformance Source
-
Nonconform Severity
-
Nonconform Priority
-
Nonconformance Type
-
Nonconformance Code
-
Nonconformance Status
-
Nonconform Line Status
-
Action Executed
-
Disposition
-
Disposition Action
-
Disposition Status
-
Disposition Source
To update values for seeded collection elements
-
Navigate to the Collection Element window.
-
Select the element, for which you want to change its value, from the Collection Element list of values.
-
Choose Values.
-
Add or modify these values to match your organization process statuses and codes.
-
Save your work.
To update values for copied collection plans
-
Navigate to the Collection Plans window.
-
Query the plan that contains the collection element that you modified above.
-
Select the Collection Element, then choose Values. You can add or modify the values you had entered.
-
Optionally, choose Defaults to copy the values from the collection element definition.
Note: Do not delete the seeded lookup values for the collection elements, Disposition Action and Disposition Status. These seeded values are internally used by Oracle Quality. You can add new lookup values to this list of elements.
Step 5 - Update of menu entry to point to the correct plan (mandatory)
To ease the use of Nonconformance and Disposition Solution seeded menu options for entry, update and view of the Nonconformance and Disposition, are provided. These menu options need to be modified by the System Administrator to point to the top most parent plan that was created in Step 2.
You first need to find the plan identification number of the Nonconformance Master and Disposition Header you have copied into.
To Update a menu entry
-
Navigate to the Collection Plans window.
Collection Plans Window
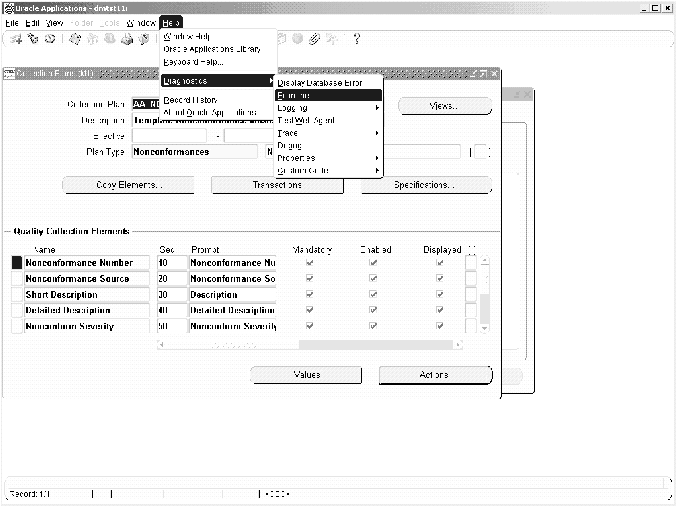
-
Select the Collection Plan from the list of values.
-
From the Help menu, select Diagnostic, then Examine, to display the Examine Field and Variable Values window.
Examine Field and Variable Values Window
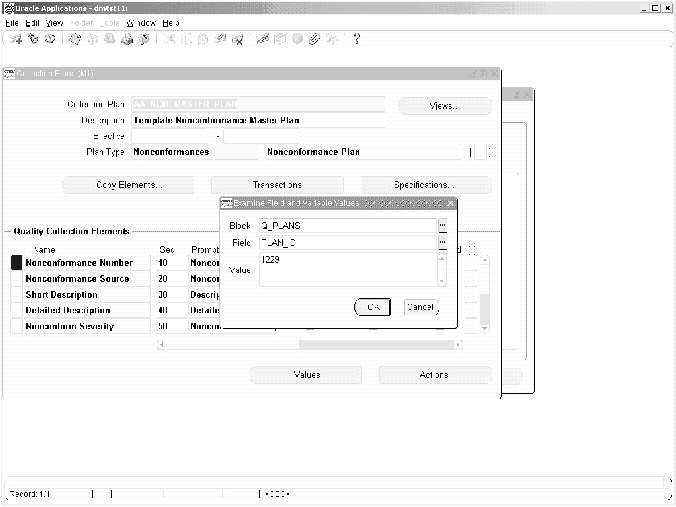
-
Select Q_PLANS from the Block list of values.
-
Select PLAN_ID from the Field list of values.
-
The plan identification number is populated within the Value field.
-
Switch to the System Administrator responsibility.
-
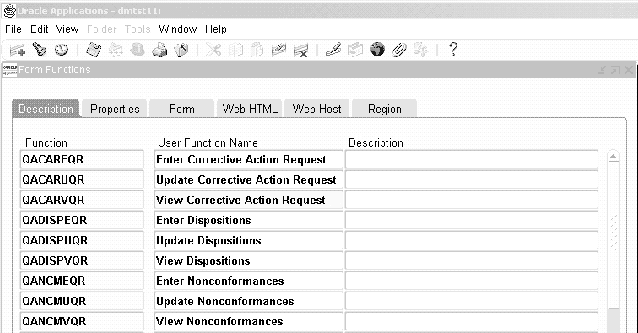
Navigate to the Form Function window.
-
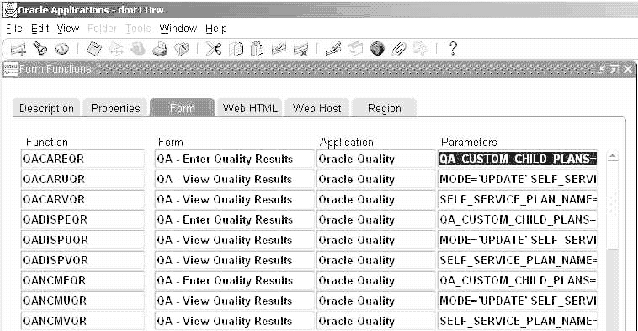
Within the Description tabbed region, select the Function field, then select the Find (flashlight) icon. Perform a query on QA%QR% functions.
Form Functions and Parameters Field for Menu Options
-
Select the Form tabbed region.
-
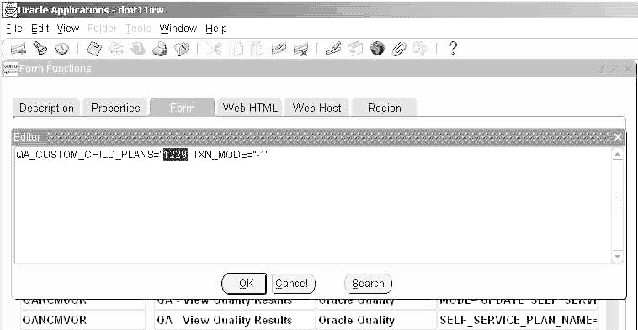
Select the Parameters field within the QANCMEQR Function row. Once selected, the Editor window will display.
-
Change the ORA$QA_PLAN_ID value to the plan identification number of the Nonconformance Master plan that was set up in previous steps.
-
For the QANCMUQR and QANCMVQR functions, change the ORA$QA_PLAN_NAME values (within their corresponding Parameters fields) to the plan name of the Nonconformance Master plan that was set up in previous steps.
-
Make similar changes for the other functions related to Dispositions (QADISPEQR, QADISPVQR, QADISPUQR). Note that to access the Disposition forms functions, the Disposition ID and Disposition Name needs to be used.
-
Save your work.
Note: For additional menu entries, if multiple Nonconformance and Disposition plans exist within the same organization, copy QA%QR% functions for each Nonconformance Master plan. Add these menu options to the responsibility of the authorized users.
While form functions like QANCMEQR can be copied and renamed as required for the customer business scenario, the attachment icon would not be enabled for the custom form function created. To enable the attachment icon, each form function should have an entry in the attachments table. You can copy the attachments setups available for QANCMEQR and other functions to their new form functions using Application Developer Responsibility.
Setup the QACAREQR, QACARUQR and QACARVQR form functions using the CAR plan id and name in a similar manner as the NCM and Disposition form functions.
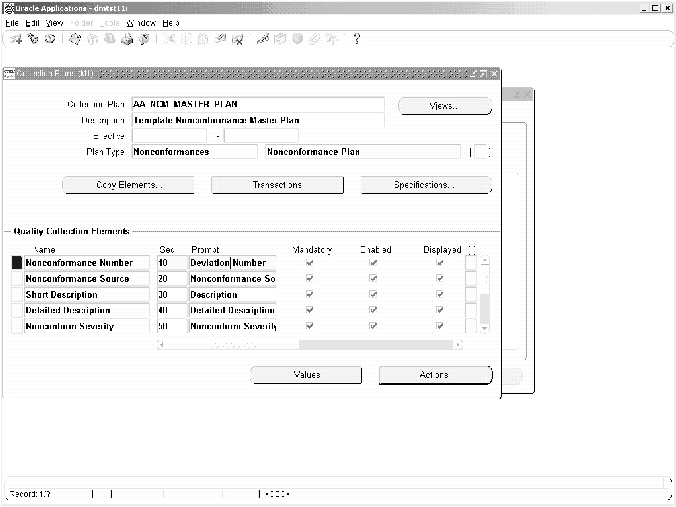
Step 6 - Modify Collection Plan Details and Plan Element Prompts (optional)
The copied plans from Step 2 have the description of the plan copied from the templates. The collection plan description can be modified to be more meaningful to the user. The collection element prompt in the copied nonconformance and disposition collection plans can be modified to suit specific user requirements.
For example, if Nonconformance Number is called Deviation Number, perform the following steps
-
Navigate to the Collection Plans window.
-
Select the Collection Plan for which you want to modify the prompt name for the collection element. In this example, query the plans that use Nonconformance Number.
-
Within the Prompt field of the collection element, enter Deviation Number.
Modification of Plan Collection Element Prompt
Step 7 - Update 'Execute a SQL script' Text (conditionally mandatory)
The Nonconformance and Disposition solution included seeded collection plans to log Supplier and Maintenance Nonconformance within self service. This enables suppliers to report nonconformance using Oracle iSupplier Portal, or Maintenance Activities within Oracle Enterprise Asset Management to report nonconformance within Self Service. As part of the template plans, there are seeded actions to copy the supplier and maintenance nonconformance to the Nonconformance Master plan. The action details need to be modified to point to the correct Nonconformance Master Collection plan name that was created in Step 2.
If you decide to implement the supplier ability to log nonconformance via Oracle iSupplier Portal, or log maintenance nonconformances via Self Service,
Execute the following steps (after copying the corresponding template plans):
-
Navigate to the Collection Plans window.
-
Select the Supplier and Maintenance Nonconformance, stand-alone collection plans (copied from the template) from the Collection Plan list of values.
-
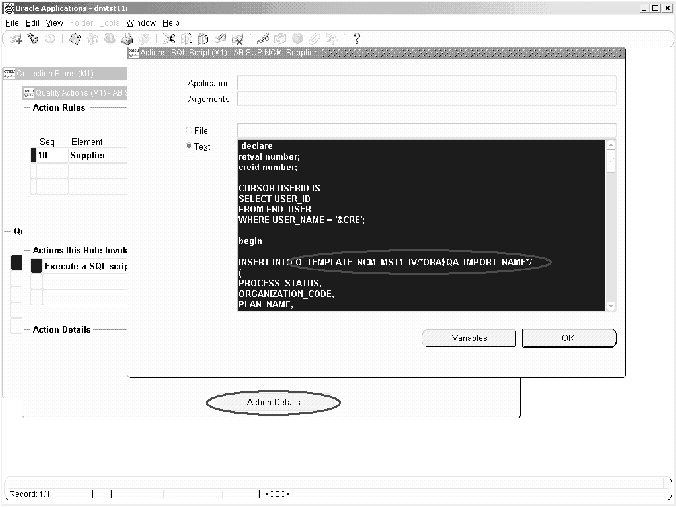
Select the Supplier collection element, then choose Actions.
Update to the Supplier Nonconformance Plan

-
Choose Action Details.
Update 1 to the Action Details in the Supplier Nonconformance Plan
-
Change the string, TEMPLATE_NCM_MST1, to the name of the Nonconformance Master plan, set up during the previous steps.
In the example above, the string, Q_TEMPLATE_NCM_MST1_IV, needs to be updated to Q_<Plan Name>_IV; the <Plan Name> is the Nonconformance Master collection plan that was previously set up.
Note: If the collection plan contains spaces, replace the spaces with underscores.
-
Change TEMPLATE NCM MST1 to the name of the Nonconformance Master plan, set up in the previous steps. In this case, do not replace the spaces with underscores. See: Figure-Update 2 to Action Details in the Supplier Nonconformance Plan
Update 2 to Action Details in the Supplier Nonconformance Plan
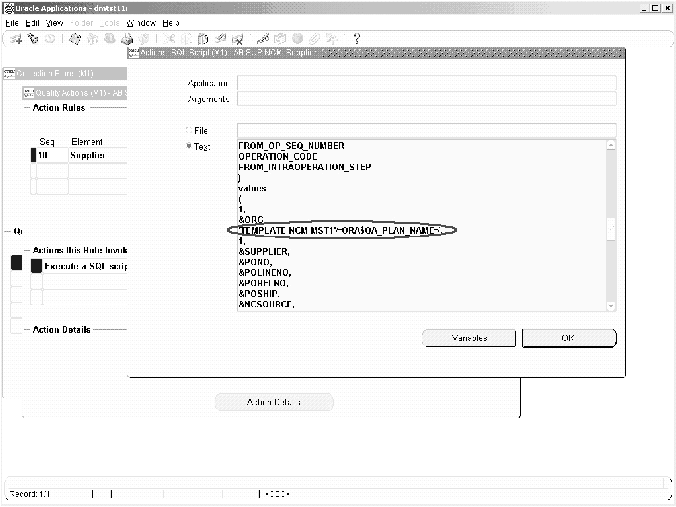
-
Save your work.
-
Repeat steps one through seven for the Maintenance Nonconformance plan.
Step 8 - Set Up Collection Plan Security (optional)
Depending upon the sensitivity of nonconformance and disposition information, it might be desired to restrict the access of the data to users for view, update, or creation. This might require different users to be granted different types of privileges. This step enables the Applications System Administrator to grant specific privileges to different users an user groups, for the different plans in the Nonconformance and Disposition Collection Plan structure (resulting from the collection plan copy in step 2).
For example, a Quality Manager has complete access to create, update, and view Nonconformance and Dispositions. A Receiving Inspector has access to log nonconformances, but not have access to update dispositions.
8.1: To set up a User Group and add users
-
Navigate to the User Group window:
-
Create a new User Group.
-
Assign users (members), whom will have the same roles and privileges, to the current user group. All users of the system should be Oracle Applications users with a valid login authority.
-
Save your work.
8.2: Grant privileges to user groups
-
Navigate to the Grant Privileges window. In this window, any User Group can be grated privileges to perform various functions for any plan, If the Privilege check box is selected, the user group is granted that privilege for the specified collection plan.
-
Depending upon the privileges that need to be granted to each user group, select the User Group name, the Collection Plan name, and the corresponding check boxes for Enter, View, Update, and Delete results.
-
Save your work.
8.3: Set Up Master Security Profile
To enable collection plan security, set the value for the following Profile Option to Yes:
QA: Collection Plan Security
After all the setup steps have been completed, the users will have access only to those collection plans to which they have privileges.
Step 9 - Add user defined elements to the plans (optional)
Specific business needs might require additional collection elements to capture information related to a Nonconformance or Disposition. This is accomplished by adding new collection elements and values to the collection plans, copied in step 2.
For example, if it is required to capture the Nonconformance and Disposition Costs in the collection plan, create two new elements, Nonconformance Cost and Disposition Cost.
To add user defined elements
-
Navigate to the Collection Element window:
-
Create a new element, Nonconformance Cost, with the following properties:
-
Element Type = Variable
-
Data Type = Number
-
Decimal Precision = 2
-
-
-
Save your work.
-
Navigate to the Collection Plans window:
-
The new collection element, Nonconformance Cost, cane either be added tot he Nonconformance Master collection plan or the Nonconformance Detail collection plan. The decision needs to be based on the respective business process.
-
If you want the costs to roll up to a parent plan, set up appropriate parent-child element relationships. For example, if you add Nonconformance Cost to the Nonconformance Master and Nonconformance Detail plans, then you can set up the parent-child element relationship in the following manner:
-
Parent Plan: Nonconformance Master
-
Child Plan: Nonconformance Detail
-
Parent Element: Nonconformance Cost is the sum of Child element: Nonconformance Cost
-
-
Where appropriate, when entering the Nonconformance Detail, enter the nonconformance cost for each line; the costs will be summed up from the nonconformance line level to the nonconformance master.
-
-
-
To keep track of updates to this element, add it to the Nonconformance Master History plan. Navigate to the Update Parent-Child Relationship page.
-
Parent Plan: Nonconformance Master
-
Child Plan: Nonconformance Master History
-
Parent Element: Nonconformance Cost is copied to Child element: Nonconformance Cost
-
-
Step 10 - Link user defined plans to the system (optional)
In some cases, it might be required to collect information in additional plans, without overloading the existing collection plans. For example, you can collect test data on a nonconformance during the analysis stage, or record the serial numbers of the nonconforming material within a separate collection plan. In these cases, you would create a new collection plan and associate it to the plan that uses the test data or serial number collection plan.
10.1: Create a collection plan for a Quality test
-
Navigate to the Collection Plan window:
-
Enter a new plan Name, Description, and Plan Type.
-
Add collection elements.
-
Save your work.
10.2: Define the Parent-Child plan relationship
Navigate to the Define Parent-Child Plan Relationship page:
-
Select your Nonconformance Master, as the Parent plan.
-
Enter the plan, created in Step 10.1, as the Child plan.
-
Select Immediate or Delayed from the Data Entry mode list of values.
-
Save your work.
When you enter a Nonconformance, you can invoke the Quality test plan from step 10.1.
Step 11 - Link Corrective Action system to Nonconformance and Disposition system (optional)
If logging a Corrective Action Request (CAR) is a part of your Nonconformance or Disposition process flow, the Corrective Action system can be linked to the collection plan, corresponding to the step within your process. Refer to Part 1 for more details.
11.1: Create an element trigger, Corrective Action Request (optional)
If you want to use an element, such as Log CAR, to trigger a CAR when its value equals YES, follow the below steps:
-
Navigate to the Collection Element window.
-
Enter Log CAR as the Collection Element name, Attribute as the Element Type, and Character as the Data Type.
-
Save your work.
-
Navigate to the Collection Plan window.
-
Perform a query on your Nonconformance or Disposition plan, then add Log CAR to this plan.
-
Save your work.
11.2: Define a Parent-Child Plan Relationship
-
Navigate to the Define Parent-Child Relationship page.
-
Enter your Nonconformance or Disposition plan as the Parent plan.
-
Enter your CAR plan as the Child plan.
-
If you want to enforce the logging of CARs immediately after a Nonconformance and/or Disposition is logged, select Immediate from the Data Entry mode list of values. Otherwise, select Delayed.
-
Optionally, enter Log CAR = YES, as the criteria.
Step 12 - Link the Transactional Collection Plan to the Nonconformance and Disposition system (optional)
Nonconformances can be logged during inspection, receiving, or while a WIP move transaction is performed. To leverage the ability to log a nonconformance in a transaction-integrated session, perform the following steps:
12.1: Create and enable the collection plan for a transaction
This step is required if no existing collection plan is enabled for this transaction.
-
Navigate to the Collection Plan window.
-
Enter a new Plan Name, Description, and Plan Type.
-
Choose Copy Element, then select the template collection plan for your transaction (for example, Template WIP Completion).
-
Choose Transaction, then associate this plan with your transaction (for example, Work-In-Process Completion).
-
Save your work.
12.2: Create an element to trigger Nonconformance Logging (optional)
If you want to use an element, such as Log NC, to trigger Nonconformance logging when its value equals YES, follow the following steps:
-
Navigate to the Collection Element window.
-
Enter Log NC as the Collection Element name, Attribute as the Element Type, and Character as the Data Type.
-
Save your work.
-
Navigate to the Collection Plan window.
-
Perform a query on your plan, then add Log NC to this plan.
-
Save your work.
12.3: Define a Parent-Child Plan Relationship
-
Navigate to the Define Parent-Child Relationship page.
-
Enter the plan you created in step 1 as the Parent plan.
-
Enter your Nonconformance Master plan as the Child plan.
-
If you want to enforce the logging of Nonconformances immediately after transaction data is entered, select Immediate from the Data Entry mode list of values. Otherwise, select Delayed.
-
Optionally, enter Log CAR = YES, as the criteria.
When you perform the transaction, you can invoke the transaction quality plan (step 12.1), then your Nonconformance Master.
When a nonconformance is found independent of any transaction, invoke the Enter Nonconformance menu option, and enter a new record directly.
Step 13 - De-link Collection Plans from the Nonconformance and Disposition system (optional)
In Chapter 2, the organization of the nonconformance and disposition data was discussed. Based on your possible need to capture granular level detail of the nonconformance, some of the collection plans can be de-linked from the existing collection plan structure.
For example, if it was determined that you need only nonconformance and one disposition plan, and that you do not need the additional plans, then the follwi9ng diagram describes the steps necessary to de-link the collection plans that are not required. In this example, the nonconformance detail and disposition header plans are de-linked from the structure.
De-linking Collection Plans
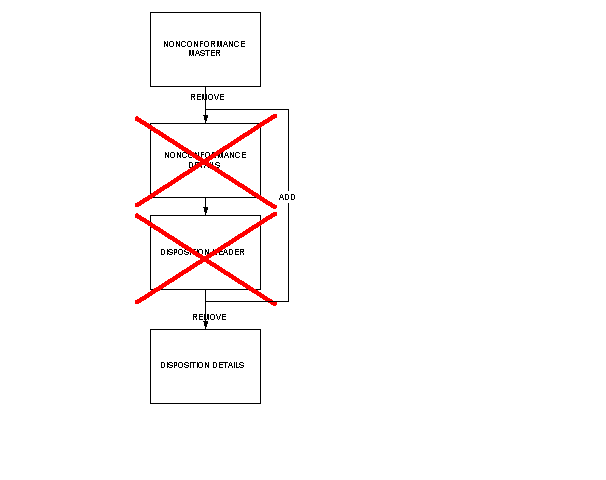
13.1: Remove unnecessary Parent-Child plan relationship
-
Navigate to the Update Parent-Child Relationship window.
-
Search using Nonconformance Master as the Parent plan.
-
Remove the relationship with Nonconformance Detail as the Child plan.
-
Search using Disposition Header as the Parent plan.
-
Remove the relationship with Disposition Detail as the Child plan.
-
Save your work.
13.2: Add a new Parent-Child Plan Relationship
-
Navigate to the Define Parent-Child Plan Relationship page.
-
Enter Nonconformance as the Parent plan
-
Enter Disposition Details as the Child plan.
Step 14 - Organize the Plan Elements into Folders (optional)
The Nonconformance Master collection plan copied during Step 2 contains collection elements to capture nonconformance data from different functional areas of the enterprise (Receiving, Work in Process, Shipping). Users of this system might be interested only in the data related to their job role. For example, a receiving inspector might be interested only in the data related to receiving, such as Purchase Order or Receipt, and not the entire set of collection elements.
You can use Folders functionality available with Oracle Applications for the modes of enter, update, and view of collection plans. In Oracle Quality, Folder Tools can be enabled for Enter, Update, and View Quality Results.
See Also
Folder Tools, Oracle E-Business Suite User's Guide
Step 15 - Set Up Profile Options (optional)
If you expect a large number of nonconformance and disposition records, then to improve performance, set the following profile option value to Never: QA: Update Quality Results Autoquery.
Step 16 - Setup within other modules (conditionally mandatory)
Because this solution provides the features to send e-mail notifications and workflow notifications, it is required for users to be set up as employees, within their e-mail addresses, in Oracle HR and/or to be set up as Oracle Applications Users.
See Also
Oracle HRMS
Oracle E-Business Suite System Administrator Guide Documentation Set
Considerations Prior to Implementation
The following are considerations to consider before implementation:
-
Maintain a Reference Copy of Collection Plans
Maintaining a Reference Copy of Collection Plans (optional)
After completing the setup process, prior to implementation, you might want to maintain a Reference Copy of the real collection plans that you intend to implement. This Reference set of plans can then be copied to collection plans that will be implemented and used. The Copy Collection Plan process can be utilized. This approach eliminates the need to copy from the template plans and modify the same for the implementation, within each organization.
If you plan to deploy these plans multiple times without repeating the above setup steps, it is a good idea to preserve these plans with all the modifications in a reference copy that is not used for data entry. Copy from the reference to real plans.
The following diagram depicts the implementation process of the consideration discussed above:
Reference Copy of Collection Plans Diagram

Your nonconformance and disposition solution plans are ready for implementation.