Tailoring Your Solution
This chapter covers the following topics:
- Overview of Tailoring Solutions
- Workflow Configuration
- Using Oracle Approval Management
- Tailoring E-mail Notifications
- Tips and Techniques
Overview of Tailoring Solutions
This chapter illustrates how the solutions can be tailored to suit your organization requirements. This chapter lists only examples for tailoring your implementation. This chapter contains the following topics:
Note: The examples in this chapter are not part of Oracle's code; they have not been tested or certified by Oracle. Customers and implementors must use their discretion before implementing.
Workflow Configuration
This solution includes generic workflow notifications for the Nonconformance and Disposition set of collection plans. You can replace these workflows with your own workflows. You can design Workflow notification messages in your own format. Responses entered on the notification can be written back to collection plans.
For example, you can build a new workflow based on a the Disposition Detail Notification workflow:
-
Send notification to the next approver (higher authority)
-
Update the disposition record with an approval Reason Code from the notification
Refer to Appendix F for a list of seeded workflow notifications provided as part of the solution.
Starting Workflow Builder
-
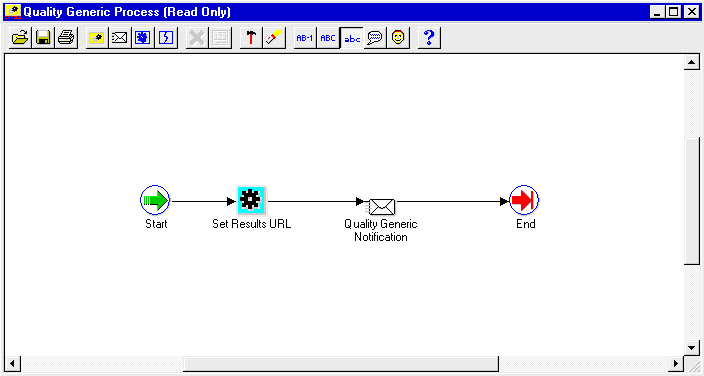
Copy the seeded workflow, Quality Generic Process, to a new workflow name.
-
Workflow Process Diagram for Nonconformance and Disposition Notification
Modified Workflow Process Diagram for Nonconformance and Disposition Notification

-
Add a new item attribute, X_APPROVAL_REASON, to this workflow.
-
Display this item attribute within the message body of the current workflow.
-
Add a call to the standard qa_results_wf_pkg.process_update procedure, within the Process Updates step. It can then write back all item attributes with an X_ prefix. This includes the Approval Reason.
-
Add a call to custom PL/SQL code for finding approver, within the Find Approver step. Sample PL/SQL code to achieve this is illustrated in Appendix C. This sample code is for illustration purposes only, and has not been tested or certified by Oracle.
Oracle Quality Setup
-
Add an Approval Reason element to the Disposition Detail collection plan (See: Step 9 within Chapter 3).
-
Replace the generic workflow, specified within the Workflow action (associated with the Send Notification element), with your new workflow.
-
Add a new token, X_APPROVAL_REASON, to the Workflow action (associated with the Send Notification element) within the Disposition Detail. Map it to the Approval Reason element within the Disposition Detail.
Using Oracle Approval Management
The Oracle Approval Management application can be utilized for managing nonconformances and dispositions. This application enables you to define business rules governing approvals. For example:
-
IF Severity = MEDIUM, then one approval is required.
-
IF Severity = HIGH, then two approvals are required.
Once the rules have been defined, the workflow uses APIs (Approval Management) to find the next approver (Step 6) until all approvals are obtained or rejected.
Guidelines for Setting Up the Approval Process
-
Register Nonconformance and/or Disposition as a new transaction type.
-
Create Transaction attributes (Severity, Urgency, Nonconformance Type), which are used in rules to determine approvers.
-
Define Approval Rules.
-
In the first step of your workflow process, call ame_api.setFirstAuthorityApprover with the user specified in the Send Notification To item. If you are using Oracle Approvals Management to determine the first approver, call ame_api.getNextApprover to obtain the identification of the first approver.
-
During the Find Approver step of your workflow process, call ame_api.getNextApprover to obtain the identification of the next approver.
-
If ame_api.getNextApprover returns and empty ame_util.approverRecord, the transaction is approved.
-
During the Notification step, call ame_api.updateApprovalStatus. This sends the approval status to Oracle Approvals Management.
See Also
How Should a Workflow use the Oracle Approvals Management API to Manage Approvals?
Oracle Approvals Management Implementation Guide, Appendix C
Oracle Workflow User's Guide
Oracle Workflow Administrator's Guide
Oracle Workflow API Reference
Oracle Workflow Developer's Guide
Oracle Workflow Customization, Oracle White Paper, August 2002
Tailoring E-mail Notifications
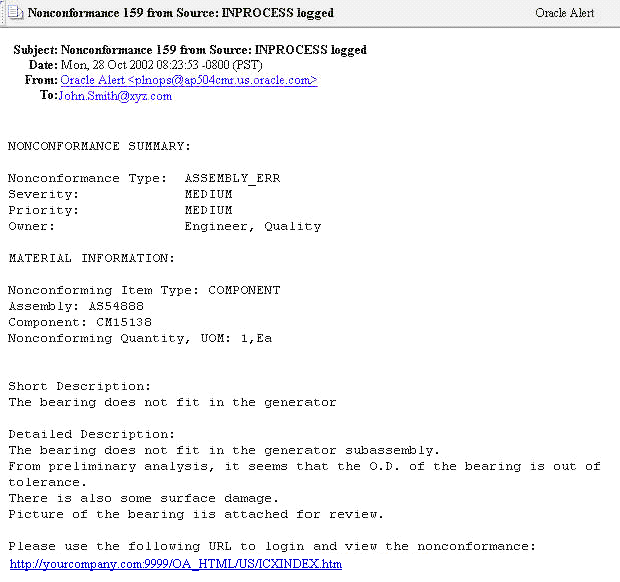
You can modify all e-mail notification message text, according to your business conventions. For example, you can include the Personal Home Page URL of Oracle Applications. Recipients of the e-mail are then easily directed to Oracle Applications, enabling ease in Nonconformance and Disposition response.
To tailor e-mail notifications:
-
(N) Quality: Setup > Collection Plan
-
Perform a query on the collection plan associated with the notification needing modification.
-
Select the Send Email element.
-
Choose Action.
-
Select the Send an electronic email notification action, then choose Action Details.
-
The Text area contains the notification's message text.
E-mail Alert with Oracle Applications' URL
Tips and Techniques
This section includes tips and techniques to help tailor your solutions. The topics covered deal with field security, deriving user information using assign-a-value, lookup feature using SQL validation strings, dependant list of values, and custom reports.
Field Security
Depending on your business needs, it might be desirable to make a critical element within a collection plan protected from update by specific users. For example the Disposition Status should be protected from update, within the Disposition Header plan, by the MFG and PROJMFG users. Below are the steps used to set this scenario up:
Step 1: Create a collection element to control record saving
-
(N) Quality: Setup > Collection Element
-
Enter Save (or any unused name) as the Collection Element name, Attribute as the Collection Element Type, and Character as the Data Type.
-
Save your work.
Step 2: Add elements and actions to your plan
-
(N) Quality: Setup > Collection Plan
-
Perform a query on your Disposition Header plan, and add the collection element, Save. Make sure it is enabled but not displayed.
-
Add an action to Save.
-
Action Trigger: When Save = 2
-
Action: Reject the input with the message, "this record is protected from update by the current user."
Note: Reject the input action rejects the whole row and not only the element to which the action is associated.
-
Add the current action to Disposition Status. When Disposition Status is entered, assign a value to Save with the following SQL script:
SELECT c
FROM (SELECT 2 c from dual
WHERE: parameter.user_id in (1003612, 1003614)
-- user id of users that should not be able to update the Disposition Status
UNION ALL
SELECT 1 FROM dual)
WHERE rownum = 1
With this action in place, when MFG users (1003612) and PROJMFG users (1003614) attempt to update and save the disposition status, their input will be rejected and a message will display.
Derive User Information using Assign-a-Value
Information about a user, such as e-mail address and telephone number, can be retrieved by using the action, Assign-a-Value, with a SQL statement. This technique is used often. For example, the Owner collection element assigns a value to Owner E-mail, based on the following SQL query:
SEKECT EMAIL_ADRESS, NULL
FROM PER_EMPLOYEES_CURRENT_X
WHERE FULL_NAME = &OWNER -- &OWNER token maps to the Owner element.
Another example involves deriving the current user's telephone number information. This example is not included in the solution.
Setting up telephone information derivation:
-
Navigate to the Collection Element window (N) Quality: Setup > Collection Element. Create a collection element.
-
Navigate to the Collection Plan window (N) Quality: Setup > Collection Plan.
-
Query the plan that will receive the Telephone Number collection element.
-
Add the Telephone Number element to the element block.
-
Select a mandatory element and then choose Actions. Add the following action:
IF <collection element> is entered, assign a value to Telephone Number with SQL:
SELECT p.work_telephone
FROM PER_PEOPLE_F P, FND_USER U
WHERE P.PERSON_ID = U.EMPLOYEE_ID AND
U.USER_ID =: PARAMETER.USER_ID AND
ROWNUM <= 1
Note: This SQL string is used for example purposes. It is not part of Oracle's code; it has not been tested or certified by Oracle. Customers and implementors must use their discretion before implementing.
-
Save your work.
Lookup Feature Using SQL Validation Strings
SQL can be utilized as an element's list of values. This is widely used in this solution. For example, the Source Owner collection element list of values is based on the following SQL query:
SELECT pecx.full_name
FROM per_employees_current_x pecx, fnd_user fu
WHERE pecx.employee_id = fu.employee_id
ORDER by full_name
Using SQL as the list of values of an element will simulate a lookup feature. For example, Supplier Contact Lookup (not included in the solution).
Setting up a SQL as a list of values:
-
Navigate to the Collection Element window (N) Quality: Setup > Collection Element.
-
Create a Supplier Contact collection element.
-
Enter the following SQL Validation String:
SELECT p.first_name ll ‘ ‘ ll p.last_name ll ' ' ll
p.area_code ll '-' ll p.phone_code, v.vendor_name description
FROM PO_VENDOR_CONTACTS P, PO_VENDOR_SITES S, PO_VENDORS V
WHERE P.VENDOR_SITE_ID = S.VENDOR_SITE_ID
AND S.VENDOR_ID = V.VENDOR_ID
ORDER BY 2, 1
-
Navigate to the Collection Plan window (N) Quality: Setup > Collection Plan.
-
Query the plan that will receive the Supplier Contact collection element.
-
Add the Supplier Contact element to the element block.
-
Save your work.
You can now display this element's list of values. You can use it to find the name and phone number of a contact person, for any supplier.
Note: This SQL string is used for example purposes. It is not part of Oracle's code; it has not been tested or certified by Oracle. Customers and implementors must use their discretion before implementing.
Dependant List of Values
The solution has not included any dependent lists of values. Displaying a different list of values for one element, depending on the value of another element, is a dependency example.
For example, your business requires the NONCONFORMANCE CODE element value to depend on the NONCONFORMANCE TYPE element value. The NONCONFORMANCE CODE values could be named with the following prefixes:
| NONCONFORMANCE TYPE | Dependent NONCONFORMANCE CODE |
|---|---|
| Electrical | E - Short |
| Electrical | E - No Solder |
| Electrical | E - Broken Lead |
| Mechanical | M - Damaged Component |
| Mechanical | M - Corrosion |
| Mechanical | M - Missing Pieces |
After completing the following setup tasks, when users enter Electrical into the NONCONFORMANCE TYPE field, the NONCONFORMANCE CODE list of values will contain Short, No Solder, and Broken Lead.
Setting up a dependent list of values:
-
Navigate to the Collection Plan window (N) Quality: Setup > Collection Plan.
-
Query your Nonconformance plan.
-
Within the NONCONFORMANCE CODE element, choose Values. Enter the values within the above table.
-
Within the NONCONFORMANCE TYPE element, choose Actions. Enter the following actions:
-
IF NONCONFORMANCE TYPE is equal to Electrical, assign a value to NONCONFORMANCE CODE with value E%.
-
IF NONCONFORMANCE TYPE is equal to Mechanical, assign a value to NONCONFORMANCE CODE with value M%.
-
-
-
Save your work.
When users enter Electrical as the NONCONFORMANCE TYPE, the NONCONFORMANCE CODE list of values will display, Short, No Solder, and Broken Lead.
Custom Reports
You can write reports that are tailored to your business needs, using custom SQL. The Oracle E-Business Suite System Administrator's Guide - Configuration recommends custom SQL and a concurrent process to be defined, within a customer application (in this case, custom Quality).
Setting Up a Custom Report
-
Save your SQL under the directory, <custom Quality's base path>/sql/ (See: Applications DBA Duties, Oracle E-Business Suite System Administrator's Guide - Configurationfor information on registering a new or custom application and where the Applications DBA specifies a base path for the application). Name it with your business' convention. Prefix it with custom Quality short name, and suffix it with .sql (XXCQA_NCMREP.sql).
-
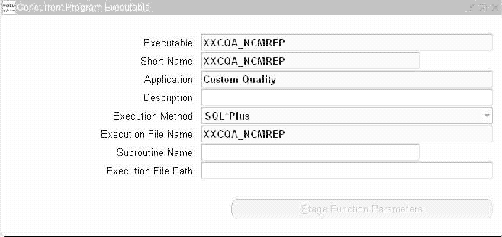
Navigate to the Concurrent Program Executable window (N) System Administrator: Concurrent > Program > Executable. Define an executable with SQL *Plus program style.
Define Concurrent Program Executable
-
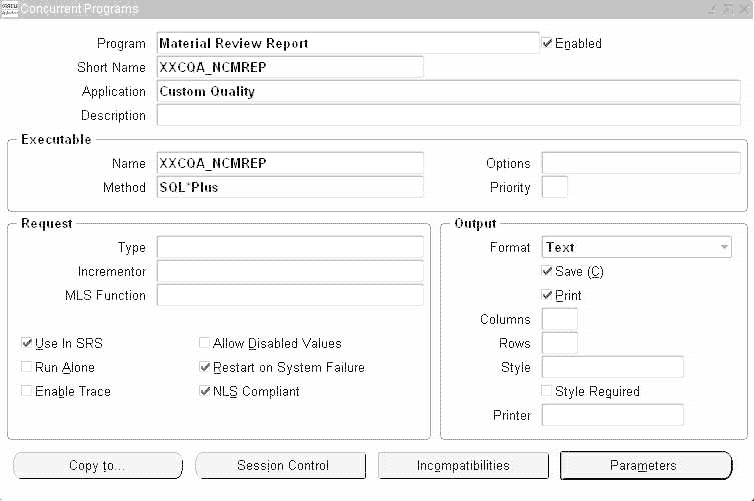
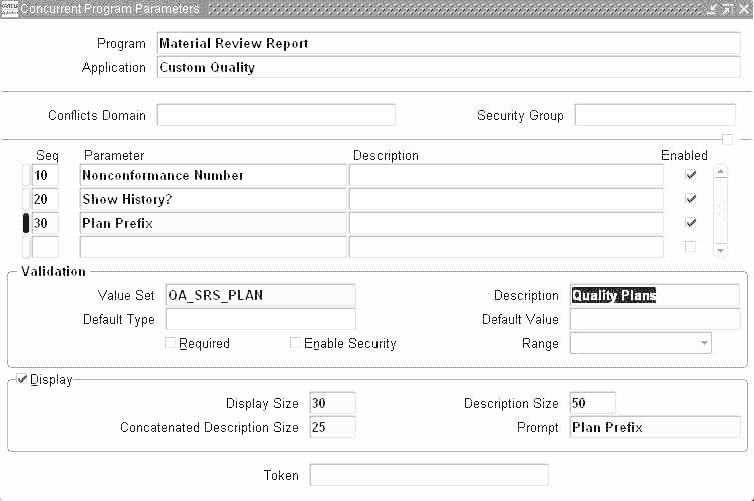
(N) System Administrator: Concurrent > Program > Define. Define a program, Material Review Report. For example, use the above executable.
-
Choose Parameters. Enter three parameters in the following order:
Parameters Parameter Value Set Corresponding Parameter in Sample SQL Nonconformance Number QA_SRS_PLAN &1 Show History? QA_SRS_YES_NO_ID &2 Plan Prefix QA_SRS_PLAN &3 The value sets are predefined and used for validation of parameter values.
Concurrent Program Definition
Concurrent Program Parameters Definition
Executing the custom report
-
Within the Manufacturing and Distribution Superuser responsibility, navigate to the Submit Request window (N) Quality: Reports > Submit Request.
-
Select Material Review Report from the Name list of values (or any name that you created while setting up), and submit the process.