Setting Up
This chapter covers the following topics:
- Overview of Setting Up
- Step 1 - Choose a configuration (mandatory)
- Step 2 - Copy from template Collection Plans (mandatory)
- Step 3 - Update of Sequence prefix and suffix (mandatory)
- Step 4 - Update of values for seeded collection elements (optional)
- Step 5 - Update of menu entry to point to the correct plan (mandatory)
- Step 6 - Modify Collection Plan Details and Plan Element Prompts (optional)
- Step 7 - Add user defined elements to the plans (optional)
- Step 8 - Link user defined plans to the system (optional)
- Step 9 - Organize the plan elements into folders (optional)
- Step 10 - Set Up Profile Options (optional)
- Step 11 - Setup within other modules (conditionally mandatory)
- Step 12 - Set Up Collection Plan Security
- Step 13 - Set Up Collection Element Security
- Considerations Prior to Implementation
Overview of Setting Up
This chapter outlines the steps necessary to set up Oracle Quality to use the Corrective Action Solution Templates. This chapter contains the following topics:
The Corrective Action Request solution is delivered as a set of template collection plans and related seeded data. To utilize the solution, real collection plans need to be set up for use. These plans should be modified according to your specific organization needs. The following is a setup checklist:
Setup Checklist
-
Choose a configuration
-
Copy from template collection plans
-
Update of Sequence prefix and suffix
-
Update of values for seeded collection elements
-
Update of menu entry to point to the correct plan
-
Modify collection plan details and plan element prompts
-
Set up collection plan security
-
Add user defined elements to the plans
-
Organize the plan elements into folders
-
Set up Profile Options: Autoquery set to No
Step 1 - Choose a configuration (mandatory)
In order to accommodate a customer's choice to implement a Corrective Action System purely with Oracle Quality or using the Oracle Quality/Oracle Service integration, the following configurations are proposed:
| Configuration | Usage |
|---|---|
| CAR Implementation in Oracle Quality | This configuration consists of all collection plans and related seeded data used for Corrective Action Requests |
| CAR using Oracle Quality and Oracle Service | This configuration consists of a single seeded, stand-alone collection plan that can be integrated with the Oracle Service Requests system, and be used for Corrective Action Requests |
Step 2 - Copy from template Collection Plans (mandatory)
Based on the configuration you had chosen in the previous step, copy the entire structure of template collection plans into a set of real collection plans. The plans can be copied using the Copy Collection Plans process. It is required to specify the target or destination organization in which this set of plans will be used, as well as the user-defined names for these plans.
Note: Template collection plans cannot store quality results and cannot be updated.
To copy from template Collection Plans
-
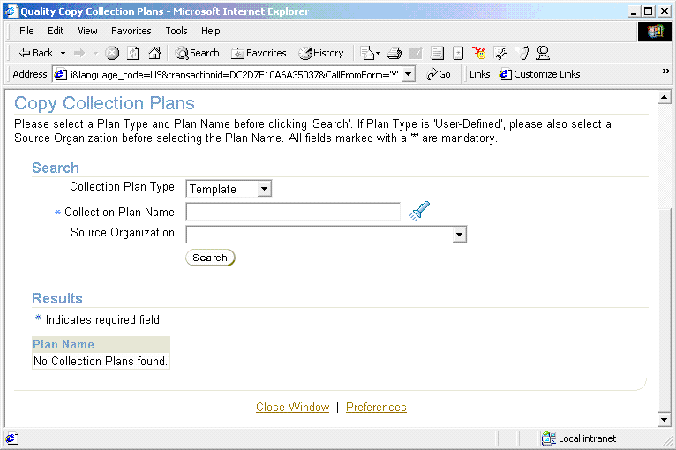
Navigate to the Copy Collection Plans page.
Copy Collection Plans Page
-
Select Template from the Collection Plan Type list of values. The Organization will not be populated and is not necessary because the template plans are not assigned to an organization.
-
Select a parent Collection Plan Name. Depending on the configuration (step 1) chosen for implementation, the appropriate parent plan should be chosen for the parent-child structure to be copied.
Configurations Usage Parent Plan CAR Implementation in Oracle Quality This configuration consists of all collection plans and related seeded data, used for Corrective Action Requests Template Corrective Action Request CAR using Oracle Quality and Oracle Service This configuration consists of a single seeded, stand-alone collection plan that can be integrated with the Oracle Service Requests system and used for Corrective Action Requests Template Quality Service CAR -
Choose Search.
-
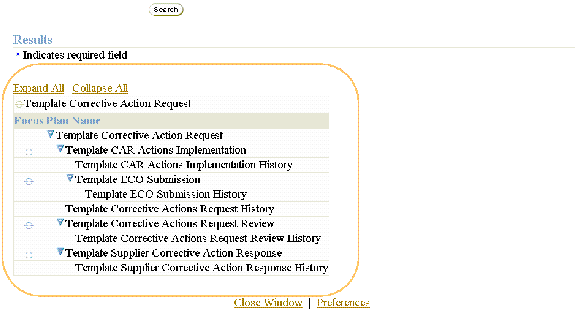
Review the hierarchy of plans within the Results region.
Results Region
-
Choose Copy.
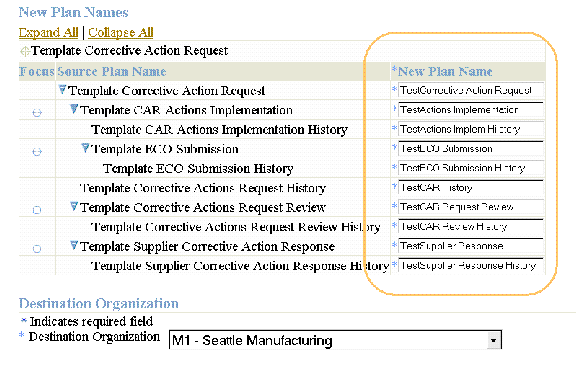
New Plan Names Page
-
Enter a New Plan Names for each of the template plan names displayed within the Source Plan Name column.
Note: Each individual plan name is required to be entered. The first 25 characters of the plan name should be unique.
-
Select a Destination Organization. The collection plan structure will be copied to this organization.
-
Choose Finish. Plans with names you have chosen will be created with elements, values, actions, and parent-child relationships, copied from the template plans.
Step 3 - Update of Sequence prefix and suffix (mandatory)
The Corrective Action Solution generates a sequence number for uniquely identifying the individual Corrective Action Request Number and New ECO Name. If your business practice requires a specific manner of identifying these sequentially generated numbers, you can set up the appropriate prefix and suffix information; this should be performed before using and entering data in the Corrective Action Request Collection Plans.
Note: After quality results have been entered for sequence collection elements and saved into the corrective action collection plans, the prefix/suffix cannot be changed.
-
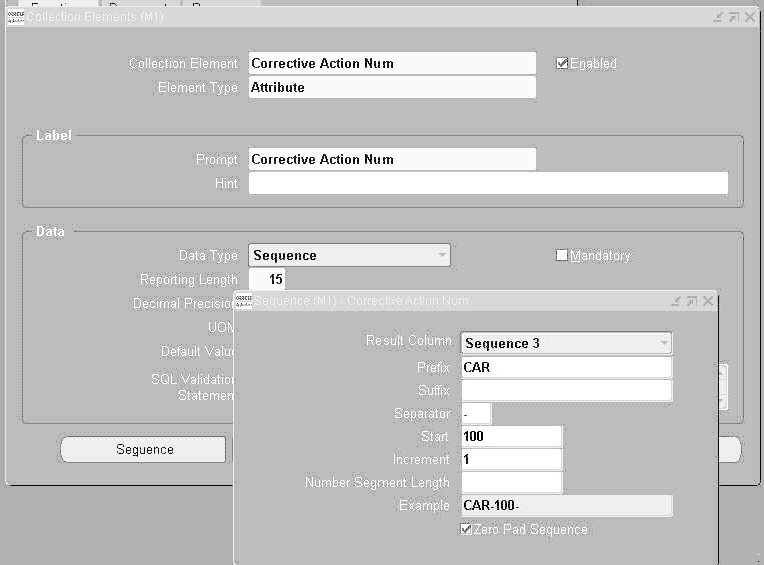
Navigate to the Collection Elements window.
Collection Elements Window
-
Select Corrective Action Num from the Collection Element list of values.
-
Choose Sequence.
-
Enter your desired Prefix, Suffix, Separator, Increment, and Number Segment Length.
-
Save your work.
-
Repeat steps one through five for the New ECO Name collection element.
Step 4 - Update of values for seeded collection elements (optional)
Oracle Quality has seeded commonly used values for some collection elements, as part of the seeded data. Depending on applicability of these values to your organization process, these values can be modified either at the collection element level, or at the plan level.
Note: Do not delete the seeded lookup values for the collection elements, Disposition Action and Disposition Status. These seeded values are internally used by the Oracle Quality. You can add new lookup values to this list of elements.
As part of the Corrective Action Solution, many new seeded collection elements have been provided. Some of these elements are listed below:
-
Request Source
-
Request Type
-
Standard Violated
-
Section Violated
-
Problem Solving Method
-
Request Priority
-
Request Severity
-
Request Status
-
Action Type
-
Implementation Type
To update values for seeded collection elements
-
Select the element, for which you want to change its value, from the Collection Element list of values.
-
Navigate to the Collection Elements window.
-
Choose Values.
-
Add or modify these values to match your organization process statuses and codes.
-
Save your work.
Step 5 - Update of menu entry to point to the correct plan (mandatory)
Seeded menu options for entry, update, and view, are provided. These menu options need to be modified by the System Administrator to point to the top most parent plan that was set up in Step 2. They need to point to the correct Corrective Action Request plan that was set up when copying the collection plan structures.
You first need to find the plan identification number of the Corrective Action Request plan you have created.
-
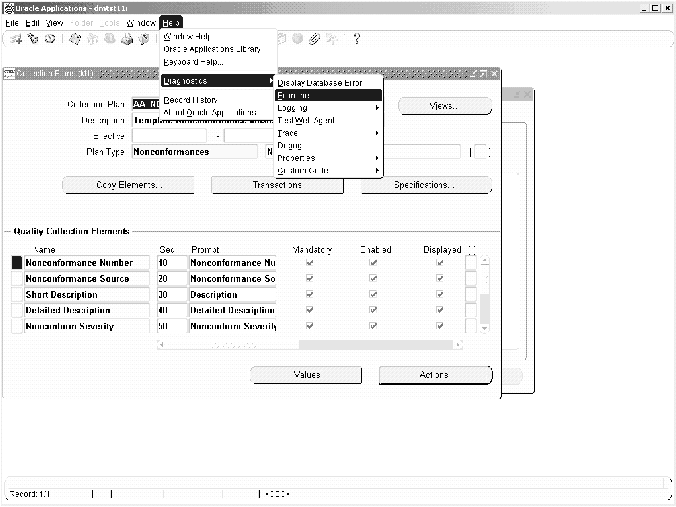
Navigate to the Collection Plans window.
Collection Plans Window
-
Select the Collection Plan from the list of values.
-
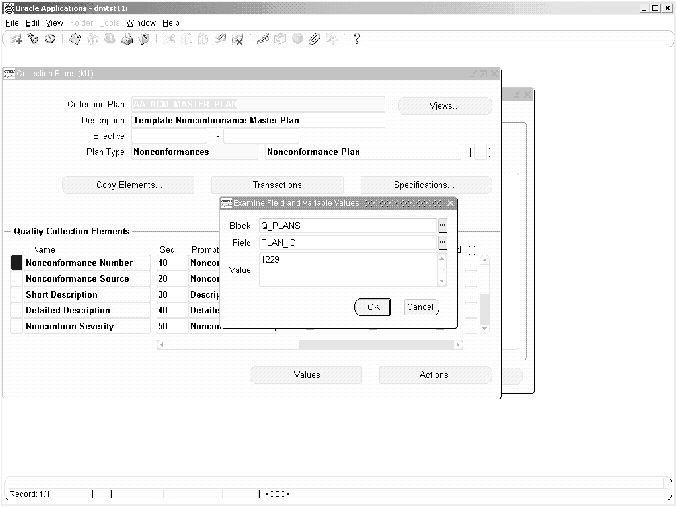
From the Help menu, select Diagnostic, then Examine, to display the Examine Field and Variable Values window.
Examine Field and Variable Values Window
-
Select Q_PLANS from the Block list of values.
-
Select PLAN_ID from the Field list of values.
-
The plan identification number is populated within the Value field.
-
Switch to the System Administrator responsibility.
-
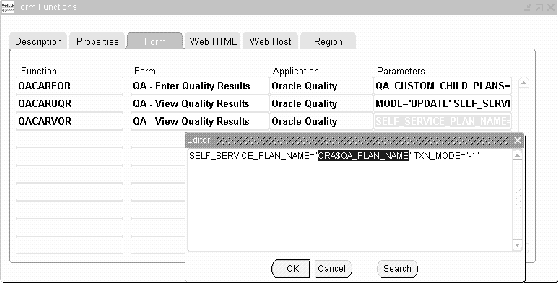
Navigate to the Form Functions window.
Form Functions Window
-
Within the Description tabbed region, select the Function field, then select the Find (flashlight) icon. Perform a query on QACAR% functions.
-
Select the Form tabbed region.
-
Select the Parameters field within the QACAREQR Function row. Once selected, the Editor window will display.
-
Change the ORA$QA_PLAN_ID value to the plan identification number of your Corrective Action Request plan, created above.
Note: When updating the Plan ID parameter include only the Plan ID and not the ORA$ prefix.
-
For the QACARUQR and QACARVQR functions, change the ORA$QA_PLAN_NAME values (within their corresponding Parameters fields) to the plan name of your Corrective Action Request plan, created above.
-
Make similar changes for the other functions.
-
Save your work.
Note: For additional menu entries, if multiple CAR plans exist within the same organization, copy QACAR% functions to functions with different names and change the ORA$ token, accordingly. Add these functions to the QA_CAR menu.
Step 6 - Modify Collection Plan Details and Plan Element Prompts (optional)
The copied plans from Step 2 have the description of the plan copied from the templates. The collection plan description can be modified to be more meaningful to the user. The collection element prompt in the copied Corrective Action plans can be modified for specific user requirements. Depending on the business process in place and the terminology in use, some of the collection element prompt names in the collection plans can be modified to be more meaningful to end users.
For example, if Request Type is called CAR Type, perform the following steps
-
Navigate to the Collection Plans window.
-
Select the Collection Plan for which you want to modify the prompt name for the collection element.
-
Within the Prompt field of the collection element, change the Request Type to CAR Type.
Step 7 - Add user defined elements to the plans (optional)
Specific business needs might require additional collection elements, in order to capture information related to a Corrective Action Request. This can be accomplished by adding new collection elements and values to the collection plans copied in Step 2. If the collection elements that are provided in the CAR solution are not sufficient, then additional collection elements can be created.
For example, if it is required to calculate the Total CAR cost (estimate and actual) in the Quality collection plan, create two new elements: Total CAR Estimate Cost and Total CAR Actual Cost.
-
Navigate to the Collection Elements window.
-
Create a new element, Total CAR Estimate, with the following properties:
-
Element Type = Variable
-
Data Type = Number
-
Decimal Precision = 2
-
-
-
Save your work.
-
Navigate to the Collection Plans window.
-
Select the Corrective Action Request plan from the Collection Plan list of values.
-
Add Total CAR Estimate Cost to the current collection plan.
To keep an audit trail of updates to this element, you should also add this element to the Corrective Action Request History plan.
-
Save your work.
-
Navigate to the Update Parent-Child Plan Relationships page.
-
Select Corrective Action request from the Parent Plan list of values.
-
Select Corrective Action Request History from the Child Plan list of values.
-
Choose Element Relationship.
-
Add a Copy relationship between Total CAR Estimate Cost in Parent and Child plans.
-
Save your work.
Step 8 - Link user defined plans to the system (optional)
If the additional elements are better organized in a separate collection plan, such a plan can be linked through-out the system. For example, you can perform a certain Quality test for Corrective Action Implementation, within your organization. You can create a Quality collection plan to capture this test data, and associated it with Corrective Action Implementation.
Collection plans can also be created for carrying out quality audits, or for capturing complaint information; they can have parent-child relationships trigger the entry of a corrective action request.
8.1 - To create a collection plan for a Quality test
-
Navigate to the Collection Plans window.
-
Enter a new collection plan Name, Description, and Plan Type.
-
Add collection elements to the current collection plan.
-
Save your work.
8.2 - To define a Parent-Child Plan Relationship
-
Once the following steps are completed and you implement Corrective Action, you can invoke the Quality test plan from Step 9.
-
Navigate to the Define Parent-Child Plan Relationships page.
-
Enter your Corrective Action Implementation, as the Parent Plan.
-
Enter the plan created in Step 8.1, as the Child Plan.
-
Select Immediate or Delayed from the Data Entry Mode list of values.
-
Save your work.
Step 9 - Organize the plan elements into folders (optional)
The Collection Plans copied in Step 2 have collection elements to capture data from different functional areas of your enterprise (Receiving, Work in Process, Shipping, etc.). Users of the system might be interested only in the data related to their job role. For example, a customer service representative might be interested only in the data related to sales orders, and not the entire set of collection elements. In order to restrict what the user sees in the collection plans, Folder Tools can be utilized.
See Also
Folder Tools, Oracle E-Business Suite User's Guide
Step 10 - Set Up Profile Options (optional)
If you expect a large number of CAR records, then to improve performance, set the following profile option value to never: QA: Update Quality Results Autoquery.
Step 11 - Setup within other modules (conditionally mandatory)
Because this solution provides the features to send e-mail notifications and workflow notifications, it is required for users to be set up as employees, within their e-mail addresses, in Oracle HR and/or to be set up as Oracle Applications Users.
See Also
Oracle HRMS
Oracle E-Business Suite System Administrator Guide Documentation Set
Step 12 - Set Up Collection Plan Security
Depending upon the sensitivity of data in the quality system, it might be desired to restrict the access of the data to users for view, update, or creation. This might require different users to be granted different types of privileges.
For example, a Quality Manager has complete access to create, update, and view corrective action requests. A Purchasing Manager has access to view CARs, but not to enter or update them.
12.1: To set up a User Group and add users
-
Navigate to the User Groups window:
-
Create a new User Group.
-
Assign users (members), who will have the same roles and privileges, to the current user group. All users of the system should be Oracle Applications users with a valid login authority.
-
Save your work.
12.2: Grant privileges to user groups
-
Navigate to the Grant Privileges window. In this window, any User Group can be granted privileges to perform various functions for any plan, If the Privilege check box is selected, the user group is granted that privilege for the specified collection plan.
-
Depending upon the privileges that need to be granted to each user group, select the User Group name, the Collection Plan name, and the corresponding check boxes for Enter, View, Update, and Delete results.
-
Save your work.
12.3: Set Up Master Security Profile
-
To enable collection plan security, set the value for the following Profile Option to Yes:
-
QA: Collection Plan Security
-
After all the setup steps have been completed, the users will have access only to those collection plans to which they have privileges.
Step 13 - Set Up Collection Element Security
You might want to make a critical element in a collection plan disabled to specific users. For example, the Request Status field is protected from update for user 1003612. Only non-mandatory elements can be disabled.
13.1: Create an element to control saving of a record
-
Navigate to the Collection Elements window:
-
Enter Save (or any unused name) as the Collection Element name, Attribute as the Collection Element Type, and Character as the Data Type.
-
Save your work.
13.2: Add elements and actions to your plan
After the following setup is performed, when user 1003612 updates the Request Status, the number 2 will be assigned to the hidden element, Save. The update will be rejected.
-
Navigate to the Collection Plans window:
-
Perform a query on your Disposition plan.
-
Add the Save collection element to the current collection plan.
-
Select the Enabled check box.
-
De-select Displayed.
-
Add this Action to Save. When Save equals 2, reject the input with a message "This record is protected from update by the current user.".
-
Add this Action to Request Status. When Request Status is entered, assign a value to Save with the SQL text:
Select C
From (select 2 c from dual where :parameter.user_id in (1003612)
Union all
Select 1 from dual)
Where rownum = 1
-
Save your work.
Considerations Prior to Implementation
The following are considerations to consider before implementation:
-
Reference Copy of Collection Plans
-
Evaluation of Reference Copy of Collection Plan Structure and Content
Reference Copy of Collection Plans Diagram
After completing the setup process, prior to implementation, you might want to maintain a Reference Copy of the real collection plans that you intend to implement. This Reference set of plans can then be further copied to collection plans that will be implemented and used. The Copy Collection Plan process can be utilized for the same. This approach eliminates the need to copy from the template plans and modify the same for the implementation, within each organization.
The following diagram depicts the implementation process of the consideration discussed above:

Evaluation of Reference Copy of Collection Plan Structure and Content
Evaluation of the Reference Copy should be performed prior to copying the collection plans to the individual organizations, to ensure that the business process needs are addressed. It is possible that the evaluation necessitates the elimination of one or more collection plans, in the collection plan structure. In such a case, the collection plans can be deleted in the Reference Copy, and propagated to the individual organizations.