Tests
This topic explains the fundamentals of quality tests. It provides the processes to enter or find test methods, gives a concise explanation of test data types, and explains how to enter tests, customized customer display information, and experimental error.
This chapter covers the following topics:
- Entering Test Methods
- Finding Test Methods
- Understanding Tests
- Entering Tests
- Entering Customer Display Information
- Entering Experimental Error
- Finding Tests
Entering Test Methods
The Test Methods window lets you enter and display all previously defined test methods. A test method is associated to a single test on the Tests window so that there is a one-to-one relationship between the test and the test method. This window lets you relate test-specific attributes to ensure the referential integrity of your overall testing process. For example, a test for chloride in material can be done by several methods. Attributes of a test method include:
-
Quantity of material required
-
Instrument to perform the test
-
Number of replicates required
-
Test kit produced internally or externally
-
Duration of the test
-
Decimal precision
In order to interpret a test result, you need to know not only the test, but the method that was used to run it. A test method is associated to a test on the Tests window. For quality laboratory management and scheduling purposes, you need to know which instruments are scheduled for testing, and test time duration on these resources.
Prerequisites
-
List all test methods to enter.
-
Identify any instrument-test dependencies. For example, a standard is only run on a specific instrument to test calibration.
-
Set up test kit organizations as quality laboratories, test kit items, and inventory units of measure for the material to test in Oracle Inventory.
To enter a test method:
-
Navigate to the Test Methods window.
-
Enter the test Method code. Required.
-
Enter a brief Description of the test method Required.
-
Enter the test Qty of material required for the test. If the test is passive, and does not require a physical sample quantity, then leave this field blank. For example, determining the color of a lot by visual methods may not require the removal of a physical sample.
-
Select the test quantity UOM for the test method. Required if you enter a test quantity.
-
Enter the desired Stored Precision for the result. You can override the stored precision using the Tests window.
Duration
-
Enter the test method duration as the total time to perform the test in the Days, Hours, Minutes, and Seconds fields. If the test is sent to an external laboratory, then enter the total test turnaround time.
-
Enter the required number of test replicates in the Replicate field. Required.
-
Select a test kit Organization from the list of quality laboratory organizations that your responsibility can access. The organization must be defined as a Quality Laboratory.
-
Select the Test Kit item. Test kit items are process quality-enabled items defined in Oracle Inventory. Test kit items display based on the test kit organization you select. If you do not select an organization, then this field is disabled.
-
Enter Resource as the instrument to use for the test method.
-
Save the window.
To duplicate a test method:
-
Query the test method to duplicate.
-
Choose New from the File menu.
-
Choose Duplicate, then choose Record Above from the Edit menu. The record in the row is copied.
-
Enter a new Method, and make any necessary changes to other fields.
-
Save the window.
To mark a test method for purge:
-
Choose Mark for Purge from the Actions menu. The record is marked for deletion.
-
Save the window.
To edit text in a test method:
-
Choose Edit Text from the Actions menu. The Select Text Paragraph window displays.
-
Make appropriate text changes.
-
Save the window.
Finding Test Methods
The Find Test Methods dialog box lets you search for test methods by method, description, instrument, or marked for deletion.
Prerequisites
-
Enter a test method.
To find a test method:
-
Navigate to the Find Test Methods dialog box.
-
Enter any of the following to narrow your search:
-
Method code
-
Description of the method
-
Resource used for the test method
-
-
Select Marked for Purge as:
-
Yes if you want find test methods that are marked for deletion.
-
No if you do not want to find test methods that are marked for deletion.
-
Leave this field blank if you do not want to limit your search based on whether a test method is marked for deletion.
-
To create a new test method code from the Find Test Methods dialog box:
-
Click New. The Test Methods window displays.
-
Create a new test method as described in the "Entering Test Method Codes" topic.
Understanding Tests
A test helps determine a quality characteristic or attribute of an item or lot. Test data type refers to the data type or format expected for the test result. Following are the test data types you can set up:
Non-Validated Test
Enter a test code and description. Test results for the Non-Validated test data type are free-form text. This entry does not require validation. Results for items or lots cannot fail this test data type.
Numeric Range Test
Enter a test code, description, test unit, and range of acceptable values for the test. If results for the item or lot fall outside this range, then the material fails this test. For example, a glucose test has a full functional test range of 20 to 300 g/dL. Results outside this test range cannot be saved.
List of Test Values Test
Enter a test code, description, unit, and list of valid values for this test data type. For example, Clear, Slightly Cloudy, and Turbid are valid list of test values. Test results must match an entry in the list.
Text Range Test
Enter a test code, description, unit, and ordered list of valid values for this test data type. Defining a test of this type builds a lookup table where a text value in the list maps to a sequence number. Values in this ordered list are defined in a text or alphanumeric format so that the specification minimum, target value, specification maximum, and results are recorded as text or alphanumeric formatted values.
The sequence number is a display-only field that represents the order of the values relative to each other and to a result. Enter the text range values in the order used for results evaluation. By selecting New Record and then Insert Record, you can insert new values between existing values in the list.
The following is an example of entering a sequenced set of values for a Text Range test data type:
-
The test minimum is A2.
-
The test maximum is D2.
-
The specification minimum is A1.
-
The specification maximum is D1.
Sequence Value 1 A2 2 A1 3 D1 4 D2
A specification against a Text Range test data type refers to a subset of this list of values as acceptable results. When you enter results, the application validates the value entered by looking up the corresponding sequence number in order to evaluate whether the results are within the acceptable range of the test or the specification.
Numeric Range with Display Text
When you define a Numeric Range with Display Text test, the application builds a lookup table so that a numeric value in the list maps to a text equivalent. The application converts a numeric result into a text results for display and reporting purposes. You can define subranges within the numeric range that have individual display values assigned.
In the following example, a numeric result greater than or equal to zero and less than or equal to ten displays LOW. A result greater than or equal to 10.0001 and less than or equal to 20 displays MEDIUM.
Open-ended ranges are permitted. The maximum field in the last row of subranges is blank. Leave the minimum field on the first row of subranges blank to allow for values less than the maximum of the first subrange.
| Range Minimum | Range Maximum | Displayed Text Result |
|---|---|---|
| 0 | 10 | LOW |
| 10.0001 | 20 | MEDIUM |
| 20.0001 | 30 | HIGH |
| 30.0001 | No Value Entered | DILUTE AND REPEAT |
Subranges Cannot Overlap
Numbers used for a minimum or a maximum cannot be repeated for a specific test code. This allows for the less than or equal to condition and the greater than or equal to condition observed at the ends of ranges. It also allows for holes in ranges. In the previous example, 10 is used for the maximum of the first subrange. It cannot, however, be used for the minimum of the next subrange. When 10 is entered in as the maximum, of a subrange, the next minimum has a default minimum of 10.001.
Display Text Can Be Repeated
Display text does not have to be unique for each subrange. This helps in situations where results below a certain number or above a certain number display RESULT OUTSIDE THE DETECTION LIMIT.
Enter Single Numbers or a Range of Numbers
You can enter a single number rather than a range of numbers as a result. Each number in the list is associated to display text. If the numeric result is within the minimum and maximum values, then the result is associated to the specified display text. The Results window displays both the numeric result and equivalent display text. To enter a single number, enter it as both a minimum and maximum value.
Expression Test
The Expression test data type lets you enter a mathematical expression to calculate test results. The application uses the results from other Numeric Range tests and constants, and applies a mathematical expression to calculate a result. You can save an expression type test that is based on a combination of other numeric-based tests.
Use Valid Arithmetic Operators and Mathematical Functions
Valid arithmetic operators are: +, -, *, /, and any SQL operators such as SQRT("A") and ABS("B"). Define the decimal precision of an Expression test data type. Change arithmetic operators, mathematical functions, and other tests used in the expression until the time that the Expression test is used in a specification. Once it is used in the specification, you cannot update it.
Business Rules Followed in Expression Test Data Types
The following summarizes the business rules for Expression test data types:
-
You can define experimental error for an Expression test data type.
-
Tests that are referenced in the Expression test must be either Numeric Range or Numeric Range with Display Text, and not marked for deletion.
-
Test codes that are referenced in an Expression test must be enclosed within double quotation marks. For example, FAHRENHEIT is a valid test code for entry in an Expression test, if the test for Fahrenheit is a defined test.
-
Referenced tests must have lower test sequence numbers than the Expression test.
-
Decimal precision defaults from the test method.
-
Specification target, minimum, and maximum follow the same rules as for other numeric-based tests.
-
The expression is calculated at result time when all referenced tests have a result entered in the result set. In cases of replicated or repeated tests that are referenced in the Expression test, the most recent result of the referenced test is used.
-
Expression tests can only be added to a result set on an as needed basis if any and all of the referenced tests already exist in the result set.
-
Expression tests are calculated regardless of whether the tests they reference pass or fail their individual specifications.
-
You can save an expression type test that is based on a combination of other numeric-based tests. Some expressions can be calculated before all referenced tests are complete using the SQL command NR1. Also, if referenced test results are edited, expressions can be recalculated.
Entering Arithmetic Operators and Mathematical Functions
To enter arithmetic operators, put quotation marks around the names of component Numeric Range tests used in the expression. Operands in the expression are enclosed within double quotation marks.
Tests A and B are two Numeric Range test codes:
-
To add the two tests, enter "A"+"B"
-
To subtract the two tests, enter "A"-"B"
-
To multiply the two tests, enter "A"*"B"
-
To divide the two tests, enter "A"/"B"
Tests C and D are two Numeric Range tests:
-
To take the square root of test C, enter SQRT("C"). If you use the POWER function, then enter POWER("C",(1/2))
-
To take the cube root of test D, enter POWER("D",(1/3))
-
To calculate an expression without the result of test D, enter NVL("D",0)
Example of Entering an Expression Test
To enter an Expression test data type for calculation of Density, define the mathematical expression for Density, which is by definition, Density = Mass/Volume. Define tests for Mass and Volume. Define an Expression type test for Density. Enter "Mass"/"Volume" in the Expression field. Enter other appropriate fields for the Expression test.
Entering Tests
The Tests window lets you define tests that become part of a specification, or that are added on an impromptu basis for sample analysis. Refer to the "Understanding Test Data Types" topic for details on the test data types you can enter on this window.
You can use flexfields with this window.
See: Oracle E-Business Suite User's Guide and Oracle E-Business Suite Flexfields Guide
Prerequisites
-
Enter test methods and test units.
-
Enter test classes to group specific tests into meaningful sets.
-
Enter instruments to track them as resources.
-
Enter quality action codes to assign them to experimental error regions for tests.
-
Enter customers in Oracle Receivables to define customer-specific test information for reporting purposes.
To set up test data types:
-
Navigate to the Tests window.
-
Enter a Test code for the test. For example, CHLORIDE. Required.
-
Enter a Description for this test code. For example, Chloride in mEq/L. Required.
-
Enter the Class code for this test data type. A description of the test class displays in the unlabeled field.
-
Ordering is the sequence of the test as it appears in a test group. Refer to "Setting Up Test Groups" for detailed information.
-
Enter the test Method. For example, Ion-Specific Electrode. Test Method entry is described in the "Entering Test Methods" topic. Required.
-
Select one of the following as test Data Type:
-
Non-Validated if you do not want test results to cause the item or lot to be rejected. Enter a test code and description. Test results are recorded for future evaluation against the test value. Test results from this test data type do not cause an item or lot to be rejected. Non-validated results do not prevent a step from completing.
-
Numeric Range if you want an item or lot falling outside a specified range to be rejected. Enter a test code, description, and range of possible values.
-
List of Test Values if you want an item or lot to match an entry in a specific list of values. Enter a test code, description, and a list of valid test values for the test.
-
Text Range if you want an item or lot to match an entry in an ordered list, and a particular specification to restrict the acceptable entries to a subset of the list by specifying the limits of the subset. Enter a test code, description, and a list of valid values. The entries you make are sequenced automatically.
-
Numeric Range with Display Text if you want subsets of a numeric range to display text values. Enter a test code, description, subranges, and corresponding text values. Make the range open-ended by not making an entry in the minimum of the first subrange or the maximum of the last subrange.
-
Expression if you want to enter a mathematical expression for calculation of test results. Only those tests with numeric data types can be referenced. These are Numeric Range and Numeric Range with Display Text. For example, to calculate density, you define tests for mass and volume, since density equals mass divided by volume.
Required.
Depending on selection of test data type, the remaining fields on the window vary. For example, if you select Numeric Range, then the Range fields are editable. If you select List of Specifications, then the Value and Description fields are editable.
-
-
Enter the test Unit code for the test. For example, enter mEq for milliequivalents. The description of the unit displays. Required for all test data types except Non-Validated.
-
Enter the test Priority as Low, Normal, or High. Test priority determines the order a test displays on a worklist. Test priority is defined initially at the Test level. It can be overridden at the Specification level. A System Administrator can add to the seeded list of values for test priority using the lookup functionality.
-
Replicate displays the number of test replicates for this test. It defaults from the value entered on the Test Methods window. Enter this field if you have not defined a test method for this test.
Values
-
Enter the fields as described for the test data type selected:
-
For a Non-Validated test data type, you cannot enter data in this panel.
-
For a Numeric Range test data type, enter the lower limit of the Range in the first field. Enter the upper limit of the range in the next field. You define the target value in the specification. For example, pH has a test range of 0 to 14, but an item could have a pH specification range of 4.2 to 6.7. The Seq field displays the sequence number of each value listed.
-
For a List of Test Values test data type, enter each possible Value required for item or lot characteristic state. Define the target value in the specification. Enter one value and description per line. For example, the value list could include RED, BLUE, and CLEAR, but an item could have a value specification of RED. The Seq field displays the sequence number of each value listed.
-
For a Text Range test data type, enter a Value and text Description. Enter values in the order you want. The text description represents the text to assign to each of the sequenced values. The Seq field displays the sequence number of each value listed.
-
For a Numeric Range with Display Text test data type:
Enter the minimum value for the interval in the Min field. Leave the first Min field blank for an open-ended test range. This field is automatically entered for each interval in the range after the first subrange. Required if it is not the first subrange.
Enter the maximum value for the interval in the Max field. When you enter a maximum value and tab to the next field, the Min field automatically displays the next Min value. Leave the last Max field blank for an open-ended test range. Required if it is not the last subrange.
Enter the text to Display when a test value is within the interval specified by the minimum and maximum values entered for the row.
The Seq field displays the sequence number of each value listed.
-
For Expression test data types:
Enter the expression in the Expression field. Refer to the "Understanding Test Data Types" topic for guidance on entering an expression. To enter a test to reference in the expression, click Test and select the test code from the LOV. The test displays with double-quotation marks around it. Enter the appropriate arithmetic and mathematical operators outside the double quotation marks. Enter any SQL-compatible expression.
For example, to take the cube root of a test named EXAMPLE, click Test, select "EXAMPLE". Enter the following mathematical operators: POWER("EXAMPLE",(1/3)).
-
-
Enter the Stored Precision as the number of decimals stored and displayed for this test. The default value is entered on the Test Methods window. Required if the test entered is a Numeric Range, Numeric Range with Display Text, or an Expression type test.
-
Enter the Report Precision as the number of decimals to report on the Certificate of Analysis for this test. Values entered on the Customer Display window for a particular test override this information. The precision entered must be less than or equal to the value entered in the Display Decimal Precision field. Required if the test entered is a Numeric Range, Numeric Range with Display Text, or an Expression type test.
-
For Numeric Range, Numeric Range with Display Text, and Expression test data types to click Experimental Error to display the Experimental Error window. Define an experimental error region that is calculated from either a percentage of the entire test range, or from a number representing the tolerance around the specification minimum or maximum. Values entered default to the test when it is added to a specification.
-
Click Customer Display to display the Customer Display window where you can enter an optional customized set of test-specific information used to run a report on this test for specific customers.
-
Save the window.
To insert a new row in a List of Test Values, Text Range, or Numeric Range with Display Text test:
You can only insert a new row for these test data types if the test is not already used in a specification and has results entered for it.
-
Position the cursor on the row directly above where you want to insert the row. For example, to insert a row between the second and third entries in the list, position the cursor at the second entry.
-
Choose New from the File menu. A new blank row inserts directly below the row selected.
-
Enter new values.
-
Save the window.
To enter a new test method:
-
Choose Test Methods from the Actions menu. The Test Methods window displays.
-
Enter the new test method as described in the "Entering Test Methods" topic.
To mark a test for purge:
-
Choose Mark for Purge from the Actions menu. The record is marked for deletion. Once a test is marked for deletion, you cannot edit it.
-
Save the window.
To edit text in a test:
-
Choose Edit Text from the Actions menu. The Select Text Paragraph dialog box displays.
-
Make appropriate text changes.
-
Save.
To edit text in a List of Test Values, Text Range, or Numeric Range with Display Text test:
-
Position the cursor on the record to edit in the Values tab.
-
Make appropriate text changes.
-
Save the window.
Entering Customer Display Information
The Customer Display dialog box lets you enter an optional customized set of test-specific information used when you run a report for specific customers. Display this dialog box from the Tests window where a specific test is entered or maintained. This information includes a test alias label that prints on customer-specific quality certificates, and the decimal precision to show for test results.
Prerequisites
-
Enter the test to customize with customer-specific information.
To enter customer display information:
-
Navigate to the Customer Display dialog box.
-
Enter a Customer previously defined in Oracle Receivables.
-
Number displays the customer account number that corresponds to the customer entered.
-
Enter a label or customer alias name for the test to Display on all reports generated. This field overrides the test name when it displays on a customer-specific quality certificate.
-
Enter Report Precision to use for the customer. Enter the preference for decimal precision for numeric results printed on a quality certificate. The report precision defined here overrides the precision entered on the Tests window. You can only enter this field for Numeric Range, Numeric Range with Display Text, and Expression test data types for a customer-specific quality certificate.
-
Click OK to navigate back to the Tests window.
Entering Experimental Error
Experimental error accounts for inaccuracy and imprecision in test results by defining action zones around the specification limits or target. User actions such as RETEST display as warnings when a test result falls inside the experimental error range.
You can define experimental error at the test level for Numeric Range, Numeric Range with Display Text, and Expression test data types. When a test is associated to a specification, the corresponding experimental error values default from the test. However, you can override these values at the specification level.
Understanding Experimental Error Regions
The experimental error region is calculated from either a percentage of the entire test range, or from a number representing the tolerance around the specification minimum or maximum. Experimental error regions cannot overlap. If gaps are entered, then an error displays when the specification is validated.
Experimental error is defined for any combination of regions:
-
Experimental error region below the specification minimum = Specification Minimum - Number or, Specification Minimum - (Percentage * Test Range)
-
Experimental error region above the specification minimum = Specification Minimum + Number or, Specification Minimum + (Percentage * Test Range)
-
Experimental error region below the specification maximum = Specification Maximum - Number or, Specification Maximum - (Percentage * Test Range)
-
Experimental error region above the specification maximum = Specification Maximum + Number or, Specification Maximum + (Percentage * Test Range)
The experimental error regions below the Specification Minimum and above the Specification Maximum can overlap with the out-of-specification regions.
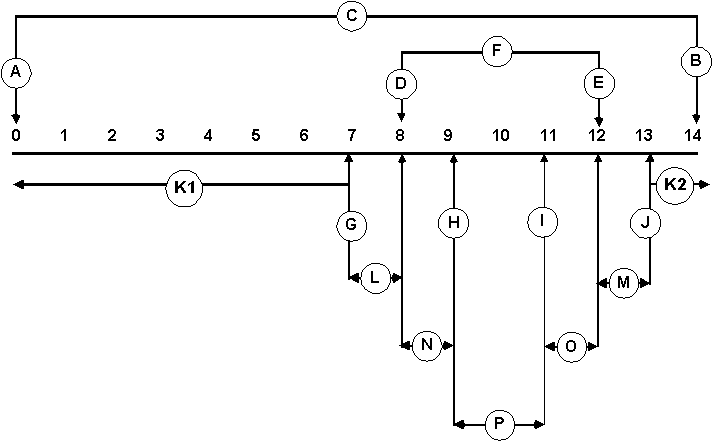
The following is a specific example of a Numeric Range test data type:
-
Test data type is Numeric Range.
-
Test range C is from 0 to 14.
-
Test minimum at point A is 0.
-
Test maximum at point B is 14.
-
Test error type is number.
-
Item specification range F is from 8 to 12.
-
Specification minimum at point D is 8.
-
Specification maximum at point E is 12.
-
When a test error of plus or minus 1 is applied:
-
Specification minimum - test error at point G is 7.
-
Specification minimum + test error at point H is 9.
-
Specification maximum - test error at point I is 11.
-
Specification maximum + test error at point J is 13.
-
The following is an assessment of values:
-
Values less than 7 and greater than 13 are outside the specification, as shown by ranges K1 and K2.
-
Values ranging from:
-
7 to 8 are outside the specification, but within the experimental error region, as shown by range L.
-
12 to 13 are outside the specification, but within the experimental error region, as shown by range M.
-
8 to 9 are within the specification, but also within the experimental error region, as shown by range N.
-
11 to 12 are within the specification, but also within the experimental error region, as shown by range O.
-
9 to 11 are within-specification, as shown by range P.
-
The following graphic depicts the previously described points, ranges, and values using the specific example of a Numeric Range test data type:
Assigning Action Codes
Associate an action code to each of the experimental error regions that you define. If an experimental error is not defined for a test, then action codes cannot be assigned. Entering a result within the experimental error region displays a warning message with the associated out-of-specification action code. Appropriate action codes also display for results that are outside the specification limits. Refer to the Oracle Inventory User's Guide for detailed information on setting up action codes.
You can use flexfields with this window.
See: Oracle E-Business Suite User's Guide and Oracle E-Business Suite Flexfields Guide
Prerequisites
-
Define action codes in Oracle Inventory.
-
Enter a test that requires entry of experimental error.
To enter experimental error for a test:
-
Navigate to the Experimental Error window.
-
Select the Error Type:
-
Percent to indicate the specification value for calculating the experimental error regions is a percent.
-
Number to indicate the specification value for calculating experimental error regions is a number.
Required.
-
-
Enter one or more of the following fields:
-
Below Specification Min to define the percentage or number to use in calculating the experimental error region below the specification minimum. Enter the beginning of the action zone at the low end of the specification.
-
Above Specification Min to define the percentage or number to use in calculating the experimental error region above the specification minimum. Enter the end of the zone of the action zone at the low end of the specification.
-
Below Specification Max to define the percentage or number to use in calculating the experimental error region below the specification maximum. Enter the beginning of the action zone at the high end of the specification.
-
Above Specification Max to define the percentage or number to use in calculating the experimental error region above the specification maximum. Enter the end of the action zone at the high end of the specification.
-
-
Enter the appropriate Action code to associate with the experimental error region. The Action Description field displays the action associated with the code entered.
-
Optionally, press Reset to reset the values to those displayed when you originally displayed the window.
-
Click OK to return to the Tests window.
Example of Entering Experimental Error
A test has a range of 0 to 200. The test has an experimental error of plus or minus two percent of the specification minimum. Two percent is four points on either side of the specification minimum. If results are inside this action zone, then the individual performing the test must repeat it, and alert the individual requesting the test or owner of the sample. The action RTAO is defined to indicate Retest and Alert Owner.
In this case, select Percent as Error Type, enter 2 in the Below Specification Min field, and enter 2 in the Above Specification Min field. Enter RTAO in the Action field to indicate that you want to retest the sample and alert the sample owner. After you click OK and save the window, the experimental error and action is applied to the database.
In the Specifications window, you can override the test numbers or add percentages for an action zone around the specification maximum. The specification minimum for this example is 90, the specification maximum is 170, and the test default experimental error is plus or minus two percent. Enter a result of 91. This is within the action zone which ranges from 86 to 94. The application displays a warning on the appropriate Results window with the action code and action code description.
Finding Tests
The Find Tests dialog box lets you find tests by class, method, data type, test unit, priority, or if they are marked for deletion.
You can use flexfields with this window.
See: Oracle E-Business Suite User's Guide and Oracle E-Business Suite Flexfields Guide
Prerequisites
-
Enter a test.
To find a test:
-
Navigate to the Find Tests dialog box.
-
Enter any of the following to narrow your search:
-
Test code
-
Class code for the test data type
-
Method for the test
-
Data Type for the test
-
Unit as test unit for the test
-
Priority for the test as High, Low, or Normal
-
-
Select Marked for Deletion as:
-
Yes to find tests that are marked for deletion.
-
No not to find tests that are marked for deletion.
-
Leave this field blank to not limit your search based on whether a test is marked for deletion.
-
-
Click Find. The Test window displays the results of the search.
To create a new test from the Find Tests dialog box:
-
Click New. The Tests window displays.
-
Create a new test as described in the "Entering Tests" topic.
-
Save the window.