Specifications
This topic explains the basic concepts of quality specifications. You are shown how to enter and find specifications and their associated specification validity rules for both item and monitoring specifications. Specification summaries available from the Quality Workbench navigator are described.
This chapter covers the following topics:
- Understanding Specifications
- Using Lot UOM Conversions Based on Quality Results
- Understanding the Status Approval Workflow
- Adding and Editing Status Codes
- Entering Status Details
- Finding a Status Code
- Understanding Specification Version Control
- Understanding License Plate Numbers for Containerization
- Entering a Specification
- Copying a Specification
- Finding an Item Specification
- Entering an Item Specification Validity Rule
- Displaying the Item Specification Validity Rules Summary
- Entering a Monitoring Specification Validity Rule
- Displaying the Monitoring Specification Validity Rules Summary
- Displaying Specification Summaries from the Navigator
Understanding Specifications
Specifications state the quality conformance requirements for materials, such as an item or a lot, or for environmental conditions, such as a resource or a subinventory locator.
Item Specifications
Item specifications identify a target or ideal result for each quality test performed by listing test requirements that specify these characteristics or attributes. When you complete the initial quality setup, then combine tests and test methods to design specifications. The specifications entered are used to compare against actual test results from samples taken. For range-validated tests, define the minimum and maximum acceptable range values for the test as well as the out-of-specification action to perform when a test fails. View or update a specification only if your responsibility is associated with the specification owner organization.
From the owner organization, you can copy a specification with the status Approved for General Use to one or more organizations associated with your responsibility.
Monitoring Specifications
Create a specification for a set of calibration tests on a resource or locator. A resource can be an instrument in a quality laboratory, or a piece of equipment in a plant. View the scheduled tests for this specification in context with the sample load for an instrument. Monitoring specifications are used to list the acceptable conditions for each variant storage condition in a stability study. When you create a monitoring specification, the Item and Grade fields on the Specifications window cannot be entered.
Using Specification Versions and Status Approval
Specification name, version, and the approval processes provide the flexibility and control required to manage quality specifications. The combination of Spec and Version fields lets you define several specifications for the same item, parent lot, and lot combination, batch work in process, individual customers, suppliers, resources, or subinventory locators. Status lets you determine the approval level of a specification. Use the Status Approval workflow to ensure that the appropriate internal or external individuals are notified when a quality specification version is created or modified. The combination of version control and status control lets you track changes to the specification record, and helps enforce consistency when evaluating results against specification requirements.
Creating a Base and Overlay Specification
Define new specifications either as a base specification, or as an overlay specification that references a base specification. The base specification contains the framework as a standard set of tests, or all possible tests to build overlays. Version and status control on the base specification affect the definition and usage of the dependent overlay specifications. You can only create an overlay specification from a base specification that has a status of Approved for Lab Use, or Approved for General Use. Configure the overlay specification to exclude tests carried over from the base specification. You can also create several overlays to model various test frequencies. The overlay specification can include additional tests. For example, you can create an overlay specification for purposes of customer acceptance of the material or to fulfill regional regulatory requirements. Base and overlay specifications can be created for both item and monitoring specification types. Copy a base specification with the status Approved for General Use to one or more inventory organizations. Overlay specifications associated to the base specification are also copied.
Setting Up Test Requirements
Set up test methods and tests prior to entering a specification. Refer to "Entering Test Methods" and "Entering Tests" for discussions of test requirements.
Understanding Test Sequence
Test sequence is a sequence number entered in the Seq field on a specification. Test sequence specifies the relative sort order of tests that display in a specification and results set. When a test is added to a specification, the application enters the test sequence number as a sequential integer multiple of ten. You can override the application-assigned sequence (Seq) by entering a different number. When you save changes, the application sorts the list of tests again in ascending order based on the test sequences on the specification. However, the test sequence cannot be changed on the Results window. When you add a new test to the set of results, it is added to the end of the set.
Marking Optional Tests
Mark a test as optional on a specification to indicate that it is not required criteria to determine the quality conformance or acceptability of an item. Tests that are marked optional are not considered in specification matching.
Setting the Lot Retest/Expiry indicator to Indicate the Purpose of Retesting
The Lot Retest/Expiry indicator identifies tests on the specification that need to be performed when retesting an expired lot, or when retesting is required at specified intervals. Set this indicator for each test on a specification. The Lot Retest/Expiry indicator is also included on the sample record to identify it for retesting purposes. When a notification is sent to create a sample based on lot retesting or lot expiration dates, the sample record is marked for lot retest. Results are expected for these tests when they are selected as Lot Retest/Expiry tests on the specification.
Recommending Lot-Specific Interclass UOM Conversions Based on Test Results
Use quality test results to update a quality attribute that varies from lot to lot in inventoried material. For example, when the active ingredient of a raw material varies across lots, despite the standard potency established for all lots of a particular item, you adjust for this variability by storing a lot conversion factor between the primary and secondary units of measure for the material based on quality test results for the specific attribute. The conversion factor is recommended for multiple test replicates when testing is in progress or complete. It is also recommended for the latest test replicate when the final sample group is assigned. When a result is entered for a sample from a supplier source where the lot is not yet received into inventory, the lot-specific interclass UOM conversion update must be done manually.
Understanding Experimental Error Used in Tests
Experimental error accounts for inaccuracy and imprecision in test results by defining an action zone around the specification limits or target as well as associated user actions such as retesting. Experimental error is defined initially at the test level for Numeric Range, Numeric Range with Display Text, and Expression test data types only. The Experimental Error region is calculated from either a percentage of the entire test range or from a number representing the tolerance around the specification minimum or maximum. Experimental error regions must not overlap or have gaps with respect to the specification limits or the target. If they do, then an error displays when the specification is validated. Associate an action code to each of the experimental error regions for a test. If no experimental error regions are defined for a test, then action codes cannot be assigned. Override the experimental error values and actions defaulting from the test definition at the specification level. When you enter a result that is within the experimental error region, the application displays a warning message with the associated experimental error region action code. If a result falls within an experimental error region that is also outside the specification limits, then the experimental error action code takes precedence over any out-of-specification action that is predefined on the specification.
Refer to "Entering Experimental Error" for more information.
Indicating Certificate Formatting Options on the Specification
You can specify whether to print specification targets, limits, and results on a quality certificate when you enter a specification. If a generic or customer-specific test alias was previously specified during test definition, then the alias is used to generate the quality certificate. These formatting options are used when generating a quality certificate.
Specifying the Expiration of Tests on a Specification
You can specify the time window that a sample is viable for analysis. This information assists in planning laboratory tests and managing time-sensitive tests.
Using Item Specification Validity Rules
The Validity Rules for Item Spec window lets you define the validity rule type as inventory, WIP, customer, or supplier for item specifications for the process-enabled organization you select. It also lets you assign date ranges within which the specification is effective. With the appropriate responsibility, you can override the system default values for the indicators that control the inventory update for the sample quantity, batch step status, and lot attributes update. When associating a specification version to a sample, the application uses a predefined hierarchy to select the specification validity rule that most closely meets the information identified with the sample. Select Update Inventory Quantity in the Process Quality Parameters window to enforce an inventory transaction for drawing the sample quantity and to decrease inventory accordingly.
See: "Setting Up Parameters."
If an item substitution affects the quality specifications required for a batch, then you can change the specification association for a sample during sample creation or specification comparison. Refer to the Oracle Process Manufacturing Product Development User's Guide for detailed information on item substitution
Specifying Certificate Type on the Specification Validity Rule
A results set that has a sample group disposition of Accept or Accept with Variance must exist before you print a Certificate of Analysis. Select the Certificate Type on the Specification Validity Rule to designate either Certificate of Conformance or Certificate of Analysis as the type of quality certificate to generate, and whether the certificate is required at invoice, at shipment, or from the supplier.
Creating a Monitoring Specification Validity Rule
Monitoring specification usage is controlled by the monitoring specification validity rule. Specify either of these attribute groups:
-
Organization, Subinventory, or Locator
-
Organization, Resource, or Resource Instance
The monitoring specification is used primary for controlling the environmental conditions in a stability study, but it is not limited to this functionality. Create and use monitoring specifications for other resources or locators to assess as part of your quality operations in the supply chain.
Matching Customer Specifications in Oracle Order Management
The specification matching process only works with Oracle Order Management. In order for specification matching to function properly, set up a specification for the item to match. The specification must have an effective customer specification validity rule that coincides with the scheduled ship date. If a test has more than one replicate in the customer specification, then only the most recent replicate is considered in the matching process. Sample dispositions must be marked Accept or Accept with Variance. All tests not marked as optional in the specification must have a result, and they must be marked In-spec.
The specification matching procedure accepts and searches for any combination of parent lots, lots, and locators. Searches for locators require that an active subinventory is available for the item. This allows the procedure to be used for non-lot-controlled items.
The search for a matching customer specification delivers:
-
Results that are in-specification
-
Results that are out-of-specification
-
No matching results
Accessing Specification Matching from Oracle Order Management
You can view the matching customer specifications in Oracle Order Management from the Sales Order Allocations window or from the Oracle Inventory Transact Process Move Orders window using the Manual Allocate option.
The Quality Match field on the Available Inventory tab of these windows displays the level at which the specification matching results correspond to the customer specifications for the line item selected. If a result corresponds to the entry on the Quality Match field, then one of these values displays:
-
Acceptable (Yes)
-
Unacceptable (No)
-
Not Applicable (Blank)
Click Review Spec to display the specification, specification version, and customer specification validity rule associated to the selected line item. Click Review Results to display results associated to the selected line item.
Refer to Using Oracle Order Management with Process Inventory for more information on these applications.
Finding a Customer Specification
To find a customer specification, the specification matching operation uses the base customer hierarchy. In the specification matching process, it then considers local global, and other plant specification validity rules. Refer to Appendix B for detailed information on customer specification matching.
Refer to Using Oracle Order Management with Process Inventory for additional information.
Using Lot UOM Conversions Based on Quality Results
Use quality test results to propose a new lot-specific UOM for an item lot. This is useful for items that have attributes that vary from lot to lot. A sample is assigned a final disposition of Accept, Accept with Variance, or Reject, and you can make a lot UOM conversion update based on the final results. You can also view historical recommendations for prior test replicate results against the sample.
For example, the standard protein concentration of item ABC is:
1 milliliter (mL) = 0.10 Protein Concentration Unit (PCU)
Lot1 of item ABC is received, and the protein concentration determined by quality testing is:
1 mL = 0.13 PCU
The actual potency of the lot is 0.03 PCU greater than the standard protein concentration for the item. It is useful to create a precise lot UOM conversion for item ABC Lot1 so that 1 mL = 0.13 PCU. If several samples are taken for the same lot and the results are composited, then the average composite result becomes the conversion factor.
Lot UOM conversions from quality results are proposed when a sample group disposition changes to Accept, Accept with Variance, or Reject. The UOM Conversion tab on the Quality Change Disposition window displays lot UOM conversions derived from sample group results. Accept the recommended conversions, or reject them. After an e-signature is processed for the sample disposition change, the Oracle Process Manufacturing (OPM) Quality UOM Conversion workflow sends a notification with the UOM conversion information to each of the defined workflow roles. In this notification, a link is created to the Oracle Inventory Lot Specific Conversions window that displays the proposed conversion. Transactions and inventory balances can be updated based on the recommended lot-specific UOM conversions. The lot UOM conversions are performed based on acceptance of the proposed conversions in OPM Quality Management. When this process is complete, close out the workflow notification.
Prerequisites
-
Create inventory parent lots and lots.
-
Set up the OPM Quality UOM Conversion workflow.
To set up for item lot UOM conversions:
-
Decide which item lot UOM conversions are dependent on quality results. You can only apply UOM conversions to items that are lot controlled.
From UOM = X * To UOM, where X is the result value, and the From UOM and To UOM are UOMs that are specified on specification test. The From UOM defaults to the primary UOM of the item. You can select a different From UOM.
For example, mL is entered as ML in the application. A UOM conversion is desired for item ABC, lot LOT1 for protein concentration between the ML UOM and the Protein Concentration Unit (PCU) based on quality results. The From UOM is ML and the To UOM is PCU. The base UOM for volume is L and 1L = 1000 ML.
-
Create the tests to generate lot UOM conversion recommendations based on quality results.
For example, create a numeric test, Protein Concentration%, with a test unit of %, since the concentration is recorded as a percentage. Create an expression test called Protein Concentration Expression with a test unit of PCU_TEST. The expression for this is (Protein Concentration %) /100. This expression is created to obtain the 1ML = X PCU conversion where X is the result value.
-
Create the desired specification.
Add tests to the specification and select the Calculate UOM Conversion next to the conversion tests. Specify the From UOM and To UOM for the conversion for the test. The From UOM displays the primary UOM for the item. Specify the To UOM for the conversion. The To UOM cannot belong to the same UOM class as the From UOM. Two test lines that belong to a single specification can reference the To UOMs that belong to the same UOM Class.
For example, the tests Protein Concentration % and Protein Concentration Expression to specification Spec1 for item ABC and lot LOT1. Select the Calculate UOM Conversion indicator for test Protein Concentration Expression, and enter the From UOM as ML and a To UOM as PCU.
-
Save and approve the specification.
-
Create and approve a specification validity rule that applies to the desired lot.
To convert units of measure based on quality results:
-
Record samples and results for all tests saved on the item specification created in the previous setup task.
For example, create the sample PR1 00093. There is one sample in the sample group for item ABC, lot LOT1 using the specification Spec1. Enter the results for the sample PR1 00093 as follows:
Test Test Unit Result Auto UOM Conv Indicator From UOM To UOM Protein Concentration % % 10 N/A N/A N/A Protein Concentration Expression PCU_TEST 10/100 = 0.1 Selected ML PCU -
Navigate to the Quality Change Disposition window.
-
Change the sample group disposition to Accept, Accept with Variance, or Reject.
-
Click the UOM Conversion tab. The application enters all data displayed on this tab:
-
If at least one test on the specification has the Calculate UOM indicator selected
-
If the Change Disposition To field displays Accept, Accept with Variance, or Reject
-
If the sample group source is Inventory or Supplier
Data appears on this tab even when test results are out-of-specification.
If a lot UOM conversion already exists for the lot, then the current conversion between the UOM class of the base UOM and the UOM class of the To UOM is displayed below the new proposed conversion.
-
-
Select the Recommend indicator next to the desired UOM conversions. If this indicator is not selected, then the proposed conversion is not used in inventory.
-
Click OK to change the disposition of the sample group.
-
Provide an e-signature for the disposition change if one is required.
-
Receive the OPM Quality UOM Conversion workflow notification.
-
Click the UOM Conversion link to the Oracle Inventory Lot Specific Conversions window, and save to create the conversions.
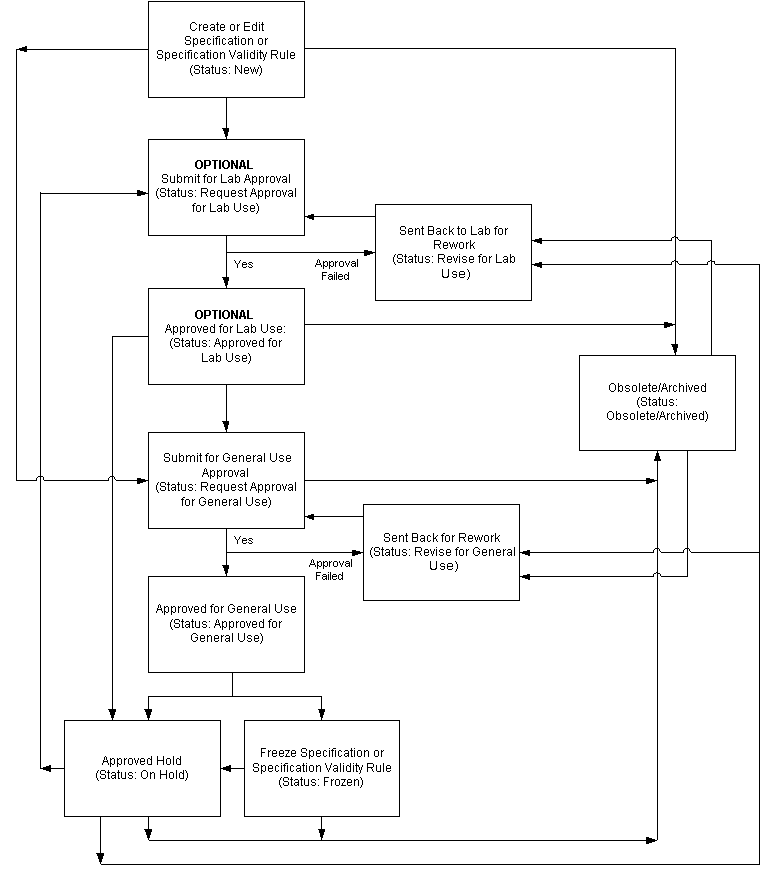
Understanding the Status Approval Workflow
When the Oracle Process Manufacturing (OPM) Quality Spec Status Change Approval workflow and the OPM Quality Spec Validity Rule Status Change Approval workflow are activated in Oracle Process Manufacturing Quality Management, new versions of specifications and their specification validity rules require a series of approvals that result in reassigning their statuses through a predefined approval process. Laboratory approval is optional.
Stability study statuses are preseeded. Refer to "OPM Quality Stability Study Change Status Workflow" in Appendix C for additional information.
Setting Up the Status Approval Workflows
Set up the workflows using the Approvals Management Business Analyst responsibility. Contact a system administrator if you are not sure that this is set up.
Enabling the Status Approval Workflow
Enable workflows using the Workflow Administrator Event Manager responsibility. Once workflows are set up and operating, each workflow is activated by changing the Status of a specification from New to any of the other available status.
Adding and Editing Status Codes to the Status Approval Workflow
If you modify or delete any of the predefined status codes that are supplied with this application, then the workflows do not run as described in this documentation. Add or edit status codes as described in "Adding and Editing Status Codes."
Running the Status Approval Workflow
When an item specification, or item validity rule is created, workflows run as follows:
-
Upon creation, by default, the Status for a specification or validity rule is assigned as New.
-
If you choose Change Status from the Actions menu and then select Approved for Laboratory Use, then the workflow changes Status to Request Approval for Laboratory Use. Once approved, Status changes to Approved for Laboratory Use.
-
If you choose Change Status from the Actions menu and then select Approved for General Use, then the workflow changes Status to Request Approval for General Use. Once approved, Status changes to Approved for General Use.
-
Assign the Status as Obsolete or Archived.
-
An Approved for Laboratory Use status are assigned these statuses:
-
On Hold
-
Obsolete
-
Archived
-
-
An Approved for General Use status are assigned these statuses:
-
On Hold
-
Frozen
-
Obsolete
-
Archived
-
-
A Pending Approval for Laboratory status or a Pending Approval for General Use status are assigned these statuses:
-
Obsolete
-
Archived
-
-
Specification validity rules that:
-
Fail the approval of Pending Approval for Laboratory Use Status are assigned Revise for Laboratory Use.
-
Fail the approval of Request Approval for General Use Status are assigned the Revise for General Use.
-
The following depicts the previously described workflows for versions of specifications and specification validity rules:
Disabling the Status Approval Workflow
Disable the status approval workflow using the Workflow Administrator Web Applications responsibility. If the workflow is disabled, then you can change the status of a specification or a validity rule manually. However, the status change does not initiate a workflow.
Adding and Editing Status Codes
Add to or edit the predefined status codes. Modification or deletion of the predefined status codes that are supplied with the application may result in the workflows not working properly.
Stability studies have a preseeded status approval workflow. Refer to the "OPM Quality Stability Study Change Status Workflow" topic in Appendix C for additional information on these customized status codes.
You can use folders and flexfields with this window.
See: Oracle E-Business Suite User's Guide and Oracle E-Business Suite Flexfields Guide
Prerequisites
-
Read the "Understanding the Status Approval Workflow" topic.
To add a new status code:
-
Choose New from the File menu. A new row displays.
-
Enter a new Status Code. The number you enter is sorted into ascending order with the other status codes when you save and reopen the Status Codes window.
Codes entered between two predefined codes, such as 101 to 199, or 201 to 299 are included in the workflow associated with the predefined status code with the same first digit. For example, if you enter the code 110, then it becomes part of the workflow associated to code 100. If you enter a code number 699, then it becomes part of the workflow associated to code 600. Predefined status codes display in a table at the end of this task. Required.
-
Enter a Description for the status code. Required.
-
Enter the information to display on the Status field in the Meaning field. Required.
-
Enable Version determines whether the status code entered is set up for version control. Any modification made to a specification or a specification validity rule while it is set to the status entered in the Meaning field initiates or bypasses activation of a new version depending on the selection you make here, and the value entered for the specification version control profile option.
-
Select Enable Version if you want the status code to enable version control when a modification is made to a specification or specification validity rule. The specification version control profile option must be set to Yes or Optional.
-
Deselect Enable Version if you want the status code to bypass version control when a modification is made to a specification or specification validity rule.
-
-
Save the window.
-
Click Details to enter Status Details as described in the "Entering Status Details" topic.
The following are required predefined status codes:
Code Meaning Description Enable Version 100 New Can make changes at any time, assuming security access is granted. Yes 200 Request Approval for Laboratory Use Submitted for approval of use in the laboratory. No 300 Revise for Laboratory Use Approval has failed and rework is required. No 400 Approved for Laboratory Use Can be used in laboratory. Yes 500 Request Approval for General Use Submitted for final approval. No 600 Revise for General Use Approval has failed and rework is required. Yes 700 Approved for General Use Can be used for production batches and cost rollups. Yes 800 On Hold Cannot be used until status is changed. No 900 Frozen Prevents further changes to specification, specification validity rule, and any dependent data. Both specification and specification validity rule can still be used. No 1000 Obsolete/Archived Can no longer be used unless status is changed. No
To edit an existing status code:
-
Navigate to the Status Codes window.
-
Edit the following fields as required:
-
Description to change the explanation of the status code.
-
Meaning to change the information that displays on the Status field in the application.
-
-
Enable Version determines whether the status code entered is set up for version control. Any modification made to a specification or a specification validity rule while it is set to the status entered in the Meaning field initiates or bypasses activation of a new version depending on the selection you make here, and the value you select for Version Control in the Process Quality Parameters window.
-
Select Enable Version if you want the status code to enable version control when a modification is made to a specification or specification validity rule. The Version Control indicator in the Process Quality Parameters window must be set to Yes or Optional.
-
Deselect Enable Version if you want the status code to bypass version control when a modification is made to a specification or specification validity rule.
-
-
Click Details. The Status Details window displays.
-
Edit the following fields as required:
-
Target Status to change the code that appears as the destination status on the Quality Change Status window. Required.
-
Rework Status to change the destination for the listed status code when it is not accepted and must be reworked.
-
Pending Status to change the destination of the listed status code when it enters the approval workflow, and is pending approval.
-
-
Edit the Workflow Indicator by selecting:
-
Enable or Disable Workflow to indicate that the fields listed in the row enable or disable the workflow.
-
Workflow Approval to indicate that the fields listed in the row require workflow approval.
-
No Workflow Approval to indicate that the fields listed in the row do not require workflow approval.
Required.
-
-
Click OK.
-
Save the window.
Entering Status Details
The Status Details window lets you enter a target status for a new status code. You can enter rework status, pending status, and indicate how you want workflow to manage the status entered.
You can use folders and flexfields with this window.
See: Oracle E-Business Suite User's Guide and Oracle E-Business Suite Flexfields Guide
To enter status details:
-
Navigate to the Status Details window.
-
Enter a Target Status for the new status code. This code appears as the destination status on the Quality Change Status window. Enter several destinations for each status code. They must be entered on separate lines. Required.
-
Optionally, enter a Rework Status. This code defines the destination for the listed status code when it is not accepted and must be reworked.
-
Optionally, enter a Pending Status. This code defines a destination of the listed status code when it enters the approval workflow and is pending approval.
-
Select one of the following as Workflow Indicator:
-
Enable or Disable Workflow to indicate that the fields listed in the row enable or disable the workflow.
-
Workflow Approval to indicate that the fields listed in the row require workflow approval.
-
No Workflow Approval to indicate that the fields listed in the row do not require workflow approval.
Required.
-
-
Click OK.
-
Save the window.
Finding a Status Code
The Find Status Codes dialog box lets you find a status code by code number, description, enable version, or mark for purge status.
To find a status code:
-
Navigate to the Find Status Codes dialog box.
-
Enter one or more of the following fields to narrow your search:
-
Status Type as Specifications or Stability Study.
-
Status Code to find a specific code number.
-
Description to find a specific status code description.
-
Enable Version determines whether the status code entered is set up for version control. Any modification made to a specification or specification validity rule while it is set to the status entered in the Meaning field initiates or bypasses activation of a new version depending on the selection you make here and the value you select for Version Control in the Process Quality Parameters window.
Select Enable Version to find the status codes that enable version control when a modification is made to a specification or specification validity rule.
Clear Enable Version to find the status codes that bypass version control when a modification is made to a specification or specification validity rule.
-
Mark For Deletion lets you find status codes with the status:
Yes indicating the status code has been marked for purge
No indicating that the status code has been undeleted.
-
-
Click Find to display the results of your query.
-
Click the down arrow to display all status codes that were found.
-
Click New to enter a new status code. The Status Codes window displays.
Understanding Specification Version Control
Some businesses require version control to generate an audit trail. By enforcing version changes you define rules for modifying quality specifications. Version control lets you determine if an existing version can be modified, or if a new version must be created. Quality Management lets you:
-
Force the creation of new versions so that transaction sources stay intact.
-
Deliver a combination of forced version creation and no version control.
-
Provide no version control.
These decisions are made at the organization level with proper assignment of User Responsibilities. Status must be Approved for General Use for version control to be active. All other statuses do not require that a new version be created each time a change is made.
Version control does not validate the fields on a specification header. These fields cannot be changed once a specification is saved. A new specification must be created in order to change these fields, whether or not version control is used. Version control does not take the Status field into account when determining whether a new version should be created. This is also true for Mark for Purge and Undelete functions.
Setting Up Specification Version Control
Navigate to the Process Quality Parameters window. Select one of the following for Version Control:
-
Yes to activate version control. Any change requires a new version.
-
No to indicate that version control is not activated. You can make changes to the existing version.
-
Optional to indicate that version control is optional. You can create a new version if a change is made to the existing version.
You can set version control to an appropriate level of activation. It is recommended to set version control initially to Optional. You are notified when you attempt to save changes. The setting of these options is based on your individual business requirements.
Understanding License Plate Numbers for Containerization
License Plate Numbers (LPN) uniquely identify each container in the supply chain. A license plate number is a unique identifier for a collection of items in a single location. LPNs store their contents, including item, revision, lot quantity, current location, organization, subinventory, locator and serial numbers.
The LPN enables you to track the contents of each container. You use LPN to store and transact inventory throughout the supply chain. You can also individually transact LPNs during the packing or unpacking, reservation, and shipment sealing processes.
When a product is yielded into containers, the product with a single lot is yielded into multiple containers or multiple lots into multiple containers. Each of the containers would be equivalent to an LPN.
You can now enter an LPN for containerization as the requirement to yield the product from the desktop application as well.
You can enter an LPN number for a product or associate to a lot number in the yield transaction. The LPN information for yielding is entered manually. You can enter the product lot information in the Material Transaction window. You cannot associate the LPN information to pending lots or products.
You can create an item sample against the lot and optionally enter an LPN and then apply an item specification based on the specification matching hierarchy rules. You can also enter an LPN, or Delay an LPN entry for a product. For example, in batch creation, the sample is used against the lot. Once the material is tested and filled into an LPN container, the specified LPN is associated with the sample (this is known as delayed entry of LPN for a sample).
Although an LPN may be specified for a sample, there is no requirement to define a quality specification at the LPN level.
You can query a sample record based on its LPN for results entry and evaluation. The results can be used to change the lot status accordingly. If a particular container within the lot requires a status that is different from other containers in the same lot, then a lot split transaction must be performed, because status is maintained at the lot level not at the LPN level.
Note: LPNs are applicable only for Warehouse Management System (WMS) enabled organizations.
Refer to the Material Management chapter of the Oracle Warehouse Management Users Guide Release 12 for detailed information on the license plate numbers.
Entering a Specification
The Specifications window lets you define, view, or edit a quality specification.
The window associates tests, targets, actions for results, and certificate formatting options with Specification Validity Rules to create usable, valid quality specifications. You can enter an item specification or a monitoring type specification.
Select a context organization that your responsibility can access using the Organizations window.
Entering a Base Specification
The creation of a base specification provides a template to maintain a set of common tests and targets that you can propagate into overlay specifications. This process lets you customize individual test and target requirements on the overlay without compromising the integrity of the base specification. You cannot create overlay specifications with the same name.
Entering an Overlay Specification
The creation of an overlay specification lets you add new tests and targets to a base specification. You can override the test line data on the base specification. You can also exclude certain tests included in the base specification that do not apply to your customized evaluation needs. Refer to the "To create an overlay specification" task for the procedure to create an overlay specification.
Entering a Monitoring Specification
A monitoring specification defines the details of the storage condition for each variant in the stability study. The monitoring specification provides the test requirements needed to evaluate the acceptability of environmental conditions for a variant storage condition in a stability study. Use the monitoring specification to define and monitor environmental conditions outside the stability study. Refer to the "Entering Monitoring Samples" topic for additional information on taking samples for the monitoring specification. Select the Spec Type as Monitoring to create a monitoring specification and follow the procedure to enter a specification.
Workflow Procedures
Refer to "Appendix C" for additional information on workflow procedures.
E-Record and E-Signature Approvals
There may be an e-signature event associated with this window. Refer to "Appendix D" for additional information on e-record and e-signature approvals associated with this window.
You can use folders, flexfields, and attachments with this window.
See: Oracle E-Business Suite User's Guide and Oracle E-Business Suite Flexfields Guide
Prerequisites
-
Define tests, test methods, and sampling plan.
-
Set up the process quality parameters using the Process Quality Parameters window.
-
Select an organization that your responsibility can access using the Organizations window.
To enter a base specification:
-
Navigate to the Specifications window.
-
Enter Spec as the name for the specification. Required.
-
Enter a Version for the specification. Required.
-
After entering all relevant information and saving the specification with the default Status of New, return to this window to change specification status by choosing Change Status from the Actions menu. Depending on whether the status approval workflows are enabled, a different set of statuses is available.
Select a Status for the specification you are entering from one of the following:
-
Approved for Laboratory Use to indicate that the specification is approved for laboratory use.
-
Approved for General Use to indicate that the specification is approved for use in work in process.
-
Obsolete/Archived to indicate that the specification is no longer approved for use and is obsoleted, archived, or both.
If the status approval workflows are enabled when you select:
-
Approved for Laboratory Use, then Status changes to Request Approval for Laboratory Use until all approvers have accepted the specification, then its Status changes to Approved for Laboratory Use.
-
Approval for General Use, then Status changes to Request Approval for General Use until all approvers have accepted the specification, then its Status changes to Approved for General Use.
-
-
-
Enter a brief Description of the specification. Required.
-
Select Spec Type as:
-
Item to enter a specification for a process quality-enabled inventory item.
-
Monitoring to enter a specification to monitor an environmental condition.
-
-
Do not select the Overlay indicator. This ensures you enter a base specification. Refer to the "To create an overlay specification" task for the procedure to create an overlay specification.
-
Base Spec displays the base specification.
-
Version displays the version of the base specification.
-
Enter the Item code for the material being specified as listed on the Item Master. The item must be associated with the context inventory organization and set up as process quality-enabled in the Item Master. Refer to the Oracle Inventory User's Guide for detailed information. The item description displays. Required if the Spec Type is Item. You cannot enter an item for a Monitoring type specification.
-
Enter a Grade. If the item is lot-controlled and grade-controlled, then the grade on this specification is used to update the grade of a lot. You cannot enter a grade for a Monitoring type specification.
-
The Owner Organization defaults from the context organization and displays your default organization. You can designate an organization as the owner organization for many specifications.
-
The Owner of this specification displays. Change this entry to anyone who has access to the Owner Organization. Required.
Targets
-
Enter Seq as the sequence of the test in the specification. This field populates with an integer number beginning with 10. Each test added increases the number displayed in this field by 10. Required.
-
Enter the Class code for this test. This field defaults from the test entered. You cannot enter a class for a Monitoring type specification.
-
Enter a predefined Test code for this specification. The list of tests available for entry is filtered if a test class was entered. Required.
-
Enter the test Method. This field defaults from the Tests window.
-
From Base is display only. It is cleared when the test in the row is not from the base specification.
-
The Exclude indicator is selected when the test listed in the row is eliminated from an overlay specification. If you are entering an overlay specification, select the indicator to exclude a test, or deselect the indicator to include a test from the overlay specification.
-
The Modify indicator is selected to amend data on the test line. The base data is protected from modification until the indicator is selected. If the Modify indicator is disabled, then data on the test line reverts to its original base state, and is protected from updates. You can only select this indicator when the test listed in the row is derived from the base specification.
-
Enter the specification Target value for the test code. Depending on the test data type, the specification target may or may not be validated. For example,
-
For Non-Validated test data types, the specification target is not validated. Any entry is accepted in this field, including a blank.
-
For Numeric Range, Numeric Range with Display Text, or Text Range test data types, enter a value within the specification limits as defined in the Minimum and Maximum fields. Tighten the specification limits for a test by entering new values in the Minimum and Maximum fields to replace the default values of the test range.
-
For List of Test Values test data types, enter a valid value from the list of values available for the test.
-
For Expression test data types, enter a value within the calculated expression test specification limits.
-
-
Enter the specification Minimum value that is acceptable to meet specification requirements, if the test data type is Numeric Range, Numeric Range with Display Text, Text Range, or Expression. This field defaults from the Tests window.
-
Enter the specification Maximum value that is acceptable to meet specification requirements, if the test data type is Numeric Range, Numeric Range with Display Text, or Text Range, or Expression. This field defaults from the Tests window.
-
Unit displays the default quality unit of measure for the test entered. This field defaults from the Tests window.
-
Enter the Quantity of material required to perform the test. This field defaults from the Tests window.
-
UOM displays the unit of measure in Oracle Inventory for the test quantity. This field defaults from the Test Method window.
-
Enter Replicate as the number of times that the test is repeated for the same sample. This field defaults from the Test Methods window.
-
Enter the test Priority as Low, Normal, or High. Test priority identifies the relative priority of a test, and used to sort tests listed in a specification. Test priority is defined initially at the test level. You can override it here at the specification level.
-
Select Optional if the test is not required for the specification. You can indicate that a Result Set is complete even if an optional test is incomplete. Use Consider Optional Tests Results in the Process Quality Parameters window to configure whether an optional test that displays on the specification and results records contributes to the final disposition of the sample.
See: "Setting Up Process Quality Parameters"
-
Select Lot Retest/Expiry to indicate whether this test is required for lot retesting or expiration testing.
Actions
-
The following fields display the values entered on the Targets tab:
-
Seq displays the sequence of the test in the specification. This field populates with a number beginning with 10. Each test added increases the number displayed in this field by 10. Required.
-
Class code displays the class for this test data type. This field defaults from the Tests window.
-
Test displays the test code for this specification. Required.
-
-
Enter the Out of Spec Action as the action to take if the result of the test falls outside the specification range. This action displays a message window on the Results window.
-
Description displays a brief explanation of the action entered.
-
Enter one of the following in the Interval field, depending on how you implement action codes in Oracle Inventory:
-
Enter the number of days between the expiration date and the date that the action must be taken.
-
Enter the number of days after the failed quality test date that the action must be taken.
-
-
Error Type displays the type of numerical or percentage Experimental Error associated with a numeric-based test. This defaults from the Tests window.
-
Calculate UOM Conversion functions with the From UOM and To UOM fields to convert the item primary UOM to a desired To UOM:
-
Select Calculate UOM to use the test result as an item lot conversion in Oracle Inventory.
-
Deselect Calculate UOM if you do not want the result value for this test to be used as an item lot conversion in the Oracle Inventory .
Note: Calculate UOM Conversion is disabled if the Spec Type is Monitoring.
-
-
The From UOM field displays the specification item in its primary UOM. You can select a different From UOM.
-
Enter the To UOM as the desired item lot conversion UOM. The UOM class must differ from the From UOM class and other UOM classes used on tests that belong to the specification. Required if the Calculate UOM Conversion indicator is selected.
Refer to the "Using Lot UOM Conversions Based on Quality Results" topic for an example of the OPM Quality Management UOM conversion process.
-
The following fields are entered on a test-specific basis on the Experimental Error window:
-
Below Minimum displays the percentage or number to be used in calculating the experimental error region below the specification minimum. This is the beginning of the action zone at the low end of the specification.
-
Below Minimum Action displays the Action code associated with the Below Minimum experimental error region.
-
Above Minimum displays the percentage or number to be used in calculating the experimental error region above the specification minimum. This is the end of the action zone at the low end of the specification.
-
Above Minimum Action displays the Action code associated with the Above Minimum experimental error region.
-
Below Maximum displays the percentage or number to use in calculating the experimental error region below the specification maximum. This is the beginning of the action zone at the high end of the specification.
-
Below Maximum Action displays the Action code associated with the Below Maximum experimental error region.
-
Above Maximum displays the percentage or number to use in calculating the experimental error region above the specification maximum. This is the end of the action zone at the high end of the specification.
-
Above Maximum displays the Action code associated with the Above Maximum experimental error region.
-
Formatting
-
The following fields display the values entered on the Targets tab:
-
Seq displays the sequence of the test in the specification. This field populates with a number beginning with 10. Each test added increases the number in this field by 10. Required.
-
Class code displays the class for this test data type. This field defaults from the Tests window.
-
Test displays the test code for this specification. Required.
-
-
Alias displays an alternate name for the test. This field defaults from the Tests window.
-
Select Print Spec to print the specification target, minimum, and maximum values for this test on quality certificates. Deselect if you do not want to print these values on quality certificates.
-
Select Print Result to print the result of this test on quality certificates. Deselect if you do not want to print results on quality certificates.
-
Enter Stored Precision as the number of decimals to store and display for the specification target, minimum, maximum, and test result. This value defaults from the value entered on the Tests window. Required.
-
Enter Report Precision as the number of decimals to print on quality certificates for the specification target, minimum, maximum, and test result. This value defaults from the value entered on the Tests window. Required.
Planning
-
The following fields display the values entered on the Targets tab:
-
Seq displays the sequence of the test in the specification. This field populates with a number beginning with 10. Each test added increases the number in this field by 10. Required.
-
Class code displays the class for this test data type. This field defaults from the Tests window.
-
Test displays the test code for this specification. Required.
-
-
The following fields function as a single entry for the test expiration time:
-
Enter Test Expiration Days as the number of days allowable for the test to run after the sample is drawn.
-
Enter Test Expiration Hours as the number of hours allowable for the test to run after the sample is drawn.
-
Enter Test Expiration Minutes as the number of minutes allowable for the test to run after the sample is drawn.
-
Enter Test Expiration Seconds as the number of seconds allowable for the test to run after the sample is drawn.
For example, if a test expiration is 1 day, 6 hours, and 30 minutes after the sample is drawn, enter:
-
1 in the Test Expiration Days field
-
6 in the Test Expiration Hours field
-
30 in the Test Expiration Minutes field
-
-
-
Save the window.
To enter validity rules for the specification:
-
Click Validity Rules. The Validity Rules Summary for Item Spec window displays.
-
Click New to create a new validity rule.
-
Enter appropriate information on the window. Refer to the "Entering Specification Validity Rules" topic for additional information.
-
Save the window.
To duplicate the specification:
-
Choose Duplicate, then choose Record Above from the Edit menu. All fields are copied.
-
Choose Record Above from the Edit menu. All fields are copied.
-
Enter a new Name, Version, and changes to other fields.
-
Save the window.
To mark a specification for purge:
Choose Mark for Purge from the Actions menu. The record is marked for deletion.
To edit text in the specification:
-
Choose Edit Text from the Actions menu. The Select Text Paragraph window displays.
-
Make appropriate text changes.
-
Save the window.
To display test details:
-
Select the desired test.
-
Choose Tests from the Actions menu. The Tests window displays for the selected test.
To create an overlay specification:
-
Enter the required specification header information for an item specification or a monitoring specification.
-
Select the Overlay indicator.
-
Select the Base Spec and Version with a status of Approved for Lab Use or Approved for General Use to generate the overlay specification. The Tests region of the window displays all data copied from the selected base specification. The From Base indicator is cleared if a test line was not derived from the base specification.
-
Select the Exclude indicator to exclude a test from the overlay specification.
-
Select the Modify indicator to modify other applicable fields in the row. If you select this field, then depending on the test type, enter each of the fields in the row to modify.
-
Select the next Seq to add a test to the overlay specification. Enter all necessary test information.
-
Save the window.
-
Create a specification validity rule. Refer to the "Entering Specification Validity Rules" topic for additional information.
To create a monitoring specification:
-
Enter the required specification header information for a monitoring specification.
-
Select Spec Type as Monitoring.
-
Enter all necessary test information for the monitoring specification as discussed in the "To enter a base specification" task.
-
Save the window.
-
Create a monitoring specification validity rule. Refer to the "Entering a Monitoring Specification Validity Rule" topic for additional information.
To assign a test group to a specification:
-
Navigate to the Specifications window.
-
Query the desired specification to assign a test group.
-
Choose Add Test Group from the Actions menu. The Test Group window displays. Add tests to a specification that has a status of New, Revise For General Use, or Revise For Lab Use. If the flexfield for specification tests is mandatory, then you cannot use this option.
-
Query the desired Test Group as the test class that is also group enabled. The window displays all tests included in that test group.
-
Ordering is the sequence of the test in the group as entered on the Tests window.
-
Test is the name of the test entered.
-
Description is the description of the test code.
-
Data Type is the test data type as described in "Understanding Tests."
-
Qty is the amount of material required for the test. This defaults from the test quantity specified for the test method.
-
UOM is the unit of measure for the test quantity defined in the test method.
-
-
Select Include to indicate the tests in the group to be copied to the specification. The Include indicator is disabled for tests that were previously added to the specification. To include an additional test replicate on the specification, increase the replicate by one.
-
Click OK. Selected tests are added to the specification.
-
Save your work.
Copying a Specification
You can copy a specification to one or more local organizations that are different from the owning organization. After the specification is copied, the local organization becomes the owner organization and you can make changes to the copied specification locally. If overlay specifications are associated to the copied specification, then they are copied along with the selected base specification. The Copy Specification menu option is enabled if the status of the specification is Approved for General Use.
To copy a specification
-
Navigate to the Specifications window.
-
Choose Copy Specification from the Actions menu. The Copy Spec window displays.
-
Owner Organization defaults from the Specifications window and displays the owner organization of the source specification.
-
Specification displays the source specification name.
-
Version displays the version of the source specification.
Copy To
-
Enter the local inventory organizations to which you are copying the specification in the Organization fields.
-
Specification displays the specification name of the copied specification. The owner organization name to which it is copied to is appended to the specification name. If you edit the default specification name, ensure that it is unique.
-
The Version defaults to 1. You can edit the version.
-
Click Copy to save a copy of the specification to each local organization you specify.
Finding an Item Specification
The Find Specifications dialog box lets you find a specification based on its code, version, item or monitoring specification type, status, item, grade, or owner organization. You can also find item specifications that are overlays to a base specification, and identify base specifications by version.
Prerequisites
-
Enter an item specification or a monitoring specification.
To find a specification:
-
Navigate to the Find Specifications dialog box.
-
Enter any of the following to narrow your search:
-
Spec code entered for the specification
-
Version number of the specification
-
Spec Type as Item or Monitoring
-
-
Select Overlay to find overlay specifications of a specific base specification, and leave the Base Spec field blank to find all overlay specifications. Deselect Overlay to exclude overlay specifications from the search.
-
Enter any of the following to narrow your search:
-
Base Spec as a specific base specification
-
Base Spec Version as a specific base specification version
-
Status as the specification status
-
Item code as the item code for the material being specified as it is listed on the Item Master. The item must be set up as process quality-enabled.
-
Revision as the item revision, if the item is revision-controlled
-
Grade as the assigned to the item listed in the specification
-
Owner Organization as the owner organization entered for the specification
-
Owner as the owner of the specification
-
-
Select Marked for Deletion as:
-
Yes if you want find specifications that are marked for deletion.
-
No to exclude specifications that are marked for deletion.
-
Leave this field blank to limit your search based on whether a specification is marked for deletion.
-
-
Click Find. The Specifications window displays the results of the search.
To create a new specification from the Find Specifications dialog box:
-
Click New. The Specifications window displays.
-
Create a new specification as described in the "Entering a Specification" topic.
-
Save your work.
Entering an Item Specification Validity Rule
The Item Spec Validity Rules window lets you define the usage of the specification validity rule at the inventory, work in process, customer, and supplier levels.
Define specification validity rules for each process quality-enabled item in your inventory, for each customer or supplier that you sell to or buy from, or for each recipe or work in process batch that you produce. Also, you can define a specification validity rule for an item grade.
E-record and E-signature Approvals
There may be an e-signature event associated with this window. Refer to "Appendix D" for additional information on e-record and e-signature approvals associated with this window.
Refer to "Solutions" for additional information.
Refer to "Appendix B" for the hierarchies of validity rules.
You can use folders, flexfields, and attachments with this window.
See: OracleE-Business Suite User's Guide and Oracle E-Business Suite Flexfields Guide
Prerequisites
-
Enter and save a specification.
-
Optionally, enter a sampling plan.
To enter an item specification validity rule:
-
Navigate to the Item Spec Validity Rules Summary window.
-
Click New.
-
Spec displays the specification name. This defaults from the Specifications window.
-
Version displays the specification version.
-
Item displays the item code for which you are creating the specification validity rule. The item must be set up as process quality-enabled in the Item Master in Oracle Inventory. If the item is an engineering item, then the organization must be process-enabled and set up as a research and development lab.
-
Revision displays the item revision, if the item is revision-controlled.
-
Grade displays the grade associated to the item on the specification, if the item is grade-controlled.
-
Spec Status displays the status of the specification used in the validity rule. Specification status is discussed in "Entering a Specification."
-
Click one of the following to create a validity rule for the item and optional grade entered:
-
Inventory to create a specification validity rule for inventoried item. Proceed to step 10.
-
WIP to create a specification validity rule for work in process (WIP). Proceed to step 23.
-
Customer to create a specification validity rule for a customer. Proceed to step 34.
-
Supplier to create a specification validity rule for a supplier. Proceed to step 45.
-
Inventory
-
Organization displays the default process-enabled organization for the validity rule.
-
After entering all relevant information and saving the validity rule with the default Validity Rule Status of New, return to this window to change specification status by choosing Change Status from the Actions menu. Depending on whether status approval workflows are enabled, a different set of statuses is available.
Select a Status for the specification you are entering:
-
Approved for Laboratory Use to indicate that the validity rule is approved for laboratory use.
-
Approved for General Use to indicate that the validity rule is approved for use in work in process.
-
Obsolete/Archived to indicate that the validity rule is no longer approved for use and is obsoleted, archived, or both.
If status approval workflows are enabled, when you select:
-
Approved for Laboratory Use, then Status changes to Request Approval for Laboratory Use until all approvers accept the validity rule, then its Status changes to Approved for Laboratory Use.
-
Approval for General Use, then Status changes to Request Approval for General Use until all approvers accept the validity rule, then its Status changes to Approved for General Use.
-
-
-
Enter the Parent Lot for the specification validity rule to apply to all lots of the parent lot. Refer to "Understanding Sampling" for detailed information on sampling parent lots.
-
Enter the Lot for the specification validity rule to apply to a specific lot. Leave the field blank to apply to all lots.
-
Enter a Subinventory code to create the specification validity rule for a particular subinventory in the specified inventory organization. Leave the field blank to indicate that the specification validity rule is applicable to all subinventories within the organization.
-
Enter a Locator to create this specification validity rule for a particular locator of the specified subinventory. Leave this field blank to indicate that the validity rule is applicable to all locators within the subinventory.
Control
-
The Delayed LPN Entry checkbox will be enabled for a WMS enabled organization. Select Delayed LPN Entry to enable the entry of an LPN number during the final disposition of a sample. Deselect to prevent an LPN number from being entered during the final disposition of a sample. If you enter an LPN number during sample creation, then the LPN number cannot be changed when assigning the sample disposition.
-
The following controls default from the process quality parameters configured by the inventory organization:
-
Create Samples Automatically to enable automatic sample creation. This defaults from the Process Quality Parameters window. Deselect to disable automatic sample creation using this validity rule.
-
Update Inventory Quantity to enforce an inventory transaction for drawing the sample quantity and to decrease inventory by the sample amounts taken for testing. Update Inventory Quantity defaults from the process quality parameters for the organization specified. The item must be transactable in the inventory organization. This indicator is not enabled if the item is serial controlled.
-
Control Lot Attributes to control lot status, grade, and hold date based on the final disposition of the sample group. This indicator defaults from the process quality parameter for the organization specified. Specify the In-Spec and Out-Spec material statuses.
-
Select Lot Optional on Sample to skip the entry of a lot during sample creation for a lot-controlled item. Deselect this selection to require a lot to be entered on a sample.
-
Select Delayed Lot Entry if Lot Optional On Sample is selected to enable the entry of a lot during the final disposition of a sample. Deselect to prevent a lot from being entered during the final disposition of a sample. If you enter a lot number during sample creation, then the lot cannot be changed when assigning the sample disposition.
-
-
To define Effective Dates for this validity rule:
-
Enter From as the starting date and time for the validity rule. This defaults to the current system date and time.
-
The To date indicates the date and time the validity rule is no longer effective. Leave this field blank until you stop this validity rule from being effective.
-
-
To define Certificate, select Certificate Type as:
-
Certificate of Analysis to generate a certificate of analysis when this validity rule is selected.
-
Certificate of Conformance to generate a certificate of conformance when this validity rule is selected.
When you select the certificate type, choose any of the following to indicate at which stage the certificate is generated or required:
-
Select Invoice to generate it at invoice time.
-
Select Shipment to generate it when the item is shipped.
-
Select Supplier if the certificate is required when the item is received from a supplier.
-
-
-
Enter the Name of the Sampling Plan to associate to this validity rule. If the sample quantity defined on the sampling plan is not greater than or equal to the sum of the planned test quantities on the specification, then a warning message displays. The following fields display when a sampling plan is specified:
-
Count displays the number of samples to take at each instance of the sampling frequency entered.
-
Quantity and UOM indicate the sample size, or the amount of material and its inventory unit of measure.
-
Per indicates the sampling frequency period. Count, Frequency Type, and Frequency Period or Per fields work together to define the number of repetitions for sampling.
-
-
Save the window.
WIP
-
Select a process-enabled inventory Organization. The organization is defined as a Plant or research and development Laboratory organization. If the item is an engineering item, then the organization must be defined as a research and development laboratory.
-
After entering all relevant information and saving the validity rule with the default Validity Rule Status of New, return to this window to change specification status by choosing Change Status from the Actions menu. Depending on whether status approval workflows are enabled, a different set of statuses is available.
Select a Status for the specification you are entering from one of the following:
-
Approved for Laboratory Use to indicate that the validity rule is approved for laboratory use.
-
Approved for General Use to indicate that the validity rule is approved for use in work in process.
-
Obsolete/Archived to indicate that the validity rule is no longer approved for use and is obsoleted, archived, or both.
If status approval workflows are enabled, when you select:
-
Approved for Laboratory Use, then Status changes to Request Approval for Laboratory Use until all approvers accept the validity rule, then its Status changes to Approved for Laboratory Use.
-
Approval for General Use, then Status changes to Request Approval for General Use until all approvers accept the validity rule, then its Status changes to Approved for General Use.
-
-
Enter the Batch number for which this validity rule is applicable. If you enter a valid batch number, then the following fields display with batch-specific information:
-
Recipe indicates the recipe and Version used in the batch.
-
Formula indicates the formula and Version used in the batch.
-
Formula Line indicates the line in the formula controlled by this validity rule. The formula line Type displays.
-
Routing indicates the routing associated to the recipe and Version used in the batch.
-
Operation indicates the operation controlled by this validity rule and its Version.
If a batch number is not entered, then enter a recipe, formula and version, formula line, routing, or operation and version.
Note: If a batch is specified, then the material detail line is used instead of the formula line.
-
-
Enter Step and Charge on a new WIP specification validity rule, for the sample from a WIP source with the specified step or charge can get the specification for this validity rule.
-
Control indicates what to affect with this validity rule. The following controls default from the process quality parameters configured by the inventory organization:
-
Create Samples Automatically to enable automatic sample creation. This defaults from the Process Quality Parameters window. Deselect to disable automatic sample creation using this validity rule.
-
Update Inventory Quantity to decrease inventory by the sample amounts taken for testing. This indicator defaults from the process quality parameters for the organization specified. This is disabled if the item is serial controlled.
-
Control Batch Step Status to control the batch step status for the selected validity rule.
-
Control Lot Attributes to control lot status, grade, and hold date based on the final disposition of the sample group. This defaults from the process quality parameters for the organization. Specify In-Spec and Out-Spec material statuses.
-
-
The Delayed LPN Entry checkbox will be enabled for a WMS enabled organization. Select Delayed LPN Entry to enable the entry of an LPN number during the final disposition of a sample. Deselect to prevent an LPN number from being entered during the final disposition of a sample. If you enter an LPN number during sample creation, then the LPN number cannot be changed when assigning the sample disposition.
-
Select Lot Optional on Sample to require a lot to be entered for a sample of a lot-controlled item. Deselect if you do not want to require a lot to be entered on a sample for a lot-controlled item. This defaults from the Process Quality Parameters window.
-
If Lot Optional On Sample is selected, then Delayed Lot Entry is available. This field defaults from the selection in the Process Quality Parameters window. Update this field if the item specification validity rule status is changed to Approved, Frozen, or Obsoleted/Archived. If Delayed Lot Entry is selected, then the samples created must have lot entered after sample creation. If you enter a lot number during sample creation, then the lot is used to choose a sample group and it cannot be changed.
-
To define Effective Dates for this validity rule:
-
Enter From as the starting date and time for the validity rule. This defaults to the current system date and time.
-
The To date indicates the date and time the validity rule is no longer effective. Leave this field blank until stop this validity rule from being effective.
-
-
To define Certificate, select Certificate Type as:
-
Certificate of Analysis to generate a certificate of analysis when this validity rule is selected.
-
Certificate of Conformance to generate a certificate of conformance when this validity rule is selected.
When you select the certificate type, choose any of the following to indicate at which stage the certificate is generated or required.
-
Select Invoice to generate it at invoice time.
-
Select Shipment to generate it when the item is shipped.
-
Select Supplier if the certificate is required when the item is received from a supplier.
-
-
-
Enter the Name of the Sampling Plan to associate to this validity rule. If the sample quantity is not greater than or equal to the sum of the planned test quantities on the specification, then a warning message displays. The following fields display when a sampling plan is specified:
-
Count displays the number of samples to take at each instance of the frequency entered.
-
Quantity and UOM indicate the sample size, or the amount of material.
-
Per indicates the frequency period. Count, Frequency Type, and Frequency Period or Per fields work together to define the number of repetitions for sampling.
-
-
Save the window.
Customer
-
Organization displays the default organization for the validity rule.
-
After entering all relevant information and saving the validity rule with the default Validity Rule Status of New, return to this window to change specification status by choosing Change Status from the Actions menu. Depending on whether status approval workflows are enabled, a different set of statuses is available.
Select a Status for the specification you are entering from one of the following:
-
Approved for Laboratory Use to indicate that the validity rule is approved for laboratory use.
-
Approved for General Use to indicate that the validity rule is approved for use in work in process.
-
Obsolete/Archived to indicate that the validity rule is no longer approved for use and is obsoleted, archived, or both.
If status approval workflows are enabled, when you select:
-
Approved for Laboratory Use, then Status changes to Request Approval for Laboratory Use until all approvers have accepted the validity rule, then its Status changes to Approved for Laboratory Use.
-
Approval for General Use, then Status changes to Request Approval for General Use until all approvers have accepted the validity rule, then its Status changes to Approved for General Use.
-
-
Enter the Customer number for which the specification validity rule is applicable. Required.
-
Enter the Operating Unit to narrow the selection of a customer ship-to-location or bill-to-location for the specification validity rule.
-
Enter the Customer Location as the ship-to-location or bill-to-location to which the specification validity rule applies.
-
Enter the Order number from existing orders in the Oracle Order Management application for the operating unit specified.
-
Type displays the sales order type code from those that are set up for the operating unit in the Oracle Order Management application. This field only displays when an order is specified.
-
Line displays the sales order lines associated to the entry made in the Order field.
-
Control indicates what to affect with this validity rule. Select Lot Optional on Sample if you do want to require a lot to be entered on sample of a lot-controlled item. Deselect this selection if you do not want to require a lot to be entered on a sample for a lot-controlled item. This defaults from the Process Quality Parameters window.
-
To define Effective Dates for this validity rule:
-
Enter From as the starting date and time for the validity rule. This defaults to the current system date and time.
-
The To date indicates the date and time the validity rule is no longer effective. Leave this field blank until you need to stop this validity rule from being effective.
-
-
To define Certificate select Certificate Type as:
-
Certificate of Analysis if you want a certificate of analysis when this validity rule is selected.
-
Certificate of Conformance if you want a certificate of conformance when this validity rule is selected.
When you select the certificate type, choose one or more of the following to indicate at which stage the certificate is generated or required.
-
Select Invoice to generate it at invoice time.
-
Select Shipment to generate it when the item is shipped.
-
Select Supplier if the certificate is required when the item is received from a supplier.
-
-
Enter the Name of the Sampling Plan to associate to this validity rule. If the sample quantity is not greater than or equal to the sum of the planned test quantities on the specification, then a warning message displays. The following fields display when a sampling plan is specified:
-
Count displays the number of samples to take at each instance of the frequency entered.
-
Quantity and UOM indicate the sample size, or the amount of material.
-
Per indicates the frequency period. Count, Frequency Type, and Frequency Period or Per fields to define the number of repetitions for sampling.
-
-
Save the window.
Supplier
-
Select a process-enabled inventory Organization. Required.
-
After entering all relevant information and saving the validity rule with the default Validity Rule Status of New, return to this window to change specification status by choosing Change Status from the Actions menu. Depending on whether status approval workflows are enabled, a different set of statuses is available.
Select a Status for the specification you are entering from one of the following:
-
Approved for Laboratory Use to indicate that the validity rule is approved for laboratory use.
-
Approved for General Use to indicate that the validity rule is approved for use in work in process.
-
Obsolete/Archived to indicate that the validity rule is no longer approved for use and is obsoleted, archived, or both.
If status approval workflows are enabled, when you select:
-
Approved for Laboratory Use, then Status changes to Request Approval for Laboratory Use until all approvers accept the validity rule, then its Status changes to Approved for Laboratory Use.
-
Approval for General Use, then Status changes to Request Approval for General Use until all approvers accept the validity rule, then its Status changes to Approved for General Use.
-
-
Enter the Supplier code for whom this validity rule is effective. Required. The supplier name displays.
-
Enter Operating Unit as the operating unit number of the supplier for which the validity rule is effective.
-
Enter Site as the supplier site number for which this validity rule is effective.
-
Enter PO as the purchase order number for which this validity rule is effective.
-
Enter PO Line as the purchase order line number for which this validity rule is effective.
-
Control indicates what to affect with this validity rule. The following controls default from the process quality parameters configured by the inventory organization. Select:
-
Create Samples Automatically to enable automatic sample creation. This defaults from the Process Quality Parameters window. Deselect this selection to disable automatic sample creation using this validity rule.
-
Update Inventory Quantity to decrease inventory by the sample amounts taken for testing. This indicator defaults from the process quality parameters for the organization specified.
-
Control Lot Attributes to control lot status, grade, and hold date based on the final disposition of the sample group. This indicator defaults from the process quality parameters for the organization specified. Specify In-Spec and Out-Spec material statuses.
-
-
The Delayed LPN Entry checkbox will be enabled for a WMS enabled organization. Select Delayed LPN Entry to enable the entry of an LPN number during the final disposition of a sample. Deselect to prevent an LPN number from being entered during the final disposition of a sample. If you enter an LPN number during sample creation, then the LPN number cannot be changed when assigning the sample disposition.
-
Select Lot Optional on Sample to require a lot to be entered on a sample for a lot-controlled item. Deselect this selection if you do not want to require a lot to be entered on a sample for a lot-controlled item. This defaults from the Process Quality Parameters window.
-
If Lot Optional On Sample is selected, then Delayed Lot Entry is available. This defaults from the selection on the Process Quality Parameters window. Update the indicator when the item specification validity rule status is changed to Approved, Frozen, or Obsoleted/Archived. If you select Delayed Lot Entry, then samples created must have lot number entered after sample creation. If the lot number is entered during sample creation, then the lot is used to choose a sample group and it cannot be changed.
-
Enter the Name of the Sampling Plan to associate to this validity rule. If the sample quantity is not greater than or equal to the sum of the planned test quantities on the specification, then a warning message displays. The following fields display when a sampling plan is specified:
-
Count displays the number of samples to take at each instance of the frequency entered.
-
Quantity and UOM indicate the sample size, or the amount of material.
-
Per indicates the frequency period. Count, Frequency Type, and Frequency Period or Per fields to define the number of repetitions for sampling.
-
-
Save the window.
Displaying the Item Specification Validity Rules Summary
The Item Spec Validity Rules Summary window displays a complete list of item specification validity rules for an item and its optional grade combination.
You can use folders, flexfields, and attachments with this window.
See: Oracle E-Business Suite User's Guide and Oracle E-Business Suite Flexfields Guide
To display a summary of item specification validity rules:
-
Navigate to the Item Spec Validity Rules Summary window. The specification name and version display in the window title.
-
Spec displays the specification name. This defaults from the Specifications window.
-
Version displays the specification version.
-
Item displays the item code for the item specification.
-
Revision displays the item revision, if the item is revision-controlled.
-
Grade displays the default grade for the item, if the item is grade-controlled.
-
Spec Status displays the status of the item specification validity rule.
-
The following fields are display only:
-
Organization displays the default organization for the specification validity rule. This defaults from the Process Quality Parameters window.
-
Specification Type is the type of specification that is associated to the validity rule:
-
Inventory for inventoried items
-
WIP for work in process materials
-
Customer for customer items
-
Supplier for vendor items
-
-
Deleted displays Yes if the specification validity rule is marked for deletion, or No if it is not marked for deletion.
-
Spec Validity Rule Status is the status of the specification validity rule.
-
Start Date is the effective start date and time for the selected validity rule.
-
End Date is the effective end date and time for the selected validity rule. If this field is blank, then the validity rule in effect.
-
Parent Lot is the parent lot associated to the selected validity rule, if the item is child lot-controlled. The field applies to specification validity rule for the inventory specification type.
-
Lot is the lot associated to the selected validity rule, if the item is lot-controlled. This field applies to specification validity rules for the inventory specification type.
-
Subinventory is the specific subinventory associated to the selected validity rule. This field applies to specification validity rules for the inventory specification type.
-
Locator is the locator of the item associated to the selected validity rule if the item or subinventory has locator control. This field applies to specification validity rules for the inventory specification type.
-
Update Inventory Quantity indicates whether the selected validity rule is set to decrease inventory by the sample amounts taken for testing.
-
Control Lot Attributes indicates whether the selected validity rule controls lot status based on the disposition of the sample. This field applies to specification validity rules for the WIP specification type.
-
In-Spec Lot Status is the default material lot status for results that are within specification limits for the selected validity rule.
-
Out-of-Spec Lot Status is the material lot status for results that are outside of specification limits for the selected validity rule.
-
Control Batch Step Status indicates whether the validity rule controls the batch step status for the selected validity rule. This field applies to specification validity rules for the WIP specification type.
-
Lot Optional On Sample indicates whether entry of a lot number is required when a sample is taken. If this field is selected, then entry of the lot number entry at sampling is optional. If Lot Optional On Sample is not selected, then a lot number must be entered when a sample is taken.
-
Certificate Type indicates whether the validity rule prints a Certificate of Analysis or a Certificate of Conformance for the selected validity rule.
-
Certificate Type at Invoice indicates whether the certificate type selected is generated at invoice time for the selected validity rule.
-
Certificate Type at Shipment indicates whether the certificate type selected is generated when the item is shipped for the selected validity rule.
-
Certificate Type from Supplier indicates whether the certificate type selected is generated when the item is received from a supplier for the selected validity rule.
-
Batch is the batch associated to the selected validity rule. This field applies to specification validity rules for the WIP specification type.
-
Recipe is the recipe used in the batch associated to the selected validity rule. This field applies to specification validity rules for the WIP specification type.
-
Recipe Version is the recipe version used in the batch associated to the selected validity rule. This field applies to specification validity rules for the WIP specification type.
-
Formula is the formula used in the batch and the Formula Version for the selected validity rule. This field applies to specification validity rules for the WIP specification type.
-
Routing is the routing and Routing Version associated to the recipe used in the batch for the selected validity rule. This field applies to specification validity rules for the WIP specification type.
-
Step is the batch step associated to the routing for the selected validity rule. This field applies to specification validity rules for the WIP specification type.
-
Operation is the operation and Operation Version controlled by the selected validity rule. This field applies to specification validity rules for the WIP specification type.
-
Charge is the charge associated to the routing for the selected validity rule.
-
Order is the purchase order number for the selected validity rule. This field applies to specification validity rules for the supplier specification type.
-
Order Line is the purchase order line number for the selected validity rule. This field applies to specification validity rules for the supplier specification type.
-
Ship-To-Location is the location for the specified customer and operating unit for the selected specification validity rule. This field applies to specification validity rules for the supplier specification type.
-
PO is the purchase order number, and purchase order type for the selected specification validity rule. This field applies to specification validity rules for the supplier specification type.
-
PO Line is the purchase order line number for which the selected validity rule is effective. This field applies to specification validity rules for the supplier specification type.
-
Supplier is the supplier for which the selected validity rule is effective. This field applies to specification validity rules for the supplier specification type.
-
Site is the supplier site for which the selected validity rule is effective. This field applies to specification validity rules for the supplier specification type.
-
-
Click the drill-down indicator next to a validity rule to display the Specification Validity Rules window.
To enter a new validity rule:
Click New in the Item Spec Validity Rules Summary window to display the Item Spec Validity Rules for Item Spec window where you can enter a new validity rule.
To edit an existing validity rule:
-
Select the validity rule to edit in the Item Spec Validity Rules Summary window.
-
Click Edit.
-
Make appropriate edits.
-
Save the window.
To display the E-Record Generic Query:
Choose E-Record Details from the Actions menu. The E-Record Generic Query displays if this option is available in your application. Refer to "Appendix D" for information on e-records.
Entering a Monitoring Specification Validity Rule
The Monitoring Spec Validity Rules window lets you enter a new validity rule for a monitoring specification.
E-record and E-signature Approvals
There may be an e-signature event associated with this window. Refer to "Appendix D" for additional information on e-record and e-signature approvals associated with this window.
You can use folders, flexfields, and attachments with this window.
See: Oracle E-Business Suite User's Guide and Oracle E-Business Suite Flexfields Guide
Prerequisites
-
Enter and save a monitoring specification.
-
Optionally, enter a sampling plan.
To enter a monitoring specification validity rule:
-
Navigate to the Monitoring Spec Validity Rules Summary window.
-
Click New.
-
Specification displays the monitoring specification name.
-
Spec Status displays the approval status of the monitoring specification.
-
Select Rule Type as:
-
Resource to create a validity rule for a resource such as a refrigerator, environmental chamber. If you select this field, then enter information in the Resource region.
-
Location to create a validity rule for a location such as a subinventory and locator. If you select this field, then enter information in the Location region.
-
-
Spec Validity Rule Status indicates the status of the monitoring specification validity rule. Change the status of the validity rule after you enter and save all the following information.
-
Enter the following information in the Resource region for a resource validity rule:
-
Name as the name of the generic resource for the validity rule.
-
Resource Organization as the inventory organization where the monitoring specification validity rule applies.
-
Instance as the specific instance of the resource in the resource organization where the validity rule is defined.
-
-
Select the following information in the Location region for a locator validity rule:
-
Organization as the process-enabled inventory organization associated to the locator validity rule.
-
Subinventory as the subinventory of the specified organization to which the specification validity rule applies.
-
Locator from the list of locators associated with the subinventory you select. Locator is the subinventory locator where the specification validity rule applies if the subinventory exists for the locator.
-
-
In the Effective Dates region, enter:
-
From as the start date for the monitoring specification validity rule. Required.
-
To as the end date for the monitoring specification validity rule. Leave this field blank if there is no end date for the monitoring specification validity rule.
-
-
In the Sampling Plan region, enter:
-
Name as the name of the sampling plan.
-
Count as the number of samples to take at each instance of the frequency entered. Required.
-
Qty as and UOM as the sample size, or the amount of material needed to take a sample from the material requiring inspection. This is expressed in the primary inventory unit of measure. Required.
-
Per as the frequency period. Count, Frequency Type, and Frequency Period or Per fields to define the number of repetitions for sampling.
-
-
Save the window.
-
Choose Change Status from the Actions menu to change the status of the validity rule entered to Approved for General Use.
-
Save the window.
To change the status of a monitoring specification validity rule:
-
Query the desired monitoring specification validity rule.
-
Choose Change Status from the Actions menu.
-
Make appropriate changes.
-
Save the window.
To mark a monitoring specification validity rule for purge:
Choose Mark for Purge from the Actions menu. The record is marked for deletion.
To edit text in the monitoring specification validity rule:
-
Choose Edit Text from the Actions menu
-
Make appropriate text changes.
-
Save the window.
To display the E-Record Generic Query:
-
Choose E-Record Details from the Actions menu. The E-Record Generic Query displays if this option is available in your application.
-
Refer to "Appendix D" for information on e-records.
Displaying the Monitoring Specification Validity Rules Summary
The Monitoring Spec Validity Rules Summary window displays the monitoring specifications entered. Fields on this window are display only. If you need to enter a new monitoring specification, then click New and refer to the "Entering a Monitoring Specification Validity Rule" for more information.
You can use folders and flexfields with this window.
See: Oracle E-Business Suite User's Guide and Oracle E-Business Suite Flexfields Guide
Prerequisites
-
Enter and save a monitoring specification validity rule.
To display a list of monitoring specification validity rules:
-
Navigate to the Monitoring Spec Validity Rules Summary. The specification name and version display in the window title.
-
The following fields are display only:
-
Specification displays the monitoring specification name.
-
Spec Status displays the approval status of the monitoring specification.
-
Organization displays the organization associated to the validity rule type displayed.
-
Rule Type displays the rule entered for the monitoring specification as Physical Location or Resource.
-
Deleted displays Yes if the monitoring specification validity rule is marked for deletion, or No if it is not marked for deletion.
-
Spec Validity Rule Status displays the current status of the monitoring specification validity rule.
-
Start Date displays the effective start date for the monitoring specification validity rule.
-
End Date displays the end date for the monitoring specification validity rule, if one was entered.
-
-
If the rule type entered is for a resource monitoring specification, then:
-
Resource displays the generic resource for the monitoring specification validity rule.
-
Instance displays the specific resource for the monitoring specification validity rule.
-
-
If the rule type entered is for a location monitoring specification, then:
-
Subinventory displays the subinventory where the specification validity rule applies.
-
Locator displays the locator in the subinventory where the specification validity rule applies if the subinventory is locator controlled.
-
-
Sampling Plan displays the current monitoring specification sampling plan, if one is entered.
-
Close the window.
Displaying Specification Summaries from the Navigator
The Specification Summary window lets you view a list of specifications by individual specification, customer, supplier, item, owner organization, or status.
This window displays item specifications, including base and overlay specifications. It does not display monitoring specifications.
You can use flexfields with this window.
See: Oracle E-Business Suite User's Guide and Oracle E-Business Suite Flexfields Guide
Prerequisites
-
Enter and save specifications.
-
Enter and save specification validity rules.
To display the Specification Summary window:
-
Navigate to the Quality Workbench.
-
Select Show Active Specs to display only those specifications that are active, where specification statuses are either Approved for Lab Use, or Approved for General Use. Deselect this indicator to display all specifications.
-
Select View By:
-
Specifications to display an alphanumeric sort of specifications. Expand the Specifications node. Select the desired specification node to display the Specification Summary window. Drill down to tests, customer validity rules, and inventory validity rules.
-
Customer to sort specifications by customer. Expand the desired customer node. Select each unexpanded specification node to display the Specification By Item window. Drill down to individual specifications, Tests, and Customer Validity Rules.
-
Supplier to sort specifications by supplier. Expand the Specifications By Supplier node. Expand the desired supplier node. Select each unexpanded specification node to display the Specification By Item window. Drill down to individual specifications, Tests, and Supplier Validity Rules.
-
Item to sort specifications by item. Select the unexpanded item to display the Specifications by Item window. Expand the item node to display the Specification Summary window for the item. Drill down to individual tests, customer validity rules, and inventory validity rules.
-
Owner Organization to sort the specifications by owner organization. Select the unexpanded Specifications By Status node to display the Specifications By Status window. Drill down to individual specifications, tests, customer validity rules, inventory validity rules, supplier validity rules, and WIP validity rules.
-
Status to display the Specifications By Status window.
Note: Views are restricted to the organizations that your responsibility can access.
-
-
The following fields are display only on the Specification By Customer, Supplier, Item, Owner Organization, or Status, and Specification Summary windows:
-
Specification displays the name of the specification.
-
Version displays the specification version.
-
Description displays a brief description of the specification.
-
Owner Organization displays the owner organization.
-
Item displays the code for the material specified as it is listed on the Item Master.
-
Item Revision displays the item revision, if the item is revision-controlled.
-
Status displays the status defined by the specification.
-
-
Click Specification to display the Specifications window.