Stability Studies
This topic provides procedures for creating and managing stability studies including when they are performed, and what essential guidelines exist for stability testing programs. The topic also provides an overview of the stability study lifecycle management, including the creation of test interval plans and the creation of a storage condition plan. You are given guidance on the creation and management of a stability study, including the assignment of its material sources, editing stability study variants and time points, and defining its storage packages.
This chapter covers the following topics:
- Understanding Stability Studies
- Example of a Stability Program for Product X
- Managing the Stability Study Lifecycle
- Understanding the Stability Study Change Status Workflow
- Creating Test Interval Plans
- Generating a Series of Testing Periods
- Finding Test Interval Plans
- Creating a Storage Condition Plan
- Finding Storage Condition Plans
- Defining Storage Packages
- Finding Storage Packages
- Creating and Managing a Stability Study
- Finding Stability Studies
- Assigning Stability Study Material Sources
- Editing Stability Study Variants
- Finding Stability Study Variants
- Editing Variant Time Points
Understanding Stability Studies
Stability studies are performed in life sciences, chemical, and food and beverage industries to determine the effects of environmental conditions on product quality. Environmental conditions can impact product shelf life, and the viability of product formulation. Stability studies provide the supporting data that companies use to establish product storage requirements and expiration dating.
When are stability studies performed?
Stability studies are performed at various stages of the product development process. Early stages of stability testing are typically performed on laboratory materials to determine if the material to be produced has any inherent sensitivities to storage or shipping environments. Many manufacturers perform accelerated stability testing at relatively high temperatures and humidities as a worst case scenario to determine what types of degradation products can experience after long-term storage. Materials produced in a full production run are tested under controlled temperature and humidity storage conditions that simulate environmental extremes. Results of testing on these materials provide valuable information about overall product stability, and serve as a basis for product claims on storage requirements and shelf life.
What are the essential guidelines for a stability program?
There are a number of key national and international standards, laws, regulations, and guidelines for Good Manufacturing Practice (cGMP). The U.S. Food & Drug Administration (FDA) provides compliance guidelines for drugs and medical devices. The International Conference on Harmonisation of Technical Requirements for Registration of Pharmaceuticals for Human Use (ICH) is a consortium of regulatory authorities from Europe, Japan, the United States, and experts from the pharmaceutical industry worldwide. This group discusses scientific and technical aspects of product registration. The ICH makes recommendations on the interpretation and application of technical guidelines and requirements for product registration.
Section 211.166 of the FDA guidelines requires companies who produce finished pharmaceutical products to have a written stability program. The results of this program are used in determining appropriate storage conditions and product expiration dating. This guideline specifies what to include in a stability program. The following summarizes some of the essentials presented in this guideline:
-
A written testing program designed to assess the stability characteristics of drug products. The results of this stability testing program used in determining appropriate drug product storage conditions and expiration dating.
-
The written program must be followed, and it must include:
-
Sample size and test intervals based on statistical criteria for each attribute examined to assure valid estimates of stability.
-
Testing of the drug product in the same container closure system in which the drug product is marketed.
-
Testing of drug products for reconstitution at the time of dispensing as directed in the labeling as well as after they are reconstituted.
-
Testing of an adequate number of batches of each drug product to determine an appropriate expiration date. Records of this data must be maintained.
-
Accelerated studies, combined with basic stability information on the components, drug products, and container closure system, is used to support tentative expiration dates provided full shelf life studies are not available and are being conducted.
-
Where data from accelerated studies are used to project a tentative expiration date that is beyond a date supported by actual shelf life studies. There must be stability studies conducted, including drug product testing at appropriate intervals, until the tentative expiration date is verified or the appropriate expiration date determined.
-
Example of a Stability Program for Product X
In the following program, both study protocols are run concurrently, so that expiration dating does not factor into the interpretation of results.
Stability Study Protocol A - Measure of Active Ingredients Under Controlled Room Temperature and Humidity
There are two testing procedures to run:
-
Within-lot stability at 25 deg C/30% RH - Batch 1, Lot X
A typical monitoring specification can be set up for temperature and humidity as follows:
-
The temperature range is -10 deg C to 100 deg C. The target for a monitoring specification is 25 deg C, with a minimum of 24 deg C, and a maximum of 26 deg C.
-
The humidity range is 0% RH to 100% RH. The target for a monitoring specification is 30% RH, with a minimum of 29% RH, and a maximum of 31% RH.
-
-
Between-lot stability at 25 deg C/30% RH - Batch 2, Lot Y, Batch 3, Lot Z. Use the same monitoring specification that was designed for within-lot stability testing.
Stability Study Protocol B - Measure of Active Ingredients Under Stressed Conditions
A robust stability study can contain within-lot and between-lot investigations for various combinations of temperature and humidity. This approach provides an extensive profile of material stability at a variety of temperatures and relative humidities. The following is an example of this type of study:
-
Within-lot stability at specified ICH conditions for Batch 1, Lot X
-
25 deg C/40% RH
-
25 deg C/60% RH
-
30 deg C/35% RH
-
30 deg C/60% RH
-
40 deg C/20% RH
-
40 deg C/75% RH
-
60 deg C/20% RH
-
60 deg C/75% RH
-
-
Between-lot stability at specified ICH conditions for - Batch 2, Lot Y, Batch 3, Lot Z
-
25 deg C/40% RH
-
25 deg C/60% RH
-
30 deg C/35% RH
-
30 deg C/60% RH
-
40 deg C/20% RH
-
40 deg C/75% RH
-
60 deg C/20% RH
-
60 deg C/75% RH
-
Oracle Process Manufacturing (OPM) Quality Management stability studies let you create both simple and robust stability studies. The stability study owner remains in full control of the variants created for each time point, and monitors the progress of the study through workflow notifications. The workflow and Oracle E-Records events associated with the stability study document critical decisions to support the written study program.
Managing the Stability Study Lifecycle
Following are stages that define a typical stability study lifecycle:
-
Setting Up for a Stability Study
-
Planning a Stability Study
-
Performing Initial Sampling and Testing
-
Approving a Stability Study Plan
-
Launching a Stability Study
-
Performing Stability Study Testing
-
Evaluating a Stability Study
Setting Up for a Stability Study
Following are steps that describe the process of setting up for a stability study:
Step 1: Create a test interval plan.
Define test interval plans before creating a storage condition plan for a stability study. Each test interval plan represents a unique set of testing time points that list the junctures at which you plan to test samples in the stability study. The frequency or intervals between time points vary depending on the purpose of a storage condition. For example, long-term, intermediate, or accelerated storage conditions can have very different frequencies between time points.
All test interval plans that use the storage conditions of a stability study must be either a base interval plan or an overlay of the base interval plan assigned to the storage condition plan. Define interval periods as the testing frequencies required by the storage condition.
-
Define base test interval plan as the total set of testing time points used by each of the stability study storage conditions. If all storage conditions test the sample material at the same frequency or time intervals, then this is the only test interval plan you define.
-
Define an overlay test interval plan when a stability study storage condition performs time point tests with a different set of time intervals from those defined in the base test interval plan. You can enter additional time points for the overlay interval plan. You cannot delete time points on the overlay interval plan that come from the base interval plan, however, you can exclude them.
Step 2: Create monitoring specifications.
Create specifications to define the environmental monitoring criteria for the storage conditions. These are called monitoring specifications. A monitoring or nonitem specification must be created to include tests that support each required storage condition detail such as ambient temperature, relative humidity, and atmospheric pressure. Assign tests to the monitoring specifications. Create a specification validity rule to specify the resource or physical location to monitor.
Step 3: Create a storage condition plan.
Create the required set of storage conditions. These conditions include a unique combination of temperature and relative humidity measurements that differentiate testing conditions for a stability study. The storage conditions created require the environmental monitoring of a defined equipment resource such as a refrigerator or a subinventory locator in a particular storage organization. The planned and actual storage condition parameters must be monitored for each storage condition combination. For example, 30 deg C/60% RH requires the monitoring of both the 30 deg C refrigeration and 60% RH ambient moisture content.
Define the two components of a storage condition plan:
-
A monitoring specification to define the details of the storage condition for each one of the variants in the stability study
-
A test interval plan to define testing time points by indicating the test intervals for each variant in the stability study
Step 4: Create the storage packages.
Decide on the package to use for the container closure system for the product to test in a particular organization. Create a storage package configuration.
Step 5: Create base and overlay item specifications for the stability study.
Create base and overlay item specifications that contain the tests you use in stability testing. These are usually based on the product release specifications which are a combination of physical, chemical, biological, and microbiological tests and acceptance criteria that determine the suitability of a product at the time of its release. The base specification serves as the default item specification when you create the stability study. You can associate the overlay specifications to time points when the stability testing requirements vary from the base specification.
Step 6: Set up for sample numbering.
Set up document numbering using the Samples tab in the Process Quality Parameters window for the organization where you plan to perform the sampling.
Step 7: Set up for stability study numbering.
Set up document numbering using the Stability Studies tab in the Process Quality Parameters window for the stability study organization.
Planning a Stability Study
Following are steps that describe the planning of a stability study:
Step 1: Create a stability study.
Create a stability study with the following information:
-
Item as the process quality-enabled item to test in the stability study
-
Master item specification to use in evaluating item performance in the stability study
-
Study name to record a unique identifier for the stability study entity
-
Protocol to enter as part of the study description to capture the purpose of the stability study
-
Study start, notification lead time, testing grace period, and completion dates to define the beginning and end dates for study
-
Study approval process with status control. Stability study status controls sample pull and testing notifications, and specifies how all associated samples are consumed, allocated, or used for testing in the study
Refer to the "Creating and Managing a Stability Study" topic for more information on creating a stability study.
Step 2: Assign storage condition plan to the stability study.
Assign the storage condition plan to the stability study. This plan consists of the monitoring specification that provides the details of the storage condition for each one of the variants in the stability study, and a test interval plan that defines the testing time points.
Step 3: Identify source materials to be used in the stability study.
Identify the item, lot, and batches that serve as the basis for the stability study. The source material can already exist in a material source inventory organization as lots or it can be selected, or requested as batch. Batches can be initial production batches for a new formulation, or a portion of routine production batches pulled for stability testing. This information includes the item, lot, batch number, date of manufacture or product yield date, sample quantity and UOM, recipe, recipe version used, and sample quantity.
Step 4: Plan stability study variants and time points.
Plan all variant storage conditions for each time point sample or sample group. Variants are defined by the unique combination of the stability study storage condition in a storage organization, the test interval plan, the package, and material source. Specify the default item specification, number of stability samples per time point, and the number of retained samples for the variant. You can configure the default item specification for the variant to select an overlay specification for a time point.
Performing Initial Sampling and Testing
Following are steps that describe initial sampling and testing in a stability study:
Step 1: Acquire initial samples from source materials.
When acquiring the initial material to use as a basis for a stability study, the item lots must be allocated or reserved as inventory for use only in the stability study. Material must be physically stored in a subinventory, locator, and container, or moved directly from the manufacturing floor to a staging area where initial testing is performed. Samples used in stability studies reflect inventory consumption and sample movement into storage subinventory locators to manage environmental variants. An initial stability sample can be retained, or moved into a storage subinventory and locator.
Step 2: Test initial samples and assign sample disposition.
Define the test criteria to perform for the initial stability sample. If an approved, prerelease, laboratory specification exists for the material, then use that specification. If an approved production specification exists for the product, then use it for the initial sample testing. The selected sample specification must be entered as the master item specification defined in the stability study. The outcome of these tests determines whether an item lot or batch is used for continuing the stability study. Initial sampling and testing must indicate acceptable source material before the stability study is launched.
Step 3: Select the initial sample group to associate initial samples with material sources.
Associate the initial samples with a material source by selecting the appropriate sample group. Only initial sample groups with a disposition of Accept or Accept with Variance are listed. Make this association prior to launching the stability study.
Approving a Stability Study Plan
Following are steps required to approve a stability study plan:
Step 1: Approve the stability study.
Use the Change Status action on the Stability Study window to request stability study approval. This initiates the Stability Study Change Status workflow which notifies the study owner of the request for status change in the stability study. The process of changing the status from NEW to a status of Stability Study Plan Approved is managed by the workflow. Oracle E-Records works with the workflow to enforce generation of an electronic record and capture of electronic signatures for each status change.
If material source lots are identified, then stability sample groups and samples are created by the application for the planned variants and time points. These samples are based on the:
-
Number of samples per time point
-
Number of retained samples for a variant
-
Sample quantity and UOM defined for a variant
These system-generated item samples are automatically associated to a stability study as identified by the sample source fields. You cannot create stability samples manually through the Samples window.
If the material source is requested as a batch, then the appropriate workflow initiates for batch and sample creation. Prior to launching the stability study, specify a lot on the Material Sources window.
Step 2: Schedule variant and time point testing.
The application generates the schedule dates for all the testing time points based on the stability study scheduled start date. A sample group is generated for each testing time point to permit the assignment of a final disposition to each point.
Step 3: Finalize acceptable material sources.
Finalize the availability and acceptability of the lots for every material source listed on the Material Sources window. Specify the lot for any batch requested to produce as a material source. Enter material source organization as the inventory organization where the sample material is produced. Prior to launching the stability study, each material source must have an acceptable initial sample group. If you cannot finalize all material sources at this time, then finalize them before you launch the stability study.
Step 4: Generate testing time point labels.
The Testing Time Point Label Generation report produces a pdf file. For each testing time point, the report produces the name of the stability study, variant, testing time point, sample number, time point scheduled date, and sample quantity.
You can generate this report for:
-
All testing time points for variants of a stability study
-
All testing time points for an individual variant
-
A specific time point for an individual variant
Regenerate the report for a specific variant time point if you add a time point to a variant during the study.
Step 5: Put sample materials in storage packages and place them into variant storage conditions.
If packaging is specified for the variant, then put the sample material for each variant time point in individual packages. If labels were generated, then apply them to the sample storage package. Place the materials in the defined variant storage conditions in the specified storage organization. Update the storage date of stability samples for each variant.
Step 6: Verify sufficient stability sample quantities.
Determine that there are sufficient sample materials to conduct the stability study. The total sample quantity must be validated to determine if there is sufficient quantity of material for each variant time point sample. This validation ensures there is sufficient material to complete the required analysis. Positive material identification is essential to a fully traceable stability study.
Launching a Stability Study
Following are steps required to launch a stability study:
Step 1: Verify that material sources are finalized.
If material sources are not finalized, then repeat steps 2 through 6 in the "Approving the Stability Study Plan" topic.
Step 2: Launch the approved stability study.
Once all source materials have an initial sample group with an acceptable disposition, the stability study owner can launch the approved stability study.
Performing Stability Study Testing
Following are steps required to perform stability study testing:
Step 1: Put the study in progress.
Change the status of the stability study to In Progress.
Step 2: Receive notification to pull samples.
You receive notification to pull samples for stability study testing. The Stability Study Testing Notification master workflow governs this process.
Step 3: Pull and test samples at each time point until testing is complete.
Identify samples that require testing on the scheduled time point dates, and use the specification assigned to the time point to test the samples. If necessary, assign a retained sample for a variant to a point for time point testing.
Step 4: Monitor variant environmental conditions throughout the stability study.
Use the monitoring specification to evaluate the environmental conditions used in the study. The Sample Group Rejection workflow notifies you when either a monitoring sample group, or a stability study time point sample group is rejected.
Step 5: Evaluate samples and sample groups used in the stability study.
Enter results for time point testing and evaluate them against the specification assigned to the time point. The Sample Group Rejection workflow notifies you when either a monitoring sample group, or a stability study time point sample group is rejected.
Evaluating a Stability Study
Following are steps that describe the evaluation of a stability study:
Step 1: Complete stability study time point testing.
The Stability Study disposition is complete when the scheduled testing time points have a final disposition required to perform the stability study analysis. The stability study owner determines testing is complete when all scheduled testing time points variants have a final disposition, or when a sufficient number of testing time points have a rejected disposition for a specific variant, in which case it would be unnecessary to continue testing.
Step 2: Review test result data.
The stability study owner reviews all test result data.
Step 3: Determine whether additional testing is required.
The stability study owner determines whether additional testing is required for any of the time points in the study.
Step 4: Conclude the stability study.
The stability study owner concludes the stability study by:
-
Changing the status of the stability study to Completed
-
Entering a study end date
-
Entering the recommended shelf life derived from the results of tests performed on variants in the study that met the item specification
-
Entering the recommended storage conditions derived from the monitoring specification used for the variants in the study that met the item specification
Step 5: Communicate the results of the stability study.
The stability study owner communicates the results of the stability study to appropriate individuals within the supply chain.
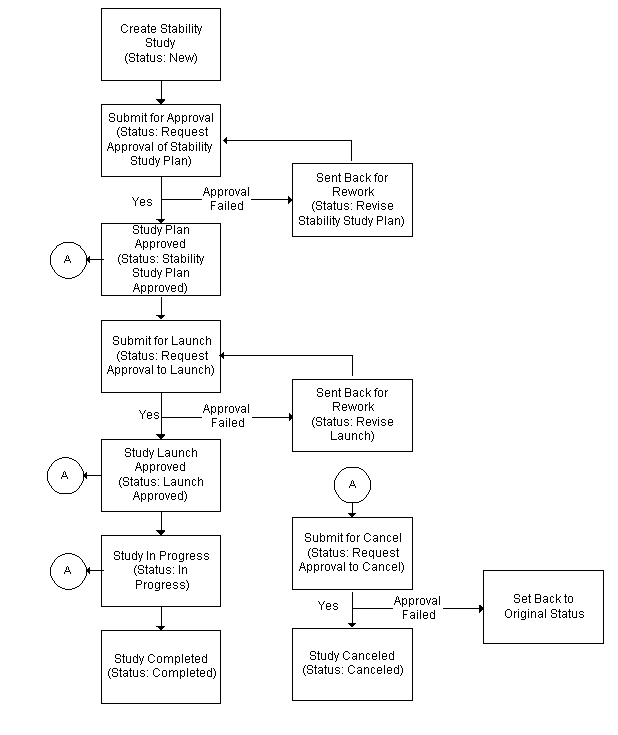
Understanding the Stability Study Change Status Workflow
When the OPM Quality Stability Study Change Status workflow is activated the stability study requires a series of approvals that result in reassigning status through a predefined approval process.
Stability study statuses are preseeded. Refer to the "OPM Quality Stability Study Change Status Workflow" topic in "Appendix C" for additional information.
Prerequisites
-
Set up the workflow. Contact a system administrator if you are not sure this is set up.
-
Enable the workflow. Enable the Stability Study Change Status workflow by setting it up in the System Administration application. The workflow is activated initially by changing the status of a stability study from New to Request Approval of Stability Study Plan.
To run the workflow:
Upon creation of a stability study, the default Status is New.
-
Choose Stability Study Plan Approved from the Actions menu to submit the stability study plan for approval. The status displays as Request Approval of Stability Study Plan.
-
If the stability study plan is approved, then the status changes to Stability Study Plan Approved. Proceed to step 2.
-
If the stability study plan is rejected, then the status changes to Revise Stability Study Plan. Repeat this step.
-
-
Choose Launch Approved from the Actions menu to submit the stability study for launch. The status displays as Request Approval to Launch.
-
If the stability study launch is approved, then the status changes to Launch Approved. Proceed to step 3.
-
If the stability study launch is rejected, then the status changes to Revise Launch. Repeat this step.
-
-
Choose In Progress from the Actions menu to perform stability study testing, .
-
Choose Completed from the Actions menu to complete the stability study, .
-
Choose Canceled from the Actions menu to cancel the stability study at Stability Study Plan Approved, Launch Approved, or In Progress. The status displays:
-
Request Approval to Cancel from Approved Plan if the stability study plan is approved, but not yet launched.
-
Request Approval to Cancel From Approved Launch if the stability study has an approved launch, but is not yet in progress.
-
Request Approval to Cancel From In Progress if the stability study is in progress.
The following depicts the previously described workflow:
-
Creating Test Interval Plans
The Test Interval Plan window lets you simulate a set of test interval periods to use in a stability study. The initial test interval plan saved becomes a candidate base test interval plan. Once you save a base test interval plan, you can reuse it to create an overlay test interval plan. The overlay can exclude time periods, or add time periods to the base plan.
Creating an Overlay Test Interval Plan
MONTH_12 is a test interval plan that includes 12 periods spaced at one month each as follows:
MONTH-1, MONTH-2, MONTH-3, MONTH-4, MONTH-5, MONTH-6, MONTH-7, MONTH-8, MONTH-9, MONTH-10, MONTH-11, MONTH-12
When you recall MONTH_12, make it the base plan for MONTH_13, an overlay test interval plan that adds an additional month to the one year testing cycle. For example, MONTH_13 includes 13 periods spaced at one month, with the last interval being MONTH-13.
With this approach, you can create many variations of test interval plans by entering a base test interval plan and modifying the overlay test interval plan to meet your specific requirements.
For example, 2_YEAR is a test interval plan with a two year duration as follows:
-
1 WEEK
-
2 WEEKS
-
3 WEEKS
-
1 MONTH
-
2 MONTHS
-
3 MONTHS
-
6 MONTHS
-
12 MONTHS
-
18 MONTHS
-
2 YEARS
Use the Generate Test Intervals dialog box to enter a series of periods by defining a total duration and a frequency to repeat each period. The interval periods are resorted in ascending order by the simulated date when you save your work. Refer to the "Generating a Series of Testing Periods" topic for more information.
You can use flexfields with this window.
See: Oracle E-Business Suite Flexfields Guide
Prerequisites
-
Determine the baseline plan for all test intervals.
-
Identify the plan variations for different testing frequencies.
To enter a base test interval plan:
-
Navigate to the Test Interval Plan window.
-
Enter a name for the Test Interval Plan. Required.
-
Enter a Description of the base test interval plan. Required.
-
Do not select Overlay for the entry of a base test interval plan.
-
Duration displays a simulated measure of the total duration of the test interval plan after the interval periods are entered and saved.
-
Simulation Start Date is a baseline time when testing is required for the period if the stability study variant starts on the date displayed. This field defaults to the current system date with the time truncated to the hour for a new record. This tool helps you simulate actual dates for planning purposes. Required.
Interval Period
-
Enter a Period as the name of the period. For example, enter MONTH-1 to indicate a period that is one month. When the Generate Test Intervals dialog box is used to enter periods, then this field has a period name prefix added to each interval period generated in the list. Required.
-
Enter the following fields to define an exact time point when testing is required from the start date. Each of the time intervals calculated from the start represent the sum of years, months, weeks, days, and hours from the simulation start date as follows:
-
Enter Years as the number of years from the simulation start date.
-
Enter Months as the number of months from the simulation start date.
-
Enter Weeks as the number of weeks from the simulation start date.
-
Enter Days as the number of days from the simulation start date.
-
Enter Hours as the number of hours from the simulation start date.
For example, to define a period that is 1 year, 3 months, and 15 days from the simulation start date, enter a period name such as 1YR-3MO-15DA, and enter 1 in the Years field, 3 in the Months field, and 15 in the Days field.
-
-
Simulated Date displays the simulated calendar date and time for the period.
-
From Base indicates that the period displayed is from the base test interval plan. This field is disabled for the base test interval plan.
-
Exclude is disabled for the base test interval plan.
-
Save the window.
To define an overlay test interval plan:
Define an overlay test interval plan when stability study variants require a set of time intervals different from those defined in a base test interval plan. Overlay test interval plans let you excludes periods from a base test interval plan and add new periods.
-
Enter a name for the overlay Test Interval Plan. Required.
-
Enter a Description for the overlay test interval plan. Required.
-
Select Overlay. Required.
-
Enter the Base Test Interval Plan to use for the overlay test interval plan.
-
Duration displays the simulated measure of the total duration for the overlay test interval plan.
-
Simulation Start Date is a baseline time when testing is required for the period if the stability study variant starts on the date displayed. This field defaults to the current system date with the time truncated to the hour for a new record. This tool simulates actual dates for planning purposes. Required.
-
Periods for the base test interval plan are marked with the From Base indicator.
-
Exclude can only be selected or cleared if the period displayed is from a base test interval plan. This lets you keep the period in the test interval plan. Select to include or exclude the period in any variant created using the overlay test interval plan.
-
The Years, Months, Weeks, Days, and Hours fields display only if the time point is derived from the base test interval plan. These fields display the specified time period from the simulation start date. You can enter these fields for interval periods that are added to this overlay test interval plan.
-
Simulated Date displays the simulated calendar date and time for the period.
-
Save the window.
To include all periods from the base test interval plan:
Click Include All to include all periods from the base test interval plan in the overlay.
To exclude all periods from the base test interval plan:
Click Exclude All to exclude all periods from the base test interval plan from the overlay.
To add a new interval period to an overlay test interval plan:
-
Click the Add Row window control icon.
-
Enter a new interval period from the scheduled start date.
-
Save your work.
To mark a test interval plan for deletion:
Choose Mark for Purge from the Actions menu. The test interval plan is marked for deletion.
To generate a series of testing periods:
Choose Generate Mass Intervals from the Actions menu. Refer to the "Generating a Series of Testing Periods" topic for more information.
Generating a Series of Testing Periods
The Setup Test Intervals dialog box provides a rapid way to enter a series of periods by defining a total duration and a frequency to repeat each period. Select this action if the test interval plan is not referenced by another overlay plan. If referenced, then you cannot modify the plan. For example, to enter 12 one-month periods, enter a 1 year duration with a frequency of 1 month. Or, enter a 12 month duration with a 1 month frequency.
The following conventions are used to generate testing periods:
-
1 year = 365 days
-
1 month = 30 days
You can adjust these periods once they are generated. These conventions distribute test interval periods uniformly for the study.
-
Navigate to the Setup Test Intervals dialog box.
-
Enter Frequency as the number of times to repeat a period in the defined duration. Select the Frequency Unit as Year, Month, Week, Day, or Hour. For example, for a frequency of three months, enter 3 and select Month. Required.
-
Enter Duration as the total of time to divide into periods. Select the Duration Unit as Year, Month, Week, Day, or Hour. For example, for a duration of 2 years, enter 2 and select Year.
-
Enter the Period Name Prefix as the interval period name to append as a prefix to each period listed.
-
Click OK.
The series of periods defined by the frequency and duration display on the Test Interval Plan window. For example, if you enter Test as the Period Name Prefix, assign a Frequency of 2 months, and a Duration of 1 year, then the window displays six rows of periods: Test-1, Test-2, Test-3, Test-4, Test-5, and Test-6.
To generate contiguous sequences with the same prefix:
-
Generate the first sequence of periods.
-
Save the Time Interval Plan.
-
Generate the next contiguous sequence of periods.
-
Save the Time Interval Plan.
Finding Test Interval Plans
The Find Test Interval Plans dialog box lets you find test interval plans, base test interval plans, overlays, and those test interval plans that are marked for deletion.
To find a test interval plan
-
Navigate to the Find Test Interval Plans dialog box.
-
Make no entries to find all test intervals plans. Enter any of the following parameters to narrow the search:
-
Test Interval Plan as the name of test interval plan.
-
Base Test Interval Plan as the name of the base test interval plan.
-
Marked for Deletion to determine all test interval plans marked for purge.
-
-
Select Overlay to find overlays of test interval plans.
-
Click Find.
Creating a Storage Condition Plan
The Storage Condition Plan window lets you structure a plan for the storage conditions to use in a stability study for a specific storage organization. The plan relates each condition to a monitoring specification. A storage condition plan is not associated to any specific item, and can be reused for several stability studies.
Define the two components of a storage condition plan:
-
A monitoring specification to define the details of the storage condition for each one of the variants in the stability study. Refer to the "Understanding Specifications" topic for more information.
-
A test interval plan to define testing time points by indicating the test intervals for each time point. Refer to the "Creating Test Interval Plans" topic for more information.
You can use folders and flexfields with this window.
See: Oracle E-Business Suite User's Guide and Oracle E-Business Suite Flexfields Guide
Prerequisites
-
Identify the storage condition requirements for the stability study.
-
Optionally, define the storage organization, resource and resource instance, or subinventory and locator that provide and maintain the required storage conditions.
-
Create a monitoring specification for each of the storage conditions.
-
Create a monitoring specification validity rule for each of the storage conditions.
-
Create a test interval plan.
To create a storage condition plan:
-
Navigate to the Storage Condition Plan window.
-
Enter the Storage Condition Plan name. Required.
-
Enter a Description for the storage condition plan. Required.
-
Base Test Interval Plan displays the default base test interval plan. Select any appropriate base test interval plan from the LOV. You cannot select an overlay test interval plan. Required.
-
Duration displays the total duration of the base test interval plan.
Storage Details
-
Enter the Spec Name and Spec Version for each storage detail. The monitoring specification lists the tests, test targets, minimums, and maximums for the environmental condition required by the specified storage condition. Each monitoring specification entered here cannot have a status of Obsolete or On Hold.
-
Select Storage Organization as a process-enabled inventory organization. Required if you enter Subinventory and Locator.
-
Enter either a Resource or a Storage Subinventory and Locator combination:
-
Resource that meets the requirements for the storage condition. For example, enter a refrigerator that can meet the requirements for the monitoring specification. You can enter a generic resource that can be reassigned later on in the stability study.
-
Storage Subinventory and a Locator, if the subinventory exists for the locator, that meets the requirements for the storage condition.
-
-
Test Interval Plan displays the default base test interval plan. You can select an overlay test interval plan that is associated to the base test interval plan to override the default.
-
Duration is the default from the test interval plan.
-
Save the window.
To mark a storage condition plan for deletion:
Choose Mark for Purge from the Actions menu. The storage condition plan is marked for deletion.
To edit text in the storage condition plan:
-
Choose Edit Text from the Actions menu. The Select Text Paragraph window displays.
-
Make appropriate text changes.
-
Save the window.
Finding Storage Condition Plans
The Find Storage Condition Plans dialog box helps you find existing storage condition plans by name or by the base test interval plan associated to them. You can also find storage condition plans that are marked for deletion.
Prerequisite
-
Enter and save storage condition plans.
To find a storage condition plan:
-
Navigate to the Find Storage Condition Plans dialog box.
-
Make no entries to find all storage condition plans. Enter any of the following parameters to narrow the search:
-
Storage Plan Name as the name of a storage condition plan to find.
-
Base Test Interval Plan as the name of the base test interval plan associated to storage condition plans.
-
Deleted as those storage condition plans marked for purge.
-
-
Click Find.
Defining Storage Packages
The Storage Packages window lists all existing packages and you can define the packages for variants for a specified organization. A storage package is the package material (item) or container closer system (formula) that the material is stored in for stability testing. Each package applies to a single variant. You can select these packages when you create or plan variants. Reuse these package definitions for multiple stability studies.
You can use flexfields with this window.
See: Oracle E-Business Suite User's Guide and Oracle E-Business Suite Flexfields Guide
Prerequisite
-
Enter a packaging formula if there are multiple components to the storage package, or container closure system.
-
Define process quality-enabled items for the storage package.
To define a storage package:
-
Navigate to the Storage Packages window.
-
Enter the package Name. For example, enter one package as Glass Vial Closure and another package as Plastic Vial Closure. You can define multiple storage packages when the stability study evaluates material in different container closure systems. Required.
-
Select Organization as a process-enabled organization.
-
Select one of the following:
-
Item as the package material in which stability samples are stored. The item Description displays. The item is the container closure system. Select the item Rev, if the item is revision-controlled. This field is disabled if the item is not revision-controlled in Oracle Inventory.
-
Enter the packaging Formula and its Version. This represents the bill of materials for a container closure system. The product of the formula is the packaging configuration for stability sample storage.
-
-
Enter Qty as the quantity of material required for each testing time point sample in its UOM. This represents the total quantity of sample in the storage package. If you change the UOM, then the UOM entered must be convertible to the primary UOM for the item. Required.
To mark a storage package for deletion:
Choose Mark for Purge from the Actions menu.
To edit text in the storage packages:
-
Choose Edit Text from the Actions menu. The Select Text Paragraph window displays.
-
Make appropriate text changes.
-
Save the window.
Finding Storage Packages
The Find Storage Package dialog box lets you find storage packages by name, item, or formula. You can also find deleted storage packages.
Prerequisites
-
Enter and save storage packages.
To find a storage package:
-
Navigate to the Find Storage Package dialog box.
-
Make no entries to find all storage packages. Enter any of the following parameters to narrow the search:
-
Package is the package name.
-
Organization is the process-enabled organization.
-
Item is the package material in which stability samples are stored.
-
Rev is the item revision, if the item is revision-controlled.
-
Formula is the bill of materials for the container closure system. The product of the formula is the packaging configuration for stability sample storage.
-
-
Select Yes to find Deleted storage packages that meet the criteria entered, or select No to find current storage packages that meet the criteria entered.
-
Click Find.
Creating and Managing a Stability Study
The Stability Study window lets you create and manage a stability study. Refer to the "Managing the Stability Study Lifecycle" topic for an overview of the creation and management of a stability study.
To create a stability study, enter preliminary information about the study including its document number, description, and storage condition plan. Specify the process quality-enabled item, item revision if the item is revision-controlled, and its base item specification to test in a quality laboratory.
Once the study is created, assign material sources to the study and create all the variants to investigate. At least one material source is required to create a stability study. Once the stability study is underway, use this window to view other pertinent information about the study, including its actual and revised start and end dates. This window also serves as a repository for assigned shelf life recommendations.
You can use folders and flexfields with this window.
See: Oracle E-Business Suite User's Guide and Oracle E-Business Suite Flexfields Guide
Prerequisites
-
Set up document numbering for the organization that owns the stability study by selecting the stability study Assignment Type as Manual or Automatic in the Process Quality Parameters window.
-
Create a storage condition plan.
-
Create a master item specification for stability testing.
-
Identify at least one material source for the stability study.
-
Identify at least one storage package for the stability study.
-
Enable the stability study workflows as described in "Appendix C."
To create a stability study:
-
Navigate to the Stability Study window. The stability study owner organization or the context organization displays in the window title. Select a different context organization using the Organizations window.
-
Enter Study as the stability study number if you select the stability study document numbering Assignment Type as Manual in the Process Quality Parameters window. If you select the Assignment Type as Automatic, then this field is protected. The stability study number is automatically assigned and displays when you save the window.
-
Enter a Description for the stability study.
-
Choose Change Status from the Actions menu of the Stability Study window to change the stability study status, after entering all relevant information, and saving the stability study with the default Status of New. The Status Approval workflow must be enabled for stability study approval. You can request the following actions in the order presented from the Actions menu:
-
Approved Launch to launch the stability study.
-
Canceled to initiate the stability study cancellation process. The response to this change depends on the status of the current stability study. It can be canceled from an approved plan, an approved launch, or an in progress study.
Refer to the "OPM Quality Stability Study Change Status Workflow" topic in "Appendix C" for an explanation of the stability study workflow statuses.
-
Stability Study Plan Approved to approve the planned stability study.
Required.
-
-
Enter the Storage Condition Plan to use for the stability study.
Refer to the "Creating a Storage Condition Plan" topic for more information on how to structure a plan for the storage conditions. Required.
-
Enter the Item as the material tested in the stability study. The item can be an engineering item, but it must be active and lot-controlled. The initial sample material tested must be the same as the item entered here. The item must be set up as process quality-enabled in the Item Master. The item Description displays as it appears on the Item Master. Required.
-
Enter the item Revision, if the item is revision-controlled. Required. This field is disabled if the item is not revision-controlled in Oracle Inventory.
-
Enter the Master Item Spec as the item specification containing the list of tests performed throughout the entire stability study. The Version displays. The Master Item Spec must be a base specification, and it must have a status of:
-
Approved for Lab Use, for a laboratory item such as an engineering item
-
Approved for General Use, for a production item
This specification serves as the default item specification when variants are loaded initially.
Required.
-
-
Enter the inventory organization defined as the Quality Lab. Required.
-
Enter the Owner of the stability study. This field defaults to the user who creates the stability study. The user must be associated with the stability study lab organization. The individual who creates the stability study can specify the owner. Required.
-
Enter the Notification Lead Time as the amount of advance notice you need prior to each scheduled testing time point using the OPM Stability Study Time Point Scheduling Notification workflow. For example, if a testing time point is scheduled for March 15, and you enter a 3-day notification lead time, you are notified of the scheduled time point on March 12. The notification lead time applies to all time points for all variants.
-
Enter Testing Grace Period as the lag time that can be added to each scheduled time point to create a window of opportunity for testing the item. If testing is not done within this testing grace period, then the Stability Study Late Time Point Scheduling Notification starts to notify appropriate individuals that testing is late. The testing grace period applies to all time points for all variants.
Variant
-
Enter Material Sources as the required number of material sources for the stability study. This entry must be a whole positive integer greater than zero. The default for this field is 1 and is updated based on the number of lots or recipes identified as material sources for the stability study. Identify the item, lot, and batches that serve as the basis for the stability study. Required.
-
Storage Conditions displays the number of storage conditions required by the stability study. This field defaults from the number of storage conditions defined for the storage condition plan entered for the stability study.
-
Enter Packages as the number of packaging configurations that you plan to use to build the stability study. A minimum of one packaging configuration is required. If you plan to study more than one packaging configuration, then enter the total number of packages. For example, if you plan to study an amber vial and clear glass vial closure system, enter 2 because these are two separate packaging configurations.
-
Count displays the actual number of variants created.
Dates
-
Enter the Scheduled Start date for the stability study. This date cannot be changed after the stability study has a status of Stability Study Plan Approved. This scheduled start date is used to calculate the scheduled end date. Variants created by the application use the scheduled start date as the variant start date unless the material source has a yield date. Required.
-
Scheduled End date is calculated by adding the longest time point identified across all the time intervals in the storage condition plan to the scheduled start date. You can only change this date until the stability study is approved. Required.
-
Revised Start date displays a revision to the Scheduled Start date. You can only enter this field after the stability study has reached a status of Stability Study Plan Approved, but does not yet have a status of Approved for Launch. This revised start date is used to calculate the revised end date.
-
Revised End date displays the revision to the scheduled end date based on the revised start date.
-
Enter Actual Start date when the stability study is changed to a status of In Progress and defaults to the system date. The stability study can only reach this status when the:
-
Required number of initial samples for each material source have a disposition of Accepted or Accepted with Variance
-
Required number of variants are created
-
Stability study has a status of Approved for Launch
-
-
Actual End date displays the date the stability study has a status of Completed.
Recommendations
-
Recommended Shelf Life displays the recommended shelf life for the item tested in the stability study. Enter this field when the stability study has a status of Completed. Enter a recommended shelf life in years, months, weeks, days, or hours.
-
Recommended Storage Spec displays the ideal storage condition for the item tested in the stability study by entering the recommended storage specification and Version for the material. Enter this field when the stability study has a status of Completed.
-
Save your work to create a stability study with the status of New.
-
Assign material sources as described in the "Assigning Stability Study Material Sources" topic.
-
Choose Change Status from the Actions menu to select appropriate statuses.
-
Edit variants as described in the "Editing Variants for the Stability Study" topic.
To assign material sources to the stability study:
-
Identify the item, lot, and batches to serve as the basis for the stability study as described in the "Planning a Stability Study" topic.
-
Query the stability study to assign material sources.
-
Click Material Source. Refer to the "Assigning Stability Study Material Sources" topic for additional information.
To edit variants for the stability study:
-
Identify the unique combinations of the stability study storage conditions, the test interval plan, and the package.
-
Query the stability study to edit variants.
-
Click Variants. Refer to the "Editing Variants for the Stability Study" topic for additional information.
To edit text in the stability study:
-
Choose Edit Text from the Actions menu. The Select Text Paragraph window displays.
-
Make appropriate text changes.
-
Save the window.
To mark the stability study for purge:
Choose Mark for Purge from the Actions menu. The record is marked for deletion.
To change the status of the stability study:
-
Choose Change Status from the Actions menu.
-
Select the desired status.
-
Save the window.
To display the master item specification:
Choose View Master Item Specification from the Actions menu. The master item displays in the Specifications window.
To display the storage condition plan:
Choose View Storage Condition Plan from the Actions menu. The storage condition plan displays in the Storage Condition Plan window.
Finding Stability Studies
The Find Stability Studies dialog box helps you find stability studies by study status, item tested, lab organization, or owner.
Prerequisites
-
Enter and save stability studies.
To find stability studies:
-
Navigate to the Find Stability Studies dialog box.
-
Make no entries to find all stability studies. Enter any of the following parameters to narrow the search:
-
Enter Study as the stability study number.
-
Select Status as:
-
New to find stability studies created, but not yet approved.
-
Request Approval of Stability Study Plan to find stability studies submitted for the stability study plan approval process using the workflow.
-
Revise Stability Study Plan to find stability studies under revision for stability study plan approval.
-
Stability Study Plan Approved to find stability studies that have an approved stability study plan.
-
Request Approval to Launch to find stability studies submitted for stability study launch approval using the workflow.
-
Revise Launch Request to find stability studies under revision for stability study launch approval.
-
Launch Approved to find stability studies that have an approved stability study launch.
-
In Progress to find stability studies in-progress.
-
Request Approval to Cancel to find stability studies submitted for stability study cancellation before the stability study plan is approved.
-
Request Approval to Cancel From Approved Plan to find stability studies submitted for stability study cancellation when the study has a status of Stability Study Plan Approved.
-
Request Approval to Cancel From Approved Launch to find stability studies submitted for the stability study cancellation when the study has a status of Launch Approved.
-
Request Approval to Cancel From In Progress to find stability studies submitted for stability study cancellation when the study has a status of In Progress.
-
Canceled to find stability studies that are canceled.
-
Completed to find stability studies that are completed.
-
-
Item as the material tested in the stability study.
-
Revision as the item revision.
-
Quality Lab as the inventory organization defined as a quality laboratory.
-
Owner as the individual responsible for the stability study.
-
-
Click Find.
-
Press the down arrow to display each study that was found.
Assigning Stability Study Material Sources
The Material Sources window lets you specify the organization and the material source of sample material for the stability study. This window displays the details for the number of material sources entered on the Stability Study window. The source material can already exist in inventory as lots or it can be selected, or requested as batch. Batches can be initial production batches for a new formulation, or a portion of routine production batches that are pulled for stability testing. This information includes the item, revision, lot, batch number, date of manufacture or manufacturing release date, batch size, recipe, and recipe version used.
The batch that produces the sample material for the stability study is specified in one of the following ways:
-
Request batch, if the material needs to be produced. Specify the plant, or plant and recipe, or plant, recipe, and recipe version.
-
Select lot if the material is produced and is assigned a specific lot.
You can use folders and flexfields with this window.
See: Oracle E-Business Suite User's Guide and Oracle E-Business Suite Flexfields Guide
Prerequisites
-
Create and save a stability study.
-
Identify material sources to use in the stability study.
To enter material source details:
-
Navigate to the Material Sources window. The stability study owner organization and the status display in the window title.
-
Enter Organization as the process-enabled material source inventory organization where the sample material is produced. The organization must be defined as either a plant or a research and development laboratory. If the item is an engineering item, then the organization must be defined as a laboratory organization. If the material is not yet produced, then this is the organization that is assigned to produce the material. If you leave this field blank, then specify the recipe and version for the material source.
-
Enter the Batch number. Specify the organization before you can enter this field. The batch status must be WIP or Completed. Select a batch that contains a stability study item identified as a product or byproduct.
-
Enter the Lot when material already exists in inventory. You can update this field after the source material is produced by the specified recipe and recipe version. Specify the organization before you enter this field. Required if Batch is entered.
-
Enter the Recipe as the recipe to use when the source material is planned for the stability study. There must be an active recipe validity rule for the material source organization.
-
Enter the Recipe Version as the version of the recipe to use when the source material is planned for the stability study. If you leave this field blank, then indicate any version of the recipe can be used to produce the material.
-
Yield Date displays the date that the specified lot is yielded from the specified batch.
-
Sample Qty displays the total sample quantity required for stability testing of each material source identified in the item primary UOM.
-
Sample Qty UOM displays the UOM of the sample quantity.
-
Initial Sample Group Associated is selected if a sample group is associated to the material source before launching the stability study.
-
Save the window.
To update the sample quantity required:
Enter the number of samples per time point and the sample quantity to put into storage package for all study variants:
-
Choose Calculate Sample Quantity from the Actions menu. The Sample Qty field displays an updated sample quantity for the selected material source.
-
Evaluate sample quantity to make certain there is sufficient material to complete the stability study.
To display all stability study variants:
Click Study Variants to open the Variant window where all stability study variants for all material sources display.
To select initial samples:
-
Choose Select Initial Sample Group from the Actions menu. A list of sample groups with a disposition of Accept or Accept with Variance for the selected material source display.
-
Select the desired initial sample group.
-
Click OK.
To edit text in the material sources:
-
Choose Edit Text from the Actions menu. The Select Text Paragraph window displays.
-
Make appropriate text changes.
-
Save the window.
To mark the material sources for purge:
Choose Mark for Purge from the Actions menu. The record is marked for deletion.
Editing Stability Study Variants
The Variant window lets you edit stability study variants. This window displays all variants the application creates when the stability study is created. The total number of rows displayed on this window depends on the number of unique combinations of:
-
A specific batch.
-
A specific storage condition in a storage organization such a combination of temperature and humidity. For example, 30 deg C and 60% RH.
-
A specific storage package. You can set up a stability study for several storage packages, however at least one package is required.
Delete or add variants until the stability study plan is approved. Resources or locators identified for variant storage conditions can also be replaced if they do not meet environmental monitoring requirements.
Creating Variants
Each row on the Variant window represents an individual material source, storage condition, and storage package combination. Based on the variant count for a new stability study, the application creates a variant for each of these combinations. It is assumed that stability study sample material from each source is stored in each storage condition and storage package combination for the specified duration. Sample material from a batch is stored at one or several storage conditions in a process-enabled inventory storage organization, depending on the scope of the stability study.
Planning Variants
Plan or edit variants once material sources are defined. However, changes to the number of acceptable material sources can affect the number of planned variants before a stability study plan is approved. Add, edit, or delete variants until the stability study plan is approved. Once the stability study is in progress, you can only edit the variant end date, or replace the resource or physical location for a storage condition.
You can use folders and flexfields with this window.
See: Oracle E-Business Suite User's Guide and Oracle E-Business Suite Flexfields Guide
Prerequisites
-
Define base and overlay item specifications for stability testing.
-
Define the storage organization, resource and resource instance, or storage subinventory and storage locator that provide and maintain the required storage conditions.
-
Define at least one storage package.
-
Create a stability study.
To edit variants in a stability study:
-
Navigate to the Variant window. The context organization displays in the window title. Select a different context organization using the Organizations window.
-
Query the stability Study to enter variants.
Note: Status must be New or Revise Stability Study Plan to edit variants.
-
The following fields are display only:
-
Item displays the material tested in the stability study. The item description displays as it appears on the Item Master.
-
Revision displays the item revision.
-
Variant Count displays the total number of variants for the stability study. Each time you add or delete a variant, this number displays the current number of variants saved.
-
Variant
-
Num displays a unique variant number generated by the application in a series with increments of one. When a new variant is added, a material source is required for the record entered. You cannot delete a numbered row once the stability study plan is approved. The variant number remains, and it is not reused. However, the particular variant is no longer valid. Required.
-
Enter Default Spec as the item specification for the variant, and the specification Default Spec Version. These fields default from the master item specification entered on the Stability Study window. If an overlay specification exists for the master item specification, then you can enter the overlay specification. The default item specification applies to all time points for a variant. You can also configure it more specifically on the Time Points window. Required.
-
Enter Start Date as the default start date from the material source yield date. This changes to the scheduled start date of the stability study when the stability study has a status of New.
-
Enter End Date as the default end date of the stability study.
-
Enter Samples Per Time Point as the default number of samples for each time point that is associated to the variant selected. The default is one sample per time point.
-
Enter Retained Samples as the number of samples retained for a variant in the eventuality that unscheduled testing is required. The default value is zero. You can assign retained samples for a variant at a specific time point on the Variant Time Points window.
Material Source
-
The following fields are display only:
-
Num displays a unique variant number generated by the application in a series with increments of one. When a new variant is added, a material source is required for the record entered. You cannot delete a numbered row once the stability study plan is approved. The variant number remains, and it is not reused. However, the particular variant is no longer valid. Required.
-
Organization displays the material source organization where the sample material is produced. This defaults from the Material Sources window and is a process-enabled inventory organization.
-
Batch displays the batch document number where the stability study item is identified as a product or byproduct.
-
Recipe displays the recipe to use when the source material is requested for the stability study, and the Recipe Version.
-
Lot displays the lot for a stability study material source.
-
Storage Condition
-
The following fields are display only:
-
Num displays a unique variant number generated by the application in a series with increments of one. When a new variant is added, a material source is required for the record entered. You cannot delete a numbered row once the stability study plan is approved. The variant number remains, and it is not reused. However, the particular variant is no longer valid. Required.
-
Storage Spec displays the monitoring specification and Storage Spec Version for a storage condition that defaults from the storage condition plan.
-
Organization displays the process-enabled inventory organization that stores the sample. This defines the storage subinventory and storage locator or resource and resource instance.
-
Resource displays the storage resource specified on the storage condition plan. You can override this entry. For example, enter a refrigerator that meets the requirements for the monitoring specification if the default resource cannot meet this requirement. This field defaults from the storage condition plan.
-
Resource Instance displays a specific resource instance identified for the storage condition specified in the monitoring specification. For example, this field can display a specific environmental chamber.
-
Subinventory displays a subinventory that meets the storage condition requirements for the variant. This field defaults from the storage condition plan.
-
Locator displays the subinventory locator if the subinventory exists for the locator. This field defaults from the storage condition plan.
-
-
Enter the Storage Date that samples are placed in the variant storage condition. This date can also represent the date the resource or locator for a storage condition is modified after the start of the stability study. You can reenter this field after the stability study plan is approved and launched until samples are put in the variant storage condition.
Package
-
Num displays a unique variant number generated by the application in a series with increments of one. When a new variant is added, a material source is required for the record entered. You cannot delete a numbered row once the stability study plan is approved. The variant number remains, and it is not reused. However, the particular variant is no longer valid. Required.
-
Enter a valid Package as the selected storage package used to store the variant of the item in the stability study organization.
-
Formula displays the formula and Formula Version if a formula is defined for the storage package.
-
Item displays the item for the storage package.
-
Revision displays the item revision, if the item is revision-controlled.
-
Enter Sample Quantity as the quantity of sample for each variant and the Sample Quantity UOM. These fields default from the Storage Packages window. You can reenter them for each variant. Required.
-
Save the window.
To add a variant:
-
Query the Study. Status must be New or Revise Stability Study Plan to edit variants.
-
Select a row to add a variant. Variants insert below the row selected.
-
Choose New from the File menu.
-
Select the material source from the Material Source dialog box. Required.
-
Click OK.
To delete a variant:
-
Query the Study. Status must be New or Revise Stability Study Plan to edit variants.
-
Select the variant to delete.
-
Choose Delete from the Edit menu. All time points associated to the selected variant are deleted.
-
Save the window.
To display the item specification associated to the variant:
Click Item Spec. The Specifications window displays the default item specification for the selected variant.
To display the storage specification associated to the variant:
Click Item Spec. The Specifications window displays the default item specification for the selected variant.
To display time points associated to the variant:
-
Select the variant.
-
Click Time Points. Refer to the "Editing Variant Time Points" topic for more information.
To display the stability study samples associated to a variant:
-
Select the variant.
-
Click Samples.
To display monitoring samples for a storage specification:
-
Select the variant.
-
Choose View Storage Spec Samples from the Actions menu.
To modify the resource or locator for a storage condition:
-
Choose Modify Storage Condition from the Actions menu.
-
From Storage Conditions display the current:
-
Process-enabled Storage Organization, which is the inventory organization of the stability study variant.
-
Resource that meets the requirements for the storage condition. This defaults initially from the storage condition plan, but you can override it.
-
Instance of a specific resource identified for the storage condition specified in the monitoring specification.
-
Subinventory that meets the requirements for the storage condition. This defaults initially from the storage condition plan, but you can override it.
-
Locator in the subinventory that meets the requirements for the storage condition, if the subinventory exists for the locator.
-
Start Date as the date when samples are placed in the variant storage condition, resource, or locator. This date reflects modifications to the start of the stability study.
-
End Date as the date when samples are removed from the variant storage condition, resource, or locator. When you save the window, this field updates to reflect the start date entered for the To Storage Condition.
-
-
Enter a To Storage Condition for a resource and resource instance, or for a subinventory and locator to change the current value displayed. Following is a list of conditions you can enter:
-
Storage Organization as the process-enabled inventory organization of the stability study variant. Required.
-
Resource that meets the requirements for the storage condition. When you enter a new resource, the resource instance field is cleared if an instance was entered previously.
-
Instance that meets the storage condition specified in the monitoring specification.
-
Subinventory that meets the requirements for the storage condition.
-
Locator that meets the requirements for the storage condition, if the subinventory exists for the locator.
-
Start Date when samples are placed in the variant storage condition.
-
-
Click OK to modify the resource or locator storage conditions.
To display the history of storage condition resource and locator changes:
-
Choose View Storage History from the Actions menu. The View Storage History dialog box displays the history of the Storage Organization, Resource, Instance, Subinventory, Locator, Start Date, and End Date replacements or the variant.
-
Review the history.
To assign a retained sample from the variant to a testing time point:
-
Select the variant.
-
Choose Assign Sample to Time Point from the Actions menu
-
Variant Num defaults from the Variant window.
-
Source Time Point displays the current time interval of the retained sample. This field is blank when selecting a retained sample from the variant.
-
Enter the Sample No to assign to the target time point. The organization code for the sample defaults to the sample organization identified for the material source.
-
Target Time Point displays the time interval the retained sample is assigned to.
-
Click OK.
Finding Stability Study Variants
The Find Variants dialog box lets you find stability study variants.
To find a stability study variant
-
Navigate to the Find Variants dialog box.
-
Make no entries to find all variants. Enter any of the following parameters to narrow the search:
-
Study as the name of the stability study.
-
Status as the status of the stability study.
Refer to the "Finding Stability Studies" topic for a complete explanation of stability study status.
-
Item as the material tested in the stability study. The item can be an engineering item, but it must be active. The item Description displays as it appears on the Item Master.
-
Revision as the item revision.
-
-
Click Find.
Editing Variant Time Points
The Variant Time Points window displays all time intervals defined in the test interval plan assigned to the storage condition for each variant in the stability study. The time intervals display in chronological order starting with the earliest time point to test.
The number and frequency of the time points are defined by the test interval plan assigned to the variant storage condition in the storage condition plan. You can add or remove time points from the variant at the time the variant is created, or during the revised stability study approval phase, if rework is required. After the stability study begins, you can add additional time points. You can assign retained samples to a time point, or move retained samples between time points.
You can use folders and flexfields with this window.
See: Oracle E-Business Suite User's Guide and Oracle E-Business Suite Flexfields Guide
Prerequisites
-
Define base and overlay item specifications for stability testing.
-
Create a stability study and variants.
To edit variant time points:
-
Navigate to the Time Point window.
-
Time Interval displays the time interval from the variant's test interval plan that defines a testing time point.
-
Enter Spec Name as the item specification number and Spec Version used to test sample material at the testing time point. This field displays the default item specification for the variant. You can select an overlay specification.
-
The following fields are display only:
-
Scheduled Date displays the date the testing for the time point needs to be scheduled. This date calculated by adding the time point interval to the variant start date.
-
Actual Date displays the actual date the testing for the time point was done. You can enter and modify this field when the stability study is in progress.
-
-
Enter Samples Per Time Point as the required number of samples for the testing time point. This field defaults from the Samples Per Time Point field entered on the Variants window.
-
Disposition displays the disposition of the testing time point sample group.
To add a time point to a stability study before it is approved:
-
Select the time interval to insert the new time point. Status must be New or Revise Stability Study Plan.
-
Choose New from the File menu.
-
Enter the Time Interval name, Spec Name, Version, Scheduled Date, and Samples Per Time Point for testing the new time point.
-
Save the window.
To add a time point to a stability study after it is approved:
-
Select the time interval to insert the new time point. Status must be Revise Stability Study Plan.
-
Choose New from the File menu.
-
Enter the Time Interval name, Spec Name, Version, Scheduled Date, and Samples Per Time Point for testing the new time point.
-
Assign the sample to the time point.
-
Save the window.
To display the item specification associated to the variant:
Click Item Spec. The default item Specification displays.
To display the sample associated to a variant:
-
Select the variant time point.
-
Click Samples.
-
Drill down to individual item samples to view information about each one of them.
To assign a retained sample to a new testing time point:
-
Select the new testing time point.
-
Choose Assign Sample to Time Point from the Actions menu.
-
Variant defaults from the Variants window.
-
Enter a Source Time Point, or leave this field blank for the application to select a retained sample from the variant.
-
Enter the Sample to assign to the new testing time point. The organization code for the sample defaults to the same organization identified for the material source.
-
Target Time Point displays the time interval for the new testing time point created, and cannot be edited.
-
Click OK.
To move a retained sample to a specific time point:
Move a retained sample from one time point to another specific time point in order to replace a sample that was damaged in transit to the laboratory, or to complete testing.
-
Select the testing time point to move the sample to.
-
Choose Assign Sample to Time Point from the Actions menu.
-
Variant defaults from the Variant window.
-
Enter Source Time Point as the testing time point to move the sample from.
-
Enter the Sample assigned to the new testing time point. The organization code for the sample defaults to the same organization identified for the material source.
-
Target Time Point displays testing time point selected and cannot be edited.
-
Click OK.