Oracle iSetup Reportable API
Oracle iSetup Reportable API
This chapter explains how to write a iSetup Reportable API for Oracle E-Business Suite Release 12.0.6 and later.
Typographical Conventions
This chapter uses the following typographic conventions to distinguish important elements from the body of the chapter.
Command and Example Syntax
Syntax:
OAPageContext.getParameter("<parameterName>");
Example:
/*
** Creates a SupplierEOImpl entity object and a corresponding row in the
SuppliersVO.
*/
public void createSupplier()
{
OAViewObject vo = getSuppliersVO();
vo.insertRow(vo.createRow());
}
Command and example syntax adhere to the conventions in the following table:
| Convention | Explanation |
|---|---|
| plain monotype | Used for code fragments and examples. |
| < Italic monotype in angle brackets > | Indicates developer-supplied values. |
| ... | An ellipsis indicates that the actual code extends beyond the example shown. |
| /* */ |
A C-style comment. |
| /** */ |
A Javadoc comment. |
| // | A Java comment. |
| Indentation | The Oracle standard indentation helps to show code structure. |
Setting Up JDeveloper
Refer to My Oracle Support Knowledge Document 416708.1 to find out the patch number for the patch with the appropriate version of JDeveloper for the Oracle E-Business Suite that you need. Download this patch for JDeveloper.
Note: You can build, test, and deploy Oracle iSetup Framework interfaces on Oracle E-Business Suite Release 12.0.6 and later. These instructions use Release 12.0.6 as an example.
Download the Tutorial attachment to My Oracle Support Knowledge Document 843397.1 to get the Oracle iSetup Framework Library and sample code used in this document.
To Set Up JDeveloper
-
Unzip the JDeveloper patch to the folder JDeveloper_12.0.6.
-
You can add iSetup framework tutorial shipped with patch to your developer. Alternatively, you can go through this chapter to create BC4J objects on your own.
-
Unzip the Tutorial.zip. You should have the following contents:
-
iSetupFwk.jar - Oracle iSetup Framework Library.
-
TutorialCode - Sample code used in this document.
-
-
Navigate through the folder JDeveloper_12.0.6/jdevbin/ and click on jdeveloper.exe
-
To open the example code, select File > Open in JDeveloper and navigate to the location where TutorialCode is present. Select iSetupReportableAPI.jws in the TutorialCode folder and click Open. To compile the above code, add the iSetup Framework Library as described in Steps 10 and 11, below. To create your own BC4J Objects, please follow the process described below.
-
Click on Applications Navigator tab > Right-click on Applications > New OA Workspace > Enter the workspace file name and directory name. Ensure that the "Add a new OA Project" box is checked.
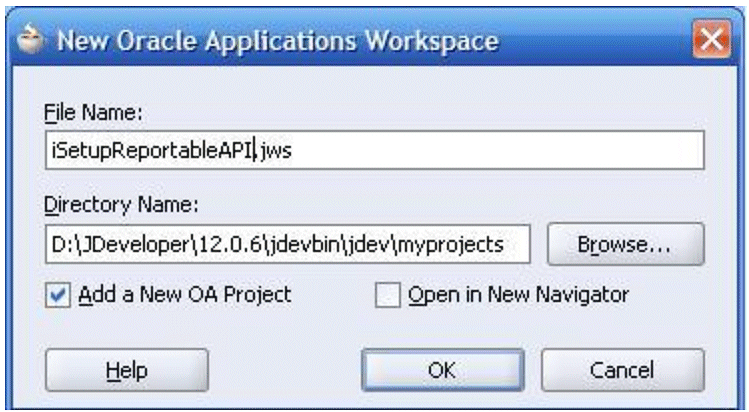
Click OK.
The window "Oracle Applications Project Wizard" opens.
-
Complete the following steps in the Oracle Applications Project Wizard window.
-
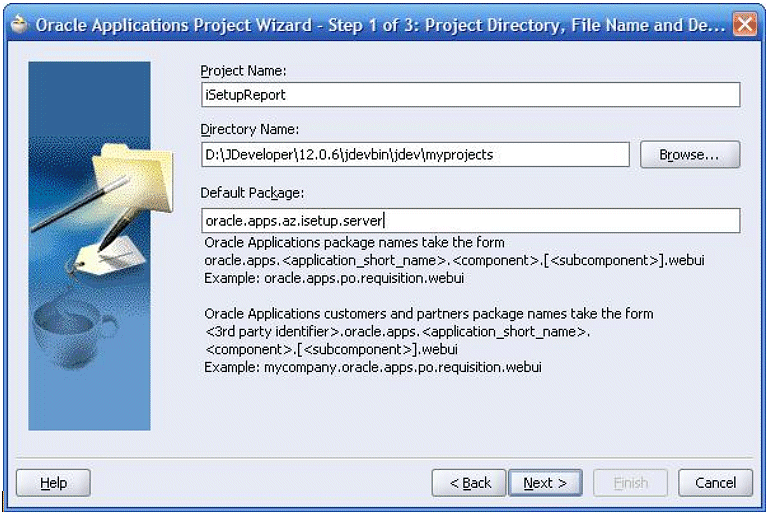
Step 1 of 3: Click on Next. Enter Project Name, Directory Name, and Default Package Name (for example, 'oracle.apps.az.isetup.server').
-
Click Next.
-
Step 2 of 3: Check the box "Use Repository for Design Time". If you have already defined the database connection select it from the list or else click on New. The window "Create Database Connection Wizard" opens.
-
-
Click Next. Perform the steps required to create a database connection.
-
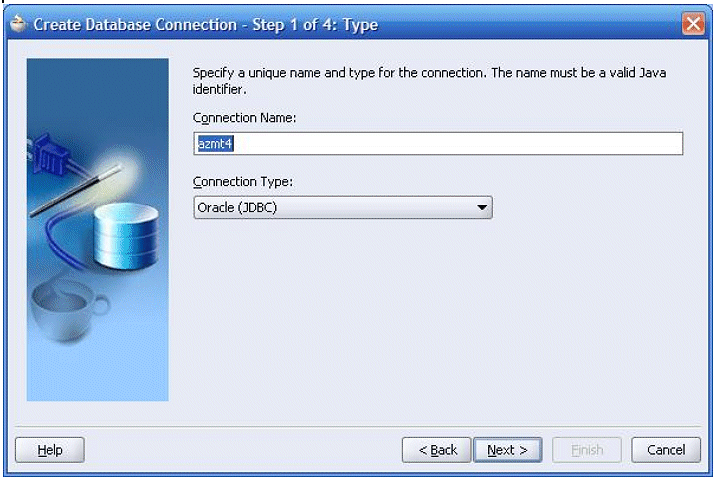
Step 1 of 4: Enter Connection Name and Select Connection type as Oracle (JDBC). Click Next.
-
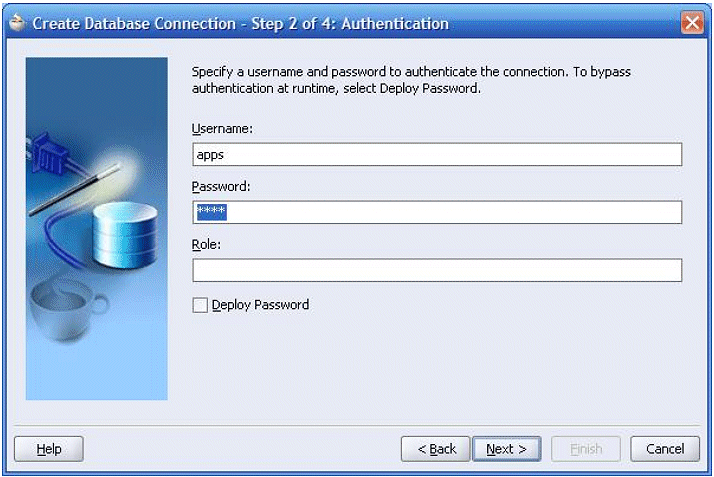
Step 2 of 4: Enter Username and Password to authenticate the connection. Click Next.
-
Step 3 of 4: Specify connection details of the database machine. Click Next.
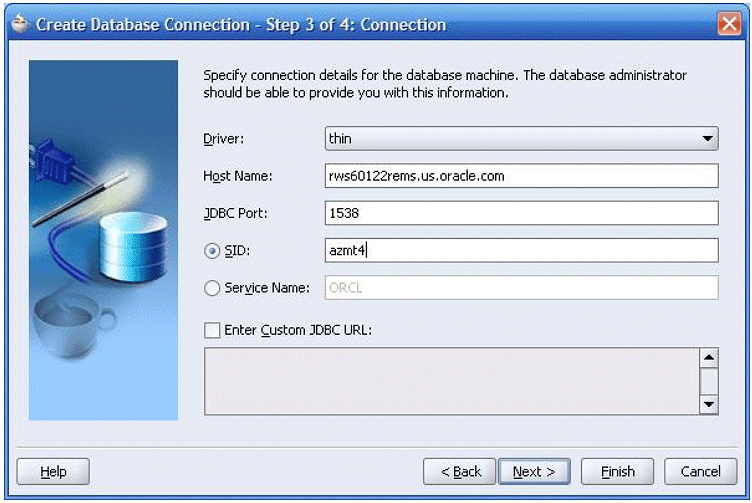
-
Step 4 of 4: Click on Test Connection to ensure that all the details you supplied above are correct.
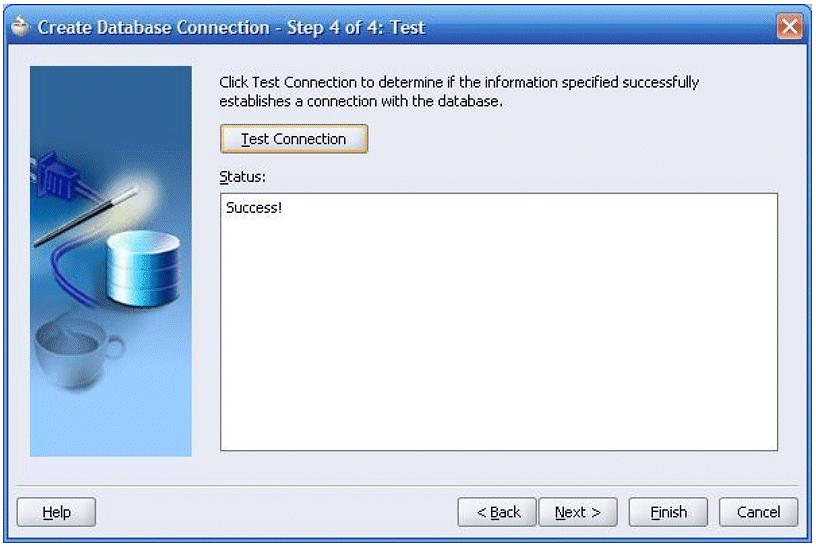
Click Finish to return to the Oracle Applications Project Wizard.
-
-
Now you are done creating the new OA Project. Click Finish.
-
In the Applications Navigator right-click on the project and navigate to Project Properties > Libraries > Add Library.
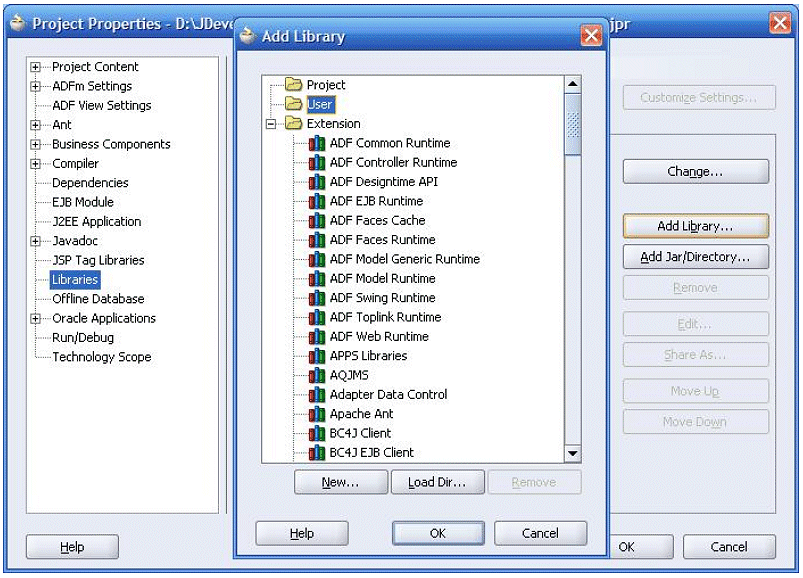
-
Add a new library:
-
Click on New.
-
Enter Library Name using the navigation path iSetup > Select Class Path and click on Add Entry.
-
Browse to the directory where the iSetup Tutorial files have been unzipped (Refer to Step 3). Select iSetFwk.jar. Click OK in Create Library Dialog Pane.
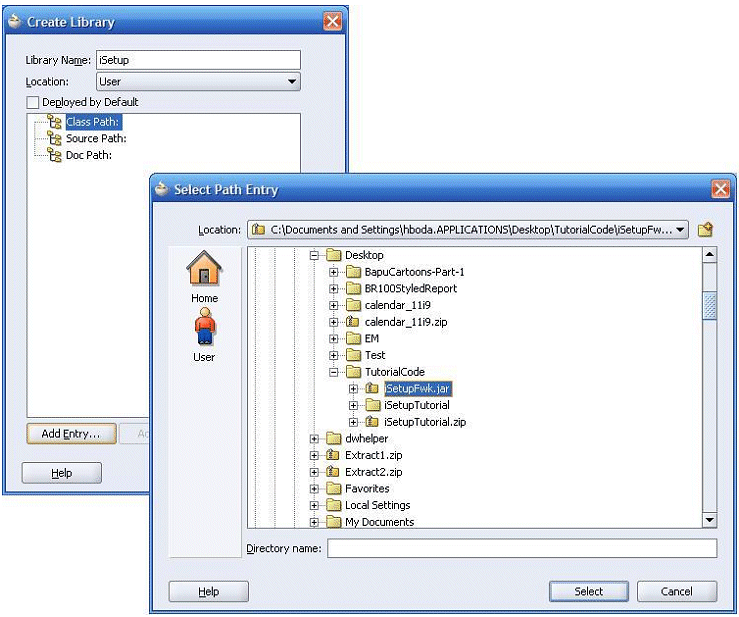
-
-
Click OK in Add Library Dialog Pane.
-
Click OK in Project Properties Dialog Pane.
To Create the iSetup Framework Reportable Interface
-
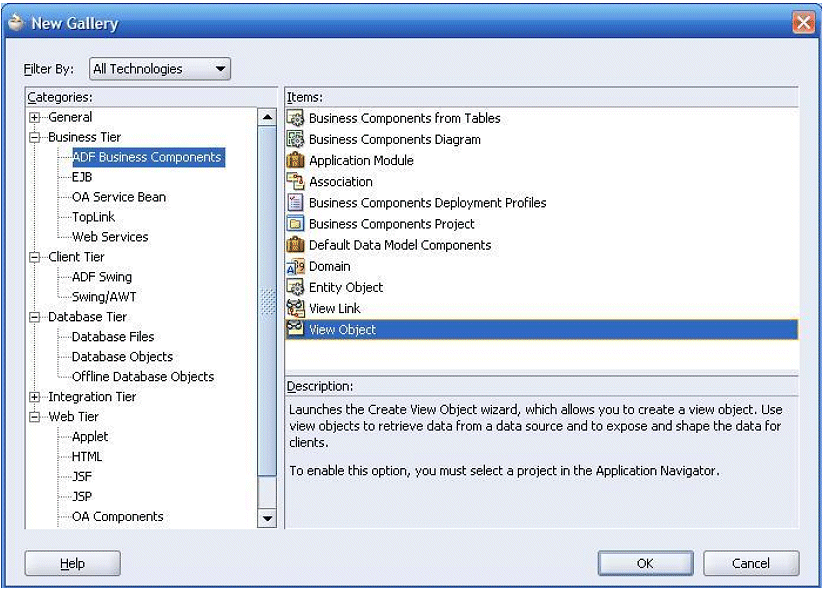
Create View Object: Right-click on the Project and click on New > Select ADF Business Components: View Object.
-
Click on OK. The "Create View Object Wizard" window opens.
-
Click Next.
-
Perform the following in the Create View Object screens:
-
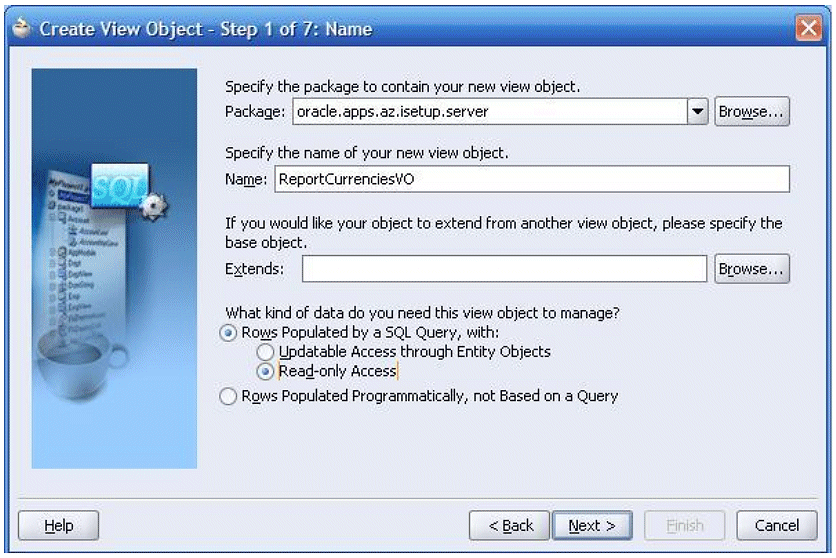
Step 1 of 7: Specify the package and name of the View Object.
Select rows populated with SQL Query: with Read-only access radio button.
Click Next.
This tutorial is explained using Oracle iSetup, with the application short name 'az' ('AZ'). You can create under your custom PRODUCT_TOP. You can replace 'az' with your own product short code (application short name).
For example, the Package Name can be given as oracle.apps.az.isetup.server and the View Object name as ReportCurrenciesVO.
-
Step 2 of 7: Enter the SQL query (The query for the desired records that needs to come in the report. In this example, we used the FND_CURRENCIES table) in the Query Statement text box and select the binding style as Oracle Positional. Click Next.
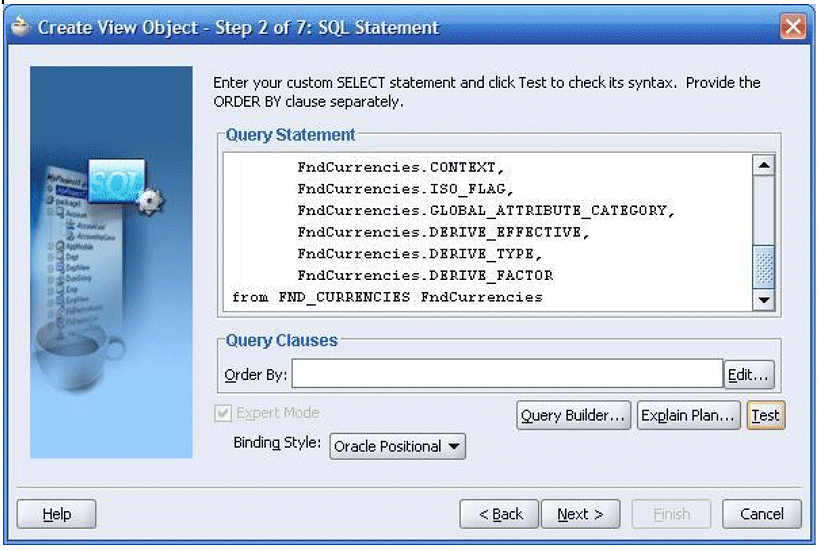
Note: An example query is
SELECT
 FndCurrencies.CURRENCY_CODE,
 FndCurrencies.ENABLED_FLAG,
 FndCurrencies.CURRENCY_FLAG,
 FndCurrencies.DESCRIPTION,
 FndCurrencies.ISSUING_TERRITORY_CODE,
 FndCurrencies.PRECISION,
 FndCurrencies.EXTENDED_PRECISION,
 FndCurrencies.SYMBOL,
 FndCurrencies.START_DATE_ACTIVE,
 FndCurrencies.END_DATE_ACTIVE,
 FndCurrencies.MINIMUM_ACCOUNTABLE_UNIT,
 FndCurrencies.CONTEXT,
 FndCurrencies.ISO_FLAG,
 FndCurrencies.GLOBAL_ATTRIBUTE_CATEGORY,
 FndCurrencies.DERIVE_EFFECTIVE,
 FndCurrencies.DERIVE_TYPE,
 FndCurrencies.DERIVE_FACTOR
FROM FND_CURRENCIES FndCurrencies
-
Click on Next, accepting the defaults, until you reach step 6 of 7: Attribute Settings.
-
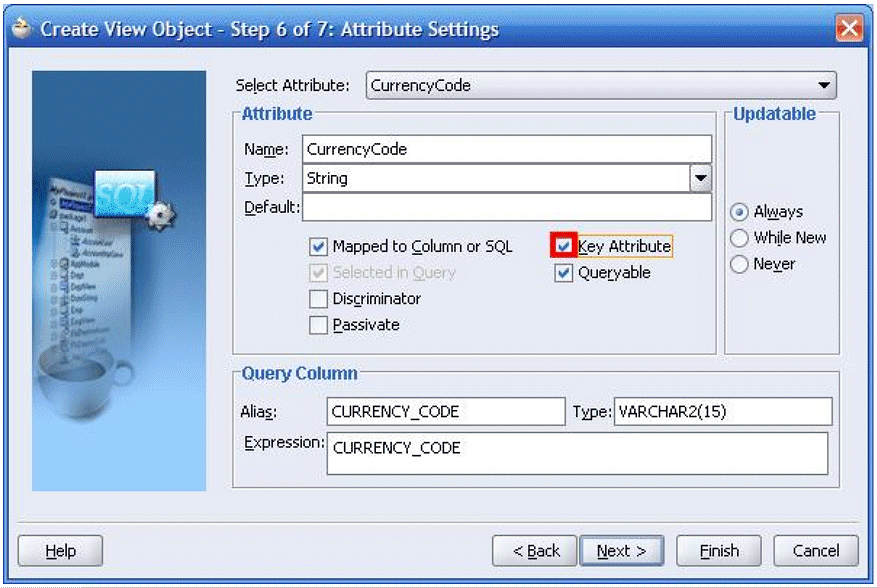
Step 6 of 7: Now mark the unique key attributes (Unique keys are the developer keys of your API. Unique Keys should not contain any sequence IDs. Based on unique key columns, you can uniquely identify a record. In this example, the CurrencyCode view object attribute uniquely identifies a record.
-
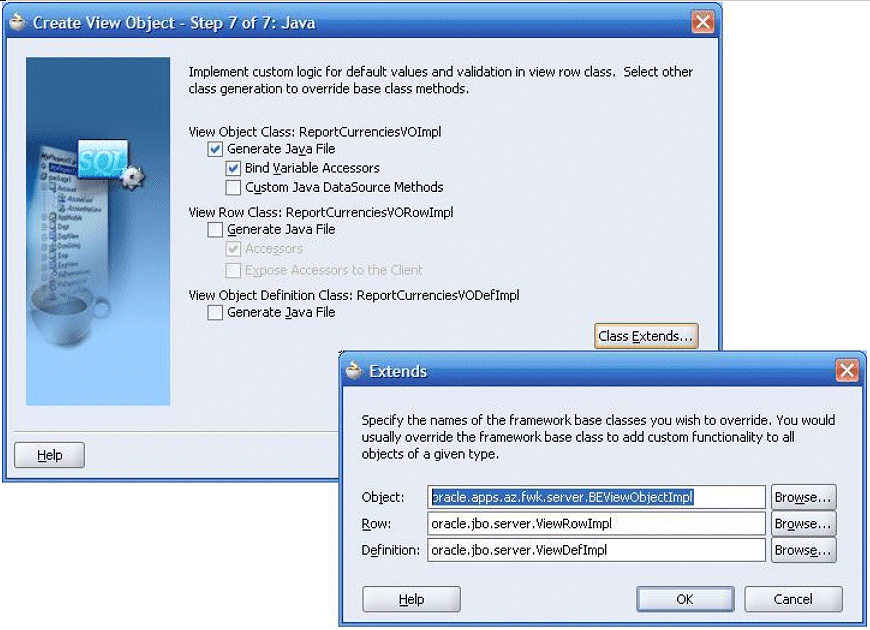
Step 7 of 7: Select Generate Java File for View Object Class: ReportCurrenciesVOImpl.
Click on the Class Extends button. In the Against Object box, you need to override the base class as 'oracle.apps.az.fwk.server.BEViewObjectImpl'.
Click OK on the Extends dialog pane and click Finish in Create View Object wizard.
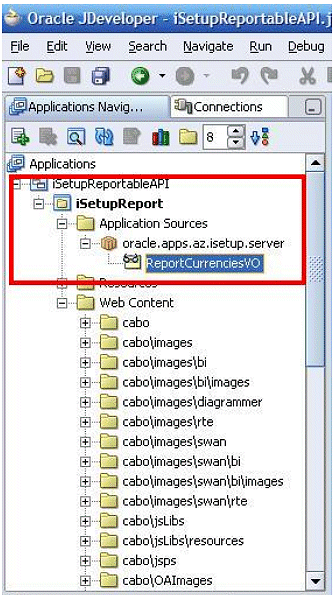
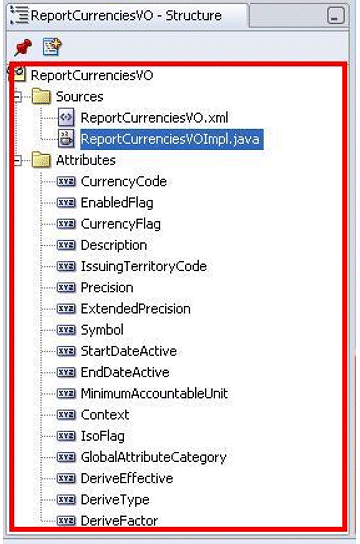
Note that the View Object is created with following two files:
-
ReportCurrenciesVO.xml
-
ReportCurrenciesVOImpl.java
-
-
Filtering attributes need to be marked if the iSetup Reportable API has to support filtering records. APIs are responsible for determining which filtering parameters are allowed and to which view object attributes that these filtering parameters map. In order to achieve these goals, the APIs need to register the filtering parameters by marking view object attributes as filtering parameters as shown below:
For the attributes that need to be filtered on, the APIs need to add the following three properties
-
AZ_FILTER_NAME: a unique value within the view object. Make sure it's all-uppercase and has no spaces. This is a mandatory parameter if you wish to set filter on an attribute.
-
AZ_ATT_DISPLAY_MSG: The Oracle Application Object Library (FND) message name.
-
AZ_ATT_DISPLAY_APP: The application short name that corresponds to the FND message name.
Optional properties are as follows:
Properties AZ_ATT_DISPLAY_MSG and AZ_ATT_DISPLAY_APP are used to show the label of the filtering parameter in the iSetup Migration UI pages. These properties are optional. If you do not set the values for these properties, then the VO attribute name would be used as the display name.
To set the above properties you need to follow following steps.
In this example, attribute CurrencyCode of ReportCurrenciesVO is the filtering parameter.
-
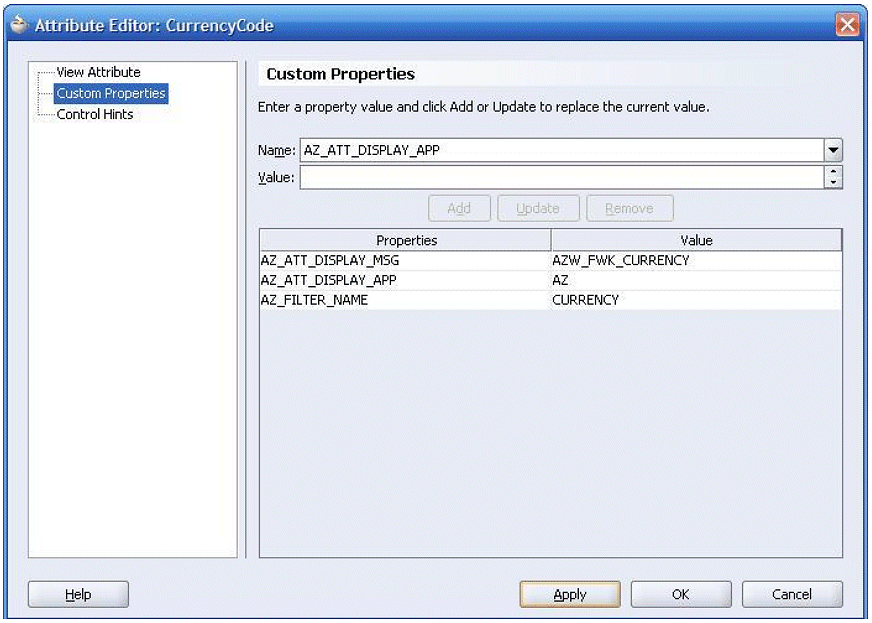
Select ReportCurrenciesVO in Applications Navigator of JDeveloper. In the Structure Pane, select and right-click on the CurrencyCode view object attribute and select 'Edit CurrencyCode'. Then select 'Custom Properties' in Attribute Editor wizard. For Name enter: AZ_FILTER_NAME and for Value enter: CURRENCY. Click on Add and Apply.
-
Repeat the above procedure for the properties (Optional): AZ_ATT_DISPLAY_MSG and AZ_ATT_DISPLAY_APP. In this example the values are given as follows:
-
AZ_FILTER_NAME: CURRENCY
-
AZ_ATT_DISPLAY_MSG: AZW_FWK_CURRENCY
-
AZ_ATT_DISPLAY_APP: AZ
-
-
After entering all the properties for filtering parameters, click OK.
-
To Create an Application Module
Perform the following steps to create an application module.
-
Right-click on the project and click on New. Select ADF Business Components: Application Module.
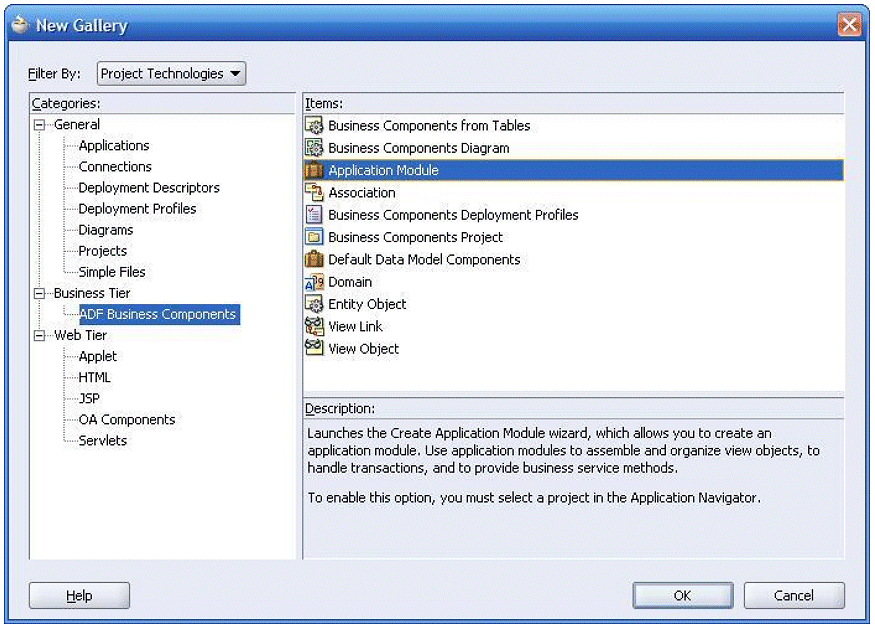
-
Click OK. The "Create Application Module" wizard opens. Click Next.
-
Perform the steps in the Create Application Module window.
-
Step 1 of 4: Specify the package and name of the Application Module. Here the package name is given as 'oracle.apps.az.isetup.server' and the View Object name is given as 'ReportCurrenciesAM'.
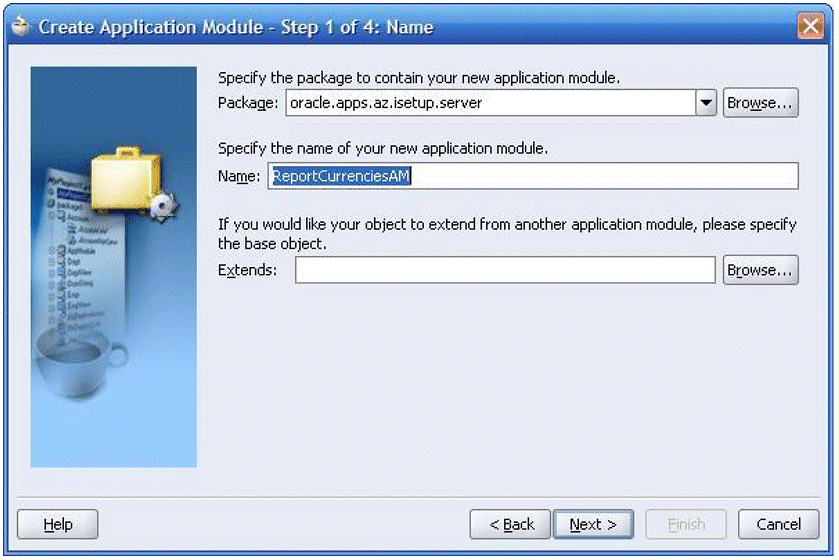
-
Step 2 of 4: Select ReportCurrenciesVO in the Available View Objects and add it to the data model. Click on Next.
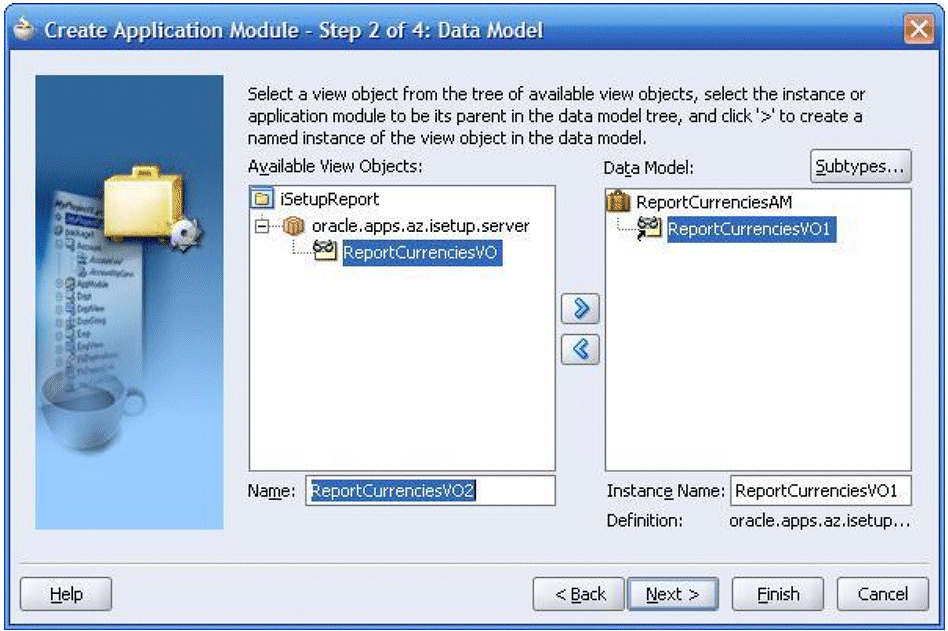
-
Click on Next until you reach step 4 of 4: Java.
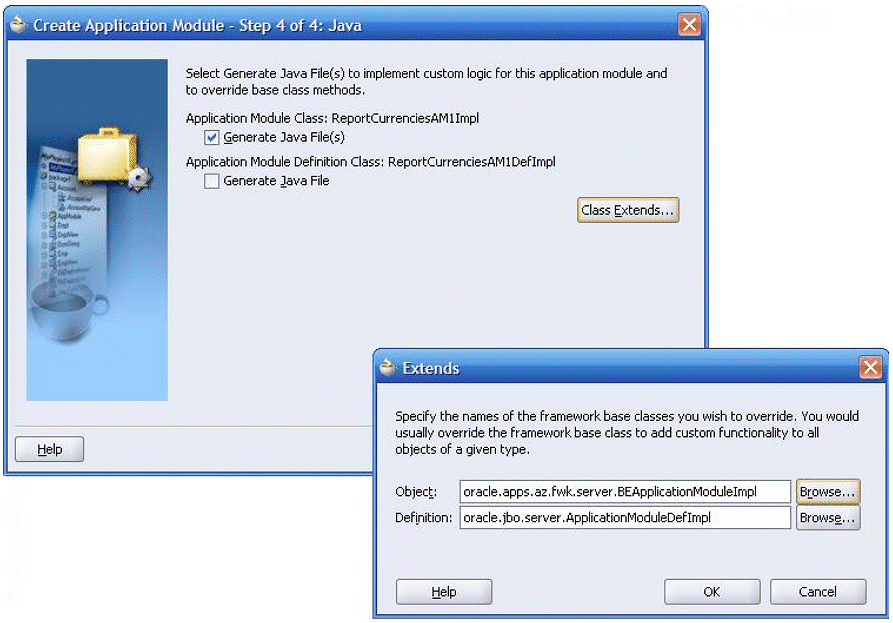
-
Select Application Module Class: ReportCurrenciesAMImpl > Generate Java File(s). Click on the Class Extends button. In the Against Object box you need to override the base class as 'oracle.apps.az.fwk.server.BEApplicationModuleImpl'. Click OK on the Extends dialog pane and click Finish in the Create Application Module wizard.
-
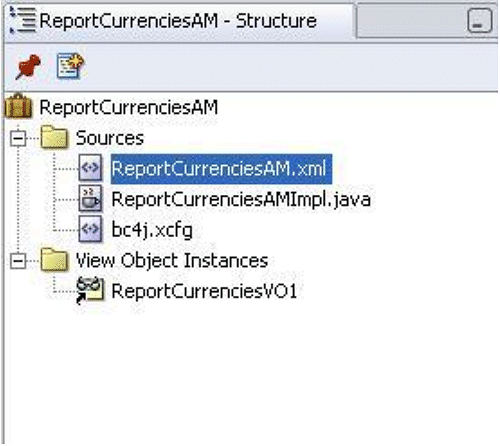
Note that the Application Module is created with following two files:
-
ReportCurrenciesAM.xml
-
ReportCurrenciesAMImpl.java
-
-
Now you need to add exportable view object to the application module. Open ReportCurrenciesAMImpl.java and add the following piece of code to the application module's default constructor:
public class ReportCurrenciesAMImpl extends BEApplicationModuleImpl { /**This is the default constructor (do not remove) */ public ReportCurrenciesAMImpl() { addVO("ReportCurrenciesVO1"); } .......... -
In the iSetup Migrator UI, a LOV can be linked to each filtering parameter. This feature is optional. You may skip this if you do not want the LOV. To enable this feature, the API needs to override BEViewObjectImpl.getSqlForLov method to return the LOV SQL, which should select the distinct values of the filtered column. Add the following piece of code to the ReportCurrenciesVOImpl.java file.
public class ReportCurrenciesVOImpl extends BEViewObjectImpl { /**This is the default constructor (do not remove) */ public ReportCurrenciesVOImpl() { } public String getSqlForLov(String attrName) { if (attrName.equalsIgnoreCase("CurrencyCode")) //if this attribute is not defined on a database column { StringBuffer sql = new StringBuffer(); sql.append("select distinct currency_code "); sql.append("from "); sql.append("fnd_currencies "); return sql.toString(); } else { return super.getSqlForLov(attrName); } } } -
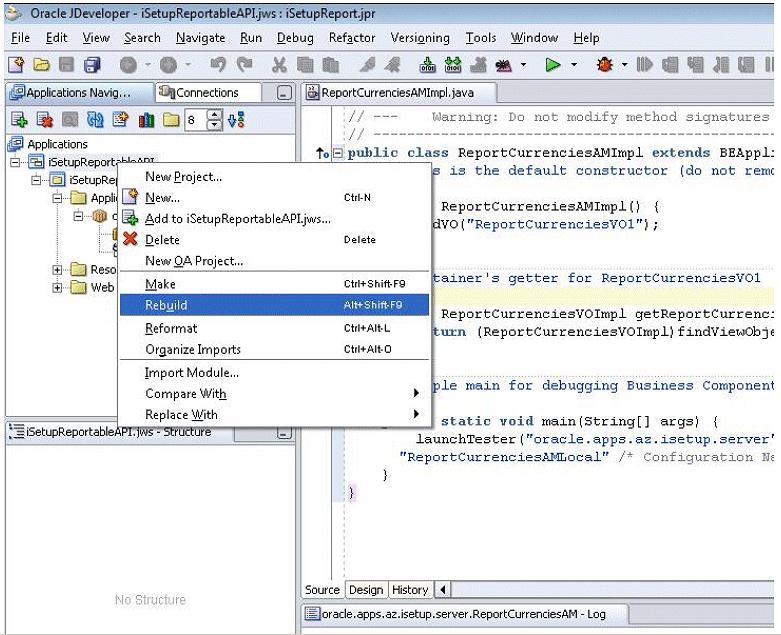
Now right-click on the workspace and select Rebuild. Ensure that there are no compilation errors.
-
Now your API supports the default export functionality, which is exporting all the records found for the defined view objects so that a report can be generated with the exported records.
-
To Test the Interface in JDeveloper
-
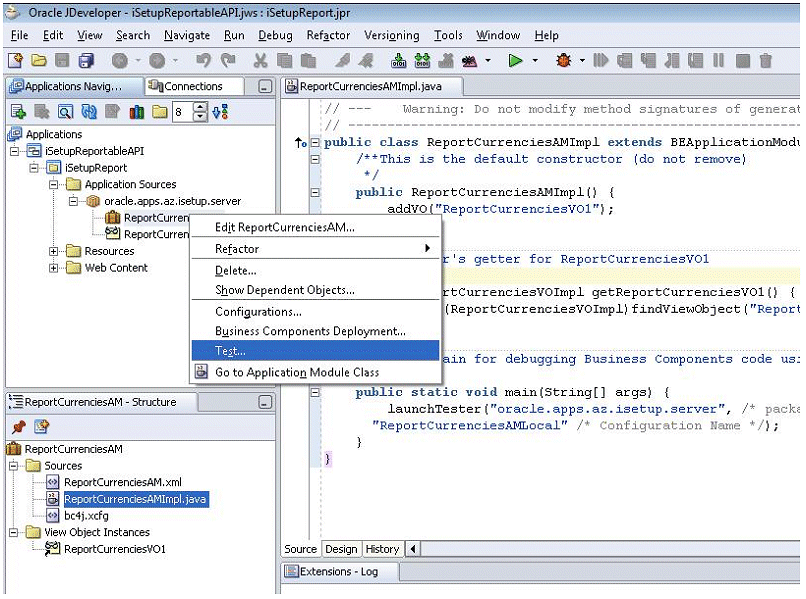
Right-click on ReportCurrenciesAM application module and select Test.
-
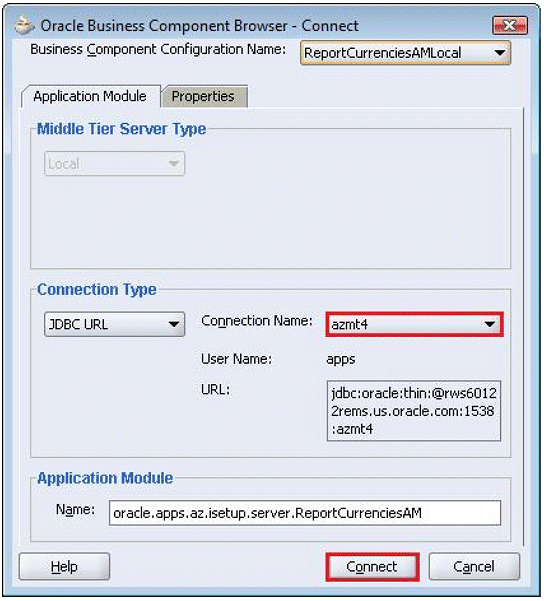
The Oracle Business Component Browser opens. Select Connection Name to the instance on to which you need to test and click on Connect.
-
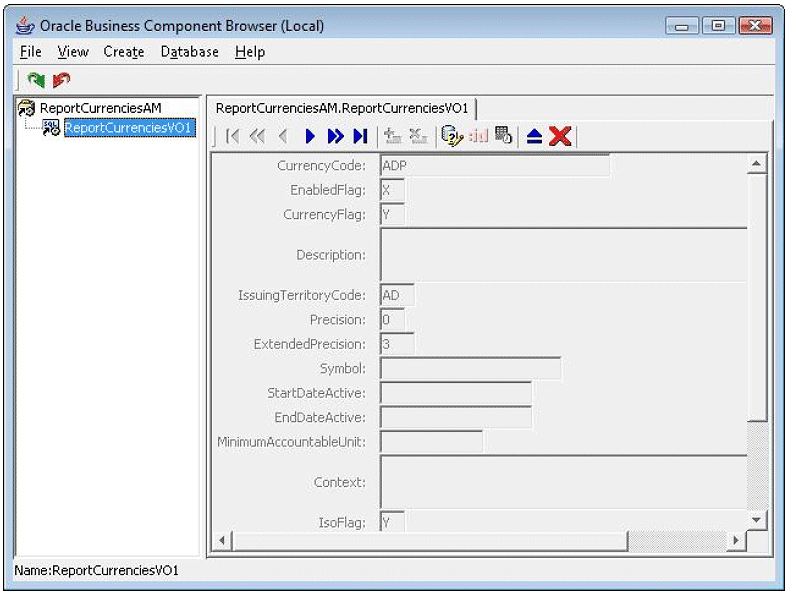
A Java frame window ‘Oracle Business Component Browser’ opens up. Click on the View Object you need to test. In this example, we added ReportCurrenciesVO1 to the application module, so we would click on ReportCurrenciesVO1. All the records that need to be fetched with the SQL query will be returned.
-
Click on File > Exit to close the Testing mode.
To Test and Deploy Interface in an Oracle E-Business Suite Instance
-
Navigate to the JDeveloper folder where your code resides. By default when you create workspace and project, this folder is usually created here:
<JDeveloper12.0.6>\jdevbin\jdev\myclasses
Copy the Application Module and View Object related files to the JAVA_TOP of the instance. During copy don’t disturb the directory structure. Here you need to copy the folder
<JDeveloper12.0.6>\jdevbin\jdev\myclasses\oracle\apps\az\isetup\server
to
<$JAVA_TOP>\oracle\apps\az\isetup\server
-
For testing purposes, execute the following query against the instance database.
Note: This query is purely for testing purpose only. After testing and if your API is working as expected, remove the below inserted record from the database and register the API as described in the section Registering the iSetup Framework (BC4J) API.
Insert Record Query INSERT INTO az_apis ( API_NAME, APPLICATION_SHORT_NAME, SEQ , DISPLAY_NAME, DESCRIPTION, COMMIT_IF_WARNING, TYPE_CODE, METHOD_NAME, PATH, CREATED_BY, CREATION_DATE, LAST_UPDATED_BY, LAST_UPDATE_DATE, LAST_UPDATE_LOGIN, API_CODE, SEQ_NUM, API_DESC, COMMIT_IF_WARNING_FLAG, API_TYPE, REPORT_LAYOUT, FILTERING_PARAMETERS, DATA_SOURCE_NAME, UPDATABLE_FLAG, CHANGE_UPDATABLE_FLAG, ALLOW_SET_TARGETVAL_FLAG, ALLOW_FILTER_FLAG, API_STANDALONE_FLAG, ACTIVE, DISABLE_REPORT_FLAG ) VALUES ( NULL , 'AZ' , NULL , :1, NULL , NULL , NULL , 'importFromXML', :2, 1, to_timestamp('03-JAN-07','DD-MON-RR HH.MI.SSXFF AM'), 1, to_timestamp('21-MAR-07','DD-MON-RR HH.MI.SSXFF AM'), 0, :3, NULL, NULL, 'N', 'BC4J', 'MULTIPLE', NULL, NULL, NULL, NULL, NULL, 'Y', 'Y', 'Y', NULL ); Where :1 => DISPLAY_NAME => Any user friendly name to identify the API. In this case, please substitute Report Currencies for DISPLAY_NAME :2 => PATH => Java path to refer AM. In this case, substitute oracle.apps.az.isetup.server.ReportCurrenciesAM for PATH. :3 => API_CODE => A unique identifier to register the API. Naming convention is prefix with Application Short Name + “_” + API Name without any spaces. In this case, substitute AZ_Currencies for API_CODE. Delete Record Query DELETE FROM az_apis WHERE api_standalone_flag = 'Y' AND api_code= 'AZ_Currencies'; -
Reports can be generated as described in the Oracle iSetup User's Guide. You will need to create a Custom Selection Set by selecting the data object created above. In our example, the navigation path is Report Currencies > Create Extract > Create Report. The detailed process can be found in the Oracle iSetup User's Guide.
-
Once you are done with testing the interface, you can deploy it on to any Oracle E-Business Suite instance. Follow the steps described in the section Registering the iSetup Framework (BC4J) API to register the iSetup reportable API to the iSetup Interface Repository.