Demand Signal Repository
This chapter covers the following topics:
- Demand Signal Repository Implementation
- Setting Up Oracle Warehouse Builder (OWB)
- Setting Up Oracle Business Intelligence Enterprise Edition
- Setting Up Web Services
- Setting Up Demand Signal Repository - Demantra Integration
- Setting Up Demand Signal Repository - Retail Merchandising System (RMS) Integration
- Oracle Value Chain Planning - Oracle Transportation Management (OTM) Integration
Demand Signal Repository Implementation
Please follow the procedures in this section to implement Oracle Demand Signal Repository (DSR).
Prerequisites
Verify the following prerequisites:
-
Oracle Database 11gR2 must be installed.
-
Oracle Warehouse Builder (OWB) 11gR2 must be installed. Please refer to Oracle Data Warehouse Builder installation documents.
-
Oracle Warehouse Builder Patch 9403153 must be applied. Please refer to the instructions in the patch readme for application instructions.
-
Perform fresh Install (skip this step if completed already). Install and set up 11gR2 Client and 11gR2 repository. Detailed instructions are listed in the Oracle Warehouse Builder Installation and Administration Guide here: http://download.oracle.com/docs/cd/E11882_01/owb.112/e17130/toc.htm
-
Upgrade from previous OWB versions (skip this step if completed already). For users upgrading from 10.2.0., 10.2.0.2, 10.2.0.3 or 10.2.0.4 to 11gR2 client, the following document lists the steps required for the upgrade to 11gR2: http://download.oracle.com/docs/cd/E11882_01/owb.112/e17130/migrate.htm#CHDFEBII
-
-
Oracle Business Intelligence Enterprise Edition 10.1.3.4 must be installed. Please refer to Oracle Business Intelligence Enterprise Edition installation documents.
-
If you are planning to use Demand Signal Repository and Retail Merchandising System (RMS) integration you must install Oracle Data Integrator version 10.1.3.5, Retail Merchandising System (RMS) version 10.0 or higher and JRE version should be 6.0 or higher.
Known Issues
Oracle Warehouse Builder (OWB) code generation bug #9543458 and #9544083 #9580806 in certain circumstances might result in incorrect map code generation. This would in certain cases also result in DSR providing incomplete error message in error tables about records being processed. Please refer Oracle Warehouse Builder (OWB) bug #9543458, bug #9544083 and bug #9580806 and related bugs for more details and solution.
Setting Up Oracle Warehouse Builder (OWB)
Perform the procedures below to setting up Oracle Warehouse Builder for your Demand Signal Repository implementation.
Setting Up the Demand Signal Repository Project
Perform the procedure below to set up the Demand Signal Repository project.
-
Identify the target schema. The readme lists steps for deployment in the "APPS" schema, which is recommended. Additional setup not detailed in this document is required if schema other than "APPS" is used.
-
Create a user for the repository. The steps for creating the user can be found here: http://download.oracle.com/docs/cd/E14072_01/owb.112/e10579/setup_windows.htm#insertedID3
-
Identify the workflow schema for process flows. Schema and location name are assumed to be to be "APPS" and "DSR_OWF_LOCATION" respectively for reference in the following sections of this document. Oracle Applications provides embedded Oracle Workflow in "APPS" schema. Please refer to Oracle Warehouse Builder Installation and Administration Guide installation instructions and other details if you need to perform standalone Oracle Workflow installation. http://download.oracle.com/docs/cd/E14072_01/owb.112/e10579/toc.htm
-
Register the target schema 'APPS' and workflow schema 'APPS' as control center users. Please refer to the following document for more details on registering the users as control center users. http://download.oracle.com/docs/cd/E14072_01/owb.112/e10579/control_ctr_mgmt.htm#CHDHFAGC
-
All the Oracle Warehouse Builder project files are available in the following directory:
$DDR_TOP/patch/115/owb/US
-
Import all MDL files. To preserve dependencies, import in the following order:
-
Import ddrrcomn.mdl and ddrbcomn.mdl files.
-
Import all other mdl files except ddrrefpf.mdl.
-
Import ddrrefpf.mdl file.
-
Import Options - Using the Design Center
-
Place the MDL files in a directory with appropriate read and write permissions.
-
From the File menu option, select Import > Warehouse Builder Metadata option from the menu. The Import Metadata dialog box appears.
-
Browse the MDL file to be imported and select a file based on the sequence given above.
-
Choose Import all objects from file under object selection.
-
Select the Update Meta data (replace existing objects and create new metadata) option under Import option.
-
Select Match By Name under Match By option.
-
Click Import.
-
Monitor the process and click on import summary to check for any errors.
Import Options - Using OMBPlus Utility with the OMBIMPORT Command
-
Refer to the link below for a detailed explanation of the OMBIMPORT usage.
http://download.oracle.com/docs/cd/E11882_01/owb.112/e10584/toc.htm
Sample format of Import command:
OMB+> OMBIMPORT MDL_FILE '<mdl name and path> ' USE UPDATE_MODE MATCH_BY NAMES OUTPUT LOG TO 'log name and path'
It is recommended that the customer maintain an import script that can be run from the OMBPlus console. This will reduce the effort and time to import the MDL files and also take care of all the dependencies automatically.
-
Identify the target schema and login credentials, host, port and sid. Assumed to be "APPS" schema in the following sections in this document.
-
Identify the workflow schema and login credentials, host, port and sid. Assumed to be "APPS" schema in the following sections in this document.
-
Create target location.
The name of the location is assumed to be <DSR_APPS_LOCATION> for reference in the following section of the document. Refer to the following document for more details on creating locations: http://download.oracle.com/docs/cd/E11882_01/owb.112/e10935/toc.htm
-
Create workflow location.
The name of the location is assumed to be <DSR_OWF_LOCATION> for reference in the following section of the document. Refer to the following document for more details on creating locations: http://download.oracle.com/docs/cd/E11882_01/owb.112/e10935/toc.htm
Setting Up Project Module Location
-
In the Project Explorer window, expand project DEMAND_SIGNAL_REPOSITORY.
-
Locate and expand the module Databases and Oracle.
-
Double-click on the DEMAND_SIGNAL_REPOSITORY_ETL module.
-
Select the Metadata Location tab.
-
Choose the Location as <DSR_APPS_LOCATION>.
-
Select Data Location and select the <DSR_APPS_LOCATION> from the Available Locations list.
-
Click OK. Ignore any warnings for the configuration if displayed.
-
Right-click on the DEMAND_SIGNAL_REPOSITORY_ETL module and select Configure from the menu.
-
In the details dialog, select the Location and Streams Administrator Location as <DSR_APPS_LOCATION>. Click OK.
Setting Up the Process Flow Module Location
-
In the Project Explorer window, expand project DEMAND_SIGNAL_REPOSITORY.
-
Locate and expand the Process Flows module.
-
Expand Process Flow Modules and double-click on the DSR_OTHER_PROCESS_FLOWS module.
-
Select Data Locations tab and select "DSR_OWF_LOCATION" or equivalent workflow location from the Available Locations list.
-
Click OK and ignore any warnings for the configuration if thrown.
-
Right-click the DSR_OTHER_PROCESS_FLOWS module and select Configure from the menu.
-
In the details dialog, select the "Evaluation Location" as "Use default location" and "Location" as <DSR_OWF_LOCATION>. Click OK.
-
Follow steps 1 to 7 listed above for other process flow modules. Set up "DSR_DEMANTRA_INTEGRATION" process flow only if you are planning to deploy and implement integration with Demantra.
-
Create a New FILE location:
-
In Oracle Warehouse Builder design center, go to "Connection Explorer," right-click on the Files node and select New.
-
Provide the location, a name, and point it to the directory location for TDLINX csv file.
-
-
Set up external file:
-
In Oracle Warehouse Builder design center, expand the File node in Project Explorer.
-
Right-click the module under the File node, and select Open Editor.
-
Metadata Location tab: Select the location, the FILE location set earlier in step 1 above.
-
Data Location tab: Select the FILE location set earlier.
-
Right-click and select Configure. Select the FILE location set earlier.
-
Open DDR_TDLINX_STR_DATA node under External Files and set the Default Physical File Name to the name of the tdlinx data file.
-
-
Set up external table:
-
In Oracle Warehouse Builder design center in "Project Explorer," right-click on the "External Table" and select Open Editor.
-
Locations tab: Select file location set above in step 1.
-
Right-click and select Configure.
-
Select the locations for: Bad file, Discard file and Log file.
-
-
Identify the control center users' login credentials.
-
Identify the control center schema, host, port, sid information.
-
Identify the locations to be registered as source and targets depending on the repository configuration.
-
Set up Control Center.
-
In the Connection Explorer window, expand Control Centers.
-
Right-click and select New from the menu.
-
Provide a name to the control center <DSR_CONTROL_CENTER>.
-
Click Test Connection to see if the set up is correct and click OK.
-
Double-click on the control center created above and select the Data Locations tab.
-
Select required locations from the Available Locations list. Usually source, target and workflow and files locations are selected here.
-
-
Configure the Project.
-
In the Project Explorer window, expand project DEMAND_SIGNAL_REPOSITORY.
-
Locate and expand the Configurations module.
-
Right-click on the configurations and select New from the menu.
-
Specify a name for the configuration, and select the Set and save as my Active Configuration for this Project check box. Click Next.
-
Select the control center from the list and click Next.
-
Review the details and click Finish.
-
Deployment
Perform the following during the deployment process:
-
Before deploying DDR_B_SL_RTN_ITEM_IS_MAP - right click on the map name in the navigator and select configure and in the properties panel under "Code Generation Options" change "ANSI SQL Syntax" to false.
-
All the mappings and processes flows provided should be deployed, except for the mapping provided for Demantra integration "DDR_DMNT_INTG_MAP". The Demantra mapping are only required if you intend to integrate Demand Signal Repository with Demantra. This mapping is used to import store data from syndicated store reference data source.
-
Deployment can be performed at the individual object level or in bulk. The deployment can be performed from the design editor or the control center. Please refer to the Oracle Warehouse Builder User Guide for more details.
-
If you plan to import store data from syndicated store reference data source deploy the External Table first and then proceed to deploying the other maps and process flows.
Setting Up Oracle Business Intelligence Enterprise Edition
Install Oracle Business Suite Intelligence Enterprise Edition (OBIEE) 10.1.3.4.
Refer to the Oracle Business Suite Intelligence Enterprise Edition 10.1.3.4 documentation for details.
Setting Up the Oracle Business Intelligence Enterprise Edition Infrastructure
Files ddrpd.zip and ddrwebcat.zip contain the following files for use with the Oracle Business Intelligence Suite Enterprise Edition 10.1.3.4:
-
DSR_Reports.rpd - This is the Oracle Demand Signal Repository product repository file; contained in ddrrpd.zip
-
DSR_Reports - This directory is the Oracle Demand Signal Repository product Web catalog; contained in ddrwebcat.zip
Copy these ZIP files (ddrrpd.zip, ddrwebcat.zip) from obiee ($DDR_TOP/patch/115/obiee) directory.
Unzip ddrrpd.zip to get DSR_Reports.rpd.
Copy the DSR_Reports.rpd file to repository subdirectory of the Oracle Business Intelligence Enterprise Edition server.
-
On a Windows system, the Oracle Business Intelligence Enterprise Edition server is usually installed in the "OracleBI" directory. You can copy the appropriate the file using Windows Explorer, or execute a command from a command prompt as shown in the following example:
copy DSR_Reports.rpd ORACLE_HOME\server\repository
-
On UNIX or Linux-based systems, you can copy the appropriate directory by executing a command similar to the one shown in the following example:
cp DSR_Reports.rpd ORACLE_HOME/server/repository
Enable the use of "Oracle Demand Signal Repository" repository file:
-
Update the NQSConfig.INI file of the Oracle Business Intelligence Enterprise Edition Infrastructure by replacing the line that starts with the word "Star = " with "Star =DSR_Reports.rpd, DEFAULT;".
-
Refer to "Updating Oracle BI Server Configuration Settings" in the Oracle Business Intelligence Infrastructure Installation and Configuration Guide for more details.
-
Set up database connection details.
-
Open DSR_Reports.rpd in Oracle Business Administration Tool using Administrator/Administrator as username/password.
-
In the physical layer, change the username/password for the database connection in DDR connection Pool.
-
Add entry for the database in the correct TNSNAMES.ora file.
-
Setting Up the Oracle Business Intelligence Enterprise Edition Presentation Services
Perform the following to set up the Oracle Business Intelligence Enterprise Edition Presentation Services.
-
Unzip ddrwebcat.zip to get DSR_Reports Web catalog.
-
Copy the catalog directory into the Oracle Business Intelligence Enterprise Edition Presentation server.
-
On a Windows system, the Oracle Business Intelligence Enterprise Edition presentation server is usually installed in the "OracleBIData" directory. You can copy the appropriate the file using Windows Explorer, or execute a command from a command prompt as shown in the following example:
xcopy /E /I DSR_Reports ORACLE_HOME\web\catalog
Note: On Windows 2003, this command copies over the folder contents to the location from where the command was executed. Please use Windows Explorer for copying over this folder to the required location.
-
On UNIX or Linux-based systems, you can copy the appropriate directory by executing a command similar to the one shown in the following example
cp -rf DSR_Reports ORACLE_HOME/web/catalog
-
Setting Up Oracle Business Intelligence Enterprise Translation
Perform this setup only if you are planning to use translated OBIEE UI. This process uses the "transx" utility that is part of the Oracle DB install.
-
Configure Transx using the instructions provided at the link below:
http://www.oracle.com/technology/tech/xml/xdk/doc/production10g/doc/java/Getting_Started_Java.html
Note: The above instructions are valid if you have Oracle 10g database installation.
The instructions are specifically for Windows-based standalone setup.
The directory paths will change based on the install directory used. Please use the sample setup below as guideline.
-
In Window Environment, right-click My Computer icon and select Properties.
-
Select the Advanced tab in System Properties.
-
Click Environment Variables and setup CLASSPATH, CLASSPATHJ, JAVA_HOME, XDX_HOME variables.
Sample Variables Setup for Database 10g
%CLASSPATH==>.;%CLASSPATHJ%;C:\Apps\db\oracle102\LIB\xmlparserv2.jar;C:\Apps\db\oracle102\LIB\xschema.jar;C:\Apps\db\oracle102\LIB\xsu12.jar;C:\Apps\db\oracle102\LIB\oraclexsql.jar;C:\Apps\db\oracle102\LIB\classgen.jar;C:\Apps\db\oracle102\LIB\transx.zip;C:\Apps\db\oracle102\jdbc\lib\classes12dms.jar;C:\Apps\db\oracle102\jdbc\lib\ojdbc14.jar;C:\Apps\db\oracle102\LIB\servlet.jar;C:\Apps\db\oracle102\RDBMS\jlib\xdb.jar

%CLASSPATHJ ==> C:\Apps\db\oracle102\jdbc\lib\classes12.zip;C:\Apps\db\oracle102\jdbc\lib\nls_charset12.jar

%JAVA_HOME ==> D:\jdk1.5.0_09

%ORACLE_HOME ==> C:\Apps\db\oracle102
Sample Variables Setup for Database 11g
JDBCVER==>6

JDKVER==>1.6.0_11

CLASSPATH==>.;%CLASSPATHJ%;%ORACLE_HOME%\LIB\xmlparserv2.jar;%ORACLE_HOME%\LIB\xschema.jar;%ORACLE_HOME%\LIB\xsu12.jar;%ORACLE_HOME%\LIB\oraclexsql.jar;%ORACLE_HOME%\LIB\classgen.jar;%ORACLE_HOME%\LIB\transx.zip;%ORACLE_HOME%\LIB\xmlcomp.jar;%ORACLE_HOME%\LIB\xmlcomp2.jar;%ORACLE_HOME%\LIB\xmlmesg.jar

CLASSPATHJ==>%ORACLE_HOME%\jdbc\lib\ojdbc%JDBCVER%.jar;%ORACLE_HOME%\jlib\orai18n.jar;%ORACLE_HOME%\RDBMS\jlib\xdb.jar;%ORACLE_HOME%\LIB\jde-rt.zip;%ORACLE_HOME%\RDBMS\jlib\xdb.jar;%ORACLE_HOME%\oui\jlib\classes12.jar;%ORACLE_HOME%\jdbc\lib\classes12.zip

JAVA_HOME==>C:\Oracle\Middleware\jdk160_11

ORACLE_HOME==>C:\app\MP17603\product\11.1.0\db_1

PATH==>%JAVA_HOME%\bin;%ORACLE_HOME%\bin;%PATH%
-
-
The OBIEE translated files are shipped under <$DDR_TOP>/patch/115/obiee directory and are named as ddr_obiee_<language id>.zip (for example, ddr_obiee_fr.zip).
-
Unzip the language zip file to be used to a local drive (for example, c:\ drive). The DLF files will be extracted into the C:\ddr\OracleBI\Repository directory.
-
Import the files into the DB by executing the following transx command:
transx "hostname:port:sid" username password filename
For example, to load the Spanish translation version you might use the following:
c:\transx rws60147rems:1524:mz1dv220 apps apps ddr_es.dlf
-
Verify the seeding data gets uploaded correctly in DDR_TRANSLATED_MESSAGE by the following query:
SELECT Count(*)
FROM DDR_TRANSLATED_MESSAGE
GROUP BY lang_id='<language id>'
-
Copy the files sopcaptions.xml, scacaptions.xml and scrmcaptions.xml if available from
ddr\OracleBIData\l_<language id>
into
<..>\OracleBIData\web\res\l_<language id>\Captions
If the directory l_<language id>is not there, then perform:
create subdirectory l_<language id>>\Captions
under OracleBIData\web directory.
-
Restart the BI servers to verify the translation.
-
To use the translated UI, select an appropriate language and then enter user id/password when you log in to Presentation Service.
Setting Up the Exception Management Dashboard Feature
Perform the set up described in this section only if you plan to use the exception management dashboard feature.
-
Copy <product_top>/patch/115/obiee/java/DDRExceptionHandler.jar file to $HOME/OracleBI/web/javahost/lib on the BI server.
This enhancement uses iBots that require OBIEE Scheduler be set up.
For complete set-up instructions please refer to Oracle Business Intelligence Infrastructure Installation and Configuration Guide, Chapter 10, "Configuring Oracle BI Scheduler."
This enhancement uses a custom Java program to write exceptions to the database. This custom Java program requires a 'dbConnection.properties' file for database access information.
-
Create a text file named "dbConnection.properties".
The content of the file should be set-up like example below.
Example File
driver=oracle.jdbc.driver.OracleDriver
connection_url=jdbc:oracle:thin:@servername.oracle.com:1524:mydatabase
user=apps
password=<apps_password>
Note: If you do not want to expose "APPS" schema password in the file, perform the following: Create a database a new database user ddremd and grant execute privilege on ddr_emd_util package in apps schema to this user.
You may use following sample commands to create user and grantprivileges:
create user ddremd identified by ddremd
grant execute on apps.ddr_emd_util to ddremd;
-
Modify the CLASSPATH in the javahost config file, located at $HOME/OracleBI/web/javahost/config/config.xml to make sure $HOME/OracleBI/web/javahost/lib/DDRExceptionHandler.jar file is in the class path.
Sample CLASSPATH configuration:
<Loader>

<Name>Scheduler</Name>

<Class>com.siebel.analytics.scheduler.Javahostrpccalls.SchedulerComponentLoader</Class>

<ConfigNodePath>Scheduler</ConfigNodePath>

<ClassPath>{%javahostdir%}/lib/scheduler/schedulerrpccalls.jar;

{%javahostdir%}/lib; C:/Oracle/OracleBI/oc4j_bi/jdbc/lib/ojdbc14dms.jar;
C:\Oracle\OracleBI\oc4j_bi\lib\dms.jar;

C:/Oracle/OracleBI/web/javahost/lib/DDRExceptionHandler.jar</ClassPath>

</Loader>
Setting Up Web Services
Demand Signal Repository provides a set of Web services that can be optionally deployed. Implementers can use these Web services to automate their processes or perform integration with 3rd party systems.
Prerequisites
SOA Suite 10.1.3.3 must be installed.
Deploying Web Service
-
Log on to Oracle Application Server Control, click the name of the OC4J instance you want to deploy to (example: home).
The Web services delivered in Oracle Demand Signal Repository as part of this Maintenance Pack appear in the table below.
Description Web Service File Deployed Application in Application Server Demand Signal Repository Fact Data Webservice ddrwsfal.ear DDR_WS1.0 -
To deploy the Web service, perform the following:
-
For a given application, if it has been deployed previously, please first undeploy it before deploying it again.
-
Select the Application tab, and then click Deploy button.
-
On "Archive Location", click browse and select the following:
<DDR TOP>/patch/115/ear/ddrwsfal.ear
-
In Step 2, click Next .
-
In Step 3, click Deploy. The Web service is now deployed.
-
Repeat for each of the EAR files.
-
-
Update Connection Pool.
-
For the deployed application, go back to the corresponding Applications screen.
-
Click Administration, and then click JDBC Resources.
-
Click the connection pool named "jdev-connection-pool-CustomerDBConnection".
-
In the URL field, please enter proper host name, port name and database connection information for the EBS database. There may already be an example value entered "ap619sdb.us.oracle.com:20105:MZ121DV1". If present, replace it.
-
Set the Username field to the APPS database username, set the password. Click Apply. If users would like to avoid using clear text passwords, please see password indirection and password obfuscation sections in Oracle Containers for J2EE Security Guide.
-
Click Apply.
-
-
Re-start the SOA Application Server.
Setting Up Demand Signal Repository - Demantra Integration
Customers who want to use Oracle Demantra Release 7.2 with DSR should apply the script msddemcrwf3.sql to create the series, integration profiles, and workflows required for the integration.
The SQL file is not executed during patch application. It must be applied manually.
The SQL file location is as follows:
$MSD_TOP/patch/115/sql/msddemcrwf3.sql
Case 1: DSR (APS) and Demantra on the Same Database Instance
-
Make sure that the profile 'MSD_DEM: Schema' is set to the correct Demantra Schema name.
-
Make sure the Demantra installation is not in use for any activity.
-
Apply the SQL File msddemcrwf3.sql in the APPS schema.
-
Bounce the Demantra Application Web Server.
-
Create a synonym named 'BIIO_DSR_SALES_DATA' in the APPS schema of the instance where DSR is installed.
This synonym should point to the table 'BIIO_DSR_SALES_DATA' in the Demantra Schema. For example, if the Demantra schema name is 'DMTRA_TEMPLATE', then create the synonym by running the following command in the APPS schema:
CREATE OR REPLACE SYNONYM BIIO_DSR_SALES_DATA FOR DMTRA_TEMPLATE.BIIO_DSR_SALES_DATA
Case 2: Demantra on Separate Database Instance
-
Create the package MSD_DEM_DEMANTRA_UTILITIES in the Demantra schema by applying the following files
-
$MSD_TOP/patch/115/sql/msddemdus.pls - Package Specification
-
$MSD_TOP/patch/115/sql/msddemdub.pls - Package Body
-
-
Make sure the Demantra installation is not in use for any activity.
-
Apply the SQL File msddemcrwf3.sql in the Demantra schema.
-
Bounce the Demantra Application Web Server.
-
Create a synonym named 'BIIO_DSR_SALES_DATA' in the APPS schema of the instance where DSR is installed. This synonym should point to the table 'BIIO_DSR_SALES_DATA' in the Demantra Schema.
Setting Up Demand Signal Repository - Retail Merchandising System (RMS) Integration
Please follow instructions in this section only if you are planning to implement Demand Signal Repository integration with Retail Merchandising System (RMS).
Prerequisites
-
Oracle Data Integrator (ODI) 10.1.3.4 must be installed and repositories created. Refer to ODI install documentation for information at the following link:
-
Verify that the java home is in the path variable, this can be set on Linux with "export PATH=$PATH:/dir", or in the environment variables on Windows.
Setting Up Oracle Data Integrator (ODI)
The required Oracle Data Integrator set up files are available through ddrrmsint.zip file. The file is located under odi directory under Demand Signal Repository product directory.
Objects in the ZIP File
Topology Objects
These objects set up the database connections for the integration and must be modified in the ODI topology manager.
-
CONT_RetailtoDSRContext.xml - Creates the context for ODI.
-
CONN_OracleDSRDS.xml - Establishes the physical connection to the DB where the DSR tables are.
-
CONN_RETLDLPRDDS.xml - Establishes the physical connection to the .dtd file for the XML format.
-
LSC_OracleDSR.xml - Establishes the logical connection for the DSR DB which ties the physical connection and the context together.
-
LSC_RETLDLPRD.xml - Establishes the logical connection for the XML file which ties the physical connection and the context together.
Scenario Object
This object is the integration process within ODI.
-
SCEN_LOAD_RETL_ITEMS_TO_DSR_PKG_SCENARIO Version 001.xml - The Process flow for running the integration.
Java Class File
The Java program that converts the pre EDI 852 flat file generated by RMS to XML file format that can be used by ODI.
-
DLPRDFileToXml Converter.class
DTD File
This file defines the XML structure for the Java converter program and ODI.
-
RETLDLPRD.dtd
Configuring the User Parameters in DSR Lookups and Setting Up Integration Directories
Please refer Demand Signal Repository implementation guide for more information on how to set up the system parameters.
The parameters specified below in the LKUP_CD column need to be configured and set up by the user. Sample values appear below.
| Parameter | Parameter Value (Example values listed) | Purpose of the parameter |
|---|---|---|
| RETL_DSR_SRC_DIR | ODI_HOME/retldsr/source | The directory where the RMS EDIDLPRD File should be kept for upload to DSR. |
| RETL_DSR_SRC_FILENAME | EDIDLPRD.pc | The RMS EDIDLPRD File name that needs to be loaded into Oracle DSR. |
| RETL_DSR_SUCCESS_DIR | ODI_HOME/retldsr/sucess | The directory where the RMS EDIDLPRD file should be moved after the successful upload. |
| RETL_DSR_FAILED_DIR | ODI_HOME/retldsr/failed | The directory where the RMS EDIDLPRD File should be moved after the upload fails. |
| RETL_DSR_TO_ADDR | user_name@ integrator.com | The admin email address where the error or success notification should be sent. |
| RETL_DSR_FM_ADDR | retl-dsr@integrator.com | The Integrator admin email from which the error or success notification should be sent. |
| RETL_DSR_MAIL_SERVER | Mail. integrator.com | Mail Server that will send the ODI email notifications. |
| RETL_DSR_CLASS_DIR | ODI_HOME/retldsr/source | The directory where the DLPRDFileToXMLConverter.class file is located. |
Create the directories that were set up in the DDR_R_LKUP_MST table to be the source, success, failure and class directories.
Copying the Class and DTD Files to the Necessary Folders
-
Copy the class file DLPRDFileToXMLConverter.class from the temporary folder/src/class to the directory specified in the RETL_DSR_CLASS_DIR in the DDR_R_LKUP_MST Table.
-
Copy the DTD file RETLDLPRD.dtd from the temporary folder/src/xml to the source directory specified in the RETL_DSR_SRC_DIR in the DDR_R_LKUP_MST Table.
Setting Up the odiparams.bat /.sh File for Importing from Command Line
-
Go to the Oracle ODI Home /bin directory.
-
Open the odiparams.bat (win) or .sh (UNIX) file for editing.
-
Add the repository connection information, which should appear as follows:
set ODI_SECU_DRIVER=oracle.jdbc.driver.OracleDriver
set ODI_SECU_URL=jdbc:oracle:thin:@<host>:<port>:<sid>
set ODI_SECU_USER=user for master repository
set ODI_SECU_ENCODED_PASS= use agent encode utility in bin dir to encode the user password
set ODI_SECU_WORK_REP=repository name
set ODI_USER=SUPERVISOR
set ODI_ENCODED_PASS=LELKIELGLJMDLKMGHEHJDBGBGFDGGHODI
Importing and Configuring the Topology Objects
Importing from Command Line (Preferred)
-
Make sure that the odiparams file is set to the ODI repository.
-
From the command line run the following:
"startcmd.bat OdiImportObject -FILE_NAME= "<Insert the ODI object name and directory path>" -WORK_REP_NAME= ODI_WORKREP_PROJECT -IMPORT_MODE=SYNONYM_INSERT_UPDATE
-
Repeat this process for all 5 topology objects.
-
Verify that all the objects were imported.
-
On the physical architecture tab under Oracle verify that tree structure of "Oracle DSR DS" and under that "Oracle DSR DS.DDR" were imported.
-
On the physical architecture tab under XML verify that tree structure of "RETL DLPRD DS" and under that "RETL DLPRD DS.RETLDLPRD" were imported.
-
On the logical architecture tab under Oracle verify that "Oracle DSR" was imported.
-
On the logical architecture tab under XML verify that "RETL DLPRD" was imported.
-
On the contexts tab verify that "Retail to DSR Context" was imported.
-
Importing from UI
-
From ODI topology manager, select File > Import > Topology.
-
From the import mode drop down, select Synonym Mode INSERT_UPDATE.
-
Select Import From a Folder option.
-
Click the Browse button to the right of the text box and select the temporary folder where retl_dsr_install was unzipped in. Select the folder retl_dsr_install > src > topology and click OK to start the import.
Configuring the Physical Architecture in Topology Manager
-
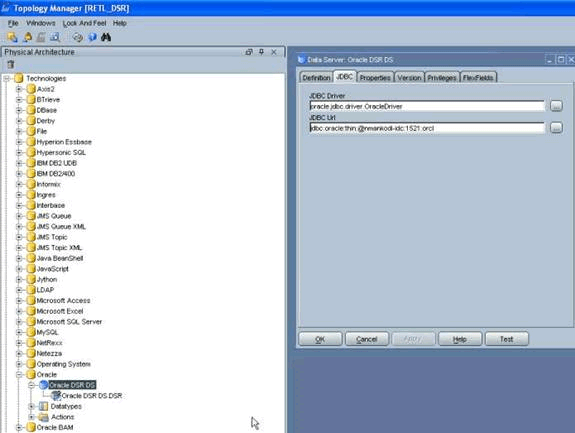
On the physical architecture tab under Oracle on the "Oracle DSR DS" object, change the JDBC URL to point to the DSR database.
jdbc:oracle:thin:@yourserver:port:dbname
-
On the "Oracle DSR DS.DDR", change the username and password for that connection. Click Test and make sure the connection is successful.
-
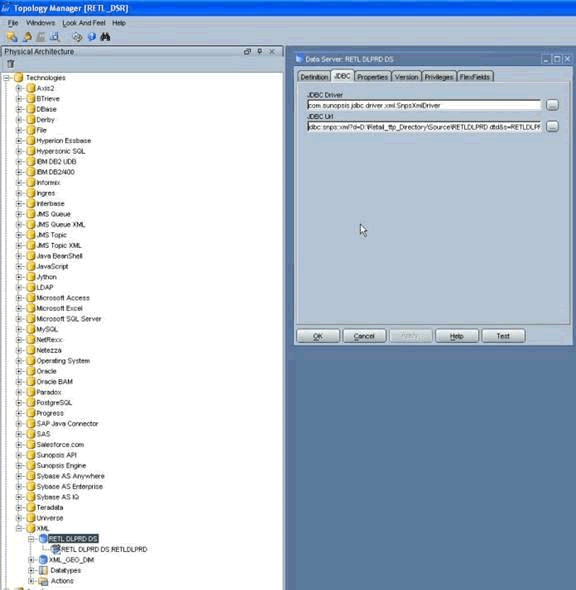
Under XML on the "RETL DLPRD DS", change the JDBC URL to point to the file RETLDLPRD.dtd in the source directory created. Click Test and make sure connection is successful.
jdbc:snps:xml?d=directory_path_to_dtd_file/RETLDLPRD.dtd&s=RETLDLPRD
Configuring the Context and Logical Architecture in Topology Manager
-
On the contexts tab, verify on the schemas tab for the "Retail to DSR Context" .
-
Logical Schema "Oracle DSR" = "Oracle DSR DS.DDR" Physical Schema
-
Logical Schema "RETL DLPRD" = "RETL DLPRD DS.RETLDLPRD" Physical Schema
-
-
On the logical architecture tab under Oracle, verify on the definitions tab for "Oracle DSR" that Context "Retail to DSR Context" = "Oracle DSR DS.DDR" Physical Schema.
-
On the logical architecture tab under XML verify on the definitions tab for "RETL DLPRD" that Context "Retail to DSR Context" ="RETL DLPRD DS.RETLDLPRD" Physical Schema.
Importing the Scenario Object in the Operator
-
Make sure that the odiparams file is set to the repository.
-
From the command line run the following:
startcmd.bat OdiImportObject -FILE_NAME=

 ".\src\topology\CONT_RetailtoDSRContext.xml" -WORK_REP_NAME=

 ODI_WORKREP_PROJECT -IMPORT_MODE=SYNONYM_INSERT_UPDATE
Importing from UI
-
From ODI Operator, select the Scenario tab and then File > Import > Import Scenario.
-
From the import mode drop down list, select Synonym Mode INSERT_UPDATE.
-
Click the Browse button to the right of the text box, and select the folder where retl_dsr_install was unzipped in. Select the folder retl_dsr_install > src > scenario.
-
Select the LOAD_RETL_ITEMS_TO_DSR_PKG object and click OK to start the import.
-
Verify that the object gets imported.
Executing the Scenario
-
When the EDI file is received, move it to the source directory that is set up in the variable RETL_DSR_SRC_DIR in the DDR_R_LKUP_MST table.
-
Right-click the LOAD_RETL_ITEMS_TO_DSR_PKG object from the ODI Operator on the Scenario tab, and select Execute.
-
On the variables to be used window, enter the RTL_ORG_CD. This is the code that represents the retailer in DSR.
-
Tab out of the RTL_ORG_CD field, and click OK.
-
Select the Sessions List tab to check the status of the execution.
Oracle Value Chain Planning - Oracle Transportation Management (OTM) Integration
Setting Up Oracle Transportation Management (OTM) v60 to integrate with EBS 12.1.3
All customers using OTM version 6 in order to integrate with EBS 12.1.3 need to do the following on the OTM side:
-
The following steps need to be performed once on the OTM instance to have the XSL file available for use:
Get a copy of the "GLogXML v60 to v55 DateTime.xsl" and "GLogXML v60 to v55.xsl" files, the files are shipped with OTM in the {otm_install}/utils/integration/transform directory
Place the xsl files on the OTM server. There are two options:
-
Manually copy the files to the xsl file location {otm_install}/glog/integration/client/xsl .Note that the actual location is indicated by the following OTM property : glog.integration.stylesheetRoot
-
Upload the XSL files in the Integration Manager
-
In OTM login as DBA.ADMIN (you can only upload the xsl files as DBA.ADMIN)
-
Go to Business Process Automation > Integration >Integration Manager > Upload an XML/CSV Transmission
-
Upload each of the XSL files
-
-
-
The following steps need to be performed for the External Systems configured to send to the BPEL flow:
-
In OTM log in to the domain.
-
Go to the External System you are using to send to BPEL, menu: Business Process Automation > Communication Management > External Systems.
-
In the External System Manager, in the External System Translations section, enter the following:
-
Sequence Number:1 (increase for each entry)
-
Stylesheet Name : GLogXML v60 to v55 DateTime.xsl
-
XML Element ID: chose the outbound interface or select "*" for all interfaces.
-
Leave the other fields in the grid empty and click Save to save the translation entry.
-
Click Finished at the top of the page to save the External System.
-
-