Configuring Security During Installation
Setting Component Security
The following section explains how to create and modify components. Since this process determines what is available to a user, it is an important way for controlling access to series, and levels, engine profiles, and other data.
Creating or Modifying a Component
To create or modify a component
-
Click Components > Create/Open Component. Or click the Create/Open Component button.
Note: This option may not be available, depending on the user name with which you logged onto Business Modeler.
The Create/Open Component dialog box appears.
-
Now do one of the following:
-
To create a new component, click the New Component button and then click OK. Or double-click the New Component icon.
Note: This option is available only if you log into Business Modeler as the user with the highest permission.
-
To open an existing component, double-click the icon corresponding to the component. Or click the icon and then click OK.
The Component Configuration Wizard displays its first dialog box.
-
-
Enter or edit general information for the user interface, as follows:
Component Name Unique name for this component. Component Description Description About Window Description Optional description to include in the About page of this component. -
Click Next.
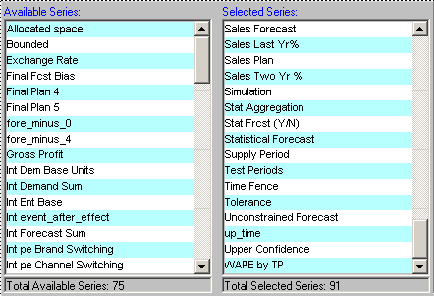
The Business Modeler displays the Available Series and Selected Series lists.
-
Select the series that should be available in the component.
-
Move all series that you want into the Selected Series list, using any of the techniques in “Working with Lists”.
-
Remove any unwanted series from the Selected Series list.
-
When you are done specifying series, click Next.
Note: By default, this configuration affects all users of this component. To hide additional series for a given user, see “Creating or Modifying a User”.
-
-
Click Next.
The Business Modeler displays the Select Component Indicators for Series window. Here you specify which series should have indicators to indicate associated promotions or notes.
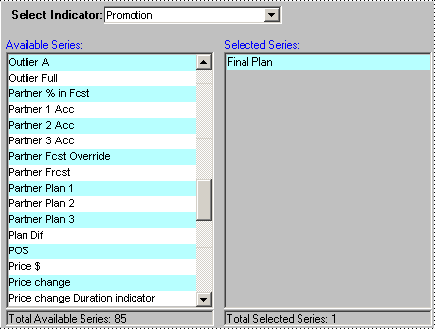
Within a worksheet, a user can attach a promotion (in the case of Promotion Effectiveness) or a note to a given item-location combination, at a given date. If a series has been configured as using an indicator for that particular promotion or note, the series will be displayed with an indicator in all worksheet cells that correspond to that item-location combination and date.
-
You can associate an indicator for any general level at the lowest level (that is, any general level that do not have child levels).
-
The default associations are different for different kinds of series. Sales series have notes indicators by default. Promotion series have both notes and promotion indicators by default.
-
This configuration affects all users of this component. No further fine tuning is possible.
-
-
To associate indicators with different series, do the following for each general level:
-
In Select Indicator, select the general level, either Note or Promotion.
-
Move all series that should use the associated indicator into the Selected Series list, using any of the techniques in “Working with Lists”.
-
Remove any unwanted series from the Selected Series list.
-
-
Click Next.
The system displays all the levels and indicates the current permission settings in this component.
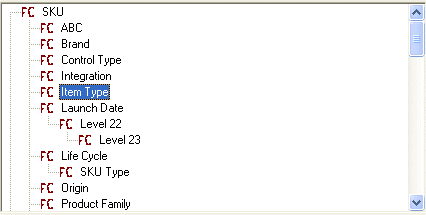
The following icons indicate the permissions:
FC Full control (including permission to delete members) W Read/write access R Read access X No access -
For each level that you want to change, right-click the level and select the appropriate permission:
-
No Access (the user does not have access to this member; this option is equivalent to not including this member in the filter)
-
Read Only (the user can view this member but cannot make any changes)
-
Write (the user can view or edit this member)
-
Full Control (user can view, edit, create, and delete within this member)
-
System Default (use the default permission controlled by the DefaultLevelSecurityAccess parameter.

Note: By default, this configuration affects all users of this component. To fine tune permissions for a given user, see “Creating or Modifying a User”.
-
-
Click Next.
The system displays the Available Units and Selected Units lists.

-
Select the units of measure that should be available in the component.
-
Move all units that you want into the Selected Units list, using any of the techniques in “Working with Lists”.
-
Remove any unwanted units from the Selected Units list.
Note: This configuration affects all users of this component. No further fine tuning is possible.
-
-
Click Next.
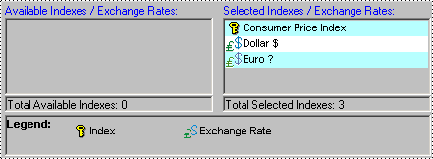
-
Select the indexes and exchange rates that should be available in the component.
-
Move all indexes and exchange rates that you want into the Selected Indexes and Exchange Rates list, using any of the techniques in “Working with Lists”.
-
Remove any unwanted indexes and exchange rates from the Selected Indexes and Exchange Rates list.
Note: This configuration affects all users of this component. No further fine tuning is possible.
-
-
Click Next.
The next dialog box allows you to associate public worksheets with levels.
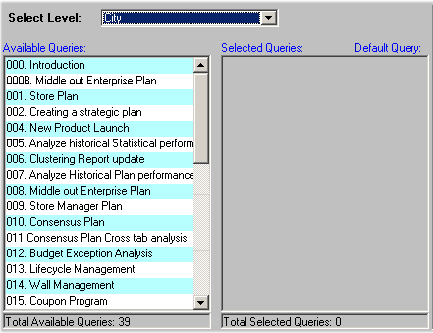
This association is used in two ways:
-
Within the Members Browser, a user can use the right-click menu to open any of these associated worksheets directly from a member of the level (via the Open With menu option). In this case, Demantra opens the associated worksheet. The worksheet is filtered to show only data relevant to the member.
-
A worksheet can include an embedded worksheet that shows details for the member that is currently selected in the worksheet. Specifically, within the worksheet designer, users can add a subtab to a worksheet. The subtab consists of any of the worksheets that are associated with a level included in the main worksheet. The embedded worksheet is filtered to show only data relevant to the member.
Note: This configuration affects all users of this component. No further fine tuning is possible.
-
-
At this point, do one of the following:
-
To continue without associating any worksheets and levels, click Next.
-
To associate a worksheet with a level, do the following:
-
Click the level in the Select Level dropdown menu.
-
Double-click the worksheet in Available Queries list, which moves it to the Selected Queries list.
-
Move other worksheets from the Available Queries list to the Selected Queries list, as needed.
-
Decide which worksheet in the Selected Queries list should be the default worksheet for this level. For that worksheet, click the Default check box. When the user right-clicks and selects Open, this is the worksheet that will be used.
-
When you are done on this screen, click Next.
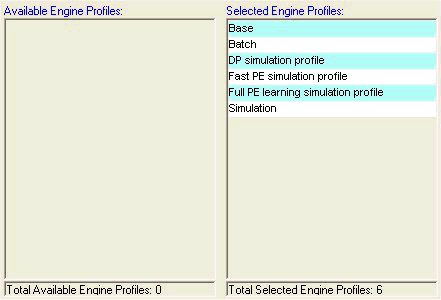
If you are using the PE Analytical Engine, the system displays engine profiles that could potentially be used within this component. The Business Modeler displays the Available Engine Profiles and Selected Engine Profiles lists.
-
-
-
Select the engine profiles that should be available in the component. Profiles can be used only with the Promotion Effectiveness engine.
-
Move all profiles that you want into the Selected Engine Profiles list, using any of the techniques in “Working with Lists”.
-
Remove any unwanted profiles from the Selected Engine Profiles list.
-
When you are done specifying profiles, click Next.
Note: This configuration affects all users of this component. No further fine tuning is possible.
In the next step, you specify the user name and password of the user who owns the component. This user will be able to log into the Business Modeler and create additional users for this component.

-
-
-
To specify the owner of the component:
-
In the User Name box, type the user name.
-
In the User Password box, type the user password.
-
-
To exit and save the configuration, click OK.
-
Modify the newly created user so that it has access to the appropriate Demantra modules. To do so, use the Security menu; see “Creating or Modifying a User”.
Deleting a Component
-
Click Components > Create/Open Component. Or click the Create/Open Component button.
Note: This option may not be available, depending on the user name with which you logged onto Business Modeler.
The Create/Open Component dialog box appears.
-
Click the icon corresponding to the component.
-
Click Delete.
-
Click Yes to confirm the deletion.
Configuring the Security Provider
Integration with JAAS
OracleAS Web Services provides an implementation of Java Authentication and Authorization Service (JAAS) for J2EE applications that is fully integrated with J2EE declarative security. This allows Demantra to take advantage of the JAAS constructs such as principal-based security and pluggable login modules. OracleAS Web Services Security provides out-of-the-box JASS authentication login modules that allow J2EE applications running on OracleAS Web Services to leverage the central security services of Oracle Identity Management.
The JAAS Provider ensures secure access to and execution of Java applications, and integration of Java-based applications with Oracle Application Server Single Sign-On.
Demantra has implemented a custom login module that is deployed in the OracleAS.
Configuring the Security Provider of the Application Server
Demantra has implemented a custom login module that is deployed in the OracleAS. The following procedure configures the application server to use this login module:
-
Connect to Oracle Enterprise Manager.
-
Deploy Demantra
-
Define Security Provider as follows:
-
Select – 'Administration' -> 'Security Providers' (by Go to Task) -> 'demantra' application -> edit (demantra) -> 'Change Security Provider'.
-
In the Drop Down of 'Security Provider Type', select 'Custom Security Provider'.
-
In the 'JAAS Login Module Class' field, set 'com.demantra.common.authentication.DemantraLoginModule'.
-
Click OK.
Note: This step can be done only through a deployment of the Demantra application
-
-
Return to the Home Page and select 'Web Service'.
-
If no web services are found, open the link of the WF Web Service: http://(ROOT)/demantra/MSC_WS_DEMANTRA_WORKFLOWSoapHttpPort
-
Then refresh the Enterprise Manager page.
-
Click on the link: MSC_WS_DEMANTRA_WORKFLOWSoapHttpPort.
-
Select 'Administration' -> 'Enable/Disable Features'
-
Move 'Security' to the 'Enabled Features' box and then click OK.
-
Make sure that the 'Security' Feature is marked as Enabled.
-
-
On the same page, select the 'Edit Configuration' icon of the 'Security' Feature, Press the 'Inbound Policies' button, and in the 'Authentication' tab, mark the checkbox 'Use Username/Password Authentication' and select 'Password Type' = 'Plain Text'. Click OK.
-
Test the Workflow Web Service by providing User Name & Password in the WS-Security section.
Details of the Demantra custom login module
Location: package com.demantra.common.authentication;
DemantraLoginModule.java
Methods
-
public void initialize(Subject subject, CallbackHandler callbackHandler, Map sharedState, Map options)
Initialize this LoginModule.
Parameters:
subject the Subject to be authenticated.
callbackHandler a CallbackHandler for communicating with the end
user (prompting for usernames and passwords, for example).
sharedState shared LoginModule state.
options options specified in the login Configuration for this particular LoginModule.
-
public boolean login() throws LoginException
Authenticate the user by prompting for a username and password.
Returns: true if the authentication succeeded, or false if this LoginModule should be ignored. Throws:
FailedLoginException if the authentication fails.
LoginException if this LoginModule is unable to perform the authentication.
-
public boolean commit() throws LoginException
This method is called if the LoginContext's overall authentication succeeded (the relevant REQUIRED, REQUISITE, SUFFICIENT and OPTIONAL LoginModules succeeded).
If this LoginModule's own authentication attempt succeeded (checked by retrieving the private state saved by the login method), then this method associates a Principal with the Subject located in the LoginModule. If this LoginModule's own authentication attempted failed, then this method removes any state that was originally saved.
Returns: true if this LoginModule's own login and commit attempts succeeded, or false otherwise.
Throws: LoginException if the commit fails.
-
public boolean abort() throws LoginException
This method is called if the LoginContext's overall authentication failed. (the relevant REQUIRED, REQUISITE, SUFFICIENT and OPTIONAL LoginModules did not succeed).
If this LoginModule's own authentication attempt succeeded (checked by retrieving the private state saved by the login and commit methods), then this method cleans up any state that was originally saved.
Returns: false if this LoginModule's own login and/or commit attempts failed, and true otherwise.
Throws: LoginException if the abort fails.
-
public boolean logout() throws LoginException
Logout the user.
This method removes the Principal that was added by the commit method.
Returns: true in all cases since this LoginModule should not be ignored.
Throws: LoginException if the logout fails.
Running SYS_GRANTS.SQL Script
You need to run this script manually after installing or upgrading Demantra only if you did not specify a database user with full SYSDBA privileges when running the Installer. In this scenario, the Installer displays a message at the end of the installation/upgrade prompting you to run this script.
SYS_GRANTS.sql performs the following:
-
Adds ‘EXECUTE’ privileges to access DBMS_CRYPTO (UPGRADE_PASSWORDS): Provides the highest level of user password encryption.
-
Adds ‘EXECUTE’ privileges to access DBMS_LOCK: Provides as SLEEP operation for improved concurrency.
-
Adds ‘EXECUTE’ privileges to access V_$PARAMETER so that Oracle Demantra can better adapt to your database’s configuration.
-
(10g only) Adds ‘GRANT’ privileges to access the package UTL_HTTP, which enables Oracle Demantra to send notification messages to the application server and engine.
-
(11g only) Adds an ACL to enable HTTP communications for Oracle Demantra to send notification messages to the application server and engine.
Syntax:
C:\> cd DEMANTRA_INSTALL_DIRECTORY
C:\DEMANTRA_INSTALL_DIRECTORY> sqlplus SYS@SERVER as sysdba@sys_grants.sql DB_USER ACL_for_WebServerURL ACL_for_EngineServerURL
Where:
-
DEMANTRA_INSTALL_DIRECTORY is the location of the unzipped Demantra installation file
-
SYS is the DB user with SYSDBA privileges · SERVER is the DB server TNS name
-
DB_USER is the Demantra database user name (must be entered in upper case)
-
ACL_for_WebServerURL is the full path to the access control list (ACL) for the Web Server URL. If you pass the name ACL_DEFAULT it will use the ACL named /sys/acls/demantra.xml. The ACL will be created if it does not exist.
-
ACL_for_EngineServerURL is the full path to the access control list for the Engine Server URL. If you pass the name ACL_DEFAULT it will use the ACL named /sys/acls/demantra.xml. The ACL will be created if it does not exist.
Configuring Web Applications for SSL and Firewalls
To use SSL security or if users need to work through a firewall, perform the following procedure:
-
When you install Oracle Demantra, be sure to configure all URLs with https instead of http.
-
Switch off the HTTP server on port 80. The procedure to perform this is dependent on the Web server.
-
Configure the Web server for SSL support. You will need to obtain a VeriSign certificate or equivalent certificate authority.
-
Configure the firewalls to allow connections to port 443.
-
Optional: Configure the firewall to disallow all communication to port 80 instead of disabling it on the Web server.
-
If you have a firewall between the Web Platform Server and the database, you will also need to open the port that is defined for the connection between the Application Server and the database. For Oracle, this port is 1521 by default.
-
If you change any of the default port numbers, make sure to also change them in the Oracle Demantra URLs, the Web server, and the firewall. See Other Configuration Files.
-
If you want to enable mutual (client) SSL Authentication, set the client.ssl.authentication parameter in to "1" (true). You define this parameter in Business Modeler > Parameters > System Parameters > Application Server > DP Web. By default, this parameter is false, which means only standard (server) SSL authentication is supported.
After client SSL authentication is enabled, a pop-up dialog box appears prompting you to insert keystore, truststore locations and passwords. Once validated, Demantra will save these parameters in an encrypted file under the user.home/demantra directory for future logins.
Note: Demantra supports both standard and mutual (client) SSL Authentication. If you are using standard authentication with Internet Explorer (IE) 6.x, Demantra users will be prompted to enter valid SSL credentials (e.g., Keystore and Truststore path and password information) only once after logging into Collaborator Workbench. However, in IE 7.x, the Java plugin cannot obtain user credentials from the browser and users will be prompted to enter this information for every applet within the current Demantra page (in Collaborator Workbench, there may be between 2-4 applets).
To avoid this issue, it is recommended that the web server administrator exclude the Demantra .jar files from the Web Server Basic Authentication rules. To do this, add the following filter to the <files> directive in httpd-sll.conf:
<Files ~ “^(\.jar”> </Files>
