Administering Oracle E-Business Suite
This chapter covers the following topics:
- Starting and Stopping Services
- Manual Synchronization of Editions
- Privilege Propagation With Administration Groups
- Instance Administration
Starting and Stopping Services
There are two ways to start and stop the services running on each instance node: by selecting the options in the Administration menu or by using command line verbs.
Using the Administration Menu to Start and Stop Services
You can start and stop the components running on each node using the Administration menu. Select Administration > Start and Stop Services from the instance target menu (labeled "Oracle E-Business Suite"). All application nodes are shown with the targets running in them. You can select individual target or a node (which means you are selecting all targets running on that node) and start or stop it. ICM does not show up under a specific node because we can start and stop it from any node where it is enabled. If the Oracle E-Business Suite instance features Online Patching, only run editions targets are shown.
Jobs are submitted to start and stop services. The details and status of these jobs can be tracked through standard Enterprise Manager Job screens.
Note: For Oracle E-Business Suite Release 12.2, you cannot perform any action if a cutover is detected.
Privileges Need to Start and Stop Services Using the Administration Menu
An administrator must have the EM_ALL_ADMINISTRATOR role to run the jobs to start and stop components. In addition, an administrator must have the "Start and Stop Services" privilege to start and stop services.
For more information on privileges and roles, see: Privileges and Roles for Managing Oracle E-Business Suite.
Credentials Needed to Start and Stop Services Using the Administration Menu
-
The preferred credential must be set for Oracle E-Business Suite node for the credential set OS Credentials.
-
The preferred credential must be set for Oracle E-Business Suite for the credential set AppsDBCredsSet.
For more information on preferred credentials, see: Setting Oracle E-Business Suite Preferred Credentials.
Using Command Line Verbs to Start and Stop Services
Oracle Application Management Pack for Oracle E-Business Suite provides a command-line interface for the batch execution of start/stop multiple Oracle E-Business Suite services. This feature uses Enterprise Manager Command Line Interface (EM CLI). See Enterprise Manager Command Line Interface to understand more about EM CLI.
The EM CLI verbs allow you to start and stop on-premises Oracle E-Business Suite instances. These verbs also generate a health check report which describes the status of certain target types (if certain services are accessible).
The health check is generated before stopping and after starting Oracle E-Business Suite. You can use these reports to validate or check any discrepancies that might occur between the stop and start of Oracle E-Business Suite.
Prerequisites
-
EM CLI must be installed. See "Downloading and Deploying the EM CLI Client for Standard EM CLI" in Oracle Enterprise Manager Command Line Interface.
-
Set up EM CLI. See "Getting Started with EM CLI" in Oracle Enterprise Manager Command Line Interface.
-
Log in to your Oracle Management Server (OMS).
-
Synchronize the EM CLI client with OMS.
-
The following are mandatory credentials that must be set:
-
The preferred credential must be set for Oracle E-Business Suite node for the credential set OS Credentials.
-
The preferred credential must be set for Oracle E-Business Suite for the credential set AppsUserCredsSet.
-
The preferred credential must be set for Host for the credential set Normal Host Credentials (for all application node hosts).
-
Stopping Services on the Oracle E-Business Suite Instance
Use the EM CLI verb stop_ebs to stop services on the Oracle E-Business Suite instance with details of the instance provided as an XML file. Schema requirements and sample XML with comments are found in the appendix XML Schema Using EM CLI.
You can provide the following named credentials in the input XML file:
-
"E-Business Suite Database credentials" type for Oracle E-Business Suite target type set for the APPS schema.
-
"Oracle Weblogic credentials" type for Oracle WebLogic Server target type.
The required APPS schema database credentials and WebLogic Server administration credentials are chosen in the following order:
-
Preferred credentials set for:
-
"AppsDBCredsSet" credential set for Oracle E-Business Suite.
-
"Oracle Weblogic Administration credentials" credential set of Oracle WebLogic Server target type.
-
-
Named credentials provided at the individual Oracle E-Business Suite instance level
-
Global named credentials
Note: You can generate the XML from the schema using any IDE. Choose a depth of 8 or more, if you do so.
Execute the following command to stop services on the Oracle E-Business Suite instance:
./emcli stop_ebs -input_file=stop_file:<fully qualified path of stop_ebs_file.xml> -oms_url=<em url> [-log_file=<fully qualified path of log file>] [-emcli_pwd=<password>]
The log_file parameter is optional. If it is not provided, the system generates its own, and the path is then displayed in the console. The log file contains the debug statements, job IDs of various jobs which are submitted in the process of stopping Oracle E-Business Suite. You may be prompted for the emcli_pwd parameter if it is not passed.
The following is the sequence of actions that occurs while stopping Oracle E-Business Suite:
-
A job is submitted to stop the Oracle E-Business Suite instance.
-
A health check report is generated and the path of the report is displayed in the console.
-
A blackout is performed on the Oracle E-Business Suite instance. This is to avoid receiving alerts that the instance is down.
-
Application node components are stopped.
-
Selection of application nodes
-
Either all or only selected application nodes are stopped, based on the attribute
StartAndStopOnAllNodesvalue of theEBSInstancesList/GlobalSettings/AppsTiertag. -
All application nodes are stopped if this value is
true. -
If this value is
false, only the application nodes mentioned in theEBSInstancesList/EBSInstances/EBSInstance/AppNodes/ContextNametag are stopped. -
Multiple
ContextNametags could be provided to mention multiple application context names. -
For Oracle E-Business Suite Release 12.2, only application nodes of run edition type are stopped.
-
-
Components to be stopped
-
Using the
EBSInstancesList/GlobalSettings/AppsTier/Componenttag, you can specify the component that has to be stopped. To do this, provide one of the following options:-
All
-
ICM
-
APPS_LISTENER
-
HTTP_SERVER
-
OAFM_OC4J
-
OACORE_OC4J
-
FORMS_OC4J
-
ADMIN_SERVER_WEBLOGIC
-
FORMS_WEBLOGIC
-
OACORE_WEBLOGIC
-
FORMS_LISTENER
-
-
-
Selection of database nodes
-
Either all or only selected database nodes are stopped based on the attribute
StartAndStopOnAllNodesvalue of theEBSInstancesList/GlobalSettings/DBTiertag. -
All database nodes are stopped if this value is
true. -
If this value is
false, only the database nodes mentioned in theEBSInstancesList/EBSInstances/EBSInstance/DBNodes/ContextNametag are stopped. -
Multiple
ContextNametags could be provided to mention multiple DB context names.
-
-
Components to be stopped
-
Using the
EBSInstancesList/GlobalSettings/DBTier/Componenttag, you can specify the component that has to be stopped. To do this, provide one of the following options:-
ALL
-
LISTENER
-
DATABASE
-
-
-
-
Database node components are stopped.
-
Either all database nodes or only selected database nodes would be stopped based on the attribute “StartAndStopOnAllNodes” value of EBSInstancesList/GlobalSettings/DBTier tag. All database nodes are stopped if this value is true. If this value is false, only database nodes mentioned in the EBSInstancesList/EBSInstances/EBSInstance/DBNodes/ContextName tag are stopped.
-
Multiple ContextName tags could be provided to mention multiple DB context names.
-
Using the EBSInstancesList/GlobalSettings/DBTier/Component tag, you can specify the component to be stopped. The following is a list of options:
-
ALL
-
LISTENER
-
DATABASE
-
-
You can review the job summary to view the execution report of all Oracle E-Business Suite instances.
Starting Services on the Oracle E-Business Suite Instance
Use the EM CLI verb start_ebs to start services on the Oracle E-Business Suite instance with details of the instance provided as an XML file. Schema requirements and sample XML with comments are found in the appendix XML Schema Using EM CLI.
You can provide the following named credentials in the input XML file:
-
"E-Business Suite Database credentials" type for Oracle E-Business Suite target type set for the APPS schema.
-
"Oracle Weblogic credentials" type for Oracle WebLogic Server target type.
The required APPS schema database credentials and WebLogic Server administration credentials are chosen in the following order of precedence:
-
Preferred credentials set for:
-
"AppsDBCredsSet" credential set for Oracle E-Business Suite
-
"Oracle Weblogic Administration credentials" credential set of Oracle WebLogic Server target type
-
-
Named credentials provided at the individual Oracle E-Business Suite instance level
-
Global named credentials
Note: You can generate the XML from the schema using any IDE. Choose a depth of 8 or more, if you do so.
Execute the following command to stop the Oracle E-Business Suite instance:
./emcli start_ebs -input_file=start_file:<fully qualified path of start_ebs_file.xml> -oms_url=<em url> [-log_file=<fully qualified path of log file>] [-emcli_pwd=<password>]
The log_file parameter is optional. If it is not provided, the system generates its own and the path will be displayed in the console. The log file contains the debug statements, job IDs of various jobs which are submitted in the process of starting Oracle E-Business Suite. You may be prompted for the emcli_pwd parameter if it is not passed.
The following is the sequence of actions that occurs while starting Oracle E-Business Suite.
-
A job is submitted to start the Oracle E-Business Suite instance.
-
The Oracle E-Business Suite database components are started.
-
Selection of application nodes
-
Either all or only selected application nodes are started based on the attribute
StartAndStopOnAllNodesvalue of theEBSInstancesList/GlobalSettings/AppsTiertag. -
All application nodes are started if this value is
true. -
If this value is
false, only those application nodes mentioned in theEBSInstancesList/EBSInstances/EBSInstance/AppNodes/ContextNametag are started. -
Multiple
ContextNametags could be provided to mention multiple application context names. -
For Oracle E-Business Suite Release 12.2, only application nodes of run edition type are started
-
-
Components to be started
-
Using the
EBSInstancesList/GlobalSettings/AppsTier/Componenttag, you can specify the component that has to be started. To do so, provide one of the following options:-
ALL
-
ICM
-
APPS_LISTENER
-
HTTP_SERVER
-
OAFM_OC4J
-
OACORE_OC4J
-
FORMS_OC4J
-
ADMIN_SERVER_WEBLOGIC
-
FORMS_WEBLOGIC
-
OACORE_WEBLOGIC
-
FORMS_LISTENER
-
-
-
Selection of database nodes
-
Either all or only selected database nodes are started based on the attribute
StartAndStopOnAllNodesvalue of theEBSInstancesList/GlobalSettings/DBTiertag. -
All database nodes are started if this value is
true. -
If this value is
false, only database nodes mentioned in theEBSInstancesList/EBSInstances/EBSInstance/DBNodes/ContextNametag are started. -
Multiple
ContextNametags could be provided to mention multiple DB context names.
-
-
Components to be started
-
Using the
EBSInstancesList/GlobalSettings/DBTier/Componenttag, you can specify the component that has to be started. To do so, provide one of the following options:-
ALL
-
LISTENER
-
DATABASE
-
-
-
-
The blackout is removed on the Oracle E-Business Suite instance.
-
The health check report is generated and the path of the report is displayed in on the console.
You can review the job summary to view the execution report of all Oracle E-Business Suite instances.
Health Check Report
As part of the Health Check Report, the following tests are executed on Oracle E-Business Suite. The name of the test and its results are displayed in a table in HTML format.
| Serial No. | Test Name |
|---|---|
| 1 | Verify that maintenance mode is disabled |
| 2 | Verify Service Manager concurrent manager on each node |
| 3 | Verify if AppsLocalLogin.jsp is accessible |
| 4 | Verify database in Archive Mode |
| 5 | Verify Forms server is up and running |
| 6 | Verify OPMN processes are up and running |
| 7 | Verify JTF Login as sysadmin |
| 8 | Verify MWA server |
| 9 | Verify responsibilities assigned to SYSADMIN |
| 10 | Show number of JVMs configured |
| 11 | Verify Workflow Notification Mailer |
| 12 | Compare the Workflow Components status |
| 13 | Compare invalid database objects |
| 14 | Verify duplicate rows in FND_OAM_CONTEXT_FILES |
| 15 | Run "Prints environment variable values" CP |
Manual Synchronization of Editions
When monitoring an Oracle E-Business Suite instance that features Online Patching, the plug-in ensures that only the run edition targets are monitored after a cutover. This is achieved through a corrective actions job which will black out the patch edition targets. The corrective actions are triggered based on the metrics collected about the patching activity. In case if they fail to trigger, the plug-in will end up monitoring the wrong file system. Corrective actions will not be triggered until the next cutover. Therefore, if the user observes that the plug-in is monitoring the wrong file system, with the Operator privilege the user must manually trigger the corrective actions job.
Navigate to Administration > Synchronize Edition Details in the instance target menu.
By synchronizing the edition details, this will ensure that the plug-in monitors the run edition only. This job will exit gracefully if the correct file system is being monitored. The same UI will also show the details of previous submissions for the same purpose.
Privilege Propagation With Administration Groups
An administration group in Enterprise Manager is a special kind of group wherein the target members can be added automatically based on certain target properties of the members. When target properties match with administrative group specifications, then the target is automatically added to that administration group. A privilege defined for an administrative group is also set for all the member targets. A target must have the ability to accept privilege propagation to be part of administration group, otherwise the privileges cannot be set for the members of that target. All Oracle E-Business Suite targets can be part of administration groups and allow privilege propagation.
For more information on administration groups in Enterprise Manager, see the Oracle Enterprise Manager Cloud Control Administrator's Guide.
Important: To use this functionality, an administrator must have both Full Any Target and Create Privilege Propagating Group target privileges to be able to create an Administration Group.
How to Create an Administration Group in Enterprise Manager
-
From the Enterprise Manager console, click the Targets drop-down menu > Groups.
-
On this screen, click on the Create drop-down.
-
Select Administration Group from the list.
-
Define the Administration Group's target properties. Choose one or more target properties by clicking on Add in Hierarchy Levels table.
-
Specify the target property value(s) by adding in the Hierarchy Nodes table.
-
Click Create to save your work and create the group.
How to Add Targets as Members of an Administration Group
Once an administration group is created, members can be added by specifying member properties as that are of the group. For an Oracle E-Business Suite instance, the following steps are used to set the target properties.
-
Navigate to Targets > Oracle E-Business Suite from the Oracle Enterprise Manager console.
-
Select an instance by clicking on it.
-
From the Oracle E-Business Suite instance target menu, select Target Setup > Properties.
-
Set the target property value to one of the values specified in the Administration Group page by clicking on the Edit button.
-
To save, click OK.
-
To view the Administration group members, go back to Targets and then Groups.
You can now see the Oracle E-Business Suite instance and members added to the administration group created earlier and also in the corresponding subgroup based on the value of target property chosen.
Example
For example, you can create an administration group with two subgroups corresponding to Production and Development lifecycle statuses.
Set the Lifecycle Status of an Oracle E-Business Suite instance by selecting Production in the drop-down listing.
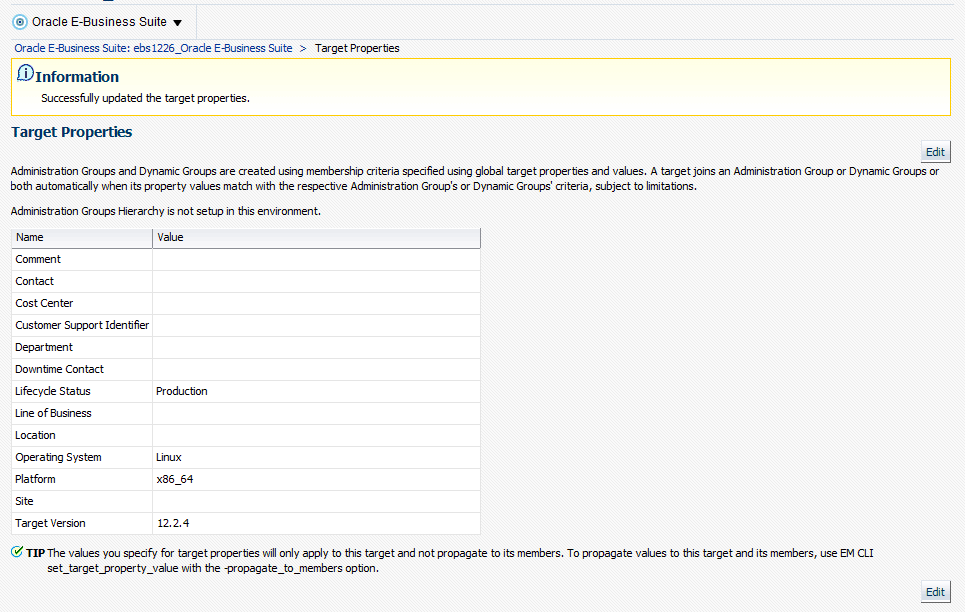
Now, the Oracle E-Business Suite target members should be added to the group automatically and to the Production level.
Instance Administration
Brief Description
The Oracle E-Business Suite Instance Administration feature provides the option to modify the existing Oracle E-Business Suite instance in the following ways:
-
Add/Remove application tier nodes
-
Enable/Disable service groups in each application node
-
Create/Delete managed servers in each application node (For Oracle E-Business Suite Release 12 only)
Required Setup
Oracle E-Business Suite Instance Administration requires Perl 5.005 or later on the Oracle Enterprise Manager agent. The user who starts the agent processes must set the PERL5LIB environment variable to point to the Perl 5.005 (or later) libraries. Also, the Perl executable 5.005 must be used.
All virtual internet protocol (VIP) addresses configured in the Oracle Cluster Ready Services (CRS) of the target nodes identified for the created RAC instance must be up and running.
The OS utilities make, ld, cc, and ar must be in the environment PATH variable in all host targets. If not, please update the PATH variable accordingly and restart the agent in the same terminal.
Prerequisites
Before starting Oracle E-Business Suite Instance Administration, please make sure the following prerequisites are met:
Oracle E-Business Suite Instance Prerequisites
-
The Oracle E-Business Suite instance to be modified must be up and healthy.
-
The instance should have been discovered in Enterprise Manager and the status must not be pending.
-
The instance should have had AutoConfig run successfully. It is mandatory that AutoConfig was successfully run on the source applications tier and source database tier.
-
Before adding an application tier node on an Oracle E-Business Suite Release 12.2 instance, make sure that you add a new connection filter rule on the admin server node. For more information, refer to "Appendix C: Adding Connection Filter Rule for a New Application Tier Node" of My Oracle Support Knowledge Document 1383621.1, Cloning Oracle E-Business Suite Release 12.2 with Rapid Clone.
-
At the time of running the Oracle E-Business Suite instance, the
etc/oraInst.locmust point to the correct oraInventory.Note: On some platforms such as Solaris, the variable is
/var/opt/oracle/oraInst.loc.
Oracle Application Management Pack for Oracle E-Business Suite Prerequisites
-
All database hosts and application tier hosts should have "Oracle E-Business Suite Plug-in" deployed before starting Oracle E-Business Suite Instance Administration.
User Privileges
-
User privileges for the Cloning module are also applicable to Oracle E-Business Suite instance administration.
Navigation to Oracle E-Business Suite Instance Administration
Oracle E-Business Suite Instance Administration can be accessed through the Oracle E-Business Suite home page or from the Procedure Library.
From the Oracle E-Business Suite Home Page
Go to the Oracle E-Business Suite Management page and expand the Administer menu. Then, select Instance Administration.
From the Procedure Library
Navigate to the Procedure Library from the Enterprise menu, go to Provisioning and Patching, then Procedure Library.
Search for and select the "Instance Administration for R12, 12.2.x" procedure radio button. Then, click Go.
How to Submit an Oracle E-Business Suite Instance Administration Procedure
From the Oracle E-Business Suite Instance Administration start page, follow the steps below to submit an Oracle E-Business Suite Instance Administration procedure:
-
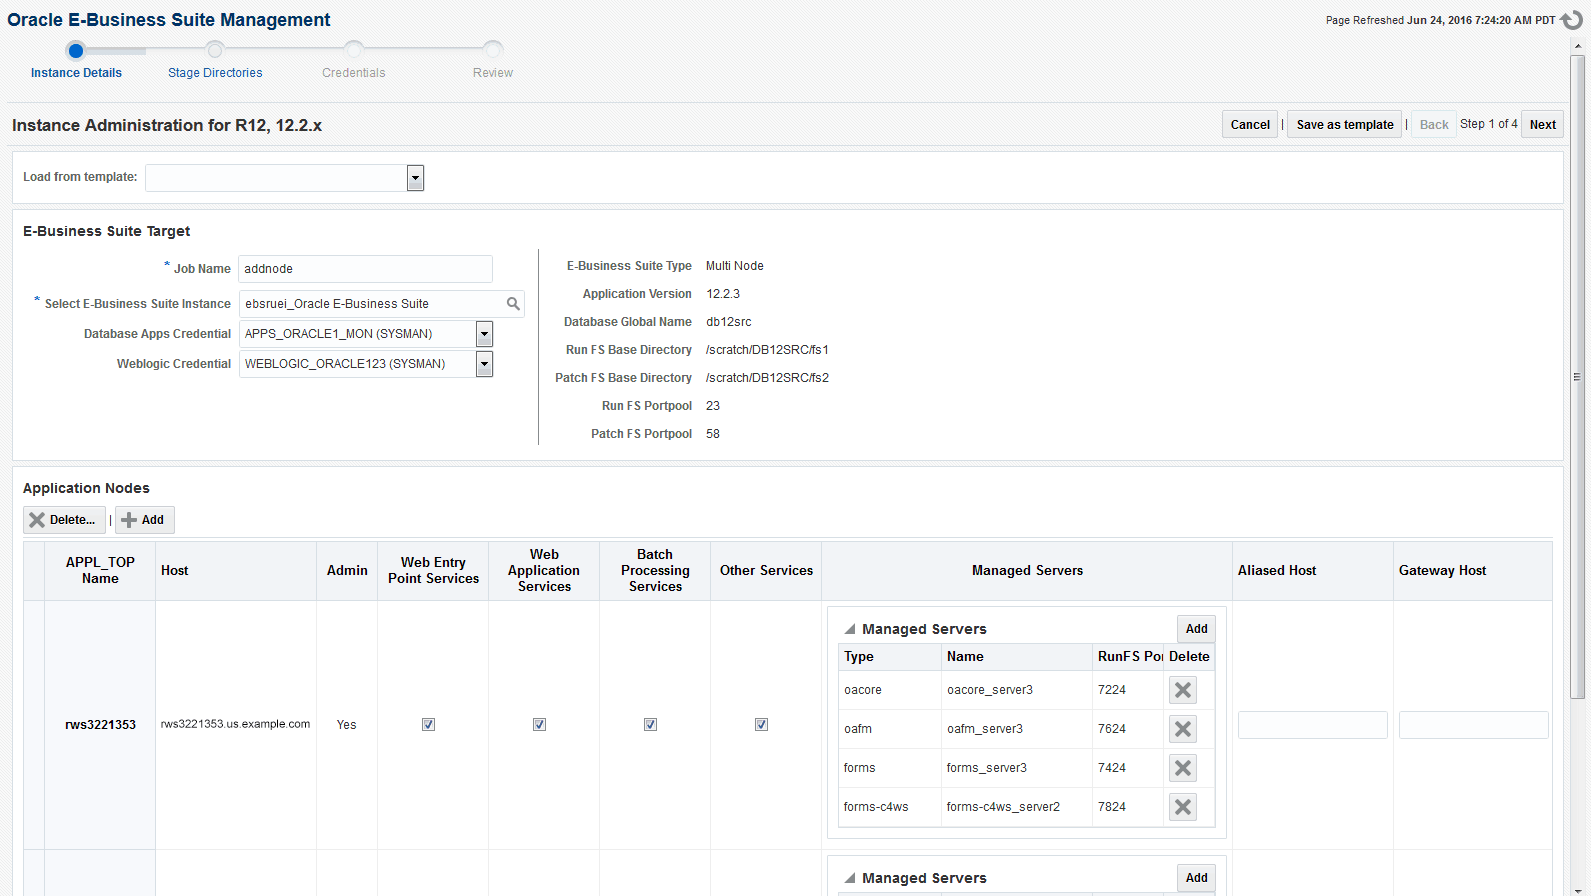
Select the Oracle E-Business Suite instance by clicking on the Search icon. Selecting an instance will display the application and database node information.
-
Verify the current Oracle E-Business Suite details.
Then, enter the following data:
-
Job name: Name of the current job to be submitted
-
Database Apps Credential
-
Database Apps Credential
-
For Oracle E-Business Suite Release 12.2 only: WebLogic password
-
-
Manage the application nodes.
To add application nodes:
-
In the Application Nodes section, click Add. The Select Host(s) window will appear.
-
Select one or more hosts to be added, then click OK.
For Release 12.2 only: To add an application node as a shared file system node:
-
In the Select Host(s) window, select the Shared Application Node radio button. Choose the node to be added in the Select APPL_TOP drop-down.
-
Then, select one or more hosts to be added. Click OK.
To delete application nodes:
-
Select one or more rows in the Application Nodes table.
-
In the Application Nodes panel, click Delete, which pops up a list of hosts.
To update the service groups of each application node:
-
The user will be able to update the following service groups for each node:
-
Web Entry Point Service Group: To enable following services in the current node:
-
OHS, OPMN
-
-
Web Application Service Group: To enable following services in the current node:
-
oacore, forms, oafm, tns_apps
-
For Release 12.2 only: forms-c4ws, oaea
-
-
Batch Processing Service Group: To enable following services in the current node:
-
Concurrent Manager, ICSM, JTFF
-
-
Other Services: To enable following services in the current node:
-
forms_server, met_cl, met_srv, mwa_srv
-
-
For Release 12.2 only: Admin - To enable WebLogic Admin Server in the current node.
-
For Releases earlier than 12.2.x only: Root Service Group - To enable Node Manager in the current node.
Note: For Release 12.2, the node manager will automatically be enabled if the Web Application Service Group is enabled.
-
For Release 12.2 only: Updating managed servers:
-
When a user selects "Web Application Services," default managed servers will automatically be populated.
-
Users can delete/add managed servers with the options found in the Managed Servers column. Click Add to add a managed server. Click the red X icon to delete it.
-
-
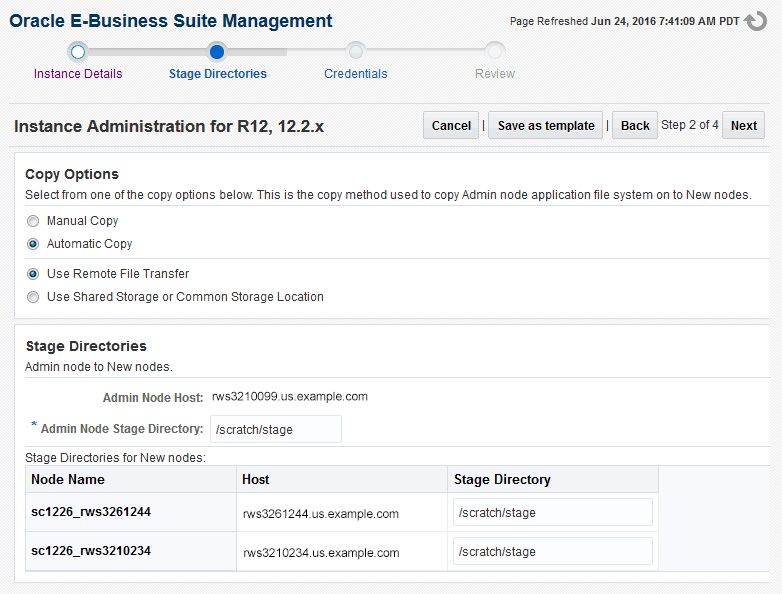
Modify the stage directory details.
If the user has added at least one new node, this option will appear.
Manual copy: If a user wants to copy files manually / file system on the new application node is already present.
Automatic copy: This option allows users to automatically copy files from the Admin node to the new application nodes. Users can choose from one of the copy methods described below:
-
Remote file transfer: When in the Admin node, new application nodes do not have any shared storage mounted.
-
Shared file system storage: When in the Admin node, new application nodes are on different hosts and have a common storage location mounted across.
Enter the stage directory path.
Enter the absolute path for the Admin Host stage directory.
Also, enter the absolute path of the stage directories for new application host(s).
Note: Make sure this directory has write permissions. Also, the stage directory has sufficient space to hold a complete course file system (Approximately 15GB - 20GB or more free space is required, depending on the source application file system).
The following screenshot shows an example of when the user had added 2 new nodes to the existing Oracle E-Business Suite instance:
-
-
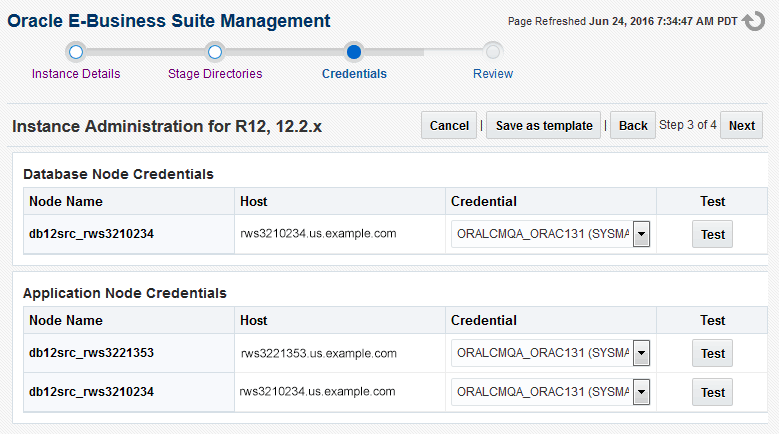
The following host credentials need to be defined:
-
Database node credentials: This table lists all the database nodes.
-
Application node credentials: This table contains all the application node hosts.
Note: It is recommended that you verify your entries and click on the Test button before proceeding to the next step.
-
-
The last step displays the data which was entered by the user. Review and click on the Finish button to submit the clone.
Viewing the Status of a Submitted Instance Administration Procedure
-
Open the Procedure Activity page by navigating to the Enterprise menu > Provisioning and Patching > Procedure Activity.
-
Enter the Job Name that was provided when the procedure was submitted into the Search Text Fields field and click Go.
-
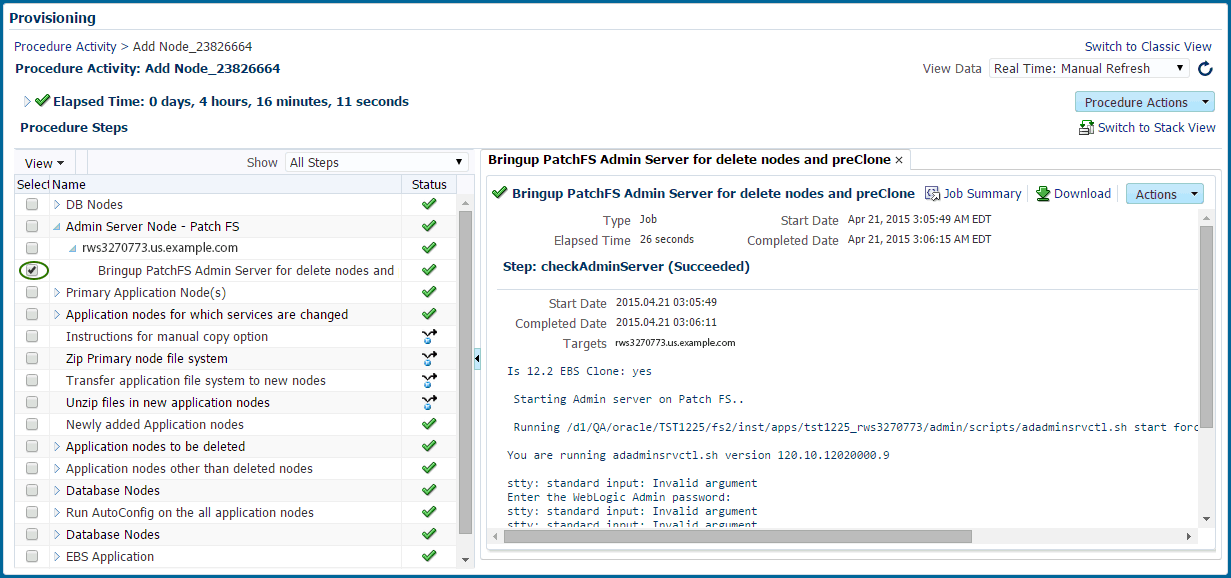
In the Procedure Steps section, select the corresponding checkbox to choose a procedure to view its details.
-
If any of the procedure step statuses are marked as failed, select the step to view it in the procedure view and choose one of the following options:
-
Ignore - Ignore the current failed step and proceed to the next step.
-
Retry - Retry the failed step.
-
Update and Retry - Update the job parameters and retry the failed step.

Note that in the Instance Administration deployment procedure for Release 12.2.x, as AutoConfig on the database tier will update the
sqlnet.orathere will be a manual step just before the target Oracle E-Business Suite discovery step to enable the OMS host(s) to connect to the target Oracle E-Business Suite database. You need to verify and update the OMS host(s) entry for tcp.invited_nodes if tcp.validnode_checking is set to yes.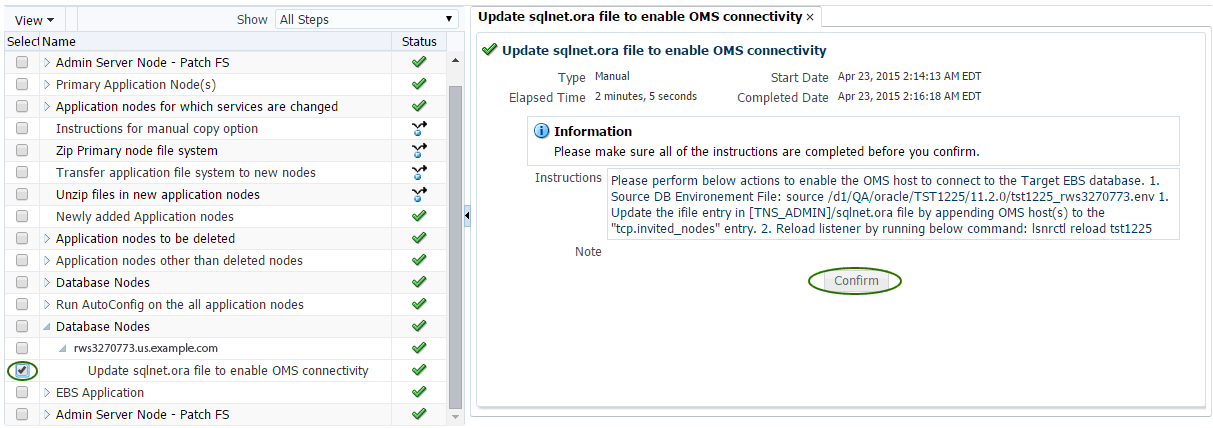
-